入行深度学习1年多了,该还的还得还,没接触过LSTM的预测项目,这就来活了。
文章目录
- 前言
- 1. 开工
- 1.1 引入必须的库
- 1.2 数据初探
- 1.3 划分数据集
- 1.4 数据归一化
- 1.5 数据分组
- 1.6 搭建模型
- 1.7 训练
- 1.8 测试集
- 总结
前言
LSTM是一个处理时序关联的数据模型,这里不分析它的前世今生,RNN->LSTM->BiLSTM 等等,原来很容易懂,但是从工程上搞一搞,说一说我的体会。
希望学完这篇文章,你和我一样能够学会:
1.LSTM的超参数有哪些?
2.LSTM的推理如何使用?
1. 开工
1.1 引入必须的库
# Importing the libraries
import numpy as np
import matplotlib.pyplot as plt
plt.style.use('fivethirtyeight')
import pandas as pd
from sklearn.preprocessing import MinMaxScaler
from keras.models import Sequential
from keras.layers import Dense, LSTM, Dropout, GRU, Bidirectional
from keras.optimizers import SGD
import math
from sklearn.metrics import mean_squared_error
## 1.1 数据处理
1.2 数据初探
dataset = pd.read_csv('./input/IBM_2006-01-01_to_2018-01-01.csv', index_col='Date', parse_dates=['Date'])
dataset.head()
结果如下: 是以时间为index 的一组股票值,开盘 最大值,最小值,收盘价格 股票名称
Open	High	Low	Close	Volume	Name
Date
2006-01-03	82.45	82.55	80.81	82.06	11715200	IBM
2006-01-04	82.20	82.50	81.33	81.95	9840600	IBM
2006-01-05	81.40	82.90	81.00	82.50	7213500	IBM
2006-01-06	83.95	85.03	83.41	84.95	8197400	IBM
2006-01-09	84.10	84.25	83.38	83.73	6858200	IBM
dataset
Open	High	Low	Close	Volume	Name
Date
2006-01-03	82.45	82.55	80.81	82.06	11715200	IBM
2006-01-04	82.20	82.50	81.33	81.95	9840600	IBM
2006-01-05	81.40	82.90	81.00	82.50	7213500	IBM
2006-01-06	83.95	85.03	83.41	84.95	8197400	IBM
2006-01-09	84.10	84.25	83.38	83.73	6858200	IBM
...	...	...	...	...	...	...
2017-12-22	151.82	153.00	151.50	152.50	2990583	IBM
2017-12-26	152.51	153.86	152.50	152.83	2479017	IBM
2017-12-27	152.95	153.18	152.61	153.13	2149257	IBM
2017-12-28	153.20	154.12	153.20	154.04	2687624	IBM
2017-12-29	154.17	154.72	153.42	153.42	3327087	IBM
3020 rows × 6 columns
3020 行数据, 从2006-01-03 到 2017-12-29 日 不包括节假日的数据。
1.3 划分数据集
# Checking for missing values # 取High价格做预测, 2006年到2016年为训练集 , 2017年为测试集
training_set = dataset[:'2016'].iloc[:,1:2].values
test_set = dataset['2017':].iloc[:,1:2].values
画图:
dataset["High"][:'2016'].plot(figsize=(16,4),legend=True)
dataset["High"]['2017':].plot(figsize=(16,4),legend=True)
plt.legend(['Training set (Before 2017)','Test set (2017 and beyond)'])
plt.title('IBM stock price')
plt.show()

1.4 数据归一化
# Scaling the training set  # MinMaxScaler作用是将每一维度的特征向量映射到指定的区间内,通常是0,1。也就是数据归一化
sc = MinMaxScaler(feature_range=(0,1))
training_set_scaled = sc.fit_transform(training_set)
training_set_scaled
array([[0.06065089],
       [0.06029868],
       [0.06311637],
       ...,
       [0.66074951],
       [0.65546633],
       [0.6534235 ]])
1.5 数据分组
60相当于给的超参数,主要后一个数据受前60个数据的关联影响
# Since LSTMs store long term memory state, we create a data structure with 60 timesteps and 1 output
# So for each element of training set, we have 60 previous training set elements
# 分成了60份,相当于bachsize,但是写死的方式非常不讲究,需要优化
X_train = []
y_train = []
for i in range(60,2769):
    X_train.append(training_set_scaled[i-60:i,0])
    y_train.append(training_set_scaled[i,0])
X_train, y_train = np.array(X_train), np.array(y_train)
训练集reshape,将list切换成np数组
# Reshaping X_train for efficient modelling
X_train = np.reshape(X_train, (X_train.shape[0],X_train.shape[1],1))
训练集reshape,将pandas切换成np数组
1.6 搭建模型
没啥好说的
# The LSTM architecture
### 搭建LSTM结构
regressor = Sequential()
# First LSTM layer with Dropout regularisation
regressor.add(LSTM(units=50, return_sequences=True, input_shape=(X_train.shape[1],1)))
regressor.add(Dropout(0.2))
# Second LSTM layer
regressor.add(LSTM(units=50, return_sequences=True))
regressor.add(Dropout(0.2))
# Third LSTM layer
regressor.add(LSTM(units=50, return_sequences=True))
regressor.add(Dropout(0.2))
# Fourth LSTM layer
regressor.add(LSTM(units=50))
regressor.add(Dropout(0.2))
# The output layer
regressor.add(Dense(units=1))

# Compiling the RNN
regressor.compile(optimizer='rmsprop',loss='mean_squared_error')
# Summary of the model
regressor.summary()
但输出的网络结构要看一下
2023-01-10 13:35:13.549501: I tensorflow/core/platform/cpu_feature_guard.cc:193] This TensorFlow binary is optimized with oneAPI Deep Neural Network Library (oneDNN) to use the following CPU instructions in performance-critical operations:  AVX2 AVX512F FMA
To enable them in other operations, rebuild TensorFlow with the appropriate compiler flags.
Model: "sequential"
_________________________________________________________________
 Layer (type)                Output Shape              Param #
=================================================================
 lstm (LSTM)                 (None, 60, 50)            10400

 dropout (Dropout)           (None, 60, 50)            0

 lstm_1 (LSTM)               (None, 60, 50)            20200

 dropout_1 (Dropout)         (None, 60, 50)            0

 lstm_2 (LSTM)               (None, 60, 50)            20200

 dropout_2 (Dropout)         (None, 60, 50)            0

 lstm_3 (LSTM)               (None, 50)                20200

 dropout_3 (Dropout)         (None, 50)                0

 dense (Dense)               (None, 1)                 51

=================================================================
Total params: 71,051
Trainable params: 71,051
Non-trainable params: 0
_________________________________________________________________
1.7 训练
epochs、batch_size 的超参数出现, 前面一个是当前值收到前面多少个序列值得影响。
# 开始训练,epochs=50, batch_size=32
regressor.fit(X_train,y_train,epochs=50,batch_size=32)
训练过程的输出也贴出来
Output exceeds the size limit. Open the full output data in a text editor
Epoch 1/50
85/85 [==============================] - 18s 132ms/step - loss: 0.0273
Epoch 2/50
85/85 [==============================] - 11s 132ms/step - loss: 0.0109
Epoch 3/50
85/85 [==============================] - 11s 134ms/step - loss: 0.0083
Epoch 4/50
85/85 [==============================] - 11s 129ms/step - loss: 0.0070
Epoch 5/50
85/85 [==============================] - 11s 131ms/step - loss: 0.0065
Epoch 6/50
85/85 [==============================] - 11s 132ms/step - loss: 0.0056
Epoch 7/50
85/85 [==============================] - 11s 130ms/step - loss: 0.0052
Epoch 8/50
85/85 [==============================] - 11s 130ms/step - loss: 0.0045
Epoch 9/50
85/85 [==============================] - 11s 130ms/step - loss: 0.0043
Epoch 10/50
85/85 [==============================] - 11s 129ms/step - loss: 0.0039
Epoch 11/50
85/85 [==============================] - 11s 133ms/step - loss: 0.0037
Epoch 12/50
85/85 [==============================] - 11s 132ms/step - loss: 0.0036
Epoch 13/50
...
Epoch 49/50
85/85 [==============================] - 11s 133ms/step - loss: 0.0014
Epoch 50/50
85/85 [==============================] - 11s 133ms/step - loss: 0.0015
<keras.callbacks.History at 0x7f578c6b2910>
1.8 测试集
这里是这样的,因为我们要靠前60个数据预测当前的数据,对于测试集的第一个数据来说,它并没有前60个数据,所以要从训练集中拿最后60个数据作为测试集的前60个数据。
# Now to get the test set ready in a similar way as the training set.
# The following has been done so forst 60 entires of test set have 60 previous values which is impossible to get unless we take the whole
# 'High' attribute data for processing
dataset_total = pd.concat((dataset["High"][:'2016'],dataset["High"]['2017':]),axis=0)
print(dataset_total)
# 找到测试集的起始位置
inputs = dataset_total[len(dataset_total)-len(test_set) - 60:].values
# 这里说明它的key就是date
inputs = inputs.reshape(-1,1)
# 归一化
inputs  = sc.transform(inputs)
conf第一个数据逐步累加
X_test = []
for i in range(60,311):
    X_test.append(inputs[i-60:i,0])
X_test = np.array(X_test)
X_test = np.reshape(X_test, (X_test.shape[0],X_test.shape[1],1))
predicted_stock_price = regressor.predict(X_test)
predicted_stock_price = sc.inverse_transform(predicted_stock_price)
输出一下测试结果
# Visualizing the results for LSTM
plot_predictions(test_set,predicted_stock_price)
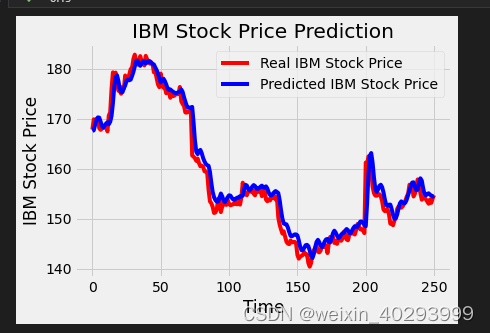
所以这个模型就是拿前60个数据,预测当前数据,如此反复!和实际的时间无关。在实际应用的时候,也是给定60个获取第61个数据, [2,61] 获取 62个数据。。。。
总结
以上就是我对LSTM的总结,需要数据集的请留言。
并且到处一份可运行的代码
# %%
# Importing the libraries
import numpy as np
import matplotlib.pyplot as plt
plt.style.use('fivethirtyeight')
import pandas as pd
from sklearn.preprocessing import MinMaxScaler
from keras.models import Sequential
from keras.layers import Dense, LSTM, Dropout, GRU, Bidirectional
from keras.optimizers import SGD
import math
from sklearn.metrics import mean_squared_error

# %%
# Some functions to help out with
def plot_predictions(test,predicted):
    plt.plot(test, color='red',label='Real IBM Stock Price')
    plt.plot(predicted, color='blue',label='Predicted IBM Stock Price')
    plt.title('IBM Stock Price Prediction')
    plt.xlabel('Time')
    plt.ylabel('IBM Stock Price')
    plt.legend()
    plt.show()

def return_rmse(test,predicted):
    rmse = math.sqrt(mean_squared_error(test, predicted))
    print("The root mean squared error is {}.".format(rmse))

# %%
# First, we get the data
dataset = pd.read_csv('./input/IBM_2006-01-01_to_2018-01-01.csv', index_col='Date', parse_dates=['Date'])
dataset.head()

# %%
dataset
# 从2006年到2017年11年的交易价格和交易量

# %%


# %%
# Checking for missing values # 取High价格做预测, 2006年到2016年为训练集 , 2017年为测试集
training_set = dataset[:'2016'].iloc[:,1:2].values
test_set = dataset['2017':].iloc[:,1:2].values

# %%
training_set

# %%
dataset["High"][:'2016'].plot(figsize=(16,4),legend=True)
dataset["High"]['2017':].plot(figsize=(16,4),legend=True)
plt.legend(['Training set (Before 2017)','Test set (2017 and beyond)'])
plt.title('IBM stock price')
plt.show()

# %%
# Scaling the training set  # MinMaxScaler作用是将每一维度的特征向量映射到指定的区间内,通常是0,1。也就是数据归一化
sc = MinMaxScaler(feature_range=(0,1))
training_set_scaled = sc.fit_transform(training_set)
training_set_scaled

# %%


# %%
len(training_set_scaled)

# %%
# Since LSTMs store long term memory state, we create a data structure with 60 timesteps and 1 output
# So for each element of training set, we have 60 previous training set elements
# 分成了60份,相当于bachsize,但是写死的方式非常不讲究,需要优化
X_train = []
y_train = []
for i in range(60,2769):
    X_train.append(training_set_scaled[i-60:i,0])
    y_train.append(training_set_scaled[i,0])
X_train, y_train = np.array(X_train), np.array(y_train)

# %% [markdown]
# ### ref:https://www.kaggle.com/code/abhideb/intro-to-recurrent-neural-networks-lstm

# %%
X_train[2]

# %%
y_train[1]

# %%
(X_train.shape[0],X_train.shape[1],1)

# %%
# Reshaping X_train for efficient modelling
X_train = np.reshape(X_train, (X_train.shape[0],X_train.shape[1],1))

# %%
X_train.shape

# %%
# The LSTM architecture
### 搭建LSTM结构
regressor = Sequential()
# First LSTM layer with Dropout regularisation
regressor.add(LSTM(units=50, return_sequences=True, input_shape=(X_train.shape[1],1)))
regressor.add(Dropout(0.2))
# Second LSTM layer
regressor.add(LSTM(units=50, return_sequences=True))
regressor.add(Dropout(0.2))
# Third LSTM layer
regressor.add(LSTM(units=50, return_sequences=True))
regressor.add(Dropout(0.2))
# Fourth LSTM layer
regressor.add(LSTM(units=50))
regressor.add(Dropout(0.2))
# The output layer
regressor.add(Dense(units=1))

# Compiling the RNN
regressor.compile(optimizer='rmsprop',loss='mean_squared_error')
# Summary of the model
regressor.summary()

# %%
# 开始训练,epochs=50, batch_size=32
regressor.fit(X_train,y_train,epochs=50,batch_size=32)

# %%
# Now to get the test set ready in a similar way as the training set.
# The following has been done so forst 60 entires of test set have 60 previous values which is impossible to get unless we take the whole
# 'High' attribute data for processing
dataset_total = pd.concat((dataset["High"][:'2016'],dataset["High"]['2017':]),axis=0)
print(dataset_total)
# 找到测试集的气始位置
inputs = dataset_total[len(dataset_total)-len(test_set) - 60:].values
# 这里说明它的key就是date
print("---=========---", inputs)
inputs = inputs.reshape(-1,1)
# 归一化
inputs  = sc.transform(inputs)

# %%
print(inputs)
len(dataset["High"]['2017':])
# 需要让测试集只有有60个数据集,原因是为什么? @todo,因为要满足从第一个60开始取数据

# %%
inputs.shape

# %%
X_test = []
for i in range(60,311):
    X_test.append(inputs[i-60:i,0])
X_test = np.array(X_test)
# X_test = np.reshape(X_test, (X_test.shape[0],X_test.shape[1],1))
# predicted_stock_price = regressor.predict(X_test)
# predicted_stock_price = sc.inverse_transform(predicted_stock_price)

print(inputs,X_test, len(X_test))

# %%
# Visualizing the results for LSTM
plot_predictions(test_set,predicted_stock_price)

# %%
# Evaluating our model
return_rmse(test_set,predicted_stock_price)

# %%
regressor.to_json()

# %%
from keras.models import model_from_json
json_string = regressor.to_json()
model = model_from_json(json_string)

# %%
predicted_stock_price = model.predict(X_test)
predicted_stock_price = sc.inverse_transform(predicted_stock_price)

# %%
predicted_stock_price

# %%
plot_predictions(test_set,predicted_stock_price)

# %%
X_test

# %%

ref: https://www.kaggle.com/code/abhideb/intro-to-recurrent-neural-networks-lstm


