
目录
前言
1. Redis 的下载及安装
1.1 Redis 的下载
1.2 安装 Redis
1.3 启动 Redis
2. 创建 SpringBoot 项目整合 Redis
2.1 环境要求
2.2 SpringBoot项目构建
2.2.1 方式一
2.2.2 方式二
2.3 在 pom.xml 文件中导入依赖坐标
2.4 在 application.properties 中加入 Redis 相关配置
2.5 创建 pojo 包,在此包下创建 Student 实体类
2.6 创建 util 包,加载封装好的 RedisUtil.java 文件
2.7 创建 config 包,在此包下创建 RedisConfig 配置类
2.8 创建 mapper 包,编写 Mapper 接口及实现类
2.9 创建 controller 包,编写 Controller 类作业务逻辑
2.10 在 SpringbootApplication 启动类中
总结
注:手机端浏览本文章可能会出现 “目录”无法有效展示的情况,请谅解,点击侧栏目录进行跳转
前言
Redis 在项目开发过程中,扮演着 “缓存”、“会话存储”、“消息队列”、“数据存储”等角色,可以提示系统的性能、可扩展性和稳定性,同时还可以实现各种复杂的功能需求。下面,我对 Spring Boot 整合 Redis 作了归纳总结,供大家参考,谢谢!qwq
1. Redis 的下载及安装
1.1 Redis 的下载
相关搜索:Redis安装![]()
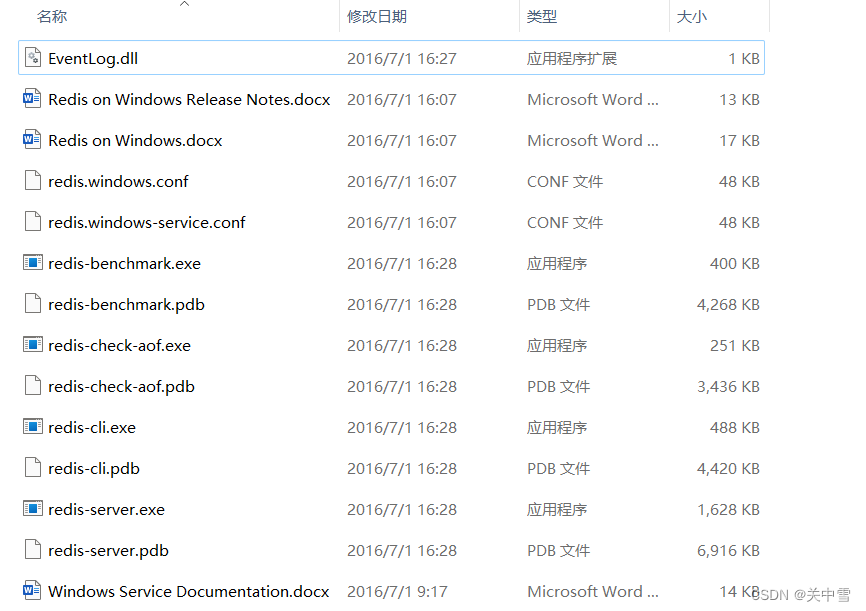
1.2 安装 Redis
核心文件:
- redis-server.exe:服务器启动命令
- redis-cli.exe:命令行客户端
- redis.windows.conf:redis核心配置文件
- redis-benchmark.exe:性能测试工具
- redis-check-aof.exe:AOF文件修复工具
- redis-check-dump.exe:RDB文件检查工具(快照持久化文件)
1.3 启动 Redis
服务器启动
方式一:双击 redis-server.exe
方式二:指令 redis-server.exe redis.windows.conf
客户端连接
2. 创建 SpringBoot 项目整合 Redis
2.1 环境要求
环境准备:
- Java:1.8.*
- Maven:3.6.*
- SpringBoot:2.*(推荐使用2.7.14)
2.2 SpringBoot项目构建
2.2.1 方式一
使用Spring Initializr的Web 页面创建项目
1. 打开https://start.spring.io/
2. 填写项目信息
3. 点击 “Generate Project”按钮生成项目;下载此项目
4. 解压项目包,并用IDEA以Maven项目导入,一直下一步即可,只到项目导入完毕
5. 如果是第一次使用,可能速度会比较慢,推荐查看Setting菜单下Maven的路径,使用国内镜像进行下载。
2.2.2 方式二
使用 IDEA 直接创建项目
1. 创建一个新项目
2. 选择 Spring initializr ,可以看到默认就是去官网的快速构建工具
3. 填写项目信息
4. 选择初始化的组件(初学勾选Web)即可
5. 填写项目路径
6. 等待项目构建成功
注:在项目构建成功后,请在 pom.xml 中查看 java的版本信息,改为自己电脑上已有的JDK版本
2.3 在 pom.xml 文件中导入依赖坐标
Redis 的启动器依赖坐标
		<!--redis依赖-->
		<dependency>
			<groupId>org.springframework.boot</groupId>
			<artifactId>spring-boot-starter-data-redis</artifactId>
		</dependency>
说明:在 SpringBoot 2.x 之后,原来使用的 jedis 被替换位了 lettuce
jedis:采用直连,多个线程操作的话不安全,如果想要避免不安全,使用 jedis pool 连接池
lettuce:采用 netty ,实例可以在多个线程中进行共享,不存在线程不安全的情况,可以减少线程数据量
SpringBoot 的 Web 启动器依赖坐标
	    <dependency>
			<groupId>org.springframework.boot</groupId>
			<artifactId>spring-boot-starter-web</artifactId>
		</dependency>
MyBatis 的启动器依赖坐标
	    <dependency>
			<groupId>org.mybatis.spring.boot</groupId>
			<artifactId>mybatis-spring-boot-starter</artifactId>
			<version>2.0.1</version>
		</dependency>
MySQL 的启动器依赖坐标
	    <dependency>
			<groupId>mysql</groupId>
			<artifactId>mysql-connector-java</artifactId>
			<scope>runtime</scope>
		</dependency>
SpringBoot 的启动器依赖坐标
	    <dependency>
			<groupId>org.springframework.boot</groupId>
			<artifactId>spring-boot-starter-test</artifactId>
			<scope>test</scope>
		</dependency>
2.4 在 application.properties 中加入 Redis 相关配置
spring.datasource.username=root
spring.datasource.password=123456
spring.datasource.driver-class-name=com.mysql.cj.jdbc.Driver
spring.datasource.url=jdbc:mysql://localhost:3306/2003db?serverTimezone=GMT%2B8

# 设置该包下的日志输出级别为 debug,可以输出debug级别及以上的日志信息
logging.level.com.ape.springboot_redis02.mapper=debug
#开启调试模式
debug=true

# redis 数据库索引
spring.redis.database = 0
# redis 服务器的本机地址
spring.redis.host=localhost
# redis 服务器的端口号
spring.redis.port=6379
# redis 服务器连接密码(默认为空)
spring.redis.password=
# redis 连接池最大连接数(使用负值表示没有限制)
spring.redis.pool.max-active=200
# redis 连接池最大阻塞等待时间(使用负值表示没有限制)
spring.redis.pool.max-wait=-1
# redis 连接池的最大空闲连接
spring.redis.pool.max-idle=10
# redis 连接池中的最小空闲连接
spring.redis.pool.min-idle=0
# redis 连接超时时间(毫秒)
spring.redis.timeout=1000
2.5 创建 pojo 包,在此包下创建 Student 实体类
案例中为 学生 实体类,实现 Serializable 接口,用于后期开发中在网络上进行数据传输
public class Student implements Serializable{

    private Integer stuid;

	private String stuname;

    private String stuhobby;

    public Integer getStuid() {
        return stuid;
    }

    public void setStuid(Integer stuid) {
        this.stuid = stuid;
    }

    public String getStuname() {
        return stuname;
    }

    public void setStuname(String stuname) {
        this.stuname = stuname;
    }

    public String getStuhobby() {
        return stuhobby;
    }

    public void setStuhobby(String stuhobby) {
        this.stuhobby = stuhobby;
    }

    public Student() {
    }

    public Student(Integer stuid, String stuname, String stuhobby) {

        this.stuid = stuid;
        this.stuname = stuname;
        this.stuhobby = stuhobby;
    }
}
2.6 创建 util 包,加载封装好的 RedisUtil.java 文件
相关传送门:===》封装好的Redis 工具类《===
2.7 创建 config 包,在此包下创建 RedisConfig 配置类
@Configuration
public class RedisConfig{


    @Bean
    public RedisTemplate<Object, Object> jsonRedisTemplate(
            RedisConnectionFactory redisConnectionFactory) throws UnknownHostException {
        RedisTemplate<Object, Object> template = new RedisTemplate<>();
        template.setStringSerializer(new StringRedisSerializer());
        //配置json类型的序列化工具
        template.setDefaultSerializer(new Jackson2JsonRedisSerializer(Object.class));
        template.setConnectionFactory(redisConnectionFactory);
        return template;
    }


}
解读:
- 定义一个 jsonRedisTemplate 的 Bean,用于返回 jsonRedisTemplate 对象。
- jsonRedisTemplate 方法用于连接到 Redis 数据库:
- 使用 StringRedisSerializer 作为 key 的序列化器,用于将 Redis 的 key 序列化为字符串。
- 使用 Jaskson2JsonRedisSerializer 作为默认序列化器,用于将值序列化为 JSON 格式。
- 将传入的 redisConnectionFactory 设置为 RedisTemplate 的连接工厂。
2.8 创建 mapper 包,编写 Mapper 接口及实现类
public interface StudentMapper {

    @Select("select * from Student where stuid = #{id}")
    public Student getStudentById(Integer id);


    @Delete("delete from student where stuid = #{id}")
    public int deleteStudentById(Integer id);
}
@Service
public class StudentService {
@Autowired(required = false)
StudentMapper mapper;
@Autowired
public RedisUtil redisUtil;
/**
* 获取用户策略:先从缓存中获取用户,没有则取数据表中数据,再将数据写入缓存
*/
public Student findById(Integer id){
String key = "student:id:" + id;
//1.1判断key在redis中是否存在
boolean hasKey = redisUtil.hasKey(key);
if (hasKey) {
//1.2存在缓存则直接获取
Object stu = redisUtil.get(key);
ObjectMapper change = new ObjectMapper();
Student student = change.convertValue(stu,Student.class);
System.out.println("==========从缓存中获得数据=========");
System.out.println(student.getStuname());
System.out.println("==============================");
return student;
} else {
//1.3不存在缓存,先从数据库中获取,在保存至redis,最后返回用户
Student student = mapper.getStudentById(id);
System.out.println("==========从数据表中获得数据=========");
System.out.println(student.getStuname());
System.out.println("==============================");
if (student != null){
redisUtil.set(key, student);//写入缓存
}
return student;
}
}
/**
* 删除用户策略:删除数据表中数据,然后删除缓存
*
*/
public void deleteStudentById(Integer id){
//1.删除数据库
int result = mapper.deleteStudentById(id);
//2.判断数据库中是否删除成功
String key = "student:id:" + id;
if (result != 0) {
//3.判断redis中是否存在
boolean hasKey = redisUtil.hasKey(key);
//4.存在删除,不存在直接跳转
if (hasKey) {
redisUtil.del(key);
System.out.println("删除了缓存中的key:" + key);
}
}
}
}2.9 创建 controller 包,编写 Controller 类作业务逻辑
@RestController
public class UserController {

    @Autowired
    StudentService userService;

    @GetMapping("/findById/{id}")
    public Student findById(@PathVariable("id") Integer id) {
        Student stu = userService.findById(id);
        return stu;
    }


    @GetMapping("/delete/{id}")
    public Integer delete(@PathVariable("id") Integer id) {
        userService.deleteStudentById(id);
        return id;
    }


}
2.10 在 SpringbootApplication 启动类中
完整代码如下
@SpringBootApplication
@MapperScan("com.ape.springboot_redis02.mapper")
public class SpringbootRedis02Application {

	public static void main(String[] args) {
		SpringApplication.run(SpringbootRedis02Application.class, args);
	}

}
解读:
总结
在上文的案例中,我们看到了 @Component 、@Autowired等注解的出现,在此,我对这些注解的常规用法进行总结:
@Component 注解:用于标识一个类为 Spring 的组件(bean),可以让 Spring 框架扫描并识别这个类,并将其实例化为一个 bean ,从而在应用程序中进行依赖注入和其他操作。@Autowired 注解:用于自动装配 Spring bean 的依赖关系。当一个类需要使用另一个类的实例时,可以在需要注入的地方使用。@Configuration 注解:用于标识一个类为配置类,定义配置元数据。@Bean 注解:用于定义 bean 的注解,告诉 Spring 容器,由该注解标注的方法返回一个对象,并交由 Spring 容器管理。@Mapper 注解:用于标注一个接口作为 MyBatis 的映射器(Mapper),使其能被 Spring 扫描并生成对应的代理对象,从而实现数据库操作的映射。@Service 注解:用于标识一个类为服务层组件(service bean),使其能被 Spring 扫描并实例化为一个 bean,可以在需要调用服务层逻辑的地方进行依赖注入。@RestController 注解:结合了 @Controller 和 @ResponseBody 的功能,表示这是一个控制器,并且其中的方法自动将返回值转换为 JSON 或 XML 格式的响应体。@GetMapping 注解:用于将 HTTP GET 请求映射到特定的处理方法上。可以让 Spring MVC 框架知道哪个方法来处理对应的 GET 请求。@SpringBootApplication 注解:用于标识一个 Spring Boot 应用程序的入口类。组合了多个注解 @Configuration、@EnableAutoConfiguration 和 @ComponentScan,用于自动配置 Spring 应用程序并启动基于注解的组件扫描。@MapperScan 注解:用于指定 MyBatis Mapper 接口所在的包路径,告诉 Spring 在启动时扫描该包下的 Mapper 接口并创建对应的实现类。

