1 缘起
项目需要,向量搜索使用ES,为了顺利使项目顺利交付,开始学习ES的稠密向量功能,本文即ES向量的实践:增删查改。ES从7.x版本支持向量功能,为测试ES向量功能,需要使用7.x及以上的版本。本文从ES环境搭建开始,完成ES向量功能实践,分享如下。

2 Docker部署ES
2.1 配置ES config
# 打开系统配置文件
vim /etc/sysctl.conf
# 添加修改内容
vm.max_map_count=655360
# 生效
sudo systcl -p
2.2 拉取镜像
拉取指定版本ES,如8.12.2,
稠密向量功能是ES在7.x版本之后推出的功能。
docker pull docker.elastic.co/elasticsearch/elasticsearch:8.12.2
2.3 启动ES
docker run -dit \
--restart=always \
--name es01-8-12-2 \
-p :9300 \
-v /home/xindaqi/data/es-8-12-2/data:/usr/share/elasticsearch/data \
-v /home/xindaqi/data/es-8-12-2/logs:/usr/share/elasticsearch/logs \
-e ES_JAVA_OPS="-Xms512m -Xmx1g" \
-e discovery.type="single-node" \
-e ELASTIC_PASSWORD="admin-es" \
-m 1GB \
docker.elastic.co/elasticsearch/elasticsearch:8.12.2
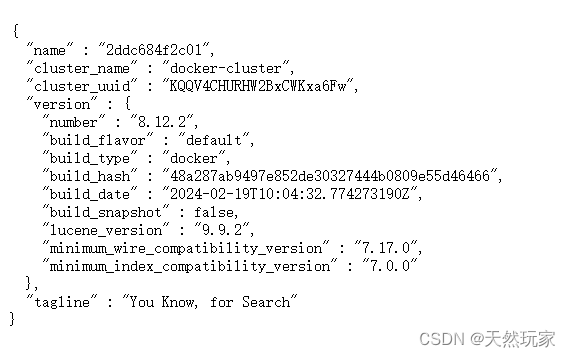
2.4 测试连接ES
- cURL
curl --location 'http://localhost:9200' \
--header 'Authorization: Basic ZWxhc3RpYzphZG1pbi1lcw=='
- 浏览器访问:
http://localhost:9200
用户名:elastic
密码:admin-es
3 向量操作
ES向量功能使用了新的数据类型:dense_vector,创建索引时,需要指定存储向量属性的类型为dense_vector,同时指定向量维度,当然,创建索引时可以不指定dense_vector类型,ES会自动识别类型,需要注意的是,当向量为低维度数据时,会被识别为float,因此,当使用低维度的数据时,为保险起见,需要在创建索引时指定dense_vector类型。
3.1 新建向量索引
新建向量索引格式:
index-name用户指定的索引名称,用户自定义即可。
http://localhost:9200/index-name
参数:
"field-name":{
    "type":"dense_vector",
    "dims": n
}
其中,filed-name为用户设定的属性名称,n为向量维度,其余为固定值。
样例如下:
curl --location --request PUT 'http://localhost:9200/vector-test' \
--header 'Content-Type: application/json' \
--header 'Authorization: Basic ZWxhc3RpYzphZG1pbi1lcw==' \
--data '{
    "mappings": {
        "properties": {
            "dense_value":{
                "type":"dense_vector",
                "dims":5
            },
            "text": {
                "type": "text"
            },
            "uid":{
                "type":"keyword"
            }
        }
    }
}'
3.2 插入向量数据
插入向量数据需要和定义的向量维度相同,否则插入失败。
- 格式:
http://172.22.75.234:9200/index-name/_doc/id
其中,index-name为用户指定的索引名称,id为数据id。
- 样例如下:
curl --location 'http://172.22.75.234:9200/vector-test/_doc/5' \
--header 'Content-Type: application/json' \
--header 'Authorization: Basic ZWxhc3RpYzphZG1pbi1lcw==' \
--data '{
    "uid": "5",
    "text": "新增的数据5",
    "dense_value": [
        0.6369616873214543,
        0.2697867137638703,
        0.04097352393619469,
        0.016527635528529094,
        0.8132702392002724
    ]
}'
更新向量数据
- 格式:
http://172.22.75.234:9200/index-name/_update/id
其中,index-name为用户指定的索引名称,id为数据id。
- 样例如下:
curl --location 'http://172.22.75.234:9200/vector-test/_update/1' \
--header 'Content-Type: application/json' \
--header 'Authorization: Basic ZWxhc3RpYzphZG1pbi1lcw==' \
--data '{
    "doc": {
        "uid": "1",
        "text": "新增的数据11",
        "dense_value": [
            0.6369616873214543,
            0.2697867137638703,
            0.04097352393619469,
            0.016527635528529094,
            0.8132702392002724
        ]
    }
}'
3.3 查询向量数据
3.3.1 相似度查询
相似度查询使用knn,相似度计算使用:cosine
- 格式:
http://172.22.75.234:9200/index-name/_search
其中,index-name为用户指定的索引名称。
{
    "knn":{
        "field":"filed-name",
        "query_vector":[v1, v2, v-dim],
        "k": n,
        "num_candidates": m
    }
其中,field-name为用户定义的向量属性,n为查询的前n个相似数据(分数从大->小排列),v1为向量值,维度与定义的索引维度一致,否则会报错,m为候选数据数量(等看了官方文档再更新)。
- 样例如下:
curl --location 'http://172.22.75.234:9200/vector-test/_search' \
--header 'Content-Type: application/json' \
--header 'Authorization: Basic ZWxhc3RpYzphZG1pbi1lcw==' \
--data '{
    "knn":{
        "field":"dense_value",
        "query_vector":[
                        0.6369616873214543,
                        0.2697867137638703,
                        0.04097352393619469,
                        0.016527635528529094,
                        0.8132702392002724
                    ],
        "k": 3,
        "num_candidates": 100
    },
    "_source":{
        "excludes":["dense_value"],
        "includes":["text", "uid"]
    }
}'
3.3.2 条件查询
根据指定条件筛选数据,应用于只使用精准过滤的情况。
- 格式:
http://172.22.75.234:9200/index-name/_search
其中,index-name为用户指定的索引名称,id为数据id。
{
    "query": {
        "bool": {
            "filter": [
                {
                    "terms": {
                        "field-name": [v1, v2, ..., vn]
                    }
                }
            ]
        }
    }
}
其中,filed-name为用户自定义的属性名称,v1为属性的值。
- 样例如下:
curl --location 'http://172.22.75.234:9200/vector-test/_search' \
--header 'Content-Type: application/json' \
--header 'Authorization: Basic ZWxhc3RpYzphZG1pbi1lcw==' \
--data '{
    "query": {
        "bool": {
            "filter": [
                {
                    "terms": {
                        "uid": ["0","1"]
                    }
                }
            ]
        }
    },
    "_source": {
        "includes": ["text","uid"],
        "excludes": [
            "dense_value"
        ]
    }
}'
4 小结
(1)Docker部署ES时通过ELASTIC_PASSWORD配置密码;
(2)ES7.x之后的版本支持稠密向量功能;
(3)创建使用稠密向量的索引时,需要指定属性类型:dense_vector和向量维度;
(4)向量维度固定后,后续使用向量进行操作(插入数据/插叙数据/更新数据)时必须保持一直,否则报错。

