文章目录
- 写作背景
- Feign核心组件介绍
- Encoder和Decoder
- Logger
- Contract
- Feign.Builder
- 上手实战
- 开启FeignClient调用请求日志
- 给FeignClient注入自定义拦截器
- Feign支持文件上传配置
- Feign开启Gzip压缩
- Feign配置超时时间
- Feign整合Ribbon支持负载均衡
- 核心源码部分
- FeignClient注入到Spring容器的源码
- FeignClient接口构造为bean的过程
- FeignClientFactoryBean的getObject()构建真正的Bean实例源码
- 构建并配置Feign.Builder的过程源码
- Feign默认的组件注入的源码
- 读取feign.client开头的配置信息的源码
- 使用Feign.Builder构建一个FeignClient实例源码
- 基于HystrixTargeter和HardCodedTarget创建Feign动态代理细节
- Feign开启Hystrix熔断后生成动态代理的源码
- Feign关闭Hystrix熔断生成动态代理的源码
- Feign动态代理处理请求的核心源码
- Contract组件解析@RequestParam等SpringMVC注解绑定到HTTP请求参数源码
- 执行Feign拦截器的源码
- Feign与Ribbon整合发送HTTP请求的源码
- 真正发起HTTP请求的源码
- 获取Ribbon相关配置源码
写作背景
前面复习了SpringCloud Netflix Eureka和Ribbon的知识,并进行了实战以及源码的验证。你会发现在没有Feign之前从fc-service-portal服务发起对fc-service-screen服务的调用,需要注入RestTemplate然后通过RestTemplate的Api来发起访问,每次都要写类似
restTemplate.getForObject(“http://fc-service-screen/getPort”, Integer.class)
这样的代码,是不是感觉有点不优雅,在微服务架构中有专门负责服务之间通信的组件,同步的组件有Feign和Rpc,异步通信的组件一般通过消息队列。本文复习的重点是SpringCloud OpenFeign,注意Feign是Netflix研发的一个轻量级RESTful的HTTP客户端,而OpenFeign是SpringCloud 官方自研的,在Feign的基础上增加了对SpringMVC注解的支持。
本文的书写思路从以下几个方面来,主要是实战和源码验证
- Feign的核心组件介绍
- 上手实战
- 源码验证Feign动态代理的生成和请求的发送与处理
Feign核心组件介绍
上一篇复习了Ribbon,它有核心的几个组件ILoadBalancer、IRule、IPing、ServerList,Feign一样也有几个核心组件
Encoder和Decoder
编码器和解码器
在发起Feign接口调用时,如果传递的参数是个对象,那么Feign会通过Encoder编码器组件对这个对象进行encode编码,转成Json格式,在SpringCloud中默认Encoder组件是SpringEncoder。
在Feign客户端收到一个Json参数之后,就会通过Decoder解码器将Json转成本地的一个对象。在SpringCloud中默认Decoder组件是ResponseEntityDecoder。
Logger
日志组件
顾名思义,日志组件是负责打印日志的,Feign是负责接口调用发送HTTP请求的,通过Logger可以打印接口调用请求的日志信息。在SpringCloud中默认Logger组件Slf4jLogger。
Contract
契约组件
这个组件是用来解释SpringMVC的注解的,比如@PathVariable、@RequestMapping、@RequestParam等注解,让Feign可以跟这些SpringMVC的注解可以结合起来使用。在SpringCloud中默认的Contract组件是SpringMvcContract。
Feign.Builder
Feign的构造器组件
使用构造器模式构造FeignClient实例的。一个FeignClient实例包含了上面所有的组件,比如Encoder、Decoder、Logger、Contract。在SpringCloud中Feign实例构造器是HystrixFeign.Builder, Hystrix其实也是跟Feign整合在一起使用的,而Feign的客户端实例FeignClient是LoadBalancerFeignClient底层是跟Ribbon整合来使用的。
上手实战
改造fc-service-portal服务,改RestTemplate方式为Feign方式发起接口调用
1、pom.xml引入坐标依赖
<dependency>
     <groupId>org.springframework.cloud</groupId>
     <artifactId>spring-cloud-starter-openfeign</artifactId>
</dependency>
2、启动类加@EnableFeignClients注解开启 SpringCloud OpenFeign的自动装配功能
@EnableFeignClients
@EnableEurekaClient
@SpringBootApplication
public class ServicePortalApplication {
}
3、定义一个接口加@FeignClient注解标识这个接口是一个Feign客户端
/**
 * @author zhangyu
 */
@FeignClient(value = "fc-service-screen", fallback = ScreenFeignClientHystrix.class)
public interface ScreenFeignClient {

    /**
     * 获取服务端口
     *
     * @return String
     */
    @GetMapping("/getPort")
    int getPort();

}
value属性指定要调用的服务名
fallback属性是指定Hystrix的熔断降级的类,当fc-service-screen服务的getPort()不可用时会进入fallack降级,也就是会调用ScreenFeignClientHystrix的getPort(),关于Hystrix的知识后面等我复习到Hystrix时再来说明。
@Service
public class ScreenFeignClientHystrix implements ScreenFeignClient {

    @Override
    public int getPort() {
        return 0;
    }
}
4、在fc-service-portal编写接口通过Feign来调用
@RestController
public class HelloWorldController {

    @Resource
    ScreenFeignClient screenFeignClient;

    @Resource
    RestTemplate restTemplate;
	//通过RestTemplate调用
    @GetMapping("/getPort")
    public int getPort() {
        return restTemplate.getForObject("http://fc-service-screen/getPort", Integer.class);
    }
	//看这个通过Feign调用
    @GetMapping("/getPortByFeign")
    public int getPortByFeign() {
        return screenFeignClient.getPort();
    }
}
我们先启动fc-service-portal服务,然后再启动fc-service-screen服务,然后发起
http://localhost:8002/getPortByFeign
开启FeignClient调用请求日志
OpenFeign有四种日志级别,默认是NONE,就是不打印任何日志
NONE:默认级别,不显示日志
BASIC:仅记录请求方法、URL、响应状态及执行时间
HEADERS:除了BASIC中定义的信息之外,还有请求和响应头信息
FULL:除了HEADERS中定义的信息之外,还有请求和响应Body等元数据信息
1、首先在配置类里注入一个Logger.Lever的Bean
@Configuration
public class ScreenFeignConfiguration {

    /**
     * 开启feign请求日志要注入下面这个Bean
     */
    @Bean
    Logger.Level feignLoggerLevel() {
        return Logger.Level.FULL;
    }
}
2、然后在ScreenFeignClient里指定这个配置类
@FeignClient(value = "fc-service-screen", configuration = ScreenFeignConfiguration.class, fallback = ScreenFeignClientHystrix.class)
public interface ScreenFeignClient {

    /**
     * 获取服务端口
     *
     * @return String
     */
    @GetMapping("/getPort")
    int getPort();

}
@FeignClient注解里的configuration属性可以指定用哪个配置类
3、最后要在配置文件里指定哪个FeignClient要打印日志
#指定某个feign客户端的日志级别
logging:
  level:
    com:
      zhangyu:
        serviceportal:
          feign:
            ScreenFeignClient: DEBUG
loggin.lever下面是ScreenFeignClient的一个全限定类名,DEBUG表示日志级别是DEBUG
配置完成后,我们重启fc-service-portal服务,然后再发起一个请求
http://localhost:8002/getPortByFeign
可以看到控制台已经打印了日志

给FeignClient注入自定义拦截器
1、自定义拦截器实现RequestInterceptor接口
/**
 * 自定义HeaderRequestInterceptor实现了RequestInterceptor接口
 * 主要往请求头加点东西,这里演示加个appId
 *
 * @author zhangyu
 * @since 2023/1/6 12:43
 */
public class HeaderRequestInterceptor implements RequestInterceptor {

    @Override
    public void apply(RequestTemplate template) {
        template.header("appId", "12345");
    }
}
往请求头里加一个appId的属性,value值为12345
2、将自定义的拦截器注入到FeignClient的配置类里
@Configuration
public class ScreenFeignConfiguration {

    /**
     * 开启feign请求日志要注入下面这个Bean
     */
    @Bean
    Logger.Level feignLoggerLevel() {
        return Logger.Level.FULL;
    }

    /**
     * 注入一个自定义的拦截器
     * @return RequestInterceptor
     */
    @Bean
    public RequestInterceptor requestInterceptor () {
        return new HeaderRequestInterceptor();
    }
}
3、去下游服务fc-service-screen里打印日志看拦截器是否成功
@RestController
public class HelloWordController {

    private static Logger log = LoggerFactory.getLogger(HelloWordController.class);

    @Value("${server.port}")
    int port;

    @GetMapping("/getPort")
    public int getPort(HttpServletRequest request) {
        log.info("header里的appId:{}", request.getHeader("appId"));
        return port;
    }

}
发起如下请求,然后去看fc-service-screen的控制台日志打印请求头里是否有appId的值
http://localhost:8002/getPortByFeign
我们现在拦截器里加一个断点可以看看,发现请求已经进来了
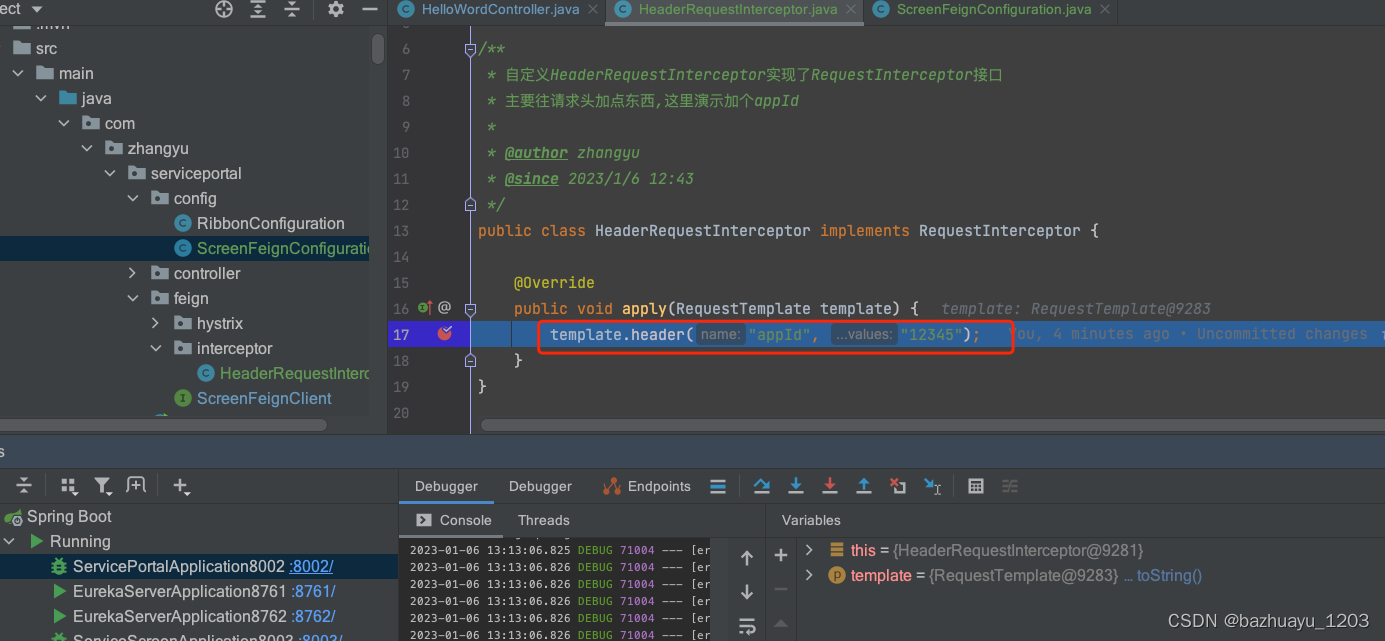
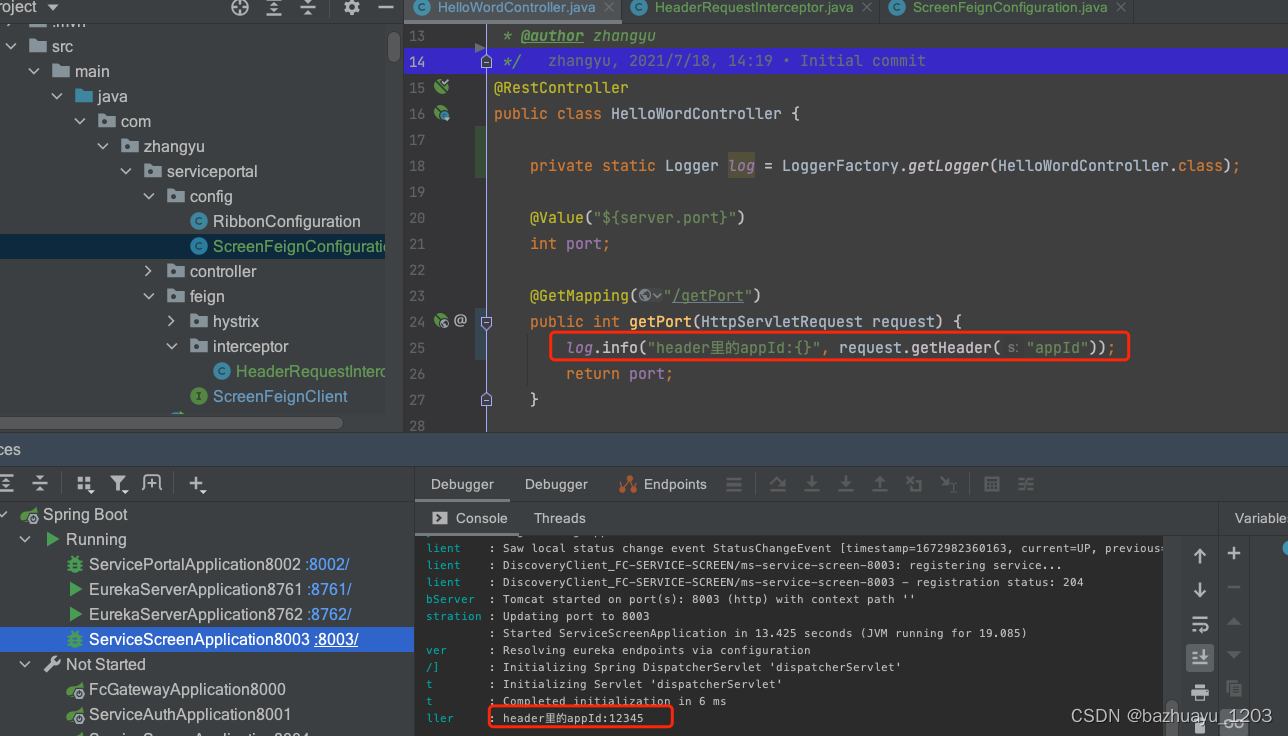
可以看到日志里打印的appId的值是拦截器里设置的。
Feign支持文件上传配置
上面组件介绍里有说过,Feign需要对参数进行编解码的,文件上传的编解码需要注入一个专门的编码器SpringFormEncoder
@Configuration
public class ScreenFeignConfiguration {

    @Autowired
    private ObjectFactory<HttpMessageConverters> messageConverters;
	@Bean
	@Scope("prototype")
	public Encoder multipartFormEncoder() {
    	return new SpringFormEncoder(new SpringEncoder(messageConverters));
	}
然后要引入github社区提供的依赖
<dependency>
    <groupId>io.github.openfeign.form</groupId>
    <artifactId>feign-form</artifactId>
    <version>3.4.1</version>
</dependency>
<dependency>
    <groupId>io.github.openfeign.form</groupId>
    <artifactId>feign-form-spring</artifactId>
    <version>3.4.1</version>
</dependency>
最后就是在FeignClient里具体的文件上传接口,要注意的是入参要有@RequestPart注解,我demo里就不演示上传了。
/**
     * 上传文件
     *
     * @param file 文件
     * @return String
     */
    @PostMapping(value = "/upload", consumes = MediaType.MULTIPART_FORM_DATA_VALUE)
    String upLoad(@RequestPart("file") MultipartFile file);
Feign开启Gzip压缩
Feign可以对请求和响应进行压缩,默认都是未开启的,开Gzip压缩有两个好处,一个是减少存储空间,另一个是减少网络传输时间。只需要在配置文件里增加如下配置即可,压缩阈值和类型都是默认的,其实只是修改了request和response的默认关闭false为true。
feign:
  #开启请求和响应压缩
  compression:
    request:
      enabled: true
      #压缩阈值
      min-request-size: 2048
      #压缩类型
      mime-types: text/xml,application/xml,application/json
    response:
      enabled: true

开启压缩后可以看到请求和响应头里
Feign配置超时时间
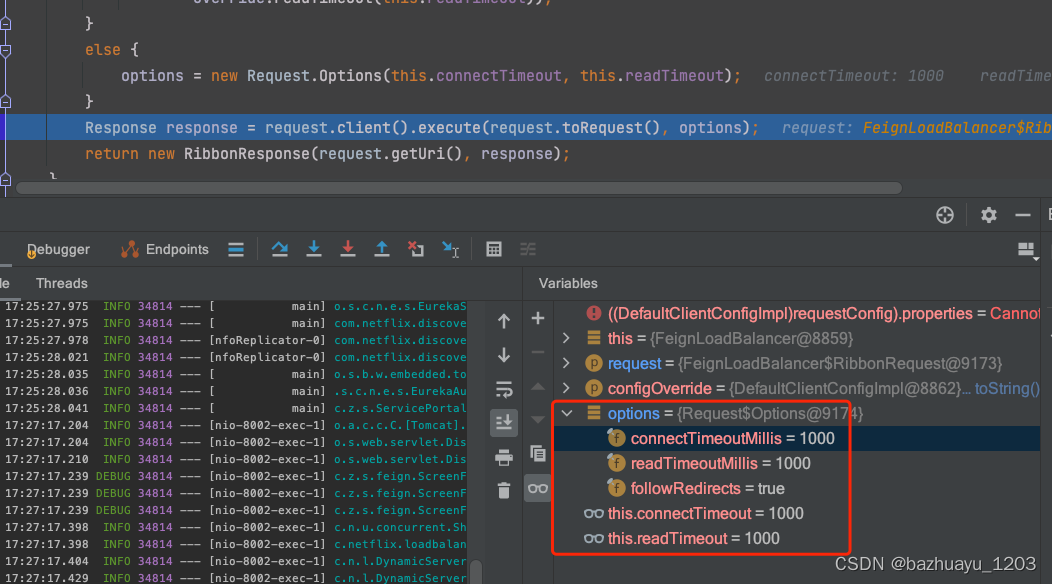
Feign默认的请求处理超时时间为1s,有时候有些业务请求会超过1s的限制,就需要修改Feign的超时时间配置,比如下面的配置,设置请求连接超时5s,请求处理超时5s。
打个断点验证一下,在没有配置Feign和Ribbon超时时间的情况,Feign默认的连接超时和请求处理超时时间
feign:
  client:
    config:
      fc-service-screen:
        connectTimeout: 5000
        readTimeout: 5000
故意让fc-service-screen里线程睡个5s然后模拟超时看下
@GetMapping("/getPort")
    public int getPort(HttpServletRequest request) throws InterruptedException {
        Thread.sleep(5000);
        log.info("header里的appId:{}", request.getHeader("appId"));
        return port;
    }
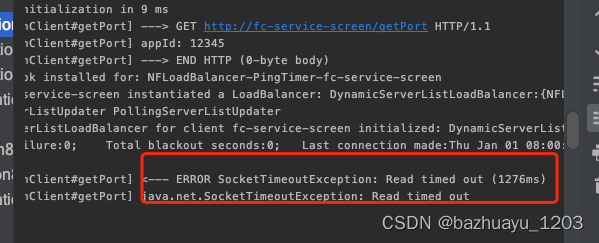
访问如下请求,从日志里可以看到超时了
http://localhost:8002/getPortByFeign
Feign整合Ribbon支持负载均衡
上面说到Feign有自己的超时配置,Ribbon也有超时配置,那如果既设置了Feign的超时又设置了Ribbon超时,那以谁的为准呢?经过测试以Feign的的超时配置为准,比如我设置对fc-service-screen服务的Ribbon的连接超时和请求处理超时都是5s,然后设置Feign的连接和处理超时为1s,处理请求的线程睡个3s然后观察以哪个为准,如果请求超时说明是以Feign为准,请求成功说明以Ribbon为准
#Ribbon超时配置
fc-service-screen:
  ribbon:
    #请求连接超时时间
    ConnectTimeout: 5000
    #请求处理超时时间
    ReadTimeout: 5000
    #对所有操作都进⾏重试
    OkToRetryOnAllOperations: true
    #对当前选中实例重试次数,不包括第⼀次调⽤
    MaxAutoRetries: 0
    #切换实例的重试次数
    MaxAutoRetriesNextServer: 0
Feign的超时设置
feign:
	client:
    	config:
      		default:
        	connectTimeout: 1000
        	readTimeout: 1000
 @GetMapping("/getPort")
    public int getPort(HttpServletRequest request) throws InterruptedException {
        //睡3s
        Thread.sleep(3000);
        log.info("header里的appId:{}", request.getHeader("appId"));
        return port;
    }
访问入下请求
http://localhost:8002/getPortByFeign
结果是超时,说明当Feign和Ribbon两个都设置了超时时间,以Feign的超时时间为准
核心源码部分
Feign的核心机制是将打了@FeignClient注解的接口生成Feign的动态代理,然后注入到Spring容器中,以及解析并处理接口上打的那些SpringMVC的注解,比如@RequestMapping、@RequstParam、@PathVarialbe等,基于这些SpringMVC的注解来生成接口对应的HTTP请求。因此源码部分主要从以下几个方面来分析
- Feign是如何与Spring整合将FeignClient注入到Spring容器的
- Feign动态代理是如何创建的
- Feign是如何接受和处理请求的
FeignClient注入到Spring容器的源码
首先看@EnableFeignClients注解
@Retention(RetentionPolicy.RUNTIME)
@Target(ElementType.TYPE)
@Documented
//导入了一个关键类
@Import(FeignClientsRegistrar.class)
public @interface EnableFeignClients {
导入一个极为重要的类:@Import(FeignClientsRegistrar.class) 这个类实现了ImportBeanDefinitionRegistrar接口,它是Spring的一个扩展点,实现registerBeanDefinitions()方法我们可以自己封装一个BeanDefinition注册到Spring容器。
我们看下FeignClientsRegistrar的registerBeanDefinitions()方法的逻辑
@Override
	public void registerBeanDefinitions(AnnotationMetadata metadata,
			BeanDefinitionRegistry registry) {
			//这个看名字是注册默认的配置,先不看
		registerDefaultConfiguration(metadata, registry);
		//重点是这个,看名字就是注册FeignClient的
		registerFeignClients(metadata, registry);
	}
我们跟进去,可以看到有扫描打了@FeignClient注解的代码,还有
public void registerFeignClients(AnnotationMetadata metadata,
			BeanDefinitionRegistry registry) {
			//获取一个扫描器
		ClassPathScanningCandidateComponentProvider scanner = getScanner();
		scanner.setResourceLoader(this.resourceLoader);

		Set<String> basePackages;

		Map<String, Object> attrs = metadata
				.getAnnotationAttributes(EnableFeignClients.class.getName());
				//添加一个FeignClient.class的注解过滤器AnnotationTypeFilter
		AnnotationTypeFilter annotationTypeFilter = new AnnotationTypeFilter(
				FeignClient.class);
		final Class<?>[] clients = attrs == null ? null
				: (Class<?>[]) attrs.get("clients");
		if (clients == null || clients.length == 0) {
			scanner.addIncludeFilter(annotationTypeFilter);
			basePackages = getBasePackages(metadata);
		}
		else {
			final Set<String> clientClasses = new HashSet<>();
			basePackages = new HashSet<>();
			for (Class<?> clazz : clients) {
				basePackages.add(ClassUtils.getPackageName(clazz));
				clientClasses.add(clazz.getCanonicalName());
			}
			AbstractClassTestingTypeFilter filter = new AbstractClassTestingTypeFilter() {
				@Override
				protected boolean match(ClassMetadata metadata) {
					String cleaned = metadata.getClassName().replaceAll("\\$", ".");
					return clientClasses.contains(cleaned);
				}
			};
			scanner.addIncludeFilter(
					new AllTypeFilter(Arrays.asList(filter, annotationTypeFilter)));
		}

		for (String basePackage : basePackages) {
			Set<BeanDefinition> candidateComponents = scanner
					.findCandidateComponents(basePackage);
			for (BeanDefinition candidateComponent : candidateComponents) {
				if (candidateComponent instanceof AnnotatedBeanDefinition) {
					// verify annotated class is an interface
					AnnotatedBeanDefinition beanDefinition = (AnnotatedBeanDefinition) candidateComponent;
					AnnotationMetadata annotationMetadata = beanDefinition.getMetadata();
					Assert.isTrue(annotationMetadata.isInterface(),
							"@FeignClient can only be specified on an interface");
					//拿到注解的元数据
					Map<String, Object> attributes = annotationMetadata
							.getAnnotationAttributes(
									FeignClient.class.getCanonicalName());

					String name = getClientName(attributes);
					registerClientConfiguration(registry, name,
							attributes.get("configuration"));
					//注册FeignClient接口
					registerFeignClient(registry, annotationMetadata, attributes);
				}
			}
		}
	}
FeignClient接口构造为bean的过程
private void registerFeignClient(BeanDefinitionRegistry registry,
			AnnotationMetadata annotationMetadata, Map<String, Object> attributes) {
		String className = annotationMetadata.getClassName();
		//构建一个BeanDefinitionBuilder
		BeanDefinitionBuilder definition = BeanDefinitionBuilder
		//注意这里有个FeignClientFactoryBean,是生成动态代理的关键
				.genericBeanDefinition(FeignClientFactoryBean.class);
		validate(attributes);
		//构建的BeanDefiniton包含FeignClient注解和ScreenFeignClient接口的所有信息
		definition.addPropertyValue("url", getUrl(attributes));
		definition.addPropertyValue("path", getPath(attributes));
		String name = getName(attributes);
		definition.addPropertyValue("name", name);
		String contextId = getContextId(attributes);
		definition.addPropertyValue("contextId", contextId);
		definition.addPropertyValue("type", className);
		definition.addPropertyValue("decode404", attributes.get("decode404"));
		definition.addPropertyValue("fallback", attributes.get("fallback"));
		definition.addPropertyValue("fallbackFactory", attributes.get("fallbackFactory"));
		definition.setAutowireMode(AbstractBeanDefinition.AUTOWIRE_BY_TYPE);

		String alias = contextId + "FeignClient";
		AbstractBeanDefinition beanDefinition = definition.getBeanDefinition();

		boolean primary = (Boolean) attributes.get("primary"); // has a default, won't be
																// null

		beanDefinition.setPrimary(primary);

		String qualifier = getQualifier(attributes);
		if (StringUtils.hasText(qualifier)) {
			alias = qualifier;
		}

		BeanDefinitionHolder holder = new BeanDefinitionHolder(beanDefinition, className,
				new String[] { alias });
		BeanDefinitionReaderUtils.registerBeanDefinition(holder, registry);
	}
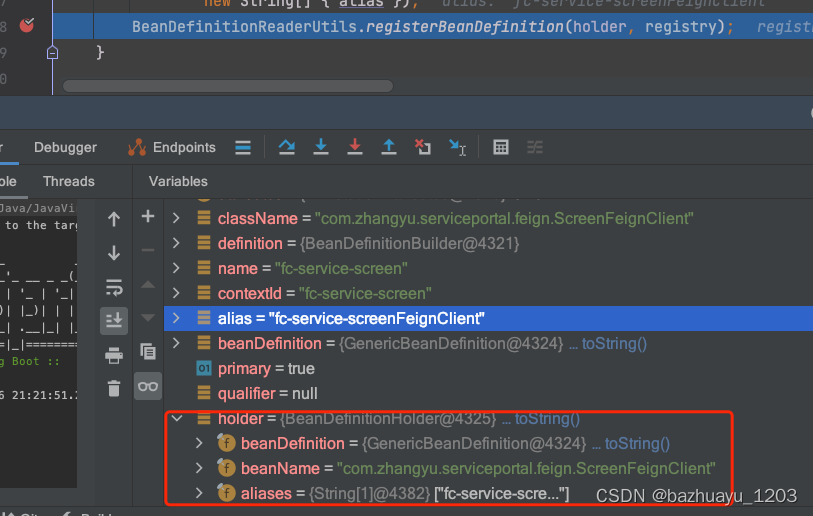
我们打个断点看下这个BeanDefinitionHolder包含哪些内容
FeignClientFactoryBean的getObject()构建真正的Bean实例源码
我们重点看下FeignClientFactoryBean,因为它是一个FactoryBean在Spring容器获取这个Bean的时候实际上是调用FactoryBean的getObject()方法,我们看下这个方法
@Override
	public Object getObject() throws Exception {
		return getTarget();
	}
	<T> T getTarget() {
		FeignContext context = this.applicationContext.getBean(FeignContext.class);
		//构建一个Feign.Builder,这是一个核心组件
		Feign.Builder builder = feign(context);
		//如果@FeignClient注解里的url属性为空,
		if (!StringUtils.hasText(this.url)) {
			if (!this.name.startsWith("http")) {
				this.url = "http://" + this.name;
			}
			else {
				this.url = this.name;
			}
			this.url += cleanPath();
			//那么FeignClient客户端就是一个带负载均衡功能的LoadBalancer就是feign+ribbon整合
			return (T) loadBalance(builder, context,
					new HardCodedTarget<>(this.type, this.name, this.url));
		}
		。。。
	}
构建并配置Feign.Builder的过程源码
protected Feign.Builder feign(FeignContext context) {
		FeignLoggerFactory loggerFactory = get(context, FeignLoggerFactory.class);
		Logger logger = loggerFactory.create(this.type);

		// @formatter:off
		//从FeignContext里获取一个Feign.Builder实例,然后从FeignContext里获取其他几个组件并赋值给builder
		Feign.Builder builder = get(context, Feign.Builder.class)
				// required values
				.logger(logger)
				.encoder(get(context, Encoder.class))
				.decoder(get(context, Decoder.class))
				.contract(get(context, Contract.class));
		// @formatter:on
		//后去feign.client开头的配置信息并配置到Feign.Builder的实例中去
		configureFeign(context, builder);

		return builder;
	}
这些组件我们没有配置,默认是在哪里注入的呢?
Feign默认的组件注入的源码
我们看FeignClientsConfiguration类里面
@Bean
	@ConditionalOnMissingBean
	public Decoder feignDecoder() {
		return new OptionalDecoder(
				new ResponseEntityDecoder(new SpringDecoder(this.messageConverters)));
	}

@Bean
	@ConditionalOnMissingBean
	@ConditionalOnMissingClass("org.springframework.data.domain.Pageable")
	public Encoder feignEncoder() {
		return new SpringEncoder(this.messageConverters);
	}

@Bean
	@ConditionalOnMissingBean
	public Contract feignContract(ConversionService feignConversionService) {
		return new SpringMvcContract(this.parameterProcessors, feignConversionService);
	}

@Bean
	@ConditionalOnMissingBean
	public Retryer feignRetryer() {
		return Retryer.NEVER_RETRY;
	}
读取feign.client开头的配置信息的源码
我们看下configuraFeign()方法
protected void configureFeign(FeignContext context, Feign.Builder builder) {
		//FeignClientProperties就是对应装配feign.client开头的配置的
		FeignClientProperties properties = this.applicationContext
				.getBean(FeignClientProperties.class);
		//有配置过feign相关配置的走这里
		if (properties != null) {
			if (properties.isDefaultToProperties()) {
				configureUsingConfiguration(context, builder);
				configureUsingProperties(
						properties.getConfig().get(properties.getDefaultConfig()),
						builder);
				configureUsingProperties(properties.getConfig().get(this.contextId),
						builder);
			}
			else {
				configureUsingProperties(
						properties.getConfig().get(properties.getDefaultConfig()),
						builder);
				configureUsingProperties(properties.getConfig().get(this.contextId),
						builder);
				configureUsingConfiguration(context, builder);
			}
		}
		else {
			configureUsingConfiguration(context, builder);
		}
	}
我们直接打个断点来看吧
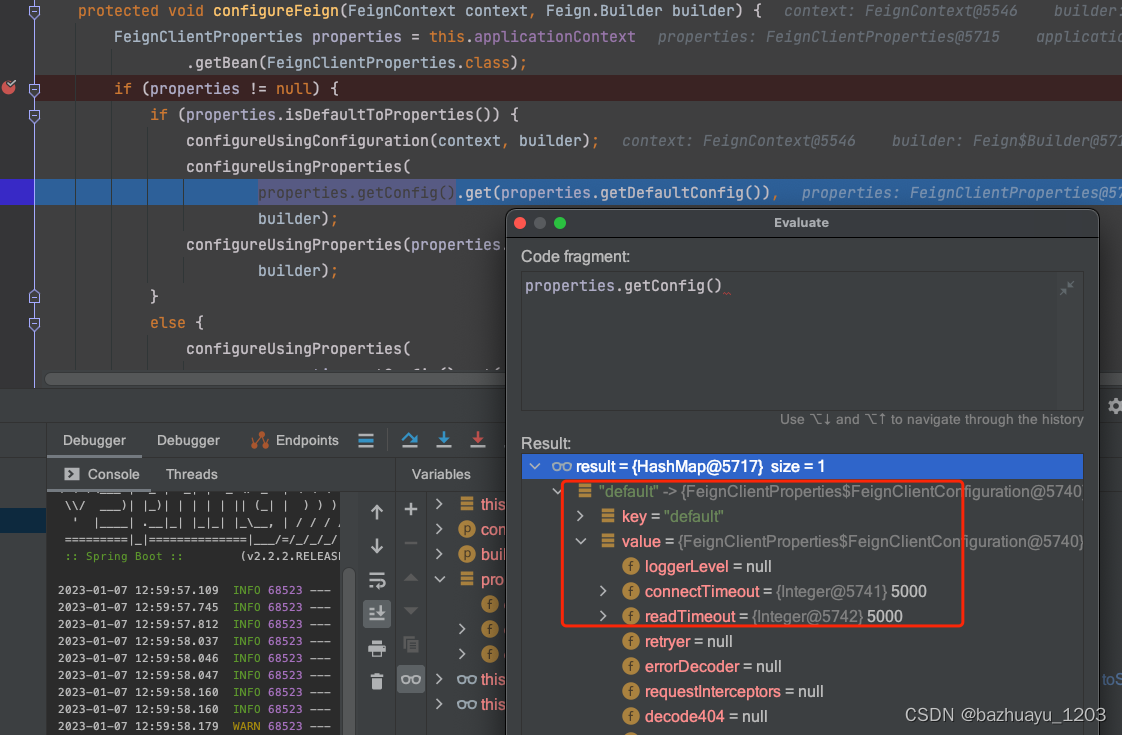
这些配置数据对应我们application.yml的feign.client开头的配置
feign:
	client:
    	config:
      		default:
        		connectTimeout: 5000
        		readTimeout: 5000
再看configureUsingConfiguration()看名字是用配置来配置builder实例的,我们看下源码
protected void configureUsingConfiguration(FeignContext context,
			Feign.Builder builder) {
		Logger.Level level = getOptional(context, Logger.Level.class);
		if (level != null) {
		//logger组件
			builder.logLevel(level);
		}
		Retryer retryer = getOptional(context, Retryer.class);
		if (retryer != null) {
		//重试组件
			builder.retryer(retryer);
		}
		ErrorDecoder errorDecoder = getOptional(context, ErrorDecoder.class);
		if (errorDecoder != null) {
		//编码组件
			builder.errorDecoder(errorDecoder);
		}
		//这里就是设置请求的超时时间的
		Request.Options options = getOptional(context, Request.Options.class);
		if (options != null) {
			builder.options(options);
		}
		//Feign的拦截器
		Map<String, RequestInterceptor> requestInterceptors = context
				.getInstances(this.contextId, RequestInterceptor.class);
		if (requestInterceptors != null) {
			builder.requestInterceptors(requestInterceptors.values());
		}
		QueryMapEncoder queryMapEncoder = getOptional(context, QueryMapEncoder.class);
		if (queryMapEncoder != null) {
			builder.queryMapEncoder(queryMapEncoder);
		}
		if (this.decode404) {
			builder.decode404();
		}
	}
我们打个断点看看此时Feign.Builder里有哪些数据
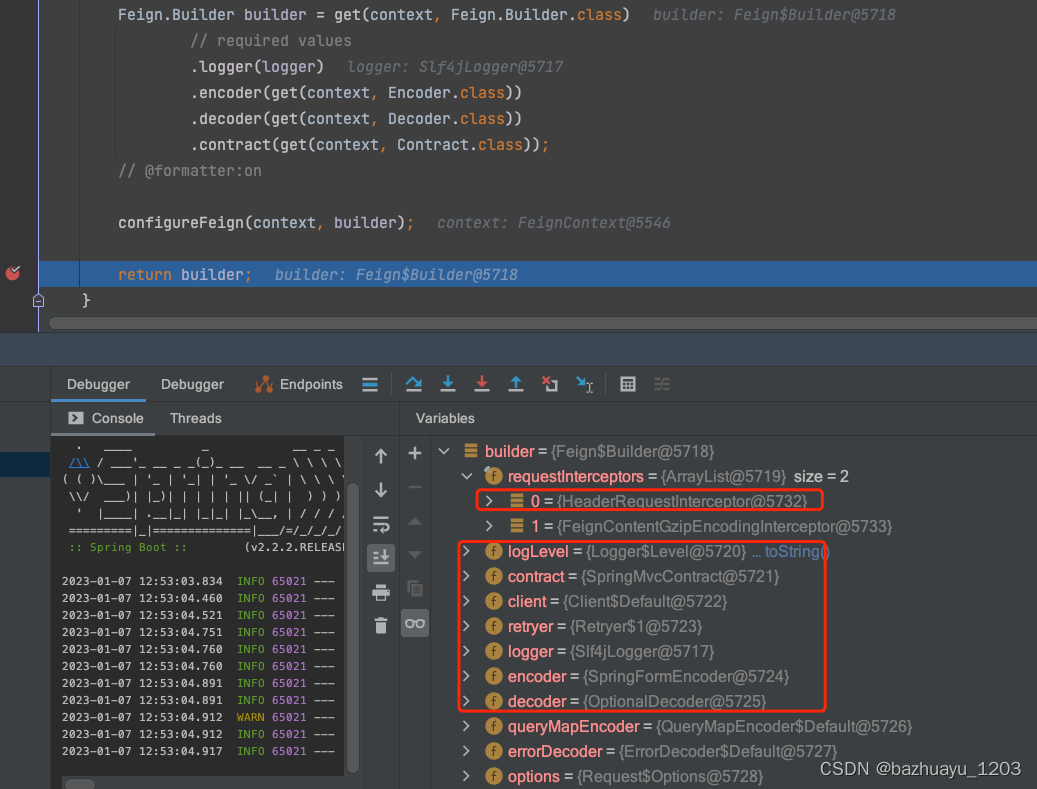
到这里其实Feign.Builder就全部构造完了,我这里想试下如果不配置Feign的超时时间,默认的超时时间是多少
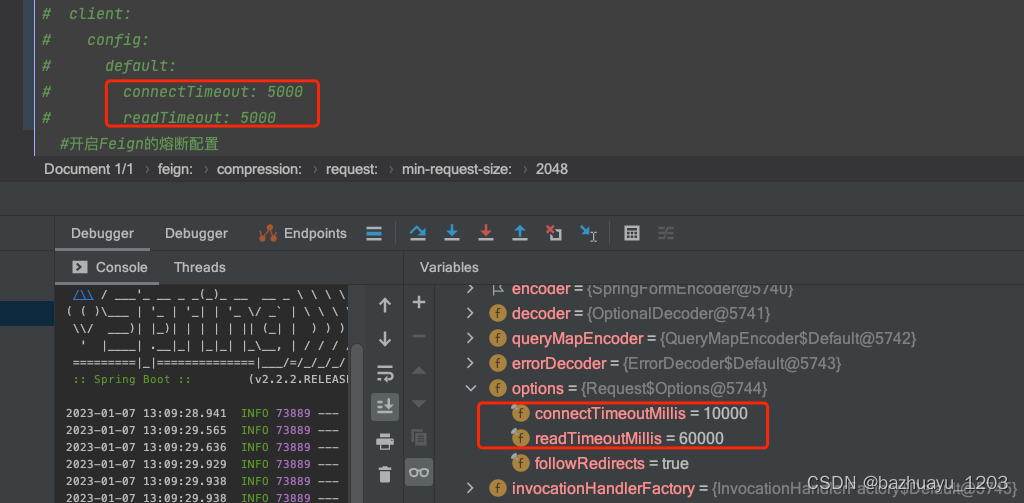
可以看到Feign默认的连接超时是10s,请求处理超时是60s
使用Feign.Builder构建一个FeignClient实例源码
FeignClientFactoryBean#getTarget
<T> T getTarget() {
		FeignContext context = this.applicationContext.getBean(FeignContext.class);
		Feign.Builder builder = feign(context);

		if (!StringUtils.hasText(this.url)) {
			if (!this.name.startsWith("http")) {
				this.url = "http://" + this.name;
			}
			else {
				this.url = this.name;
			}
			this.url += cleanPath();
			//看这里
			return (T) loadBalance(builder, context,
					new HardCodedTarget<>(this.type, this.name, this.url));
先是new了一个HardCodedTarget,里面包含了接口类型(com.zhangyu.serviceportal.feign.ScreenFeignClient)、服务名称(fc-service-screen)、跟Feign.Builder、FeignContext,一起,传入了loadBalance()方法里去。
跟进去看下这个loadBalance()方法
protected <T> T loadBalance(Feign.Builder builder, FeignContext context,
			HardCodedTarget<T> target) {
		//从FeignContext里获取Feign.Client
		Client client = getOptional(context, Client.class);
		if (client != null) {
			builder.client(client);
			//OpenFeign的实现类是HystrixTargeter,targeter是一个接口
			Targeter targeter = get(context, Targeter.class);
			//这个targetr的target()方法会得到一个实例
			return targeter.target(this, builder, context, target);
		}
	}
再打个断点看看这里获取的client是个啥
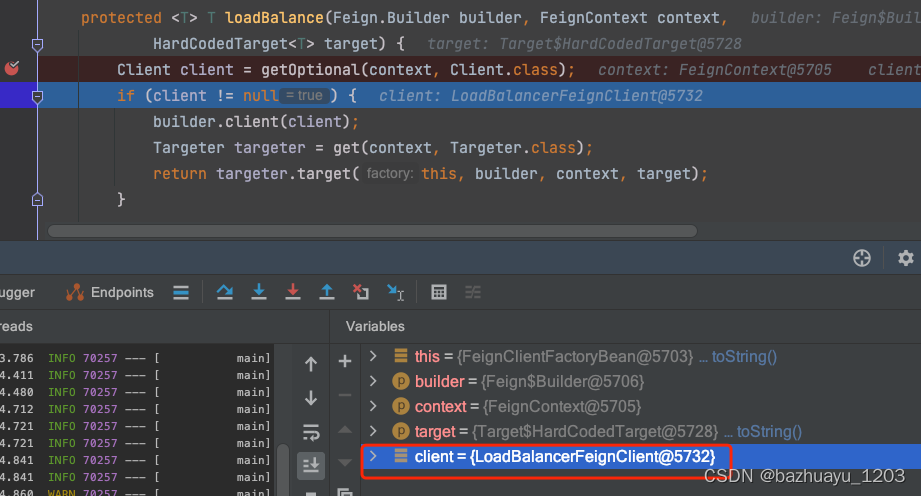
哦,原来是LoadBalancerFeignClient,那这个LoadBalancerFeignClient是那里注入的呢?看名字跟负载均衡有关,应该是和Ribbon整合的代码中,看这个类FeignRibbonClientAutoConfiguration
@ConditionalOnClass({ ILoadBalancer.class, Feign.class })
@ConditionalOnProperty(value = "spring.cloud.loadbalancer.ribbon.enabled",
		matchIfMissing = true)
@Configuration(proxyBeanMethods = false)
@AutoConfigureBefore(FeignAutoConfiguration.class)
@EnableConfigurationProperties({ FeignHttpClientProperties.class })
//导入了三个类
@Import({ HttpClientFeignLoadBalancedConfiguration.class,
		OkHttpFeignLoadBalancedConfiguration.class,
		DefaultFeignLoadBalancedConfiguration.class })
public class FeignRibbonClientAutoConfiguration {
导入了三个类,我们每个点进去看下,首先HttpClientFeignLoadBalancedConfiguration是需要有feign.httpclient.enabled为true才生效;然后OkHttpFeignLoadBalancedConfiguration需要有feign.okhttp.enabled为true才生效
@Configuration(proxyBeanMethods = false)
@ConditionalOnClass(ApacheHttpClient.class)
@ConditionalOnProperty(value = "feign.httpclient.enabled", matchIfMissing = true)
@Import(HttpClientFeignConfiguration.class)
class HttpClientFeignLoadBalancedConfiguration {

	@Bean
	@ConditionalOnMissingBean(Client.class)
	public Client feignClient(CachingSpringLoadBalancerFactory cachingFactory,
			SpringClientFactory clientFactory, HttpClient httpClient) {
		ApacheHttpClient delegate = new ApacheHttpClient(httpClient);
		return new LoadBalancerFeignClient(delegate, cachingFactory, clientFactory);
	}

}

@Configuration(proxyBeanMethods = false)
@ConditionalOnClass(OkHttpClient.class)
@ConditionalOnProperty("feign.okhttp.enabled")
@Import(OkHttpFeignConfiguration.class)
class OkHttpFeignLoadBalancedConfiguration {

	@Bean
	@ConditionalOnMissingBean(Client.class)
	public Client feignClient(CachingSpringLoadBalancerFactory cachingFactory,
			SpringClientFactory clientFactory, okhttp3.OkHttpClient okHttpClient) {
		OkHttpClient delegate = new OkHttpClient(okHttpClient);
		return new LoadBalancerFeignClient(delegate, cachingFactory, clientFactory);
	}

}
那就只剩最后一个了DefaultFeignLoadBalancedConfiguration,默认返回的是LoadBalancerFeignClient,它是Feign的客户端实例,里面包含execute()是发起一个请求的核心逻辑。
@Configuration(proxyBeanMethods = false)
class DefaultFeignLoadBalancedConfiguration {

	@Bean
	@ConditionalOnMissingBean
	public Client feignClient(CachingSpringLoadBalancerFactory cachingFactory,
			SpringClientFactory clientFactory) {
		return new LoadBalancerFeignClient(new Client.Default(null, null), cachingFactory,
				clientFactory);
	}

}
基于HystrixTargeter和HardCodedTarget创建Feign动态代理细节
最后看这行代码return targeter.target(this, builder, context, target);其实就是HystrixTargeter#target
public <T> T target(FeignClientFactoryBean factory, Feign.Builder feign,
			FeignContext context, Target.HardCodedTarget<T> target) {
		//区分feign是否开启了hystrix支持(配置文件feign.hystrix.enabled=true,默认是不开启的)
		if (!(feign instanceof feign.hystrix.HystrixFeign.Builder)) {
		//没有开启进这里
			return feign.target(target);
		}
		//开启了进这里,又从FeignContext里获取了HystrixFeign
		feign.hystrix.HystrixFeign.Builder builder = (feign.hystrix.HystrixFeign.Builder) feign;
		String name = StringUtils.isEmpty(factory.getContextId()) ? factory.getName()
				: factory.getContextId();
		SetterFactory setterFactory = getOptional(name, context, SetterFactory.class);
		if (setterFactory != null) {
			builder.setterFactory(setterFactory);
		}
		Class<?> fallback = factory.getFallback();
		if (fallback != void.class) {
		//如果fallback属性不为空,返回fallback配置的类实例
			return targetWithFallback(name, context, target, builder, fallback);
		}
		Class<?> fallbackFactory = factory.getFallbackFactory();
		if (fallbackFactory != void.class) {
			return targetWithFallbackFactory(name, context, target, builder,
					fallbackFactory);
		}

		return feign.target(target);
	}
Feign开启Hystrix熔断后生成动态代理的源码
开启Feign的熔断支持后,Feign.Builder就是HystrixFeign.builder()
@Configuration(proxyBeanMethods = false)
	@ConditionalOnClass({ HystrixCommand.class, HystrixFeign.class })
	protected static class HystrixFeignConfiguration {

		@Bean
		@Scope("prototype")
		@ConditionalOnMissingBean
		@ConditionalOnProperty(name = "feign.hystrix.enabled")
		public Feign.Builder feignHystrixBuilder() {
			return HystrixFeign.builder();
		}

	}
我们配置文件是开启Feign的熔断的,接着往下看
targeter是一个接口,它的target()方法可以用来生成一个实例,它有两个实现类分别是DefaultTargeter和HystrixTargeter,OpenFiegn使用的是HystrixTarger的实现,可以打断点看下
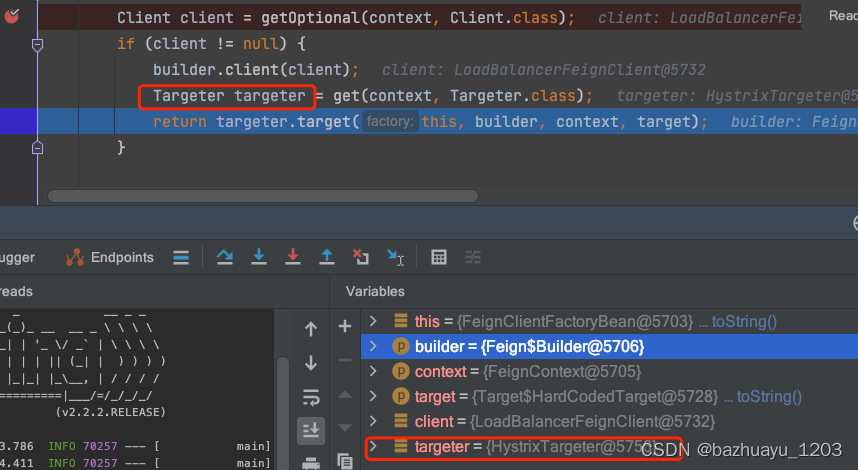
因为我给ScreenFeignClient配置了一个Hystrix熔断
@FeignClient(value = "fc-service-screen", configuration = ScreenFeignConfiguration.class, fallback = ScreenFeignClientHystrix.class)
public interface ScreenFeignClient {
打断点可以看到这里获取到fallback里的ScreenFeignClientHystrix
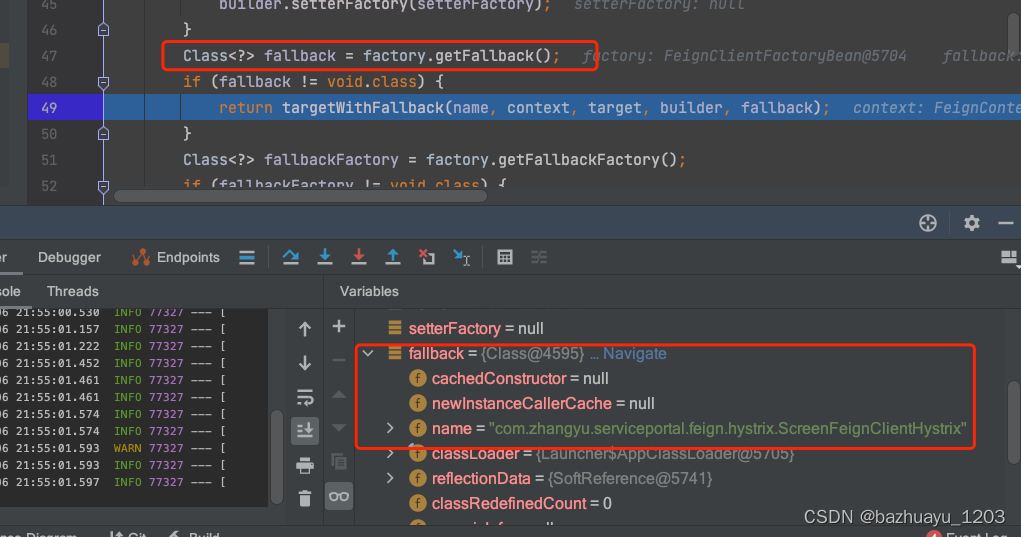
我们跟进去看看这个源码
private <T> T targetWithFallback(String feignClientName, FeignContext context,
			Target.HardCodedTarget<T> target, HystrixFeign.Builder builder,
			Class<?> fallback) {
			//又是从FeignContext里获取@FeignClient注解里fallback属性对应的Bean
		T fallbackInstance = getFromContext("fallback", feignClientName, context,
				fallback, target.type());
		//这里应该是关键
		return builder.target(target, fallbackInstance);
	}

public <T> T target(Target<T> target, T fallback) {
	//看build()方法返回的是ReflectiveFeign的实例,然后ReflectiveFeign再new一个实例出来
      return build(fallback != null ? new FallbackFactory.Default<T>(fallback) : null)
          .newInstance(target);
    }
feign.hystrix.HystrixFeign.Builder#build(feign.hystrix.FallbackFactory<?>)
Feign build(final FallbackFactory<?> nullableFallbackFactory) {
      super.invocationHandlerFactory(new InvocationHandlerFactory() {
        @Override
        public InvocationHandler create(Target target,
                                        Map<Method, MethodHandler> dispatch) {
           //再创建原来是你
          return new HystrixInvocationHandler(target, dispatch, setterFactory,
              nullableFallbackFactory);
        }
      });
      super.contract(new HystrixDelegatingContract(contract));
      //调用父类也就是Feign的build()方法
      return super.build();
    }
我们看下父类Feign.build()干了些啥,feign.Feign.Builder#build
public Feign build() {
	//生成处理FeignClient接口方法对应的Handler
      SynchronousMethodHandler.Factory synchronousMethodHandlerFactory =
          new SynchronousMethodHandler.Factory(client, retryer, requestInterceptors, logger,
              logLevel, decode404, closeAfterDecode, propagationPolicy);
      ParseHandlersByName handlersByName =
          new ParseHandlersByName(contract, options, encoder, decoder, queryMapEncoder,
              errorDecoder, synchronousMethodHandlerFactory);
      return new ReflectiveFeign(handlersByName, invocationHandlerFactory, queryMapEncoder);
    }
看下ReflectiveFeign的newInstance()方法,它是构建一个FeignClient实例的关键,看下做了什么
@Override
  public <T> T newInstance(Target<T> target) {
    Map<String, MethodHandler> nameToHandler = targetToHandlersByName.apply(target);
    Map<Method, MethodHandler> methodToHandler = new LinkedHashMap<Method, MethodHandler>();
    List<DefaultMethodHandler> defaultMethodHandlers = new LinkedList<DefaultMethodHandler>();
	//遍历ScreenFeignClient的所有方法
    for (Method method : target.type().getMethods()) {
      if (method.getDeclaringClass() == Object.class) {
        continue;
      } else if (Util.isDefault(method)) {
        DefaultMethodHandler handler = new DefaultMethodHandler(method);
        defaultMethodHandlers.add(handler);
        methodToHandler.put(method, handler);
      } else {
        //然后给每个方法生成对应的Hander,其实就是Feign.build()里面生成的SynchronousMethodHandler,然后
        //添加到methodToHandler
        methodToHandler.put(method, nameToHandler.get(Feign.configKey(target.type(), method)));
      }
    }
    //通过InvocationHandlerFactory创建JDK的动态代理,如果是Hystrix的就会创建HystrixInvocationHandler
    InvocationHandler handler = factory.create(target, methodToHandler);
    T proxy = (T) Proxy.newProxyInstance(target.type().getClassLoader(),
        new Class<?>[] {target.type()}, handler);

    for (DefaultMethodHandler defaultMethodHandler : defaultMethodHandlers) {
      defaultMethodHandler.bindTo(proxy);
    }
    return proxy;
  }
ReflectiveFeign的newInstance()方法主要做了两件事
- 扫描FeignClient接口里所有方法,然后为每个方法生成对应的SynchronousMethodHandler
- 使用Proxy创建FeignClient实例的动态代理对象
看了这么多静态源码了,打了断点看下动态数据
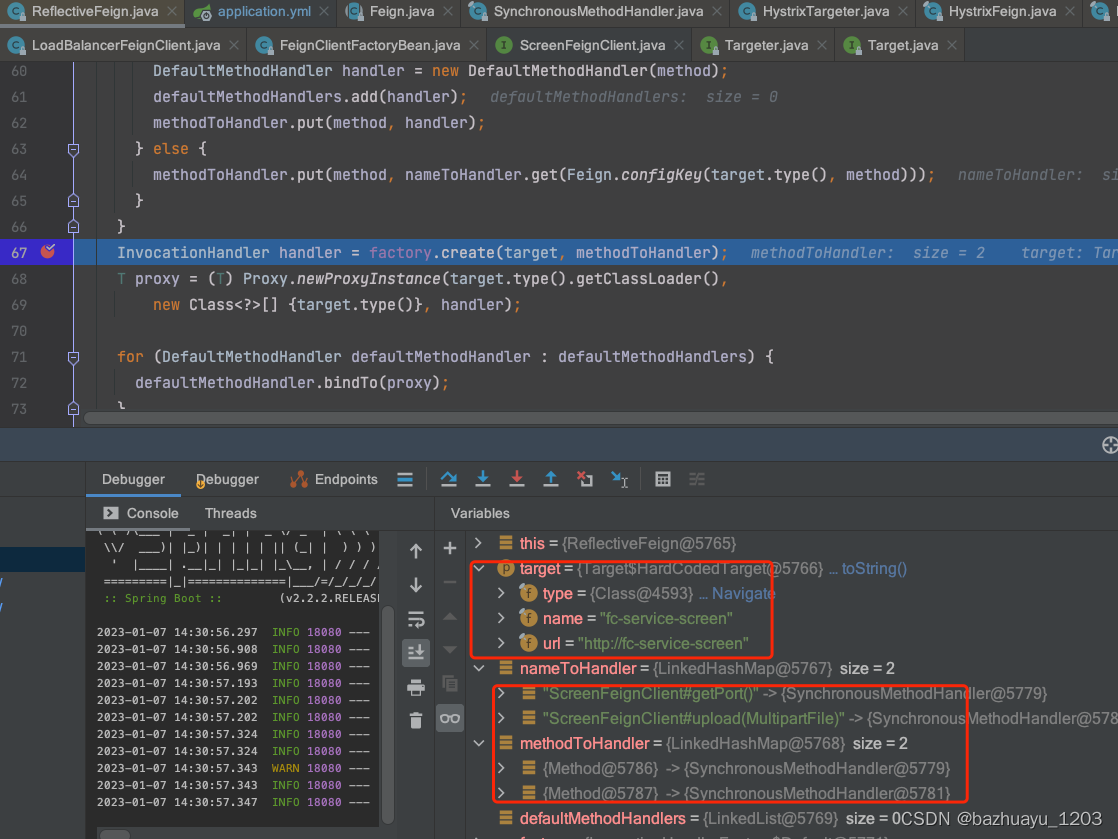
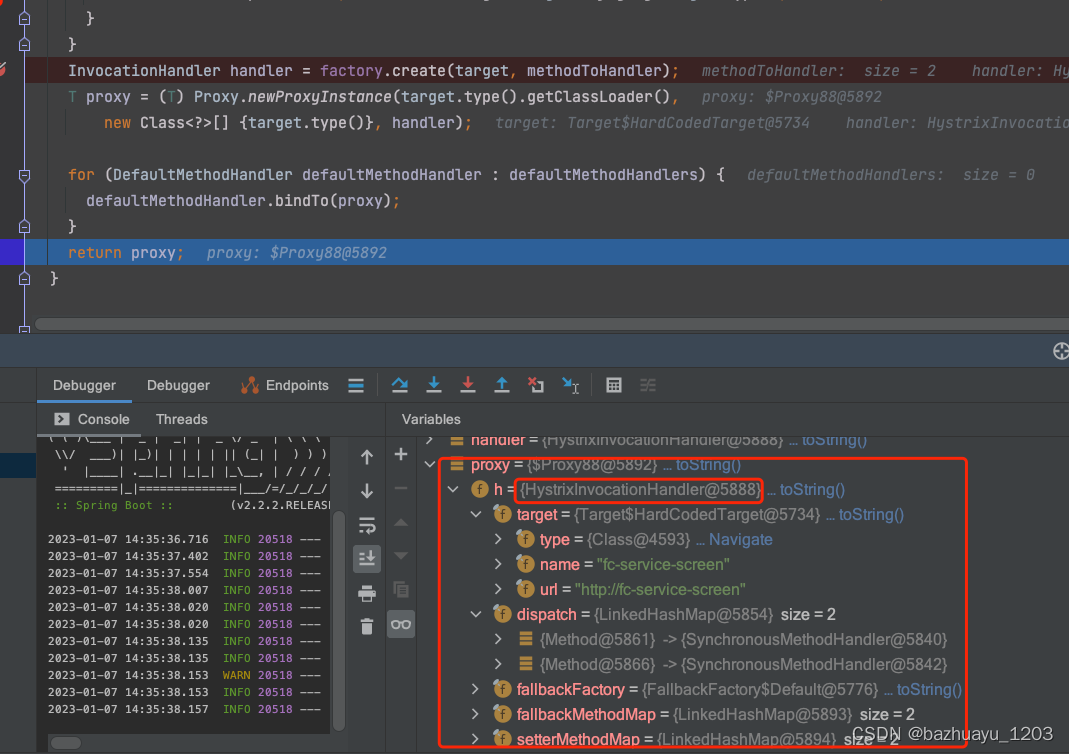
Feign关闭Hystrix熔断生成动态代理的源码
我们先在配置 文件里关闭Feign的Hystrix的支持
feign:
  hystrix:
    enabled: false
我们回个头看下HystrixTargeter#target
@Override
	public <T> T target(FeignClientFactoryBean factory, Feign.Builder feign,
			FeignContext context, Target.HardCodedTarget<T> target) {
			//非Hystrix的进入这个
		if (!(feign instanceof feign.hystrix.HystrixFeign.Builder)) {
			//看这个target方法
			return feign.target(target);
		}
		//后面的是开启了Hystrix的逻辑就不看了
		...
	}

public <T> T target(Target<T> target) {
		//先build
      return build().newInstance(target);
    }
public Feign build() {
      SynchronousMethodHandler.Factory synchronousMethodHandlerFactory =
          new SynchronousMethodHandler.Factory(client, retryer, requestInterceptors, logger,
              logLevel, decode404, closeAfterDecode, propagationPolicy);
      ParseHandlersByName handlersByName =
          new ParseHandlersByName(contract, options, encoder, decoder, queryMapEncoder,
              errorDecoder, synchronousMethodHandlerFactory);
      return new ReflectiveFeign(handlersByName, invocationHandlerFactory, queryMapEncoder);
    }
最终创建的JDK动态代理对象如下
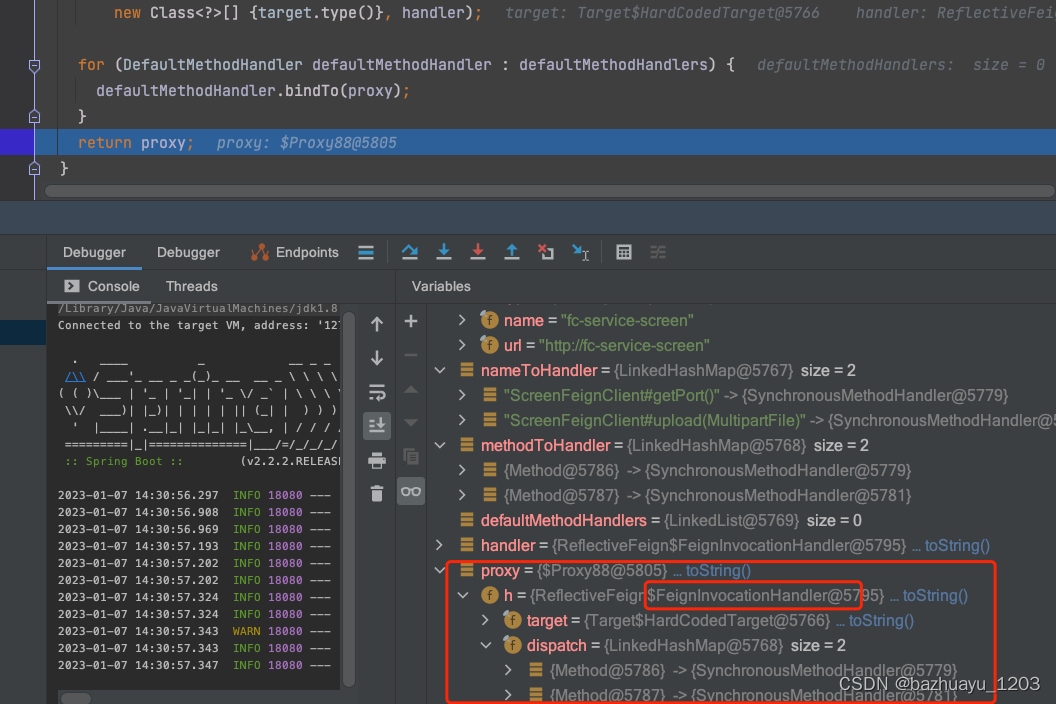
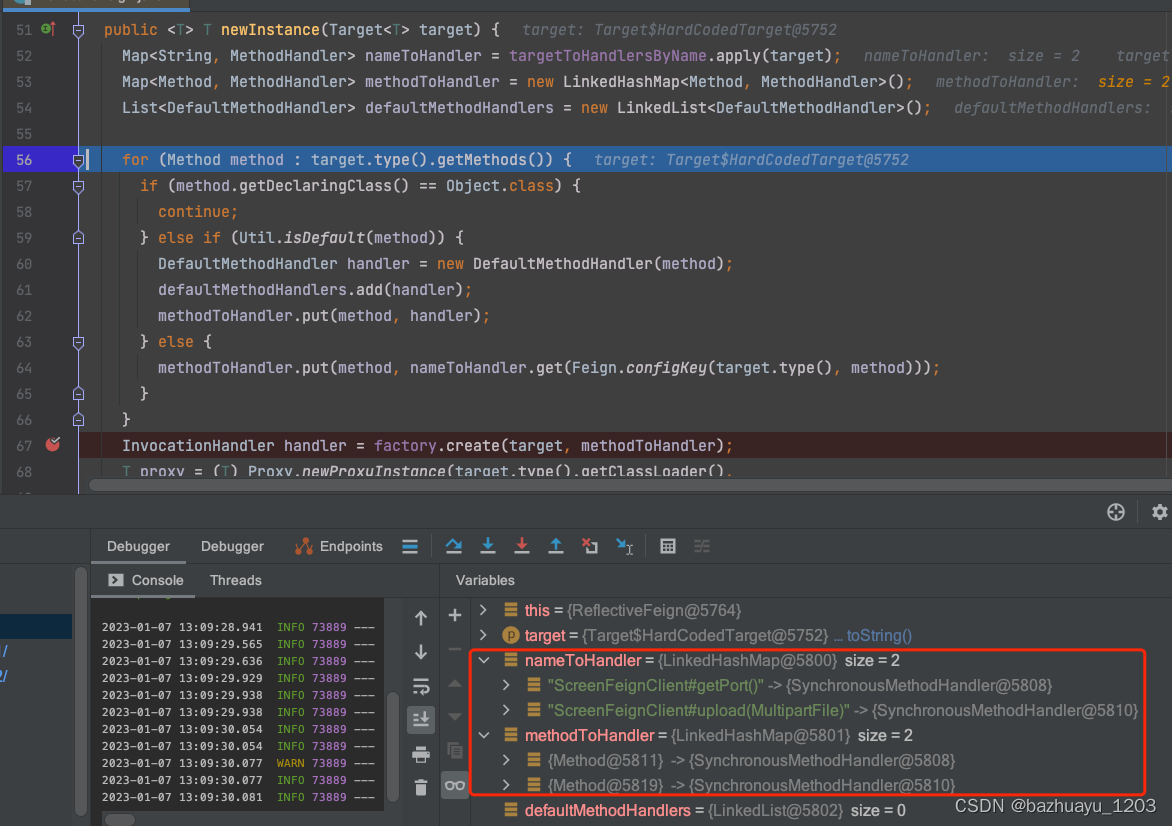
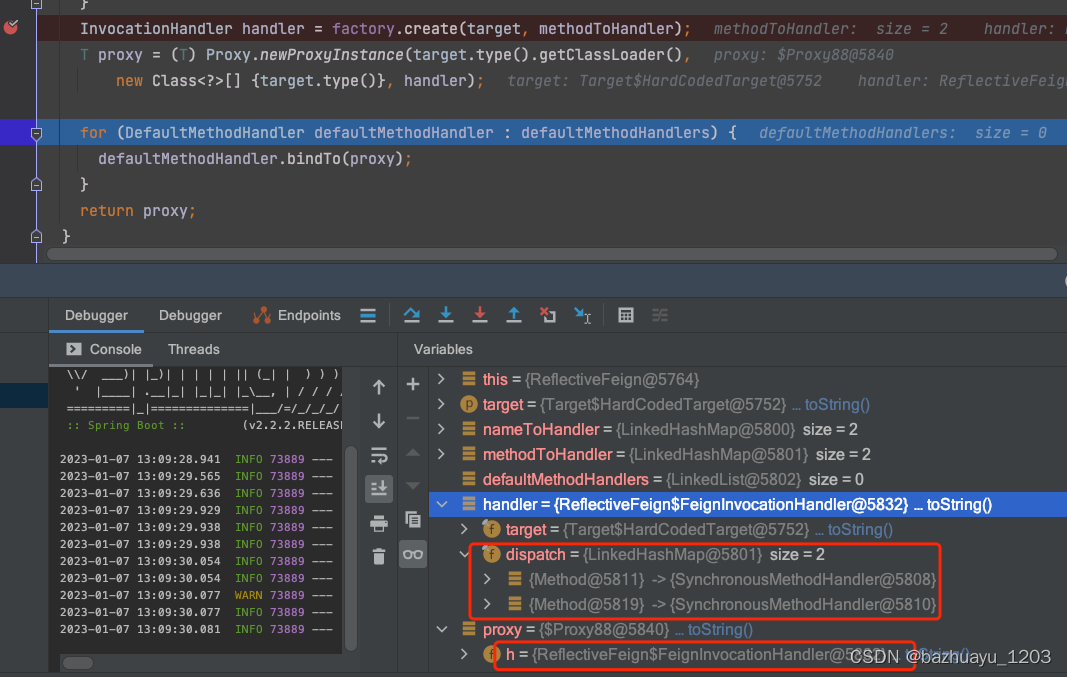
可以看到如果Feign开启了Hystrix支持,创建的动态代理对象的InvocationHandler为HystrixInvocationHandler,
没有开启Hystrix支持,创建的动态代理对象的InvocationHandler为FeignInvocationHandler
Feign动态代理处理请求的核心源码
我先关闭掉Feign的Hystrix支持,配置文件设置feign.hystrix.enabled=flase,然后再打断点跟下源码,上面分析也知道对FeignClient的函数调用会进入动态代理对象的FeignInvocationHandler的invoke()方法,我们看下它的源码
FeignInvocationHandler#invoke
@Override
    public Object invoke(Object proxy, Method method, Object[] args) throws Throwable {
      if ("equals".equals(method.getName())) {
        try {
          Object otherHandler =
              args.length > 0 && args[0] != null ? Proxy.getInvocationHandler(args[0]) : null;
          return equals(otherHandler);
        } catch (IllegalArgumentException e) {
          return false;
        }
      } else if ("hashCode".equals(method.getName())) {
        return hashCode();
      } else if ("toString".equals(method.getName())) {
        return toString();
      }
		//重点是这里,其实就是根据调用方法名找到对应的SynchronousMethodHandler的invoke()方法
      return dispatch.get(method).invoke(args);
    }
那么我们继续看SynchronousMethodHandler的invoke()方法源码
@Override
  public Object invoke(Object[] argv) throws Throwable {
  //根据方法参数创建RequestTemplate 请求模板的实例对象,这里面包含解析
    RequestTemplate template = buildTemplateFromArgs.create(argv);
    Options options = findOptions(argv);
    Retryer retryer = this.retryer.clone();
    while (true) {
      try {
      //重点在这里
        return executeAndDecode(template, options);
      } catch (RetryableException e) {
        try {
          retryer.continueOrPropagate(e);
        } catch (RetryableException th) {
          。。。
        continue;
      }
    }
  }
Contract组件解析@RequestParam等SpringMVC注解绑定到HTTP请求参数源码
RequestTemplate template = buildTemplateFromArgs.create(argv);
看这行代码,它里面有Contract组件解析SpringMVC的注解比如@RequestParam,将请求的入参绑定到HTTP请求参数里去
@Override
    public RequestTemplate create(Object[] argv) {
    //获取请求中的参数,然后添加到varBuilder中
      RequestTemplate mutable = RequestTemplate.from(metadata.template());
      if (metadata.urlIndex() != null) {
        int urlIndex = metadata.urlIndex();
        checkArgument(argv[urlIndex] != null, "URI parameter %s was null", urlIndex);
        mutable.target(String.valueOf(argv[urlIndex]));
      }
      Map<String, Object> varBuilder = new LinkedHashMap<String, Object>();
      for (Entry<Integer, Collection<String>> entry : metadata.indexToName().entrySet()) {
        int i = entry.getKey();
        Object value = argv[entry.getKey()];
        if (value != null) { // Null values are skipped.
          if (indexToExpander.containsKey(i)) {
            value = expandElements(indexToExpander.get(i), value);
          }
          for (String name : entry.getValue()) {
            varBuilder.put(name, value);
          }
        }
      }
	  //这个resolvr方法就是解析@RequestParam,@PathVariable等注解的
      RequestTemplate template = resolve(argv, mutable, varBuilder);
      if (metadata.queryMapIndex() != null) {
        // add query map parameters after initial resolve so that they take
        // precedence over any predefined values
        Object value = argv[metadata.queryMapIndex()];
        Map<String, Object> queryMap = toQueryMap(value);
        template = addQueryMapQueryParameters(queryMap, template);
      }

      if (metadata.headerMapIndex() != null) {
        template =
            addHeaderMapHeaders((Map<String, Object>) argv[metadata.headerMapIndex()], template);
      }
为了演示效果,我在fc-service-portal加一个接口如下
@GetMapping("/getUser/{id}")
    public User getUser(@PathVariable("id")Integer id,
                        @RequestParam(name = "age", required = false) Integer age) {
        return screenFeignClient.getUser(id, age);
    }

@FeignClient(value = "fc-service-screen", configuration = ScreenFeignConfiguration.class, fallback = ScreenFeignClientHystrix.class)
public interface ScreenFeignClient {

    @GetMapping("/getUser/{id}")
    User getUser(@PathVariable("id")Integer id,
                 @RequestParam(name = "age", required = false) Integer age);
然后fc-service-screen的服务里也加个接口
@GetMapping("/getUser/{id}")
    public User getUser(@PathVariable("id")Integer id,
                        @RequestParam(name = "age", required = false) Integer age) {
        return User.builder().id(id).age(age).name("愉乐人生").build();
    }
重启fc-service-portal和fc-service-screen服务,访问如下请求
http://localhost:8002/getUser/1?age=22
我直接打断点,看下解析后的请求
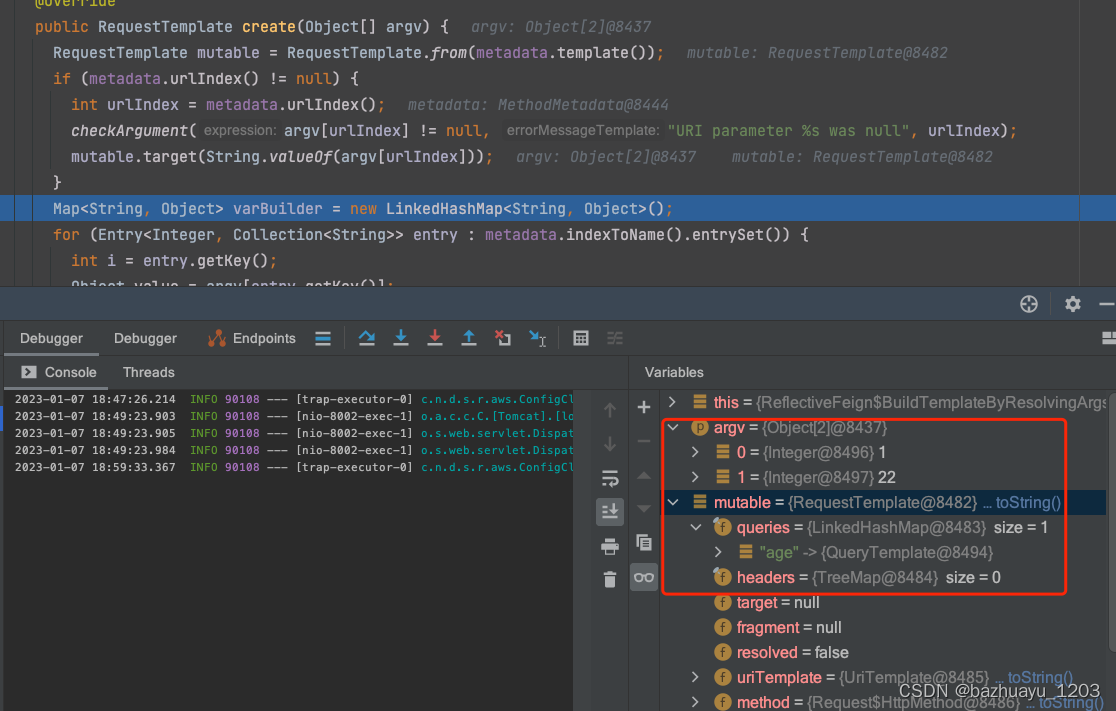
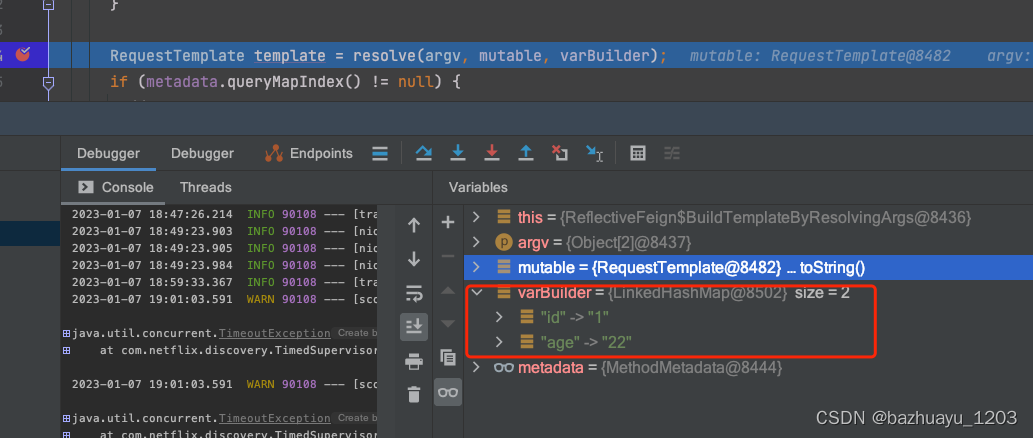
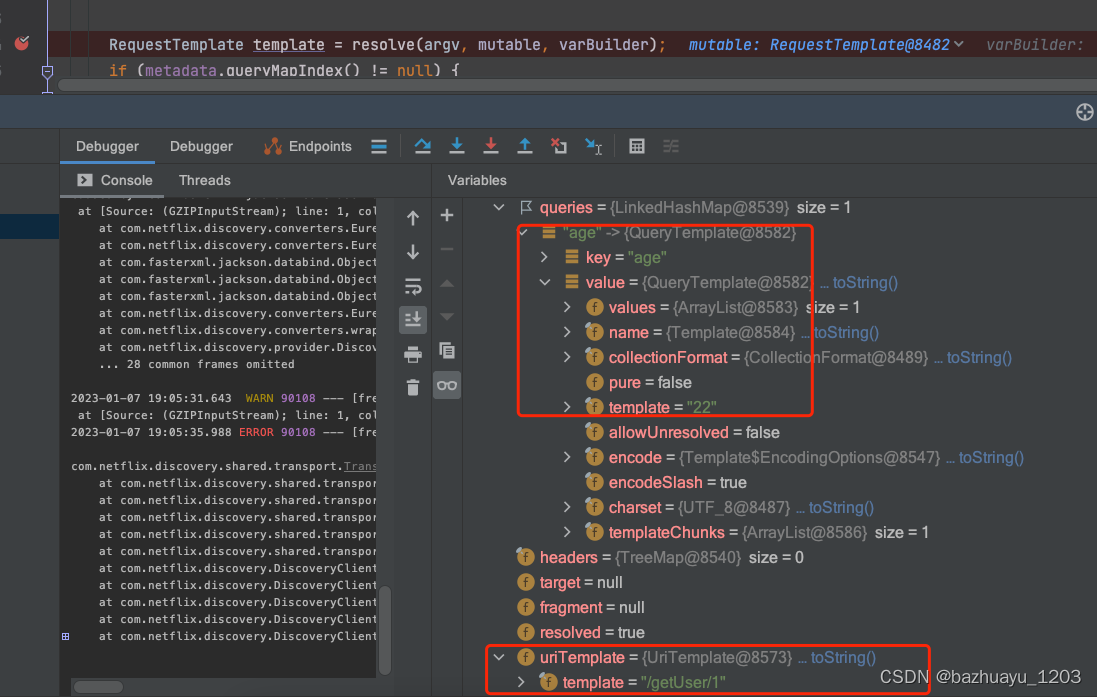
GET /getUser/{id}?age=22 HTTP/1.1
基于SpringMvcContract也会去解析@RequestParam注解,将方法的入参,绑定到http请求参数里去
GET /user/sayHello/1?age=张三 HTTP/1.1
看这个核心方法,看名字就是执行并解码响应
SynchronousMethodHandler#executeAndDecode
Object executeAndDecode(RequestTemplate template, Options options) throws Throwable {
	//执行feign的拦截器
    Request request = targetRequest(template);

    if (logLevel != Logger.Level.NONE) {
      logger.logRequest(metadata.configKey(), logLevel, request);
    }

    Response response;
    long start = System.nanoTime();
    try {
    	//通过LoadBalancerFeignClient执行请求
      response = client.execute(request, options);
    } catch (IOException e) {
      。。。省略
    }
    //如果返回响应正确
      if (response.status() >= 200 && response.status() < 300) {
        if (void.class == metadata.returnType()) {
          return null;
        } else {
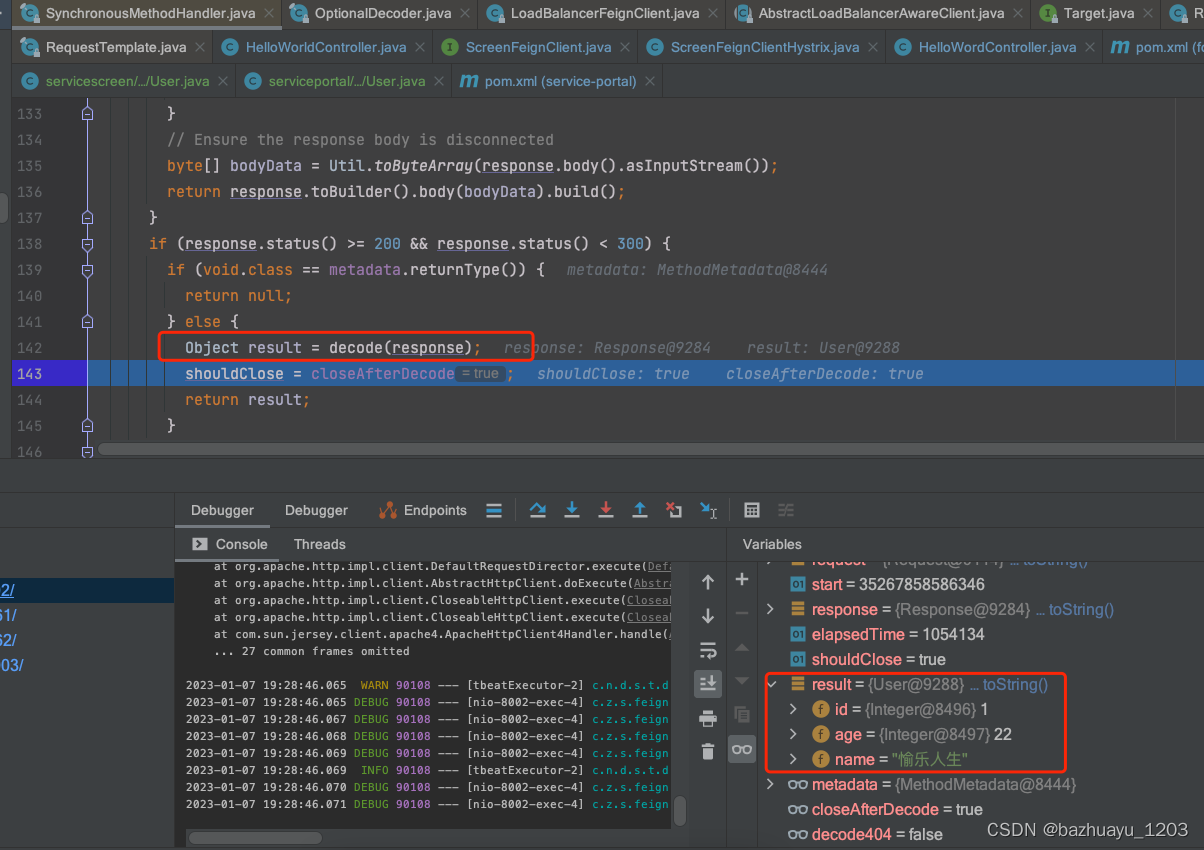
        //通过Decoder解析响应
          Object result = decode(response);
          shouldClose = closeAfterDecode;
          return result;
        }
      } else if (decode404 && response.status() == 404 && void.class != metadata.returnType()) {
        Object result = decode(response);
        shouldClose = closeAfterDecode;
        return result;
      } else {
        throw errorDecoder.decode(metadata.configKey(), response);
      }
    } 。。。
  }
执行Feign拦截器的源码
SynchronousMethodHandler#targetRequest
多个拦截器遍历执行apply()方法
Request targetRequest(RequestTemplate template) {
    for (RequestInterceptor interceptor : requestInterceptors) {
      interceptor.apply(template);
    }
    return target.apply(template);
  }
Feign与Ribbon整合发送HTTP请求的源码
LoadBalancerFeignClient#execute
@Override
	public Response execute(Request request, Request.Options options) throws IOException {
		try {
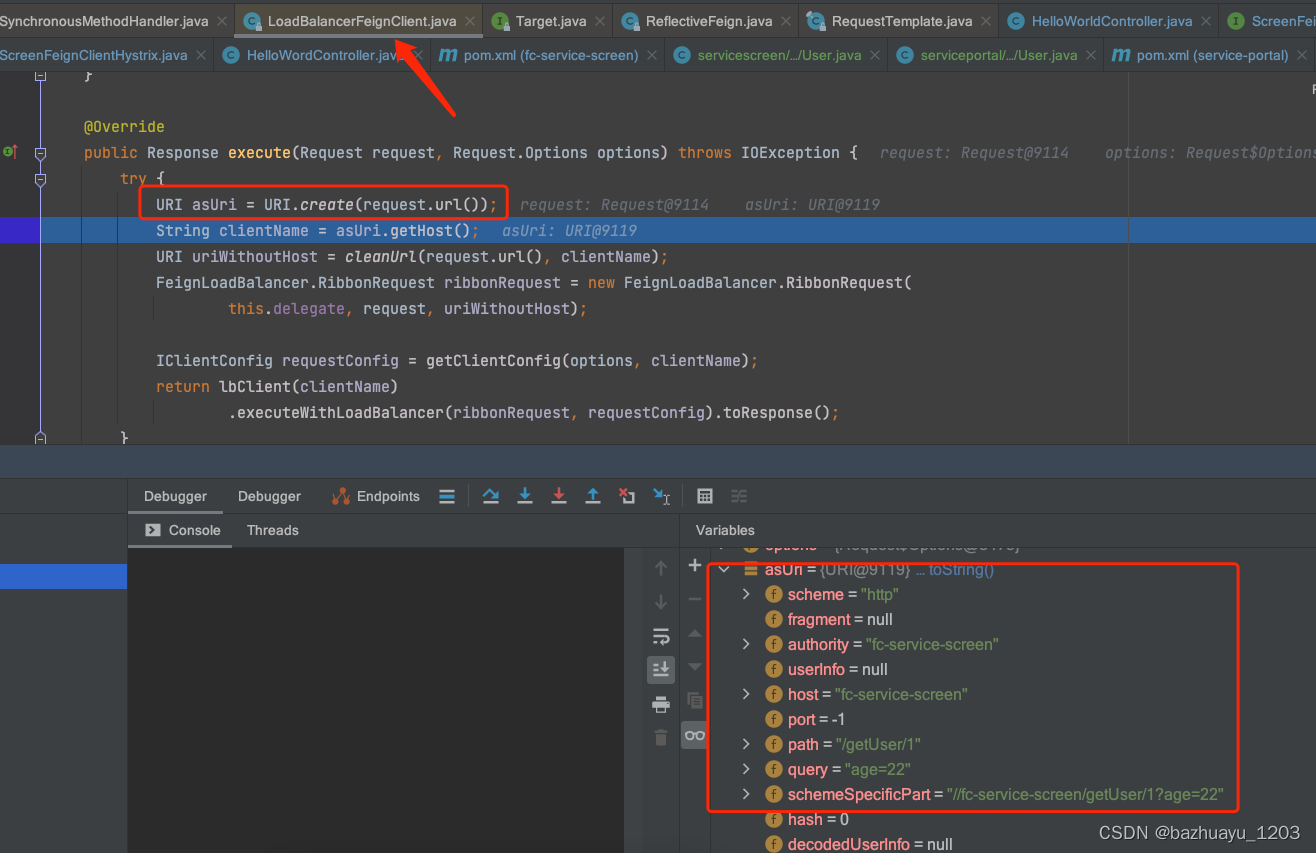
			//到这里asUrl是http://fc-service-screen/getUser/1?age=22
			URI asUri = URI.create(request.url());
			//取出要访问的服务名 clientName是fc-service-screen
			String clientName = asUri.getHost();
			//将请求url中的服务名称给干掉了
			URI uriWithoutHost = cleanUrl(request.url(), clientName);
			//基于去掉服务名的url创建一个符合Ribbon的请求RibbonRequest
			FeignLoadBalancer.RibbonRequest ribbonRequest = new FeignLoadBalancer.RibbonRequest(
					this.delegate, request, uriWithoutHost);
			//获取配置文件Ribbon相关的配置
			IClientConfig requestConfig = getClientConfig(options, clientName);
			//根据服务名创建先创建一个FeignLoadBalancer,然后执行
			return lbClient(clientName)
					.executeWithLoadBalancer(ribbonRequest, requestConfig).toResponse();
		}
		catch (ClientException e) {
			IOException io = findIOException(e);
			if (io != null) {
				throw io;
			}
			throw new RuntimeException(e);
		}
	}
根据服务名创建一个FeignLoadBalancer的源码看下
private FeignLoadBalancer lbClient(String clientName) {
		return this.lbClientFactory.create(clientName);
}

public FeignLoadBalancer create(String clientName) {
 //先从缓存一个Map里获取 Map<String, FeignLoadBalancer> cache = new ConcurrentReferenceHashMap<>();
		FeignLoadBalancer client = this.cache.get(clientName);
		if (client != null) {
			return client;
		}
		IClientConfig config = this.factory.getClientConfig(clientName);
		//这不是Ribbon的核心组件ILoadBalancer吗
		ILoadBalancer lb = this.factory.getLoadBalancer(clientName);
		ServerIntrospector serverIntrospector = this.factory.getInstance(clientName,
				ServerIntrospector.class);
		client = this.loadBalancedRetryFactory != null
				? new RetryableFeignLoadBalancer(lb, config, serverIntrospector,
						this.loadBalancedRetryFactory)
				: new FeignLoadBalancer(lb, config, serverIntrospector);
		this.cache.put(clientName, client);
		return client;
	}
我们打个断点看看
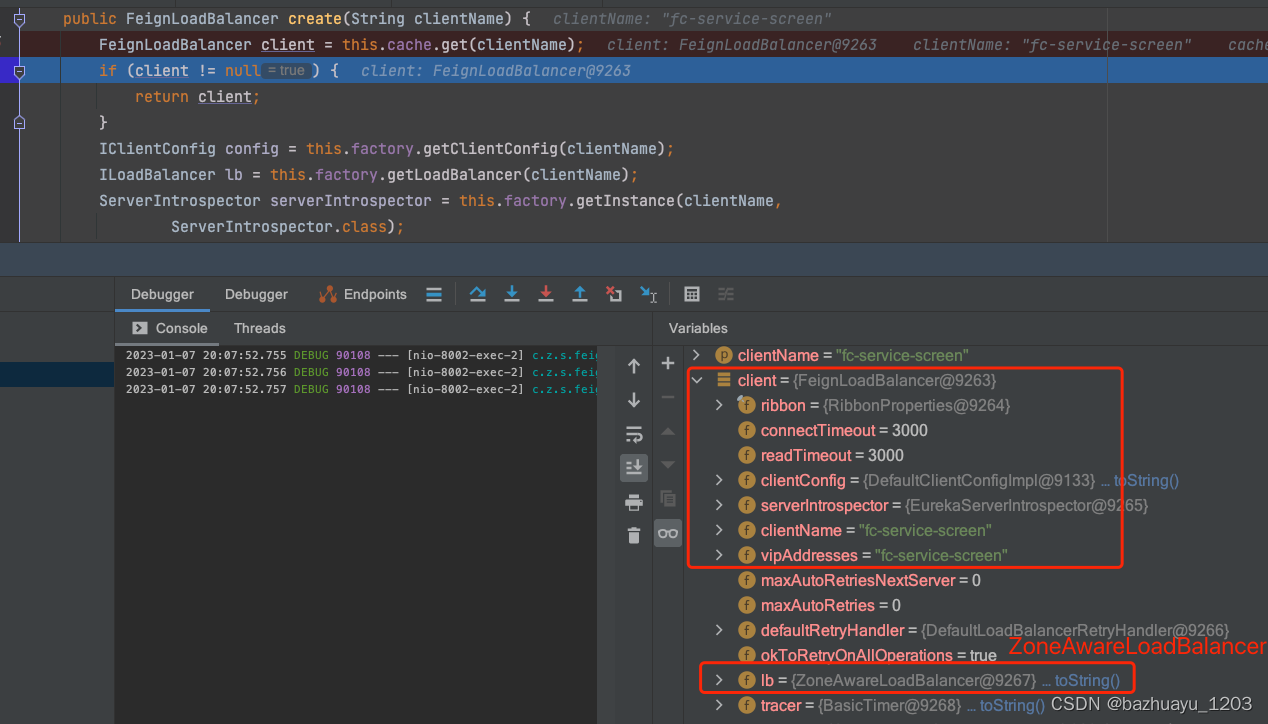
激动,这不是Ribbon默认的ZoneAwareLoadBalancer吗,Ribbon会和Eureka整合获取Eureka的服务注册表
真正发起HTTP请求的源码
FeignLoadBalancer通过Ribbon负载均衡获取要发送请求的server,然后就要发送HTTP请求了
public T executeWithLoadBalancer(final S request, final IClientConfig requestConfig) throws ClientException {
        LoadBalancerCommand<T> command = buildLoadBalancerCommand(request, requestConfig);

        try {
            return command.submit(
                new ServerOperation<T>() {
                    @Override
                    //执行HTTP请求
                    public Observable<T> call(Server server) {
                        URI finalUri = reconstructURIWithServer(server, request.getUri());
                        S requestForServer = (S) request.replaceUri(finalUri);
                        try {
                            return Observable.just(AbstractLoadBalancerAwareClient.this.execute(requestForServer, requestConfig));
                        }
                        catch (Exception e) {
                            return Observable.error(e);
                        }
                    }
                })
                .toBlocking()
                .single();
        } catch (Exception e) {
            Throwable t = e.getCause();
            if (t instanceof ClientException) {
                throw (ClientException) t;
            } else {
                throw new ClientException(e);
            }
        }

    }
这段逻辑由LoadBalancerCommand来执行这段逻辑,LoadBalancerCommand肯定是在某个地方先使用ribbon的ZoneAwareLoadBalancer负载均衡选择出来了一个server,然后将这个server,交给SeerverOpretion中的call()方法去处理
这个call()方法里面,很明显就是发送物理请求最终的一块代码,直接构造出来了具体的http请求的地址,然后基于底层的http通信组件,发送出去了这个请求。应该是ServerOperation对负载均衡选择出来的这个server封装了一下,然后直接基于这个server替换掉请求URL中的fc-service-screen,然后直接拼接出来最终的请求URL地址,然后基于底层的http组件发送请求
获取Ribbon相关配置源码
IClientConfig requestConfig = getClientConfig(options, clientName);
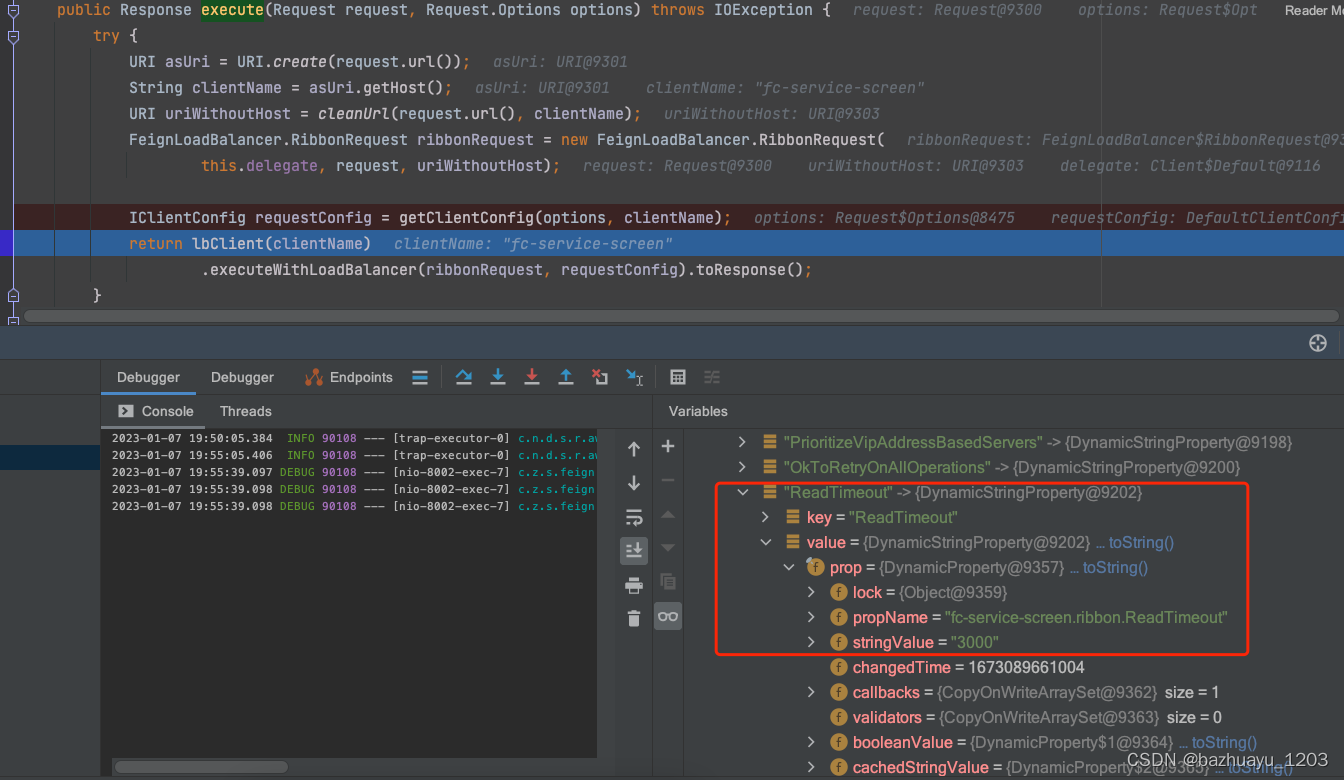
打断点看下Decoder解码器解码响应后的是什么




![学习open62541 --- [73] 数据源造成无法监测变量的问题解决](https://img-blog.csdnimg.cn/883790485f584428b5c1ee8d923b54ba.png)

![[PyTorch笔记]深度学习计算](https://img-blog.csdnimg.cn/570f79bbb804454aa3f8e0a4e5b322f8.png)


![【寒假每日一题】洛谷 P6206 [USACO06OCT] Another Cow Number Game G](https://img-blog.csdnimg.cn/b459940c6c4347b49e1b9f256bf4c3c8.png)


