文章目录
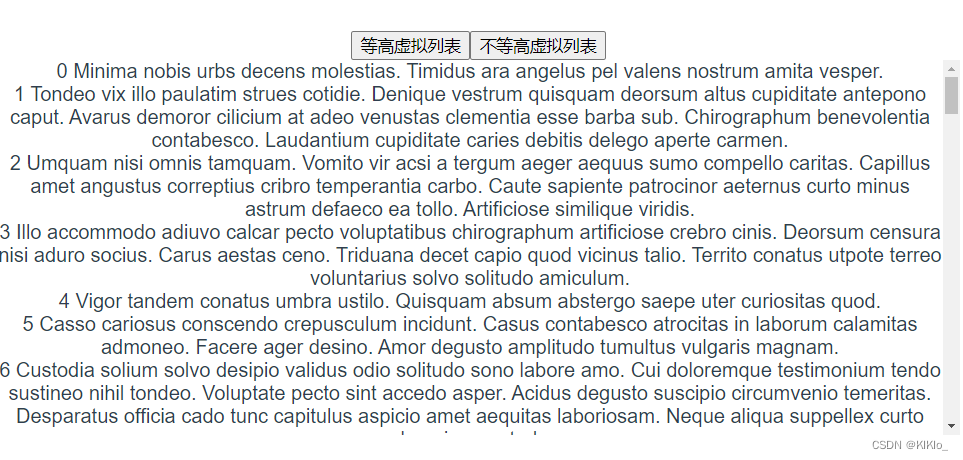
- 1、等高虚拟列表
- 2、非等高虚拟列表
1、等高虚拟列表
参考文章1
参考文章2

<!-- eslint-disable vue/multi-word-component-names -->
<template>
  <div
    class="waterfall-wrapper"
    ref="waterfallWrapperRef"
    @scroll="handleScroll"
  >
    <div :style="scrollStyle">
      <div v-for="item in computedData.items" :key="item.userId">
        {{ item.username }}
      </div>
    </div>
  </div>
</template>

<script setup lang="ts">
import { computed, onMounted, ref } from "vue";
import { sameHighData } from "../data/index";

const itemHeight = 18; //每个item的高度
let itemCount = ref(500); // 设置总共长度为500
const scrollTop = ref(0); // 滚动的高度
const wrapperHeight = ref(0); // 滚动容器的高度
const waterfallWrapperRef = ref();

const list = ref([...sameHighData]);

const handleScroll = (e: any) => {
  // 在content内容中距离content盒子的上部分的滚动距离
  scrollTop.value = e.target.scrollTop;

  // 判断是否接近底部,如果是则加载更多数据
  if (e.target.scrollHeight - e.target.clientHeight - scrollTop.value < 100) {
    getData();
  }
};

const getData = () => {
  list.value = list.value.concat(list.value);
  itemCount.value = list.value.length;
  // scrollBarRef.value.style.height = itemCount.value * itemHeight + "px";
  console.log("发送网络请求", list.value.length);
};

const scrollStyle = computed(() => ({
  height: `${
    itemHeight * (list.value.length - computedData.value.startIndex)
  }px`,
  transform: `translateY(${itemHeight * computedData.value.startIndex}px)`,
}));

// 这里不使用方法的原因是以来了scrollTop 响应式数据来变更 所以使用computed更方便
const computedData = computed(() => {
  // 可视区域的索引
  const startIndex = Math.floor(scrollTop.value / itemHeight);

  // 设置上缓冲区为2 上缓冲区的索引
  const finialStartIndex = Math.max(0, startIndex - 2);

  // 可视区显示的数量 这里设置了item的高度为50
  const numVisible = Math.floor(wrapperHeight.value / itemHeight);

  // 设置下缓冲区的结束索引 上缓冲区也设置为2
  const endIndex = Math.min(itemCount.value, startIndex + numVisible + 2);

  // 将上缓冲区到下缓冲区的数据返回
  const items: any = [];

  // contentWrapRef.value!.style.height = finialStartIndex * itemHeight + "px";
  for (let i = finialStartIndex; i < endIndex; i++) {
    const item = {
      ...list.value[i],
      top: itemHeight * i + "px",
      transform: `translateY(${itemHeight * i + "px"})`,
    };
    items.push(item);
  }
  console.log(startIndex);

  return { items, startIndex };
});

onMounted(() => {
  // 在页面一挂载就获取滚动区域的高度
  if (waterfallWrapperRef.value) {
    wrapperHeight.value = waterfallWrapperRef.value?.clientHeight;
  }
});
</script>

<style scoped>
.waterfall-wrapper {
  height: 500px;
  overflow: hidden;
  overflow-y: scroll;
  position: relative;
  .scroll-bar {
    width: 100%;
    position: absolute;
  }
}
</style>
2、非等高虚拟列表
参考链接
非等高序列列表的实现逻辑并没有通过相对定位的方式,而是通过设置translateY来实现滚动
思路:
- 难点1:每个元素的高度不一样,没办法直接计算出容器的高度
-
- 容器高度的作用是足够大 可以让用户进行滚动,所以我们可以直接假设每一个元素的高度
需要保证预测的 item 高度尽量比真实的每一项 item 的高度要小或者接近所有 item 高度的平均值
- 容器高度的作用是足够大 可以让用户进行滚动,所以我们可以直接假设每一个元素的高度
- 难点2: 每个元素高度不一样,top值不能通过
count * index算出来 - 难点3: 每个元素高度不一样,不能通过
scrollTop * size计算出已经滚动的元素个数,很难获取可视区的起始索引 -
- 难度2和难度3的解决方案是先把数据渲染到页面上 之后再通过 获取正式dom的高度 来计算
- 难度2和难度3的解决方案是先把数据渲染到页面上 之后再通过 获取正式dom的高度 来计算
<template>
  <div
    class="waterfall-wrapper"
    ref="waterfallWrapperRef"
    @scroll="handleScroll"
  >
    <!-- 内容显示的区域 -->
    <div ref="listRef" :style="scrollStyle">
      <div v-for="(item, index) in computedData" :key="index">
        {{ index }} {{ item.sentence }}
      </div>
    </div>
  </div>
</template>
- 1、先确定预测的item高度和数据
- 2、获取滚动区域的高度且计算容器最大容量
onMounted(async () => {
  // 在页面一挂载就获取滚动区域的高度
  if (waterfallWrapperRef.value) {
    wrapperHeight.value = waterfallWrapperRef.value?.clientHeight;
    // 预测容器最多显示多少个元素
    maxCount.value = Math.ceil(wrapperHeight.value / estimatedHeight) + 1;
    await nextTick();

    // 先把数据显示再页面上
    initData();
    setItemHeight();
  }
});
- 3、引用一个新的变量来存放实际的dom和
预测结果和实际的偏差高度
interface IPosInfo {
  // 当前pos对应的元素索引
  index: number;
  // 元素顶部所处位置
  top: number;
  // 元素底部所处位置
  bottom: number;
  // 元素高度
  height: number;
  // 自身对比高度差:判断是否需要更新
  dHeight: number;
}
- 4、初始化预测的dom
参考逻辑
function initPosition() {
  const pos: IPosInfo[] = [];
	//  将获取到的数据全部进行初始化
  for(let i = 0; i < props.dataSource.length; i++) {
    pos.push({
      index: item.id,
      height: props.estimatedHeight, // 使用预测高度先填充 positions
      top: item.id * props.estimatedHeight,
      bottom: (item.id + 1) * props.estimatedHeight,
      dHeight: 0,
    })
  }
  positions.value = pos;
}
实际代码
// 初始化数据
const initData = () => {
  const items: IPosInfo[] = [];
  // 获取需要更新位置的dom长度 即新增加的数据
  const len = list.value.length - preLen.value;
  // 已经处理好位置的长度
  const currentLen = initList.value.length;

  // 可以用三元运算符是因为初始化的时候initList的数值是空的
  const preTop = initList.value[currentLen - 1]
    ? initList.value[currentLen - 1].top
    : 0;
  const preBottom = initList.value[currentLen - 1]
    ? initList.value[currentLen - 1].bottom
    : 0;

  for (let i = 0; i < len; i++) {
    const currentIndex = preLen.value + i;
    // 获取当前要初始化的item
    const item: DiffHigh = list.value[currentIndex];
    items.push({
      id: item.id,
      height: estimatedHeight, // 刚开始不知道他高度 所以暂时先设置为预置的高度
      top: preTop
        ? preTop + i * estimatedHeight
        : currentIndex * estimatedHeight,
      // 元素底部所处位置 这里获取的是底部的位置 所以需要+1
      bottom: preBottom
        ? preBottom + (i + 1) * estimatedHeight
        : (currentIndex + 1) * estimatedHeight,
      // 高度差:判断是否需要更新
      dHeight: 0,
    });
  }
  initList.value = [...initList.value, ...items];
  preLen.value = list.value.length;
};
- 5、更新实际的数据,拿到实际的数据高度
-
- 通过 ref 获取到 list DOM,进而获取到它的 children
-
- 遍历 children,针对于每一个 DOM item 获取其高度信息,通过其 id 属性找到 positions 中对应的 item,更新该 item 信息
// 数据渲染之后更新item的真实高度
const setItemHeight = () => {
  const nodes = listRef.value.children;

  if (!nodes.length) return;

  //  Array.from(nodes): 使用 Array.from() 方法,其中 nodes 是一个类数组对象。
  // [...nodes]: 使用数组解构语法,其中 nodes 是一个可迭代对象,例如 NodeList。
  // 1、遍历节点并获取位置信息
  // 2、更新节点高度和位置信息:
  // 这里只更新了视图上的bottom 没有更新top的数值 而且只更新视图上面显示的,并没有更新整个列表,因为height发生了改变视图以外的数据也发生了变化 需要同步修改
  [...nodes].forEach((node: Element, index: number) => {
    const rect = node.getBoundingClientRect();
    const item = initList.value[startIndex.value + index];
    const dHeight = item?.height - rect?.height;
    if (dHeight) {
      item.height = rect.height;
      item.bottom = item.bottom - dHeight;
      item.dHeight = dHeight;
    }
  });
  // 3、将当前 item 的 dHeight 进行累计,之后再重置为 0 (更新后就不再存在高度差了)
  const len = initList.value.length;
  let startHeight = initList.value[startIndex.value]?.dHeight;
  if (startHeight) {
    initList.value[startIndex.value].dHeight = 0;
  }
	// 从渲染视图的第二个开始处理
	// 实际上第一项的 top 值为 0,bottom 值在上轮也更新过了,所以遍历的时候我们从第二项开始
  for (let i = startIndex.value + 1; i < len; i++) {
    const item = initList.value[i];
    item.top = initList.value[i - 1].bottom;
    item.bottom = item.bottom - startHeight;
    if (item.dHeight !== 0) {
      startHeight += item.dHeight;
      item.dHeight = 0;
    }
  }
  // 设置 list 高度
  listHeight.value = initList.value[len - 1].bottom;
};
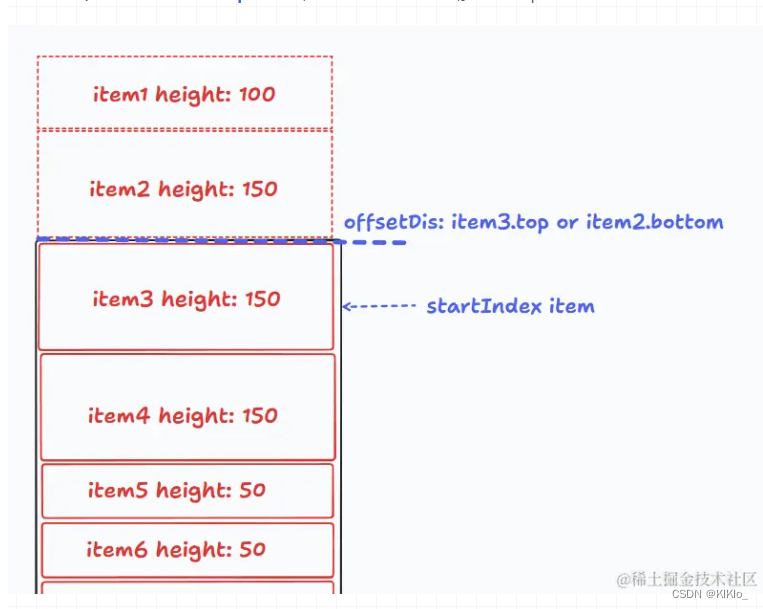
- 6、设置滚动
// 已经滚动的距离
const offsetDis = computed(() =>
  startIndex.value > 0 ? initList.value[startIndex.value - 1]?.bottom : 0
);

const scrollStyle = computed(() => ({
  height: `${listHeight.value - offsetDis.value}px`,
  transform: `translateY(${offsetDis.value}px)`,
}));
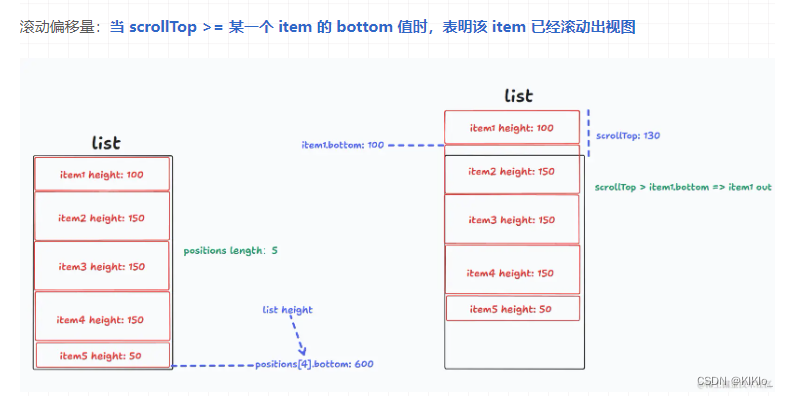
- 7、滚动事件和 startIndex 计算
-
- 如何判断一个 item 滚出视图?这个问题在最早就提到过了,只需要看它的 bottom <= scrollTop
-
- 现在就好办了,我们可以遍历 positions 数组找到第一个 item.bottom >= scrollTop 的 item,它就是 startIndex 所对应的 item,那 startIndex 就拿到了
-
- 这里再补充一个细节,在 initList 数组中 item.bottom 一定是递增的,而我们现在想要做的是查找操作,有序递增 + 查找 = 二分查找
// 二分查找 找到可视区域的索引startIndex
const getStartIndex = (list: any, value: number) => {
  let left = 0,
    right = list.length - 1,
    templateIndex = -1;

  while (left < right) {
    const mid = Math.floor((left + right) / 2);
    const midValue = list[mid].bottom;
    // 如果找到了就用找到的索引 + 1 作为 startIndex,因为找到的 item 是它的 bottom 与 scrollTop 相等,即该 item 已经滚出去了
    if (midValue === value) return mid + 1;
    else if (midValue < value) left = mid + 1;
    else if (midValue > value) {
      if (templateIndex == -1 || templateIndex > mid) {
        templateIndex = mid;
      }
      right = mid;
    }
  }
  return templateIndex;
};
- 8、每次 startIndex 改变,不仅会改变 renderList 的计算,我们还需要重新计算 item 信息
watch(
  () => startIndex.value,
  () => {
    setItemHeight();
  }
);
<!-- eslint-disable vue/multi-word-component-names -->
<template>
  <div
    class="waterfall-wrapper"
    ref="waterfallWrapperRef"
    @scroll="handleScroll"
  >
    <!-- 内容显示的区域 -->
    <div ref="listRef" :style="scrollStyle">
      <div v-for="(item, index) in computedData" :key="index">
        {{ index }} {{ item.sentence }}
      </div>
    </div>
  </div>
</template>

<script setup lang="ts">
import { computed, nextTick, onMounted, ref, watch } from "vue";
import { sameDiffData } from "../data/index";

interface IPosInfo {
  // 当前pos对应的元素索引
  id: number;
  // 元素顶部所处位置
  top: number;
  // 元素底部所处位置
  bottom: number;
  // 元素高度
  height: number;
  // 高度差:判断是否需要更新
  dHeight: number;
}

interface DiffHigh {
  id: number;
  sentence: string;
}

const waterfallWrapperRef = ref();
const listRef = ref();

const estimatedHeight = 60; // 设置预估的高度为100
let itemCount = ref(500); // 设置总共长度为500
const scrollTop = ref(0); // 滚动的高度
const wrapperHeight = ref(0); // 滚动容器的高度
const preLen = ref(0); // 因为每次处理数值的时候都需要处理全部数据 这个用来记录已经处理的数据

const list = ref<DiffHigh[]>([...sameDiffData]);
const initList = ref<IPosInfo[]>([]); // 用来存放已经处理好位置的数据
const listHeight = ref(0); // 列表的高度

const startIndex = ref(0);
const maxCount = ref(0);

const endIndex = computed(() =>
  Math.min(list.value.length, startIndex.value + maxCount.value + 2)
);

const computedData = computed(() =>
  list.value.slice(Math.max(0, startIndex.value - 2), endIndex.value)
);

// 已经滚动的距离
const offsetDis = computed(() =>
  startIndex.value > 0 ? initList.value[startIndex.value - 1]?.bottom : 0
);

const scrollStyle = computed(() => ({
  height: `${listHeight.value - offsetDis.value}px`,
  transform: `translateY(${offsetDis.value}px)`,
}));

const handleScroll = (e: any) => {
  scrollTop.value = e.target.scrollTop;

  // 在content内容中距离content盒子的上部分的滚动距离
  // 在开始滚动之后获取startIndex
  startIndex.value = getStartIndex(initList.value, scrollTop.value);
  console.log(startIndex.value, "-0-");
  // 判断是否接近底部,如果是则加载更多数据
  if (e.target.scrollHeight - e.target.clientHeight - scrollTop.value < 100) {
    getMoreData();
  }
};

watch(
  () => startIndex.value,
  () => {
    setItemHeight();
  }
);

const getMoreData = async () => {
  list.value = list.value.concat(list.value);
  await nextTick();
  initData();
  setItemHeight();
};

// 二分查找 找到可视区域的索引startIndex
const getStartIndex = (list: any, value: number) => {
  let left = 0,
    right = list.length - 1,
    templateIndex = -1;

  while (left < right) {
    const mid = Math.floor((left + right) / 2);
    const midValue = list[mid].bottom;
    if (midValue === value) return mid + 1;
    else if (midValue < value) left = mid + 1;
    else if (midValue > value) {
      if (templateIndex == -1 || templateIndex > mid) {
        templateIndex = mid;
      }
      right = mid;
    }
  }
  return templateIndex;
};

// 初始化数据
const initData = () => {
  const items: IPosInfo[] = [];
  // 获取需要更新位置的dom长度
  const len = list.value.length - preLen.value;
  // 已经处理好位置的长度
  const currentLen = initList.value.length;

  // 可以用三元运算符是因为初始化的时候initList的数值是空的
  const preTop = initList.value[currentLen - 1]
    ? initList.value[currentLen - 1].top
    : 0;
  const preBottom = initList.value[currentLen - 1]
    ? initList.value[currentLen - 1].bottom
    : 0;

  for (let i = 0; i < len; i++) {
    const currentIndex = preLen.value + i;
    // 获取当前要初始化的item
    const item: DiffHigh = list.value[currentIndex];
    items.push({
      id: item.id,
      height: estimatedHeight, // 刚开始不知道他高度 所以暂时先设置为预置的高度
      top: preTop
        ? preTop + i * estimatedHeight
        : currentIndex * estimatedHeight,
      // 元素底部所处位置 这里获取的是底部的位置 所以需要+1
      bottom: preBottom
        ? preBottom + (i + 1) * estimatedHeight
        : (currentIndex + 1) * estimatedHeight,
      // 高度差:判断是否需要更新
      dHeight: 0,
    });
  }
  initList.value = [...initList.value, ...items];
  preLen.value = list.value.length;
};

// 数据渲染之后更新item的真实高度
const setItemHeight = () => {
  const nodes = listRef.value.children;

  if (!nodes.length) return;

  //  Array.from(nodes): 使用 Array.from() 方法,其中 nodes 是一个类数组对象。
  // [...nodes]: 使用数组解构语法,其中 nodes 是一个可迭代对象,例如 NodeList。
  // 1、遍历节点并获取位置信息
  // 2、更新节点高度和位置信息:
  [...nodes].forEach((node: Element, index: number) => {
    const rect = node.getBoundingClientRect();
    const item = initList.value[startIndex.value + index];
    const dHeight = item?.height - rect?.height;
    if (dHeight) {
      item.height = rect.height;
      item.bottom = item.bottom - dHeight;
      item.dHeight = dHeight;
    }
  });
  // 3、将当前 item 的 dHeight 进行累计,之后再重置为 0 (更新后就不再存在高度差了)
  const len = initList.value.length;
  let startHeight = initList.value[startIndex.value]?.dHeight;
  if (startHeight) {
    initList.value[startIndex.value].dHeight = 0;
  }

  for (let i = startIndex.value + 1; i < len; i++) {
    const item = initList.value[i];
    item.top = initList.value[i - 1].bottom;
    item.bottom = item.bottom - startHeight;
    if (item.dHeight !== 0) {
      startHeight += item.dHeight;
      item.dHeight = 0;
    }
  }
  // 设置 list 高度
  listHeight.value = initList.value[len - 1].bottom;
};

onMounted(async () => {
  // 在页面一挂载就获取滚动区域的高度
  if (waterfallWrapperRef.value) {
    wrapperHeight.value = waterfallWrapperRef.value?.clientHeight;
    // 预测容器最多显示多少个元素
    maxCount.value = Math.ceil(wrapperHeight.value / estimatedHeight) + 1;
    await nextTick();

    // 先把数据显示再页面上
    initData();
    setItemHeight();
  }
});
</script>

<style scoped>
.waterfall-wrapper {
  height: 300px;
  /* overflow: hidden; */
  overflow-y: scroll;
  /* position: relative; */
  .scroll-bar {
    width: 100%;
  }
}
</style>


![猫头虎分享已解决Bug || RuntimeError: size mismatch, m1: [32 x 100], m2: [500 x 10]](https://img-blog.csdnimg.cn/direct/aa86eef0d81e4f279688a772e92ea3bc.webp#pic_center)