路由
- 理解: 一个路由(route)就是一组映射关系(key - value),多个路由需要路由器(router)进行管理。
- 前端路由:key是路径,value是组件。
1.基本使用
-
安装vue-router,命令:
npm i vue-router -
应用插件(在main.js中):
// 引入Vue import Vue from 'vue' // 引入所有组件的父组件App import App from './App' //引入VueRouter import VueRouter from 'vue-router' // 引入路由器(在new Vue中router赋值) import router from './router' // 关闭生产提示 Vue.config.productionTip = false // 应用插件 Vue.use(VueRouter) // 创建vm new Vue({ // el:'#app', render: h => h(App), router:router }).$mount('#app') -
编写router配置项(新建一个js文件,引入到main.js中Vue中的router):
//引入VueRouter import VueRouter from 'vue-router' //引入Luyou 组件 import About from '../components/About' import Home from '../components/Home' //创建router实例对象,去管理一组一组的路由规则 const router = new VueRouter({ routes:[ { path:'/about', component:About }, { path:'/home', component:Home } ] }) //暴露router export default router -
(替换a标签)实现切换(active-class可配置高亮样式,to中为第3步中路由的path)
<div class="list-group"> <!-- 原始html中我们使用a标签实现页面的跳转 --> <!-- <a class="list-group-item active" href="./about.html">About</a> <a class="list-group-item" href="./home.html">Home</a> --> <!-- Vue中借助router-link标签实现路由的切换 --> <router-link class="list-group-item" active-class="active" to="/about">About</router-link> <router-link class="list-group-item" active-class="active" to="/home">Home</router-link> </div> -
指定展示位置
<!-- 指定组件的呈现位置 --> <router-view></router-view> -
举例
<template>
  <div>
    <div class="row">
      <div class="col-xs-offset-2 col-xs-8">
        <div class="page-header"><h2>Vue Router Demo</h2></div>
      </div>
    </div>
    <div class="row">
      <div class="col-xs-2 col-xs-offset-2">
        <div class="list-group">
         <!-- 原始html中我们使用a标签实现页面的跳转 -->
          <!-- <a class="list-group-item active" href="./about.html">About</a>
          <a class="list-group-item" href="./home.html">Home</a> -->

          <!-- Vue中借助router-link标签实现路由的切换 -->
          <router-link class="list-group-item" active-class="active" to="/about">About</router-link>
          <router-link class="list-group-item" active-class="active" to="/home">Home</router-link>
        </div>
      </div>
      <div class="col-xs-6">
        <div class="panel">
          <div class="panel-body">
            <!-- 指定组件的呈现位置 -->
            <router-view></router-view>
          </div>
        </div>
      </div>
    </div>
  </div>
</template>
2.几个注意点
- 路由组件通常存放在
pages文件夹,一般组件通常存放在components文件夹。 - 通过切换,“隐藏”了的路由组件,默认是被销毁掉的,需要的时候再去挂载。
- 每个组件都有自己的
$route属性,里面存储着自己的路由信息。 - 整个应用只有一个router,可以通过组件的
$router属性获取到。
3.多级路由(多级路由)
-
配置路由规则,使用children配置项:
routes:[ { path:'/about', component:About, }, { path:'/home', component:Home, children:[ //通过children配置子级路由 { path:'news', //此处一定不要写:/news component:News }, { path:'message',//此处一定不要写:/message component:Message } ] } ] -
跳转(要写完整路径):
<router-link to="/home/news">News</router-link>
4.路由的query参数
-
传递参数
<!-- 跳转并携带query参数,to的字符串写法 --> <router-link :to="/home/message/detail?id=666&title=你好">跳转</router-link> <!-- 跳转并携带query参数,to的对象写法 --> <router-link :to="{ path:'/home/message/detail', query:{ id:666, title:'你好' } }" >跳转</router-link> -
接收参数:
 <template>
 	<ul>
 		<li>消息编号:{{ this.$route.query.id }}</li>
 		<li>消息标题:{{ this.$route.query.title }}</li>
 	</ul>
 </template>
5.命名路由
-
作用:可以简化路由的跳转。
-
如何使用
-
给路由命名:
{ path:'/demo', component:Demo, children:[ { path:'test', component:Test, children:[ { name:'hello' //给路由命名 path:'welcome', component:Hello, } ] } ] } -
简化跳转:
<!--简化前,需要写完整的路径 -->
<router-link to="/demo/test/welcome">跳转</router-link>

<!--简化后,直接通过名字跳转 -->
<router-link :to="{name:'hello'}">跳转</router-link>

<!--简化写法配合传递参数 -->
<router-link
	:to="{
		name:'hello',
		query:{
		   id:666,
            title:'你好'
		}
	}"
>跳转
</router-link>
-
6.路由的params参数
-
配置路由,声明接收params参数
{ path:'/home', component:Home, children:[ { path:'news', component:News }, { component:Message, children:[ { name:'xiangqing', path:'detail/:id/:title', //使用占位符声明接收params参数 component:Detail } ] } ] } -
传递参数
<!-- 跳转并携带params参数,to的字符串写法 -->
<router-link :to="/home/message/detail/666/你好">跳转</router-link>
<!-- <router-link :to="`/home/message/detail/${m.id}/${m.title}`">{{m.title}}</router-link> -->

<!-- 跳转并携带params参数,to的对象写法 -->
<router-link
	:to="{
		name:'xiangqing',
		params:{
		   id:666,
            title:'你好'
		}
	}"
>跳转</router-link>
特别注意:路由携带params参数时,若使用to的对象写法,则不能使用path配置项,必须使用name配置!
-
接收参数:
 <template>
    <ul>
 	    <li>消息编号:{{ this.$route.params.id }}</li>
 	    <li>消息标题:{{ this.$route.params.title }}</li>
    </ul>
 </template>
7.路由的props配置
作用:让路由组件更方便的收到参数
{
	name:'xiangqing',
	path:'detail/:id',
	component:Detail,

	//第一种写法:props值为对象,该对象中所有的key-value的组合最终都会通过props传给Detail组件
	// props:{a:900}

	//第二种写法:props值为布尔值,布尔值为true,则把路由收到的所有params参数通过props传给Detail组件
	// props:true

	//第三种写法:props值为函数,该函数返回的对象中每一组key-value都会通过props传给Detail组件
	props(route){
		return {
			id:route.query.id,
			title:route.query.title
		}
	}
}
8.<router-link>的replace属性
- 作用:控制路由跳转时操作浏览器历史记录的模式
- 浏览器的历史记录有两种写入方式:分别为
push和replace,push是追加历史记录,replace是替换当前记录。路由跳转时候默认为push - 如何开启
replace模式:<router-link replace ...>About</router-link>
9.编程式路由导航
-
作用:不借助
<router-link>实现路由跳转,让路由跳转更加灵活 -
具体编码:
//$router的两个API
this.$router.push({
	name:'xiangqing',
		params:{
			id:xxx,
			title:xxx
		}
})

this.$router.replace({
	name:'xiangqing',
		params:{
			id:xxx,
			title:xxx
		}
})
this.$router.forward() //前进
this.$router.back() //后退
this.$router.go() //可前进也可后退,在里面填写正数前进,负数后退
10.缓存路由组件
-
作用:让不展示的路由组件保持挂载,不被销毁。
-
具体编码:
 <!-- 缓存多个路由组件 -->
 <!-- <keep-alive :include="['News','Message']">
 	<router-view></router-view>
 </keep-alive> -->

 <!-- 缓存一个路由组件 -->
 <keep-alive include="News">
 	<router-view></router-view>
 </keep-alive>
11.两个新的生命周期钩子
-
作用:路由组件所独有的两个钩子,用于捕获路由组件的激活状态。
-
具体名字:
activated路由组件被激活时触发。deactivated路由组件失活时触发。
-
当你使用了缓存路由组件之后,但是你却想将你定义的定时器等功能给销毁时,即可使用
activated与deactivatedactivated(){ console.log('News组件激活了'); this.times = setInterval(() => { console.log('@'); this.opacity -= 0.01 if(this.opacity <= 0) this.opacity = 1 }, 16) }, deactivated(){ console.log('News组件失活了'); clearInterval(this.times) }
12.路由守卫
-
作用:对路由进行权限控制
-
分类:全局守卫、独享守卫、组件内守卫
-
全局守卫:
//全局前置守卫:初始化时执行、每次路由切换前执行 const router = new VueRouter({ ...... }) router.beforeEach((to,from,next)=>{ console.log('beforeEach',to,from) if(to.meta.isAuth){ //判断当前路由是否需要进行权限控制 if(localStorage.getItem('school') === 'atguigu'){ //权限控制的具体规则 next() //放行 }else{ alert('暂无权限查看') // next({name:'guanyu'}) } }else{ next() //放行 } }) //全局后置守卫:初始化时执行、每次路由切换后执行 router.afterEach((to,from)=>{ console.log('afterEach',to,from) if(to.meta.title){ document.title = to.meta.title //修改网页的title }else{ document.title = 'vue_test' } }) export default router -
独享守卫:
const router = new VueRouter({ mode:'hash', // mode:'history', routes:[ { name:'xinwen', path:'news', component:News, meta:{isAuth:true,title:'新闻'}, beforeEnter:((to,from,next)=>{ console.log('独享路由守卫',to,from ); if(to.meta.isAuth) { //判断是否需要权限 if(localStorage.getItem('school') === '张三学院') { next() //放行 }else { alert('学校名不对,无权查看!') } }else { next() } }) }, ] }) -
组件内守卫(在所需守卫的组件添加即可):
  <script>
     export default {
       name:'About',

       //  通过路由规则,进入该组件时被调用
       beforeRouteEnter (to, from, next) {
          console.log('About--beforeRouteEnter',to,from);
          if(to.meta.isAuth) { //判断是否需要权限
             if(localStorage.getItem('school') === '张三学院') {
                   next() //放行
             }else {
                   alert('学校名不对,无权查看!')
             }
          }else {
             next()
          }
       },

       //  通过路由规则,离开该组件时被调用
       beforeRouteLeave (to, from, next) {
          console.log('About--beforeRouteLeave',to,from);
          next()
       }
     }
  </script>
13.路由器的两种工作模式
-
对于一个url来说,什么是hash值?—— #及其后面的内容就是hash值。
-
hash值不会包含在 HTTP 请求中,即:hash值不会带给服务器。
-
hash模式:
- 地址中永远带着#号,不美观 。
- 若以后将地址通过第三方手机app分享,若app校验严格,则地址会被标记为不合法。
- 兼容性较好。
-
history模式:
- 地址干净,美观 。
- 兼容性和hash模式相比略差。
- 应用部署上线时需要后端人员支持,解决刷新页面服务端404的问题。
-
在路由里设置即可
const router = new VueRouter({
	mode:'hash',
    // mode:'history',
	......
})
ElementUI组件库
ElementUI地址:https://element.eleme.cn/#/zh-CN/component/installation
按需引入
- 在
main.js文件中// 引入Vue import Vue from 'vue' // 引入所有组件的父组件App import App from './App' // 按需引入(使用那个引入那个) import { Button, Row, DatePicker } from 'element-ui'; // 关闭生产提示 Vue.config.productionTip = false //应用ElementUI Vue.component(Button.name, Button); Vue.component('el-row', Row); Vue.component('el-date-picker', DatePicker); // 创建vm new Vue({ // el:'#app', render: h => h(App), }).$mount('#app') - 在
babel.config.js中module.exports = { presets: [ '@vue/cli-plugin-babel/preset', ["@babel/preset-env", { "modules": false }] ], "plugins": [ [ "component", { "libraryName": "element-ui", "styleLibraryName": "theme-chalk" } ] ] } - 之后即可在组件中使用按需引入的组件即可
<template>
  <div>
		<button>原生的按钮</button>
		<input type="text">
		<el-row>
			<el-button>默认按钮</el-button>
			<el-button type="primary">主要按钮</el-button>
			<el-button type="success">成功按钮</el-button>
			<el-button type="info">信息按钮</el-button>
			<el-button type="warning">警告按钮</el-button>
			<el-button type="danger">危险按钮</el-button>
		</el-row>
		<el-date-picker
      type="date"
      placeholder="选择日期">
    </el-date-picker>
		<el-row>
			<el-button icon="el-icon-search" circle></el-button>
			<el-button type="primary" icon="el-icon-s-check" circle></el-button>
			<el-button type="success" icon="el-icon-check" circle></el-button>
			<el-button type="info" icon="el-icon-message" circle></el-button>
			<el-button type="warning" icon="el-icon-star-off" circle></el-button>
			<el-button type="danger" icon="el-icon-delete" circle></el-button>
		</el-row>
  </div>
</template>
按需引入报错
- 如果根据ElementUI组件库的快速上手一步一步引入,将会报以下错误
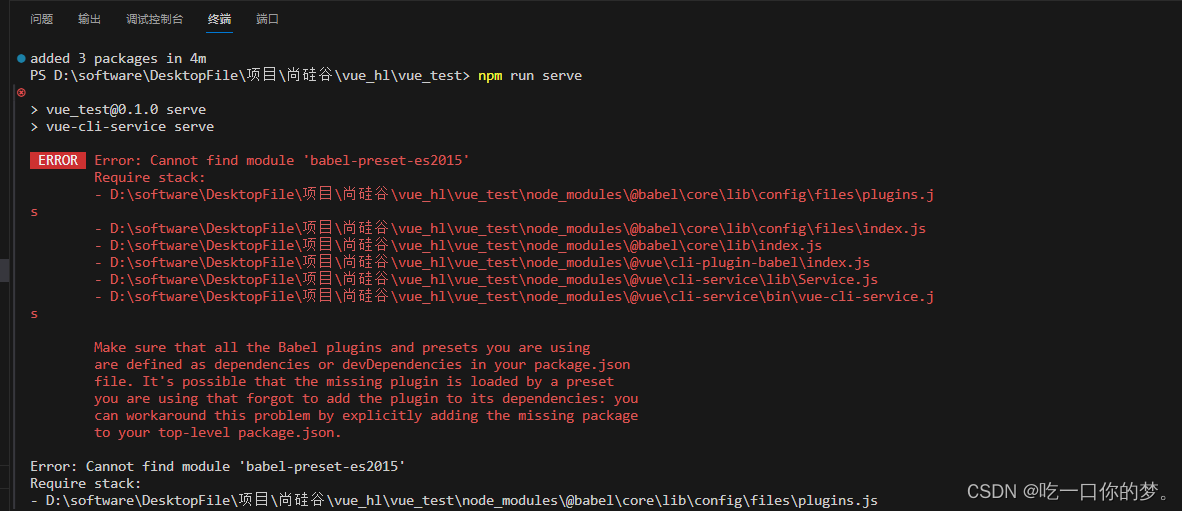
- 在
babel.config.js中将["es2015", { "modules": false }]修改为["@babel/preset-env", { "modules": false }]


![[ACM学习] 进制转换](https://img-blog.csdnimg.cn/direct/e20f57219fba4eb6a23e04e0657d81fc.png)