一、数据集准备
本篇文章使用数千张花卉照片作为数据集,共分为5个分类:雏菊(daisy)、蒲公英(dandelion)、玫瑰(roses)、向日葵(sunflowers)、郁金香(tulips) ,数据集下载地址:
https://storage.googleapis.com/download.tensorflow.org/example_images/flower_photos.tgz
每个分类的图片放在单独的子目录下,下载完毕后解压可以看到如下所示:
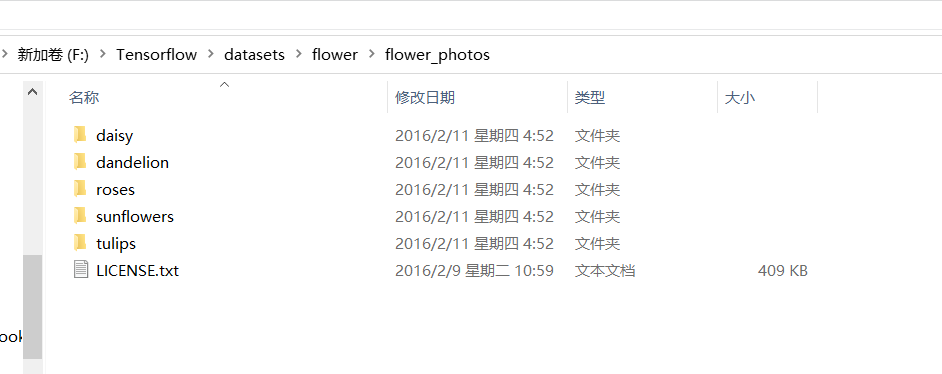
如果想要训练自己的图片,也可以像这样的方式,将每个类别的图片放在相应的子目录下。
下面可以通过 pathlib 工具对目录进行解析,该工具在安装 tensorflow 时会自动安装。
例如:使用 pathlib 查看数据集图片的数量,由于图片都以 jpg 结尾,因此可以以为来过滤:
import pathlib

path = "F:/Tensorflow/datasets/flower/flower_photos"
# 解析目录
data_dir = pathlib.Path(path)
print(len(list(data_dir.glob('*/*.jpg'))))
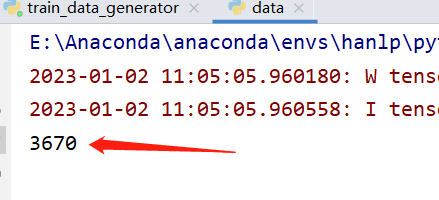
一共包含 3670 张图片,对于我们训练模型来说还是有点少,训练起来很容易出现过拟合,后面在训练前会进行图像的增强。
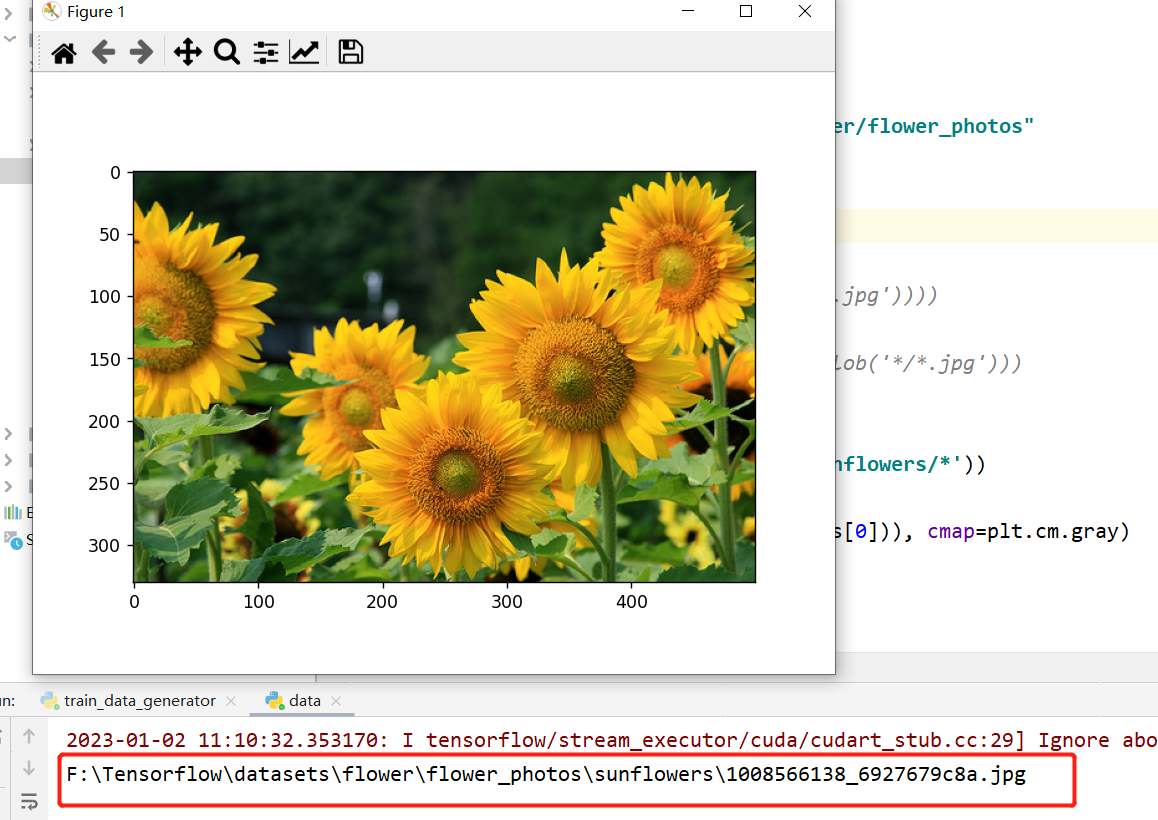
例如再查看向日葵的示例图片:
import pathlib
import matplotlib.pyplot as plt

path = "F:/Tensorflow/datasets/flower/flower_photos"
# 解析目录
data_dir = pathlib.Path(path)
# 查看 向日葵 分类的图片
sunflowers = list(data_dir.glob('sunflowers/*'))
print(str(sunflowers[0]))
plt.imshow(plt.imread(str(sunflowers[0])), cmap=plt.cm.gray)
plt.show()
二、加载数据集
由于 tf2.x 推荐使用 keras 作为上层 API 工具,在 keras 中我们可以使用 image_dataset_from_directory 工具读取图片数据集,并且借助该工具,可以方便的进行数据集的划分、随机打乱、及统一大小操作,避免了自己再对数据集进行繁琐的操作。
使用起来如下所示:
from tensorflow import keras
import pathlib

batch_size = 32
img_height = 180
img_width = 180
class_names = ['daisy', 'dandelion', 'roses', 'sunflowers', 'tulips']
path = "F:/Tensorflow/datasets/flower/flower_photos"
# 解析目录
data_dir = pathlib.Path(path)
train_ds = keras.utils.image_dataset_from_directory(
    directory=data_dir,
    validation_split=0.2,
    subset="training",
    image_size=(img_height, img_width),
    batch_size=batch_size,
    shuffle=True,
    seed=123,
    interpolation='bilinear',
    crop_to_aspect_ratio=True,
    labels='inferred',
    class_names=class_names,
    color_mode='rgb',
)
其中参数表示:
| 参数 | 解释 |
|---|---|
| directory | 数据所在的目录,可以借助第一点的 pathlib 使用。如果labels 是"inferred",它应该包含子目录,每个子目录都包含一个类的图像,否则,目录结构将被忽略。 |
| validation_split | 如果数据集没有提前划分好验证集,可以通过此参数进行划分,0 到 1 之间的可选浮点数,保留用于验证的数据的一部分 |
| subset | “training” 或 “validation” 之一。仅在设置 validation_split 时使用。 |
| image_size | 从磁盘读取图像后调整图像大小的大小。默认为 (256, 256) 。由于管道处理必须具有相同大小的批量图像,因此必须提供这一点。 |
| batch_size | 数据批次的大小。默认值:32。如果 None ,数据将不会被批处理(数据集将产生单个样本)。 |
| shuffle | 是否打乱数据。默认值:真。如果设置为 False,则按字母数字顺序对数据进行排序。 |
| seed | 随机数种子(例如123,一般验证集训练集两个函数的seed要相同)。如果使用validation_split和shuffle,则必须提供一个seed参数,确保train和validation子集之间没有重叠。 |
| interpolation | 调整图像大小时使用的插值方法。默认为 bilinear 。支持 bilinear , nearest , bicubic , area , lanczos3 , lanczos5 , gaussian , mitchellcubic 。 |
| crop_to_aspect_ratio | 如果为 True,则调整图像大小而不会出现纵横比失真。当原始纵横比与目标纵横比不同时,将裁剪输出图像以返回与目标纵横比匹配的图像(大小为image_size)中最大的可能窗口。默认情况下(crop_to_aspect_ratio=False),可能不会保留纵横比。 |
| labels | 默认值是inferred,表示标签从目录结构中生成,子目录按照字母顺序从0开始编号 |
| class_names | 仅当labels值为inferred时有效,存储实际标签名(按子目录字母顺序排序一一对应)的列表或元组 |
| color_mode | 默认值是rgb(3通道),还可以是grayscale(1通道),rgba(4通道) |
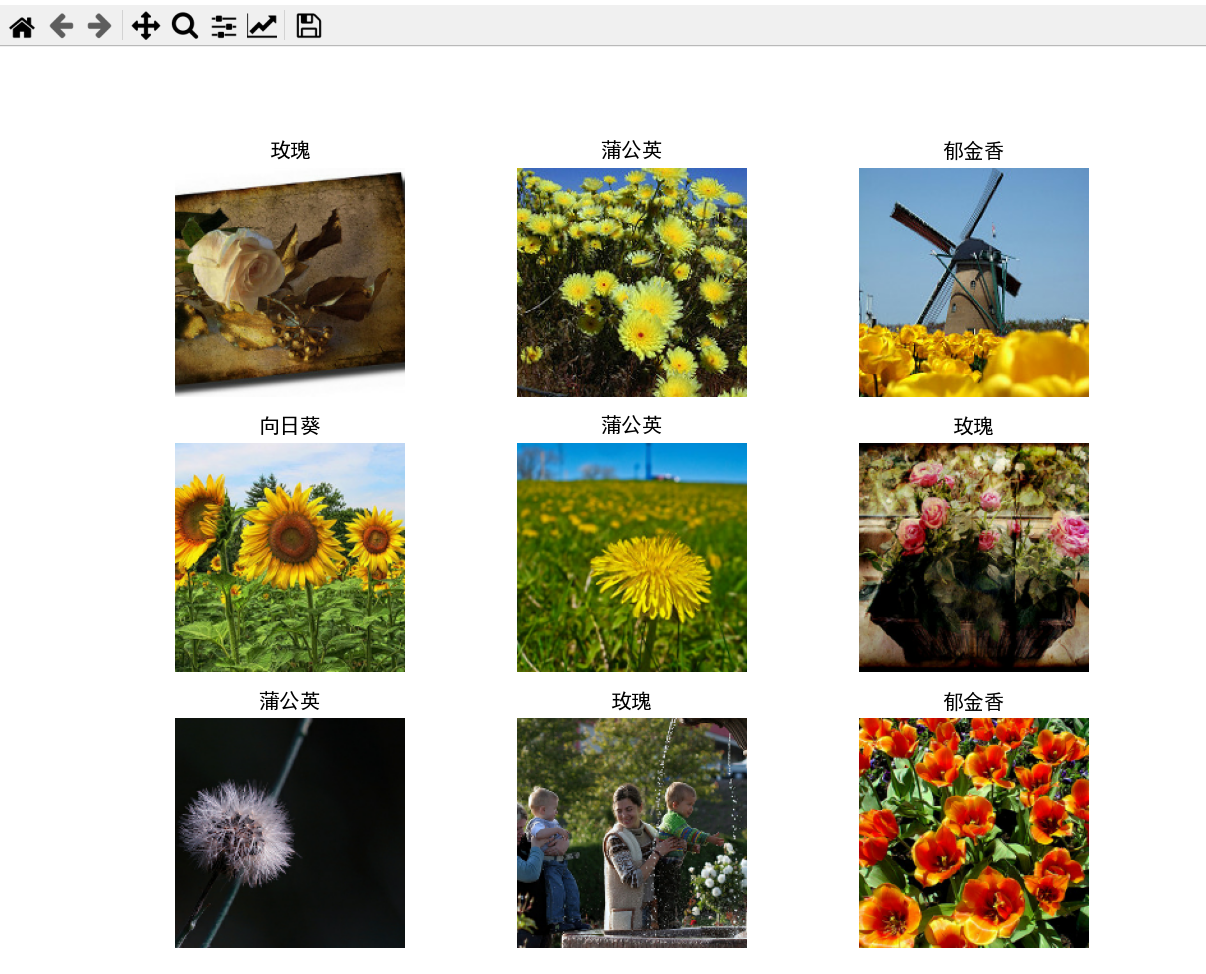
查看 image_dataset_from_directory 工具读取后的的图像:
import pathlib
import matplotlib.pyplot as plt
from tensorflow import keras

plt.rcParams['font.sans-serif'] = ['SimHei']

path = "F:/Tensorflow/datasets/flower/flower_photos"
# 解析目录
data_dir = pathlib.Path(path)

batch_size = 32
img_height = 180
img_width = 180

# 使用 80% 的图像进行训练,20% 的图像进行验证。
class_names = ['daisy', 'dandelion', 'roses', 'sunflowers', 'tulips']
class_names_cn = ['雏菊', '蒲公英', '玫瑰', '向日葵', '郁金香']

train_ds = keras.utils.image_dataset_from_directory(
    directory=data_dir,
    validation_split=0.2,
    subset="training",
    image_size=(img_height, img_width),
    batch_size=batch_size,
    shuffle=True,
    seed=123,
    interpolation='bilinear',
    crop_to_aspect_ratio=True,
    labels='inferred',
    class_names=class_names,
    color_mode='rgb',
)

# 遍历图像
# 总批次大小
print('训练总批次', len(train_ds))
# 获取第一个批次数据
plt.figure(figsize=(10, 10))
for image_batch, labels_batch in train_ds.take(1):
    for i in range(9):
        print('图片批次shape: ', image_batch.shape)
        print('标签批次shape:', labels_batch.shape)
        print('单图片shape:', image_batch[i].shape)
        ax = plt.subplot(3, 3, i + 1)
        plt.imshow(image_batch[i].numpy().astype("uint8"))
        plt.title(class_names_cn[labels_batch[i]])
        plt.axis("off")
    plt.show()
使用缓冲区优化读取方式
使用上面的方式,会每次都做 IO 读取操作,从而有可能导致 IO 阻塞,影响模型训练的进度,因此可以加入缓冲区将图像保留在内存中,确保在训练模型时数据集不会成为瓶颈。在 tensorflow 中为我们提供了 Dataset.cache() 进行数据集的缓冲。
使用方式如下:
AUTOTUNE = tf.data.AUTOTUNE
train_ds = train_ds.cache().prefetch(buffer_size=AUTOTUNE)
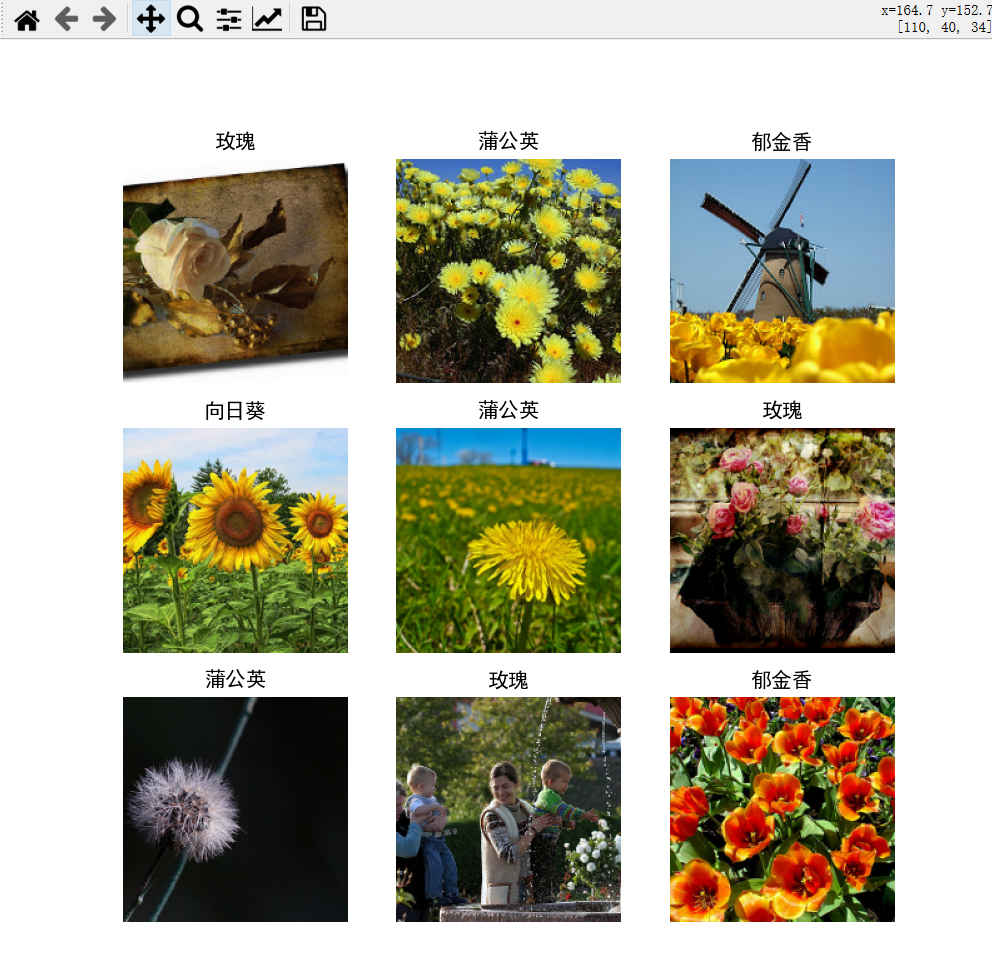
例如从缓冲区查看图片:
AUTOTUNE = tf.data.AUTOTUNE
train_ds = train_ds.cache().prefetch(buffer_size=AUTOTUNE)

# 遍历图像
# 总批次大小
print('训练总批次', len(train_ds))
# 获取第一个批次数据
plt.figure(figsize=(10, 10))
for image_batch, labels_batch in train_ds.take(1):
    for i in range(9):
        ax = plt.subplot(3, 3, i + 1)
        plt.imshow(image_batch[i].numpy().astype("uint8"))
        plt.title(class_names_cn[labels_batch[i]])
        plt.axis("off")
    plt.show()
如果数据集太大无法装入内存,也可以使用此方法创建高性能的磁盘缓存。
三、数据增强
前面在第一点的提到一共包含 3670 张图片,划分 20% 的验证集,一共只有 2936 张图片参与训练,如果细心的小伙伴应该可以发现,5个分类的数据量,其实是不相等的,蒲公英 的数据量明显是比其他分类要多的,有可能在训练的过程中偏向于蒲公英 分类。
因此解决上面问题,对于图像问题可以首先考虑使用数据增强,让每次喂入模型的数据都是有区别的,进而达到扩充数据集,在 tensorflow 中我们可以通过对图像的 随机翻转、随机旋转、随机改变对比度、随机缩放、以及随机裁剪等 操作改变图像,并且数据增强的操作我们可以放在 Sequential 模型中。
当数据增强放在模型中时,在测试时会处于停用状态,只有在调用 Model.fit(而非 Model.evaluate 或 Model.predict)期间才会对输入图像进行增强。
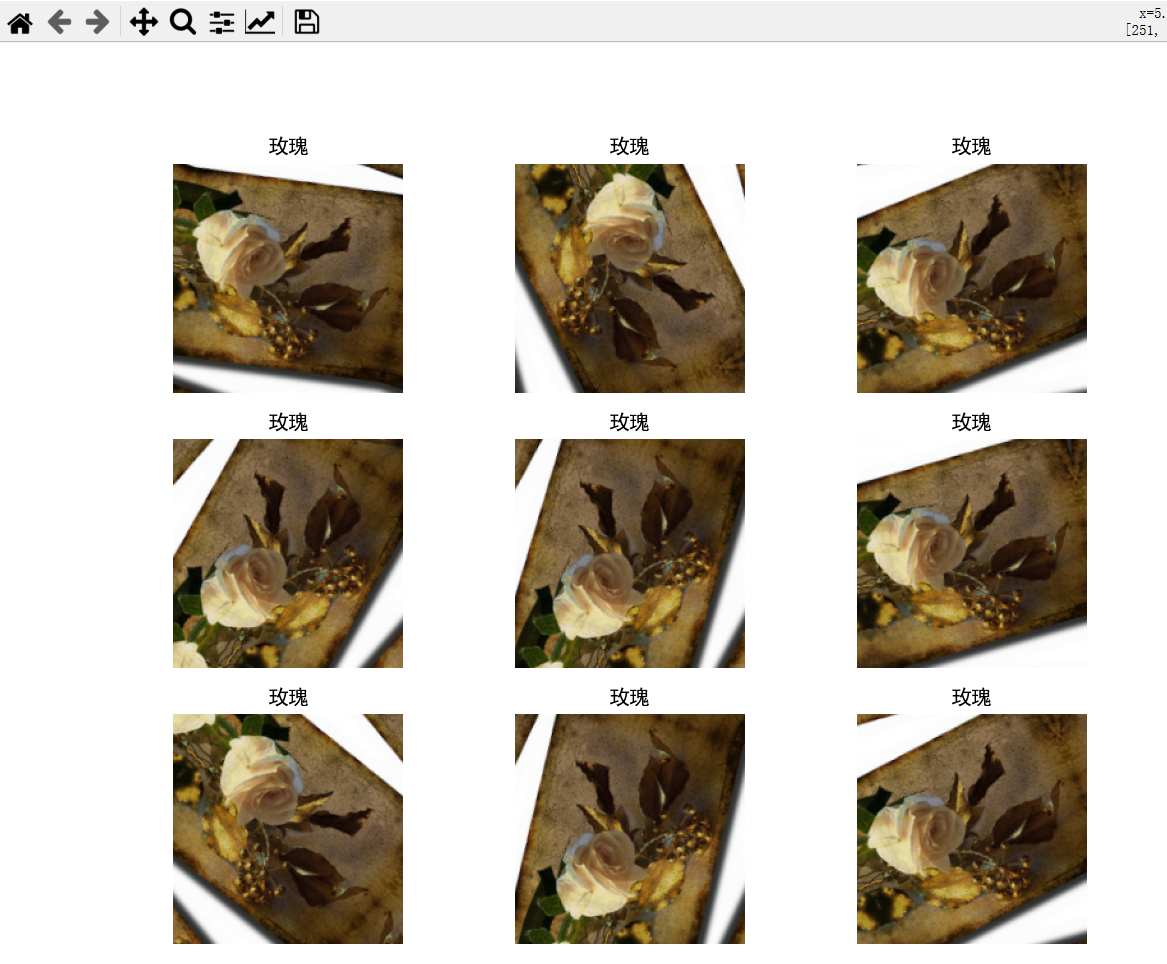
例如对图像进行随机旋转,这里将图片归一化操作也放在模型中了,这样的好处是在训练模型或预测模型时,可以不用做归一化操作了,同样也可以将 Resizing 放在模型中:
import pathlib
import matplotlib.pyplot as plt
from tensorflow import keras
import tensorflow as tf

plt.rcParams['font.sans-serif'] = ['SimHei']

path = "F:/Tensorflow/datasets/flower/flower_photos"
# 解析目录
data_dir = pathlib.Path(path)

# keras 加载数据集
batch_size = 32
img_height = 180
img_width = 180

# 使用 80% 的图像进行训练,20% 的图像进行验证。
class_names = ['daisy', 'dandelion', 'roses', 'sunflowers', 'tulips']
class_names_cn = ['雏菊', '蒲公英', '玫瑰', '向日葵', '郁金香']

train_ds = keras.utils.image_dataset_from_directory(
    directory=data_dir,
    validation_split=0.2,
    subset="training",
    image_size=(img_height, img_width),
    batch_size=batch_size,
    shuffle=True,
    seed=123,
    interpolation='bilinear',
    crop_to_aspect_ratio=True,
    labels='inferred',
    class_names=class_names,
    color_mode='rgb',
)

AUTOTUNE = tf.data.AUTOTUNE
train_ds = train_ds.cache().prefetch(buffer_size=AUTOTUNE)

model = keras.Sequential([
    # 归一化
    keras.layers.Rescaling(1. / 255),
    #随机旋转
    keras.layers.RandomRotation(0.2)
])

# 获取第一个批次数据
for image_batch, labels_batch in train_ds.take(1):
    for i in range(len(image_batch)):
        plt.figure(figsize=(10, 10))
        for j in range(9):
            plt.subplot(3, 3, j + 1)
            augmented_image = model.predict(tf.expand_dims(image_batch[i], 0))
            print(augmented_image[0].shape)
            plt.imshow(augmented_image[0])
            plt.title(class_names_cn[labels_batch[i]])
            plt.axis('off')
        plt.show()
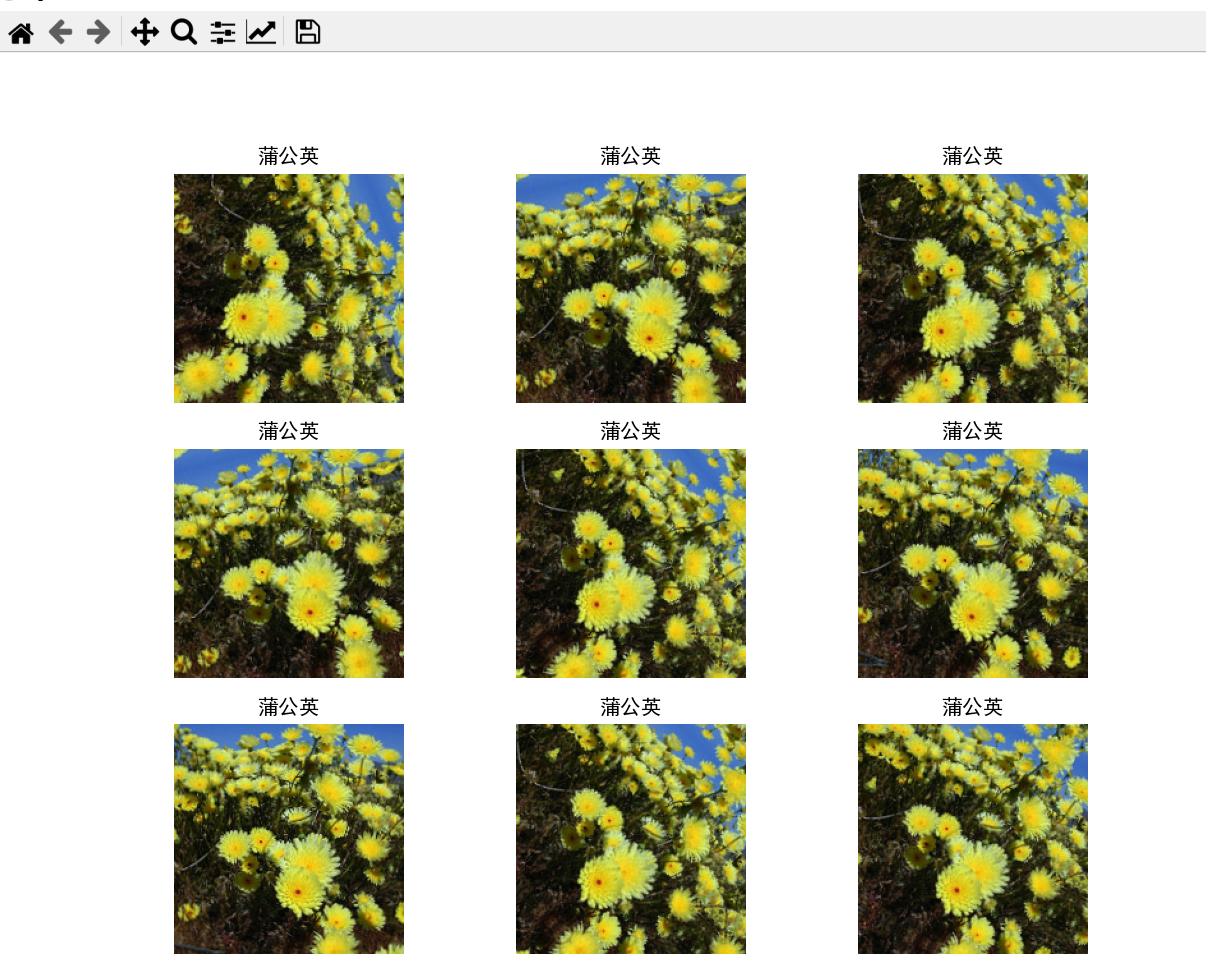
如果对使用预测的方式调用 model 呢,将上面程序中的:
augmented_image = model(tf.expand_dims(image_batch[i], 0))
换成:
augmented_image = model.predict(tf.expand_dims(image_batch[i], 0))
再次运行,可以发现数据增强部分没有了:

除了随机旋转,上面提到还可以加入 随机翻转、随机改变对比度、随机缩放等 ,这里将 Resizing 也加入到模型中,到后面预测模型时,直接给原图像即可:
import pathlib
import matplotlib.pyplot as plt
from tensorflow import keras
import tensorflow as tf

plt.rcParams['font.sans-serif'] = ['SimHei']

path = "F:/Tensorflow/datasets/flower/flower_photos"
# 解析目录
data_dir = pathlib.Path(path)

# keras 加载数据集
batch_size = 32
img_height = 180
img_width = 180

# 使用 80% 的图像进行训练,20% 的图像进行验证。
class_names = ['daisy', 'dandelion', 'roses', 'sunflowers', 'tulips']
class_names_cn = ['雏菊', '蒲公英', '玫瑰', '向日葵', '郁金香']

train_ds = keras.utils.image_dataset_from_directory(
    directory=data_dir,
    validation_split=0.2,
    subset="training",
    image_size=(img_height, img_width),
    batch_size=batch_size,
    shuffle=True,
    seed=123,
    interpolation='bilinear',
    crop_to_aspect_ratio=True,
    labels='inferred',
    class_names=class_names,
    color_mode='rgb',
)

AUTOTUNE = tf.data.AUTOTUNE
train_ds = train_ds.cache().prefetch(buffer_size=AUTOTUNE)

# 缩放和归一化
IMG_SIZE = 180
resize_and_rescale = tf.keras.Sequential([
    tf.keras.layers.Resizing(IMG_SIZE, IMG_SIZE),
    tf.keras.layers.Rescaling(1. / 255)
])

# 图像增强
data_augmentation = tf.keras.Sequential([
    # 翻转
    tf.keras.layers.RandomFlip("horizontal_and_vertical"),
    # 旋转
    tf.keras.layers.RandomRotation(0.2),
    # 对比度
    tf.keras.layers.RandomContrast(0.3),
    # 随机缩放
    tf.keras.layers.RandomZoom(height_factor=0.3, width_factor=0.3),
])

model = keras.Sequential([
    resize_and_rescale,
    data_augmentation
])

# 获取第一个批次数据
for image_batch, labels_batch in train_ds.take(1):
    for i in range(len(image_batch)):
        plt.figure(figsize=(10, 10))
        for j in range(9):
            plt.subplot(3, 3, j + 1)
            augmented_image = model(tf.expand_dims(image_batch[i], 0))
            print(augmented_image[0].shape)
            plt.imshow(augmented_image[0])
            plt.title(class_names_cn[labels_batch[i]])
            plt.axis('off')
        plt.show()

四、构建训练模型
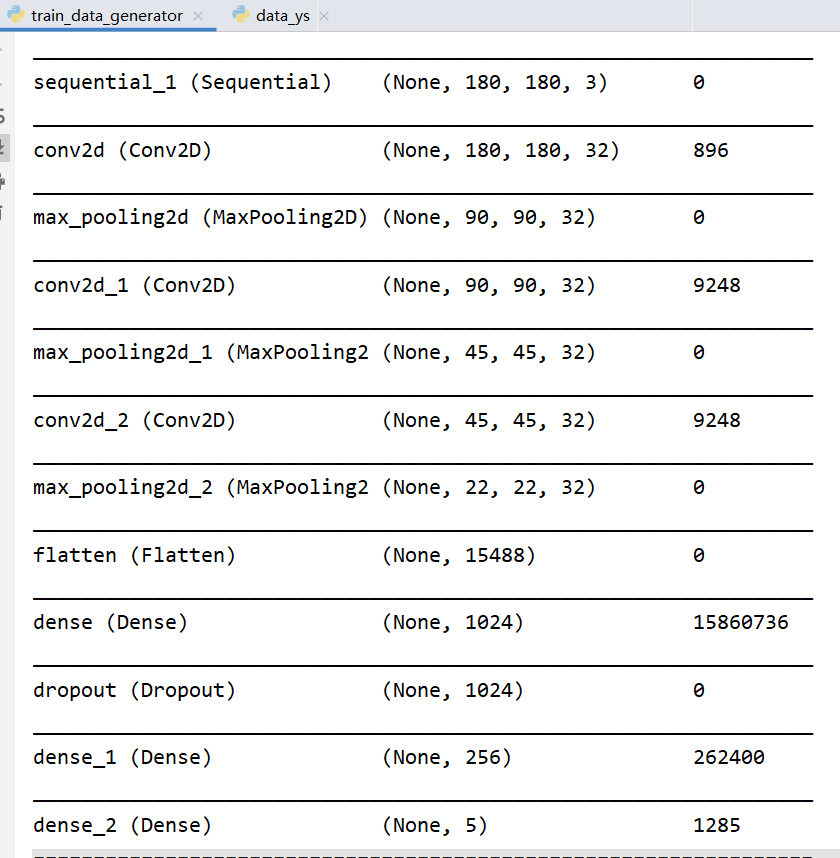
本篇文章我们使用自己搭建的模型,训练后在验证集上大概可以达到 75% 的准确度,下篇文章使用迁移训练优化,正好和本篇的训练结果形成对比,下面是模型的结构:

通过 Keras 建立模型结构:
import tensorflow as tf
from tensorflow import keras

# 定义模型类
class mnistModel():
    # 初始化结构
    def __init__(self, checkpoint_path, log_path, model_path, num_classes, img_width, img_height):
        # checkpoint 权重保存地址
        self.checkpoint_path = checkpoint_path
        # 训练日志保存地址
        self.log_path = log_path
        # 训练模型保存地址:
        self.model_path = model_path
        # 数据统一大小并归一处理
        resize_and_rescale = tf.keras.Sequential([
            keras.layers.Resizing(img_width, img_height),
            keras.layers.Rescaling(1. / 255)
        ])
        # 数据增强
        data_augmentation = tf.keras.Sequential([
            # 翻转
            keras.layers.RandomFlip("horizontal_and_vertical"),
            # 旋转
            keras.layers.RandomRotation(0.2),
            # 对比度
            keras.layers.RandomContrast(0.3),
            # 随机裁剪
            # tf.keras.layers.RandomCrop(IMG_SIZE, IMG_SIZE),
            # 随机缩放
            keras.layers.RandomZoom(height_factor=0.3, width_factor=0.3),
        ])
        # 初始化模型结构
        self.model = keras.Sequential([
            resize_and_rescale,
            data_augmentation,
            keras.layers.Conv2D(32, (3, 3),
                                   kernel_initializer=keras.initializers.truncated_normal(stddev=0.05),
                                   kernel_regularizer=keras.regularizers.l2(0.001),
                                   padding='same',
                                   activation='relu'),
            keras.layers.MaxPooling2D(2, 2),
            keras.layers.Conv2D(32, (3, 3),
                                   kernel_initializer=keras.initializers.truncated_normal(stddev=0.05),
                                   kernel_regularizer=keras.regularizers.l2(0.001),
                                   padding='same',
                                   activation='relu'),
            keras.layers.MaxPooling2D(2, 2),
            keras.layers.Conv2D(32, (3, 3),
                                   kernel_initializer=keras.initializers.truncated_normal(stddev=0.05),
                                   kernel_regularizer=keras.regularizers.l2(0.001),
                                   padding='same',
                                   activation='relu'),
            keras.layers.MaxPooling2D(2, 2),
            keras.layers.Flatten(),
            keras.layers.Dense(1024,
                               kernel_initializer=keras.initializers.truncated_normal(stddev=0.05),
                               kernel_regularizer=keras.regularizers.l2(0.001),
                               activation=tf.nn.relu),
            keras.layers.Dropout(0.2),
            keras.layers.Dense(256,
                               kernel_initializer=keras.initializers.truncated_normal(stddev=0.05),
                               kernel_regularizer=keras.regularizers.l2(0.001),
                               activation=tf.nn.relu),
            keras.layers.Dense(num_classes, activation='softmax')
        ])

    # 编译模型
    def compile(self):
        # 输出模型摘要
        self.model.build(input_shape=(None, 180, 180, 3))
        self.model.summary()
        # 定义训练模式
        self.model.compile(optimizer='adam',
                           loss='sparse_categorical_crossentropy',
                           metrics=['accuracy'])

    # 训练模型
    def train(self, train_ds, val_ds):
        # tensorboard 训练日志收集
        tensorboard = keras.callbacks.TensorBoard(log_dir=self.log_path)

        # 训练过程保存 Checkpoint 权重,防止意外停止后可以继续训练
        model_checkpoint = keras.callbacks.ModelCheckpoint(self.checkpoint_path,  # 保存模型的路径
                                                           # monitor='val_loss',  # 被监测的数据。
                                                           verbose=0,  # 详细信息模式,0 或者 1
                                                           save_best_only=True,  # 如果 True, 被监测数据的最佳模型就不会被覆盖
                                                           save_weights_only=True,
                                                           # 如果 True,那么只有模型的权重会被保存 (model.save_weights(filepath)),否则的话,整个模型会被保存,(model.save(filepath))
                                                           mode='auto',
                                                           # {auto, min, max}的其中之一。 如果 save_best_only=True,那么是否覆盖保存文件的决定就取决于被监测数据的最大或者最小值。 对于 val_acc,模式就会是 max,而对于 val_loss,模式就需要是 min,等等。 在 auto模式中,方向会自动从被监测的数据的名字中判断出来。
                                                           period=3  # 每3个epoch保存一次权重
                                                           )
        # 填充数据,迭代训练
        self.model.fit(
            train_ds,  # 训练集
            validation_data=val_ds,  # 验证集
            epochs=200,  # 迭代周期
            verbose=2,  # 训练过程的日志信息显示,一个epoch输出一行记录
            callbacks=[tensorboard, model_checkpoint]
        )
        # 保存训练模型
        self.model.save(self.model_path)

    def evaluate(self, val_ds):
        # 评估模型
        test_loss, test_acc = self.model.evaluate(val_ds)
        return test_loss, test_acc
处理数据集:
import tensorflow as tf
import pathlib
from tensorflow import keras

def getData():
    # 加载数据集
    path = "F:/Tensorflow/datasets/flower/flower_photos"
    # 解析目录
    data_dir = pathlib.Path(path)

    # keras 加载数据集
    batch_size = 32
    img_height = 180
    img_width = 180

    # 使用 80% 的图像进行训练,20% 的图像进行验证。
    class_names = ['daisy', 'dandelion', 'roses', 'sunflowers', 'tulips']
    train_ds = keras.utils.image_dataset_from_directory(
        data_dir,
        validation_split=0.2,
        subset="training",
        image_size=(img_height, img_width),
        batch_size=batch_size,
        shuffle=True,
        seed=123,
        interpolation='bilinear',
        crop_to_aspect_ratio=True,
        labels='inferred',
        class_names=class_names,
        color_mode='rgb'
    )

    val_ds = keras.utils.image_dataset_from_directory(
        data_dir,
        validation_split=0.2,
        subset="validation",
        image_size=(img_height, img_width),
        batch_size=batch_size,
        shuffle=True,
        seed=123,
        interpolation='bilinear',
        crop_to_aspect_ratio=True,
        labels='inferred',
        class_names=class_names,
        color_mode='rgb'
    )

    AUTOTUNE = tf.data.AUTOTUNE
    train_ds = train_ds.cache().prefetch(buffer_size=AUTOTUNE)
    val_ds = val_ds.cache().prefetch(buffer_size=AUTOTUNE)
    return train_ds, val_ds, len(class_names), img_width, img_height
开始训练模型:
def main():
    # 加载数据集
    train_ds, val_ds, num_classes, img_width, img_height = getData()

    checkpoint_path = './checkout/'
    log_path = './log'
    model_path = './model/model.h5'

    # 构建模型
    model = mnistModel(checkpoint_path, log_path, model_path, num_classes, img_width, img_height)
    # 编译模型
    model.compile()
    # 训练模型
    model.train(train_ds, val_ds)
    # 评估模型
    test_loss, test_acc = model.evaluate(val_ds)
    print(test_loss, test_acc)


if __name__ == '__main__':
    main()
运行后可以看到打印的网络结构:
从训练日志中,可以看到 loss 一直在减小:

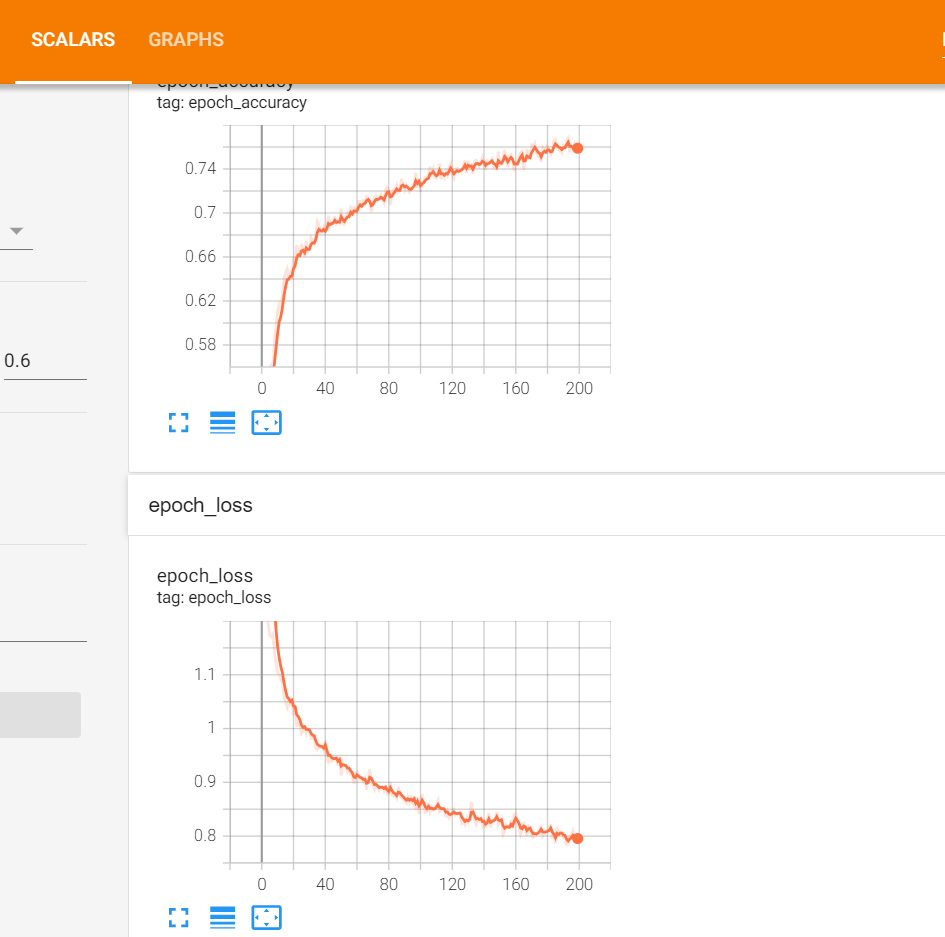
训练结束后评估模型的结果,最终在验证集上的准确率为: 74.79%

最后看下 tensorboard 中可视化的损失及准确率:
tensorboard --logdir=log/train

使用浏览器访问:http://localhost:6006/ 查看结果:
五、模型预测
训练后会在 model 下生成 model.h5 模型,下面直接加载该模型进行预测:
import tensorflow as tf
import pathlib
from tensorflow import keras
import matplotlib.pyplot as plt

plt.rcParams['font.sans-serif'] = ['SimHei']


def main():
    # 加载数据集
    path = "F:/Tensorflow/datasets/flower/flower_photos"
    # 解析目录
    data_dir = pathlib.Path(path)

    # keras 加载数据集
    batch_size = 32
    img_height = 180
    img_width = 180

    # 使用 80% 的图像进行训练,20% 的图像进行验证。
    class_names = ['daisy', 'dandelion', 'roses', 'sunflowers', 'tulips']
    class_names_cn = ['雏菊', '蒲公英', '玫瑰', '向日葵', '郁金香']
    val_ds = keras.utils.image_dataset_from_directory(
        data_dir,
        validation_split=0.2,
        subset="validation",
        image_size=(img_height, img_width),
        batch_size=batch_size,
        shuffle=True,
        seed=123,
        interpolation='bilinear',
        crop_to_aspect_ratio=True,
        labels='inferred',
        class_names=class_names,
        color_mode='rgb'
    )

    model = keras.models.load_model('./model/model.h5')

    # 获取第一个批次数据
    for image_batch, labels_batch in val_ds.take(3):
        plt.figure(figsize=(10, 10))
        for i in range(9):
            plt.subplot(3, 3, i + 1)
            softmax = model.predict(tf.expand_dims(image_batch[i], 0))
            y_label = tf.argmax(softmax, axis=1).numpy()[0]
            plt.imshow(image_batch[i].numpy().astype("uint8"))
            plt.title('预测结果:' + class_names_cn[y_label] + ',概率:' + str("%.2f" % softmax[0][y_label]) + ',真实结果:' +
                      class_names_cn[labels_batch[i]])
            plt.axis('off')
        plt.show()


if __name__ == '__main__':
    main()
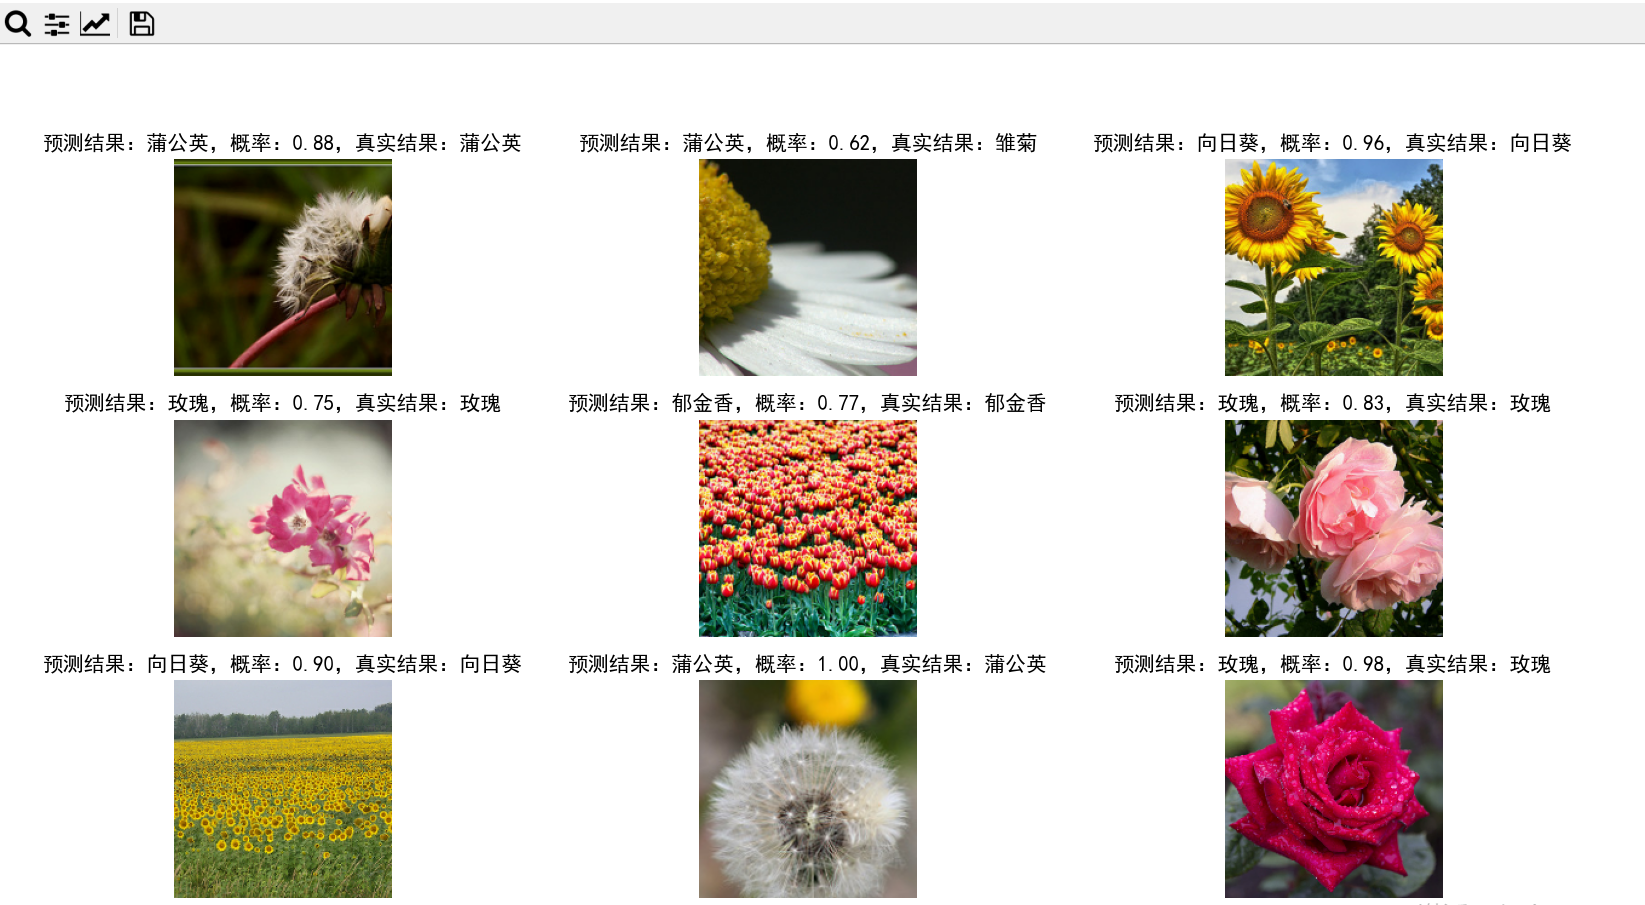
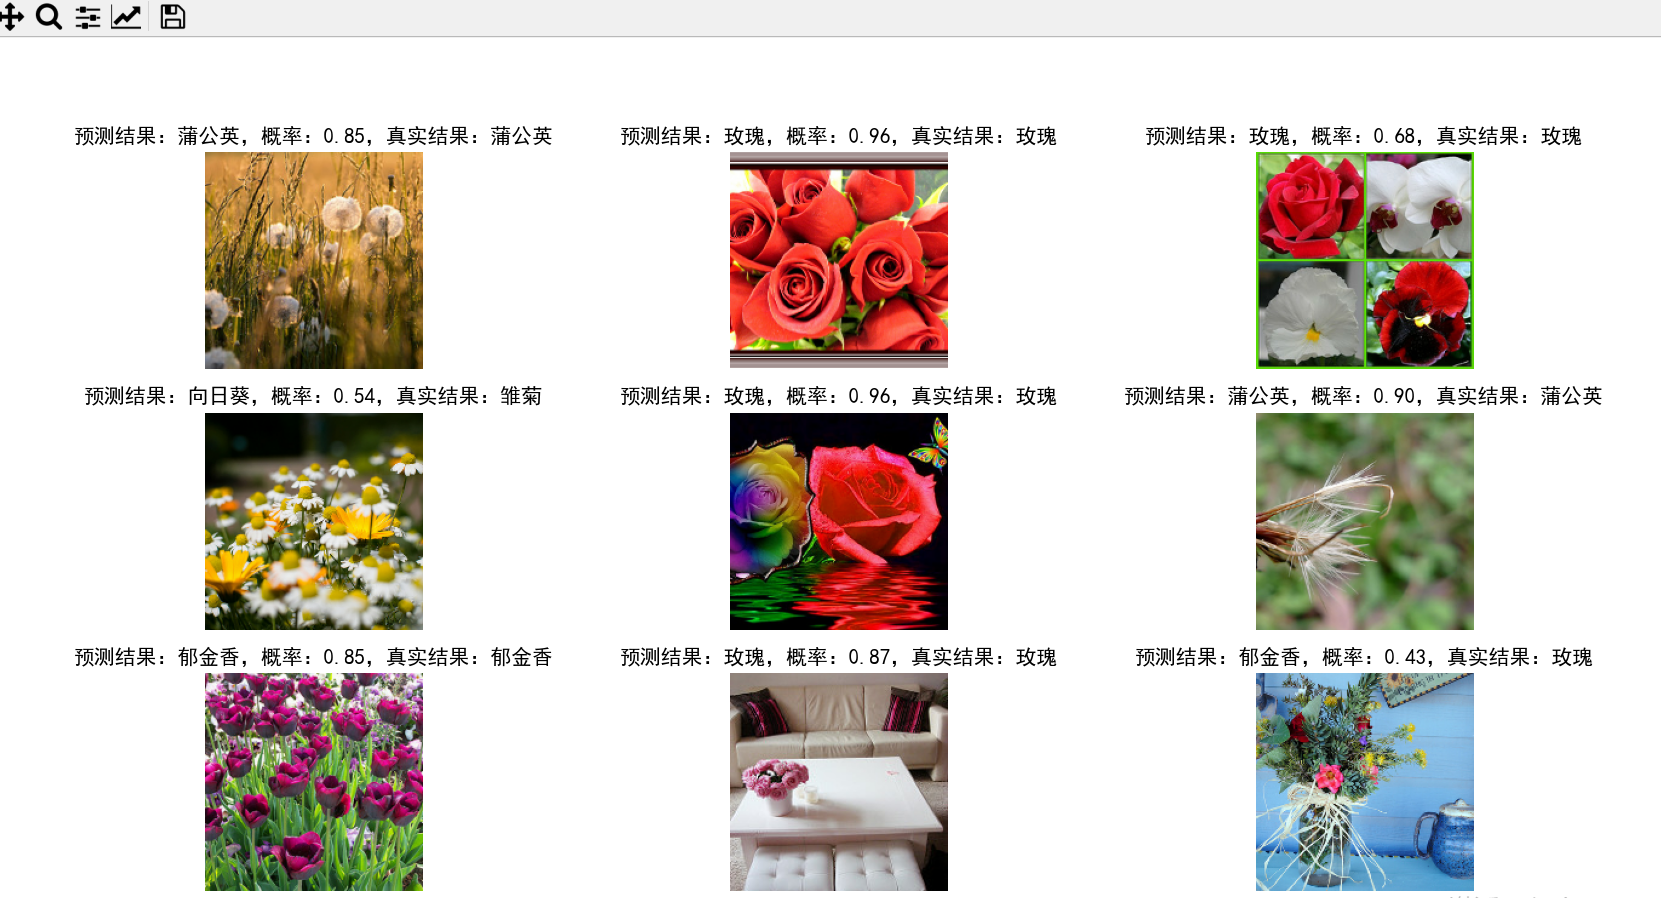
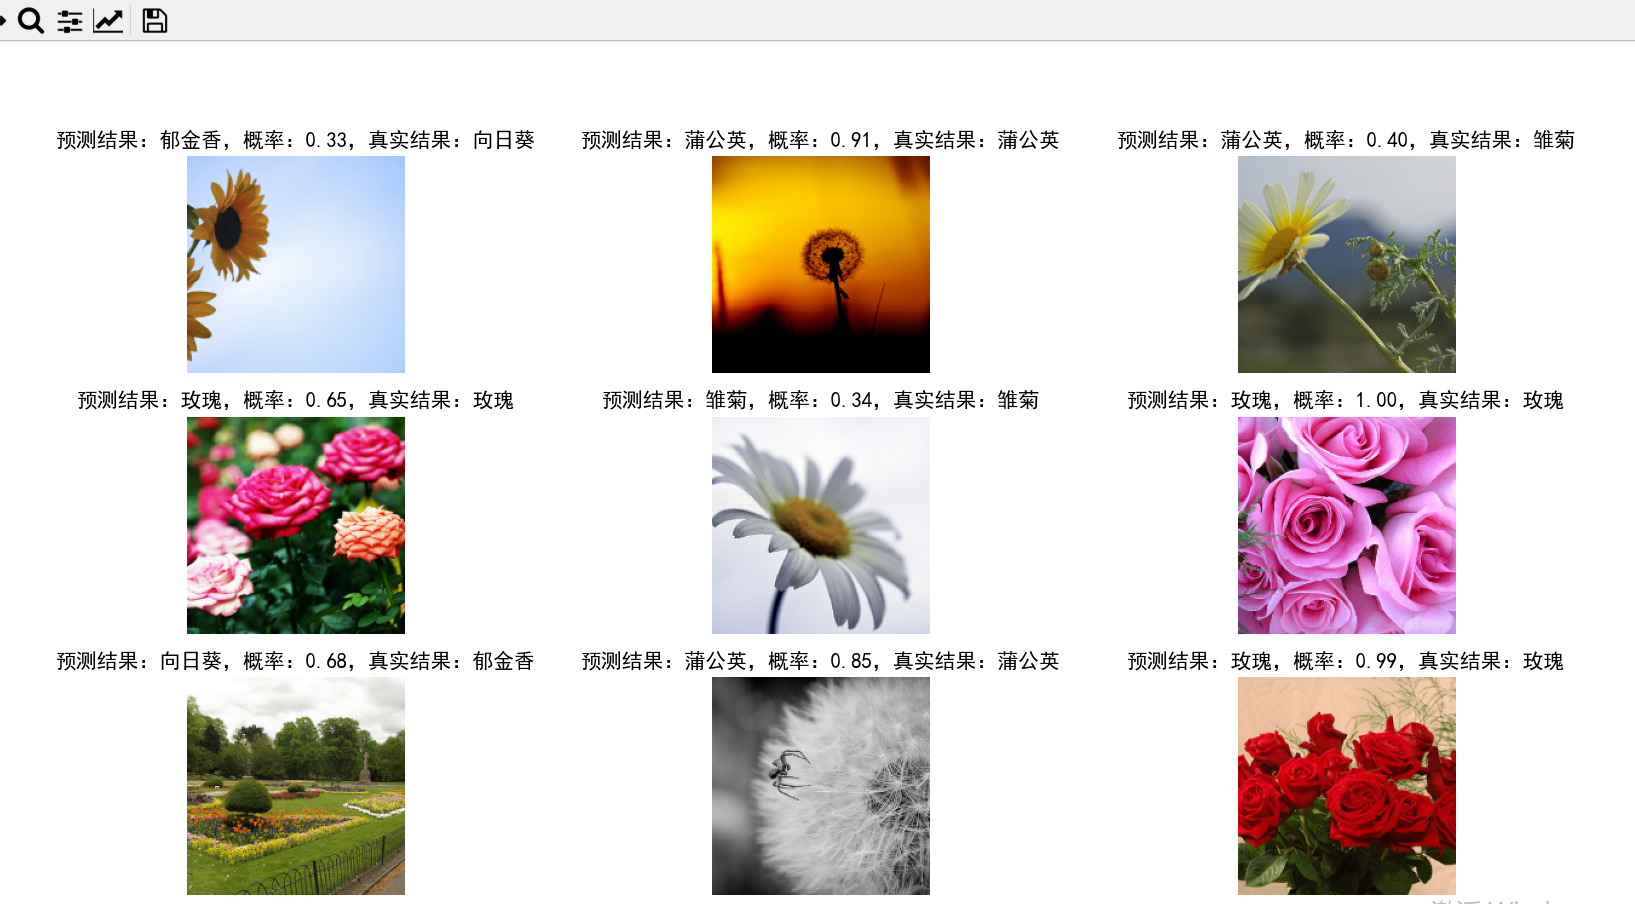
可以发现还是有些识别失败,毕竟只有大约 75% 的准确度,下篇文章使用 MobileNetV2 模型对该数据集进行迁移优化,以提高模型的准确度。


![[torch]日志记录之SummaryWriter(持更)](https://img-blog.csdnimg.cn/d0d1e944840b4048818a6a156f5a28b8.png)

![[红明谷CTF 2021]JavaWeb](https://img-blog.csdnimg.cn/7ad0a11f2a3e461cbff3231299e29b1b.png)
