setState
setState更新状态的2种写法:
setState(stateChange, [callback])------对象式的setStatestateChange为状态改变对象(该对象可以体现出状态的更改)callback是可选的回调函数, 它在状态更新完毕、界面也更新后(render调用后)才被调用
setState(updater, [callback])------函数式的setStateupdater为返回stateChange对象的函数updater可以接收到state和propscallback是可选的回调函数, 它在状态更新、界面也更新后(render调用后)才被调用
import React, { Component } from 'react'

export default class Demo extends Component {

  state = {count: 0}

  inicrement = () => {
    /* 对象式的setState */
    // 1.获取原来的count值
    // const {count} = this.state
    // // 2.更新状态
    // this.setState({count: count+1}, () => {
    //     console.log(this.state.count) // 1
    // })
    // // console.log(this.state.count) // 0

    /* 函数式的setState */
    // this.setState((state, props) => {
    //     return {count: state.count+1}
    // })
    this.setState(state => ({count: state.count+1})) // 简写
  }

  render() {
    return (
      <div>
        <h1>当前求和为:{this.state.count}</h1>
        <button onClick={this.inicrement}>点击+1</button>
      </div>
    )
  }
}
-
对象式的
setState是函数式的setState的简写方式(语法糖) -
使用原则:
(1).如果新状态不依赖于原状态 => 使用对象方式
(2).如果新状态依赖于原状态 => 使用函数方式
(3).如果需要在
setState()执行后获取最新的状态数据,要在第二个callback函数中读取
lazyLoad
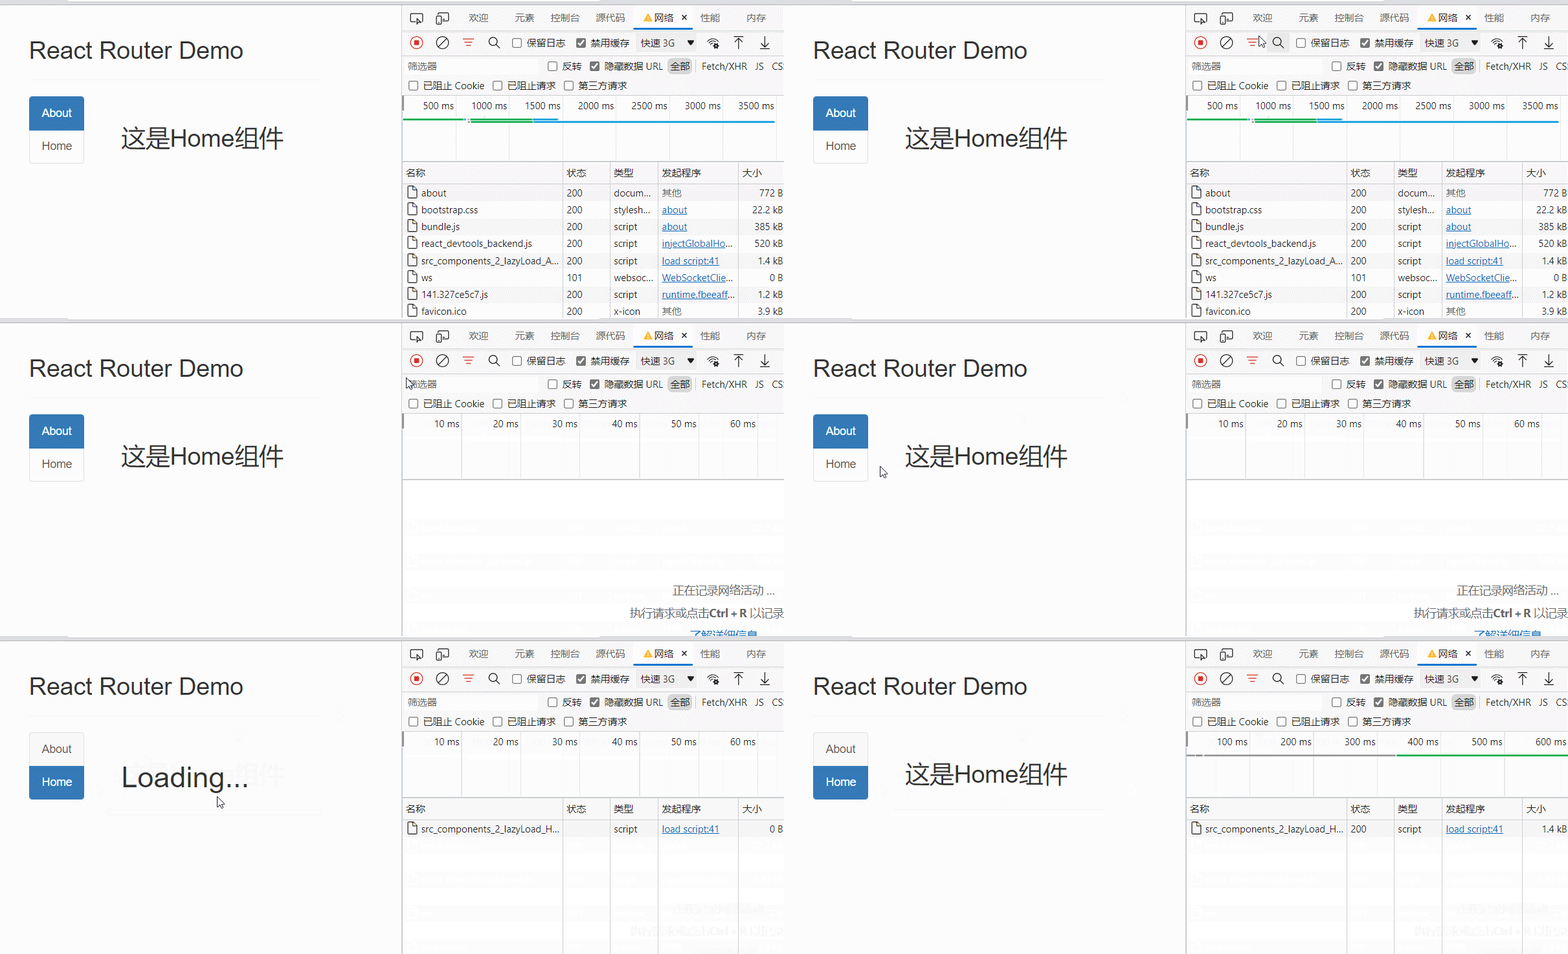
路由组件的懒加载:
- 通过
React的lazy函数配合import()函数动态加载路由组件 => 路由组件代码会被分开打包 - 通过
<Suspense fallback=?><Suspense/>指定在加载得到路由打包文件前显示一个自定义loading界面
import React, { Component, lazy, Suspense } from 'react'
import {NavLink, Route} from 'react-router-dom'
// import About from './About'
// import Home from './Home'

const About = lazy(() => import('./About'))
const Home = lazy(() => import('./Home'))


export default class Demo extends Component {

    render() {
        return (
            <div>
                <div className="row">
                    <div className="col-xs-offset-2 col-xs-8">
                        <div className="page-header"><h2>React Router Demo</h2></div>
                    </div>
                </div>
                <div className="row">
                    <div className="col-xs-2 col-xs-offset-2">
                        <div className="list-group">
                            <NavLink className="list-group-item" to="/about">About</NavLink>
                            <NavLink className="list-group-item" to="/home">Home</NavLink>
                        </div>
                    </div>
                    <div className="col-xs-6">
                        <div className="panel">
                            <div className="panel-body">
                                <Suspense fallback={<h1>Loading...</h1>}>
                                    <Route path="/about" component={About}/>
                                    <Route path="/home" component={Home}/>
                                </Suspense>
                            </div>
                        </div>
                    </div>
                </div>
            </div>
        )
    }
}
Hooks
Hook是React 16.8.0版本增加的新特性/新语法,可以在函数组件中使用 state 以及其他的 React 特性
State Hook
State Hook让函数组件也可以有state状态,并进行状态数据的读写操作
- 语法:
const [xxx, setXxx] = React.useState(initValue) useState()说明:- 参数: 第一次初始化指定的值在内部作缓存
- 返回值: 包含2个元素的数组, 第1个为内部当前状态值, 第2个为更新状态值的函数
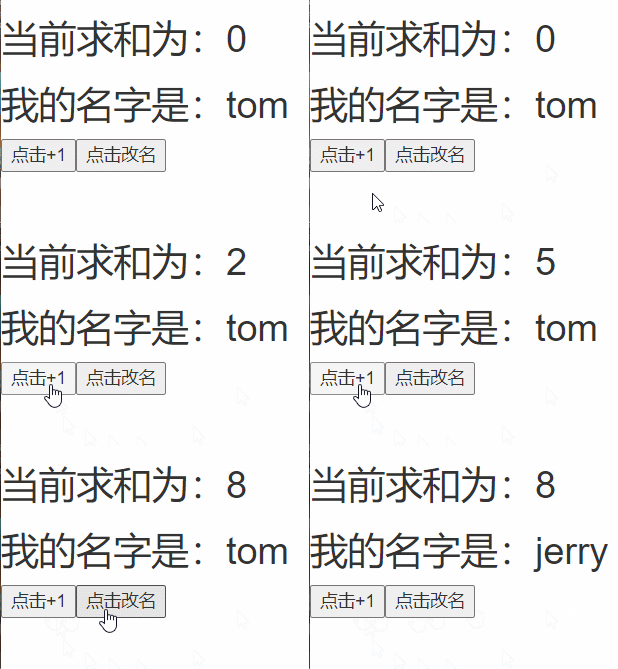
setXxx()2种写法:setXxx(newValue): 参数为非函数值, 直接指定新的状态值, 内部用其覆盖原来的状态值setXxx(value => newValue): 参数为函数, 接收原本的状态值, 返回新的状态值, 内部用其覆盖原来的状态值
import React from 'react'

export default function Demo() {
    const [count, setCount] = React.useState(0)
    const [name, setName] = React.useState('tom')

    function add() {
        // setCount(count + 1) // 第一种写法
        setCount(count => count + 1) // 第二种写法
    }

    // const add = () => {
    //     setCount(count + 1)
    // }

    // console.log(add)

    function change() {
        setName('jerry')
    }

    return (
        <div>
            <h2>当前求和为:{count}</h2>
            <h2>我的名字是:{name}</h2>
            <button onClick={add}>点击+1</button>
            <button onClick={change}>点击改名</button>
        </div>
    )
}
Effect Hook
Effect Hook 可以在函数组件中执行副作用操作(用于模拟类组件中的生命周期钩子)
-
React中的副作用操作:
* 发ajax请求数据获取 * 设置订阅 / 启动定时器 * 手动更改真实DOM -
语法和说明:
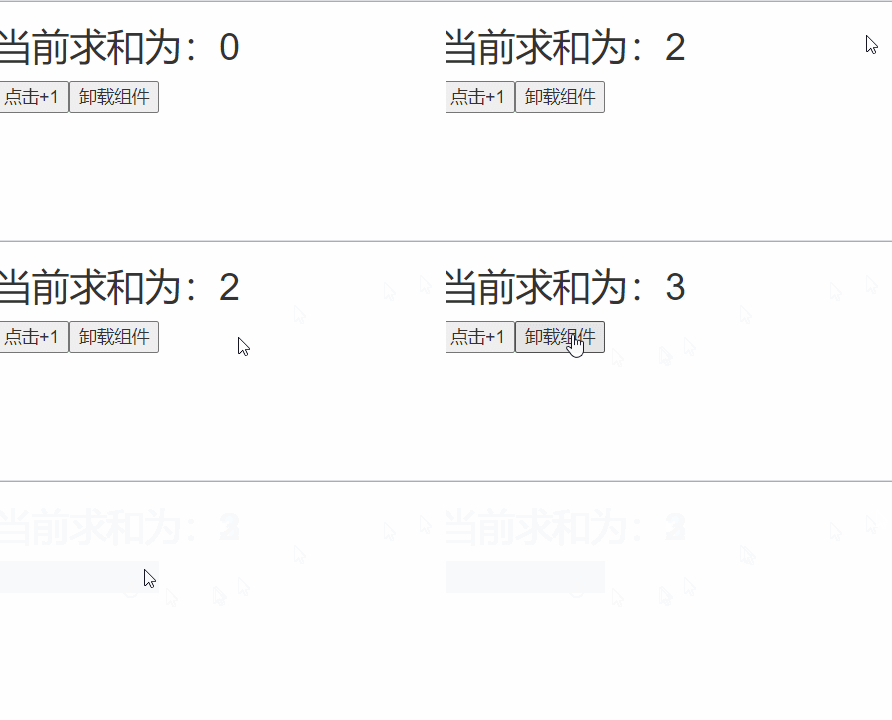
useEffect(() => { // 在此可以执行任何带副作用操作 return () => { // 在组件卸载前执行 // 在此做一些收尾工作, 比如清除定时器/取消订阅等 } }, [stateValue]) // 如果指定的是[], 回调函数只会在第一次render()后执行,即什么都不监听 -
可以把
useEffectHook 看做如下三个函数的组合
*componentDidMount()
*componentDidUpdate()
*componentWillUnmount()
import React from 'react'
import ReactDOM from 'react-dom'
export default function Demo() {
    const [count, setCount] = React.useState(0)

    React.useEffect(() => {
        let timer = setInterval(() => {
            setCount(count => count + 1)
        }, 1000)
        return () => {
            clearInterval(timer)
        }
    }, [])

    function add() {
        // setCount(count + 1) // 第一种写法
        setCount(count => count + 1) // 第二种写法
    }

    function unmount() {
        // 这是18的写法:目前卸载组件能成功卸载但会报warning,日后再研究一下React18卸载组件的方法
        // ReactDOM.createRoot(document.getElementById('root')).unmount()
        // 所以用下17
        ReactDOM.unmountComponentAtNode(document.getElementById('root'))
    }

    return (
        <div>
            <h2>当前求和为:{count}</h2>
            <button onClick={add}>点击+1</button>
            <button onClick={unmount}>卸载组件</button>
        </div>
    )
}
Ref Hook
Ref Hook可以在函数组件中存储/查找组件内的标签或任意其它数据
- 语法:
const refContainer = useRef() - 作用:保存标签对象,功能与
React.createRef()一样
import React from 'react'
import ReactDOM from 'react-dom'
export default function Demo() {
    const [count, setCount] = React.useState(0)

    const myRef = React.useRef()

    function show() {
        alert(myRef.current.value)
    }

    function add() {
        // setCount(count + 1) // 第一种写法
        setCount(count => count + 1) // 第二种写法
    }

    return (
        <div>
            <h2>当前求和为:{count}</h2>
            <button onClick={add}>点击+1</button>
            <input type="text" ref={myRef} />
        <button onClick={show}>提示数据</button>
        </div>
    )
}

Fragment
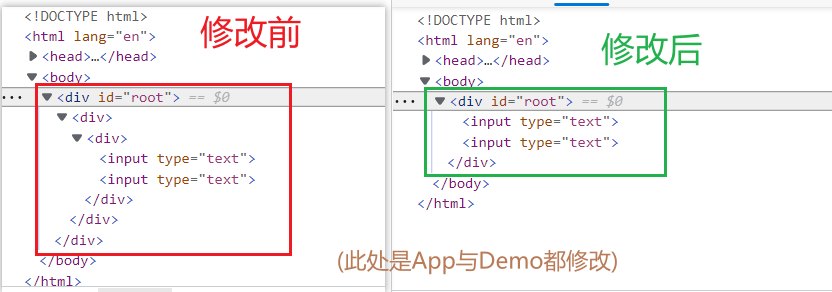
<Fragment></Fragment>可以传key和children属性,<></>不允许传任何属性
像这样:
import React, { Component, Fragment } from 'react'

export default class Demo extends Component {
  render() {
    return (
      <Fragment>
          <input type="text" />
          <input type="text" />
      </Fragment>
    )
  }
}
Context
一种组件间通信方式, 常用于【祖组件】与【后代组件】间通信
在应用开发中一般不用context, 一般都用它的封装react插件
-
创建Context容器对象:
const XxxContext = React.createContext() -
渲染子组件时,外面包裹
XxxContext.Provider, 通过value属性给后代组件传递数据:<xxxContext.Provider value={数据}> 子组件 </xxxContext.Provider> -
后代组件读取数据:
1. //第一种方式:仅适用于类组件
     static contextType = xxxContext  // 声明接收context
     this.context // 读取context中的value数据
2. //第二种方式: 函数组件与类组件都可以
     <xxxContext.Consumer>
       {
         value => ( // value就是context中的value数据
           要显示的内容
         )
       }
     </xxxContext.Consumer>
import React, { Component } from 'react'
import './index.css'

// 创建用于保存用户名的Context对象
const UserNameContext = React.createContext()
const {Provider, Consumer} = UserNameContext

export default class Demo extends Component {

    state = {username: 'tom', age: 18}

    render() {
        const {username, age} = this.state
        return (
            <div className='com' style={{'width': '500px'}}>
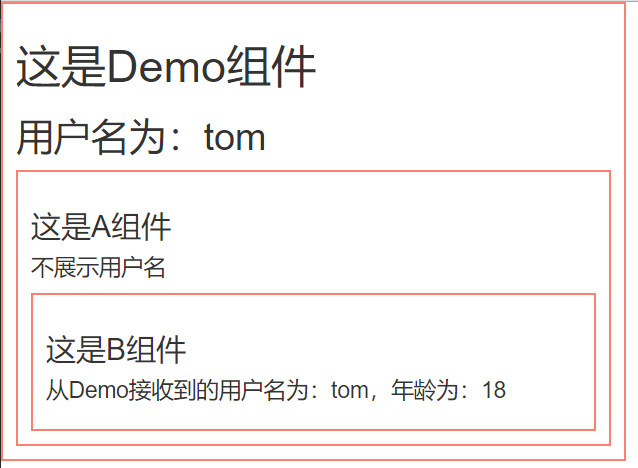
                <h1>这是Demo组件</h1>
                <h2>用户名为:{username}</h2>
                <Provider value={{username, age}}>
                    <A />
                </Provider>
            </div>
        )
    }
}

class A extends Component {
    render() {
        return (
            <div className='com'>
                <h3>这是A组件</h3>
                <h4>不展示用户名</h4>
                <B />
            </div>
        )
    }
}

/* class B extends Component {
    // 需要Context就“举手” - 声明接收Context
    static contextType = UserNameContext
    render() {
        const {username, age} = this.context
        return (
            <div className='com'>
                <h3>这是B组件</h3>
                <h4>从Demo接收到的用户名为:{username},年龄为:{age}</h4>
            </div>
        )
    }
} */

function B() {
  return (
    <div className='com'>
        <h3>这是B组件</h3>
        <Consumer>
            {
                value => <h4>从Demo接收到的用户名为:{value.username},年龄为:{value.age}</h4>
            }
        </Consumer>
    </div>
  )
}
组件优化
Component的2个问题
- 只要执行
setState(),即使不改变状态数据,组件也会重新render()=> 效率低 - 只要前组件重新
render(),就会自动重新render子组件,纵使子组件没有用到父组件的任何数据 => 效率低 - 原因:
Component中的shouldComponentUpdate()总是返回true
效率高的做法
只有当组件的state或props数据发生改变时才重新render()
-
重写
shouldComponentUpdate()方法,比较新旧state或props数据, 如果有变化才返回true,如果没有返回falseimport React, { Component } from 'react' export default class Parent extends Component { state = {carName: '奔驰'} changeCar = () => { this.setState({carName: '迈巴赫'}) } shouldComponentUpdate(nextProps, nextState) { console.log(nextProps, nextState) // 接下来要变化的目标props和目标state console.log(this.props, this.state) // 目前的props和state if(JSON.stringify(this.state) === JSON.stringify(nextState)) { return false } return true } render() { console.log('parent--render') const {carName} = this.state return ( <div style={{ 'width': '500px', 'backgroundColor': 'skyblue', 'padding': '10px' }}> <h3>这是Parent组件</h3> <span>车名字是: {carName}</span> <br /><button onClick={this.changeCar}>点击换车</button> <Child carName='宝马'/> </div> ) } } class Child extends Component { shouldComponentUpdate(nextProps, nextState) { console.log(nextProps, nextState) // 接下来要变化的目标props和目标state console.log(this.props, this.state) // 目前的props和state if(JSON.stringify(this.props) === JSON.stringify(nextProps)) { return false } return true } render() { console.log('child--render') return ( <div style={{ 'width': '100%', 'backgroundColor': 'orange', 'padding': '10px', 'marginTop': '20px' }}> <h3>这是Child组件</h3> <span>车名字是: {this.props.carName}</span> </div> ) } } -
使用
PureComponent,PureComponent重写了shouldComponentUpdate(), 只有state或props数据有变化才返回true
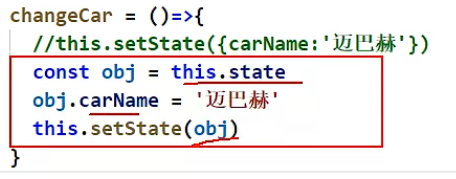
项目中一般使用PureComponent来优化import React, { PureComponent } from 'react' export default class Parent extends PureComponent { state = {carName: '奔驰'} changeCar = () => { this.setState({carName: '迈巴赫'}) } render() { console.log('parent--render') const {carName} = this.state return ( <div style={{ 'width': '500px', 'backgroundColor': 'skyblue', 'padding': '10px' }}> <h3>这是Parent组件</h3> <span>车名字是: {carName}</span> <br /><button onClick={this.changeCar}>点击换车</button> <Child carName='宝马'/> </div> ) } } class Child extends PureComponent { render() { console.log('child--render') return ( <div style={{ 'width': '100%', 'backgroundColor': 'orange', 'padding': '10px', 'marginTop': '20px' }}> <h3>这是Child组件</h3> <span>车名字是: {this.props.carName}</span> </div> ) } }PureComponent只是进行state和props数据的浅比较,如果只是数据对象内部数据变了, 返回false,不要直接修改state数据, 而是要产生新数据
render props
向组件内部动态传入带内容的结构(标签):
-
Vue中:- 使用slot技术, 也就是通过组件标签体传入结构
<A><B/></A>
- 使用slot技术, 也就是通过组件标签体传入结构
-
React中:-
使用
children props: 通过组件标签体传入结构import React, { Component } from 'react' export default class Parent extends Component { render() { return ( <div style={{ 'width': '500px', 'backgroundColor': 'skyblue', 'padding': '10px' }}> <h3>这是Parent组件</h3> <A><B/></A> </div> ) } } class A extends Component { state = {name: 'tom'} render() { console.log(this) const {name} = this.state return ( <div style={{ 'width': '100%', 'backgroundColor': 'orange', 'padding': '10px' }}> <h3>这是A组件</h3> {this.props.children} </div> ) } } class B extends Component { render() { console.log('render--B') return ( <div style={{ 'width': '100%', 'backgroundColor': 'rgb(79, 207, 93)', 'padding': '10px' }}> <h3>这是B组件</h3> </div> ) } }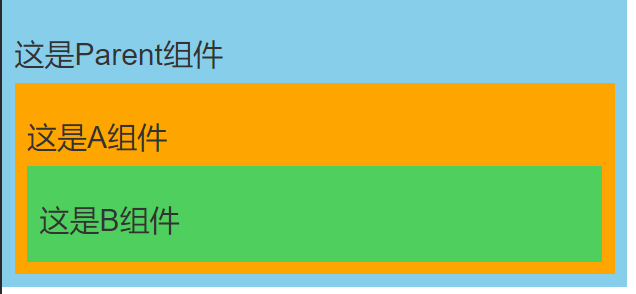
-
使用
render props: 通过组件标签属性传入结构,而且可以携带数据,一般用render函数属性import React, { Component } from 'react' export default class Parent extends Component { render() { return ( <div style={{ 'width': '500px', 'backgroundColor': 'skyblue', 'padding': '10px' }}> <h3>这是Parent组件</h3> <A render={name => <B name={name}/>} /> </div> ) } } class A extends Component { state = {name: 'tom'} render() { console.log(this) const {name} = this.state return ( <div style={{ 'width': '100%', 'backgroundColor': 'orange', 'padding': '10px' }}> <h3>这是A组件</h3> {this.props.render(name)} </div> ) } } class B extends Component { render() { console.log('render--B') return ( <div style={{ 'width': '100%', 'backgroundColor': 'rgb(79, 207, 93)', 'padding': '10px' }}> <h3>这是B组件, {this.props.name}</h3> </div> ) } }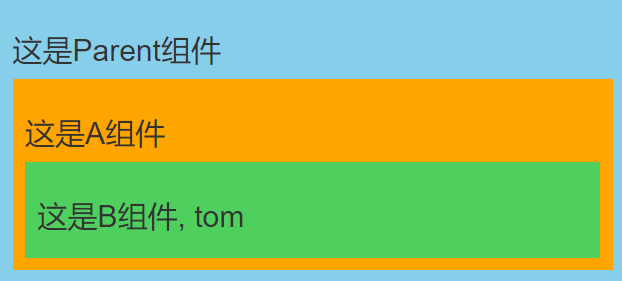
-
错误边界
错误边界(Error boundary):用来捕获后代组件错误,渲染出备用页面,只使用于生产环境
只能捕获后代组件生命周期产生的错误,不能捕获自己组件产生的错误和其他组件在合成事件、定时器中产生的错误
import React, { Component } from 'react'
import Child from './Child'

export default class Parent extends Component {

    state = {
        hasError: '' // 用于标识子组件是否产生错误
    }

    // 当子组件出现报错时,会触发getDerivedStateFromError调用,并携带错误信息
    static getDerivedStateFromError(error) {
        console.log(error)
        return {hasError: error}
    }

    componentDidCatch(error, info) {
        console.log('统计错误次数,发送给后台') // 统计错误次数,反馈给服务器
    }

    render() {
        return (
            <div>
                <h2>这是Parent组件</h2>
                {this.state.hasError ? <h2>出现了点小问题...</h2> : <Child />}
            </div>
        )
    }
}
组件间通信方式总结
组件间的关系
- 父子组件
- 兄弟组件(非嵌套组件)
- 祖孙组件(跨级组件)
几种通信方式
propschildren propsrender props
- 消息订阅-发布
pub-sub、event等
- 集中式管理
redux、dva等
conText- 生产者-消费者模式
比较好的搭配方式
- 父子组件:
props - 兄弟组件:消息订阅-发布、集中式管理
- 祖孙组件(跨级组件):消息订阅-发布、集中式管理、
Context(开发用的少,封装插件用的多)
