这里首先简单的介绍了RabbitMQ ,然后实现了springboot集成RabbitMQ ,包含两个工程:
1 Producer 生产者
2 Consumer 消费者
1 RabbitMQ 简介
AMQP :Advanced Message Queue,高级消息队列协议。
RabbitMQ 是一个由 Erlang 语言开发的 AMQP 的开源实现。
RabbitMQ是一个生产者和消费者模型,用于实现消息的接收、存储、转发。
模型如下图所示:
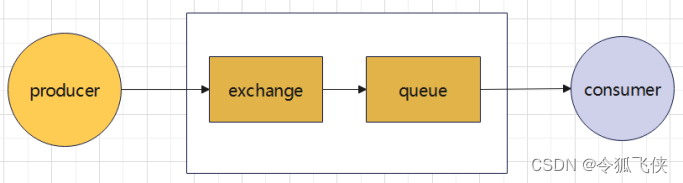
Producer 生产者
Consumer 消费者
Exchange 交换机
Queue :队列,存储消息
常用的交换机Exchange
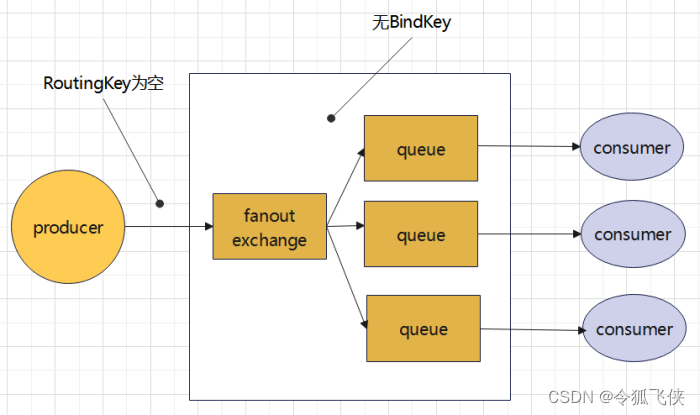
1)fanout Exchange(扇形交换机)
2)direct Exchange(直连交换机)
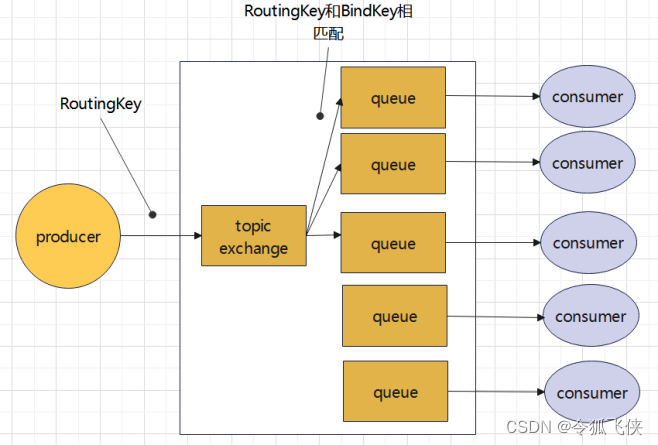
3)topic Exchange(主题交换机)
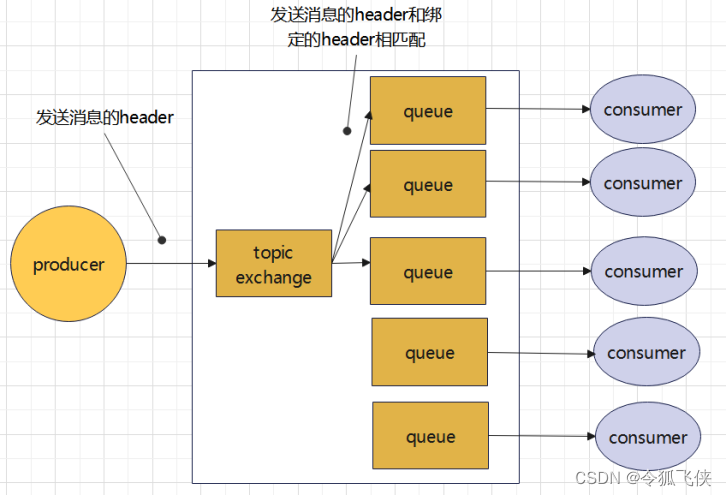
4)headers Exchange(头交换机)
2 springboot 集成RabbitMQ
第1步:pom中引入依赖的包:
		<dependency>
			<groupId>org.springframework.boot</groupId>
			<artifactId>spring-boot-starter-amqp</artifactId>
			<version>3.0.1</version>
		</dependency>
第2步:application.properties设置相关参数:
#rabbitmq相关配置
spring.rabbitmq.host=127.0.0.1
spring.rabbitmq.port=5672
spring.rabbitmq.username=guest
spring.rabbitmq.password=guest
spring.rabbitmq.publisher-confirm-type=correlated
spring.rabbitmq.publisher-returns=true
spring.main.allow-bean-definition-overriding = true
2.1 fanout Exchange(扇形交换机)
特点:将消息路由到所有与该交换机绑定的队列中。
第1步:创建配置类FanoutConfig,创建了:
交换机(exchange):fanout_exchange
队列(Queue):fanout_queue_A
绑定(Binding):fanoutBindA
队列(Queue):fanout_queue_B
绑定(Binding):fanoutBindB
@Configuration
public class FanoutConfig {
    @Bean("fanout_exchange")
    public FanoutExchange fanoutExchange() {
        return ExchangeBuilder.fanoutExchange("fanout_exchange").durable(true).build();
    }

    @Bean("fanout_queue_A")
    public Queue fanoutQueueA(){
        return QueueBuilder.durable("fanout_queue_A").build();
    }

    @Bean
    public Binding fanoutBindA(){
        return BindingBuilder.bind(fanoutQueueA()).to(fanoutExchange());
    }

    @Bean("fanout_queue_B")
    public Queue fanoutQueueB(){
        return QueueBuilder.durable("fanout_queue_B").build();
    }

    @Bean
    public Binding fanoutBindB(){
        return BindingBuilder.bind(fanoutQueueB()).to(fanoutExchange());
    }
}
第2步:Producer 项目创建发送消息的类FanoutService :
@Slf4j
@Service
public class FanoutService {
    String exchange = "fanout_exchange";

    @Resource
    private RabbitTemplate rabbitTemplate;

    public void sendData(String data) {
        log.info("------------fanout producer begin------------");
        rabbitTemplate.convertAndSend(exchange, "", data);
        log.info("exchange:"+exchange);
        log.info("send data:"+data);
        log.info("------------fanout producer end------------");
    }
}
第3步:Consumer 创建接收消息的类FanoutListener :
@Component
@Slf4j
public class FanoutListener {
    /**
     * .接收队列fanout_queue_A的数据
     */
    @RabbitListener(queues = {"fanout_queue_A"})
    @RabbitHandler
    public void receiveDataFromQueueA(Message message, Channel channel) throws IOException {
        long tag = message.getMessageProperties().getDeliveryTag();
        channel.basicAck( tag, true);
        log.info("------------fanout consumer begin------------");
        log.info("queue: fanout_queue_A");
        log.info("receive Data: " + new String(message.getBody()));
        log.info("------------fanout consumer end------------");
    }

    /**
     * .接收队列fanout_queue_B的数据
     */
    @RabbitListener(queues = {"fanout_queue_B"})
    @RabbitHandler
    public void receiveDataFromQueueB(Message message, Channel channel) throws IOException {
        long tag = message.getMessageProperties().getDeliveryTag();
        channel.basicAck( tag, true);
        log.info("------------fanout consumer begin------------");
        log.info("queue: fanout_queue_B");
        log.info("receive Data: " + new String(message.getBody()));
        log.info("------------fanout consumer end------------");
    }
}
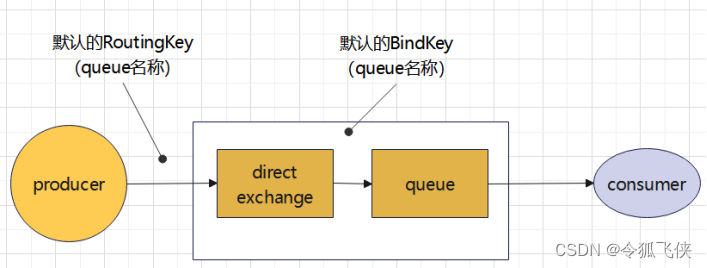
2.2 direct Exchange(直连交换机)
特点:根据消息默认的路由键(队列名称)将消息投递到相应的队列中。
第1步:创建配置类DirectConfig,创建了:
交换机(exchange):direct_exchange_A
队列(Queue):direct_queue_A
绑定(Binding):directBindA
交换机(exchange):direct_exchange_B
队列(Queue):direct_queue_B
绑定(Binding):directBindB
@Configuration
public class DirectConfig {
    @Bean("direct_exchange_A")
    public DirectExchange directExchangeA() {
        return ExchangeBuilder.directExchange("direct_exchange_A").durable(true).build();
    }

    @Bean("direct_queue_A")
    public Queue directQueueA() {
        return QueueBuilder.durable("direct_queue_A").build();
    }

    @Bean
    public Binding directBindA(@Qualifier("direct_queue_A")Queue queue,
                              @Qualifier("direct_exchange_A")DirectExchange directExchange){
        return BindingBuilder.bind(queue)
                .to(directExchange).withQueueName();
    }

    @Bean("direct_exchange_B")
    public DirectExchange directExchangeB() {
        return ExchangeBuilder.directExchange("direct_exchange_B").durable(true).build();
    }

    @Bean("direct_queue_B")
    public Queue directQueueB() {
        return QueueBuilder.durable("direct_queue_B").build();
    }

    @Bean
    public Binding directBindB(@Qualifier("direct_queue_B")Queue queue,
                               @Qualifier("direct_exchange_B")DirectExchange directExchange){
        return BindingBuilder.bind(queue)
                .to(directExchange).withQueueName();
    }
}
.withQueueName() 可见绑定key为queue名称。
第2步:Producer 项目创建发送消息的类DirectService :
@Slf4j
@Service
public class DirectService {
    String routeKey = "direct_queue_A";

    @Autowired
    private RabbitTemplate rabbitTemplate;

    public void sendData(String data) {
        CorrelationData correlationData = new CorrelationData(UUID.randomUUID().toString());
        log.info("------------direct producer begin------------");
        rabbitTemplate.convertAndSend(routeKey, data);
        log.info("routeKey:"+routeKey);
        log.info("send data:"+data);
        log.info("------------direct producer end------------");
    }
}
第3步:Consumer 创建接收消息的类DirectListener :
@Component
@Slf4j
public class DirectListener {

    /**
     * .接收队列direct_queue_A的数据
     */
    @RabbitListener(queues = {"direct_queue_A"})
    public void receiveDataFromQueueA(Message message, Channel channel) throws IOException {
        long tag = message.getMessageProperties().getDeliveryTag();
        channel.basicAck(tag, true);
        log.info("------------direct consumer begin------------");
        log.info("queue: fanout_queue_A");
        log.info("receive Data: " + new String(message.getBody()));
        log.info("------------direct consumer end------------");
    }

    /**
     * .接收队列direct_queue_B的数据
     */
    @RabbitListener(queues = {"direct_queue_B"})
    public void receiveDataFromQueueB(Message message, Channel channel) throws IOException {
        long tag = message.getMessageProperties().getDeliveryTag();
        channel.basicAck(tag, true);
        log.info("------------direct consumer begin------------");
        log.info("queue: fanout_queue_B");
        log.info("receive Data: " + new String(message.getBody()));
        log.info("------------direct consumer end------------");
    }
}
2.3 topic Exchange(主题交换机)
特点:将消息路由到路由键(RoutingKey)和绑定键(BindKey)相匹配的队列中。
第1步:创建配置类TopicConfig,创建了:
交换机(exchange):topic_exchange
队列(Queue):topic_queue_A
绑定(Binding):topicBindA
绑定key(BindKey):project1.station1.*
交换机(exchange):topic_exchange
队列(Queue):topic_queue_B
绑定(Binding):topicBindB
绑定key(BindKey):project1.."
@Configuration
public class TopicConfig {
    String routeKeyA = "project1.station1.*";
    String routeKeyB = "project1.*.*";

    @Bean("topic_exchange")
    public TopicExchange topicExchange() {
        return ExchangeBuilder.topicExchange("topic_exchange").durable(true).build();
    }

    @Bean("topic_queue_A")
    public Queue topicQueueA(){
        return QueueBuilder.durable("topic_queue_A").build();
    }

    @Bean
    public Binding topicBindA(){
        return BindingBuilder.bind(topicQueueA()).to(topicExchange()).with(routeKeyA);
    }

    @Bean("topic_queue_B")
    public Queue topicQueueB(){
        return QueueBuilder.durable("topic_queue_B").build();
    }

    @Bean
    public Binding topicBindB(){
        return BindingBuilder.bind(topicQueueB()).to(topicExchange()).with(routeKeyB);
    }
}
第2步:Producer 项目创建发送消息的类TopicService :
@Slf4j
@Service
public class TopicService {
    String exchange = "topic_exchange";
    //String routeKey = "project1.station1.device1";
    String routeKey = "project1.station2.device1";
    @Resource
    private RabbitTemplate rabbitTemplate;

    public void sendData(String data) {
        CorrelationData correlationData = new CorrelationData(UUID.randomUUID().toString());
        log.info("------------topic producer begin------------");
        rabbitTemplate.convertAndSend(exchange, routeKey, data);
        log.info("routeKey:"+routeKey);
        log.info("send data:"+data);
        log.info("------------topic producer end------------");
    }
}
第3步:Consumer 创建接收消息的类TopicListener :
@Component
@Slf4j
public class TopicListener {
    /**
     * .接收队列topic_queue_A的数据
     */
    @RabbitListener(queues = {"topic_queue_A"})
    public void receiveDataFromQueueA(Message message, Channel channel) throws IOException {
        long tag = message.getMessageProperties().getDeliveryTag();
        channel.basicAck( tag, true);
        log.info("------------topic_ consumer begin------------");
        log.info("queue: topic_queue_A");
        log.info("receive Data: " + new String(message.getBody()));
        log.info("------------topic_ consumer end------------");
    }

    /**
     * .接收队列topic_queue_B的数据
     */
    @RabbitListener(queues = {"topic_queue_B"})
    public void receiveDataFromQueueB(Message message, Channel channel) throws IOException {
        long tag = message.getMessageProperties().getDeliveryTag();
        channel.basicAck( tag, true);
        log.info("------------topic_ consumer begin------------");
        log.info("queue: topic_queue_B");
        log.info("receive Data: " + new String(message.getBody()));
        log.info("------------topic_ consumer end------------");
    }
}
2.4 headers Exchange(头交换机)
特点:路由规则是建立在头属性值之上,而不是路由键。
第1步:创建配置类TopicConfig,创建了:
交换机(exchange):headers_exchange
队列(Queue):headers_queue_A
绑定(Binding):headersBindA
头(headers):
headerValues.put(“type”, “gass”);
headerValues.put(“data”, “realTime”);
匹配规则:whereAll
队列(Queue):headers_queue_B
绑定(Binding):headersBindB
头(headers):
headerValues.put(“type”, “gass”);
headerValues.put(“data”, “realTime”);
匹配规则:whereAny
@Configuration
public class HeadersConfig {

    @Bean("headers_exchange")
    public HeadersExchange headersExchange() {
        return ExchangeBuilder.headersExchange("headers_exchange").durable(true).build();
    }

    @Bean("headers_queue_A")
    public Queue headerQueueA(){
        return QueueBuilder.durable("headers_queue_A").build();
    }

    @Bean
    public Binding headersBindA(){
        Map<String,Object> headerValues = new HashMap<>();
        headerValues.put("type", "gass");
        headerValues.put("data", "realTime");
        return BindingBuilder.bind(headerQueueA()).to(headersExchange()).whereAll(headerValues).match();
    }

    @Bean("headers_queue_B")
    public Queue headerQueueB(){
        return QueueBuilder.durable("headers_queue_B").build();
    }

    @Bean
    public Binding headersBindB(){
        Map<String,Object> headerValues = new HashMap<>();
        headerValues.put("type", "gass");
        headerValues.put("data", "realTime");
        return BindingBuilder.bind(headerQueueB()).to(headersExchange()).whereAny(headerValues).match();
    }
}
第2步:Producer 项目创建发送消息的类HeadersService :
@Slf4j
@Service
public class HeadersService {
    String exchange = "headers_exchange";
    String routeKey = "";

    @Resource
    private RabbitTemplate rabbitTemplate;

    public void sendData(String data) {
        log.info("------------headers producer begin------------");
        MessageProperties messageProperties = new MessageProperties();
        messageProperties.setHeader("type", "gass");
        messageProperties.setHeader("data", "realTime");
        //messageProperties.setHeader("data", "history");
        Message message = new Message(data.getBytes(), messageProperties);
        rabbitTemplate.convertAndSend(exchange, routeKey, message);
        log.info("send data:"+data);
        log.info("------------headers producer end------------");
    }
}
第3步:Consumer 创建接收消息的类HeadersListener :
@Component
@Slf4j
public class HeadersListener {
    /**
     * .接收队列headers_queue_A的数据
     */
    @RabbitListener(queues = {"headers_queue_A"})
    public void receiveDataFromQueueA(Message message, Channel channel) throws IOException {
        long tag = message.getMessageProperties().getDeliveryTag();
        channel.basicAck( tag, true);
        log.info("------------headers consumer begin------------");
        log.info("queue: headers_queue_A");
        log.info("receive Data: " + new String(message.getBody()));
        log.info("------------headers consumer begin------------");
    }

    /**
     * .接收队列headers_queue_B的数据
     */
    @RabbitListener(queues = {"headers_queue_B"})
    public void receiveDataFromQueueB(Message message, Channel channel) throws IOException {
        long tag = message.getMessageProperties().getDeliveryTag();
        channel.basicAck( tag, true);
        log.info("------------headers consumer begin------------");
        log.info("queue: headers_queue_B");
        log.info("receive Data: " + new String(message.getBody()));
        log.info("------------headers consumer begin------------");
    }
}
3 测试验证
3.1 fanout Exchange验证
第1步:postman发送请求:
http://127.0.0.1:8081/rabbitMq/sendMessageByFanout?msg=hello,fanout exchangge!
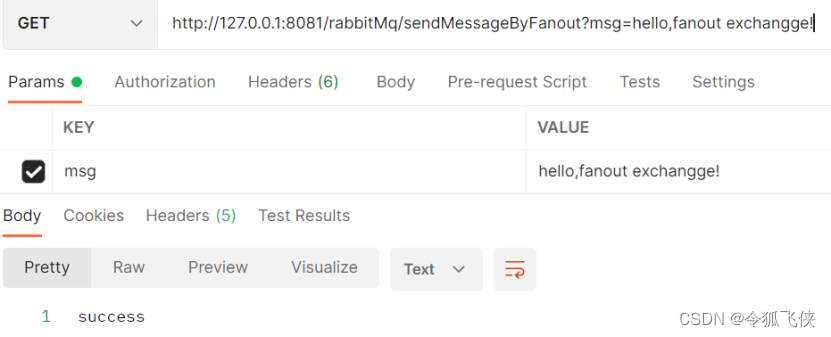
第2步:可以看到producer发送消息:

第3步:可以看到consumer接收消息:

可见:与交换机fanout_exchange绑定的两个队列fanout_queue_A、fanout_queue_B都收到了消息。
3.2 direct Exchange验证
第1步:postman发送请求:
http://127.0.0.1:8081/rabbitMq/sendMessageByDirect?msg=hello,direct exchangge!
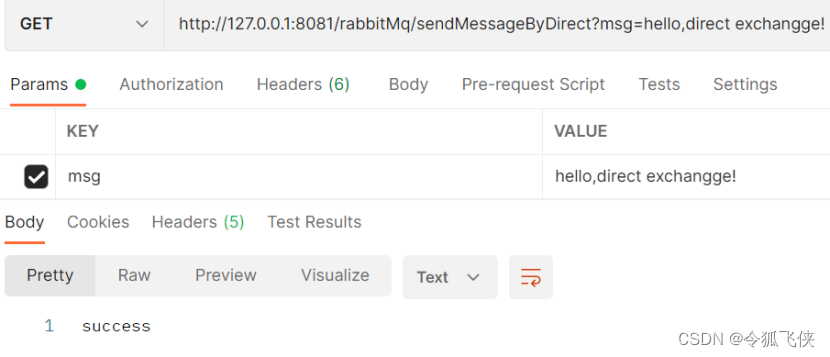
第2步:可以看到producer发送消息:

第3步:可以看到consumer接收消息:

可见:routeKey 和BindKey都为queue名称direct_queue_A,队列direct_queue_A收到了消息。
3.3 topic Exchange验证
3.3.1 topic_queue_A、topic_queue_B都匹配
路由键(routeKey):project1.station1.device1
绑定key(BindKey):project1.station1.*
绑定key(BindKey):project1.."
第1步:postman发送请求:
http://127.0.0.1:8081/rabbitMq/sendMessageByTopic?msg=hello,topic exchangge!
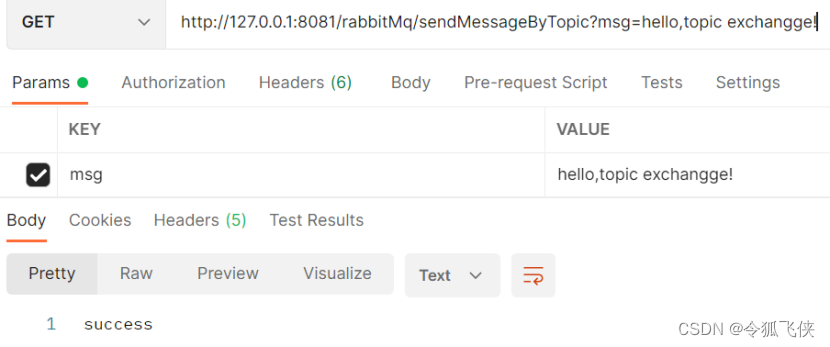
第2步:可以看到producer发送消息:

第3步:可以导刊consumer接收消息:
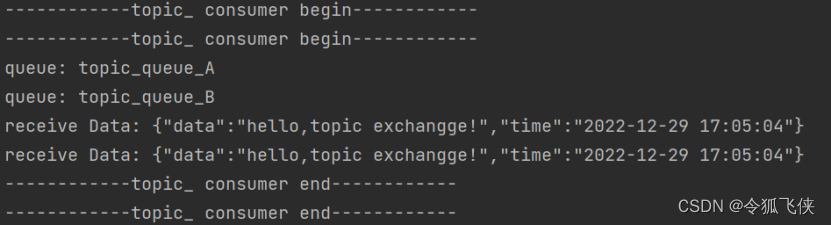
可以看到两个队列 topic_queue_A、topic_queue_B都收到了消息。
3.3.2 只有topic_queue_B匹配
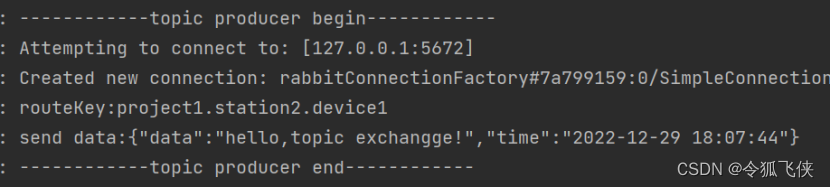
路由键(routeKey):project1.station2.device1
绑定key(BindKey):project1.station1.*
绑定key(BindKey):project1.."
第1步:postman发送请求:
http://127.0.0.1:8081/rabbitMq/sendMessageByTopic?msg=hello,topic exchangge!

第2步:可以看到producer发送消息:
第3步:可以看到consumer接收消息:

可以看到只有队列topic_queue_B收到了消息。
3.4 headers Exchange验证
3.4.1 headers_queue_A、headers_queue_B都匹配
发送消息的header:
messageProperties.setHeader("type", "gass");
messageProperties.setHeader("data", "realTime");
第1步:postman发送请求:
http://127.0.0.1:8081/rabbitMq/sendMessageByHeaders?msg=hello,headers exchangge!

第2步:可以看到producer发送消息:

第3步:可以看到consumer接收消息:
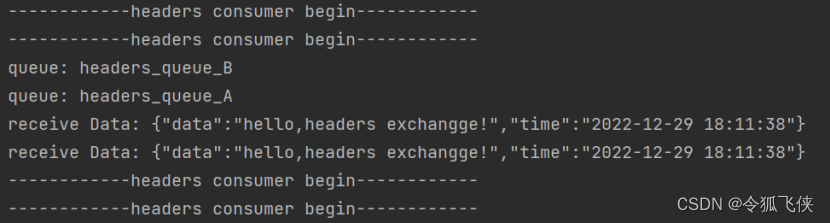
可见headers_queue_A、headers_queue_B都收到了消息。
3.4.2 只有headers_queue_B匹配
发送消息的header:
messageProperties.setHeader("type", "gass");
messageProperties.setHeader("data", "history");
第1步:postman发送请求:
http://127.0.0.1:8081/rabbitMq/sendMessageByHeaders?msg=hello,headers exchangge!

第2步:可以看到producer发送消息:

第3步:可以看到consumer接收消息:

可见:只有headers_queue_B收到了消息。
代码详见:
https://gitee.com/linghufeixia/springboot-simple
chapter6-4 producer项目
chapter6-5 consumer项目
教程列表:
springboot simple(0) springboot简介
springboot simple(1) springboot Helloworld
springboot simple(2) springboot Starter
springboot simple(3 )springboot Web开发
springboot simple(4)springboot 数据持久化
springboot simple (5) springboot Nosql
springboot simple (6) springboot mqtt
springboot simple (7) springboot thrift
springboot simple (8) springboot kafka
springboot simple (9) springboot jpa(Hibernate)
springboot simple (10) springboot protobuf
springboot simple (11) springboot protostuff
springboot simple (12) springboot RabbitMQ