操作系统实验1:操作系统的引导
- 现在是2022年12月22日,本人一如既往又是ddl战神😅 (虽然一周前刚立过flag)
- 两个月前就布置了的内容硬是拖到现在,这波实在是看不下去自己了😅😅😅
- 拖到了ddl的最后一天,明早十点要交八个lab的代码+实验报告 😭
- 更新:老师是我的神! ddl突然变成了12月27号下午4点,先不管这个了
- 先去赶另一个布置了一个月但只是调通了环境的大作业了(((😅, 这个的ddl是明晚八点…
- 下面是一些记录(有些地方用英语是为了practice 一下 English:)
- bksw,再赶这些的时候已经是12月26了,这篇写于12月26下午五点
文章目录
- 操作系统实验1:操作系统的引导
- 一.过程记录
- 1.把文件从win发到Linux上面
- 2.搭建环境(不然没法make all)
- 安装as86
- 安装gcc-3.4
- 更新gcc版本优先级
- 安装gcc-multilib
- 安装build-essential
- 安装bochs
- 可以make all了!!!
- 运行run脚本
- 芜湖
- 3.修改内核代码
- 4.重新编译内核
- 二.Linux基本操作一些小总结
- cd
- ls
- rm
- Linux文件打包和解压缩
- tar
- tar打包
- tar解包
- 文件压缩命令
- bzip2
- gzip
- zip
- 一步到位:tar命令打包结合前面的几个指令进行压缩
- 其他
- 三.一些基础知识
- vim中如何搜索代码
- gcc 、g++ 、GCC、GNU
- gcc-multilib
- dpkg
- wget
- make 和 make all
- bochs
- Linux0.11
- apt-file
- .so文件
- apt update 和 apt-get update
- i386和amd64
- 四.常见问题 lock
一.过程记录
1.把文件从win发到Linux上面
-
用
scp命令将windows上的“hit-oslab-linux-20110823.tar.gz”文件传到Linux上面-
命令格式
scp 要传的文件的路径 用户名@IP地址:目标路径 -
若是要传到传到
/usr、/root等目录下,需要在scp的时候使用root用户
Now,the file is on the Desktop of my ubuntu.

-
-
The next step is to unzip such file.
I search this question in stackoverflow :
https://stackoverflow.com/a/651028/18159372tar xzf file.tar.gz-
The letters are:
- x - extract
- z - gunzip the input
- f - Read from a file, not stdin
-
-
Then I get the folder ‘oslab’ after I unzipping the file.

-
我们看看oslab文件夹里面有哪些文件

- 脚本文件
run*:以不同模式运行虚拟机,脚本 run 采用正常模式,脚本 rundbg 采用 bochs 调试模式(汇编级),脚本 rungdb 采用 gdb 调试模式( C 语句级),这三个模式都用于内核测试。 用于启动虚拟机的内核映像文件是cur/linux/目录下的Image; 虚拟机的根文件系统是images文件夹下的rootimage-0.11;
- 脚本文件
2.搭建环境(不然没法make all)
-
下一步是
cd到 linux-0.11目录下面进行make allHowever,so much errors.

Then I type
make: as86: Command not foundinto google search .
安装as86
找到了同是做HIT oslab的uu记录的经验贴
-
参考他的做法
-
首先
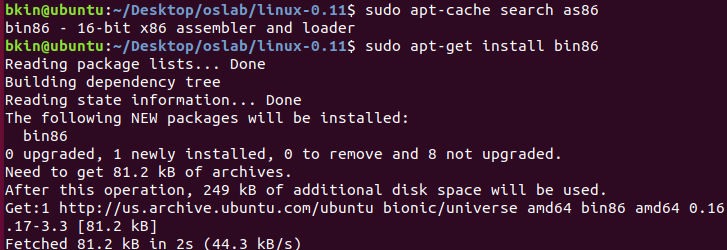
sudo apt-cache search as86查找as86所在的软件包显示as86在bin86里面
-
下一步安装bin86:
sudo apt-get install bin86
-
安装gcc-3.4
-
于是继续
make all, 这次是显示缺少gcc-3.4
我去看了看原先的gcc版本,显示是gcc -7.5

- 参考资料
- https://www.cnblogs.com/mirage-mc/p/12681366.html
- https://www.cnblogs.com/mirage-mc/p/12683481.html
- 哈工大操作系统系列实验0-熟悉实验环境
- 参考资料
-
我先新建了一个文件夹
/usr/bin/gcc3_4,然后wget要安装的gcc的deb文件wget http://old-releases.ubuntu.com/ubuntu/pool/main/g/gcc-3.4/cpp-3.4_3.4.6-6ubuntu2_amd64.deb wget http://old-releases.ubuntu.com/ubuntu/pool/main/g/gcc-3.4/gcc-3.4-base_3.4.6-6ubuntu2_amd64.deb wget http://old-releases.ubuntu.com/ubuntu/pool/main/g/gcc-3.4/gcc-3.4_3.4.6-6ubuntu2_amd64.deb
-
然后用dpkg安装
dpkg -i cpp-3.4_3.4.6-6ubuntu2_amd64.deb gcc-3.4_3.4.6-6ubuntu2_amd64.deb gcc-3.4-base_3.4.6-6ubuntu2_amd64.deb
-
看看装到哪里了
whereis gcc-3.4
ls /usr/bin/gcc* -llThe
lscommand is a utility that is used to list the contents of a directory. When used with the/usr/bin/gcc*argument, it will list the contents of the/usr/bindirectory that match the patterngcc*, which means any file or directory that begins withgcc.The
-lloption tellslsto use a long listing format, which means it will show detailed information about each file or directory that is listed. This includes the permissions, owner, size, and modification date for each file, as well as the number of links and the file type for each directory.For example, if you run the following command:
ls /usr/bin/gcc* -llIt will list the contents of the
/usr/bindirectory that match the patterngcc*, using the long listing format. This might include files such asgcc,gcc-10,gcc-7, and other files that begin withgcc.Note that the
*character is a wildcard(通配符) that is used to match any characters. In this case, it is used to match any file or directory that begins withgcc.
更新gcc版本优先级
-
To set the priority of different versions of GCC on a Debian-based system, you can use the
update-alternativescommand. This command allows you to specify which version of a given program should be used by default.To set the priority of GCC 3.4 over GCC 7.5, you can use the following steps:
-
First, check the available versions of GCC by running the following command:
update-alternatives --list gccThis will show you the available versions of GCC that are installed on your system.
-
To set the priority of GCC 3.4, you will need to specify its path and the priority value that you want to use. You can find the path of GCC 3.4 by running the following command:
which gcc-3.4This will show you the path of the
gcc-3.4executable. -
Once you have the path of GCC 3.4, you can use the
update-alternativescommand to set its priority. For example:sudo update-alternatives --install /usr/bin/gcc gcc /usr/bin/gcc-3.4 50This will set the priority of GCC 3.4 to 50. The higher the priority value, the higher the priority of the program.

-
To verify that the priority has been set correctly, you can run the following command:
update-alternatives --display gccThis will show you the available versions of GCC and their priority values. You should see that GCC 3.4 has a higher priority than GCC 7.5.

-
Note that the
update-alternativescommand can also be used to set the priority of other programs, such asg++andcpp. You can use the same steps as above to set the priority of these programs.
-
现在看看gcc的默认版本是否更改过来了

-
之前在做cs61a的lab0的时候,还用过
sudo update-alternatives --config设置优先级,这里也可以那么其实就是设置priority和config选择编号都可以

-
问问chatgpt!
Q:我通过sudo update-alternatives --config 和 设置priority的值 这两种方式来设置优先级有什么区别
A:
update-alternatives是一个 Linux 命令,它允许您在系统中管理多个可供选择的程序版本,以便用户可以在这些程序之间进行切换。您可以使用update-alternatives命令来设置一个默认程序版本,也可以使用该命令来查看系统中可用的程序版本。使用
update-alternatives命令时,您可以使用--config选项来查看可用的程序版本并选择一个默认版本。例如,假设您有两个可供选择的版本的gcc编译器,您可以使用以下命令来查看可用的版本并选择一个默认版本:sudo update-alternatives --config gcc此命令会显示所有可用的
gcc版本,并提示您选择一个版本。
另一方面,您还可以使用update-alternatives命令的--set选项来设置默认版本,并指定其优先级。例如,假设您想要将版本 2 设为默认版本,并且希望其优先级为 1000,您可以使用以下命令:sudo update-alternatives --set gcc /usr/bin/gcc-2 1000在这种情况下,您不需要查看可用的版本并手动选择,而是可以直接使用命令指定版本和优先级。
总而言之,如果您想要更改系统中的默认程序版本,则可以使用
update-alternatives命令的--config或--set选项。
使用--config选项时,您可以查看可供选择的程序版本并选择一个默认版本。这是一种更加交互式的方法,因为您可以看到所有可用的版本,并且可以通过选择编号来选择默认版本。
使用--set选项时,您可以直接指定默认版本的文件路径,并可以选择为该版本设置优先级。这是一种更加简单的方法,但是您必须知道要设为默认版本的文件路径,并且无法查看可用的其他版本。
总的来说,使用--config选项更适合交互式使用,而使用--set选项则更适合脚本化使用。取决于您的需求,可以使用适当的选项来设置默认程序版本。
-
安装gcc-multilib
-
安装完gcc-3.4
我尝试去linux0.11下make all,结果报了一堆错误

-
还需要安装gcc-multilib
sudo apt-get install gcc-multilib网络问题,装了两遍
安装build-essential
-
命令如下
sudo apt-get install build-essential -
日常感叹chatgpt tql

安装bochs
-
命令如下
sudo apt-get install bochs bochs-x bochs-sdl
可以make all了!!!
-
make all 成功啦

-
此时也出现了Image文件夹

运行run脚本
-
首战告负

-
网上有很多xd遇到这个问题,参考这篇博客来搞一下
-
打印动态链接配置
ldconfig -p | grep libSM.so.6打印结果为
libSM.so.6 (libc6,x86-64) => /usr/lib/x86_64-linux-gnu/libSM.so.6
-
-
安装apt-file
sudo apt install apt-file -
搜索
apt-file search libSM.so.6遇到如下问题

这个错误信息提示系统中的软件包信息缓存已经清空,因此无法执行查找操作。
在使用 apt-file 命令查找文件的时候,apt-file 会在本地的软件包信息缓存中查找,如果缓存为空,那么就会出现这个错误。
要解决这个问题,要先运行 apt update 命令来更新软件包信息缓存,然后再尝试使用 apt-file 命令查找文件。
-
根据提示来运行apt update
结果遇到了这个经常遇到的问题

这个错误通常是由于在系统中已经有一个进程正在使用 dpkg 命令进行软件包管理操作,导致其他进程无法获取 dpkg 的锁而产生的。
要解决这个问题,你需要等待正在使用 dpkg 的进程结束,或者手动杀掉这个进程。
参考这个
sudo killall apt apt-get
sudo rm /var/lib/apt/lists/lock
sudo rm /var/cache/apt/archives/lock
sudo rm /var/lib/dpkg/lock*
sudo dpkg --configure -a
sudo apt update
泪目,等了很久

-
apt-file search libSM.so.6
得到其对应的包名为libsm6,安装对应的32位库
sudo apt-get install libsm6:i386
-
接着切回oslab运行run脚本,还是报错

libX11.so.6is a shared library that provides support for the X Window System, which is a network-transparent window system for displaying graphical user interfaces (GUIs) on Unix-like operating systems. It is part of the X Window System library, which provides a set of functions and data structures that allow applications to interact with the X Window System. The.soextension stands for “shared object,” which means that the library is compiled in a way that allows it to be loaded and used by multiple programs at the same time. The.6at the end of the file name is the version number of the library. -
按照上面的方法依葫芦画瓢,
apt-file search libX11.so.6,但是有两个对应包名🤔
-
不知道搞哪个了,接着跟着博客走
-
使用
dpkg-query工具dpkg-query -S libX11.so.6dpkg-queryis a command-line tool that is used to manage packages in a Debian-based Linux system. It can be used to perform a variety of tasks, such as listing the packages installed on the system, displaying information about a specific package, or searching for a package that provides a particular file.
-
-
于是安装对应的包
上面我这没显示i386, 但还是按照博主写的来装32位的吧
libx11-6:i386andlibx11-6:amd64are package names for the X Window System library. These packages are used to provide support for the X Window System, which is a network-transparent window system for displaying graphical user interfaces (GUIs) on Unix-like operating systems.The main difference between
libx11-6:i386andlibx11-6:amd64is the architecture of the processor that they are compiled for. Thei386architecture refers to 32-bit processors, while theamd64architecture refers to 64-bit processors. These packages contain the same set of files and functions, but they are compiled in a way that is optimized for the specific processor architecture.In general, you should use the
libx11-6:i386package on a 32-bit system and thelibx11-6:amd64package on a 64-bit system. This will ensure that the package is compatible with your system and that you get the best performance possible.It is also worth noting that these packages are typically used as dependencies for other software packages, rather than being installed directly. This means that you might not need to install them directly unless you are trying to resolve a dependency issue or are installing software that specifically requires these packages.
sudo apt-get install libx11-6:i386 -
继续尝试
./run新的错误👇
./bochs/bochs-gdb: error while loading shared libraries: libXpm.so.4: cannot open shared object file: No such file or directory -
依葫芦画瓢
dpkg-query -S libXpm.so.4我这还是只显示了amd64的
libxpm4:amd64: /usr/lib/x86_64-linux-gnu/libXpm.so.4
libxpm4:amd64: /usr/lib/x86_64-linux-gnu/libXpm.so.4.11.0
但还是安装32位的
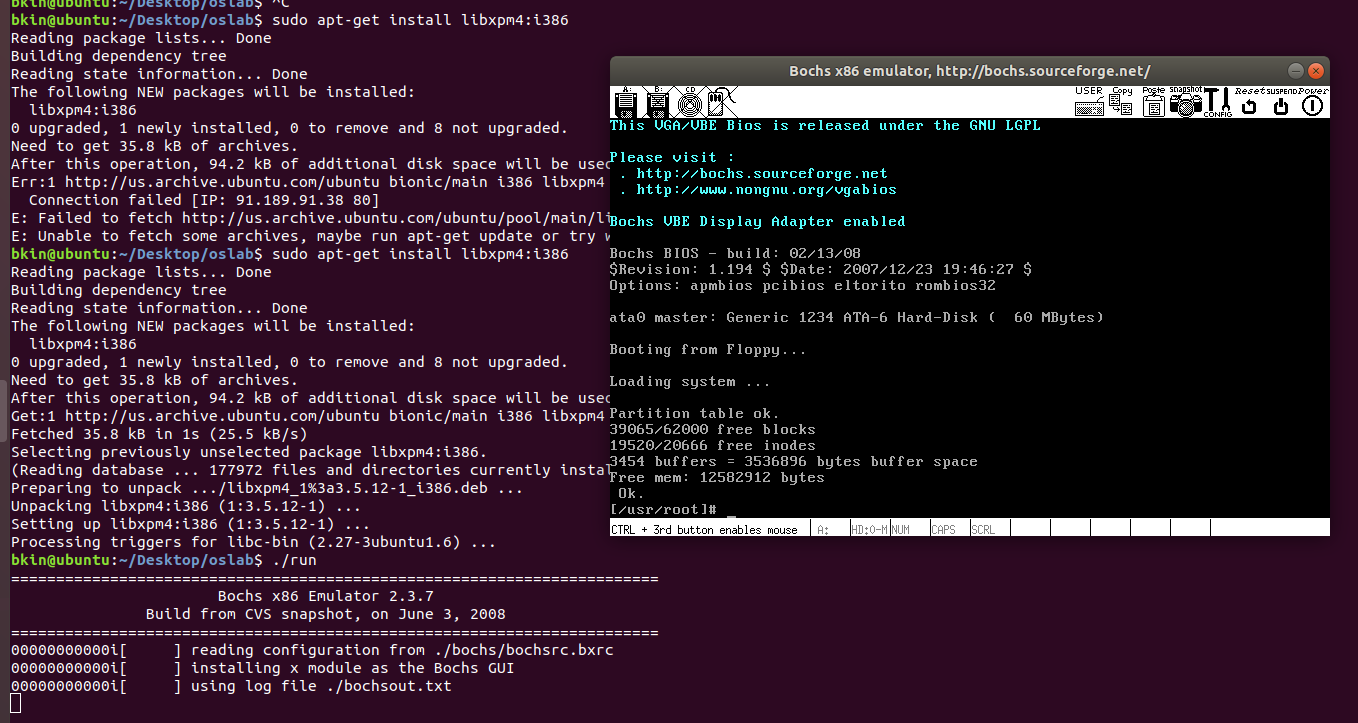
sudo apt-get install libxpm4:i386
芜湖
3.修改内核代码
-
进入oslab的boot目录下,修改
bootsect.s- 在Vim中快速定位到相应的地方(相当于ctrl+f)
-
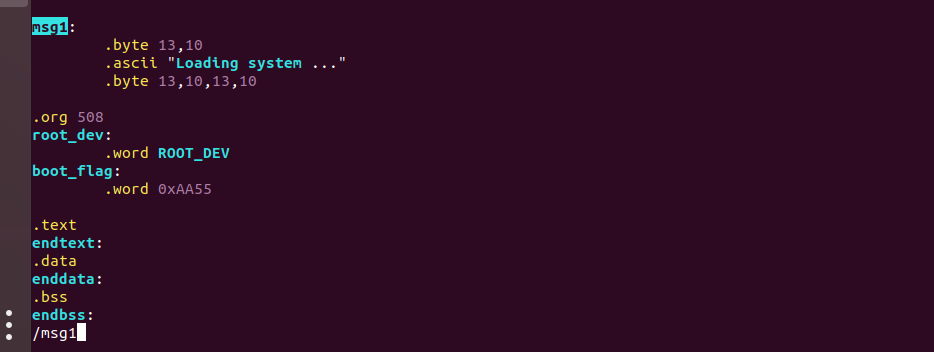
首先找到msg1,修改语句
在vim中输入/msg1可快速定位,然后输入i修改代码

-
bootsect.s文件中第92行到105行为有关屏幕输出的相关代码。
! Print some inane message

    mov ah,#0x03 ! read cursor pos
    xor bh,bh
    int 0x10

    mov cx,#24
    mov bx,#0x0007 ! page 0, attribute 7 (normal)
    mov bp,#msg1
    mov ax,#0x1301 ! write string, move cursor
    int 0x10
如上所示 3-5行:读入光标位置
7行:指明要显示的字符串的长度
-
修改后如下所示。其中es:bp是显示字符串的地址,相比与 linux-0.11 中的代码,需要增加对 es 的 处理,因为原代码中在输出之前已经处理了 es。这里需要修改的是字符串长度,即用需要输出的字符串 长度替换
mov cx,#24中的 24。-
要注意:除了我们设置的字符串 msg1 之外,还有三个换行 + 回车, 一共是 6 个字符。
下面的66是我的msg1里面的句子的长度60 + 6
!Print some inane message

	mov ah,#0x03 ! read cursor pos
	xor bh,bh
	int 0x10

	mov cx,#66
	mov bx,#0x0007 ! page 0, attribute 7 (normal)
	mov bp,#msg1
	mov ax,#0x07c0
	mov es,ax
	mov ax,#0x1301 ! write string, move cursor
	int 0x10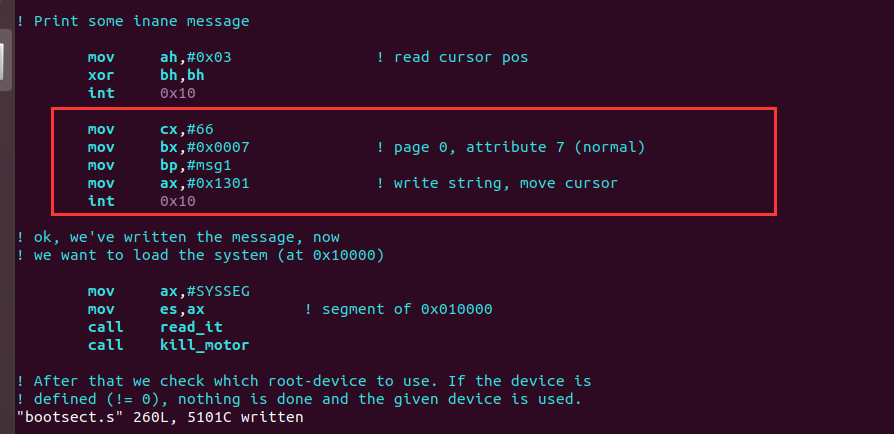
-
接下来就是修改输出的字符串了,字符串msg1在
bootsect.s文件末尾的位置:! msg1 处放置字符串 msg1: ! 换行 + 回车 .byte 13,10 .ascii "要输出的句子" ! 两对换行 + 回车 .byte 13,10,13,10比如若这里 句子是Hello OS world, my name is XXX 的长度是 30,加上 6 后是 36,所以 代码应该修改为 mov cx,#36
-
我懒得数我的句子的长度了,用python帮我数
sentence="xxxxxxxxxxxxxxxxxxxxxx." #替换成自己想要的句子
letters = [letter for letter in sentence]
letter_count = len(letters)

print(letters)
print(letter_count)
-
4.重新编译内核
-
去linux-0.11目录下make
-
然后回到oslab下
./run,芜湖!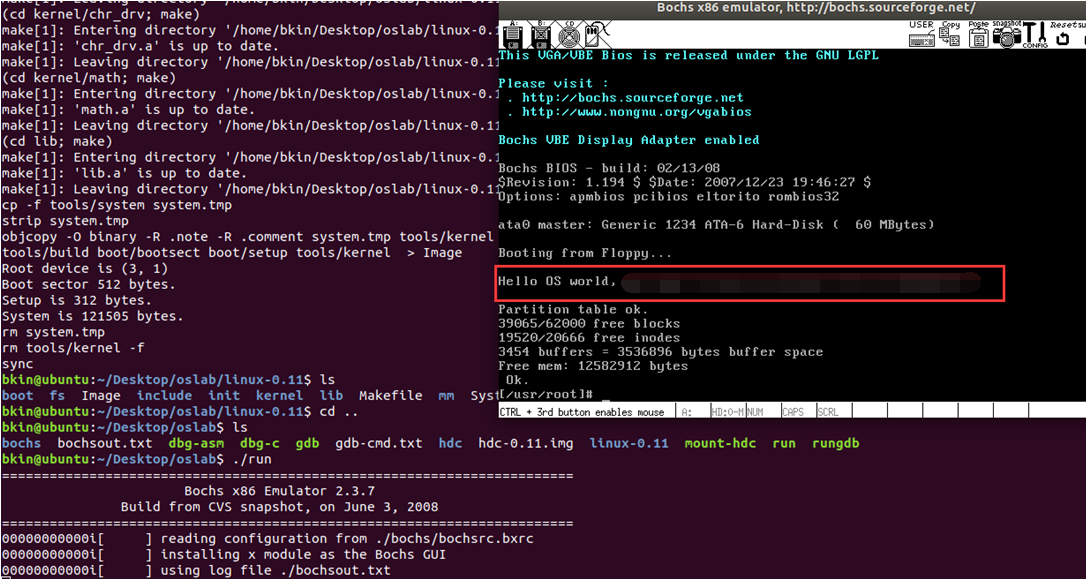
二.Linux基本操作一些小总结
- 参考
- https://www.educoder.net/paths/7eafpj36
- https://www.educoder.net/tasks/o5zghlrtf2wn
cd
-
cd使用方法总结
- 相对路径切换:以当前目录为起点去切换。
- 绝对路径切换:以根目录为起点去切换。
- 常用👇
cd 进入用户主目录; cd / 切换到根目录 cd ~ 进入用户主目录; cd - 返回进入此目录之前所在的目录; cd .. 返回上级目录(若当前目录为”/“,则执行完后还在”/“;”..”为上级目录的意思); cd ../.. 返回上两级目录; cd !$ 把上个命令的参数作为cd参数使用。若记不全路径,可以使用按两次 Tab 查看有哪些目录可选。
ls
-
ls命令总结
ls -l 可以 缩写为 ll
ls -l:以长格式显示目录下的内容列表。输出的信息从左到右依次包括文件名,文件类型、权限模式、硬连接数、所有者、组、文件大小和文件的最后修改时间等;
ls -a:显示所有文件和文件夹(包括隐藏文件/文件夹)。
rm
-
rm命令总结
rm [命令选项] filename -
常用命令选项
 -f:强制删除文件或目录;
 -r或-R:递归处理,将指定目录下的所有文件与子目录一并处理;
 -i:删除已有文件或目录之前先询问用户。
Linux文件打包和解压缩
tar
tar(tape archive的简写)其名称源于它的原始功能-创建和读取归档文件和备份磁带。
tar打包
tar命令可以将多个文件/目录进行打包,将多个文件生成一个文件,生成的文件后缀为.tar。
具体打包命令如下:
tar -cvf 生成的tar包名 要打包的文件/目录列表
常用命令参数如下:
-c 建立新的归档文件;
-v 处理过程中输出相关信息;
-f 对普通文件操作;
tar解包
tar命令可以将已经打包好的文件解压出来。
-
具体打包命令如下:
tar -xvf 解压包名 -C 解压到指定目录 -
常用命令参数如下:
-x 或--ext\fract或--get:从备份文件中还原文件;
-v 处理过程中输出相关信息;
-f  对普通文件操作;
-C <目的目录> 切换到指定的目录;
如果不使用
-C(大写)参数,则默认解压到当前目录下。
文件压缩命令
-
Linux下存在多个文件压缩工具,常用的有bzip2、gzip和zip。这三个工具都是可以将一个文件进行压缩操作,使其在不丢失任何信息的情况下占用较少的磁盘空间。 -
对于多文件/目录的压缩操作分为两步:第一步是将其进行打包,然后将打包过后的文件进行压缩操作。
bzip2
-
bzip2命令用于创建和管理(包括解压缩).bz2格式的压缩包。 -
具体命令如下:
bzip2 命令参数 指定要压缩的文件常用命令参数如下:
-z或——compress:强制执行压缩;
-d或——decompress:执行解压缩;
-f或-force:bzip2在压缩或解压缩时,若输出文件与现有文件同名,预设不会覆盖现有文件。若要覆盖。请使用此参数;
-v或——verbose:压缩或解压缩文件时,显示详细的信息;
gzip
-
gzip命令用于创建和管理(包括解压缩).gz格式的压缩包。 -
具体命令如下:
gzip 命令参数 指定要压缩的文件 -
常用命令参数如下:
-d或--decompress或----uncompress:解开压缩文件;
-f或——force:强行压缩文件。不理会文件名称或硬连接是否存在以及该文件是否为符号连接;
-l或——list:列出压缩文件的相关信息;
-r或——recursive:递归处理,将指定目录下的所有文件及子目录一并处理;
-v或——verbose:显示指令执行过程;
zip
-
zip命令对文件进行打包操作。zip是个使用广泛的压缩程序,文件经它压缩后会另外产生具有.zip扩展名的压缩文件。 -
具体命令如下:
zip 命令参数 指定生成的压缩文件名 要被压缩的文件/目录列表 -
常用命令
-d:从压缩文件内删除指定的文件;
-q:不显示指令执行过程;
-r:递归处理,将指定目录下的所有文件和子目录一并处理;
-v:显示指令执行过程或显示版本信息;
-u:更换较新的文件到压缩文件内;
-x<范本样式>:压缩时排除符合条件的文件;
一步到位:tar命令打包结合前面的几个指令进行压缩
-
tar命令可以对多个文件/目录进行打包操作,如果针对多文件/目录进行压缩操作时,首先使用tar将其打包生成一个文件,然后使用bzip2和gzip对其进行压缩,那么这里也可以使用tar命令一步就实现对多文件/目录进行压缩操作。 -
采用
bzip2方式执行tar命令进行压缩的具体命令如下:tar -jcvf 指定生成的压缩文件名 要被压缩的文件/目录列表常用命令参数如下:
-c 建立新的归档文件; -v 处理过程中输出相关信息; -f 对普通文件操作; -j 以bzip2对文件/目录进行压缩; -
采用
gzip进行压缩的具体命令如下:tar -zcvf 指定生成的压缩文件名 要被压缩的文件/目录列表常用命令参数如下:
-c 建立新的归档文件;
-v 处理过程中输出相关信息;
-f 对普通文件操作;
-z 以gzip对文件/目录进行压缩;
其他
-
记得多用tab补全命令
-
未解决:
ctrl+alt+t打不开我的terminal了,去settings里面修改也没有用- 查了一下,是因为我把python默认版本换了的问题
- 暂时先不解决,留一个链接在这里 :https://askubuntu.com/a/1239610/1659304
-
scp命令搞清楚逻辑、用户名(有的路径需要权限)
- CSDN上一个关于scp使用比较不错的总结:scp命令传文件
三.一些基础知识
vim中如何搜索代码
-
How to search code in Vim?
To search for a specific string of text in Vim, you can use the
/key followed by the string you want to search for. For example, to search for the word “foo”, you would type/fooand pressEnter.You can also use regular expressions in your search by enclosing the search string in
/characters. For example, to search for any line that contains the word “foo”, you could use the regular expression/foo.To move to the next occurrence of the search string, use the
nkey. To move to the previous occurrence, use theNkey.If you want to perform a case-insensitive search, you can use the
\cflag. For example, to search for the word “foo” without regard to case, you would use the search string/foo\c.You can also use the
*key to search for the word under the cursor. For example, if the cursor is on the word “foo”, pressing*will search for the next occurrence of “foo” in the document.For more information on searching in Vim, you can consult the Vim documentation by typing
:help searchingwithin Vim.
gcc 、g++ 、GCC、GNU
- What is gcc 、 g++ and gnu ? What is their relationship?
- GCC (GNU Compiler Collection) is a collection of compilers and libraries for C, C++, Fortran, and other programming languages. It is developed and maintained by the Free Software Foundation (FSF) as part of the GNU Project.
- GCC includes front-ends for several programming languages, including C, C++, and Fortran. The C and C++ front-ends are called
gccandg++, respectively. These are the compilers that are used to compile C and C++ source code into executable programs. - GNU (GNU’s Not Unix) is a project that aims to develop a complete, free software operating system. The GCC compiler collection is one of the core components of the GNU Project, along with other tools such as the GNU C Library (glibc) and the GNU debugger (GDB).
- In summary, GCC is a collection of compilers and libraries for several programming languages, including C and C++. The
gccandg++compilers are part of GCC and are used to compile C and C++ source code, respectively. GCC is developed and maintained by the FSF as part of the GNU Project, which aims to create a complete, free software operating system.
gcc-multilib
-
gcc-multilib is a package that provides support for building software that can run on multiple architectures or platforms with the GNU Compiler Collection (GCC). GCC is a collection of compilers and libraries for various programming languages, including C, C++, and Fortran.
-
gcc-multilib enables GCC to build software that can run on multiple architectures, such as 32-bit and 64-bit architectures, by providing support for compiling and linking programs for different architectures. This can be useful for developers who want to create software that can run on a variety of systems, or for users who need to build software that is compatible with multiple architectures.
dpkg
-
what is dpkg?
- dpkg is a package manager for Debian and its derivatives such as Ubuntu and Linux Mint. It is used to install, remove, and manage packages in these operating systems.
- A package in this context refers to a bundle of software that includes all the files necessary for a specific program or application to run on a computer. Packages are typically distributed as files with the extension
.deb. - dpkg is a command-line tool that is used to install and manage these packages. It can be used to install a package from a local file or from a repository on the internet. It can also be used to remove packages and to list the packages that are installed on the system.
- In addition to managing packages, dpkg can also be used to manage the package database on the system, which keeps track of all the installed packages and their associated files. This can be useful for troubleshooting(故障排除;疑难解答;疑难排解) issues with installed packages or for cleaning up the system by removing unused or orphaned packages.(这对于解决已安装软件包的问题或通过删除未使用或孤立的软件包来清理系统可能很有用。)
-
What is the relationship between .deb and dpkg?
.deb files are package files that are used to distribute software on Debian and its derivatives(衍生品) such as Ubuntu and Linux Mint. dpkg is a command-line tool that is used to install, remove, and manage these packages on these operating systems.
In other words, .deb files are the packages that contain the software and its associated files, while dpkg is the tool that is used to install, remove, and manage these packages on the system.
To install a .deb file on a Debian-based system, you can use the
dpkgcommand with the-ioption, followed by the name of the .deb file. For example:sudo dpkg -i package.debThis will install the package contained in the .deb file on the system.
To remove a package that was installed from a .deb file, you can use the
dpkgcommand with the-roption, followed by the name of the package. For example:sudo dpkg -r packageThis will remove the package and its associated files from the system, but it will not remove any dependencies that were installed along with the package.
In summary, .deb files are package files that contain the software and its associated files, while dpkg is the tool that is used to install, remove, and manage these packages on Debian-based systems.
wget
-
What is wget? How to use wget?
-
wgetis a command-line utility(实用工具,实用程序) that is used to download files from the internet. It is commonly used to download files from websites or FTP servers, but it can also be used to download files from other sources such as HTTP or HTTPS servers. -
To use
wget, you simply need to specify the URL of the file you want to download as an argument to thewgetcommand. For example:wget http://example.com/file.zipThis will download the file
file.zipfrom the websitehttp://example.comand save it in the current directory.
-
-
wgethas many options that allow you to control various aspects of the download process, such as the location where the file is saved, the number of retries, and the maximum download speed. Here are a few common options:-O: Specifies the name of the file where the downloaded content will be saved.-c: Resumes a partially-downloaded file.-t: Specifies the number of retries if the download fails.--limit-rate: Specifies the maximum download speed in bytes per second.
For example, to download a file and save it as
myfile.zip, you can use the-Ooption like this:wget -O myfile.zip http://example.com/file.zipTo resume(恢复) a partially-downloaded file, you can use the
-coption:wget -c http://example.com/file.zipTo specify the number of retries, you can use the
-toption:wget -t 3 http://example.com/file.zipTo specify the maximum download speed, you can use the
--limit-rateoption:wget --limit-rate=1024k http://example.com/file.zip -
hhh

make 和 make all
-
makeis a command-line tool that is used to build and maintain software projects. It is typically used in Unix-like systems, including Linux and macOS.makereads a file called aMakefileand executes the instructions contained in it to build the project. -
The
Makefilespecifies a set of targets, each of which represents a specific aspect of the project, such as building an executable or creating documentation. Each target has a set of dependencies, which are other targets or files that must be built or updated before the target can be built. -
The
makecommand can be used to build a specific target by specifying the target name on the command line. For example, to build thealltarget in aMakefile, you can run the following command:make allThe
alltarget is a special target that is often used to build the entire project. It is typically specified as the first target in theMakefile, and it depends on all other targets in the project. -
By default,
makewill build the first target in theMakefileif no target is specified on the command line. This means that if you simply runmake, it will build thealltarget if it is the first target in theMakefile, or it will build the first target ifallis not specified. -
In addition to building targets,
makecan also be used to clean up the build environment, run tests, and perform other tasks related to building and maintaining a software project.
bochs
何为bochs
-
Bochs is an open-source software emulator that allows you to run operating systems and applications in a virtual environment on your computer. It is often used for testing and development purposes, as it allows you to run software on different hardware architectures and operating systems without the need for physical hardware.
-
Bochs emulates a complete computer system, including the CPU, memory, and other hardware components, in software. This allows you to run operating systems and applications on top of the emulator, as if they were running on real hardware. Bochs can be used to run a wide variety of operating systems, including Linux, Windows, and macOS.
-
Bochs is a useful tool for developers and users who want to test software on different platforms without the need for multiple physical machines. It is also useful for running legacy(遗留,遗产)software on newer systems(它对于在较新的系统上运行旧软件也很有用), or for running operating systems that are not supported on your physical hardware.
-
To use Bochs, you will need to install it on your system and create a virtual machine configuration. You will then be able to install an operating system or applications in the virtual machine and run them using Bochs. Consult the Bochs documentation for more information on using the emulator.
Linux0.11
- Linux 0.11 is a version of the Linux kernel, which is the core component of the Linux operating system. The Linux kernel is responsible for managing the hardware and software resources of a computer, and it provides a interface between the hardware and the operating system’s userland programs.
- Linux 0.11 was released in 1991 and was one of the earliest versions of the Linux kernel. It was developed by Linus Torvalds, who is considered to be the founder of the Linux operating system. Linux 0.11 was a significant milestone in the development of Linux, as it was the first version of the kernel that was released to the public and made available for download.
- Linux 0.11 was a monolithic(庞大的) kernel, which means that it included all of the kernel’s components, including device drivers, in a single executable file. Monolithic kernels are now considered to be outdated, and most modern kernels use a microkernel architecture, which separates the kernel’s components into smaller, more modular pieces.
- Linux 0.11 supported a limited set of hardware devices and supported only a single processor architecture (Intel x86). It did not include support for modern features such as preemptive multitasking, memory protection, or virtual memory.
- Despite its limitations, Linux 0.11 played a crucial role in the development of the Linux operating system and laid the foundation for the more advanced and feature-rich kernels that followed. It is still used by some enthusiasts and developers for educational purposes or to run old software on modern systems.
apt-file
-
apt-fileis a command-line utility that is used to search for files in software packages that are available in the Advanced Packaging Tool (APT) package manager on Debian-based systems such as Ubuntu. -
The
apt-filecommand allows you to search for a specific file or a pattern of files in the package metadata of the APT package repository. This can be useful if you need to find out which package contains a specific file that you are looking for, or if you want to verify that a package contains a particular file before installing it. -
To use
apt-file, you will need to install it on your system and update the package metadata. You can do this by running the following commands:apt-get update sudo apt-get install apt-file sudo apt-file update -
Once
apt-fileis installed and the package metadata is up to date, you can use theapt-file searchcommand to search for a file or pattern of files in the package metadata. For example, you can use the following command to search for the filelibc.so:apt-file search libc.soThis will search the package metadata for any packages that contain the file
libc.soand display a list of the packages that match the search criteria. -
apt-fileis a useful tool for finding packages that contain specific files, especially when you are not sure which package provides a particular file or when you want to verify that a package contains a particular file before installing it.
.so文件
-
What is .so file
-
A file with the
.soextension is a shared object file. Shared object files, also known as shared libraries or dynamic-link libraries (DLLs), are compiled code that can be shared by multiple programs. They are often used to provide common functionality that is needed by many different programs, such as basic input/output operations or networking functions.Shared object files are typically stored in a specific location on the system and are loaded by programs at runtime when they are needed. This allows multiple programs to use the same shared object file, rather than each program needing to include its own copy of the code. This can save space and improve performance by reducing the amount of code that needs to be loaded into memory.
Shared object files are typically compiled in a platform-specific format, such as ELF (Executable and Linkable Format) on Linux systems or DLL on Windows systems. They are often used to implement software libraries or to provide plug-in functionality for applications.
To use a shared object file, a program must be linked to it at compile time or dynamically load it at runtime. This is typically done using the
ldlinker or thedlopen()function, respectively.Shared object files are an important part of many modern operating systems and are used to provide a wide range of functionality to applications and libraries.
apt update 和 apt-get update
-
What means apt update and apt-get update? What’s the difference and relationship between them?
-
apt updateandapt-get updateare commands that are used to download package lists from repositories and update the local database of available packages. They are used to ensure that the system has an up-to-date list of available packages and their dependencies, which is necessary in order to install or upgrade packages using theaptorapt-getcommand.The
apt updatecommand is part of theaptpackage manager, which is a newer package management tool that was introduced in Debian 8 (Jessie) and is now used by many Linux distributions. Theapt-get updatecommand is part of theapt-getpackage manager, which is an older package management tool that has been around since the early days of Debian.The
aptandapt-getcommands are closely related and can often be used interchangeably. However, there are some differences in how they work and the options they support. In general, theaptcommand is more user-friendly and provides a more concise and straightforward syntax, whileapt-getis more flexible and allows for more advanced usage.For example, the
apt updatecommand is generally used to download package lists and update the local database of available packages, while theapt-get updatecommand can also be used to upgrade all installed packages to the latest available version.Overall, the
aptandapt-getcommands are both useful tools for managing packages on a Linux system, and you can use either one depending on your needs and preferences.
i386和amd64
-
i386andamd64are different architectures for computer processors.i386refers to the 32-bit x86 architecture, which is a CPU architecture that was widely used in personal computers in the 1980s and 1990s. It is still used today in some older systems, as well as in some embedded devices.amd64refers to the 64-bit x86 architecture, which is a more modern version of the x86 architecture that was introduced by AMD in the mid-2000s. It is now the most widely used CPU architecture for personal computers, and it is supported by most modern operating systems.The main difference between
i386andamd64is the amount of data that they can process at one time. Thei386architecture is limited to 32 bits, which means that it can only process data in blocks of 32 bits at a time. Theamd64architecture, on the other hand, is capable of processing data in blocks of 64 bits at a time, which provides much higher performance and allows it to handle larger amounts of data.In general,
amd64systems are faster and more powerful thani386systems, but they also require more resources and are not as compatible with older software.
四.常见问题 lock
-
解决方案
sudo killall apt apt-get
sudo rm /var/lib/apt/lists/lock
sudo rm /var/cache/apt/archives/lock
sudo rm /var/lib/dpkg/lock*
sudo dpkg --configure -a
sudo apt update
