某种原因开始学习nestjs,想用nestjs做后端,mongodb做数据库来实现一个微信小程序的后台,开始了哼哧哼哧的爬代码之路。
如果想使用自己写的js或ts工具库,需要使用
require进行导入!!否则找不到文件!
文章目录
- 安装
- 目录介绍
- cli命令
- RESTful风格
- API版本控制
- http code规范
- session
- controller
- service
- provider
- module
- 全局模块:@Global()
- 动态模块:DynamicModule
- 中间件
- 全局中间件
- 第三方中间件CORS
- multer中间件(文件上传使用)
- 文件下载
- 拦截器
- 响应拦截器
- 过滤器
- 管道
- 自定义管道
- DTO校验
- 全局DTO验证管道
- 默认值给管道
- 守卫
- 守卫参数
- 全局守卫
- 装饰器
- 自定义参数装饰器
- swagger
- 常用注解
- jwt测试
- ORM
- typeorm
- entity装饰器
- 示例
- mongoose
nestjs是一个nodejs的服务端app框架,完全支持ts,借鉴springmvc和angular,底层采用express和fastify
文档:https://nestjs.bootcss.com/
安装
npm i -g @nestjs/cli
nest new xxx
// 启动
npm run start:dev
// 调试,同时配置vscode的launch.json,先启动应用后启动调试即可
npm run start:debug
// launch.json
{
  "version": "0.2.0",
  "configurations": [
    {
      "type": "node",
      "request": "attach",
      "name": "Attach NestJS WS",
      "port": 9229,
      "restart": true,
      "stopOnEntry": false,
      "protocol": "inspector"
    }
  ]
}
目录介绍
- main入口文件,用于配置一些全局起作用的东西,在这里绑定端口
- controller文件,相当于路由,这里配置各个地址映射到的函数,注意构造函数变量会自动注入,需要
@Controller() - service文件,主要写业务逻辑,这个也可以给别的模块进行逻辑复用,需要
@Injectable - module文件,主要用于配置当前模块的关联关系,比如引入其他模块,或导出当前模块
cli命令
nest g --help
    ┌───────────────┬─────────────┬──────────────────────────────────────────────┐
    │ name          │ alias       │ description                                  │
    │ application   │ application │ Generate a new application workspace         │
    │ class         │ cl          │ Generate a new class                         │
    │ configuration │ config      │ Generate a CLI configuration file            │
    │ controller    │ co          │ Generate a controller declaration            │
    │ decorator     │ d           │ Generate a custom decorator                  │
    │ filter        │ f           │ Generate a filter declaration                │
    │ gateway       │ ga          │ Generate a gateway declaration               │
    │ guard         │ gu          │ Generate a guard declaration                 │
    │ interceptor   │ itc         │ Generate an interceptor declaration          │
    │ interface     │ itf         │ Generate an interface                        │
    │ middleware    │ mi          │ Generate a middleware declaration            │
    │ module        │ mo          │ Generate a module declaration                │
    │ pipe          │ pi          │ Generate a pipe declaration                  │
    │ provider      │ pr          │ Generate a provider declaration              │
    │ resolver      │ r           │ Generate a GraphQL resolver declaration      │
    │ service       │ s           │ Generate a service declaration               │
    │ library       │ lib         │ Generate a new library within a monorepo     │
    │ sub-app       │ app         │ Generate a new application within a monorepo │
    │ resource      │ res         │ Generate a new CRUD resource                 │
    └───────────────┴─────────────┴──────────────────────────────────────────────┘
常用的就是nest g res 模块名,可以生成CRUD模板,包括:controller,service,module
RESTful风格
提一嘴,该风格主要是将请求类型利用起来了,然后url传参以param传参,而不是query传参
// 普通
/api/get?id=123
// restful
/api/get/123
请求类型常见的对应:
GET 查询
POST 提交
PUT PATCH 更新
DELETE 删除
API版本控制
nestjs提供三种版本控制方案:
- uri中带版本号(常用)
- header中带
- accept中带
启用方式:
// 1.在main中,利用app实例进行配置
app.enableVersioning({
  type: VersioningType.URI,
})
// 2.controller中配置当前路由版本
@Controller({
  path:"user",
  version:'1'
})
// 也可以在具体映射函数时配置
@Get()
@Version('1')
findAll() {
  return this.userService.findAll();
}
http code规范
200 OK
304 Not Modified 协商缓存了
400 Bad Request 参数错误
401 Unauthorized token错误
403 Forbidden referer origin 验证失败
404 Not Found 接口不存在
500 Internal Server Error 服务端错误
502 Bad Gateway 上游接口有问题或者服务器问题
session
nestjs启用session,底层用的express
npm i express-session --save
npm i @types/express-session -D
然后在main中引入并use
import * as session from 'express-session'
...
app.use(session({ secret: "xiaopi3", name: "xp.session", rolling: true, cookie: { maxAge: null } }))
session()参数解释:
secret		生成session签名
name		生成客户端cookie 的名字 默认 connect.sid
cookie		设置返回到前端 key 的属性,默认值为{ path: ‘/’, httpOnly: true, secure: false, maxAge: null }
rolling		在每次请求时强行设置 cookie,这将重置 cookie 过期时间(默认:false)
controller
控制器中的函数可以使用的参数和注解:
@Request()		req
@Response()		res
@Next()			next
@Session()		req.session
@Param(key?: string)	req.params/req.params[key]
@Body(key?: string)		req.body/req.body[key]
@Query(key?: string)	req.query/req.query[key]
@Headers(name?: string)   	req.headers/req.headers[name]
@HttpCode
参考用例:
@Get()
find(@Query() query) {
  console.log(query)
  return { code: 200 }
}
service
service文件中的类用@Injectable注解,是一个provider,在module文件的@module()中的provider配置项中进行配置,然后在controller中的构造注入就可以使用了
provider用于沟通第三方包,在这里可以通过构造函数的注入,来使用第三方包提供的功能
// 1. 定义provider app.service.ts
@Injectable()
export class AppService {
  getHello(): string {
    return 'Hello World!';
  }
}
// 2.在module中配置 app.module.ts
@Module({
  imports: [UsersModule],
  controllers: [AppController],
  providers: [AppService],
})
export class AppModule {}

// 3. 在controller构造注入 app.controller.ts
@Controller()
export class AppController {
  constructor(private readonly appService: AppService) {}

  @Get()
  getHello(): string {
    return this.appService.getHello();
  }
}
provider
用@Injectable注解的类称为provide,可以用于在controller构造中进行注入,来进行使用。
@Module({
  imports: [UsersModule],
  controllers: [AppController],
  providers: [
  // 1. 常见用法
  AppService,
  // 2. 可以给provide 自定义名称,并在注入时指定【相同名称】
  {provide:"appsvc",useClass:AppService},
  // 3. 可以配置自定义provide值
  {provide:"APP",useValue:["A","B","C"]},
  // 4. 使用工厂函数,将provide加工,返回一个新的值,会包装成provide使用,可以返回promise,可异步
  { provide: 'MyAPP', inject: ['APP',AppService], useFactory(APP) { return APP } }],
  ],

})
export class AppModule {}

// controller 构造中,对于名称和provider中的service一样的(驼峰),可以不用@Inject表明注入的名称
private readonly appService: AppService,
@Inject('appsvc') private readonly appService: AppService,
@Inject('APP') private readonly applist: string[],
@Inject('MyAPP') private MyAPP:any
module
module文件用于配置当前模块和其他模块的关系
- 可以引入其他模块:引入后可以在当前模块中调用被引入的模块service(需要controller构造注入)
- 可以导出当前模块的服务给其他模块使用
@Module({
	imports: [HttpModule],
	controllers: [UsersController],
	providers: [UsersService],
	exports:[UsersService]
})
export class UsersModule{}
全局模块:@Global()
这种模块在使用时,无需在别的module文件中导入,即可在其controller文件中的构造注入
动态模块:DynamicModule
模块依赖参数,则可以在该模块中定义一个静态方法,去接收参数,返回一个DynamicModule类型的对象
// module定义
interface Options {
    path: string
}

@Global()
@Module({
})
export class ConfigModule {
    static forRoot(options: Options): DynamicModule {
        return {
            module: ConfigModule,
            providers: [
                {
                    provide: "Config",
                    useValue: { baseApi: "/api" + options.path }
                }
            ],
            exports: [
                {
                    provide: "Config",
                    useValue: { baseApi: "/api" + options.path }
                }
            ]
        }
    }

// 引入该动态模块
@Module({
	imports: [ConfigModule.forRoot({path: '/abc'})],
	controllers: [UsersController],
	providers: [UsersService]
})
export class UsersModule{}
中间件
在路由处理之前进行调用,可访问请求和响应对象,需要注意,如果当前中间件没有结束请求响应的逻辑,则必须调用next(),否则请求被挂起
创建中间件:中间件是继承于NestMiddleware的service,其中的use方法即为该中间件处理的逻辑函数,包含三个参数,请求响应和next
使用中间件:中间件需要在module中配置(逻辑作用于路由前),configure方法apply中间件
// 创建中间件service
import {Injectable,NestMiddleware } from '@nestjs/common'
import {Request,Response,NextFunction} from 'express'

@Injectable()
export class Logger implements NestMiddleware{
  use (req:Request,res:Response,next:NextFunction) {
    console.log(req)
    next()
  }
}

// 使用中间件
import { Module,NestModule,MiddlewareConsumer } from '@nestjs/common';
import { UserService } from './user.service';
import { UserController } from './user.controller';
import { Logger } from 'src/middleware';
@Module({
  controllers: [UserController],
  providers: [UserService],
  exports:[UserService]
})
export class UserModule implements NestModule{
  configure (consumer:MiddlewareConsumer) {
    // 配置方式有如下三种:可以指定中间件作用路由范围
    consumer.apply(Logger).forRoutes('user')
    consumer.apply(Logger).forRoutes({path:'user',method:RequestMethod.GET})
    consumer.apply(Logger).forRoutes(UserController)
  }
}
全局中间件
全局和普通中间件不同,全局中间件是一个函数,在app.use中配置
import { NestFactory } from '@nestjs/core';
import { AppModule } from './app.module';

const whiteList = ['/list']

function middleWareAll  (req,res,next) {
     console.log(req.originalUrl,'我收全局的')
     if(whiteList.includes(req.originalUrl)){
         next()
     }else{
         res.send('小黑子露出鸡脚了吧')
     }
}

async function bootstrap() {
  const app = await NestFactory.create(AppModule);
  app.use(middleWareAll)
  await app.listen(3000);
}
bootstrap();
第三方中间件CORS
举例:使用cors中间件解决跨域问题
import { NestFactory } from '@nestjs/core';
import { AppModule } from './app.module';
import * as cors from 'cors'

async function bootstrap() {
  const app = await NestFactory.create(AppModule);
  app.use(cors())
  await app.listen(3000);
}
bootstrap();
multer中间件(文件上传使用)
multer专门用于处理表单数据multipart/form-data类型的
- 注入
MulterModule到模块
import { Module } from '@nestjs/common';
import { UploadService } from './upload.service';
import { UploadController } from './upload.controller';
import { MulterModule } from '@nestjs/platform-express';
import { diskStorage } from 'multer';
import { extname, join } from 'path';

@Module({
  imports: [MulterModule.register({
    // dest:'./uploadFiles',
    storage:diskStorage({
      destination:join(__dirname,"/uploadFiles"),
      filename(req, file, callback) {
        const filename = `${new Date().getTime() + extname(file.originalname)}`
        return callback(null,filename);
      },
    })
  })],
  controllers: [UploadController],
  providers: [UploadService]
})
export class UploadModule {}
注意:dest和storage两个属性取其一即可,如果不需要对文件做改名的其他操作,可以直接使用dest传入字符串即可
其中:
./uploadFiles表示上传目录为项目根目录(项目根目录/uploadFiles)。
join(__dirname,"../uploadFiles")表示上传文件为运行时的该js文件所属目录上一级的uploadfiles中(项目根目录/dist/uploadFiles)
如果是打包使用,这两种都一样
如果是开发使用,需要注意
- controller中的方法配置file拦截器
@Controller('upload')
export class UploadController {
  constructor(private readonly uploadService: UploadService) {}

  @UseInterceptors(FileInterceptor('pic'))
  @Post('picture')
  uploadPic(@UploadedFile() file): ResponseInter{
    console.log(file)
    return {
      code: 200,
      message: "上传文件成功!"
    }
  }
}
其中@UseInterceptors(FileInterceptor('pic'))的pic表示提取上传表单中的pic字段作为文件去解析
- 生成静态目录提供直接访问和下载
...
  const app = await NestFactory.create<NestExpressApplication>(AppModule);
  app.useStaticAssets(join(__dirname, "/uploadFiles"), {
    prefix: "/file" // 访问文件时的url地址,自定义
  })
...

// http://localhost:3000/file/文件名 即可下载
注意:需要指定app类型为NestExpressApplication否则ts报错
静态文件目录可以使用字符串也可以使用join去生成,但两者稍有差别
- 字符串:和multer上传目录保持一致即可
- join:由于所属js文件层级不同,需要考虑当前目录层级
文件下载
- 使用response.download方法下载
@Get('download')
downLoad(@Res() res: Response) {
  const url = join(__dirname, '../uploadFiles/1671437555790.jpg')
  res.download(url)
}
- 打包后下载
打包使用compressing包提供的zip.stream类
@Get('zip')
async down(@Res() res: Response) {
  const url = join(__dirname, '../uploadFiles/1671437555790.jpg')
  const stream = new zip.Stream()
  await stream.addEntry(url)

  res.setHeader('Content-Type', 'application/octet-stream');
  res.setHeader('Content-Disposition', `attachment; filename=download.zip`);

  stream.pipe(res)
}
注意:后端如果返回的是流数据,前端如果想实现点击下载功能,需要将流放入Blob中
const useFetch = async (url: string) => {
  const res = await fetch(url).then(res => res.arrayBuffer())
  console.log(res)
  const a = document.createElement('a')
  a.href = URL.createObjectURL(new Blob([res],{
    // type:"image/png"
  }))
  a.download = 'donwload.zip' // 这里可以自定义名称,也可以获取header中的文件名
  a.click()
}

const download = () => {
  useFetch('http://localhost:3000/upload/zip')
}
拦截器
用于在函数前或后做一些其他操作,比如转换结果,抛出异常等
响应拦截器
在响应前后进行拦截,修改response数据
- 新建一个拦截器类,设置成可注入的服务
import { Injectable, NestInterceptor, CallHandler } from '@nestjs/common'
import { map } from 'rxjs/operators'
import {Observable} from 'rxjs'

interface data<T>{
    data:T
}
@Injectable()
export class STDResponse<T = any> implements NestInterceptor {
    intercept(context, next: CallHandler):Observable<data<T>> {
        return next.handle().pipe(map(data => {
            return {
               data,
               status:200,
               success:true,
               message:"成功"
            }
        }))
    }
}
- 在main中use这个拦截器
app.useGlobalInterceptors(new STDResponse())
过滤器
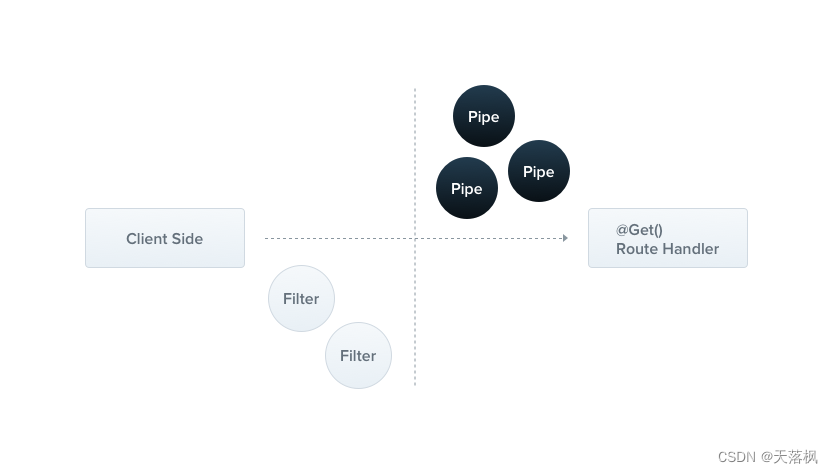
用于过滤一些数据,常用于异常过滤
nestjs内建异常过滤器层,用于处理未捕获的HttpException异常
注意:当异常不属于http异常时,默认返回:
{
  "statusCode": 500,
  "message": "Internal server error"
}
全局异常过滤器支持http-errors库,尽可能在异常发生时提供状态码和异常原因是一个好习惯
{
    "data": "Cannot GET /111",
    "time": "2022/12/20 16:29:18",
    "success": false,
    "path": "/111",
    "status": 404
}
- 定义异常过滤器
import { ExceptionFilter, Catch, ArgumentsHost,HttpException } from '@nestjs/common'
import {Request,Response} from 'express'

@Catch(HttpException)
export class ErrResponse implements ExceptionFilter {
    catch(exception:HttpException, host: ArgumentsHost) {
        const ctx = host.switchToHttp()
        const request = ctx.getRequest<Request>()
        const response = ctx.getResponse<Response>()

        const status = exception.getStatus()

        response.status(status).json({
           data:exception.message,
           time:new Date().toLocaleString(),
           success:false,
           path:request.url,
           status
        })
    }
}
- 全局使用
app.useGlobalFilters(new ErrResponse())
- 模块路由使用
@UseFilters(HttpExceptionFilter)
export class CatsController {}
- 路由方法使用
@Post()
@UseFilters(HttpExceptionFilter)
async create(@Body() createCatDto: CreateCatDto) {
  throw new ForbiddenException();
}
注意:模块和路由使用时不用传递new ErrResponse(),可以直接传递类即可
如果一个模块需要使用一个全局过滤器,而该过滤器由于已经在app中注册过了,所以无法直接在模块中进行usefilter,可以通过providers来引入:
import { Module } from '@nestjs/common';
import { APP_FILTER } from '@nestjs/core';

@Module({
  providers: [
    {
      provide: APP_FILTER,
      useClass: HttpExceptionFilter,
    },
  ],
})
export class AppModule {}
更多使用方法,参考文档:https://docs.nestjs.com/exception-filters
管道
管道功能有两个:数据转换、数据验证
管道要么返回原数据(校验通过),要么抛出异常(校验失败)
nestjs提供8个内置管道
ValidationPipe
ParseIntPipe
ParseFloatPipe
ParseBoolPipe
ParseArrayPipe
ParseUUIDPipe
ParseEnumPipe
DefaultValuePipe
示例:
// 将入参中的id转换成整数
// 如果转换失败,会直接抛出异常,该异常可以被过滤器捕获
@Get(':id')
async findOne(@Param('id', ParseIntPipe) id: number) {
  return this.catsService.findOne(id);
}

// 校验uuid,可以传递参数来指定uuid版本
@Get(':uuid')
async findOne(@Param('uuid', new ParseUUIDPipe()) uuid: string) {
  return this.catsService.findOne(uuid);
}
注意:管道可以直接传类,也可以传递实例,后者可以方便的传递一些参数来初始化管道,前者使用默认参数
自定义管道
- 管道文件
cd 模块
nest g pi 管道名称
将管道文件放置在某个模块下去验证该模块的某个接口数据交换格式信息
DTO:数据传输对象,即前后端交互时的数据承载体,可用于校验数据格式规范
标准管道文件格式:
import { PipeTransform, Injectable, ArgumentMetadata } from '@nestjs/common';

@Injectable()
export class ValidationPipe implements PipeTransform {
  transform(value: any, metadata: ArgumentMetadata) {
    return value;
  }
}
自定义管道可修改部分即transform函数体内的逻辑
value:流进管道的数据
metadata:校验DTO信息,包括以下:
export interface ArgumentMetadata {
  type: 'body' | 'query' | 'param' | 'custom';
  metatype?: Type<unknown>;
  data?: string;
}
详情官网有解释:

DTO校验
DTO校验有两种:
- 基于schema校验
- 基于class校验
校验方式不同,管道文件编写和路由中的使用方式也不同
- 基于class校验
需要安装校验包和类转换包,且必须使用ts编写app
npm i --save class-validator class-transformer
// DTO类
import { IsString, IsInt } from 'class-validator';
export class CreateCatDto {
  @IsString()
  name: string;
  @IsInt()
  age: number;
  @IsString()
  breed: string;
}

// 管道
import { PipeTransform, Injectable, ArgumentMetadata, BadRequestException } from '@nestjs/common';
import { validate } from 'class-validator';
import { plainToInstance } from 'class-transformer';

@Injectable()
export class ValidationPipe implements PipeTransform<any> {
  async transform(value: any, { metatype }: ArgumentMetadata) {
    if (!metatype || !this.toValidate(metatype)) {
      return value;
    }
    const object = plainToInstance(metatype, value);
    const errors = await validate(object);
    if (errors.length > 0) {
      throw new BadRequestException('Validation failed');
    }
    return value;
  }

  private toValidate(metatype: Function): boolean {
    const types: Function[] = [String, Boolean, Number, Array, Object];
    return !types.includes(metatype);
  }
}

// 路由
@Post()
async create(@Body(new ValidationPipe()) createCatDto: CreateCatDto,) {
  this.catsService.create(createCatDto);
}
- 基于schema校验
需要安装schema生成包
npm install --save joi
// 创建schema
略
// 管道,构造中传入需要校验的schema
import { PipeTransform, Injectable, ArgumentMetadata, BadRequestException } from '@nestjs/common';
import { ObjectSchema } from 'joi';

@Injectable()
export class JoiValidationPipe implements PipeTransform {
  constructor(private schema: ObjectSchema) {}

  transform(value: any, metadata: ArgumentMetadata) {
    const { error } = this.schema.validate(value);
    if (error) {
      throw new BadRequestException('Validation failed');
    }
    return value;
  }
}

// 路由,传入schema
@Post()
@UsePipes(new JoiValidationPipe(createCatSchema))
async create(@Body() createCatDto: CreateCatDto) {
  this.catsService.create(createCatDto);
}
全局DTO验证管道
nestjs提供一个默认的全局的
import {ValidationPipe} from '@nestjs/common'
...
app.useGlobalPipes(new ValidationPipe());
...
默认值给管道
如果管道验证的值为空,则肯定抛出异常,可以提供默认值,防止发生
@Get()
async findAll(
  @Query('activeOnly', new DefaultValuePipe(false), ParseBoolPipe) activeOnly: boolean,
  @Query('page', new DefaultValuePipe(0), ParseIntPipe) page: number,
) {
  return this.catsService.findAll({ activeOnly, page });
}
守卫
执行顺序:中间件–>守卫–>过滤器–>管道
守卫返回为true(放行)、false(阻挡)
守卫有一个单独的责任。它们根据运行时出现的某些条件(例如权限,角色,访问控制列表等)来确定给定的请求是否由路由处理程序处理。这通常称为授权。在传统的 Express 应用程序中,通常由中间件处理授权(以及认证)。中间件是身份验证的良好选择,因为诸如 token 验证或添加属性到 request 对象上与特定路由(及其元数据)没有强关联。
————————————————
版权声明:本文为CSDN博主「小满zs」的原创文章,遵循CC 4.0 BY-SA版权协议,转载请附上原文出处链接及本声明。
原文链接:https://blog.csdn.net/qq1195566313/article/details/127175529
新建一个守卫文件:nest g gu 名称
import { CanActivate, ExecutionContext, Injectable } from '@nestjs/common';
import { Observable } from 'rxjs';

@Injectable()
export class AuthGuard implements CanActivate {
  canActivate(
    context: ExecutionContext,
  ): boolean | Promise<boolean> | Observable<boolean> {
    return true;
  }
}
在路由类上加上@UseGuards(AuthGuard)即可
守卫参数
在controller中,某个路由需要通过参数控制访问时,可以通过SetMetadata 装饰器来实现
@SetMetadata(参数1,参数2):第一个参数为key,第二个参数自定义,可通过反射方法获取到该参数,进行判断。
@SetMetadata('roles', ['admin'])
@Get()
findAll() {
  return this.tmpService.findAll();
}
在守卫中可以对传入的参数进行处理
import { CanActivate, ExecutionContext, Injectable } from '@nestjs/common';
import { Observable } from 'rxjs';
import { Reflector } from '@nestjs/core'
import type { Request } from 'express'
@Injectable()
export class RoleGuard implements CanActivate {
  constructor(private Reflector: Reflector) { }
  canActivate(
    context: ExecutionContext,
  ): boolean | Promise<boolean> | Observable<boolean> {
    const admin = this.Reflector.get<string[]>('role', context.getHandler())
    const request = context.switchToHttp().getRequest<Request>()
    if (admin.includes(request.query.role as string)) {
      return true;
    }else{
      return false
    }
  }
}
测试:/tmp?role=admin
全局守卫
app.useGlobalGuards(new AuthGuard())
装饰器
装饰器文件用于生成自定义装饰器,封装一些小功能
新建:nest g d 装饰器名称
// 模板
import { SetMetadata } from '@nestjs/common';

export const Mydec = (...args: string[]) => SetMetadata('mydec', args);
在路由中使用
// @SetMetadata('roles', ['admin'])
@Mydec('admin')
@Get()
findAll() {
  return this.tmpService.findAll();
}
自定义装饰器相当于一个封装了的@SetMetadata装饰器,可以被守卫捕获其中的内容,然后做处理
自定义参数装饰器
放在参数前,对参数进行赋值
- 普通的无参数类型
// 装饰器文件
// 参数装饰器,从request中获取user返回。(赋值给参数)
import { createParamDecorator, ExecutionContext } from '@nestjs/common';

export const User = createParamDecorator(
  (data: unknown, ctx: ExecutionContext) => {
    const request = ctx.switchToHttp().getRequest();
    return request.user;
  },
);

// 路由
@Get()
async findOne(@User() user: UserEntity) {
  console.log(user);
}
- 有参数类型
// 装饰器,第一个参数为路由传过来的参数
import { createParamDecorator, ExecutionContext } from '@nestjs/common';

export const User = createParamDecorator(
  (data: string, ctx: ExecutionContext) => {
    const request = ctx.switchToHttp().getRequest();
    const user = request.user;

    return data ? user?.[data] : user;
  },
);
// 路由,装饰器函数接收一个参数
@Get()
async findOne(@User('firstName') firstName: string) {
  console.log(`Hello ${firstName}`);
}
swagger
使用swagger可以在编写代码时对方法或类使用swagger注解,可以在生成的在线文档中查看,且可以调用
参考文档:https://docs.nestjs.com/openapi/introduction
需要引入两个包:npm install @nestjs/swagger swagger-ui-express
在main中注册swagger:
async function bootstrap() {
  const app = await NestFactory.create<NestExpressApplication>(AppModule);
  const options = new DocumentBuilder().setTitle('接口文档').setDescription('描述').setVersion('1').build()
  const document = SwaggerModule.createDocument(app,options)
  SwaggerModule.setup('/api-docs',app,document)
  await app.listen(3000);
}
bootstrap();
访问:localhost:3000/api-docs
常用注解
注解作用在controller文件中
对路由类描述:@ApiTags('守卫相关接口')
对方法描述:@ApiOperation({summary:"测试admin",description:"请求该接口需要amdin权限"})
对参数描述:
@ApiParam({name:"id",description:"用户id",required:true})
@ApiQuery({name:"xxxx",description:"bbb"})
对body描述(DTO):
import { ApiProperty } from "@nestjs/swagger"

export class CreateGuardDto {
    @ApiProperty({ description: "姓名", example: "小满" })
    name: string
    @ApiProperty({ description:"年龄"})
    age: number
}
对路由返回值描述:@ApiResponse({status:403,description:"自定义返回信息"})
jwt测试
使用一些有关权限接口时需要传递token等
const options = new DocumentBuilder().addBearerAuth().setTitle('接口文档').setDescription('描述').setVersion('1').build()
在需要token的接口,写上注解:@ApiBearerAuth()
@ApiBearerAuth()
@Controller('tmp')
export class TmpController{}
ORM
可以选择任何一个nodejs的orm库,nestjs也集成了三个常用的:@nestjs/typeorm ,@nestjs/sequelize,@nestjs/mongoose
typeorm
- 先安装依赖:
npm install --save @nestjs/typeorm typeorm mysql2 - 在app.module.ts中注入数据库
@Module({
  imports: [
      TypeOrmModule.forRoot({
      type: "mysql", //数据库类型
      username: "root", //账号
      password: "123456", //密码
      host: "localhost", //host
      port: 3306, //
      database: "mydb", //库名
      // entities: [__dirname + '/**/*.entity{.ts,.js}'], //实体文件,如果使用autoLoadEntities:true,就不要使用这个了
      synchronize:true, //synchronize字段代表是否自动将实体类同步到数据库,对实体类的修改会影响数据库
      retryDelay:500, //重试连接数据库间隔
      retryAttempts:10,//重试连接数据库的次数
      autoLoadEntities:true, //如果为true,将自动加载实体 forFeature()方法注册的每个实体都将自动添加到配置对象的实体数组中
      }),
      UsersModule, UploadModule, TmpModule],
  controllers: [AppController],
  providers: [AppService],
})
export class AppModule {}
注意:synchronize:true在生产模式要改成false
- 在某个需要连接数据库的模块中,定义实体(
@Entity()注解不要忘了)
import {Entity,Column,PrimaryGeneratedColumn} from 'typeorm'

@Entity()
export class User {
   //自增列
   @PrimaryGeneratedColumn()
   id:number
   //普通列
   @Column()
   name:string
}
- 在该模块注入实体模块(可以注入多个)
import {User} from './entities/user.entity'
@Module({
  imports: [
    TypeOrmModule.forFeature([User])
    HttpModule
  ],
  controllers: [UsersController],
  providers: [UsersService]
})
export class UsersModule {}
entity装饰器
// 普通自增主键
@PrimaryGeneratedColumn()
id:number
// uuid自增
@PrimaryGeneratedColumn("uuid")
id:number
// 生成uuid
@Generated('uuid')
uuid:string
// 限制字段类型和长度
@Column({type:"varchar",length:200})
password: string
// 自动创建时间戳
@CreateDateColumn({type:"timestamp"})
create_time:Date
// 枚举
@Column({
  type:"enum",
  enum:['1','2','3','4'],
  default:'1'
})
xx:string
// 数组(数据库中拼接逗号)
@Column("simple-array")
names: string[];
// json(数据库中转成json字符串)
@Column("simple-json")
profile: { name: string; nickname: string };
更多装饰器功能参考:https://xiaoman.blog.csdn.net/article/details/127218592
示例
- APP配置数据库
@Module({
  imports: [
    TypeOrmModule.forRoot({
      type: "mysql", //数据库类型
      username: "root", //账号
      password: "xxx", //密码
      host: "xxx.xxx.xxx.xxx", //host
      port: 3306, //
      database: "xxxx", //库名
      synchronize: true, //synchronize字段代表是否自动将实体类同步到数据库,对实体类的修改会影响数据库
      retryDelay: 500, //重试连接数据库间隔
      retryAttempts: 10,//重试连接数据库的次数
      autoLoadEntities: true, //如果为true,将自动加载实体 forFeature()方法注册的每个实体都将自动添加到配置对象的实体数组中
    }),UsersModule, UploadModule, TmpModule],
    controllers: [AppController],
    providers: [AppService],
})
export class AppModule { }
- 建立entity
import { Entity, PrimaryGeneratedColumn,Column, CreateDateColumn } from "typeorm";

@Entity()
export class Tmp {

  @PrimaryGeneratedColumn('uuid')
  uuid:string

  @Column()
  name:string

  @Column()
  age:number

  @CreateDateColumn({type:'timestamp'})
  createTime:Date
}
- 模块引入当前entity
@Module({
  imports:[TypeOrmModule.forFeature([Tmp])],
  controllers: [TmpController],
  providers: [TmpService]
})
export class TmpModule {}
- 新建service(引入dao层,即对应Repository)
import { Injectable } from '@nestjs/common';
import { InjectRepository } from '@nestjs/typeorm/dist/common';
import { Equal, Like, Repository } from 'typeorm';
import { CreateTmpDto } from './dto/create-tmp.dto';
import { UpdateTmpDto } from './dto/update-tmp.dto';
import { Tmp } from './entities/tmp.entity';

@Injectable()
export class TmpService {
  constructor(@InjectRepository(Tmp) private readonly tmp: Repository<Tmp>) { }

  create(createTmpDto: CreateTmpDto) {
    const TmpObj = new Tmp()
    TmpObj.name = createTmpDto.name;
    TmpObj.age = createTmpDto.age;
    return this.tmp.save(TmpObj);
  }

  findAll({ uuid, name, age, createTime }: Tmp) {
    const where = {}
    uuid ? where['uuid'] = Equal(uuid) : null;
    name ? where['name'] = Like(`%${name}%`) : null;
    age ? where['age'] = Equal(age) : null;
    createTime ? where['createTime'] = Equal(new Date(createTime)) : null;
    return this.tmp.find({
      where,
    });
  }
}
- 新建controller层
import { Controller, Get, Post, Body, Patch, Param, Delete, UseGuards, SetMetadata, Request, Query } from '@nestjs/common';
import { TmpService } from './tmp.service';
import { CreateTmpDto } from './dto/create-tmp.dto';
import { UpdateTmpDto } from './dto/update-tmp.dto';

@Controller('tmp')
export class TmpController {
  constructor(private readonly tmpService: TmpService) {}

  @Post()
  create(@Body() createTmpDto: CreateTmpDto) {
    return this.tmpService.create(createTmpDto);
  }

  @Get()
  findAll(@Query() query) {
    return this.tmpService.findAll(query);
  }
}
mongoose
连接mongodb可以使用typeorm,也可以使用mongoose包:npm i @nestjs/mongoose mongoose
- APP配置数据库
@Module({
  imports: [
    MongooseModule.forRoot('mongodb://xxx:xxxx@xxxxx:27017/xxxxx'), UsersModule, UploadModule, TmpModule],
    controllers: [AppController],
    providers: [AppService],
})
export class AppModule { }
注意:forRoot()和mongoose.connect()一样,接收一个数据库配置的对象
- 创建schema(类似于entity)
mongoose使用schema来配置实体和数据库的映射,可以使用nestjs的装饰器创建,也可以使用mongoose手动创建
Note you can also generate a raw schema definition using the
DefinitionsFactoryclass (from the nestjs/mongoose).
@Schema()
// user.schema.ts
import { Prop, Schema, SchemaFactory } from '@nestjs/mongoose';
import { HydratedDocument } from 'mongoose';

export type UserDocument = HydratedDocument<User>;

// 这里注意了,`@Schema()`这个装饰器会默认把类名加s作为数据库集合名称,可以手动指定名称,versionKey用于控制生成的数据是否携带数据版本号字段
@Schema({ versionKey: false, collection: 'user' })
export class User {
  @Prop({ required: true })
  username: string;

  @Prop({ required: true })
  openid: string;

  @Prop({ required: true })
  role: string;
}

export const UserSchema = SchemaFactory.createForClass(User)
注意:schema导出了两个对象,一个类型,一个schema
这里注意,如果非基础类型且有引用别的model,定义方式如下:
import { Owner } from '../owners/schemas/owner.schema';

// inside the class definition
@Prop({ type: mongoose.Schema.Types.ObjectId, ref: 'Owner' })
owner: Owner;
// 如果是数组
@Prop({ type: [{ type: mongoose.Schema.Types.ObjectId, ref: 'Owner' }] })
owner: Owner[];
这里注意,可以使用raw定义嵌套类型:
@Prop(raw({
  firstName: { type: String },
  lastName: { type: String }
}))
details: Record<string, any>;
如果不喜欢使用装饰器,可以使用函数来定义:
export const CatSchema = new mongoose.Schema({
   name: String,
   age: Number,
   breed: String,
});
- 在module中引入该shema
import { User,UserSchema } from './schemas/user.schema';

@Module({
  imports: [
    MongooseModule.forFeature([{ name: User.name, schema: UserSchema }]),
    HttpModule
  ],
  controllers: [UsersController],
  providers: [UsersService]
})
export class UsersModule {}
- 在service中引入dao
import { Injectable } from '@nestjs/common';
import { CreateUserDTO } from './dto/create-user.dto';
import { UpdateUserDTO } from './dto/update-user.dto';
import { User, UserDocument } from './schemas/user.schema';
import { InjectModel } from '@nestjs/mongoose';
import { Model } from 'mongoose';

@Injectable()
export class UsersService {
  constructor(
    @InjectModel(User.name) private readonly userModel: Model<UserDocument>,
    private readonly httpService: HttpService
  ) { }

  async create(createUserDTO: CreateUserDTO): Promise<User> {
    const user = new User();
    user.openid = createUserDTO.openid;
    user.username = createUserDTO.username;
    user.role = createUserDTO.role;
    return this.userModel.create(user);
  }

  /** 查找所有用户 */
  async findAll(): Promise<User[]> {
    return this.userModel.find().exec();
  }

  /** 条件查找所有用户 */
  async findByConditions(conditions): Promise<User[]> {
    return this.userModel.where(conditions);
  }

  /** 查找单个用户 */
  async findOne(_id: string): Promise<User> {
    return this.userModel.findById(_id);
  }

  /** 添加单个用户 */
  async addOne(body: CreateUserDTO): Promise<void> {
    await this.userModel.create(body);
  }

  /** 编辑单个用户 */
  async editOne(_id: string, body: UpdateUserDTO): Promise<void> {
    console.log(body)
    await this.userModel.findByIdAndUpdate(_id, body);
  }

  /** 删除单个用户 */
  async deleteOne(_id: string): Promise<void> {
    await this.userModel.findByIdAndDelete(_id);
  }
- 在controller中使用
import { Controller, Get, Post, Body, Patch, Param, Delete } from '@nestjs/common';
import { UsersService } from './users.service';
import { CreateUserDTO } from './dto/create-user.dto';
import { UpdateUserDTO } from './dto/update-user.dto';
import { User} from './schemas/user.schema';
import UserResponse from 'src/interface/response.interface';

@Controller('users')
export class UsersController {
  constructor(private readonly usersService: UsersService) { }

  @Get()
  async findAll(): Promise<UserResponse<User[]>> {
    return {
      code: 200,
      data: await this.usersService.findAll(),
      message: 'success',
    };
  }

  @Post()
  async addOne(@Body() body: CreateUserDTO): Promise<UserResponse> {
    await this.usersService.addOne(body);
    return {
      code: 200,
      message: 'success',
    };
  }

  @Post('findByConditions')
  async findByConditions(@Body() body: CreateUserDTO): Promise<UserResponse> {
    return {
      code: 200,
      data: await this.usersService.findByConditions(body),
      message: 'success',
    };
  }

  @Patch(':_id')
  async editOne(
    @Param('_id') _id: string,
    @Body() body: UpdateUserDTO,
  ): Promise<UserResponse> {
    await this.usersService.editOne(_id, body);
    return {
      code: 200,
      message: 'Success.',
    };
  }

  @Delete(':_id')
  async deleteOne(@Param('_id') _id: string): Promise<UserResponse> {
    await this.usersService.deleteOne(_id);
    return {
      code: 200,
      message: 'Success.',
    };
  }
}
其他参考:
- https://blog.csdn.net/weixin_45828332/article/details/114120710
- https://docs.nestjs.com/techniques/mongodb
- http://mongoosejs.net/docs/guide.html


![[LeetCode周赛复盘] 第 325 场周赛20221225](https://img-blog.csdnimg.cn/10850cafa90d40be928e44bf7dba9899.png)


