文章目录
- 写在前面
- 自定义banner
- 使用banner.txt文件
- 使用图片
- 手写一个banner
- banner参数
- 在 application.properties 文件中可以配置banner其他属性
- banner自身参数
- 源码分析
- 在线生成banner
写在前面
Springboot启动的时候默认是有一套自己的banner的:
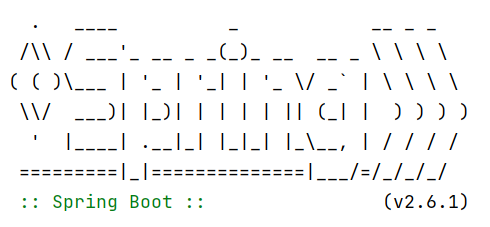
我们如何自定义这个banner呢?
自定义banner
使用banner.txt文件
在Spring Boot工程的/src/main/resources目录下创建一个banner.txt文件,然后将ASCII字符画复制进去,就能替换默认的banner了。
banner.txt:
 _  _  _  _
(_)(_)(_)(_)
 (_)      (_)_   _  _  _  _     _  _   _  _      _  _  _
 (_)        (_) (_)(_)(_)(_)_  (_)(_)_(_)(_)  _ (_)(_)(_) _
 (_)        (_)(_) _  _  _ (_)(_)   (_)   (_)(_)         (_)
 (_)       _(_)(_)(_)(_)(_)(_)(_)   (_)   (_)(_)         (_)
 (_)_  _  (_)  (_)_  _  _  _  (_)   (_)   (_)(_) _  _  _ (_)
(_)(_)(_)(_)     (_)(_)(_)(_) (_)   (_)   (_)   (_)(_)(_)
启动后的打印效果:

使用图片
在Spring Boot工程的/src/main/resources目录下,放置一张图片,起名为banner.xxx(其中xxx为gif、jpg、png格式),在项目启动时会自动解析该图片。
banner.jpg:

启动后的打印效果:
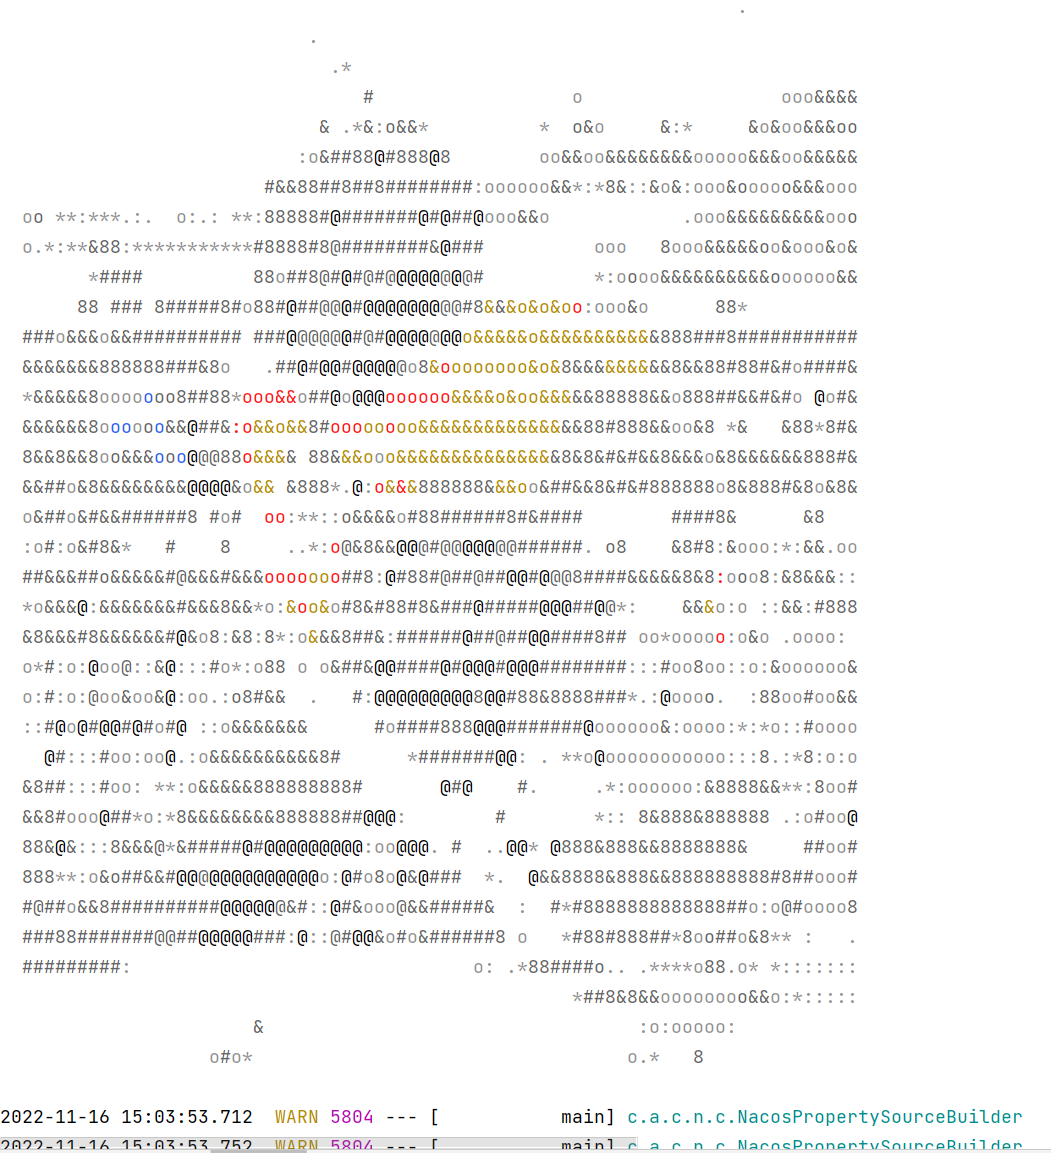
注意:图片如果太花了,效果可能并不会很好。
手写一个banner
import org.springframework.boot.Banner;
import org.springframework.boot.ansi.AnsiColor;
import org.springframework.boot.ansi.AnsiOutput;
import org.springframework.boot.ansi.AnsiStyle;
import org.springframework.core.env.Environment;
import java.io.PrintStream;
/** 自定义banner类
 */
public class MyBanner implements Banner {

    private static final String[] BANNER = new String[]{"", "  .   ____          _            __ _ _", " /\\\\ / ___'_ __ _ _(_)_ __  __ _ \\ \\ \\ \\", "( ( )\\___ | '_ | '_| | '_ \\/ _` | \\ \\ \\ \\", " \\\\/  ___)| |_)| | | | | || (_| |  ) ) ) )", "  '  |____| .__|_| |_|_| |_\\__, | / / / /", " =========|_|==============|___/=/_/_/_/"};

    public MyBanner() {
    }

    @Override
    public void printBanner(Environment environment, Class<?> sourceClass, PrintStream out) {
        String[] bannerArray = BANNER;
        int bannerLength = bannerArray.length;
        for(int i = 0; i < bannerLength; ++i) {
            String line = bannerArray[i];
            out.println(line);
        }
        out.println(AnsiOutput.toString(new Object[]{AnsiColor.GREEN, " :: Spring Boot :: ", AnsiColor.DEFAULT,  AnsiStyle.FAINT}));
        out.println();
    }
}

// 启动类中加入banner即可
@SpringBootApplication
public class DemoApplication {

    public static void main(String[] args) {
        SpringApplication springApplication = new SpringApplication(DemoApplication.class);
        //添加自定义banner
        springApplication.setBanner(new MyBanner());
        springApplication.run(args);
    }

}
banner参数
在 application.properties 文件中可以配置banner其他属性
# 来确定横幅是必须在控制台(console)上打印、发送到配置的记录器(log)还是根本不生成(off)。
spring.main.banner-mode=off
# 在 application.properties 文件中可以配置banner属性
spring.banner.charset=UTF-8
spring.banner.location=classpath:banner.txt
#在 application.properties 文件中可以配置图片的高度、宽度、颜色深度
spring.banner.image.width=100
spring.banner.image.height=20
spring.banner.image.bitdepth=4
# 是否应该为黑暗终端主题反转图像
spring.banner.image.invert=true
# banner图片的位置
spring.banner.image.location=classpath:banner.jpg
# banner右移字符数
spring.banner.image.margin=2
banner自身参数
| 参数 | 描述 |
|---|---|
| ${application.version} | MANIFEST.MF中声明的应用程序的版本号 |
| ${application.formatted-version} | MANIFEST.MF声明的应用程序的版本号并格式化以供显示(用括号括起来并以v为前缀)。比如(v1.0)。 |
| ${spring-boot.version} | 你正在使用的Spring Boot版本 |
| ${Ansi.NAME} (or ${AnsiColor.NAME}, ${AnsiBackground.NAME}, ${AnsiStyle.NAME}) | 其中NAME是ANSI转义码的名称 |
| ${application.title} | 在MANIFEST.MF中声明的应用程序的标题。 |
| ${AnsiColor.BRIGHT_RED} | 设置控制台中输出内容的颜色 |
| ${…} | 其他任意配置信息,比如说${server.port}获取端口 |
源码分析
1、在SpringApplication的run方法中,一直点进去,可以看到这样一段逻辑:
// org.springframework.boot.SpringApplication#run(java.lang.String...)
public ConfigurableApplicationContext run(String... args) {
	long startTime = System.nanoTime();
	DefaultBootstrapContext bootstrapContext = createBootstrapContext();
	ConfigurableApplicationContext context = null;
	configureHeadlessProperty();
	SpringApplicationRunListeners listeners = getRunListeners(args);
	listeners.starting(bootstrapContext, this.mainApplicationClass);
	try {
		ApplicationArguments applicationArguments = new DefaultApplicationArguments(args);
		ConfigurableEnvironment environment = prepareEnvironment(listeners, bootstrapContext, applicationArguments);
		configureIgnoreBeanInfo(environment);
		// 打印banner
		Banner printedBanner = printBanner(environment);
		context = createApplicationContext();
		context.setApplicationStartup(this.applicationStartup);
		prepareContext(bootstrapContext, context, environment, listeners, applicationArguments, printedBanner);
		refreshContext(context);
		afterRefresh(context, applicationArguments);
		Duration timeTakenToStartup = Duration.ofNanos(System.nanoTime() - startTime);
		if (this.logStartupInfo) {
			new StartupInfoLogger(this.mainApplicationClass).logStarted(getApplicationLog(), timeTakenToStartup);
		}
		listeners.started(context, timeTakenToStartup);
		callRunners(context, applicationArguments);
	}
	catch (Throwable ex) {
		handleRunFailure(context, ex, listeners);
		throw new IllegalStateException(ex);
	}
	try {
		Duration timeTakenToReady = Duration.ofNanos(System.nanoTime() - startTime);
		listeners.ready(context, timeTakenToReady);
	}
	catch (Throwable ex) {
		handleRunFailure(context, ex, null);
		throw new IllegalStateException(ex);
	}
	return context;
}
其中printBanner就是打印banner的代码。
2、printBanner方法
// org.springframework.boot.SpringApplication#printBanner
private Banner printBanner(ConfigurableEnvironment environment) {
	// 判断banner的模式
	if (this.bannerMode == Banner.Mode.OFF) {
		return null;
	}
	ResourceLoader resourceLoader = (this.resourceLoader != null) ? this.resourceLoader
			: new DefaultResourceLoader(null);
	SpringApplicationBannerPrinter bannerPrinter = new SpringApplicationBannerPrinter(resourceLoader, this.banner);
	if (this.bannerMode == Mode.LOG) {
		return bannerPrinter.print(environment, this.mainApplicationClass, logger);
	}
	return bannerPrinter.print(environment, this.mainApplicationClass, System.out);
}
3、控制台print方法
// org.springframework.boot.SpringApplicationBannerPrinter#print(org.springframework.core.env.Environment, java.lang.Class<?>, java.io.PrintStream)
	Banner print(Environment environment, Class<?> sourceClass, PrintStream out) {
		// 获取Banner
		Banner banner = getBanner(environment);
		// 打印Banner
		banner.printBanner(environment, sourceClass, out);
		return new PrintedBanner(banner, sourceClass);
	}
4、getBanner
// org.springframework.boot.SpringApplicationBannerPrinter#getBanner
private Banner getBanner(Environment environment) {
    SpringApplicationBannerPrinter.Banners banners = new SpringApplicationBannerPrinter.Banners();
    //先获取image类型的banner
    banners.addIfNotNull(this.getImageBanner(environment));
    //在获取text类型的banner
    banners.addIfNotNull(this.getTextBanner(environment));
    if (banners.hasAtLeastOneBanner()) {
        // 如果至少有一个,则返回
        // Banners 也实现了 Banner 接口,运用了组合模式,实际上可同时打印图片和文本 banner。
        return banners;
    } else {
         // 返回自定义的banner(this.fallbackBanner) 或者 springboot默认的banner(DEFAULT_BANNER)
         // 默认的banner类:SpringBootBanner。
         // 自定义的banner:需要我们仿照SpringBootBanner去自定义一个类

         //this.fallbackBanner: 表示自定义的banner,此参数可在springboot启动类的main方法中设置,后续会介绍

         //   public static void main(String[] args) {
         //        SpringApplication springApplication = new SpringApplication(Application.class);
         //        springApplication.setBanner(new MyBanner());//自定义的banner
         //        springApplication.run(args);
         //   }

          return this.fallbackBanner != null ? this.fallbackBanner : DEFAULT_BANNER;
    }
}
banner的获取方式有两种,先获取image类型的banner,然后获取text类型的banner,如果至少有一个,则执行该banner,如果没有,返回自定义的banner,如果自定义也没有,则返回默认
5、获取banner
//获取Text类型的banner
private Banner getTextBanner(Environment environment) {
    //先从spring.banner.location路径中去取,如果没有,默认banner.txt
    String location = environment.getProperty("spring.banner.location", "banner.txt");
    Resource resource = this.resourceLoader.getResource(location);
    try {
        if (resource.exists() && !resource.getURL().toExternalForm().contains("liquibase-core")) {
            return new ResourceBanner(resource);
        }
    } catch (IOException var5) {}
    return null;
}

//获取image类型的banner
private Banner getImageBanner(Environment environment) {
    String location = environment.getProperty("spring.banner.image.location");
    if (StringUtils.hasLength(location)) {
        Resource resource = this.resourceLoader.getResource(location);
        return resource.exists() ? new ImageBanner(resource) : null;
    } else {
        String[] var3 = IMAGE_EXTENSION;
        int var4 = var3.length;
        for(int var5 = 0; var5 < var4; ++var5) {
            String ext = var3[var5];
            // static final String[] IMAGE_EXTENSION = { "gif", "jpg", "png" };
            Resource resource = this.resourceLoader.getResource("banner." + ext);
            if (resource.exists()) {
                return new ImageBanner(resource);
            }
        }
        return null;
    }
}
在线生成banner
这里提供了几个在线生成banner的网址:
https://www.bootschool.net/ascii
http://www.network-science.de/ascii/
http://patorjk.com/software/taag/
http://www.degraeve.com/img2txt.php





![[附源码]java毕业设计驾校管理系统](https://img-blog.csdnimg.cn/9dd47dea8de143d19be2621d7949c92c.png)
![[附源码]java毕业设计基于的疫苗预约系统](https://img-blog.csdnimg.cn/a98cb9104c71407ebed62e86872fa8e3.png)

