@EnableCaching如何一键开启缓存
- 手动挡
- CacheManager
- Cache
- 使用演示
- 小结
- 自动挡
- CachingConfigurationSelector
- AutoProxyRegistrar
- ProxyCachingConfiguration
- CacheOperationSource
- CacheOperation
- BeanFactoryCacheOperationSourceAdvisor
- CacheInterceptor
- 小结
手动挡
我们首先来看看Spring对缓存模块的抽象体系:
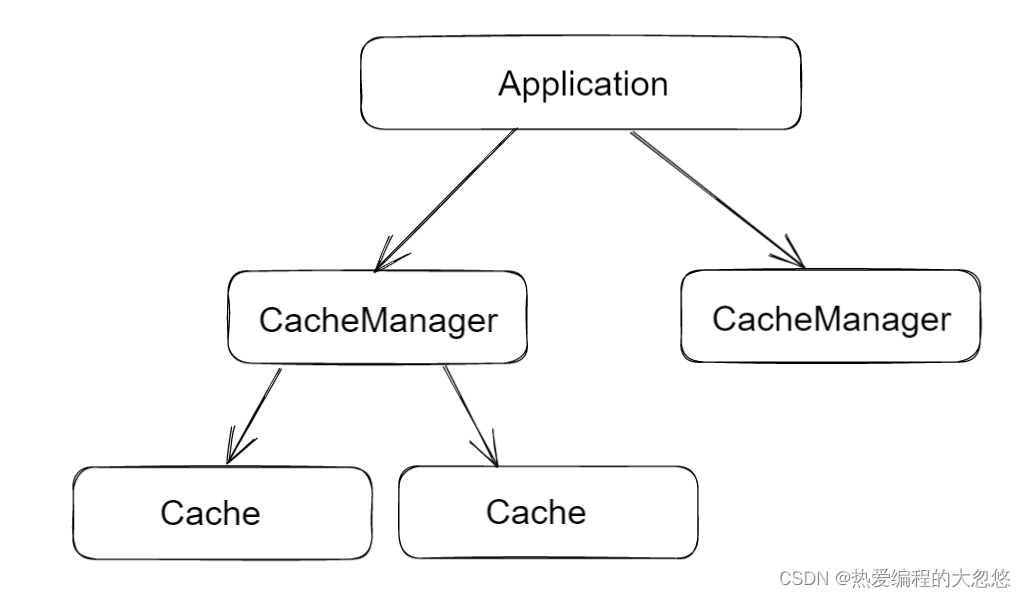
- CacheManager:缓存管理器。管理各种缓存(Cache)组件
- Cache:为缓存的组件规范定义,包含缓存的各种操作集合。比如它有很多实现:ConcurrentMapCache、RedisCache、EhCacheCache(额外导包)
Spring并没有提供缓存过期的处理,当然,后续我会给出具体的解决方案。
CacheManager
public interface CacheManager {
    //一个cacheName对应一个Cache
	Cache getCache(String name);
	//返回所有cacheNames
	Collection<String> getCacheNames();
}
CacheManager接口的子类如下:

- Caffeine,EnCache,JCacheManager底层采用了不同第三方实现,这里不多叙述。
- NoOpCacheManager用于禁用缓存。
- SimpleCacheManager通过ConcurrentHashMap集合来存放cacheName到Cache的映射关系。
- CompositeCacheManager内部保管了多个CacheManager,当要通过cacheName获取某个Cache时,会依次遍历CacheManager集合中每个CacheManager,只要其中一个返回的Cache不为null,那么就结束遍历,返回结果。
- 含有Transaction的CacheManager用于控制是否需要在当前事务提交成功时,再进行缓存的添加和清除工作,本质是通过
TransactionSynchronizationManager.registerSynchronization注册事务提交成功的监听器来完成的。
ConcurrentMapCacheManager是Spring Cache默认提供的缓基于内存的实现方案,我们来看看它具体是实现的:
public class ConcurrentMapCacheManager implements CacheManager, BeanClassLoaderAware {
    //map存放映射关系
	private final ConcurrentMap<String, Cache> cacheMap = new ConcurrentHashMap<>(16);
	//该参数用于控制如果getCache时,对应的Cache不存在,是否自动创建Cache
	private boolean dynamic = true;
    //是否允许往缓存中添加null值,如果允许,那么null值会被进行特殊包装处理,方便在从缓存中获取数据时进行鉴别
	private boolean allowNullValues = true;
    //是存储副本还是引用
	private boolean storeByValue = false;

	...
    //如果我们手动设置了cacheNames,那么会关闭自动创建Cache的功能
	public void setCacheNames(@Nullable Collection<String> cacheNames) {
		if (cacheNames != null) {
			for (String name : cacheNames) {
			    //自动创建好对应的Cache
				this.cacheMap.put(name, createConcurrentMapCache(name));
			}
			this.dynamic = false;
		}
		else {
			this.dynamic = true;
		}
	}

	public Cache getCache(String name) {
		Cache cache = this.cacheMap.get(name);
		//如果cacheName对应的cache不存在,并且开启了自动创建cache功能
		//那么就自动创建cache
		if (cache == null && this.dynamic) {
			synchronized (this.cacheMap) {
				cache = this.cacheMap.get(name);
				if (cache == null) {
					cache = createConcurrentMapCache(name);
					this.cacheMap.put(name, cache);
				}
			}
		}
		return cache;
	}

	protected Cache createConcurrentMapCache(String name) {
	     //如果决定缓存中存储的是副本的话,那么需要 SerializationDelegate来完成深拷贝工作。
		SerializationDelegate actualSerialization = (isStoreByValue() ? this.serialization : null);
		return new ConcurrentMapCache(name, new ConcurrentHashMap<>(256), isAllowNullValues(), actualSerialization);
	}
}
Cache
public interface Cache {
	String getName();
	// 返回未被包装的缓存值
	Object getNativeCache();
	// 就是用下面的ValueWrapper把值包装了一下而已~
	@Nullable
	ValueWrapper get(Object key);
	@Nullable
	<T> T get(Object key, @Nullable Class<T> type);
	@Nullable
	<T> T get(Object key, Callable<T> valueLoader);

	void put(Object key, @Nullable Object value);

	// 不存在旧值直接put就先去了返回null,否则返回旧值(并且不会把新值put进去)
	@Nullable
	ValueWrapper putIfAbsent(Object key, @Nullable Object value);
	// 删除
	void evict(Object key);
	// 清空
	void clear();


	@FunctionalInterface
	interface ValueWrapper {
		@Nullable
		Object get();
	}
}
Cache的继承树也非常的简单:

我们先来看看AbstractValueAdaptingCache的实现:
// @since 4.2.2 出现得还是挺晚的~~~
public abstract class AbstractValueAdaptingCache implements Cache {
	//是否需要缓存NULL值
	private final boolean allowNullValues;
	...
	// lookup为抽象方法
	@Override
	@Nullable
	public ValueWrapper get(Object key) {
		Object value = lookup(key);
		return toValueWrapper(value);
	}
	@Nullable
	protected abstract Object lookup(Object key);

	// lookup出来的value继续交给fromStoreValue()处理~  其实就是对null值进行了处理
	// 若是null值就返回null,而不是具体的值了~~~
	@Override
	@SuppressWarnings("unchecked")
	@Nullable
	public <T> T get(Object key, @Nullable Class<T> type) {
		Object value = fromStoreValue(lookup(key));
		if (value != null && type != null && !type.isInstance(value)) {
			throw new IllegalStateException("Cached value is not of required type [" + type.getName() + "]: " + value);
		}
		return (T) value;
	}

	// 它是protected 方法  子类有复写
	@Nullable
	protected Object fromStoreValue(@Nullable Object storeValue) {
		if (this.allowNullValues && storeValue == NullValue.INSTANCE) {
			return null;
		}
		return storeValue;
	}

	// 提供给子类使用的方法,对null值进行转换~  子类有复写
	protected Object toStoreValue(@Nullable Object userValue) {
		if (userValue == null) {
			if (this.allowNullValues) {
				return NullValue.INSTANCE;
			}
			throw new IllegalArgumentException("Cache '" + getName() + "' is configured to not allow null values but null was provided");
		}
		return userValue;
	}

	// 把value进行了一层包装为SimpleValueWrapper
	@Nullable
	protected Cache.ValueWrapper toValueWrapper(@Nullable Object storeValue) {
		return (storeValue != null ? new SimpleValueWrapper(fromStoreValue(storeValue)) : null);
	}
}
显然该类是后来(Spring4.2.2)插入进来的专门对null值进行的处理。它提供了通用实现,来适配null值的问题。若你自定义Cache的实现,建议继承自此抽象类。
ConcurrentMapCache实现:
public class ConcurrentMapCache extends AbstractValueAdaptingCache {
	//当前cache对应的cacheName
	private final String name;
    //使用map集合作为缓存存储地方
	private final ConcurrentMap<Object, Object> store;
	//如果缓存中要求保存副本,则通过序列化器来完成深拷贝
	private final SerializationDelegate serialization;
	...
	// 这是父类的抽象方法
	@Override
	protected Object lookup(Object key) {
		return this.store.get(key);
	}

	@Override
	public void put(Object key, @Nullable Object value) {
		this.store.put(key, toStoreValue(value));
	}

	@Override
	public void evict(Object key) {
		this.store.remove(key);
	}

	@Override
	public void clear() {
		this.store.clear();
	}
	...
}
ConcurrentMapCache它是spring-context提供的内建唯一缓存实现,它是完全基于本地内存的。
Springboot默认使用的是SimpleCacheConfiguration,它配置的是ConcurrentMapCacheManager来实现缓存,因此对应Cache实现为ConcurrentMapCache
使用演示
    @Test
    public void test(){
        CacheManager cacheManager = new ConcurrentMapCacheManager();
        // 即使我们上面没有放进去名字为car的Cache,此处也会帮我们自动生成
        Cache carCache = cacheManager.getCache("car");
        // 向缓存里加数据
        carCache.put("benz", "奔驰");
        carCache.put("bmw", "宝马");
        carCache.put("audi", "奥迪");

        System.out.println(carCache.getClass()); //class org.springframework.cache.concurrent.ConcurrentMapCache
        // 从缓存里获取数据
        System.out.println(carCache.get("benz").get()); //奔驰
        System.out.println(carCache.get("benz", String.class)); //奔驰
    }
小结
到此为止,我们了解了如何使用原生缓存API来实现缓存功能,这一点和之前使用原生API完成Spring事务控制一样,但是问题在于使用编码来实现缓存,会导致缓存相关代码散落在项目代码中各个地方,不方便管理;
因此,和声明式事务一样,缓存模块同样可以借助于Spring提供的AOP体系来完成声明式缓存。
原生API方式实现缓存详细学习可以阅读此篇文章
自动挡
@EnableCaching注解可以一键开启缓存功能,然后我们使用**@Cacheable、@CachePut、@CacheEvict、@Caching等注解就可以完成声明式缓存了,这一点和@EnableTransactionManagement,@Transactional**组合一样。
下面,我们就来探究一下@EnableCaching到底是如何实现一键开启缓存的:
@Target(ElementType.TYPE)
@Retention(RetentionPolicy.RUNTIME)
@Documented
//CachingConfigurationSelector是重点
@Import(CachingConfigurationSelector.class)
public @interface EnableCaching {
    //声明式缓存和声明式事务,还包括@Async注解实现,背后全部依靠Spring完善的AOP体系
    //是否强制采用cglib代理
	boolean proxyTargetClass() default false;
	//代理模式,默认是普通代理--及采用jdk或者cglib代理完成
	//另一种模式就是采用aspectj完成代理
	AdviceMode mode() default AdviceMode.PROXY;
	//目标对象可能同时被多个advisor切中,这里的order用于指定当前advisor的优先级
	//用于对多个advisor进行排序
	int order() default Ordered.LOWEST_PRECEDENCE;
}
CachingConfigurationSelector
public class CachingConfigurationSelector extends AdviceModeImportSelector<EnableCaching> {

	private static final String PROXY_JCACHE_CONFIGURATION_CLASS =
			"org.springframework.cache.jcache.config.ProxyJCacheConfiguration";
    ...

	private static final boolean jsr107Present;

	private static final boolean jcacheImplPresent;

	static {
		ClassLoader classLoader = CachingConfigurationSelector.class.getClassLoader();
		jsr107Present = ClassUtils.isPresent("javax.cache.Cache", classLoader);
		jcacheImplPresent = ClassUtils.isPresent(PROXY_JCACHE_CONFIGURATION_CLASS, classLoader);
	}

    //返回的className列表,表示需要向IOC容器中加入的bean集合
	@Override
	public String[] selectImports(AdviceMode adviceMode) {
		switch (adviceMode) {
			case PROXY:
				//上面说过代理模式一般都是普通模式,下面的ASPECTJ可以忽略掉
				return getProxyImports();
			case ASPECTJ:
				return getAspectJImports();
			default:
				return null;
		}
	}

  	// 向容器导入了AutoProxyRegistrar和ProxyCachingConfiguration
	// 若JSR107的包存在(导入了javax.cache:cache-api这个包),并且并且存在ProxyJCacheConfiguration这个类
	// 显然ProxyJCacheConfiguration这个类我们一般都不会导进来~~~~  所以JSR107是不生效的。   但是但是Spring是支持的
	private String[] getProxyImports() {
		List<String> result = new ArrayList<>(3);
		result.add(AutoProxyRegistrar.class.getName());
		result.add(ProxyCachingConfiguration.class.getName());
		if (jsr107Present && jcacheImplPresent) {
			result.add(PROXY_JCACHE_CONFIGURATION_CLASS);
		}
		return StringUtils.toStringArray(result);
	}
}
AdviceModeImportSelector会先获取到对应@Enablexxx注解中的adviceMode属性,然后将adviceMode作为参数传入selectImports,该方法由子类实现,子类再根据adviceMode决定导入哪些类到IOC容器中去。
AutoProxyRegistrar
为了在bean初始化的生命周期中通过相关回调接口(BeanPostProcessor)完成对bean的代理,我们需要往容器中添加一个自动代理创建器。
AutoProxyRegistrar负责完成往容器中注入自动代理创建器功能。
public class AutoProxyRegistrar implements ImportBeanDefinitionRegistrar {
    ...
	@Override
	public void registerBeanDefinitions(AnnotationMetadata importingClassMetadata, BeanDefinitionRegistry registry) {
		boolean candidateFound = false;
		//@EnableCaching注解需要标注在某个配置类上,importingClassMetadata就是该配置类的原数据信息
		//这里是先获取到配置类上所有的注解全类名
		Set<String> annTypes = importingClassMetadata.getAnnotationTypes();
		for (String annType : annTypes) {
		    //配置类上通常存在很多注解,如何过滤出我们需要的@EnableCaching注解呢?
			AnnotationAttributes candidate = AnnotationConfigUtils.attributesFor(importingClassMetadata, annType);
			if (candidate == null) {
				continue;
			}
			//如果注解中存在属性mode和proxyTargetClass,那么你就是我们要找的注解
			Object mode = candidate.get("mode");
			Object proxyTargetClass = candidate.get("proxyTargetClass");
			if (mode != null && proxyTargetClass != null && AdviceMode.class == mode.getClass() &&
					Boolean.class == proxyTargetClass.getClass()) {
				candidateFound = true;
				//自动代理创建器注入容器的前提是代理模式为proxy,即采用cglib或者jdk完成动态代理
				if (mode == AdviceMode.PROXY) {
				    //往容器中放入一个自动代理创建器
					AopConfigUtils.registerAutoProxyCreatorIfNecessary(registry);
					//如果强制采用cglib代理的话,会将自动代理创建器的proxyTargetClass属性设置为true
					//自动代理创建器都继承了proxyConfig
					if ((Boolean) proxyTargetClass) {
						AopConfigUtils.forceAutoProxyCreatorToUseClassProxying(registry);
						return;
					}
				}
			}
		}
		...
	}
}
AutoProxyRegistrar最终注册到容器中的自动代理创建器类型为InfrastructureAdvisorAutoProxyCreator,InfrastructureAdvisorAutoProxyCreator自动代理创建器的特点在于它只会搜集出容器中所有基础advisor,然后再依次判断每个advisor是否能应用于当前bean。
这里基础的意思是bean对应的BeanDefinition中的Role为ROLE_INFRASTRUCTURE。
如果bean的role为ROLE_INFRASTRUCTURE,表示该bean是spring内部的基础设施bean。
Spring内部通常采用如下的方式来指定某个bean为基础设施bean。
	@Bean(name = CacheManagementConfigUtils.CACHE_ADVISOR_BEAN_NAME)
	@Role(BeanDefinition.ROLE_INFRASTRUCTURE)
ProxyCachingConfiguration
自动代理创建器已经就绪,下一步我们还需要将Caching相关的advisor放入容器中,这样InfrastructureAdvisorAutoProxyCreator就可以收集到该advisor,然后在对bean进行动态代理时,将该advisor放入代理对象的拦截器链中:
@Configuration(proxyBeanMethods = false)
@Role(BeanDefinition.ROLE_INFRASTRUCTURE)
public class ProxyCachingConfiguration extends AbstractCachingConfiguration {

	@Bean(name = CacheManagementConfigUtils.CACHE_ADVISOR_BEAN_NAME)
	@Role(BeanDefinition.ROLE_INFRASTRUCTURE)
	public BeanFactoryCacheOperationSourceAdvisor cacheAdvisor(
			CacheOperationSource cacheOperationSource, CacheInterceptor cacheInterceptor) {

		BeanFactoryCacheOperationSourceAdvisor advisor = new BeanFactoryCacheOperationSourceAdvisor();
		advisor.setCacheOperationSource(cacheOperationSource);
		advisor.setAdvice(cacheInterceptor);
		if (this.enableCaching != null) {
			advisor.setOrder(this.enableCaching.<Integer>getNumber("order"));
		}
		return advisor;
	}

	@Bean
	@Role(BeanDefinition.ROLE_INFRASTRUCTURE)
	public CacheOperationSource cacheOperationSource() {
		return new AnnotationCacheOperationSource();
	}

	@Bean
	@Role(BeanDefinition.ROLE_INFRASTRUCTURE)
	public CacheInterceptor cacheInterceptor(CacheOperationSource cacheOperationSource) {
		CacheInterceptor interceptor = new CacheInterceptor();
		interceptor.configure(this.errorHandler, this.keyGenerator, this.cacheResolver, this.cacheManager);
		interceptor.setCacheOperationSource(cacheOperationSource);
		return interceptor;
	}
}

ProxyCachingConfiguration往容器中注入了以上三个Bean,这三个Bean就是声明式缓存实现的全部了。
ProxyCachingConfiguration的父类AbstractCachingConfiguration用于搜集用户注入容器中的CachingConfigurer,通过CachingConfigurer可以完成对Cache模块相关组件的自定义修改:
@Configuration(proxyBeanMethods = false)
public abstract class AbstractCachingConfiguration implements ImportAware {
    ...
	@Nullable
	protected Supplier<CacheManager> cacheManager;

	@Nullable
	protected Supplier<CacheResolver> cacheResolver;

	@Nullable
	protected Supplier<KeyGenerator> keyGenerator;

	@Nullable
	protected Supplier<CacheErrorHandler> errorHandler;

    ...

	@Autowired(required = false)
	void setConfigurers(Collection<CachingConfigurer> configurers) {
		if (CollectionUtils.isEmpty(configurers)) {
			return;
		}

		if (configurers.size() > 1) {
			throw new IllegalStateException(configurers.size() + " implementations of " +
					"CachingConfigurer were found when only 1 was expected. " +
					"Refactor the configuration such that CachingConfigurer is " +
					"implemented only once or not at all.");
		}
		//用户只能往容器中注入一个configure,多了会报错的
		CachingConfigurer configurer = configurers.iterator().next();
		//使用用户的自定义配置来修改缓存模块相关组件
		useCachingConfigurer(configurer);
	}

	protected void useCachingConfigurer(CachingConfigurer config) {
		this.cacheManager = config::cacheManager;
		this.cacheResolver = config::cacheResolver;
		this.keyGenerator = config::keyGenerator;
		this.errorHandler = config::errorHandler;
	}
}
CacheOperationSource
大家思考一个问题BeanFactoryCacheOperationSourceAdvisor增强器是如何判断当前bean是否需要缓存支持呢?
如果需要缓存支持,那么当拦截到目标对象方法执行时,又该如何解析获取到方法上缓存注解相关信息呢?
上面两个难题的解决最终靠的是CacheOperationSource:
public interface CacheOperationSource {
    //判断当前bean是否需要缓存支持
	default boolean isCandidateClass(Class<?> targetClass) {
		return true;
	}

   //解析获取到方法上缓存注解相关信息
	Collection<CacheOperation> getCacheOperations(Method method, @Nullable Class<?> targetClass);
}
CacheOperationSource的实现类如下:

我们这里只看通过解析注解来获取缓存信息的实现类:
AbstractFallbackCacheOperationSource中Fallback的意思是如果在方法上无法查询到相关缓存注解,那么还会尝试从以下几个地方去查询缓存注解:
- 目标对象所在类上
- 接口方法上
- 接口上
public abstract class AbstractFallbackCacheOperationSource implements CacheOperationSource {
    //如果某个方法不需要缓存支持,为了避免每次都要解析很久来判断当前方法是否需要缓存支持,通过 NULL_CACHING_ATTRIBUTE 进行标记
	private static final Collection<CacheOperation> NULL_CACHING_ATTRIBUTE = Collections.emptyList();
    //缓存方法和该方法对应的缓存信息
	private final Map<Object, Collection<CacheOperation>> attributeCache = new ConcurrentHashMap<>(1024);

	@Override
	public Collection<CacheOperation> getCacheOperations(Method method, @Nullable Class<?> targetClass) {
		if (method.getDeclaringClass() == Object.class) {
			return null;
		}
		//构建缓存key
		Object cacheKey = getCacheKey(method, targetClass);
		//缓存中已经存在了,那么直接返回当前方法对应的缓存信息
		Collection<CacheOperation> cached = this.attributeCache.get(cacheKey);
        //缓存中存在
		if (cached != null) {
			return (cached != NULL_CACHING_ATTRIBUTE ? cached : null);
		}
		else {
		    //缓存中不存在,那么就进行解析
			Collection<CacheOperation> cacheOps = computeCacheOperations(method, targetClass);
			if (cacheOps != null) {
				....
				this.attributeCache.put(cacheKey, cacheOps);
			}
			else {
			    //当前方法不需要缓存支持,进行特殊标记
				this.attributeCache.put(cacheKey, NULL_CACHING_ATTRIBUTE);
			}
			return cacheOps;
		}
	}
    ...

	@Nullable
	private Collection<CacheOperation> computeCacheOperations(Method method, @Nullable Class<?> targetClass) {
		//是否只对public方法提供缓存支持,默认为true(唯一的子类覆写了为true)
		if (allowPublicMethodsOnly() && !Modifier.isPublic(method.getModifiers())) {
			return null;
		}

		// The method may be on an interface, but we need attributes from the target class.
		// If the target class is null, the method will be unchanged.
		Method specificMethod = AopUtils.getMostSpecificMethod(method, targetClass);

		// 首先查询方法上是否存在相关注解,如果存在就进行解析,然后将每个注解中的信息都保存到一个CacheOperation后返回
		Collection<CacheOperation> opDef = findCacheOperations(specificMethod);
		if (opDef != null) {
			return opDef;
		}

		// 查询类上是否存在缓存注解信息
		opDef = findCacheOperations(specificMethod.getDeclaringClass());
		if (opDef != null && ClassUtils.isUserLevelMethod(method)) {
			return opDef;
		}

        //缓存注解可能标注在了接口方法上
		if (specificMethod != method) {
			// method可以看做是接口中的方法,那么此时就尝试解析接口方法上是否存在相关缓存注解信息
			opDef = findCacheOperations(method);
			if (opDef != null) {
				return opDef;
			}
			// 再查询接口上是否存在相关缓存注解信息
			opDef = findCacheOperations(method.getDeclaringClass());
			if (opDef != null && ClassUtils.isUserLevelMethod(method)) {
				return opDef;
			}
		}

		return null;
	}
	protected abstract Collection<CacheOperation> findCacheOperations(Class<?> clazz);
	protected abstract Collection<CacheOperation> findCacheOperations(Method method);
	...
}
AbstractFallbackCacheOperationSource提供了一套获取CacheOperation的模板支持,但是具体如何从目标对象上解析得到缓存信息,即CacheOperation,则靠子类实现。
public class AnnotationCacheOperationSource extends AbstractFallbackCacheOperationSource implements Serializable {
    //是否只对public方法提供缓存支持,无参构造函数中默认设置为了true
	private final boolean publicMethodsOnly;
    //缓存注解解析器
	private final Set<CacheAnnotationParser> annotationParsers;

	public AnnotationCacheOperationSource() {
		this(true);
	}

	public AnnotationCacheOperationSource(boolean publicMethodsOnly) {
		this.publicMethodsOnly = publicMethodsOnly;
		this.annotationParsers = Collections.singleton(new SpringCacheAnnotationParser());
	}
    ....

    //当前目标对象是否需要缓存支持
	@Override
	public boolean isCandidateClass(Class<?> targetClass) {
		for (CacheAnnotationParser parser : this.annotationParsers) {
			if (parser.isCandidateClass(targetClass)) {
				return true;
			}
		}
		return false;
	}

	@Override
	protected Collection<CacheOperation> findCacheOperations(Class<?> clazz) {
		return determineCacheOperations(parser -> parser.parseCacheAnnotations(clazz));
	}

	@Overridee
	protected Collection<CacheOperation> findCacheOperations(Method method) {
		return determineCacheOperations(parser -> parser.parseCacheAnnotations(method));
	}

	@Nullable
	protected Collection<CacheOperation> determineCacheOperations(CacheOperationProvider provider) {
		Collection<CacheOperation> ops = null;
		for (CacheAnnotationParser parser : this.annotationParsers) {
		    //依次尝试让每一个注解解析器都进行解析,我们可以自定义注解解析器,来解析我们自定义的缓存注解
			Collection<CacheOperation> annOps = provider.getCacheOperations(parser);
			if (annOps != null) {
				if (ops == null) {
					ops = annOps;
				}
				else {
					Collection<CacheOperation> combined = new ArrayList<>(ops.size() + annOps.size());
					combined.addAll(ops);
					combined.addAll(annOps);
					ops = combined;
				}
			}
		}
		return ops;
	}

	@FunctionalInterface
	protected interface CacheOperationProvider {
		@Nullable
		Collection<CacheOperation> getCacheOperations(CacheAnnotationParser parser);
	}

}
关于缓存注解解析器是如何解析缓存注解,然后提取注解中信息,包装为CacheOperation的,这部分内容比较简单,大家可以自行阅读源码学习。
CacheOperation
CacheAnnotationParser会解析出缓存注解中相关属性,然后填充到CacheOperation中:
public abstract class CacheOperation implements BasicOperation {

	private final String name;

	private final Set<String> cacheNames;

	private final String key;

	private final String keyGenerator;

	private final String cacheManager;

	private final String cacheResolver;

	private final String condition;

	private final String toString;
    ...
CacheOperation父类中存放所有缓存注解的通用属性,而相关子实现类会提供对应缓存注解的特有属性:

BeanFactoryCacheOperationSourceAdvisor
增强器的核心是通过内部的pointCut判断是否要切入某个bean,BeanFactoryCacheOperationSourceAdvisor的pointCut过滤主要依靠CacheOperationSource完成:
public class BeanFactoryCacheOperationSourceAdvisor extends AbstractBeanFactoryPointcutAdvisor {

	@Nullable
	private CacheOperationSource cacheOperationSource;

	private final CacheOperationSourcePointcut pointcut = new CacheOperationSourcePointcut() {
		@Override
		@Nullable
		protected CacheOperationSource getCacheOperationSource() {
			return cacheOperationSource;
		}
	};
    ...
}
pointcut具体实现如下:
abstract class CacheOperationSourcePointcut extends StaticMethodMatcherPointcut implements Serializable {

	protected CacheOperationSourcePointcut() {
		setClassFilter(new CacheOperationSourceClassFilter());
	}


	@Override
	public boolean matches(Method method, Class<?> targetClass) {
	    //通过CacheOperationSource的getCacheOperations方法,完成方法级别是否需要切入的判断
		CacheOperationSource cas = getCacheOperationSource();
		return (cas != null && !CollectionUtils.isEmpty(cas.getCacheOperations(method, targetClass)));
	}

	protected abstract CacheOperationSource getCacheOperationSource();

	private class CacheOperationSourceClassFilter implements ClassFilter {
		@Override
		public boolean matches(Class<?> clazz) {
			if (CacheManager.class.isAssignableFrom(clazz)) {
				return false;
			}
			//通过CacheOperationSource的isCandidateClass方法完成类级别的过滤
			CacheOperationSource cas = getCacheOperationSource();
			return (cas == null || cas.isCandidateClass(clazz));
		}
	}

}
CacheInterceptor
如果BeanFactoryCacheOperationSourceAdvisor成功切入某个方法,那么下一步就是将CacheInterceptor加入代理对象的拦截器链中,然后执行CacheInterceptor的invoke方法了:
public class CacheInterceptor extends CacheAspectSupport implements MethodInterceptor, Serializable {

	@Override
	public Object invoke(final MethodInvocation invocation) throws Throwable {
	   //获取目标方法
		Method method = invocation.getMethod();
        //回调接口,该回调接口功能为触发目标方法执行,如果出现异常会进行捕获,然后进行包装
		CacheOperationInvoker aopAllianceInvoker = () -> {
			try {
				return invocation.proceed();
			}
			catch (Throwable ex) {
				throw new CacheOperationInvoker.ThrowableWrapper(ex);
			}
		};
        //获取到目标对
		Object target = invocation.getThis();
		Assert.state(target != null, "Target must not be null");
		try {
		    //真正干活的方法
			return execute(aopAllianceInvoker, target, method, invocation.getArguments());
		}
		catch (CacheOperationInvoker.ThrowableWrapper th) {
			throw th.getOriginal();
		}
	}
}
execute方法在父类CacheAspectSupport中实现,我们来看一下:
	protected Object execute(CacheOperationInvoker invoker, Object target, Method method, Object[] args) {
		if (this.initialized) {
			Class<?> targetClass = getTargetClass(target);
			CacheOperationSource cacheOperationSource = getCacheOperationSource();
			if (cacheOperationSource != null) {
			    //获取当前方法相关的缓存信息
				Collection<CacheOperation> operations = cacheOperationSource.getCacheOperations(method, targetClass);
				if (!CollectionUtils.isEmpty(operations)) {
				   //如果缓存信息不为空,那么进行缓存相关逻辑处理
					return execute(invoker, method,
							new CacheOperationContexts(operations, method, args, target, targetClass));
				}
			}
		}

		return invoker.invoke();
	}
真正进行缓存逻辑处理的核心方法:
	private Object execute(final CacheOperationInvoker invoker, Method method, CacheOperationContexts contexts) {
		// 多线程情况下,是否采用同步访问缓存方式--后面会介绍
		if (contexts.isSynchronized()) {
                ....
		}

		// 在目标方法执行前,执行@CacheEvicts缓存清除逻辑
		processCacheEvicts(contexts.get(CacheEvictOperation.class), true,
				CacheOperationExpressionEvaluator.NO_RESULT);

		//处理@Cacheable注解逻辑,判断缓存是否命中
		Cache.ValueWrapper cacheHit = findCachedItem(contexts.get(CacheableOperation.class));

		// Collect puts from any @Cacheable miss, if no cached item is found
		List<CachePutRequest> cachePutRequests = new ArrayList<>();
		//缓存未命中,cachePutRequests集合中保存着需要缓存此次方法执行结果的请求
		if (cacheHit == null) {
			collectPutRequests(contexts.get(CacheableOperation.class),
					CacheOperationExpressionEvaluator.NO_RESULT, cachePutRequests);
		}

		Object cacheValue;
		Object returnValue;
        //如果缓存命中,并且没有CachePut注解逻辑需要处理的话,就直接返回结果
		if (cacheHit != null && !hasCachePut(contexts)) {
			// If there are no put requests, just use the cache hit
			//获取缓存结果
			cacheValue = cacheHit.get();
			//对Optional返回值进行特殊处理
			returnValue = wrapCacheValue(method, cacheValue);
		}
		else {
			// Invoke the method if we don't have a cache hit
			//缓存没有命中,触发目标方法执行,获取返回结果
			returnValue = invokeOperation(invoker);
			//还是对Optional返回值进行特殊处理
			cacheValue = unwrapReturnValue(returnValue);
		}

		// Collect any explicit @CachePuts
		//收集@CachePuts请求
		collectPutRequests(contexts.get(CachePutOperation.class), cacheValue, cachePutRequests);

		// Process any collected put requests, either from @CachePut or a @Cacheable miss
		//依次处理每个缓存请求
		for (CachePutRequest cachePutRequest : cachePutRequests) {
		    //传入的是目标方法执行结果
			cachePutRequest.apply(cacheValue);
		}

		// Process any late evictions
		//在目标方法执行完后,再执行@CacheEvit逻辑
		processCacheEvicts(contexts.get(CacheEvictOperation.class), false, cacheValue);

		return returnValue;
	}
execute方法中调用的其他方法实现都比较简单,这里我就不展开讲述了,大家自行翻阅源码学习即可,下面我简单对处理缓存注解的步骤进行一个小的总结:
- CacheOperation封装了@CachePut、@Cacheable、@CacheEvict(下称三大缓存注解)的属性信息,以便于拦截的时候能直接操作此对象来执行逻辑。
- 解析三大注解到CacheOperation的过程是由CacheAnnotationParser完成的
- CacheAnnotationSource代表缓存属性源,非常非常重要的一个概念。它提供接口方法来获取目标方法的CacheOperation集合。由上可知,这个具体工作是委托给CacheAnnotationParser去完成的。
- BeanFactoryCacheOperationSourceAdvisor它代表增强器,至于需要增强哪些类呢???就是看有没有存在CacheOperation属性的方法
- CacheInterceptor实现了MethodInterceptor接口,在Spring AOP中实现对执行方法的拦截。在调用invoke执行目标方法前后,通过CacheAnnotationSource获取到方法所有的缓存操作属性,从而一个个的执行
- 执行的时候,每一个CacheOperation最后被封装成了CacheOperationContext,而CacheOperationContext最终通过CacheResolver解析出缓存对象Cache(可能是多个)
- 最后最后最后,CacheInterceptor调用其父类AbstractCacheInvoker执行对应的doPut / doGet / doEvict / doClear 等等。(可以处理执行异常)
小结
本文从头到尾将Spring缓存模块的实现进行了一遍透彻的分析,下一篇文章将会对缓存模块的使用注意事项进行介绍,包括如何设置缓存过期时间。