如ehcache,guava cache,redis
也有将ehcache,guava cache分级为单机缓存
将redis分为分布式缓存
ehcache官网:https://www.ehcache.org/
这里主要说下ehcache和guava cache
单独使用ehcache(当然真正企业开发并不会单独使用ehcache,而是会和Spring或者SpringBoot集成使用)
ehcache依赖:
<dependency>
<groupId>net.sf.ehcache</groupId>
<artifactId>ehcache</artifactId>
<version>2.10.6</version>
</dependency>
注意ehcache的原生API在实际开发中一般不使用,而是和Spring或者SpringBoot集成使用,但是原理还是ehcache,只不过在Spring和SpringBoot中对它进行了包装,学习ehcache原生API可以帮助理解
这里是建了个Maven工程,引入的依赖,包含了Spring,SpringBoot
<dependencyManagement>
        <dependencies>
            <dependency>
                <groupId>org.springframework.boot</groupId>
                <artifactId>spring-boot-dependencies</artifactId>
                <version>2.2.2.RELEASE</version>
                <type>pom</type>
                <scope>import</scope>
            </dependency>
        </dependencies>
    </dependencyManagement>

    <dependencies>
        <!--springboot web-->
        <dependency>
            <groupId>org.springframework.boot</groupId>
            <artifactId>spring-boot-starter-web</artifactId>
        </dependency>

        <dependency>
            <groupId>org.springframework.boot</groupId>
            <artifactId>spring-boot-starter-jdbc</artifactId>
        </dependency>
        <!--spring aop + aspectj starter-->
        <dependency>
            <groupId>org.springframework.boot</groupId>
            <artifactId>spring-boot-starter-aop</artifactId>
        </dependency>
        <!--引入spring的 cache 支持 -->
        <dependency>
            <groupId>org.springframework.boot</groupId>
            <artifactId>spring-boot-starter-cache</artifactId>
        </dependency>
        <!--缓存实现-->
        <dependency>
            <groupId>net.sf.ehcache</groupId>
            <artifactId>ehcache</artifactId>
        </dependency>
        <dependency>
            <groupId>org.springframework.boot</groupId>
            <artifactId>spring-boot-starter-test</artifactId>
            <scope>test</scope>
        </dependency>
        <!--jsr107缓存规范-->
        <dependency>
            <groupId>javax.cache</groupId>
            <artifactId>cache-api</artifactId>
            <version>1.1.1</version>
        </dependency>
        <!--lombok,springboot中已定义版本-->
        <dependency>
            <groupId>org.projectlombok</groupId>
            <artifactId>lombok</artifactId>
        </dependency>
        <dependency>
            <groupId>com.google.guava</groupId>
            <artifactId>guava</artifactId>
            <version>29.0-jre</version>
        </dependency>

        <dependency>
            <groupId>org.springframework</groupId>
            <artifactId>spring-test</artifactId>
            <version>5.2.2.RELEASE</version>
        </dependency>

        <dependency>
            <groupId>com.alibaba</groupId>
            <artifactId>fastjson</artifactId>
            <version>1.2.78</version>
        </dependency>

        <!--redisson的一部分代码是实现了jsr107的,分布式锁-->
        <!--    <dependency>-->
        <!--      <groupId>org.redisson</groupId>-->
        <!--      <artifactId>redisson</artifactId>-->
        <!--      <version>3.16.2</version>-->
        <!--    </dependency>-->


        <dependency>
            <groupId>junit</groupId>
            <artifactId>junit</artifactId>
            <version>4.12</version>
            <scope>test</scope>
        </dependency>

    </dependencies>
使用原生ehcache的API
ehcache.xml配置
<?xml version="1.0" encoding="utf-8"?>
<ehcache
    xmlns:xsi="http://www.w3.org/2001/XMLSchema-instance"
    xsi:noNamespaceSchemaLocation="https://www.ehcache.org/ehcache.xsd">

  <!--
    path:默认写到磁盘的路径:C:\Users\user\AppData\Local\Temp\  -->
  <diskStore path="java.io.tmpdir"/>

  <!--
    对应类:net.sf.ehcache.config.CacheConfiguration
    maxEntriesLocalHeap:内存中最多放多少个元素
    memoryStoreEvictionPolicy:驱逐策略,net.sf.ehcache.store.MemoryStoreEvictionPolicy.fromString
    eternal:true:不过期
    timeToIdleSeconds:eternal=false时有效,可以闲置多长时间,单位s
    timeToLiveSeconds:eternal=false时有效,从创建开始计算可以存活多长时间,单位s
    maxElementsOnDisk:localTempSwap时有效,表示最多可以往磁盘写多少个
    diskExpiryThreadIntervalSeconds:localTempSwap时有效,检查磁盘元素是否失效的时间间隔
    persistence:当cache中的元素个数=maxEntriesLocalHeap时,
          localTempSwap:写到磁盘,其他值: net.sf.ehcache.config.PersistenceConfiguration.Strategy
    statistics:开启统计
  -->
  <cache
      name="user_cache"
      maxEntriesLocalHeap="1000"
      eternal="false"
      timeToIdleSeconds="600"
      timeToLiveSeconds="600"
      maxElementsOnDisk="10000000"
      diskExpiryThreadIntervalSeconds="120"
      memoryStoreEvictionPolicy="LRU"
      statistics="true"
  >
    <persistence strategy="localTempSwap"/>
  </cache>
</ehcache>
Test
相对路径:
String absPath="./src/main/resources/ehcache.xml";
 @Test
    public void test2(){
        System.out.println(System.getProperty("java.io.tmpdir"));
    }

    /**
     * 单独使用ehcache的api进行编程
     */
    @Test
    public void test1(){
        String absPath = "D:\\cache-demo\\src\\main\\resources\\ehcache.xml";
        /*
         用来管理多个Cache,user_cache、item_cache、store_cache...
         */
        CacheManager cacheManager = CacheManager.create(absPath);
        /*
         获取到CacheManager管理的所有的cache
         */
        String[] cacheNames = cacheManager.getCacheNames();
        System.out.println("CacheManager管理的所有的cache的名字"+ Arrays.toString(cacheNames));
        /*
         获取cache的名字(我们指定的)获取具体的cache
         */
        Cache userCache = cacheManager.getCache("user_cache");
        /*
         往userCache放入一个user
         */
        User user = new User();
        user.setId(1001L);
        user.setName("劈里啪啦");
        Element element = new Element(user.getId(),user);
        userCache.put(element);
        /*
        通过key取出缓存的对象
         */
        Element resultEle = userCache.get(1001L);
        System.out.println("获取到的resultEle:" +resultEle);
        System.out.println("获取Element的value:" + resultEle.getObjectValue());
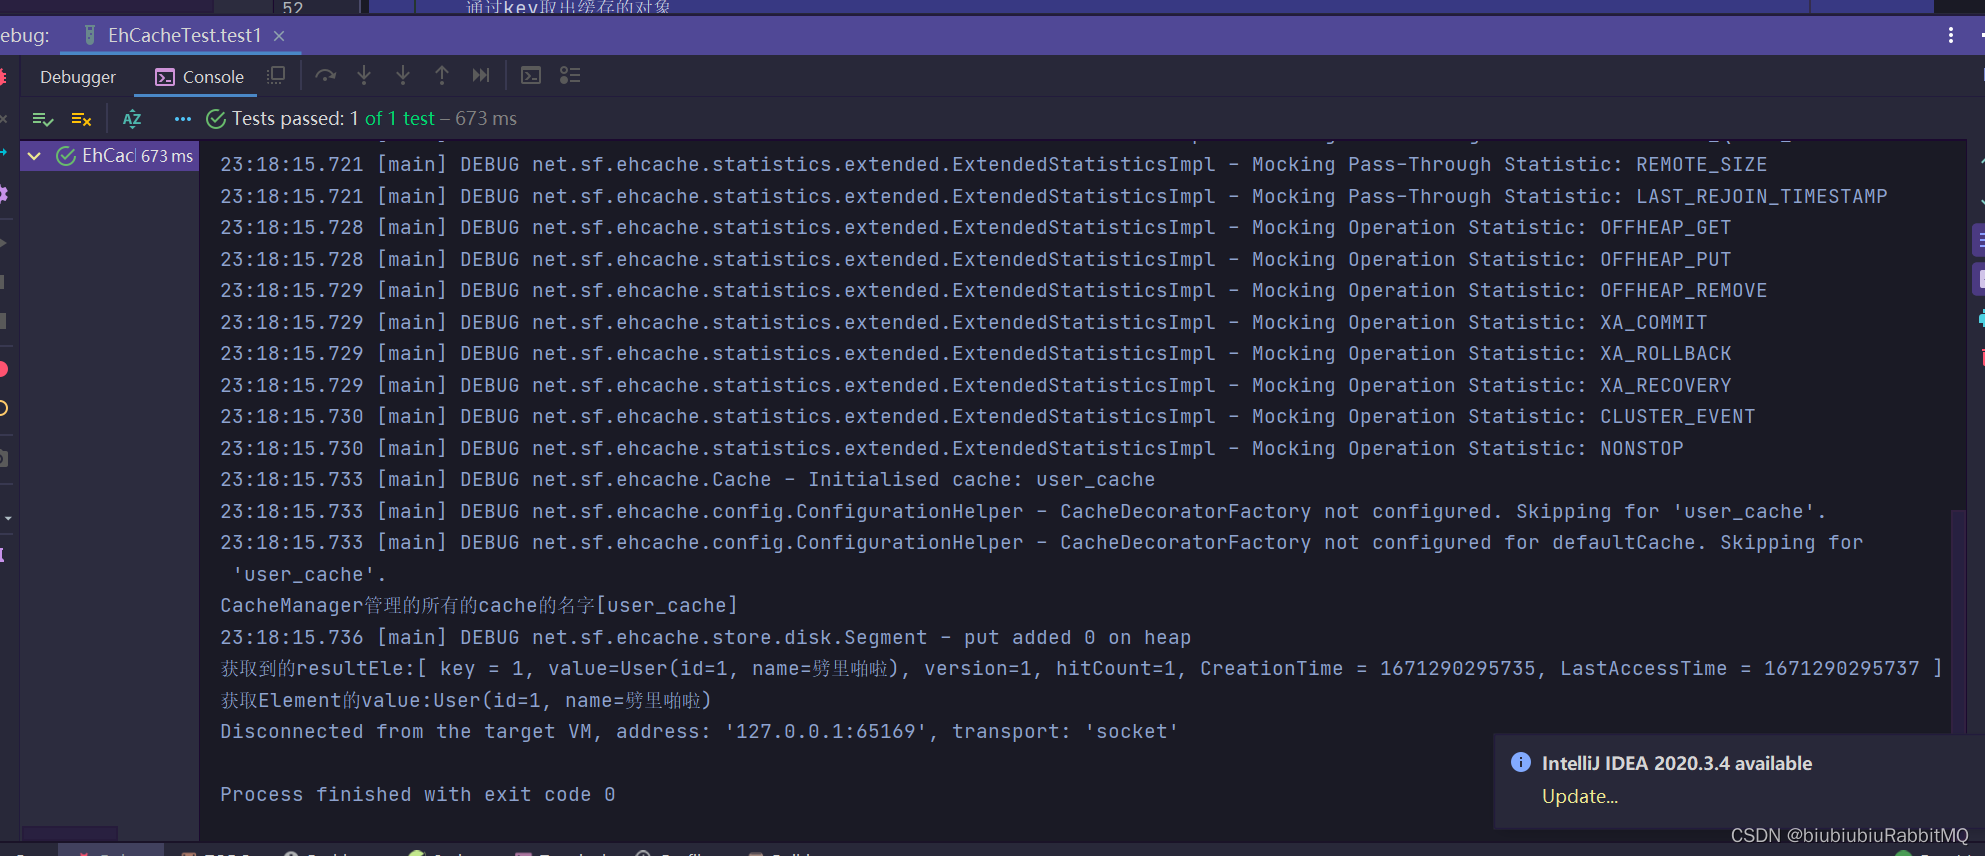
    }
关于jsr107缓存规范
依赖
<!-- JCACHE-->
<dependency>
<groupId>javax.cache</groupId>
<artifactId>cache-api</artifactId>
<version>1.1.1</version>
</dependency>
-
jcp介绍: The Java Community Process(SM) Program - JSRs: Java Specification Requests - detail JSR# 107
-
项目地址: GitHub - jsr107/jsr107spec: JSR107 Cache Specification
api结构
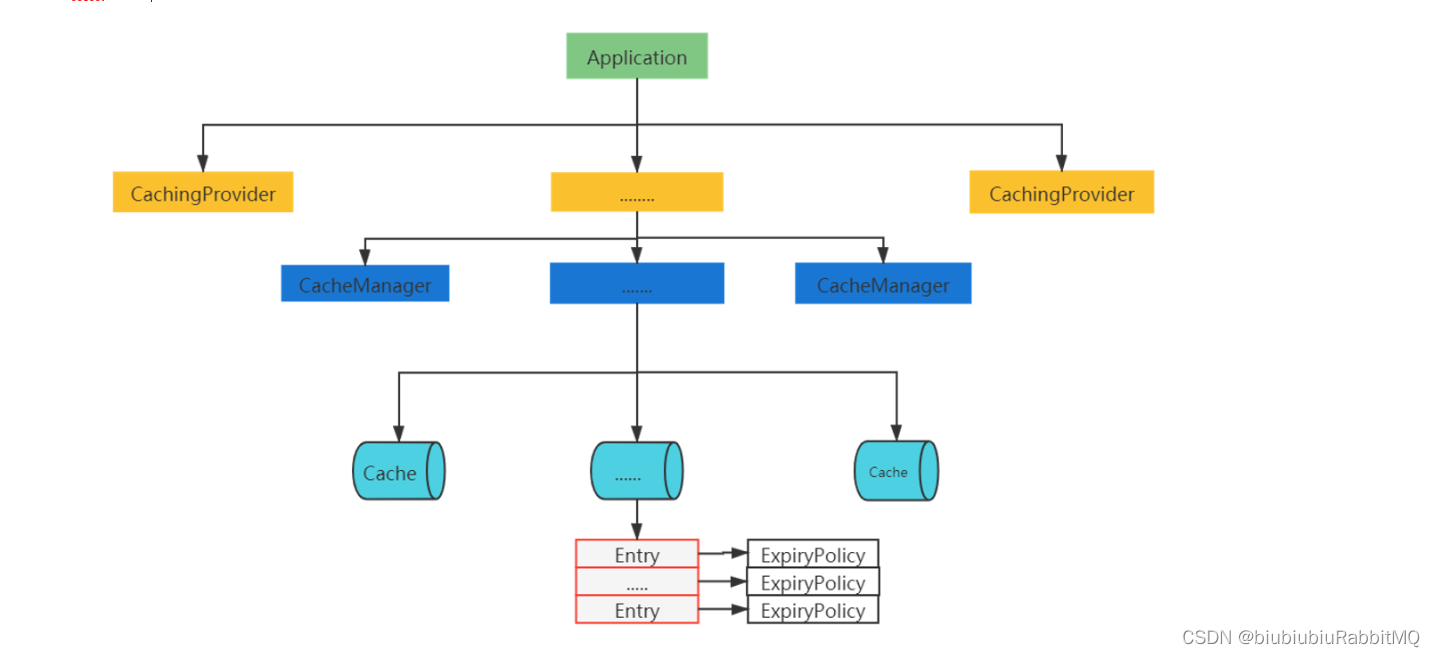
如何理解上面这张图:就是说一个应用程序下面,有很多个CahingProvider,每个CachingProvider里又包含很多CacheManager,每个CacheManager里有包含很多Cache
对于jsr107缓存规范只做了解,过于复杂
下面是Spring的缓存抽象,设计就相对简单了
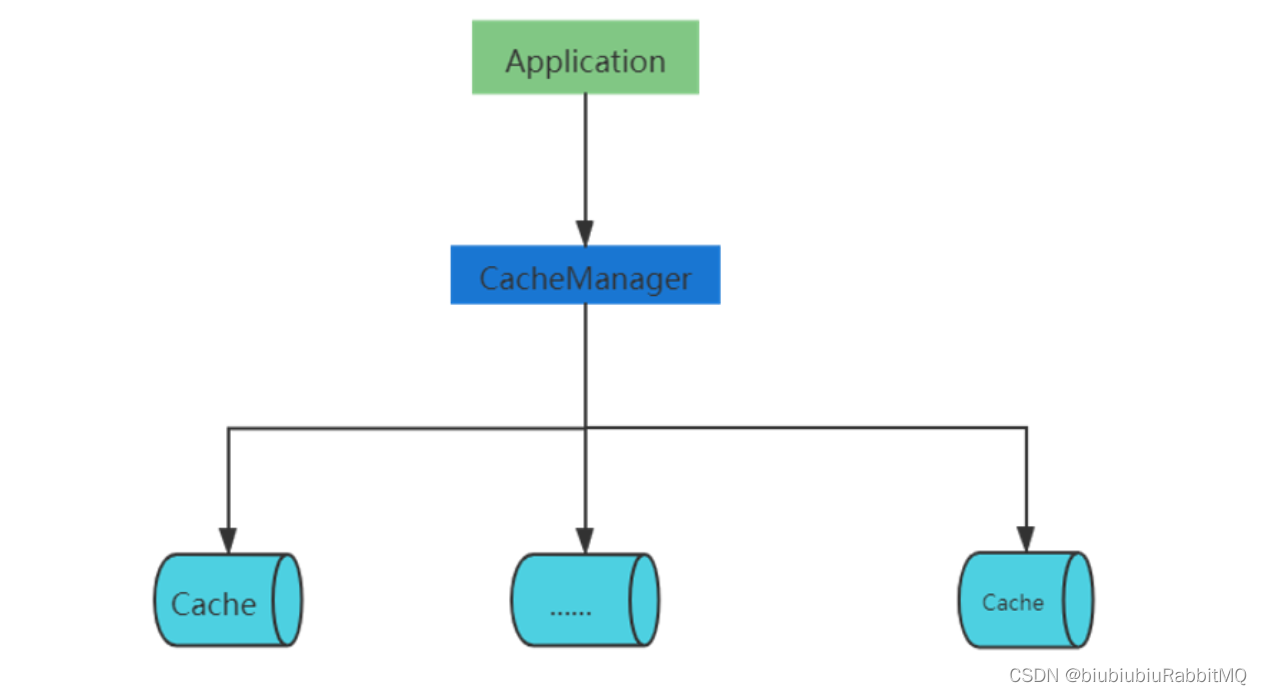
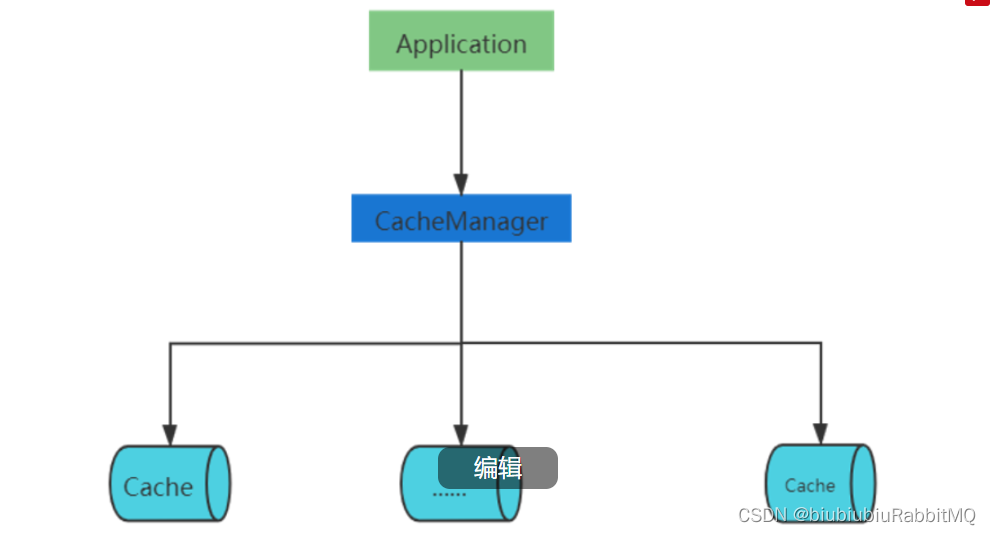
就是说一个应用里面有一个CacheManager,管理着多个Cache
ehcache与Spring集成以及编程式操作缓存
Spring依赖一开始就已经引入了
Spring集成ehCache两种方式:
1.编程式使用
2.注解方式使用
注意在Spring集成ehcache的这张图
新建一个测试类
1.编程式使用
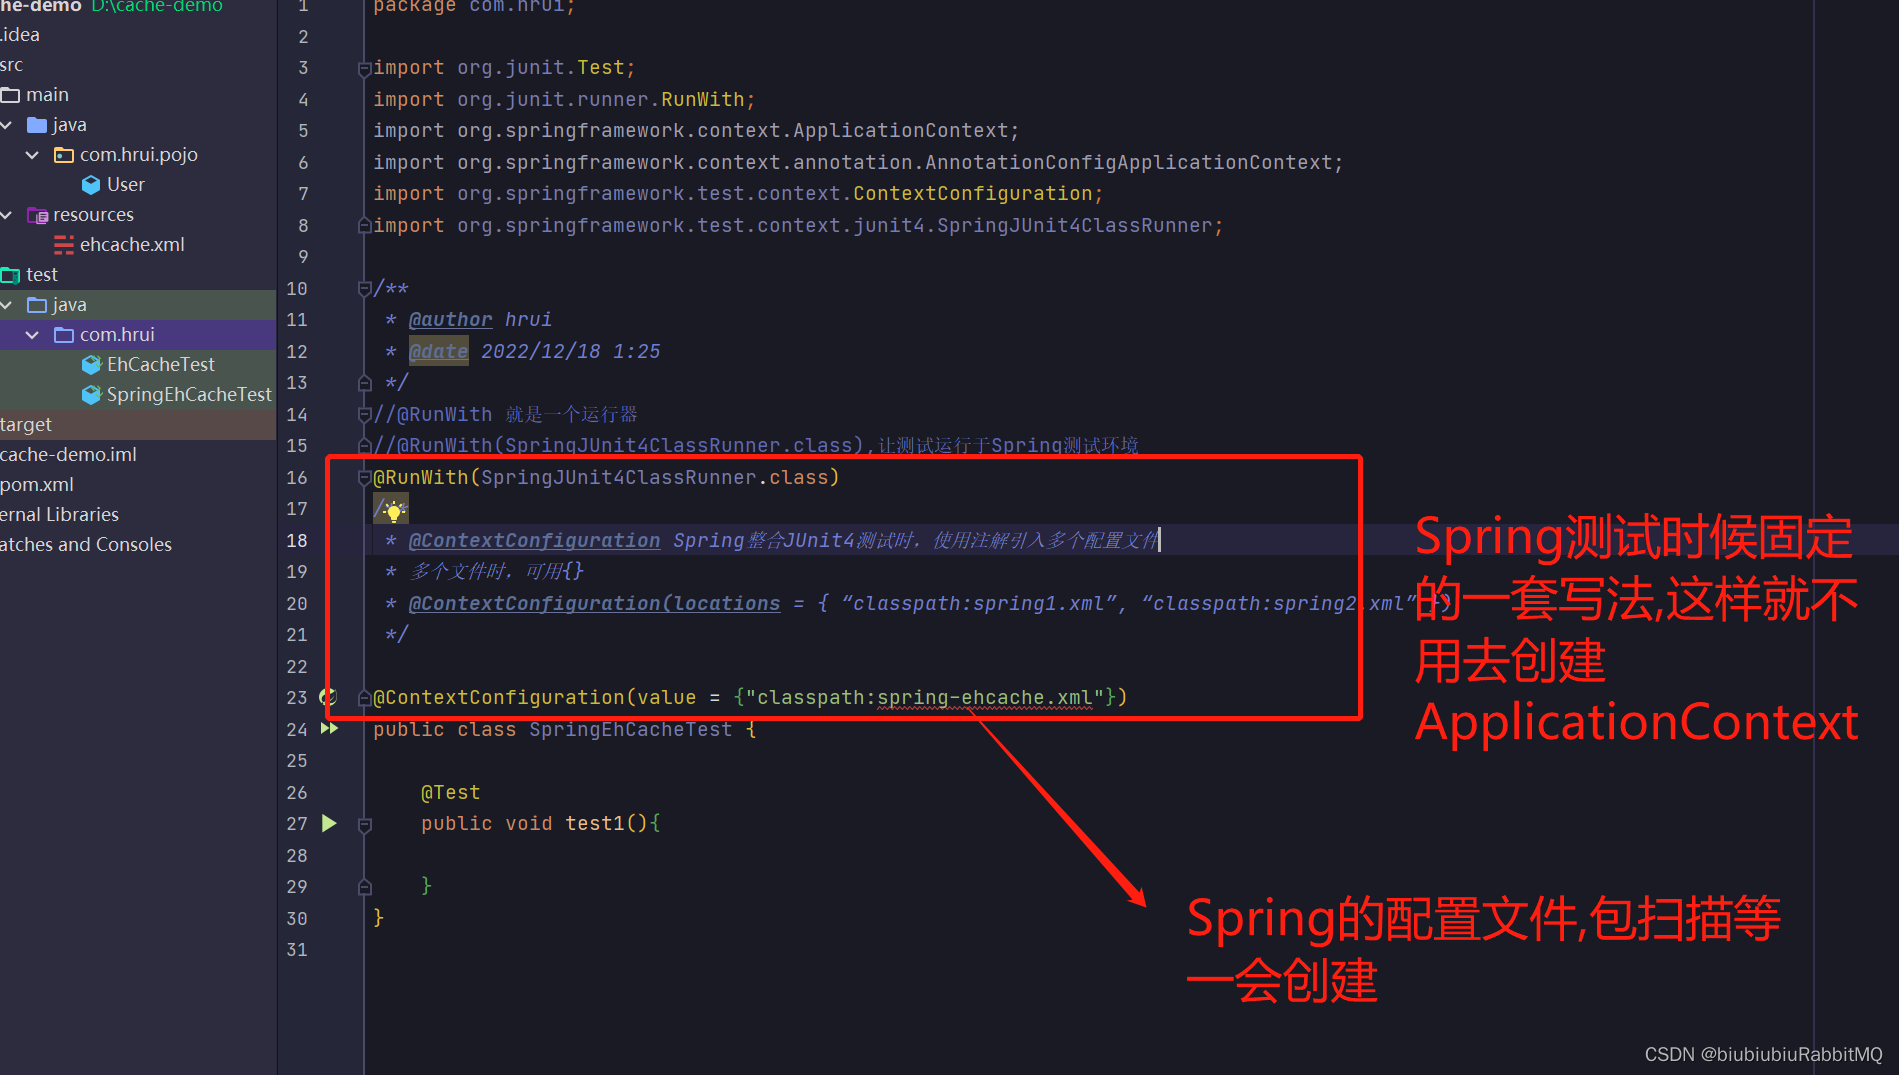
spring-ehcache.xml
<?xml version="1.0" encoding="utf-8"?>
<beans xmlns="http://www.springframework.org/schema/beans"
       xmlns:xsi="http://www.w3.org/2001/XMLSchema-instance"
       xmlns:cache="http://www.springframework.org/schema/cache"
       xsi:schemaLocation="http://www.springframework.org/schema/beans
           http://www.springframework.org/schema/beans/spring-beans.xsd
           http://www.springframework.org/schema/cache
           http://www.springframework.org/schema/cache/spring-cache-4.0.xsd">
    <!--相当于CacheManager cacheManager = CacheManager.create(absPath);-->
    <bean
        id="ehCacheManager"
        class="org.springframework.cache.ehcache.EhCacheManagerFactoryBean">
        <!--配置ehcache.xml的路径-->
      <property name="configLocation" value="classpath:ehcache.xml"/>
    </bean>
    <!--Spring中对原生的CacheManager进行包装,
    org.springframework.cache.CacheManager有多个实现
    -->
    <bean
        id="ehCacheCacheManager"
        class="org.springframework.cache.ehcache.EhCacheCacheManager">
      <property name="cacheManager" ref="ehCacheManager"/>
      <!--事务回滚缓存也回滚-->
      <property name="transactionAware" value="true"/>
    </bean>

    <!--和上面是同级的,指定用哪个实现类-->
<!--    <bean-->
<!--        id="concurrentMapCacheManager"-->
<!--        class="org.springframework.cache.concurrent.ConcurrentMapCacheManager">-->
<!--      <property name="cacheNames">-->
<!--        <list>-->
<!--          <value>item_cache</value>-->
<!--          <value>store_cache</value>-->
<!--        </list>-->
<!--      </property>-->
<!--    </bean>-->

  <!--跟org.springframework.cache.annotation.EnableCaching一样-->
  <cache:annotation-driven proxy-target-class="true"
                           cache-manager="ehCacheCacheManager"/>

</beans>
现在可以开始玩了
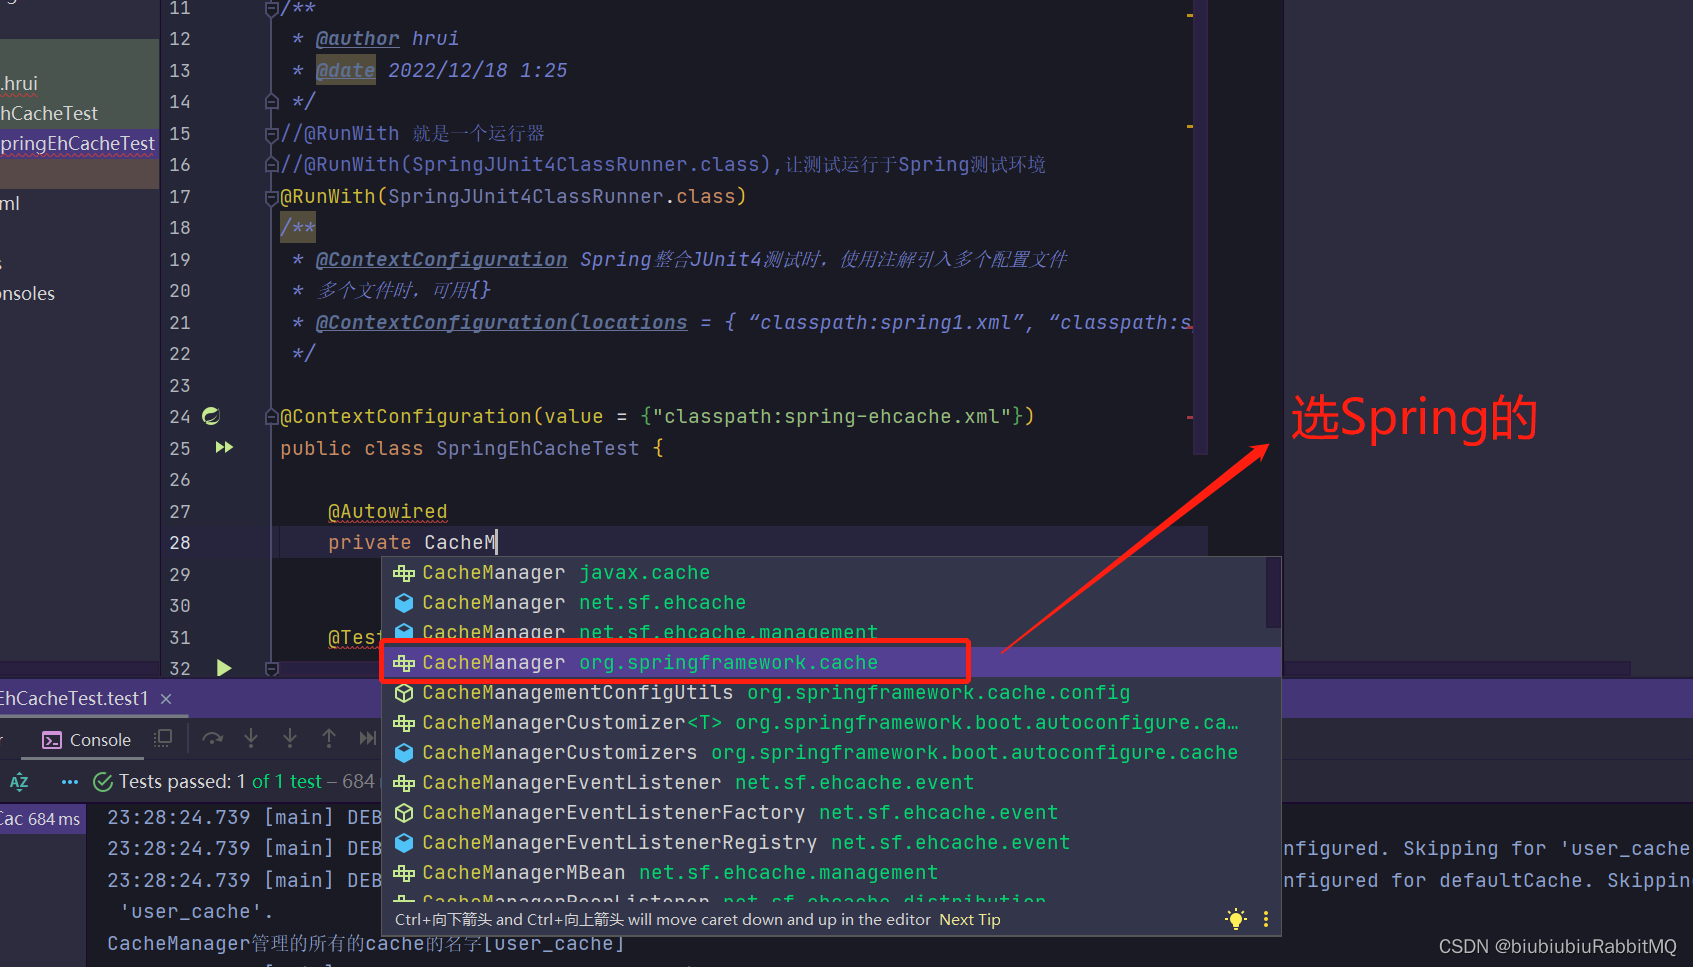
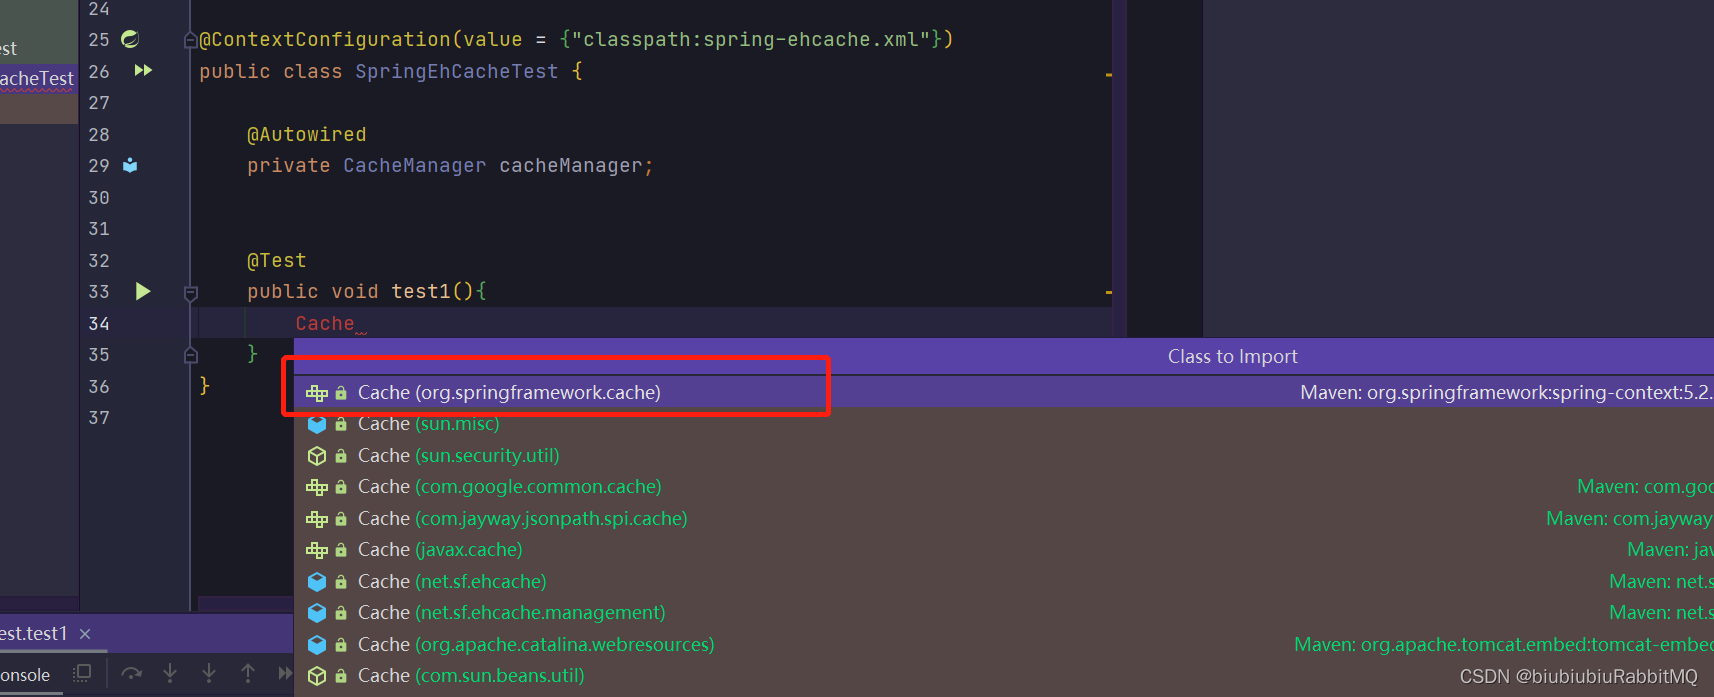
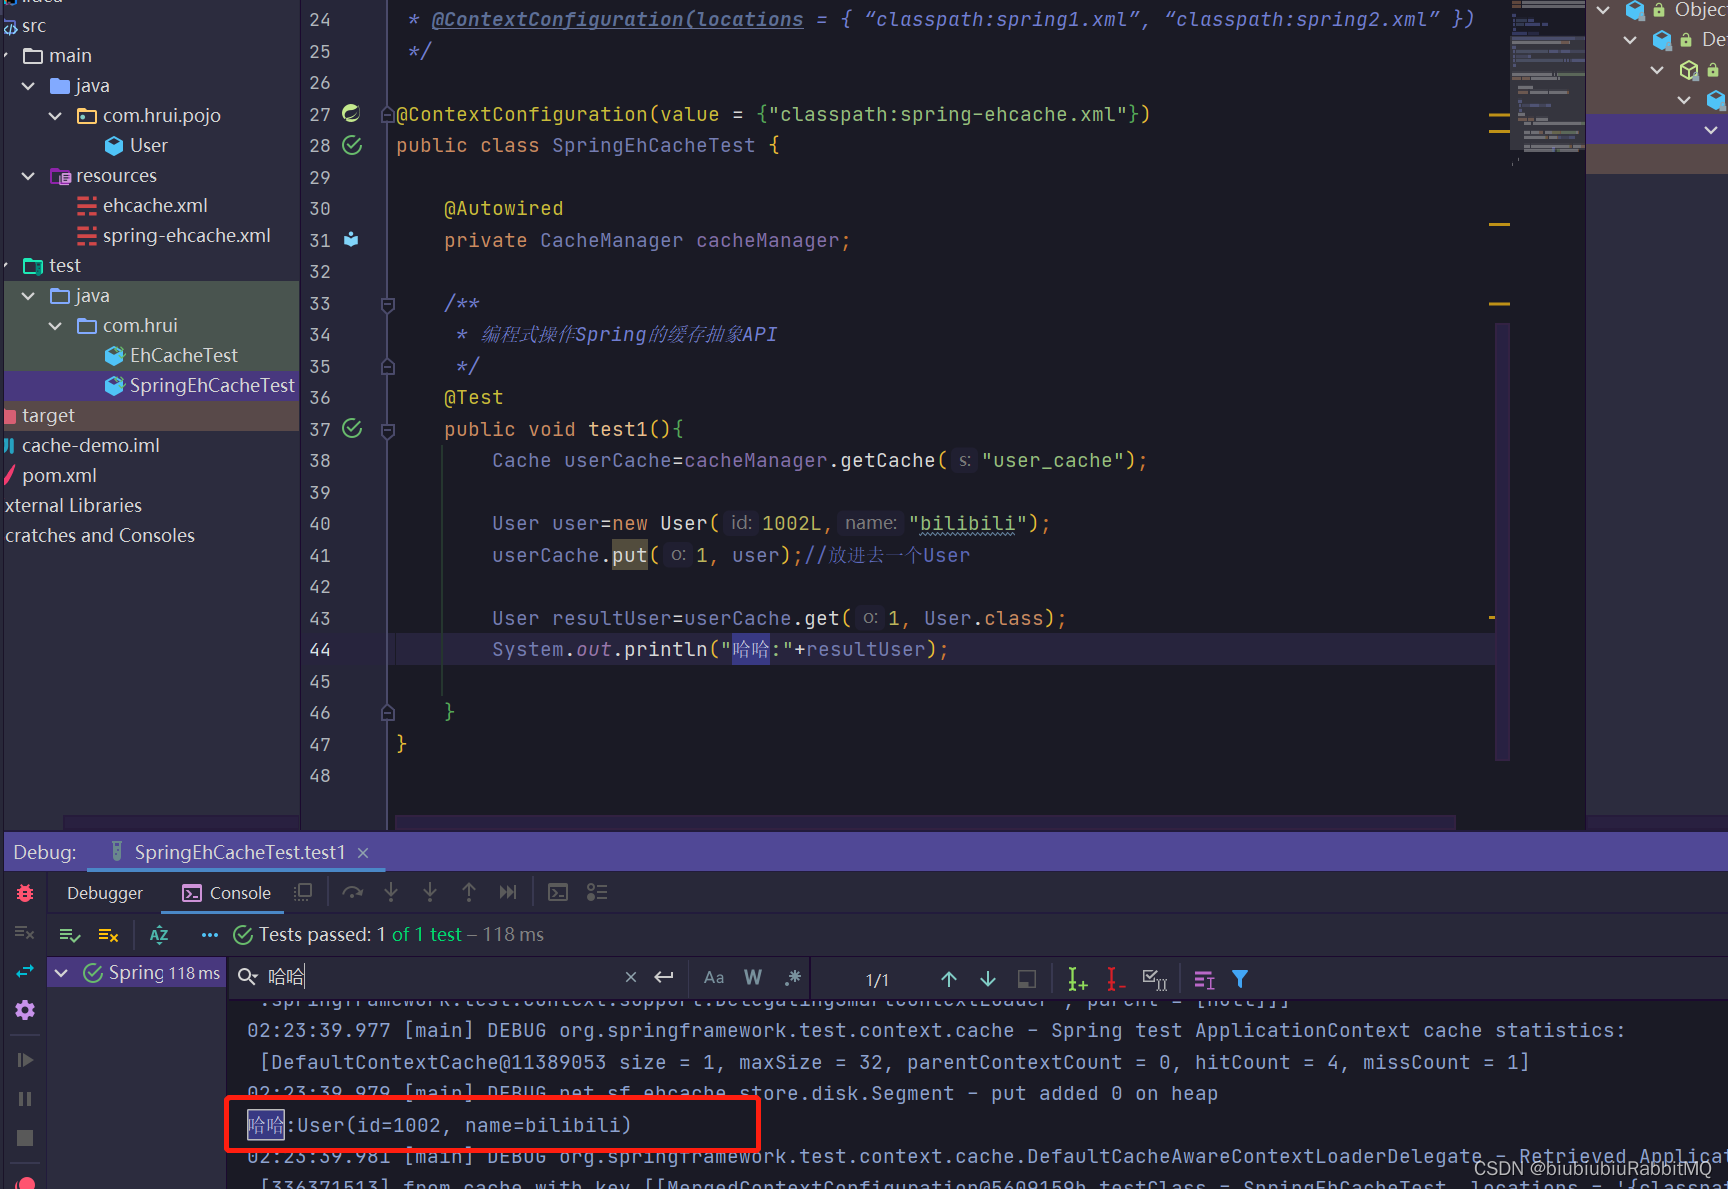
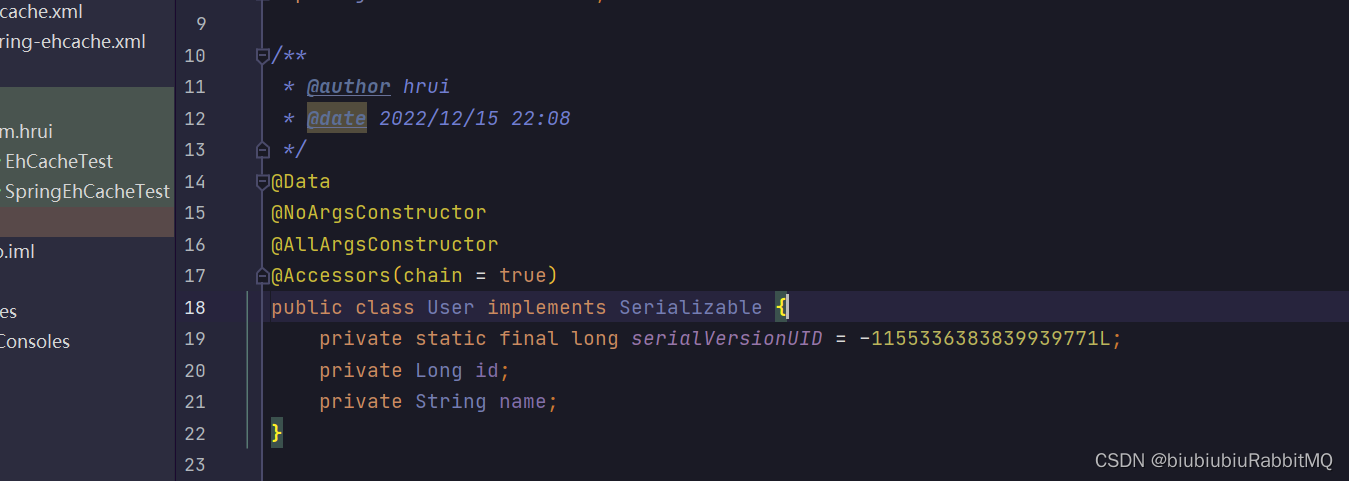
打印了,但是控制台最后也报错了,说没有实现序列化
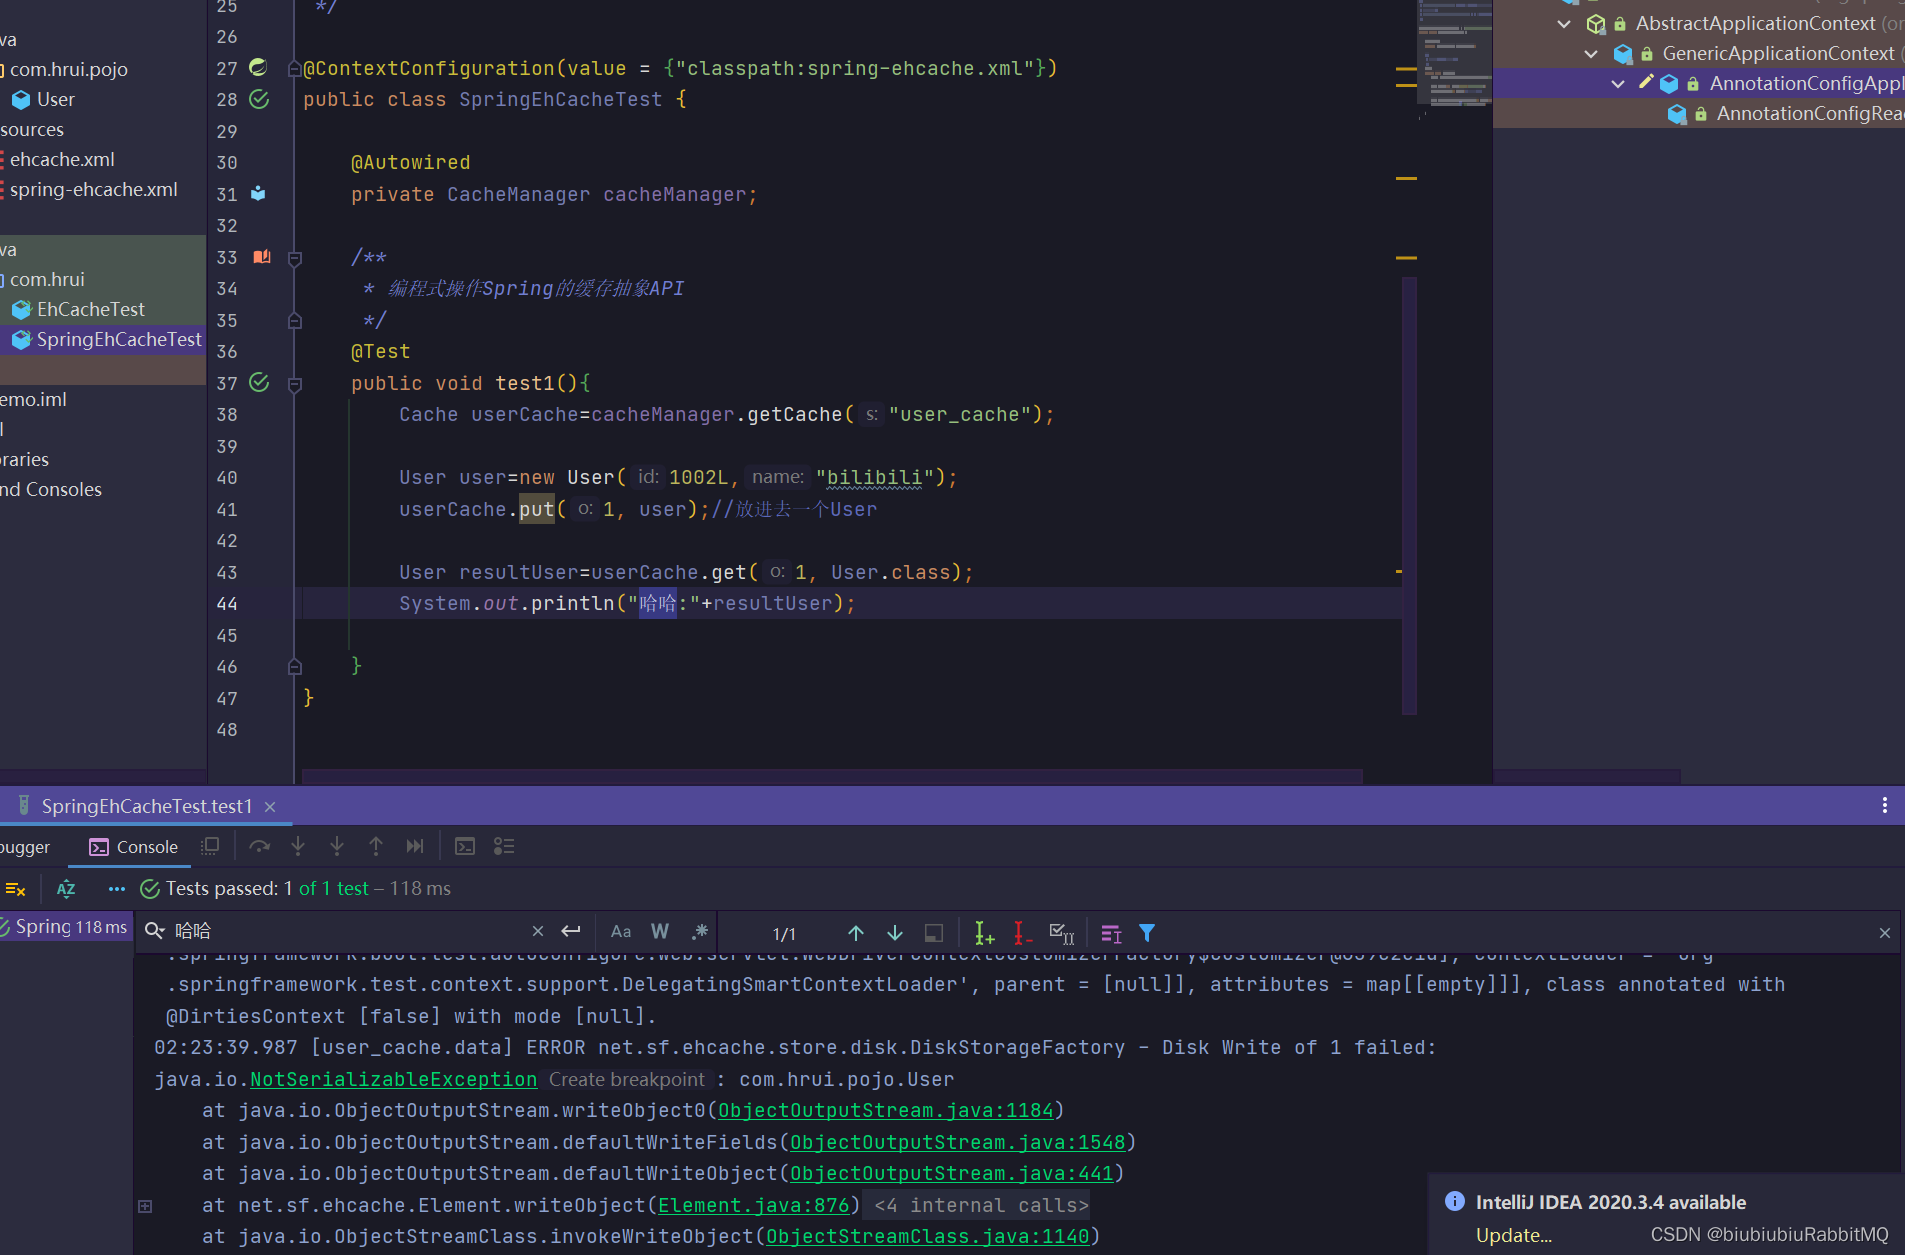
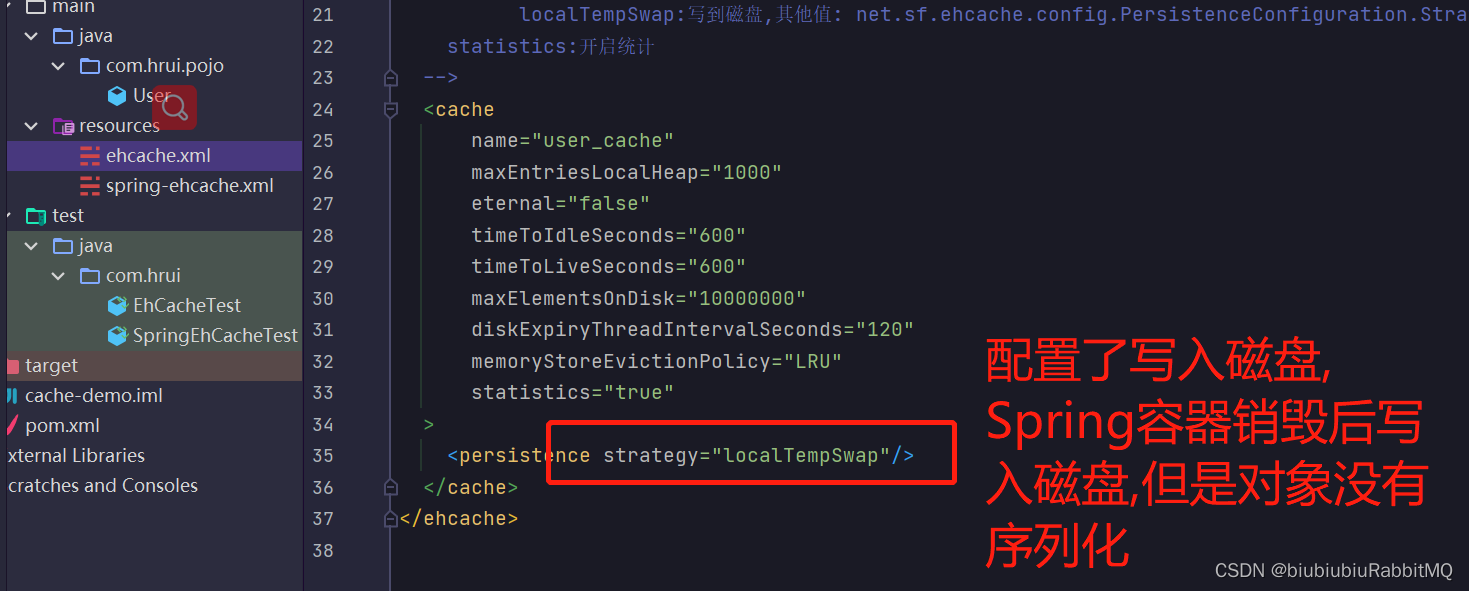
原因是
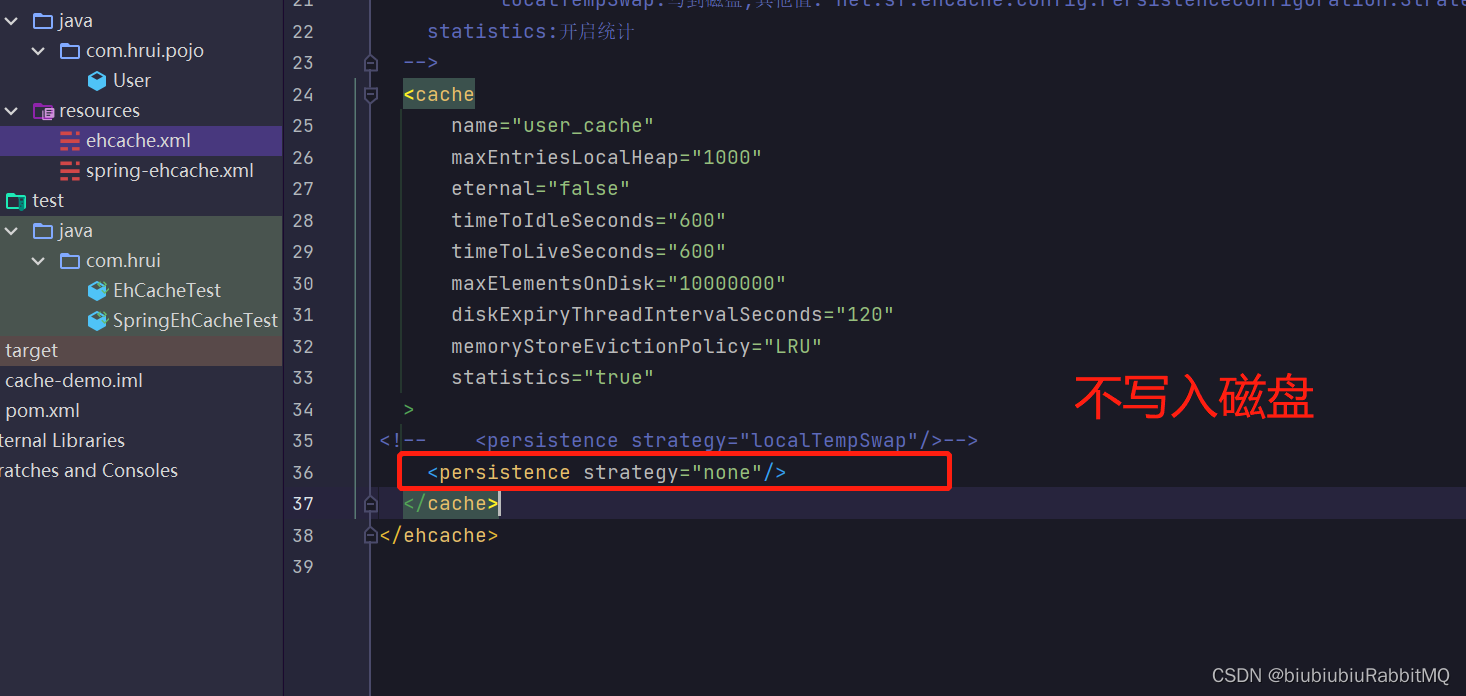
解决方式:1个改成不写入磁盘
2,那就是实现序列化
2.注解方式使用 使用@Cacheable
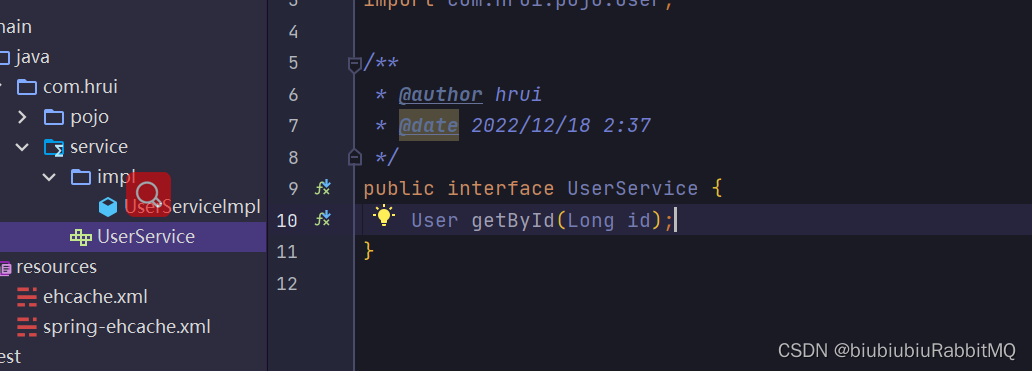
比如顶一个接口
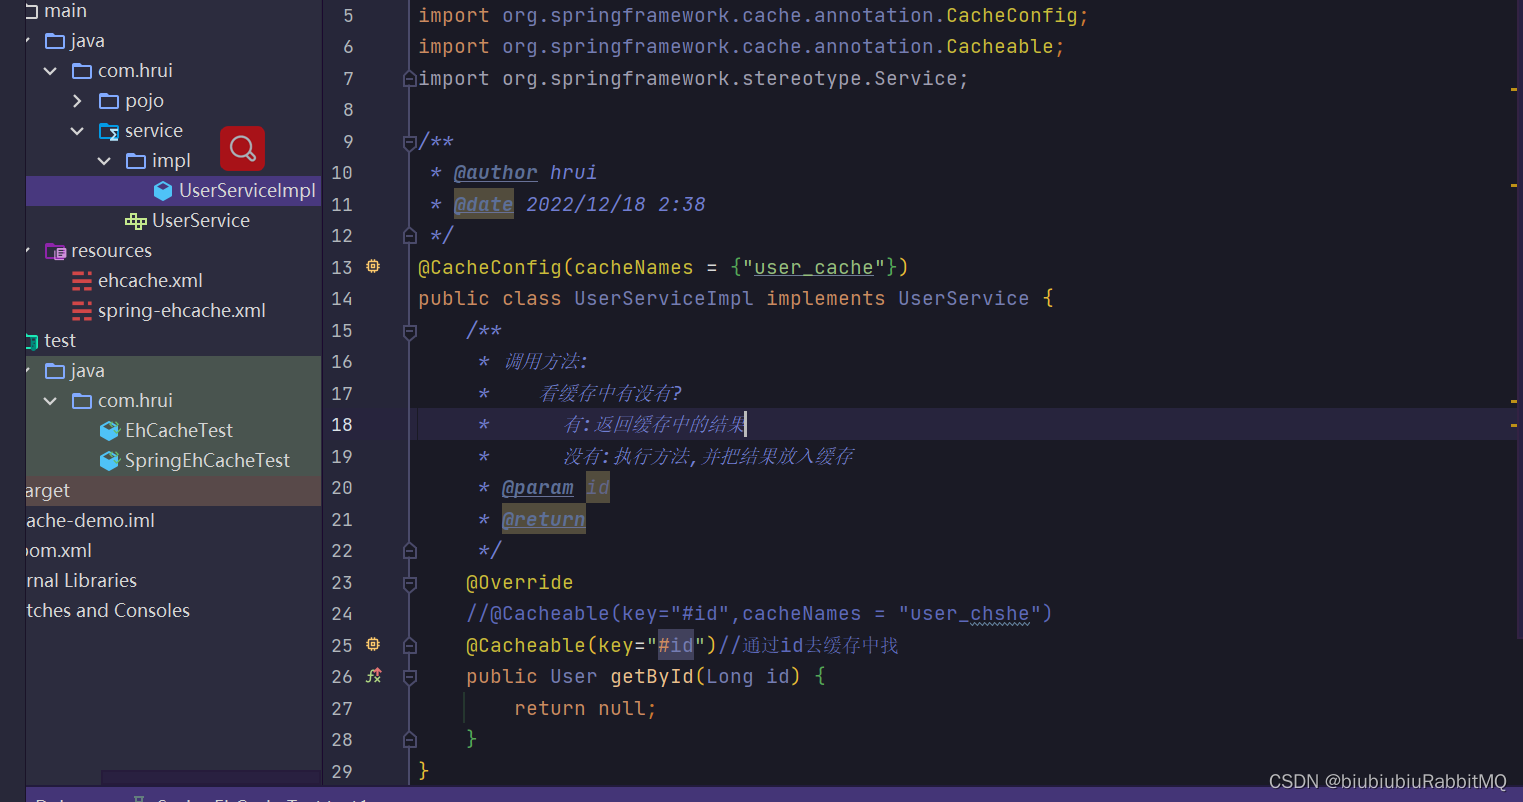
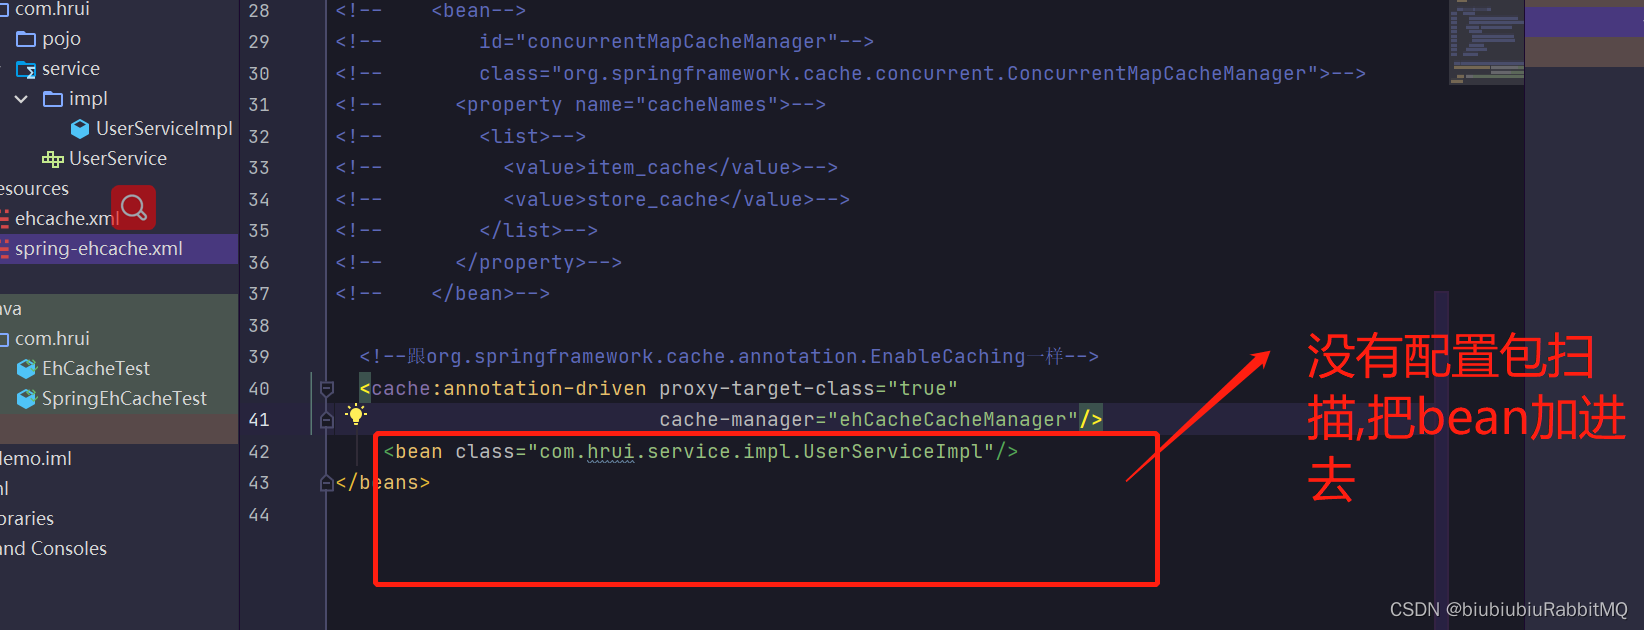
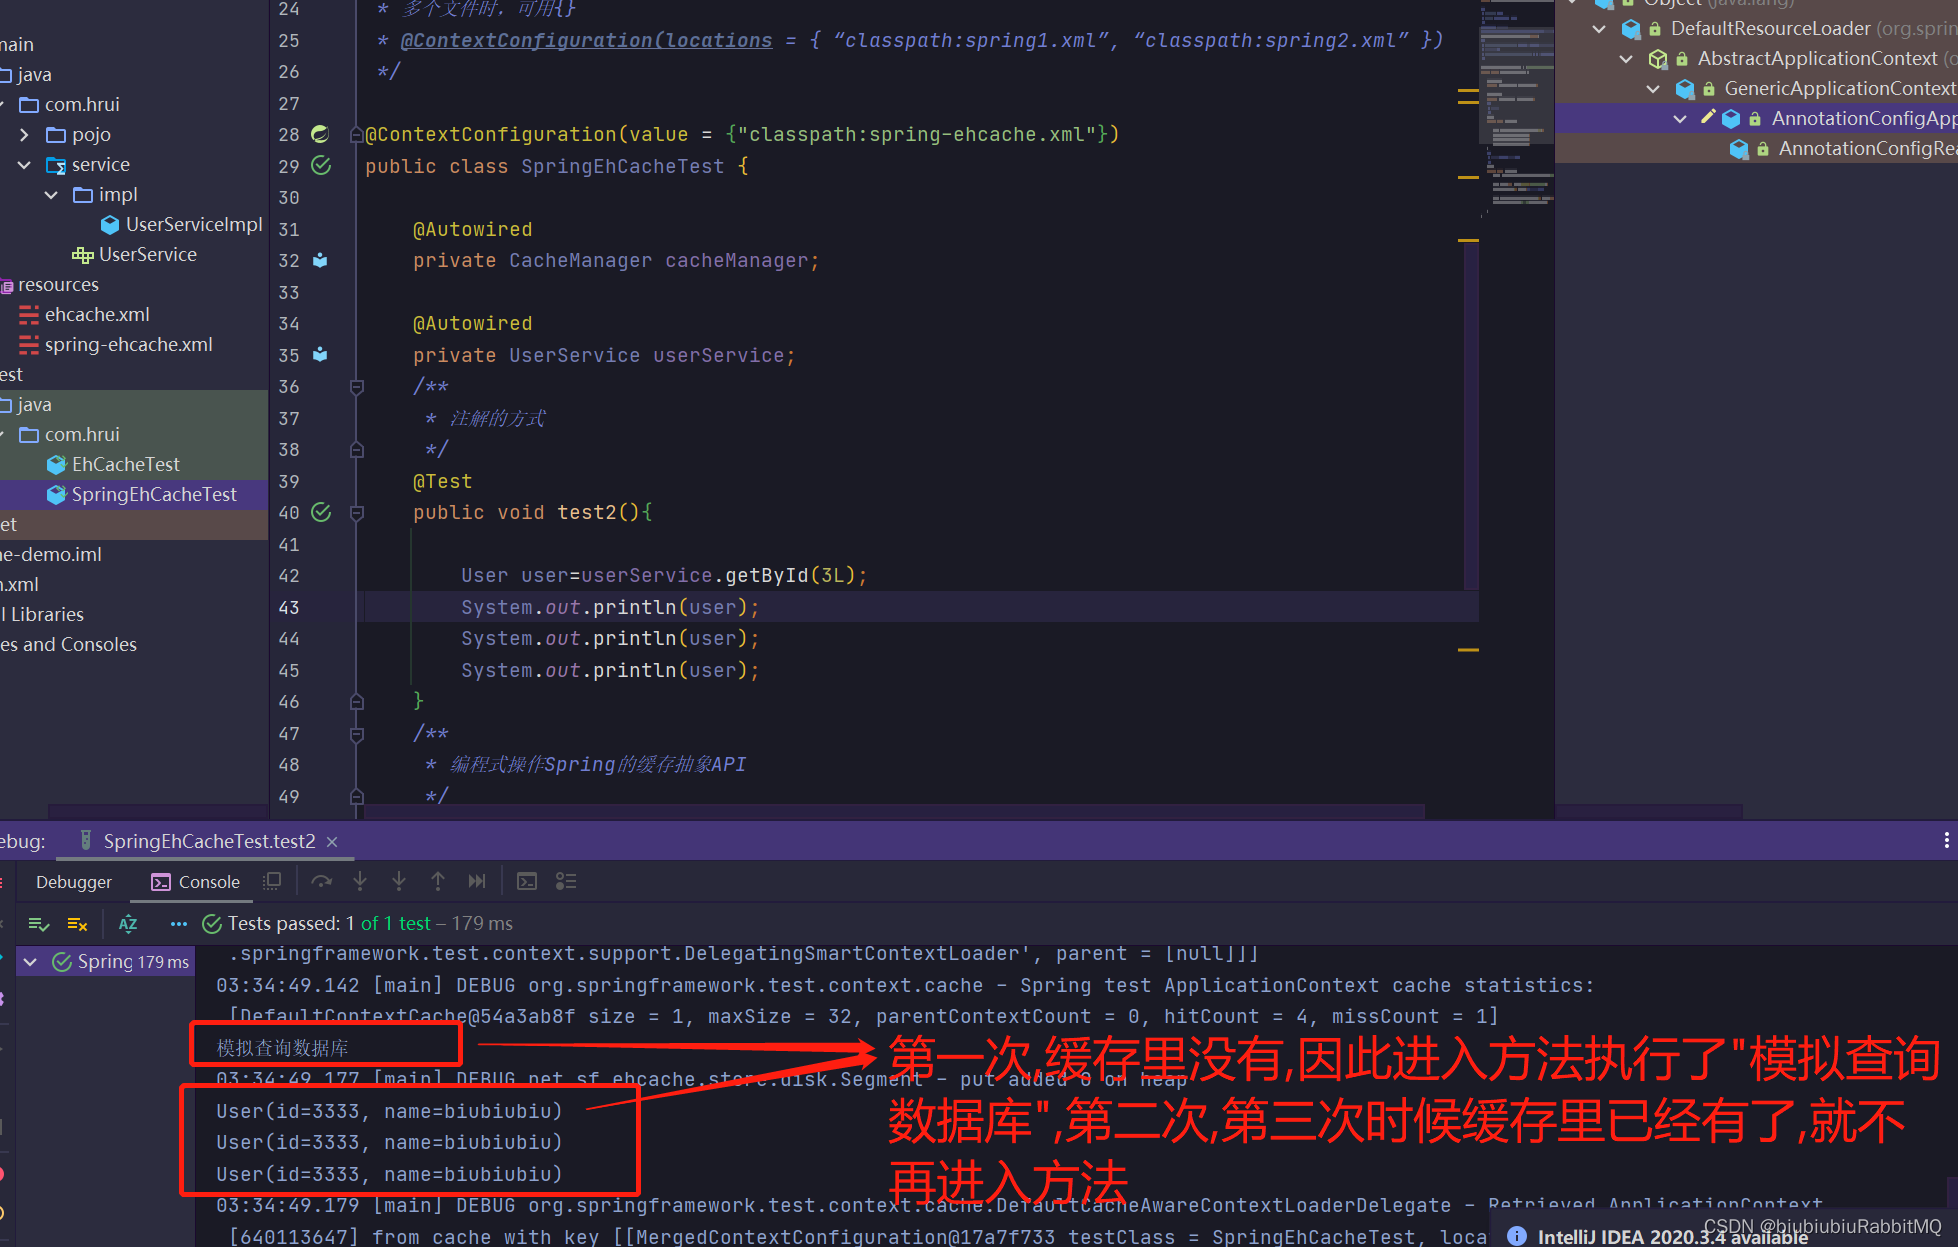
下面就是实际开发中会用到的
SpringBoot集成ehcache
依赖一开始就已引入
直接测试
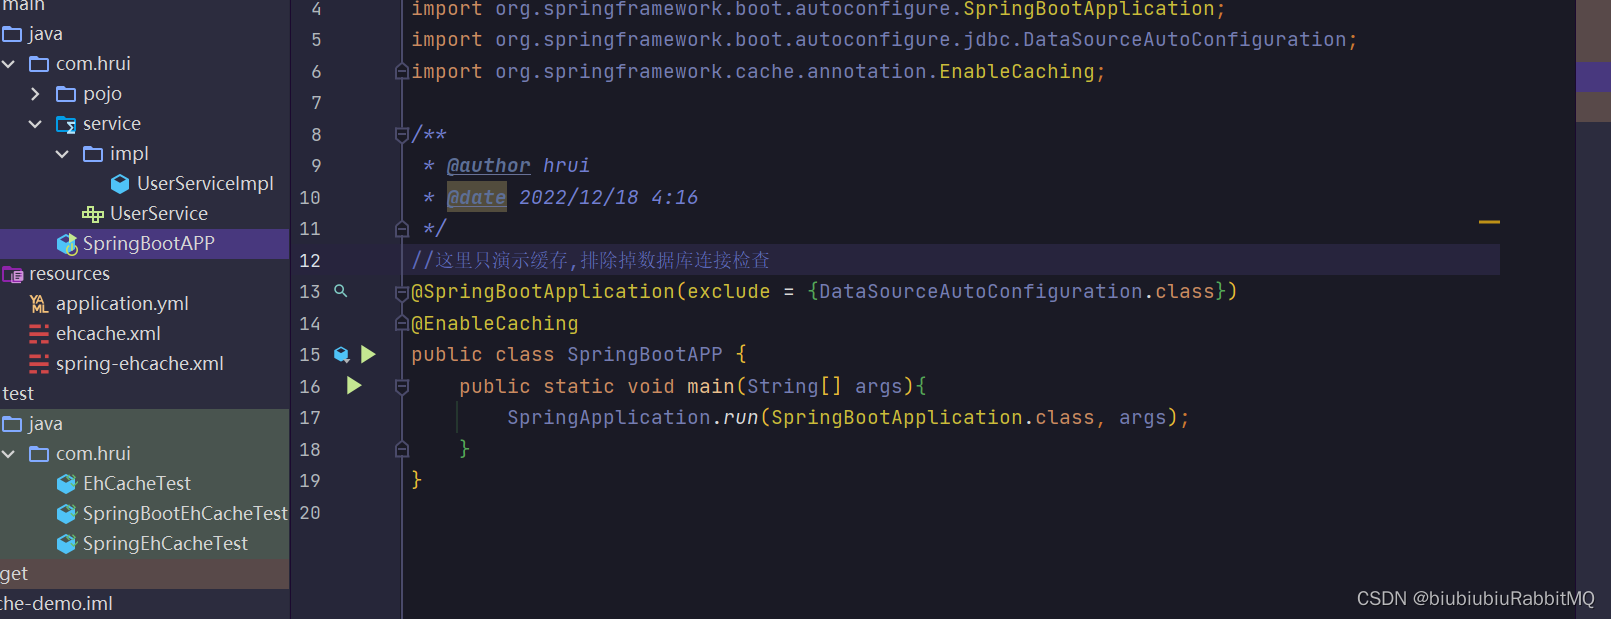
写个启动类,且加上@EnableCaching注解
在yml里的配置

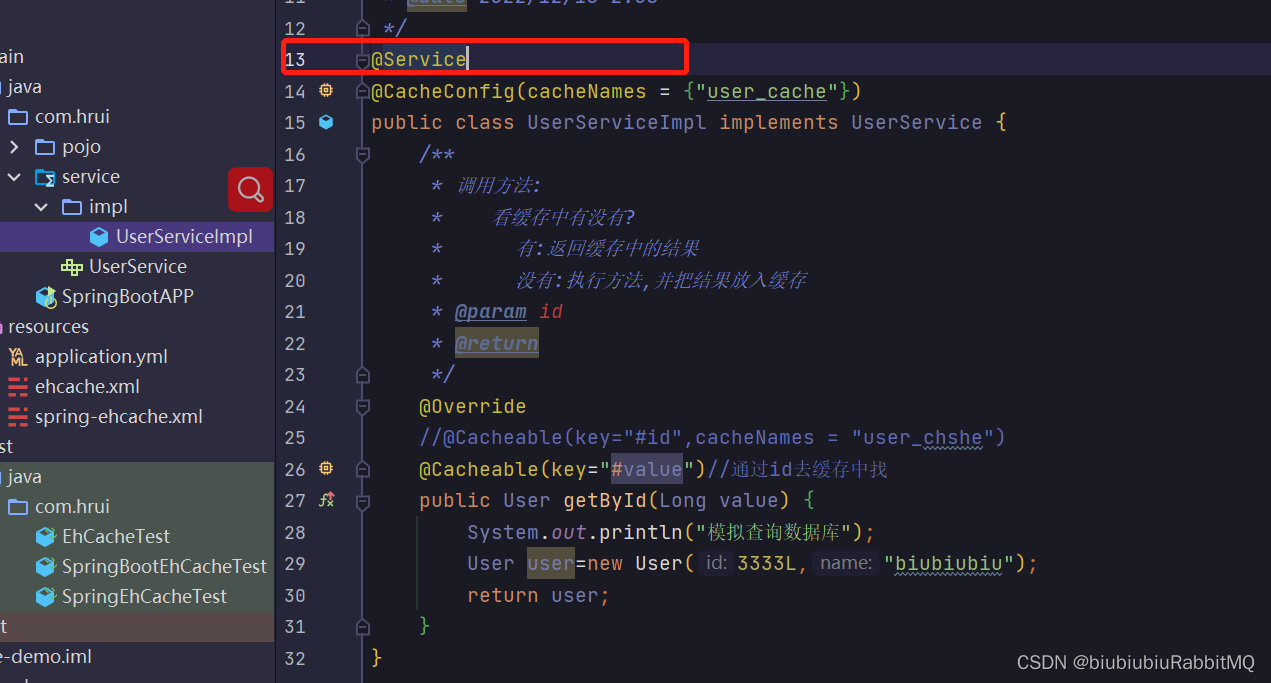
现在用的是SpringBoot,将UserServiceImpl上加上@Service注解
SpringBoot中编程式使用ehcashe和Spring是一样的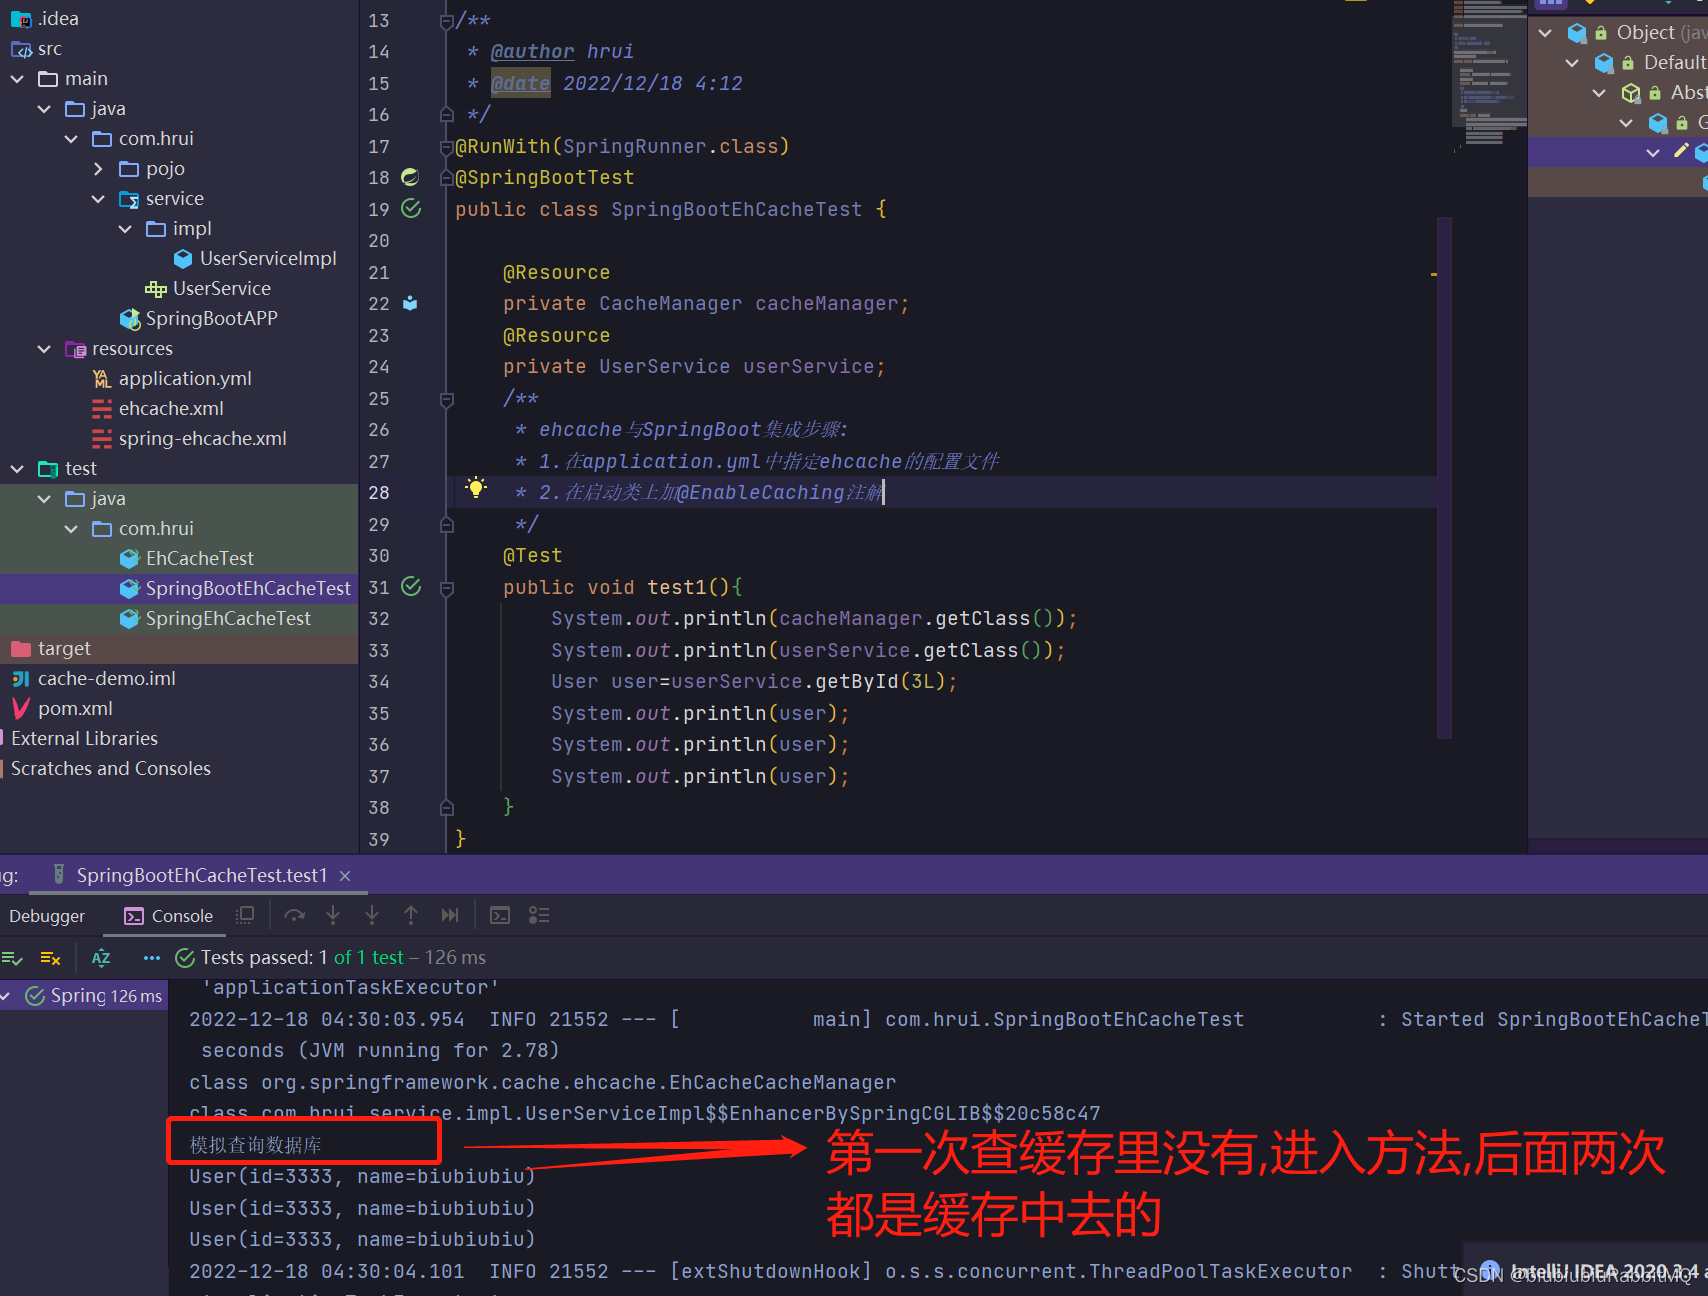

![[附源码]Python计算机毕业设计Django汽配管理系统](https://img-blog.csdnimg.cn/70fb56155b7d42febb9f80bfb0e2c510.png)
