目录
一、接口自动化测试框架
1、目录结构
二、封装iHRM登录
1、普通方式实现
2、登录接口对象层
3、登录接口测试用例层
4、封装断言方法
三、参数化
1、回顾UnitTest参数化
1.1 原始案例
1.2 参数化实现
1.3 从json文件读取
2、登录接口参数化
2.1 组织数据文件
2.2 读取数据文件
2.3 使用 parameterized 实现参数化
四、员工管理接口
1、普通方法实现
2、接口对象层
3、接口测试用例层
4、数据库工具类封装
5、解决反复修改手机号
6、完整参数化步骤:添加员工接口参数化
7、获取请求头
8、提取项目目录
9、生成测试报告
一、接口自动化测试框架
1、目录结构
7 部分(5个目录、2个文件):
- api/: 存储接口对象层(自己封装的 接口)
- scripts/: 存储测试脚本层 (unittest框架实现的 测试类、测试方法)
- data/: 存储 .json 数据文件
- report/: 存储 生成的 html 测试报告
- common/: 存储 通用的 工具方法
- config.py: 存储项目的配置信息(全局变量)
- run_suite.py: 组装测试用例、生成测试报告的 代码
二、封装iHRM登录
==登录接口==
1、普通方式实现
import unittest
import requests

class TestIhrmLogin(unittest.TestCase):

    # 测试方法1,登录成功
    def test01_login_success(self):
        # 组织url
        url = "http://ihrm-test.itheima.net/api/sys/login"
        header = {"Content-Type": "application/json"}
        json_data = {"mobile": "13800000002", "password": "123456"}
        resp = requests.post(url=url, headers=header, json=json_data)
        print("登录成功:", resp.json())

        # 断言
        self.assertEqual(200, resp.status_code)
        self.assertEqual(True, resp.json().get("success"))
        self.assertEqual(10000, resp.json().get("code"))
        self.assertIn("操作成功", resp.json().get("message"))

    # 测试方法2,密码错误
    def test02_pwd_err(self):
        # 组织url
        url = "http://ihrm-test.itheima.net/api/sys/login"
        header = {"Content-Type": "application/json"}
        json_data = {"mobile": "13800000002", "password": "123456789"}
        resp = requests.post(url=url, headers=header, json=json_data)
        print("密码错误:", resp.json())

        # 断言
        self.assertEqual(200, resp.status_code)
        self.assertEqual(False, resp.json().get("success"))
        self.assertEqual(20001, resp.json().get("code"))
        self.assertIn("用户名或密码错误", resp.json().get("message"))
2、登录接口对象层
1. 在 api/ 下,创建 ihrm_login_api.py 文件。
2. 在 文件内,封装 IhrmLoginApi 类,添加 login 类方法。
3. 安照 普通方式实现,分析。实现 login 类方法。分析:
import requests

class IhrmLoginApi(object):

    # 登录方法
    @classmethod
    def login(cls, json_data):
        url = "http://ihrm-test.itheima.net/api/sys/login"
        header = {"Content-Type": "application/json"}
        resp = requests.post(url=url, headers=header, json=json_data)
        return resp

if __name__ == '__main__':
    data = {"mobile": "13800000002", "password": "123456"}
    resp = IhrmLoginApi.login(data)
    print(resp.json())
3、登录接口测试用例层
1. 在 scripts/ 下,创建 test_ihrm_login.py 文件
2. 在 文件内,创建 测试类 TestIhrmLogin 从 unittest.TestCase 继承
3. 添加 测试方法, 并实现import unittest from api.ihrm_login_api import IhrmLoginApi class TestIhrmLogin(unittest.TestCase): # 登录成功 def test01_login_success(self): # 组织请求数据 json_data = {"mobile": "13800000002", "password": "123456"} # 调用自己封装的接口 resp = IhrmLoginApi.login(json_data) print("登录成功:", resp.json()) # 断言 self.assertEqual(200, resp.status_code) self.assertEqual(True, resp.json().get("success")) self.assertEqual(10000, resp.json().get("code")) self.assertIn("操作成功", resp.json().get("message")) # 手机号为空 def test02_mobile_none(self): # 组织请求数据 json_data = {"mobile": None, "password": "123456"} # 调用自己封装的接口 resp = IhrmLoginApi.login(json_data) print("手机号为空:", resp.json()) # 断言 self.assertEqual(200, resp.status_code) self.assertEqual(False, resp.json().get("success")) self.assertEqual(20001, resp.json().get("code")) self.assertIn("用户名或密码错误", resp.json().get("message")) # 密码错误 def test03_pwd_err(self): # 组织请求数据 json_data = {"mobile": "13800000002", "password": "123456890"} # 调用自己封装的接口 resp = IhrmLoginApi.login(json_data) print("密码错误:", resp.json()) # 断言 self.assertEqual(200, resp.status_code) self.assertEqual(False, resp.json().get("success")) self.assertEqual(20001, resp.json().get("code")) self.assertIn("用户名或密码错误", resp.json().get("message"))
4、封装断言方法
1. 在 common/ 下,新建文件 assert_util.py 文件,
2. 在文件内,添加 函数 assert_util()
3. 在 函数内,实现通用的断言函数。
4. 在 测试方法中,使用 直接封装的 通用断言函数, 实现断言
# 定义 通用断言方法
def assert_util(self, resp, status_code, success, code, message):
    self.assertEqual(status_code, resp.status_code)
    self.assertEqual(success, resp.json().get("success"))
    self.assertEqual(code, resp.json().get("code"))
    self.assertIn(message, resp.json().get("message"))
使用断言方法
assert_util(self, resp, 200, True, 10000, "操作成功")
assert_util(self, resp, 200, False, 20001, "用户名或密码错误")
assert_util(self, resp, 200, False, 20001, "用户名或密码错误")
三、参数化
参数化的核心:数据驱动(用数据驱动测试用例执行)
- 数据驱动:针对一个接口,只写一个测试方法。用一份测试数据文件,管理各个测试用例的测试数据。
参考文章:软件测试 —— Python(七)之UnitTest框架与测试报告
1、回顾UnitTest参数化
1.1 原始案例
import unittest

# 待 测试方法
def add(x, y):
    return x + y

class TestAdd(unittest.TestCase):
    def test01_add(self):
        res = add(10, 20)
        self.assertEqual(30, res)

    def test02_add(self):
        res = add(100, 200)
        self.assertEqual(300, res)

    def test03_add(self):
        res = add(1000, 20)
        self.assertEqual(1020, res)
1.2 参数化实现
实现步骤:
1. 导包 from parameterized import parameterized
2. 在通用测试方法上一行,添加 @parameterized.expand()
3. 给 expand() 传入 [(),(),()] 格式数据。( 调用 read_json_data() )
4. 修改 通用测试方法形参,按 数据中的 key 设计 参数。
5. 在 通用测试方法 内,使用形参import unittest from parameterized import parameterized # 待 测试方法 def add(x, y): return x + y data = [ {"x": 10, "y": 20, "except": 30}, {"x": 100, "y": 200, "except": 300}, {"x": 1000, "y": 20, "except": 1020}, {"x": 4, "y": 18, "except": 23} ] # [{},{},{}] ---> [(),(),()] def read_json_data(): list_data = [] for item in data: tmp = tuple(item.values()) list_data.append(tmp) return list_data class TestAdd(unittest.TestCase): # 通用测试方法(实现参数化) @parameterized.expand(read_json_data()) def test_add(self, x, y, except_data): res = add(x, y) self.assertEqual(except_data, res)
1.3 从json文件读取
创建 json 文件,写入 [{},{},{}] 格式数据
[
{"x": 10, "y": 20, "except": 30},
{"x": 100, "y": 200, "except": 300},
{"x": 1000, "y": 20, "except": 1020},
{"x": 4, "y": 18, "except": 22}
]
修改 读取数据的 read_json_data 函数,添加 打开json文件,读数据的代码
# [{},{},{}] ---> [(),(),()]
def read_json_data():
    list_data = []
    # 从 .json 文件中,读取 [{},{},{}] 数据
    with open("./params_data.json", "r", encoding="utf-8") as f:
        data = json.load(f)
        for item in data:
            tmp = tuple(item.values())
            list_data.append(tmp)
    return list_data
2、登录接口参数化
2.1 组织数据文件
[
{
"desc": "登录成功",
"req_data": {
"mobile": "13800000002",
"password": "123456"
},
"stauts_code": 200,
"success": true,
"code": 10000,
"message": "操作成功"
},
{
"desc": "手机号为空",
"req_data": {
"mobile": null,
"password": "123456"
},
"stauts_code": 200,
"success": false,
"code": 20001,
"message": "用户名或密码错误"
},
{
"desc": "密码错误",
"req_data": {
"mobile": "13800000002",
"password": "123456789"
},
"stauts_code": 200,
"success": false,
"code": 20001,
"message": "用户名或密码错误"
},
{
"desc": "多参",
"req_data": {
"mobile": "13800000002",
"password": "123456",
"abc": "123"
},
"stauts_code": 200,
"success": true,
"code": 10000,
"message": "操作成功"
},
{
"desc": "少参",
"req_data": {
"password": "123456"
},
"stauts_code": 200,
"success": false,
"code": 20001,
"message": "用户名或密码错误"
},
{
"desc": "无参",
"req_data": null,
"stauts_code": 200,
"success": false,
"code": 99999,
"message": "抱歉,系统繁忙,请稍后重试!"
},
{
"desc": "错误参数",
"req_data": {
"abc": "13800000002",
"password": "123456"
},
"stauts_code": 200,
"success": false,
"code": 20001,
"message": "用户名或密码错误"
}
]
2.2 读取数据文件
1. 在 common/ 下 创建 read_json_util.py 文件
2. 在 文件内,定义函数,从 json文件中读取数据,转换成 元组列表,返回import json # 定义函数,读取 data/xxx.json 文件 def read_json_data(): with open("../data/ihrm_login.json", "r", encoding="utf-8") as f: json_data = json.load(f) list_data = [] for item in json_data: tmp = tuple(item.values()) list_data.append(tmp) # 这个 返回,坚决不能在 for 内 return list_data if __name__ == '__main__': ret = read_json_data() print(ret)# 测试结果 [('登录成功', {'mobile': '13800000002', 'password': '123456'}, 200, True, 10000, '操作成功'), ('手 机号为空', {'mobile': None, 'password': '123456'}, 200, False, 20001, '用户名或密码错误'), ('密码错 误', {'mobile': '13800000002', 'password': '123456789'}, 200, False, 20001, '用户名或密码错误'), ('多参', {'mobile': '13800000002', 'password': '123456', 'abc': '123'}, 200, True, 10000, '操作成 功'), ('少参', {'password': '123456'}, 200, False, 20001, '用户名或密码错误'), ('无参', None, 200, False, 99999, '抱歉,系统繁忙,请稍后重试!'), ('错误参数', {'abc': '13800000002', 'password': '123456'}, 200, False, 20001, '用户名或密码错误')]
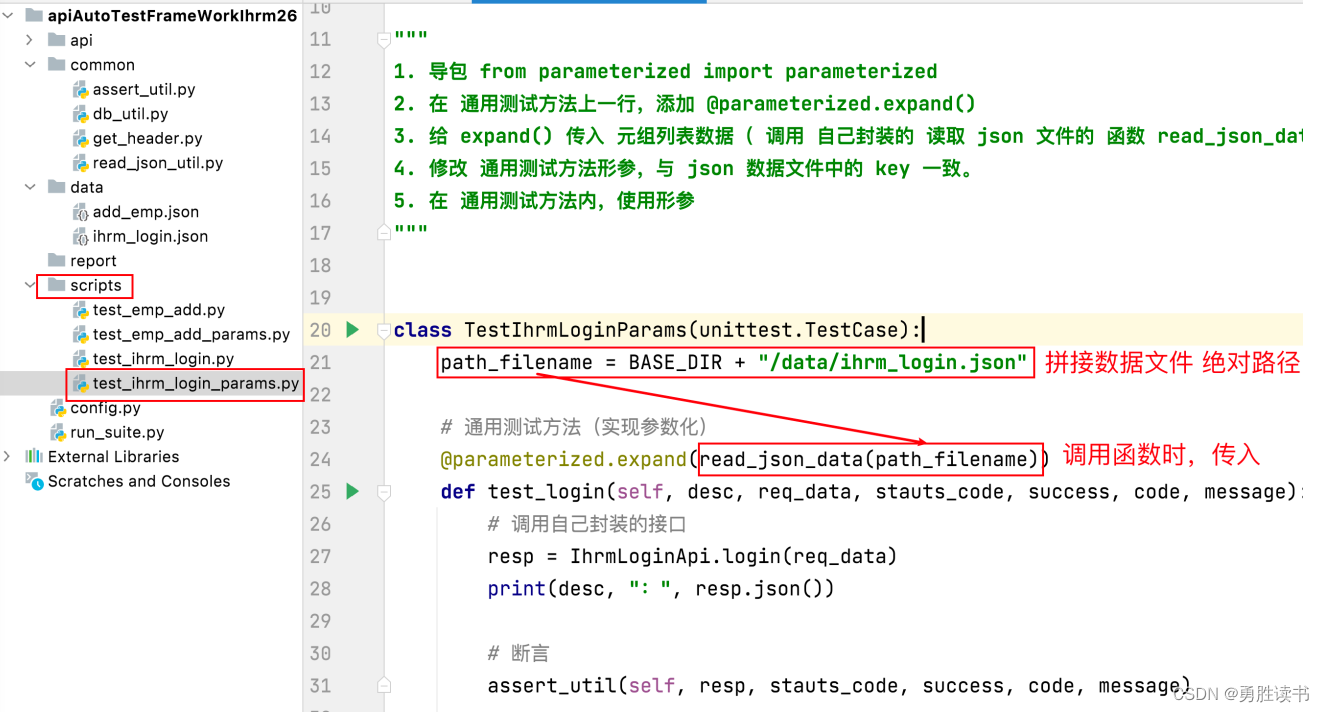
2.3 使用 parameterized 实现参数化
步骤:
1. 导包 from parameterized import parameterized
2. 在 通用测试方法上一行,添加 @parameterized.expand()
3. 给 expand() 传入 元组列表数据( 调用 自己封装的 读取 json 文件的 函数 read_json_data() )
4. 修改 通用测试方法形参,与 json 数据文件中的 key 一致。
5. 在 通用测试方法内,使用形参import unittest from api.ihrm_login_api import IhrmLoginApi from common.assert_util import assert_util from common.read_json_util import read_json_data from parameterized import parameterized """ 1. 导包 from parameterized import parameterized 2. 在 通用测试方法上一行,添加 @parameterized.expand() 3. 给 expand() 传入 元组列表数据( 调用 自己封装的 读取 json 文件的 函数 read_json_data() ) 4. 修改 通用测试方法形参,与 json 数据文件中的 key 一致。 5. 在 通用测试方法内,使用形参 """ class TestIhrmLogin(unittest.TestCase): # 通用测试方法(实现参数化) @parameterized.expand(read_json_data()) def test_login(self, desc, req_data, stauts_code, success, code, message): # 调用自己封装的接口 resp = IhrmLoginApi.login(req_data) print(desc, ":", resp.json()) # 断言 assert_util(self, resp, stauts_code, success, code, message)
四、员工管理接口
1、普通方法实现
import requests

# 添加员工
url = "http://ihrm-test.itheima.net/api/sys/user"
header = {"Content-Type": "application/json", "Authorization": "Bearer b040daed-39c1-4302-8777-f950770c8a26"}
json_data = {
    "username": "业务猪001",
    "mobile": "13978734783",
    "workNumber": "9527"
}
resp = requests.post(url=url, headers=header, json=json_data)
print("添加员工:", resp.json())

# 查询员工
url_query = "http://ihrm-test.itheima.net/api/sys/user/1469566449784717312"
header_query = {"Content-Type": "application/json","Authorization": "Bearer b040daed-39c1-4302-8777-f950770c8a26"}
resp_query = requests.get(url=url_query, headers=header_query)
print("查询员工:", resp_query.json())

# 修改员工
url_modify = "http://ihrm-test.itheima.net/api/sys/user/1469566449784717312"
header_modify = {"Content-Type": "application/json","Authorization": "Bearer b040daed-39c1-4302-8777-f950770c8a26"}
modify_data = {"username": "齐天大圣"}
resp_modify = requests.put(url=url_modify, headers=header_modify, json=modify_data)
print("修改员工:", resp_modify.json())

# 删除员工
url_del = "http://ihrm-test.itheima.net/api/sys/user/1469566449784717312"
header_del = {"Content-Type": "application/json","Authorization": "Bearer b040daed-39c1-4302-8777-f950770c8a26"}
resp_del = requests.delete(url=url_del, headers=header_del)
print("删除员工:", resp_del.json())
2、接口对象层
"""
员工管理模块的 接口对象层
"""
import requests

class IhrmEmpCURD(object):
    # 添加员工
    @classmethod
    def add_emp(cls, header, json_data):
        url = "http://ihrm-test.itheima.net/api/sys/user"
        resp = requests.post(url=url, headers=header, json=json_data)
        return resp

    # 查询员工
    @classmethod
    def query_emp(cls, emp_id, header):
        url = "http://ihrm-test.itheima.net/api/sys/user/" + emp_id
        resp = requests.get(url=url, headers=header)
        return resp

    # 修改员工
    @classmethod
    def modify_emp(cls, emp_id, header, modify_data):
        url = "http://ihrm-test.itheima.net/api/sys/user/" + emp_id
        resp = requests.put(url=url, headers=header, json=modify_data)
        return resp

    # 删除员工
    @classmethod
    def delete_emp(cls, emp_id, header):
        url = "http://ihrm-test.itheima.net/api/sys/user/" + emp_id
        resp = requests.delete(url=url, headers=header)
        return resp

if __name__ == '__main__':
    header = {"Content-Type": "application/json",
    "Authorization": "Bearer b040daed-39c1-4302-8777-f950770c8a26"}
    data_add = {
        "username": "业务猪001",
        "mobile": "13978734786",
        "workNumber": "9527"
    }
    resp = IhrmEmpCURD.add_emp(header, data_add)
    print("添加:", resp.json())
    emp_id = "1469572901224054784"
    resp = IhrmEmpCURD.query_emp(emp_id, header)
    print("查询:", resp.json())
    data = {"username": "齐天大圣"}
    resp = IhrmEmpCURD.modify_emp(emp_id, header, data)
    print("修改:", resp.json())
    resp = IhrmEmpCURD.delete_emp(emp_id, header)
    print("删除:", resp.json())
3、接口测试用例层
import unittest
from api.ihrm_emp_curd import IhrmEmpCURD
from common.assert_util import assert_util

class TestEmpAdd(unittest.TestCase):
    # 必选参数
    def test01_add_emp(self):
        # 准备数据
        header = {"Content-Type": "application/json",
                "Authorization": "Bearer b040daed-39c1-4302-8777-f950770c8a26"}
        json_data = {
            "username": "业务猪001",
            "mobile": "13978734787",
            "workNumber": "9527"
        }

        #调用自己封装的 接口
        resp = IhrmEmpCURD.add_emp(header, json_data)
        print("添加-必选:", resp.json())

        # 断言
        assert_util(self, resp, 200, True, 10000, "操作成功")

    # 组合参数
    def test02_add_emp(self):
        # 准备数据
        header = {"Content-Type": "application/json",
                "Authorization": "Bearer b040daed-39c1-4302-8777-f950770c8a26"}
        json_data = {
            "username": "业务猪001",
            "mobile": "13978743801",
            "workNumber": "9527",
            "formOfEmployment": "2"
        }

        #调用自己封装的 接口
        resp = IhrmEmpCURD.add_emp(header, json_data)
        print("添加-组合:", resp.json())

        # 断言
        assert_util(self, resp, 200, True, 10000, "操作成功")

    # 全部参数
    def test03_add_emp(self):
        # 准备数据
        header = {"Content-Type": "application/json",
                "Authorization": "Bearer b040daed-39c1-4302-8777-f950770c8a26"}
        json_data = {"username": "大猪乔治",
            "mobile": "13899078431",
            "timeOfEntry": "2021-12-01", "formOfEmployment": 1,
            "workNumber": "777888", "departmentName": "测试",
            "departmentId": "1452603344685203456",
            "correctionTime": "2021-12-30T16:00:00.000Z"}

        # 调用自己封装的 接口
        resp = IhrmEmpCURD.add_emp(header, json_data)
        print("添加-全部:", resp.json())

        # 断言
        assert_util(self, resp, 200, True, 10000, "操作成功")
4、数据库工具类封装
1. 在 common/ 下,创建 db_util.py 文件
2. 在 文件内, 实现 数据库 工具类及常用的数据库操作方法(查、增删改)import pymysql # 封装数据库工具类 class DBUtil(object): # 添加类属性 conn = None @classmethod def __get_conn(cls): # 判断 conn 是否为空,如果是,再创建 if cls.conn is None: cls.conn = pymysql.connect(host="211.103.136.244", port=7061, user="student", password="iHRM_student_2021", database="test_db", charset="utf8") # 返回 非空连接 return cls.conn @classmethod def __close_conn(cls): # 判断,conn 不为空,需要关闭。 if cls.conn is not None: cls.conn.close() cls.conn = None # 常用方法:查询一条 @classmethod def select_one(cls, sql): cursor = None res = None try: # 获取连接 cls.conn = cls.__get_conn() # 获取游标 cursor = cls.conn.cursor() # 执行 查询语句 cursor.execute(sql) # 提取一条结果 res = cursor.fetchone() except Exception as err: print("查询sql错误:", str(err)) finally: # 关闭游标 cursor.close() # 关闭连接 cls.__close_conn() # 将查询sql执行的 结果,返回 return res # 常用方法:增删改 @classmethod def uid_db(cls, sql): cursor = None try: # 获取连接 cls.conn = cls.__get_conn() # 获取游标 cursor = cls.conn.cursor() # 执行 uid 语句 cursor.execute(sql) print("影响的行数:", cls.conn.affected_rows()) # 提交事务 cls.conn.commit() except Exception as err: # 回滚事务 cls.conn.rollback() print("增删改 SQL 执行失败:", str(err)) finally: # 关闭游标 cursor.close() # 关闭连接 cls.__close_conn() if __name__ == '__main__': res = DBUtil.select_one("select * from t_book;") print("查询结果为:", res) DBUtil.uid_db("update t_book set is_delete = 1 where id = 1111;")
5、解决反复修改手机号
解决思路:
1. 在 添加员工 接口测试 前(setUp),指定一个要使用的手机号,做 删除 delete sql 实现!
2. 测试 添加员工 接口, 使用 这个手机号。
3. 在 添加员工 接口测试 后(tearDown),再次 删除 这个手机号。delete sql 实现!
4. 将 手机号 定义成 全局手机号, 存放在 config.py 文件中。 TEL = “13900231473”class TestEmpAdd(unittest.TestCase): def setUp(self) -> None: # 删除手机号 delete_sql = f"delete from bs_user where mobile = '{TEL}'" DBUtil.uid_db(delete_sql) def tearDown(self) -> None: # 删除手机号 delete_sql = f"delete from bs_user where mobile = '{TEL}'" DBUtil.uid_db(delete_sql) # 必选参数 def test01_add_emp(self): # 准备数据 header = {"Content-Type": "application/json","Authorization": "Bearer b040daed-39c1-4302-8777-f950770c8a26"} json_data = { "username": "业务猪001", "mobile": TEL, "workNumber": "9527" } #调用自己封装的 接口 resp = IhrmEmpCURD.add_emp(header, json_data) print("添加-必选:", resp.json()) # 断言 assert_util(self, resp, 200, True, 10000, "操作成功") # 组合参数 def test02_add_emp(self): # 准备数据 header = {"Content-Type": "application/json","Authorization": "Bearer b040daed-39c1-4302-8777-f950770c8a26"} json_data = { "username": "业务猪001", "mobile": TEL, "workNumber": "9527", "formOfEmployment": "2" } #调用自己封装的 接口 resp = IhrmEmpCURD.add_emp(header, json_data) print("添加-组合:", resp.json()) # 断言 assert_util(self, resp, 200, True, 10000, "操作成功") # 全部参数 def test03_add_emp(self): # 准备数据 header = {"Content-Type": "application/json","Authorization": "Bearer b040daed-39c1-4302-8777-f950770c8a26"} json_data = { "username": "大猪乔治", "mobile": TEL, "timeOfEntry": "2021-12-01", "formOfEmployment": 1, "workNumber": "777888", "departmentName": "测试", "departmentId": "1452603344685203456", "correctionTime": "2021-12-30T16:00:00.000Z"} # 调用自己封装的 接口 resp = IhrmEmpCURD.add_emp(header, json_data) print("添加-全部:", resp.json()) # 断言 assert_util(self, resp, 200, True, 10000, "操作成功")
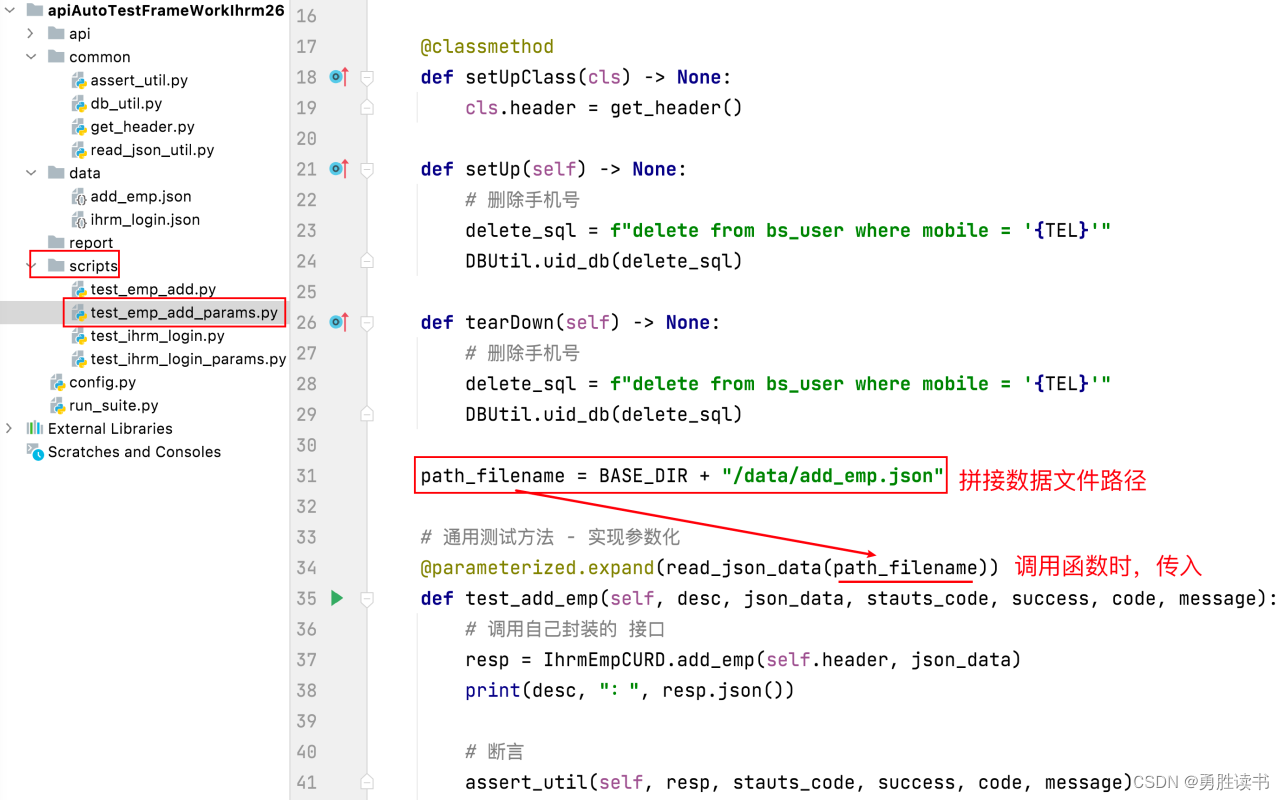
6、完整参数化步骤:添加员工接口参数化
完整参数化步骤:
1. 组织测试数据到 json 文件中。 格式 [{},{},{}]
2. 读取 json 数据文件中的 [{},{},{}] 数据,转换成 [(),(),()] 数据
3. 在 测试脚本中,借助 parameterized 实现参数化
1. 导包 from parameterized import parameterized
2. 在 通用测试方法上一行,添加 @parameterized.expand()
3. 给 expand() 传入 元组列表数据( 调用 自己封装的 读取 json 文件的 函数 read_json_data() )
4. 修改 通用测试方法形参,与 json 数据文件中的 key 一致。
5. 在 通用测试方法内,使用形参
json 数据文件:[ { "desc": "必选参数", "json_data": { "username": "业务猪001", "mobile": "13900043762", "workNumber": "9527" }, "stauts_code": 200, "success": true, "code": 10000, "message": "操作成功" }, { "desc": "组合参数", "json_data": { "username": "业务猪001", "mobile": "13900043762", "workNumber": "9527", "formOfEmployment": "2" }, "stauts_code": 200, "success": true, "code": 10000, "message": "操作成功" }, { "desc": "全部参数", "json_data": { "username": "大猪乔治", "mobile": "13900043762", "timeOfEntry": "2021-12-01", "formOfEmployment": 1, "workNumber": "777888", "departmentName": "测试", "departmentId": "1452603344685203456", "correctionTime": "2021-12-30T16:00:00.000Z" }, "stauts_code": 200, "success": true, "code": 10000, "message": "操作成功" } ]
7、获取请求头
1. 在 common/ 下 创建 get_header.py 文件
2. 在 文件内 创建 get_header() 函数,实现 登录成功,获取令牌,拼接成 请求头,返回。
3. 在 scripts/ 的测试脚本文件中,添加 setUpClass 方法,调用 get_header() 函数。 将返回值 保存到 类属性上
4. 在 使用 请求头的位置,直接从类属性获取# 在 common/ 下 创建 get_header.py 文件 实现 get_header 函数 import requests def get_header(): url = "http://ihrm-test.itheima.net/api/sys/login" data = {"mobile": "13800000002", "password": "123456"} resp = requests.post(url=url, json=data) print(resp.json()) # 从 响应体中,获取 data的值 token = resp.json().get("data") header = {"Content-Type": "application/json","Authorization": "Bearer " + token} return header # 在 scripts/ 的测试脚本文件中,添加 setUpClass 方法,调用 get_header 函数。 # 将返回值 保存到 类属性上 from common.get_header import get_header class TestEmpAdd(unittest.TestCase): # 类属性 header = None @classmethod def setUpClass(cls) -> None: cls.header = get_header() # 在 使用 请求头的位置,直接从类属性获取 resp = IhrmEmpCURD.add_emp(self.header, json_data)
8、提取项目目录
相关知识:
- __file__ : 获取 当前文件的 绝对路径。
- BASE_DIR = os.path.dirname(__file__) : 获取 到 当前文件的 上一级目录。
- 此行代码,写在 config.py 中, 可以直接获取 项目目录
项目中使用:
1. 在 config.py 文件中,添加 获取项目路径 全局变量 BASE_DIR = os.path.dirname(__file__)
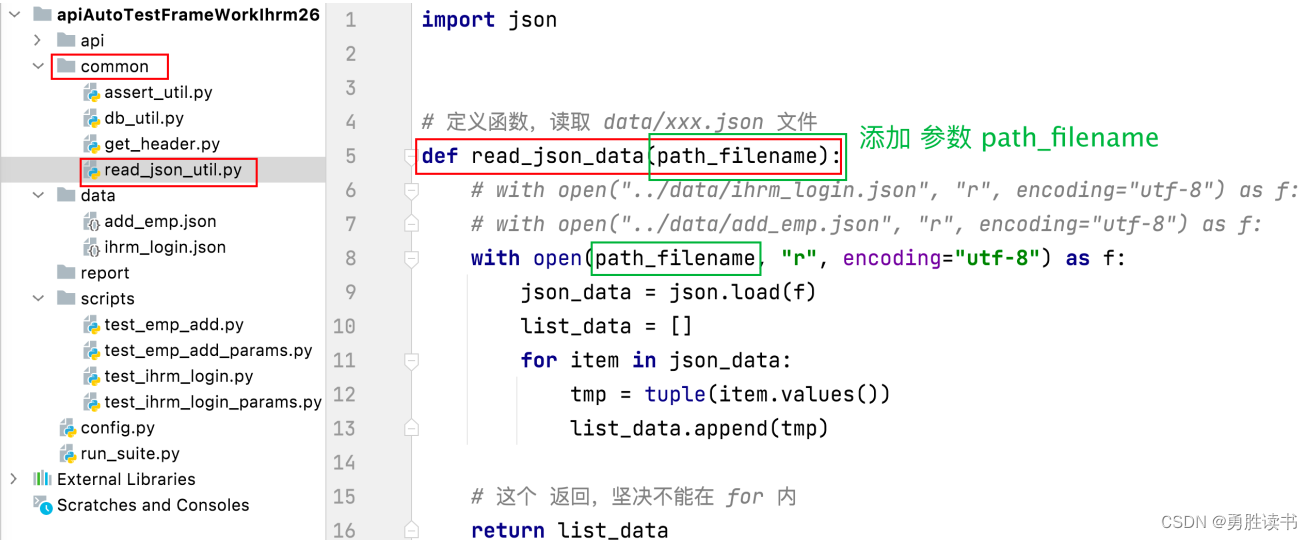
2. 修改 common/ 下 read_json_util.py 文件中,读取 json 文件 函数read_json_data(),添加 参数 path_filename
3. 在 使用 read_json_data()函数 时, 拼接 json 文件路径, 传入到 函数中。
9、生成测试报告
参考文章:软件测试 —— Python(七)之UnitTest框架与测试报告
步骤:
1. 创建测试套件实例。 suite
2. 添加 测试类
3. 创建 HTMLTestReport 类实例。 runner
4. runner 调用 run(), 传入 suite
实现:import unittest from config import BASE_DIR from scripts.test_emp_add_params import TestEmpAddParams from scripts.test_ihrm_login_params import TestIhrmLoginParams from htmltestreport import HTMLTestReport # 1. 创建测试套件实例。 suite suite = unittest.TestSuite() # 2. 添加 测试类, 组装测试用例 suite.addTest(unittest.makeSuite(TestIhrmLoginParams)) suite.addTest(unittest.makeSuite(TestEmpAddParams)) # 3. 创建 HTMLTestReport 类实例。 runner # runner = HTMLTestReport(BASE_DIR + "/report/ihrm.html") # 绝对路径 runner = HTMLTestReport("./report/ihrm.html", description="描述", title="标题") # 相对路径 # 4. runner 调用 run(), 传入 suite runner.run(suite)








![[附源码]Python计算机毕业设计Django少儿节目智能推荐系统](https://img-blog.csdnimg.cn/8aefdd883efb48be8bba815721aacdb7.png)
