众所周知,openAI的prompt对英文比较友好,也就是英文提示它的结果会更准确,假如我们不会英文,我们把中文问题给到OpenAI,然后让它翻译成英文,并把翻译后的英文给到OpenAI,让它帮忙给出解答问题,解答完的内容还是英文,继续调用OpenAI让它把英文翻译成中文结果(这个就是最终要的结果),代码如下
1.我们把不同的prompt用PromptTemplate这个模版来定义,所以下面定义三个,
- 第一个则是让把中文问题翻译成英文,
- 第二个是将英文问题设置成变量,给到openAI则动态内容覆盖,
- 第三个是将openAI给的结果英文给翻译回英文的prompt。
2.创建三个LLMChain对应上面三个prompt,将预定义的模型传入,以及prompt传入,并定义输出的key,这样返回结果就是这个key,按指定key取结果就可以啦!
3.按不同的LLMChain调用run方法,调用openAI。
#! pip install openai
#! pip install langchain
import openai, os
from langchain.prompts import #! pip install openai
#! pip install langchain
import openai, os
from langchain.prompts import PromptTemplate
from langchain.llms import OpenAI
from langchain.chains import LLMChain

os.environ["OPENAI_API_KEY"] = ""
openai.api_key = os.environ.get("OPENAI_API_KEY")
llm=OpenAI(model_name='text-davinci-003',max_tokens=2048,temperature=0.5)


# 定义prompt的模版,它可以定义一个提示语模版,里面能够定义一些可以动态替换的变量。
# 提示内容是将我输入的文字发翻译成英文
en_to_zh_prompt=PromptTemplate(
    template="请把下面这句话翻译成英文: \n\n {question}?",input_variables=["question"]
)

# 从english_question取出翻译完英文的内容在运行时把内容填充到如下的占位符
question_prompt = PromptTemplate(
    template="{english_question}",input_variables=["english_question"]
)

# 取出英文给的返回结果让AI转换为中文的模版
zh_to_cn_prompt=PromptTemplate(
    input_variables=["english_answer"],
     template="请把下面这一段翻译成中文: \n\n{english_answer}?",
)

#output_key参数用于指定生成的翻译结果在输出字中的键名。
# 使用给定的问题作为输入,运行语言模型链。
question_translate_chain = LLMChain(llm=llm, prompt=en_to_zh_prompt, output_key="english_question")
english = question_translate_chain.run(question="请你作为一个机器学习的专家,介绍一下CNN的原理。")
print(english)

# 将英文问题给到AI让它回答
qa_chain =LLMChain(llm=llm,prompt=question_prompt,output_key="english_answer")
english_answer=qa_chain.run(english_question=english)
print(english_answer)

# 拿到英文答案让AI转换为中文的结果,并把英文内容给到english_answer变量中
answer_translate_chain=LLMChain(llm=llm,prompt=zh_to_cn_prompt)
answer=answer_translate_chain.run(english_answer=english_answer)
print(answer)
from langchain.llms import OpenAI
from langchain.chains import LLMChain

os.environ["OPENAI_API_KEY"] = ""
openai.api_key = os.environ.get("OPENAI_API_KEY")
llm=OpenAI(model_name='text-davinci-003',max_tokens=2048,temperature=0.5)


# 定义prompt的模版,它可以定义一个提示语模版,里面能够定义一些可以动态替换的变量。
# 提示内容是将我输入的文字发翻译成英文
en_to_zh_prompt=PromptTemplate(
    template="请把下面这句话翻译成英文: \n\n {question}?",input_variables=["question"]
)

# 从english_question取出翻译完英文的内容在运行时把内容填充到如下的占位符
question_prompt = PromptTemplate(
    template="{english_question}",input_variables=["english_question"]
)

# 取出英文给的返回结果让AI转换为中文的模版
zh_to_cn_prompt=PromptTemplate(
    input_variables=["english_answer"],
     template="请把下面这一段翻译成中文: \n\n{english_answer}?",
)

#output_key参数用于指定生成的翻译结果在输出字中的键名。
# 使用给定的问题作为输入,运行语言模型链。
question_translate_chain = LLMChain(llm=llm, prompt=en_to_zh_prompt, output_key="english_question")
english = question_translate_chain.run(question="请你作为一个机器学习的专家,介绍一下CNN的原理。")
print(english)

# 将英文问题给到AI让它回答
qa_chain =LLMChain(llm=llm,prompt=question_prompt,output_key="english_answer")
english_answer=qa_chain.run(english_question=english)
print(english_answer)

# 拿到英文答案让AI转换为中文的结果,并把英文内容给到english_answer变量中
answer_translate_chain=LLMChain(llm=llm,prompt=zh_to_cn_prompt)
answer=answer_translate_chain.run(english_answer=english_answer)
print(answer)
结果:可以看到第一个打印的就是翻译的英文问题,第二个打印的是它的英文结果,第三个打印的就是翻译它的结果。
Please as an expert in Machine Learning, explain the principle of CNN.


Convolutional Neural Networks (CNNs) are a type of artificial neural network used in machine learning. CNNs are used to analyze visual imagery, and are especially useful for image recognition and classification. The basic principle behind CNNs is the convolution operation, which is a mathematical operation that takes two inputs, a matrix of image pixels and a filter or kernel, and produces a filtered version of the image. The filter is applied to the image by sliding it across the image and computing the dot product of each region of the image with the filter. This produces a feature map, which is then passed through a non-linear activation function. The output of the convolutional layer is then passed to the next layer of the network, which typically consists of a pooling layer and a fully connected layer. The pooling layer reduces the size of the feature map, while the fully connected layer combines the features into a single output.


卷积神经网络(CNN)是一种用于机器学习的人工神经网络。CNN用于分析视觉图像,特别适用于图像识别和分类。CNN背后的基本原理是卷积操作,这是一种数学操作,它接受两个输入,一个是图像像素矩阵,另一个是滤波器或核,并产生一个滤波后的图像版本。滤波器通过沿图像滑动并计算图像的每个区域与滤波器的点积来应用于图像。这产生一个特征映射,然后经过非线性激活函数。卷积层的输出然后传递到网络的下一层,通常由池化层和完全连接层组成。池化层减小特征映射的大小,而完全连接层将特征组合成单个输出。
1 使用 LLMChain 进行链式调用
可以看到我们上面的这种例子,需要多步的调用,比较麻烦,我们用LangChain的链式调用SimpleSequentialChain类来优化下,代码如下:
1.和上面的代码大部分都相同,着重看最后几行代码,我们把定义的这三个LLMChain放入了SimpleSequentialChain的chains属性里,最后统一调用下run即可,就不用多次调用了
from langchain.chains import SimpleSequentialChain
os.environ["OPENAI_API_KEY"] = ""
openai.api_key = os.environ.get("OPENAI_API_KEY")
llm=OpenAI(model_name='text-davinci-003',max_tokens=2048,temperature=0.5)


# 定义prompt的模版,它可以定义一个提示语模版,里面能够定义一些可以动态替换的变量。
# 提示内容是将我输入的文字发翻译成英文
en_to_zh_prompt=PromptTemplate(
    template="请把下面这句话翻译成英文: \n\n {question}?",input_variables=["question"]
)

# 从english_question取出翻译完英文的内容在运行时把内容填充到如下的占位符
question_prompt = PromptTemplate(
    template="{english_question}",input_variables=["english_question"]
)

# 取出英文给的返回结果让AI转换为中文的模版
zh_to_cn_prompt=PromptTemplate(
    input_variables=["english_answer"],
     template="请把下面这一段翻译成中文: \n\n{english_answer}?",
)

#output_key参数用于指定生成的翻译结果在输出字中的键名。
# 使用给定的问题作为输入,运行语言模型链。
question_translate_chain = LLMChain(llm=llm, prompt=en_to_zh_prompt, output_key="english_question")

# 将英文问题给到AI让它回答
qa_chain =LLMChain(llm=llm,prompt=question_prompt,output_key="english_answer")

# 拿到英文答案让AI转换为中文的结果,并把英文内容给到english_answer变量中
answer_translate_chain=LLMChain(llm=llm,prompt=zh_to_cn_prompt)

#-------------------优化再此LangChain链式调用,打开日志verbose,观察调用几次
chinese_qa_chain=SimpleSequentialChain(
    chains=[question_translate_chain,qa_chain,answer_translate_chain],input_key="question",
    verbose=True)
answer=chinese_qa_chain.run(question="请你作为一个机器学习的专家,介绍一下CNN的原理。")
print(answer)
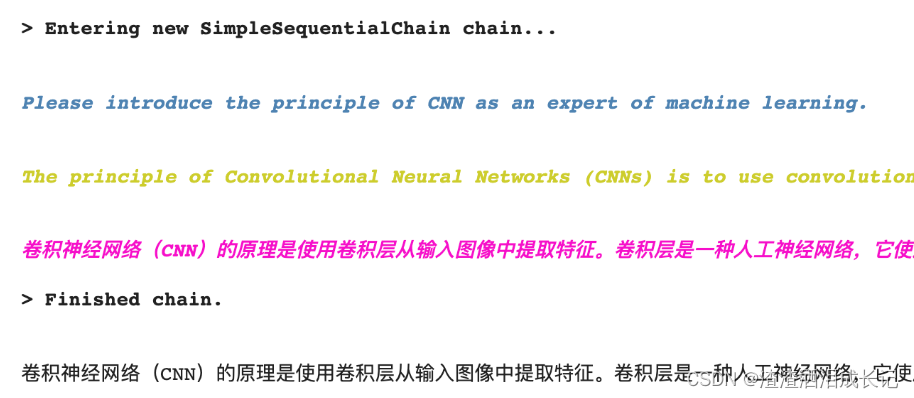
结果还是一样的:
2 支持多个变量输入的链式调用
因为使用变量的输入输出,是用这些参数定义的。所以我们不是只能用前一个 LLMChain 的输出作为后一个 LLMChain 的输入。我们完全可以连续问多个问题,然后把这些问题的答案,作为后续问题的输入来继续处理,用langchain的SequentialChain类来实现,代码如下:
也是一个很简单的例子,我们定义三个prompt的需求,第一个动态传入哪一年,第二个也是一样,第三个的则是第一个和第二个的给的答案的结果动态加入到第三个的prompt的模版里。
from langchain.chains import SequentialChain


q1_prompt = PromptTemplate(
    input_variables=["year1"],
    template="{year1}年的欧冠联赛的冠军是哪支球队,只说球队名称。"
)
q2_prompt = PromptTemplate(
    input_variables=["year2"],
    template="{year2}年的欧冠联赛的冠军是哪支球队,只说球队名称。"
)
q3_prompt = PromptTemplate(
    input_variables=["team1", "team2"],
    template="{team1}和{team2}哪只球队获得欧冠的次数多一些?"
)
chain1 = LLMChain(llm=llm, prompt=q1_prompt, output_key="team1")
chain2 = LLMChain(llm=llm, prompt=q2_prompt, output_key="team2")
chain3 = LLMChain(llm=llm, prompt=q3_prompt)

sequential_chain = SequentialChain(chains=[chain1, chain2, chain3], input_variables=["year1", "year2"], verbose=True)
# 输入多个变量
answer = sequential_chain.run(year1=2000, year2=2010)
print(answer)
结果:
西班牙皇家马德里获得欧冠的次数更多,他们曾经获得13次欧冠冠军,而波尔图只获得了2次欧冠冠军。3 通过 Langchain 实现自动化撰写单元测试
发现上一节中的根据一步一步的提问让AI写出单元测试代码,特别适合这一章节的链式调用,所以改造下,用Langchain改造下,代码如下:
这个代码里的prompt以及部分代码都和上节内容一致,所以就不再此展开了,大家可以看上一节内容:
传唤门:AI大模型的使用-让AI帮你写单元测试_渣渣洒泪成长记的博客-CSDN博客
本节整理完毕,将这几个prompt改成模版了,并且把信息都放入LLMChain,最后进行链式调用,得到的结果进行ast语义检查,这里更改成出现异常则重新获取单元测试代码,直到3次还是错误则为空。大家可以看下代码感受下,还挺简单简洁的,也都添加了很多的注释!
from tempfile import template
from langchain.chains import SequentialChain
from langchain.prompts import PromptTemplate

def write_unit_test(function_to_test,unit_test_package="pytest"):
    # 解释源代码的步骤
    explain_code = """"# How to write great unit tests with {unit_test_package}

    In this advanced tutorial for experts, we'll use Python 3.10 and `{unit_test_package}` to write a suite of unit tests to verify the behavior of the following function.
    ```python
    {function_to_test}
    ```

    Before writing any unit tests, let's review what each element of the function is doing exactly and what the author's intentions may have been.
    - First,"""

    # 解释代码的模版
    explain_code_template=PromptTemplate(
        input_variables=["unit_test_package","function_to_test"],
        template=explain_code
    )
    # llm设置
    explain_code_llm=OpenAI(model_name='text-davinci-002',max_tokens=1000,temperature=0.4,
                             top_p=1,stop=["\n\n", "\n\t\n", "\n \n"])
    # 解释代码的LLMChain
    explain_code_step=LLMChain(llm=explain_code_llm,prompt=explain_code_template,output_key="code_explaination")


    # 创建测试计划示例的步骤
    test_plan = """

    A good unit test suite should aim to:
    - Test the function's behavior for a wide range of possible inputs
    - Test edge cases that the author may not have foreseen
    - Take advantage of the features of `{unit_test_package}` to make the tests easy to write and maintain
    - Be easy to read and understand, with clean code and descriptive names
    - Be deterministic, so that the tests always pass or fail in the same way

    `{unit_test_package}` has many convenient features that make it easy to write and maintain unit tests. We'll use them to write unit tests for the function above.

    For this particular function, we'll want our unit tests to handle the following diverse scenarios (and under each scenario, we include a few examples as sub-bullets):
    -"""
    # 测试计划的模版
    test_plan_template=PromptTemplate(
        input_variables=["unit_test_package","function_to_test","code_explaination"],
         # 解释代码需求+OpenAI给出的解释代码说说吗+本次测试计划要求的promot
        template=explain_code+"{code_explaination}"+test_plan
    )
    # llm设置
    test_plan_llm=OpenAI(model_name='text-davinci-002',max_tokens=1000,temperature=0.4,
                             top_p=1,stop=["\n\n", "\n\t\n", "\n \n"])
    test_plan_step=LLMChain(llm=test_plan_llm,prompt=test_plan_template,output_key="test_plan")


    # 撰写测试代码的步骤
    starter_comment = "Below, each test case is represented by a tuple passed to the @pytest.mark.parametrize decorator"
    prompt_to_generate_the_unit_test = """

    Before going into the individual tests, let's first look at the complete suite of unit tests as a cohesive whole. We've added helpful comments to explain what each line does.
    ```python
    import {unit_test_package}  # used for our unit tests

    {function_to_test}

    #{starter_comment}"""

    # 单元测试的prompt----------------------------------------------------------------------
    unit_test_template=PromptTemplate(
        input_variables=["unit_test_package","function_to_test","code_explaination","test_plan","starter_comment"],
        template= explain_code + "{code_explaination}" + test_plan + "{test_plan}" + prompt_to_generate_the_unit_test
    )
    unit_test_llm=OpenAI(model_name='text-davinci-002',max_tokens=1000,temperature=0.4,
                             top_p=1,stop="```")
    unit_test_step = LLMChain(llm=unit_test_llm, prompt=unit_test_template, output_key="unit_test")


    # 链式调用
    sequential_chain =SequentialChain(chains=[explain_code_step, test_plan_step, unit_test_step],
                                      input_variables=["unit_test_package", "function_to_test", "starter_comment"], verbose=True)
    answer = sequential_chain.run(unit_test_package=unit_test_package, function_to_test=function_to_test, starter_comment=starter_comment)
    return f"""#{starter_comment}""" + answer


# 要写单元测试的代码
code = """
def format_time(seconds):
    minutes, seconds = divmod(seconds, 60)
    hours, minutes = divmod(minutes, 60)
    if hours > 0:
        return f"{hours}h{minutes}min{seconds}s"
    elif minutes > 0:
        return f"{minutes}min{seconds}s"
    else:
        return f"{seconds}s"
"""

import ast
# 1.调用OpeenAI得到测试单元代码
# 2.将得到的代码语义检查看是否有问题,有问题重新走第一步,直到成功!如果一直有问题超过三次则不请求处理
def write_unit_test_automatically(code, retry=3):
  # 得到OpenAI给的单元测试代码
  unit_test_code=write_unit_test(code)
  # 测试代码+单元测试代码
  all_code=code+unit_test_code
  tried=0
  # 如果异常则再次请求得到代码,最多三次
  while tried < retry:
    try:
      # 语法检查
      ast.parse(all_code)
      return all_code
    except SyntaxError as e:
      print(f"Syntax error in generated code: {e}")
      all_code=code+unit_test_code
      tried+=1


# 调用方法
print(write_unit_test_automatically(code))
结果:
def format_time(seconds):
    minutes, seconds = divmod(seconds, 60)
    hours, minutes = divmod(minutes, 60)
    if hours > 0:
        return f"{hours}h{minutes}min{seconds}s"
    elif minutes > 0:
        return f"{minutes}min{seconds}s"
    else:
        return f"{seconds}s"
#Below, each test case is represented by a tuple passed to the @pytest.mark.parametrize decorator.
    #The first element of the tuple is the name of the test case, and the second element is a list of tuples.
    #Each tuple in the list of tuples represents a single test, with the first element being the input to the function
    #and the second element being the expected output.

    @pytest.mark.parametrize(
        "test_case_name, test_cases",
        [
            # Test the function's behavior for a wide range of possible inputs
            (
                "normal_inputs",
                [
                    (42, "42s"),
                    (61, "1min1s"),
                    (3601, "1h0min1s"),
                ],
            ),
            # Test edge cases that the author may not have foreseen
            (
                "seconds_is_not_a_positive_integer",
                [
                    (0, "0s"),
                    (-1, "0s"),
                    (1.5, "1s"),
                    ("42", "42s"),
                ],
            ),
            # Test edge cases that the author may not have foreseen
            (
                "seconds_is_very_large",
                [(1000000000, "11574h46min40s")],
            ),
        ],
    )
    def test_format_time(test_case_name, test_cases):
        # For each test case, check that the actual output of the function matches the expected output.
        for seconds, expected in test_cases:
            assert format_time(seconds) == expected
本章视频说明:LangChain链式调用-简化多步提示语_哔哩哔哩_bilibili
本节知识资料感谢徐文浩老师的《AI大模型之美》,让我感受它是真的美!
