1、多层感知机
1、激活函数的引入
这个多层感知机有4个输⼊,3个输出,其隐藏层包含5个隐藏单元。输⼊层不涉及任何计算,因此使⽤此⽹络产⽣输出只需要实现隐藏层和输出层的计算。因此,这个多层感知机中的层数为2。注意,这两个层都是全连接的。每个输⼊都会影响隐藏层中的每个神经元,⽽隐藏层中的每个神经元⼜会影响输出层中的每个神经元。
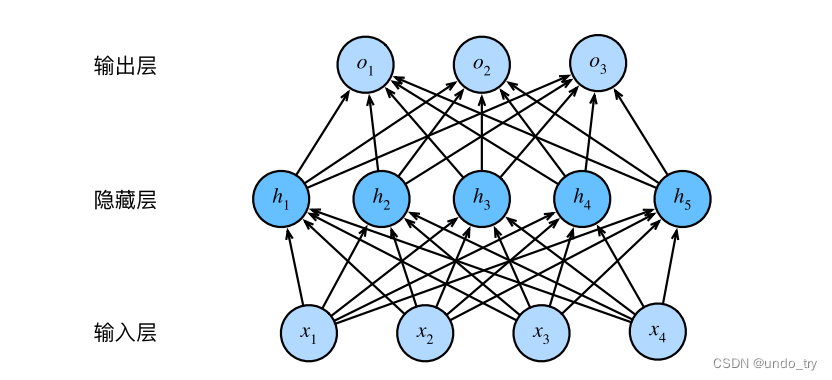
形式上,我们按如下⽅式计算单隐藏层多层感知机的输出 O

上⾯的隐藏单元由输⼊的仿射函数给出,⽽输出(softmax操作前)只是隐藏单元的仿射函数。仿射函数的仿射函数本⾝就是仿射函数,但是我们之前的线性模型已经能够表⽰任何仿射函数。

为了发挥多层架构的潜⼒,我们还需要⼀个额外的关键要素:在仿射变换之后对每个隐藏单元应⽤⾮线性的激活函数(activation function)σ
激活函数的输出(例如,σ(·))被称为活性值(activations),有了激活函数,就不可能再将我们的多层感知机退化成线性模型

2、常见的激活函数
(1)ReLU函数
最受欢迎的激活函数是 修正线性单元 (Rectified linear unit,ReLU), 因为它实现简单,同时在各种预测任务中表现良好。
给定元素x,ReLU函数被定义为该元素与0的最大值:

通俗地说,ReLU函数通过将相应的活性值设为0(激活函数的输出被称为活性值(activations)),仅保留正元素并丢弃所有负元素。
'''
1、ReLU函数

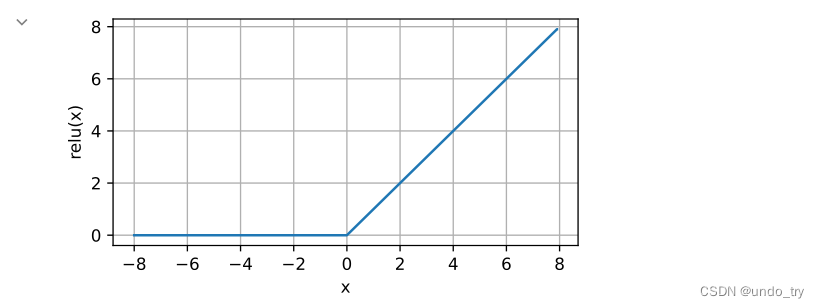
画出函数的曲线图。 正如从图中所看到,激活函数是分段线性的。
'''
import PlotFig as pf
import torch
%matplotlib inline


x = torch.arange(-8.0, 8.0, 0.1, requires_grad=True)

y = torch.relu(x)

pf.plot(x.detach(), y.detach(),'x', 'relu(x)',figsize=(5,2.5))
from matplotlib import pyplot as plt
from matplotlib_inline import backend_inline


def use_svg_display():
    """使用svg格式在Jupyter中显示绘图"""
    backend_inline.set_matplotlib_formats('svg')


def set_figsize(figsize=(3.5, 2.5)):
    """设置matplotlib的图表大小"""
    use_svg_display()
    plt.rcParams['figure.figsize'] = figsize


def set_axes(axes, xlabel, ylabel, xlim, ylim, xscale, yscale, legend):
    """设置matplotlib的轴"""
    axes.set_xlabel(xlabel)
    axes.set_ylabel(ylabel)
    axes.set_xscale(xscale)
    axes.set_yscale(yscale)
    axes.set_xlim(xlim)
    axes.set_ylim(ylim)
    if legend:
        axes.legend(legend)
    axes.grid()

def plot(X, Y=None, xlabel=None, ylabel=None, legend=None, xlim=None,
         ylim=None, xscale='linear', yscale='linear',
         fmts=('-', 'm--', 'g-.', 'r:'), figsize=(3.5, 2.5), axes=None):
    """绘制数据点"""
    if legend is None:
        legend = []

    set_figsize(figsize)
    axes = axes if axes else plt.gca()

    # 如果X有一个轴,输出True
    def has_one_axis(X):
        return (hasattr(X, "ndim") and X.ndim == 1 or isinstance(X, list)
                and not hasattr(X[0], "__len__"))

    if has_one_axis(X):
        X = [X]
    if Y is None:
        X, Y = [[]] * len(X), X
    elif has_one_axis(Y):
        Y = [Y]
    if len(X) != len(Y):
        X = X * len(Y)
    axes.cla()
    for x, y, fmt in zip(X, Y, fmts):
        if len(x):
            axes.plot(x, y, fmt)
        else:
            axes.plot(y, fmt)
    set_axes(axes, xlabel, ylabel, xlim, ylim, xscale, yscale, legend)
# 绘制ReLU函数的导数。
'''
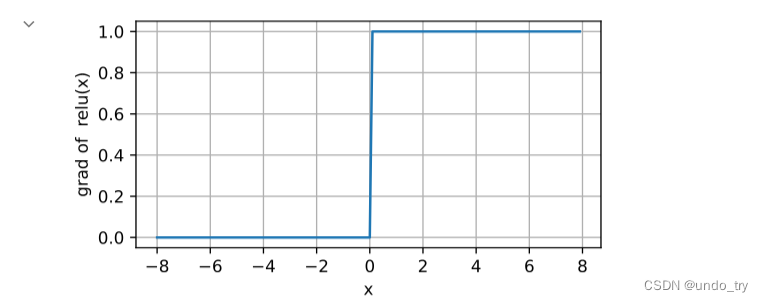
当输入为负时,ReLU函数的导数为0,而当输入为正时,ReLU函数的导数为1。
注意,当输入值精确等于0时,ReLU函数不可导。 在此时,我们默认使用左侧的导数,即当输入为0时导数为0。


使⽤ReLU的原因是,它求导表现得特别好:要么让参数消失,要么让参数通过。
这使得优化表现得更好,并且ReLU减轻了困扰以往神经⽹络的梯度消失问题
'''
y.backward(torch.ones_like(x), retain_graph=True)

pf.plot(x.detach(), x.grad,'x', 'grad of  relu(x)',figsize=(5,2.5))
(2)Sigmoid函数
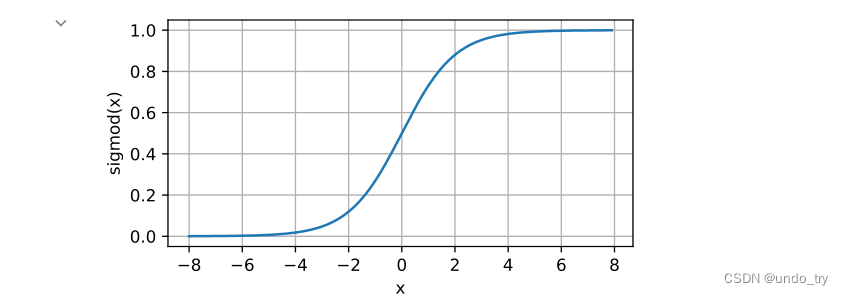
sigmoid函数将输⼊变换为区间(0, 1)上的输出

当我们想要将输出视作⼆元分类问题的概率时,sigmoid仍然被⼴泛⽤作输出单元上的激活函数。
然⽽,sigmoid在隐藏层中已经较少使⽤,它在⼤部分时候被更简单、更容易训练的ReLU所取代。
'''
2、Sigmoid函数
'''

# 注意,当输⼊接近0时,sigmoid函数接近线性变换。
y =  torch.sigmoid(x)
pf.plot(x.detach(), y.detach(),'x', 'sigmod(x)',figsize=(5,2.5))
导数:

'''
sigmoid函数的导数为: sigmoid(x) (1 − sigmoid(x)).

sigmoid函数的导数图像如下所⽰。
注意,当输⼊为0时,sigmoid函数的导数达到最⼤值0.25;⽽输⼊在任⼀⽅向上越远离0点时,导数越接近0。
'''
# 清除以前的梯度
x.grad.data.zero_()
y.backward(torch.ones_like(x),retain_graph=True)
pf.plot(x.detach(), x.grad, 'x', 'grad of sigmoid', figsize=(5, 2.5))

(3)tanh函数
tanh(双曲正切)函数能将其输⼊压缩转换到区间(-1, 1)上

'''
3、tanh函数

tanh(双曲正切)函数能将其输⼊压缩转换到区间(-1, 1)上


'''
y =  torch.tanh(x)
pf.plot(x.detach(), y.detach(),'x', 'tanh(x)',figsize=(5,2.5))

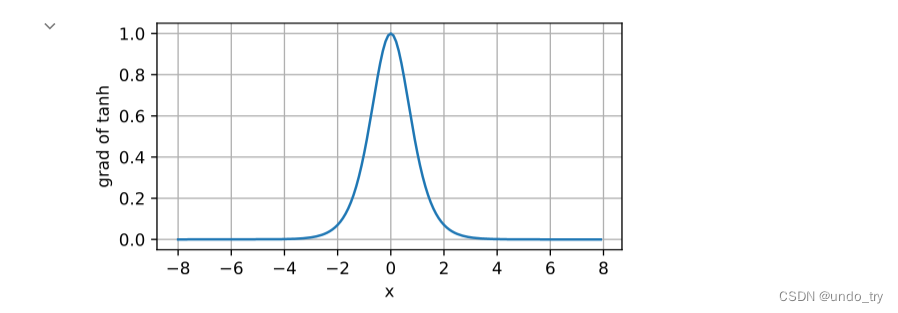
导数:

#  导数为1 − tanh^2(x)
# 当输⼊接近0时,tanh函数的导数接近最⼤值1。
# 与我们在sigmoid函数图像中看到的类似,输⼊在任⼀⽅向上越远离0点,导数越接近0。
x.grad.data.zero_()
y.backward(torch.ones_like(x),retain_graph=True)
pf.plot(x.detach(), x.grad, 'x', 'grad of tanh', figsize=(5, 2.5))
2、手动实现多层感知机
1、读取数据集
'''
  1、读取服装分类数据集 Fashion-MNIST
'''
import torchvision
import torch
from torch.utils import data
from torchvision import transforms


def get_dataloader_workers():
    """使⽤4个进程来读取数据"""
    return 4


def get_mnist_data(batch_size, resize=None):
    trans = [transforms.ToTensor()]

    if resize:
        # 还接受⼀个可选参数resize,⽤来将图像⼤⼩调整为另⼀种形状
        trans.insert(0,transforms.Resize(resize))
    trans = transforms.Compose(trans)

    mnist_train = torchvision.datasets.FashionMNIST(
        root='../data',train=True,transform=trans,download=False
    )


    mnist_test = torchvision.datasets.FashionMNIST(
        root='../data',train=False,transform=trans,download=False
    )
    # 数据加载器每次都会读取⼀⼩批量数据,⼤⼩为batch_size。通过内置数据迭代器,我们可以随机打乱了所有样本,从⽽⽆偏⻅地读取⼩批量
    # 数据迭代器是获得更⾼性能的关键组件。依靠实现良好的数据迭代器,利⽤⾼性能计算来避免减慢训练过程。
    train_iter = data.DataLoader(mnist_train,batch_size=batch_size,shuffle=True,num_workers=get_dataloader_workers())
    test_iter = data.DataLoader(mnist_test,batch_size=batch_size,shuffle=True,num_workers=get_dataloader_workers())

    return (train_iter,test_iter)


batch_size = 256

train_iter,test_iter = get_mnist_data(batch_size)
2、初始化模型参数
'''
  2、初始化模型参数

  服装分类数据集中的每个样本都是28×28的图像,一共含有10个类别。
  忽略像素之间的空间结构,我们可以将每个图像视为具有784个输⼊特征和10个类的简单分类数据集。

  ⾸先,我们将实现⼀个具有单隐藏层的多层感知机,它包含256个隐藏单元。

  注意,我们可以将这两个变量都视为超参数。通常,我们选择2的若⼲次幂作为层的宽度。
  注意,对于每⼀层我们都要记录⼀个权重矩阵和⼀个偏置向量
'''
from torch import nn
num_inputs, num_hiddens, num_outputs = 784, 256, 10


 # nn.Parameter可以看作是一个类型转换函数,将一个不可训练的类型 Tensor 转换成可以训练的类型 parameter ,并将这个 parameter 绑定到这个module
# 里面(net.parameter() 中就有这个绑定的 parameter,所以在参数优化的时候可以进行优化),所以经过类型转换这个变量就变成了模型的一部分,
# 成为了模型中根据训练可以改动的参数。使用这个函数的目的也是想让某些变量在学习的过程中不断的修改其值以达到最优化。

W1 = nn.Parameter(
    torch.randn(num_inputs,num_hiddens,requires_grad=True) * 0.01
)

b1 = nn.Parameter(
    torch.zeros(num_hiddens,requires_grad=True)
)

W2 = nn.Parameter(
    torch.randn(num_hiddens,num_outputs,requires_grad=True) * 0.01
)

b2 = nn.Parameter(
    torch.zeros(num_outputs,requires_grad=True)
)

params = [W1, b1, W2, b2]
3、激活函数
'''
  3、激活函数

  实现ReLU激活函数
'''
def relu(X):
    a = torch.zeros_like(X)
    return torch.max(X,a)
4、定义模型
'''
  4、定义模型

  因为我们忽略了空间结构,所以我们使⽤reshape将每个⼆维图像转换为⼀个⻓度为num_inputs的向量。
'''
def net(X):
    X = X.reshape((-1,num_inputs))
    H = relu(X@W1 + b1)
    return (H@W2 + b2)
5、loss函数
'''
  5、loss函数

  我们直接使⽤⾼级API中的内置函数来计算softmax和交叉熵损失
'''
loss = nn.CrossEntropyLoss(reduction='none')
6、训练
'''
  6、训练
  多层感知机的训练过程与softmax回归的训练过程完全相同
'''
# 将迭代周期数设置为10,并将学习率设置为0.1
num_epochs = 10
lr = 0.1

# 梯度下降
updater = torch.optim.SGD(params,lr=lr)

# 和softmax回归一样训练过程
import EpochTrainClass as e_train

e_train.train_ch3(net,train_iter,test_iter,loss,num_epochs,updater)

EpochTrainClass
import torch
from AccumulatorClass import Accumulator


def accuracy(y_hat, y):
    """计算预测正确的数量"""
    if len(y_hat.shape) > 1 and y_hat.shape[1] > 1:
         y_hat = y_hat.argmax(axis=1)
    cmp = y_hat.type(y.dtype) == y
    return float(cmp.type(y.dtype).sum())


def evaluate_accuracy(net,data_iter):
    """计算在指定数据集上模型的精度"""
    if isinstance(net,torch.nn.Module):
        # 将模型设置为评估模式
        net.eval()
    metric = Accumulator(2)
    with torch.no_grad():
        for X,y in data_iter:
            metric.add(accuracy(net(X),y), y.numel())

    return metric[0] / metric[1]

def epoch_train(net,train_iter,loss,updater):
    # 将模型设置为训练模式
    if isinstance(net,torch.nn.Module):
        net.train()

    # 指标:训练损失总和,训练准确度总和,样本数
    metric = Accumulator(3)
    for X,y in train_iter:
        # 计算梯度,并更新参数
        y_hat = net(X)
        l = loss(y_hat, y)

        if isinstance(updater, torch.optim.Optimizer):
            # 使用pytorch内置的优化器和损失函数
            updater.zero_grad()
            l.mean().backward()
            updater.step()
        else:
            # 使用定制的优化器和损失函数
            l.sum().backward()
            updater(X.shape[0])

        metric.add(
            float(l.sum()),
            accuracy(y_hat,y),
            y.numel()
        )

    # 返回训练损失和训练精度
    return (metric[0] / metric[2],metric[1] / metric[2])

def train_ch3(net, train_iter, test_iter, loss, num_epochs, updater):
    for epoch in range(num_epochs):
        print(f"epoch: {epoch + 1}")
        train_metrics = epoch_train(net,train_iter,loss,updater)
        print(train_metrics[0],train_metrics[1])
        test_acc = evaluate_accuracy(net,test_iter)
        print(test_acc)
Accumulator
'''
定义⼀个实⽤程序类Accumulator,⽤于对多个变量进⾏累加
'''
class Accumulator():

    """在n个变量上累加"""
    def __init__(self, n):
        self.data = [0.0] * n


    def add(self, *args):
        self.data = [a + float(b) for a,b in zip(self.data, args)]


    def reset(self):
        self.data = [0.0] * len(self.data)

    def __getitem__(self,index):
        return self.data[index]
7、模型的预测
'''
7、模型的预测
'''
def get_fashion_mnist_labels(labels):
    """返回Fashion-MNIST数据集的⽂本标签"""
    text_labels = ['t-shirt', 'trouser', 'pullover', 'dress', 'coat',
'sandal', 'shirt', 'sneaker', 'bag', 'ankle boot']
    return [text_labels[int(i)] for i in labels]


def predict_ch3(net,test_iter, n=8):

    for X,y in test_iter:
        trues = get_fashion_mnist_labels(y[0:n])
        preds = get_fashion_mnist_labels(
        net(X).argmax(axis=1)[0:n]
    )

        print('trues:',trues)
        print('preds:',preds)
        break


predict_ch3(net,test_iter)

3、多层感知机简洁实现
'''
  1、读取服装分类数据集 Fashion-MNIST
'''
import torchvision
import torch
from torch import nn
from torch.utils import data
from torchvision import transforms


def get_dataloader_workers():
    """使⽤4个进程来读取数据"""
    return 4


def get_mnist_data(batch_size, resize=None):
    trans = [transforms.ToTensor()]

    if resize:
        # 还接受⼀个可选参数resize,⽤来将图像⼤⼩调整为另⼀种形状
        trans.insert(0,transforms.Resize(resize))
    trans = transforms.Compose(trans)

    mnist_train = torchvision.datasets.FashionMNIST(
        root='../data',train=True,transform=trans,download=False
    )


    mnist_test = torchvision.datasets.FashionMNIST(
        root='../data',train=False,transform=trans,download=False
    )
    # 数据加载器每次都会读取⼀⼩批量数据,⼤⼩为batch_size。通过内置数据迭代器,我们可以随机打乱了所有样本,从⽽⽆偏⻅地读取⼩批量
    # 数据迭代器是获得更⾼性能的关键组件。依靠实现良好的数据迭代器,利⽤⾼性能计算来避免减慢训练过程。
    train_iter = data.DataLoader(mnist_train,batch_size=batch_size,shuffle=True,num_workers=get_dataloader_workers())
    test_iter = data.DataLoader(mnist_test,batch_size=batch_size,shuffle=True,num_workers=get_dataloader_workers())

    return (train_iter,test_iter)


batch_size = 256

train_iter,test_iter = get_mnist_data(batch_size)
'''
2、初始化模型参数

与softmax回归相比,唯⼀的区别是我们添加了2个全连接层(之前我们只添加了1个全连接层)。

第⼀层是隐藏层,它包含256个隐藏单元,并使⽤了ReLU激活函数。第⼆层是输出层。
'''


# pytorch不会隐式调整输入的形状,因此在线性层前定义展平层(flatten),来调整网络输入的形状
net = nn.Sequential(
    nn.Flatten(),
    nn.Linear(784, 256),
    nn.ReLU(),
    nn.Linear(256, 10)
)


def init_weights(m):
    if type(m) == nn.Linear:
        nn.init.normal_(m.weight, std=0.01)

net.apply(init_weights)
'''
3、定义损失函数

'''

loss = nn.CrossEntropyLoss(reduction='none')
'''
4、梯度下降算法

我们使⽤学习率为0.1的⼩批量随机梯度下降作为优化算法。这与我们在线性回归例⼦中的相同,这说明了优化器的普适性
'''

trainer = torch.optim.SGD(net.parameters(), lr=0.1)
'''
5、训练
'''
import EpochTrainClass as e_train

num_epochs = 10
e_train.train_ch3(net,train_iter,test_iter,loss,num_epochs,trainer)

'''
6、模型的预测
'''
def get_fashion_mnist_labels(labels):
    """返回Fashion-MNIST数据集的⽂本标签"""
    text_labels = ['t-shirt', 'trouser', 'pullover', 'dress', 'coat',
'sandal', 'shirt', 'sneaker', 'bag', 'ankle boot']
    return [text_labels[int(i)] for i in labels]


def predict_ch3(net,test_iter, n=8):

    for X,y in test_iter:
        trues = get_fashion_mnist_labels(y[0:n])
        preds = get_fashion_mnist_labels(
        net(X).argmax(axis=1)[0:n]
    )

        print('trues:',trues)
        print('preds:',preds)
        break


predict_ch3(net,test_iter)




![[附源码]Node.js计算机毕业设计高校图书服务系统Express](https://img-blog.csdnimg.cn/60197477b0aa427790fdb6b48af7c4cc.png)

