RabbitMQ安装教程请转到:RabbitMQ安装教程(超详细)
1、创建生产者
在app/Http/Controllers里创建一个php控制器文件,
namespace App\Http\Controllers;

use App\Http\Controllers\Controller;
//引入amqp扩展
use PhpAmqpLib\Connection\AMQPStreamConnection;
use PhpAmqpLib\Message\AMQPMessage;
use PhpAmqpLib\Wire\AMQPTable;


require_once(__DIR__.'/../../../../vendor/autoload.php');

class TestController extends Controller {

    public function production() {
        //创建服务器连接
        $connection = new AMQPStreamConnection('172.16.5.114', 5672, 'admin', '123456');
        //连接信道
        //信道是生产消费者与rabbit通信的渠道,生产者publish或者消费者消费一个队列都是需要通过信道来通信的
        //信道是建立在TCP上面的虚拟链接,也就是rabbitMQ在一个TCP上面建立成百上千的信道来达到多个线程处理。
        //注意是一个TCP 被多个线程共享,每个线程对应一个信道,信道在rabbit都有唯一的ID,保证了信道的私有性,对应上唯一的线程使用。
        $channel = $connection->channel();

        //channel->queue_declare通过信道创建一个是否是持久化的消息队列
        //queue第一个参数代表消息队列名称
        $channel->queue_declare('test_queue', false, false, false, false);

        //往队列里要发送内容,待发送的内容
        $data = '这是一个生产者消息' . date('Y-m-d H:i:s');
        $msg = new AMQPMessage($data);
        //通过信道来进行发送消息
        //而exchange是怎么知道消息应该推到哪个queue呢,这就要通过绑定queue与exchange时的routingkey了,通过代码进行绑定并且指定routingkey,下面有一张关系图,p(发布者) —> x(exchange) bindding(绑定关系也就是我们的routingkey) 红色代表着queue
        $channel->basic_publish($msg, '', 'test_queue');

        echo " [x] Sent '这是一个生产者消息!'\n";

        //关闭信道
        $channel->close();
        //关闭连接
        $connection->close();
    }
}
在routes/web.php中加一下路由
use App\Http\Controllers\TestController;

Route::get('/test/production', [TestController::class, 'production']);
运行下就可以生成队列了
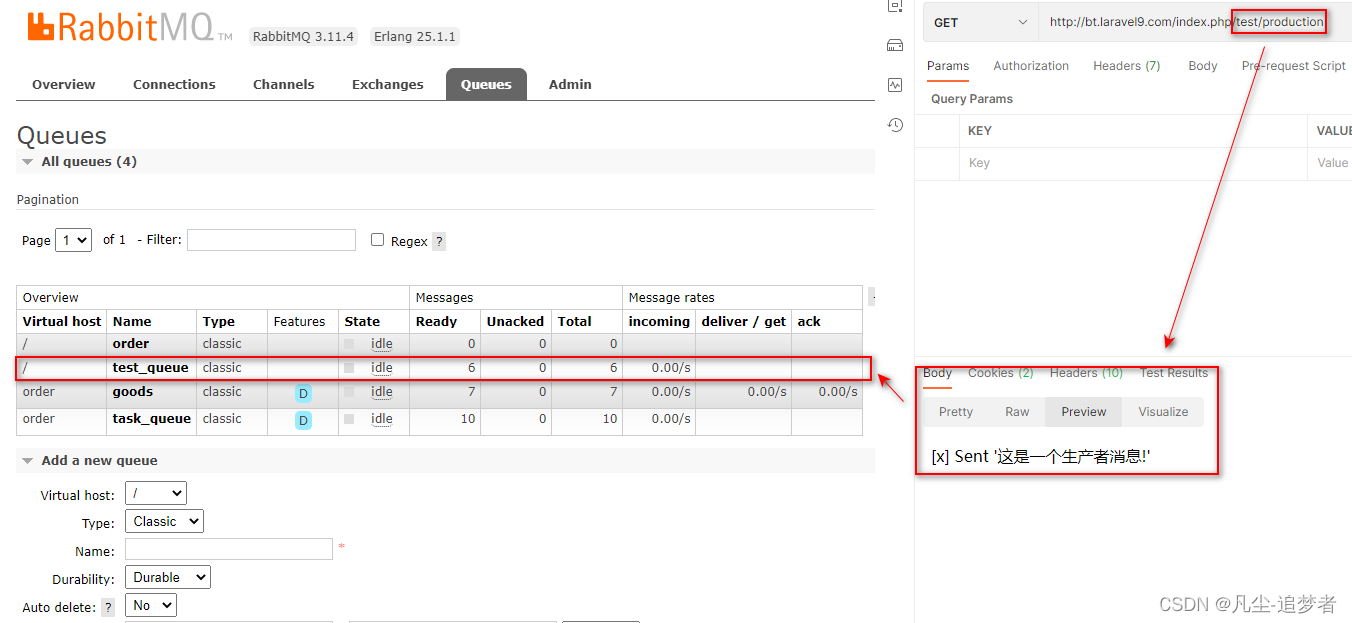
2、创建消费者
在app/Console/Commands下创建一个php文件,比如TestQueue.php
<?php

namespace App\Console\Commands\Queue;

use Illuminate\Console\Command;
use PhpAmqpLib\Connection\AMQPStreamConnection;

class TestQueue extends Command
{
    /**
     * The name and signature of the console command.
     *
     * @var string
     */
    protected $signature = 'rabbitmq_TestQueue';//给消费者起个command名称

    /**
     * The console command description.
     *
     * @var string
     */
    protected $description = 'Command description';

    /**
     * Create a new command instance.
     *
     * @return void
     */
    public function __construct()
    {
        parent::__construct();
    }

    /**
     * Execute the console command.
     *
     * @return int
     */
    public function handle()
    {
        //创建服务器连接
        $connection = new AMQPStreamConnection('172.16.5.114', 5672, 'admin', '123456');
        //连接信道
        //信道是生产消费者与rabbit通信的渠道,生产者publish或者消费者消费一个队列都是需要通过信道来通信的
        //信道是建立在TCP上面的虚拟链接,也就是rabbitMQ在一个TCP上面建立成百上千的信道来达到多个线程处理。
        //注意是一个TCP 被多个线程共享,每个线程对应一个信道,信道在rabbit都有唯一的ID,保证了信道的私有性,对应上唯一的线程使用。
        $channel = $connection->channel();

        //channel->queue_declare通过信道创建一个是否是持久化的消息队列
        //queue第一个参数代表消息队列名称
        $channel->queue_declare('test_queue', false, false, false, false);

        echo " [*] Waiting for messages. To exit press CTRL+C\n";

        //进行监听消费者是否有消息,如果有进行输出消息内容
        $callback = function ($msg) {
            echo ' [x] Received ', $msg->body, "\n";
        };

        //通过信道进行消费消息
        $channel->basic_consume('test_queue', '', false, true, false, false, $callback);

        //如果信道是打开状态
        while ($channel->is_open()) {
            //然后让信道一直处于监听等待状态
            $channel->wait();
        }

        //关闭信道
        $channel->close();
        //关闭连接
        $connection->close();
    }
}
修改app/Console/Kernel.php文件,即$commands增加TestQueue::class
<?php

namespace App\Console;

use Illuminate\Console\Scheduling\Schedule;
use Illuminate\Foundation\Console\Kernel as ConsoleKernel;
use App\Console\Commands\Queue\TestQueue;
use App\Console\Commands\Queue\Other;

class Kernel extends ConsoleKernel
{
    /**
     * The Artisan commands provided by your application.
     *
     * @var array
     */
    protected $commands = [
        TestQueue::class,
        Other::class
    ];

    /**
     * Define the application's command schedule.
     *
     * @param \Illuminate\Console\Scheduling\Schedule $schedule
     * @return void
     */
    protected function schedule(Schedule $schedule)
    {
        // $schedule->command('inspire')
        //          ->hourly();
    }

    /**
     * Register the commands for the application.
     *
     * @return void
     */
    protected function commands()
    {
        $this->load(__DIR__.'/Commands');

        require base_path('routes/console.php');
    }
}
3、使用command进行测试
先cd到项目根目录,执行下面命令
php artisan rabbitmq_TestQueue就消费了消息
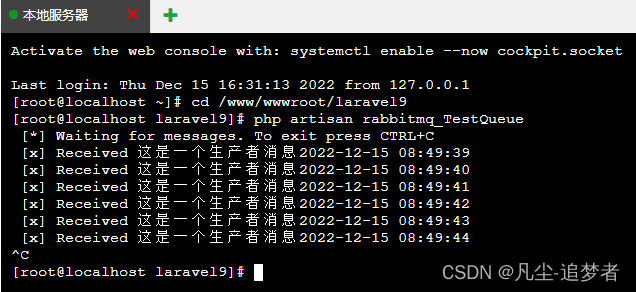
按 Ctrl+c 结束
生产环境可以使用守护进程
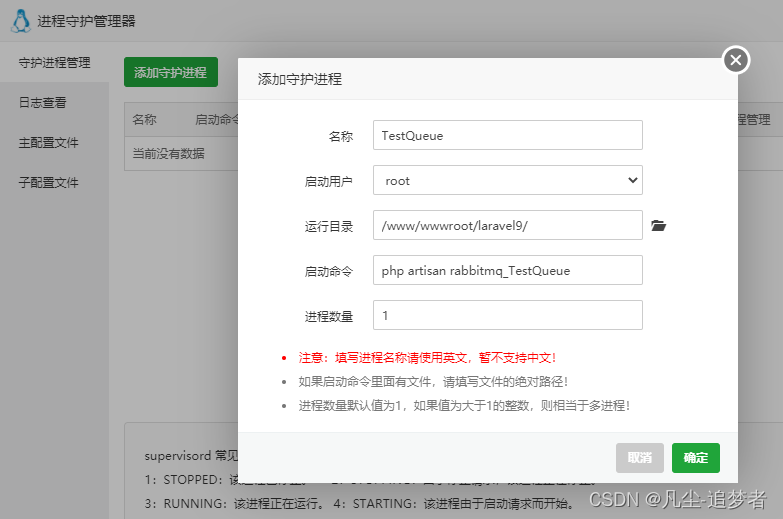
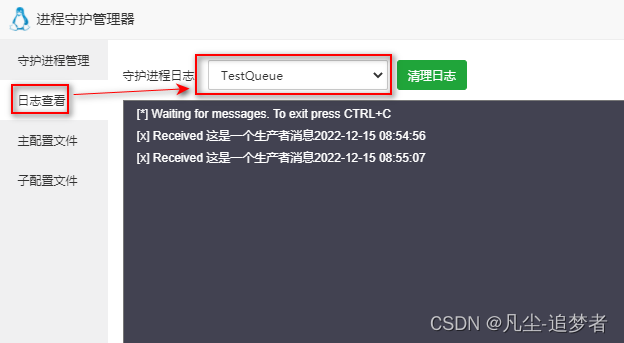



![[附源码]Node.js计算机毕业设计高校宿舍管理系统Express](https://img-blog.csdnimg.cn/617b8c9f786244629d24b4e581dc787f.png)


