文章目录
- 接口调用出错
- 推荐客户端负载均衡
- 多层JSON嵌套
- 大数据量 插入慎用foreach
- 使用Api时新建一个类封装、方便维护
接口调用出错
- 故障转移:重试选择其他可用节点,
做好幂等性可用!!! - 快速失败
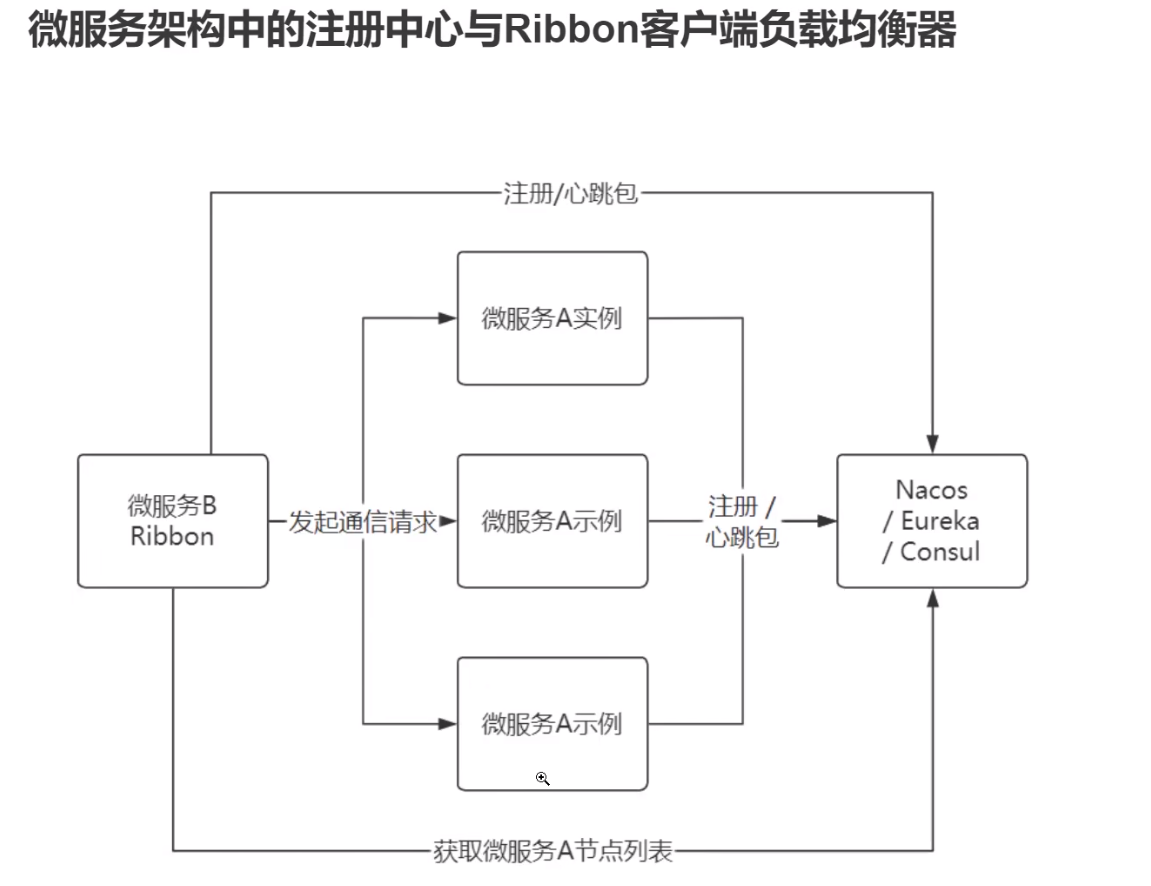
推荐客户端负载均衡
服务端 负载均衡
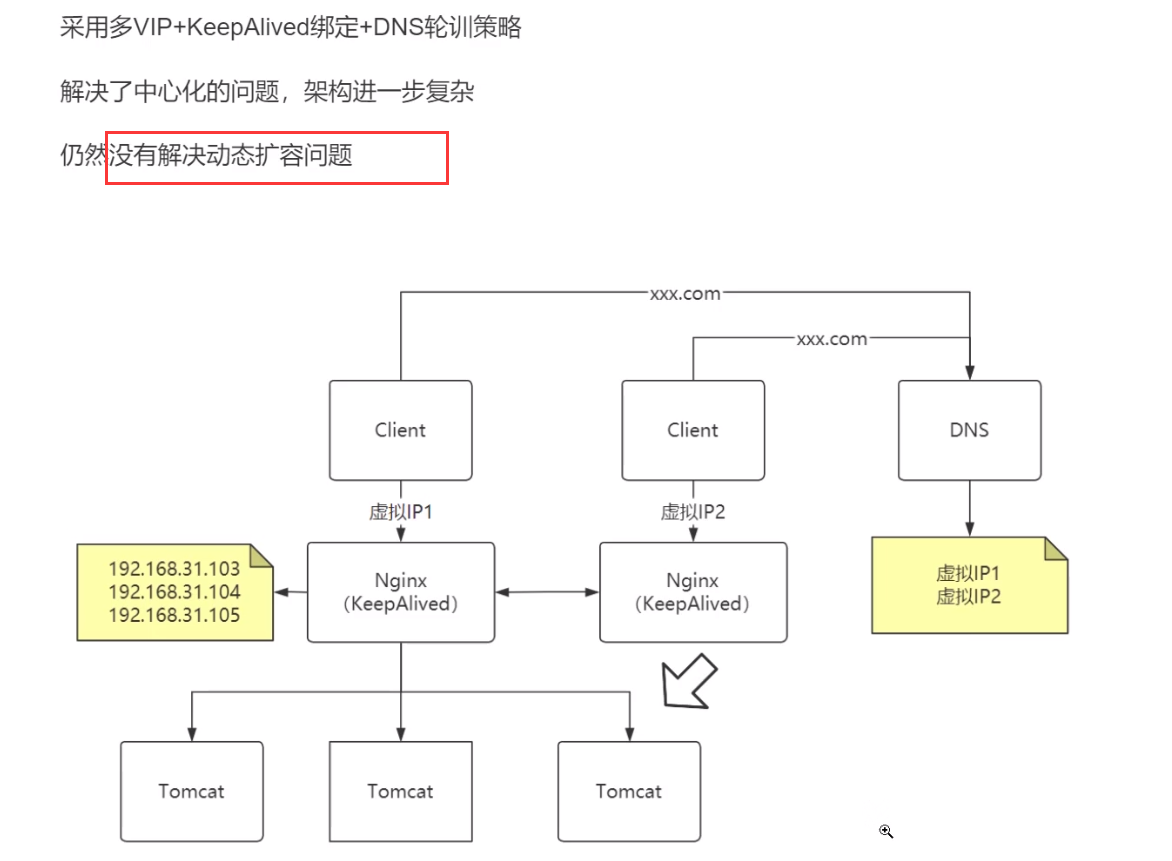
客户端 负载均衡
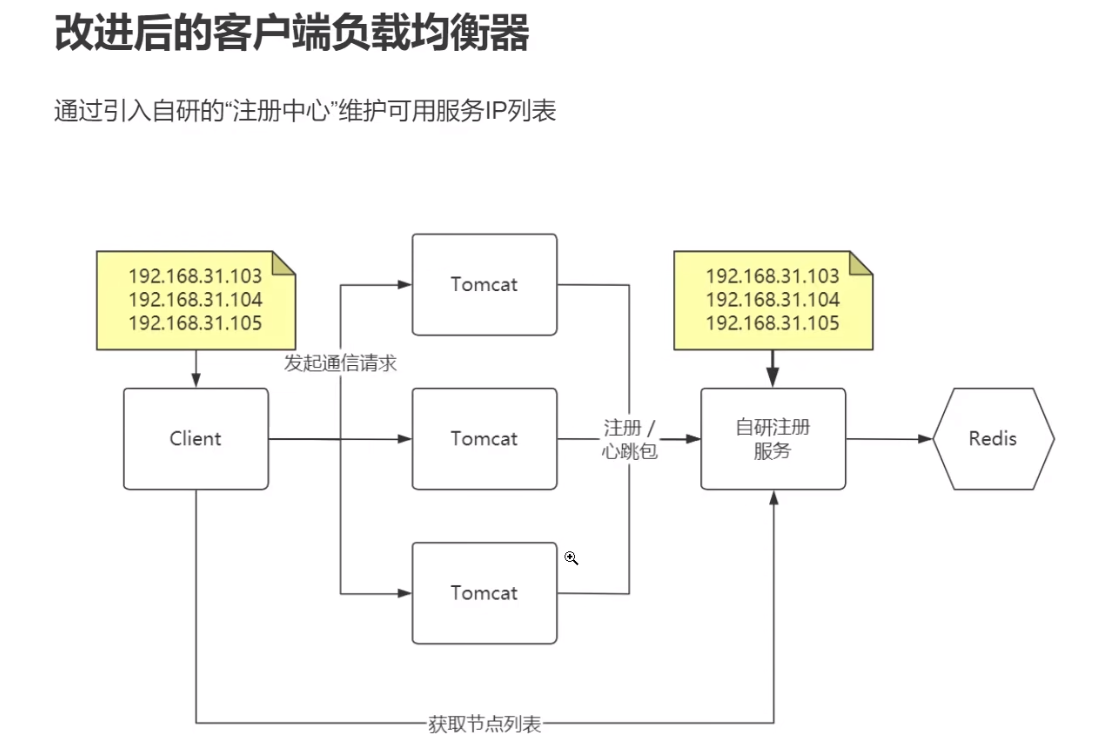
抽象为现在 的微服务架构
多层JSON嵌套
根据 不同的情况,数据的结构会发生变化,定义各种各样的实体类不太好!!因为实体类太多不方便维护
<dependency>
    <groupId>ognl</groupId>
    <artifactId>ognl</artifactId>
    <version>3.1.1</version>
</dependency>

<dependency>
    <groupId>junit</groupId>
    <artifactId>junit</artifactId>
    <version>4.13.2</version>
</dependency>

<dependency>
    <groupId>com.google.code.gson</groupId>
    <artifactId>gson</artifactId>
    <version>2.10</version>
</dependency>
JsonUtils 工具类
import com.google.gson.Gson;
import com.google.gson.reflect.TypeToken;
import ognl.Ognl;
import ognl.OgnlContext;

import java.util.Map;

public class JsonUtils {
    /**
     * 将指定JSON转为Map对象,Key固定为String,对应JSONkey
     * Value分情况:
     * 1. Value是字符串,自动转为字符串,例如:{"a","b"}
     * 2. Value是其他JSON对象,自动转为Map,例如:{"a":{"b":"2"}}}
     * 3. Value是数组,自动转为List<Map>,例如:{"a":[{"b":"2"},"c":"3"]}
     *
     * @param json 输入的JSON对象
     * @return 动态的Map集合
     */
    public static Map<String, Object> transferToMap(String json) {
        Gson gson = new Gson ();
        Map<String, Object> map = gson.fromJson (json,
                new TypeToken<Map<String, Object>> () {
                }.getType ());
        return map;
    }

    /**
     * 简化方法
     *
     * @param json  原始的JSON数据
     * @param path  OGNL规则表达式
     * @param clazz Value对应的目标类
     * @return clazz对应数据
     */
    public static <T> T getValue(String json, String path, Class<T> clazz) {
        try {
            Map<String, Object> map = transferToMap (json);
            OgnlContext context = new OgnlContext ();
            context.setRoot (map);
            T value = (T) Ognl.getValue (path, context, context.getRoot ());
            return value;
        } catch (Exception e) {
            throw new RuntimeException (e);
        }
    }

}
测试
import org.junit.Test;

import java.util.List;
import java.util.Map;

public class JsonCase {
    /**
     * 超多层级JSON嵌套的快速提取
     */

    @Test

    public void case0() {
        //language=JSON,获取 嵌套json中 e的值
        String text = "{\n" +
                "  \"a\": {\n" +
                "    \"b\": {\n" +
                "      \"c\": {\n" +
                "        \"d\": {\n" +
                "          \"e\": \"nothing\"\n" +
                "        }\n" +
                "      }\n" +
                "    }\n" +
                "  }\n" +
                "}";
        Map<String, Object> jsonMap = JsonUtils.transferToMap (json);

        String e = JsonUtils.getValue (text, "a.b.c.d.e", String.class);
        System.out.println (e);

    }


    //language=JSON
    private String json = "{\n" +
            "  \"showapi_res_error\": \"无\",\n" +
            "  \"showapi_res_id\": \"628cc9850de3769f06edbb49\",\n" +
            "  \"showapi_res_code\": 0,\n" +
            "  \"showapi_fee_num\": 1,\n" +
            "  \"showapi_res_body\": {\n" +
            "    \"ret_code\": 0,\n" +
            "    \"area\": \"南安\",\n" +
            "    \"areaid\": \"101230506\",\n" +
            "    \"areaCode\": \"350583\",\n" +
            "    \"hourList\": [\n" +
            "      {\n" +
            "        \"weather_code\": \"06\",\n" +
            "        \"time\": \"202205242000\",\n" +
            "        \"area\": \"南安\",\n" +
            "        \"wind_direction\": \"东南 风\",\n" +
            "        \" wind_power\": \"0-3级 微风<5.4m/s\",\n" +
            "        \" weather\": \" 小 雨\",\n" +
            "        \" areaid\": \"101230506\",\n" +
            "        \" temperature\": \"20\"\n" +
            "      },\n" +
            "      {\n" +
            "        \"weather_code\": \"07\",\n" +
            "        \"time\": \"202205242100\",\n" +
            "        \"area\": \"南安\",\n" +
            "        \"wind_direction\": \"东 风\",\n" +
            "        \" wind_power\": \"0-3级 微风<5.4m/s\",\n" +
            "        \" weather\": \" 小 雨\",\n" +
            "        \" areaid\": \"101230506\",\n" +
            "        \" temperature\": \"20\"\n" +
            "      }\n" +
            "    ]\n" +
            "  }\n" +
            "}";

    //将JSON转为标准Map结构
    @Test
    public void case1() {
        Map<String, Object> jsonMap = JsonUtils.transferToMap (json);
        System.out.println (jsonMap);
    }

    /**
     * OGNL直接提取数据,Value为子JSON对象的情况
     */
    @Test
    public void case2() {
        Map<String, Object> jsonMap = JsonUtils.transferToMap (json);
        Map resBody = JsonUtils.getValue (json, "showapi_res_body", Map.class);
        System.out.println (resBody);
    }

    /**
     * OGNL直接提取数据,Value为标准字符串的情况
     */
    @Test
    public void case3() {
        String value = JsonUtils.getValue (json, "showapi_res_body.area", String.class);
        System.out.println (value);
    }

    /**
     * OGNL直接提取数据,Value为标准字符串的情况,Value为数组的情况
     */
    @Test
    public void case4() {
        List<Map> hourList = JsonUtils.getValue (json, "showapi_res_body.hourList",
                List.class);


        // 每一个集合对象都是List,遍历这个集合
        for (Map hour : hourList) {
            System.out.println (hour);
        }
    }

    /**
     * 利用List语法获取第1个时点天气预报
     */
    @Test
    public void case5() {
        String area = JsonUtils.getValue (json,
                "showapi_res_body.hourList[0].weather_code", String.class);

        System.out.println (area);
    }
}
大数据量 插入慎用foreach
@Resource
private UserService userService;

// saveBatch 批量插入
userService.saveBatch (null);
只有把rewriteBatchedStatements参数置为true,
驱动才会帮你批量执行SQL (jdbc:mysql://ip:port/db?rewriteBatchedStatements=true)
使用Api时新建一个类封装、方便维护
把
变化放在盒子里
也就是 使用一个类来 封装原有的方法,解耦!
起初:
String pass = "123456";
String md5 = DigestUtils.md5DigestAsHex (pass.getBytes ());
有 更好的方法时,不得不更新所有的api,麻烦
使用一个类封装 时:
import org.springframework.util.DigestUtils;

public class MyDigestUtils {

    public static String md5Digest(String source) {

        return DigestUtils.md5DigestAsHex (source.getBytes ());
    }

}
调用:
String pass = "123456";
String md5 = MyDigestUtils.md5Digest (pass);
发生变化时,直接修改MyDigestUtils下的md5Digest 方法即可!!



![[附源码]Python计算机毕业设计大学生心理健康咨询系统Django(程序+LW)](https://img-blog.csdnimg.cn/b41f7b4d4e074188928f7371e709717d.png)




![[附源码]Node.js计算机毕业设计大学生健康系统Express](https://img-blog.csdnimg.cn/853811809f5849c287f8532983d0f29c.png)

