一、前言
文章目录:Spring源码深度解析:文章目录
我们上篇已经分析到了 Spring将已经找到所有适用于当前bean 的Advisor 集合。下面就要创建代理对象了,而代理对象的创建是从 AbstractAutoProxyCreator#createProxy()开始。下面我们就来看看代理对象的创建过程。
1. ProxyFactory
ProxyFactory的结构图如下:
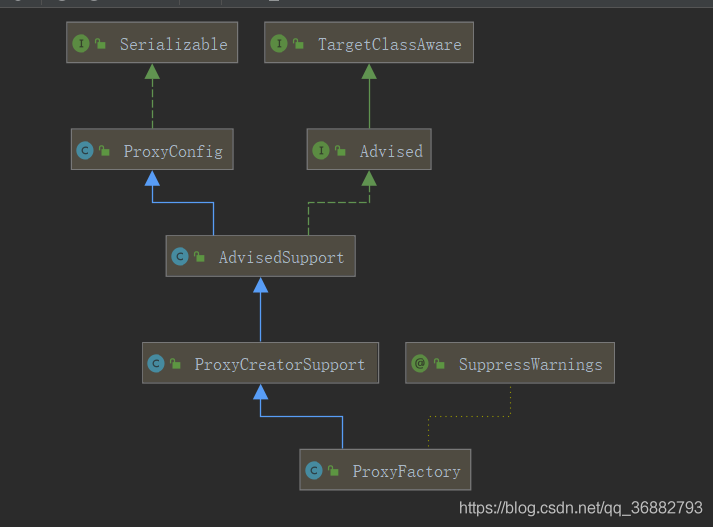
在代理对象的创建过程中,实际上是委托给ProxyFactory来完成的。ProxyFactory在创建过程中保存了筛选后的 Advisor集合以及其他的一些属性。而在后面创建代理类的时候,将 ProxyFactory作为参数传递给了 JdkDynamicAopProxy 和 ObjenesisCglibAopProxy。这个在后面的代码分析中会有详细说明。
二、创建代理类 - AbstractAutoProxyCreator#createProxy
AbstractAutoProxyCreator#createProxy 的代码如下:
	// 这里的入参 beanClass :当前BeanClass,
	// beanName : 当前BeanName
	// specificInterceptors : 中篇中寻找出来的 Advisor
	// targetSource : SingletonTargetSource 目标类是单例 拥有给定对象的TargetSource接口的实现。 这是Spring AOP框架使用的TargetSource接口的默认实现。 通常不需要在应用程序代码中创建此类的对象。
	protected Object createProxy(Class<?> beanClass, @Nullable String beanName,
			@Nullable Object[] specificInterceptors, TargetSource targetSource) {

		if (this.beanFactory instanceof ConfigurableListableBeanFactory) {
			AutoProxyUtils.exposeTargetClass((ConfigurableListableBeanFactory) this.beanFactory, beanName, beanClass);
		}

		ProxyFactory proxyFactory = new ProxyFactory();
		// 获取当前类的相关属性
		proxyFactory.copyFrom(this);
		// 判断当前bean 是使用 TargetClass 代理还是接口代理
		if (!proxyFactory.isProxyTargetClass()) {
			// 检查 proxyTargeClass设置以及preservetargetClass 属性
			if (shouldProxyTargetClass(beanClass, beanName)) {
				proxyFactory.setProxyTargetClass(true);
			}
			else {
				evaluateProxyInterfaces(beanClass, proxyFactory);
			}
		}
		// 将拦截器 Interceptors 封装成增强器 Advisor
		Advisor[] advisors = buildAdvisors(beanName, specificInterceptors);
		// 加入增强器
		proxyFactory.addAdvisors(advisors);
		proxyFactory.setTargetSource(targetSource);
		// 定制代理
		customizeProxyFactory(proxyFactory);
		proxyFactory.setFrozen(this.freezeProxy);
		if (advisorsPreFiltered()) {
			proxyFactory.setPreFiltered(true);
		}
		// 在这里面就封装出了ProxyFactory,并交由其来完成剩下的代理工作。
		return proxyFactory.getProxy(getProxyClassLoader());
	}
代码中已经有详细的注释了,可以看到代理类的创建Spring委托给ProxyFactory去处理,而在此函数中主要是对ProxyFactory的初始化操作:
- 获取当前类的属性
- 添加代理接口
- 封装
Advisor并加入到,ProxyFactory中 - 设置要代理的类
- 通过
customizeProxyFactory定制代理类 ,对ProxyFactory进一步封装 - 进行获取代理操作
下面我们主要下面两个方法:
1. buildAdvisors(beanName, specificInterceptors);
这一步的目的是将Interceptors封装成增强器Advisor。虽然我们之前动态解析的都是Advisor,但是保不齐用户自己注入的并不是Advisor类型,所以这里需要一个转换。
需要注意的是:这里的参数 就是Object[] specificInterceptors就是getAdvicesAndAdvisorsForBean()方法返回的 Advisor,通过对getAdvicesAndAdvisorsForBean()方法的分析我们可以得知,specificInterceptors应该全是InstantiationModelAwarePointcutAdvisorImpl类型。
protected Advisor[] buildAdvisors(@Nullable String beanName, @Nullable Object[] specificInterceptors) {
		// Handle prototypes correctly...
		// 解析注册的所有 Interceptor Name。即我们可以手动添加一些 拦截器,这里将手动添加的拦截器保存到commonInterceptors  中
		Advisor[] commonInterceptors = resolveInterceptorNames();

		List<Object> allInterceptors = new ArrayList<>();
		if (specificInterceptors != null) {
			// 加入拦截器
			allInterceptors.addAll(Arrays.asList(specificInterceptors));
			if (commonInterceptors.length > 0) {
				if (this.applyCommonInterceptorsFirst) {
					allInterceptors.addAll(0, Arrays.asList(commonInterceptors));
				}
				else {
					allInterceptors.addAll(Arrays.asList(commonInterceptors));
				}
			}
		}
		// ... 日志打印
		if (logger.isDebugEnabled()) {
			int nrOfCommonInterceptors = commonInterceptors.length;
			int nrOfSpecificInterceptors = (specificInterceptors != null ? specificInterceptors.length : 0);
			logger.debug("Creating implicit proxy for bean '" + beanName + "' with " + nrOfCommonInterceptors +
					" common interceptors and " + nrOfSpecificInterceptors + " specific interceptors");
		}

		Advisor[] advisors = new Advisor[allInterceptors.size()];
		for (int i = 0; i < allInterceptors.size(); i++) {
			// 拦截器进行转化为 Advisor
			advisors[i] = this.advisorAdapterRegistry.wrap(allInterceptors.get(i));
		}
		return advisors;
	}

	/**
	 * Resolves the specified interceptor names to Advisor objects.
	 * @see #setInterceptorNames
	 */
	//  this.interceptorNames 是自己通过set设置的属性。在基础篇中Advice 有过类似的设置。我们这里是没有的
	private Advisor[] resolveInterceptorNames() {
		BeanFactory bf = this.beanFactory;
		ConfigurableBeanFactory cbf = (bf instanceof ConfigurableBeanFactory ? (ConfigurableBeanFactory) bf : null);
		List<Advisor> advisors = new ArrayList<>();
		// 将 interceptorNames 获取到的拦截器保存起来,并返回。
		for (String beanName : this.interceptorNames) {
			if (cbf == null || !cbf.isCurrentlyInCreation(beanName)) {
				Assert.state(bf != null, "BeanFactory required for resolving interceptor names");
				Object next = bf.getBean(beanName);
				advisors.add(this.advisorAdapterRegistry.wrap(next));
			}
		}
		return advisors.toArray(new Advisor[0]);
	}
我们下面来看一下this.advisorAdapterRegistry.wrap(allInterceptors.get(i)); 的实现。
DefaultAdvisorAdapterRegistry#wrap()方法也很简单,就是将adviceObject包装成Advisor。
2. proxyFactory.getProxy(getProxyClassLoader());
上述代码中proxyFactory.getProxy(getProxyClassLoader()); 会继续调用到DefaultAopProxyFactory#createAopProxy
因此我们来看DefaultAopProxyFactory#createAopProxy
首先我们来看一下proxyFactory.getProxy()方法。
	public Object getProxy(@Nullable ClassLoader classLoader) {
		return createAopProxy().getProxy(classLoader);
	}
显然意见我们需要将这个内容分为两步:createAopProxy()和 ,CODE>getProxy(classLoader)
2.1 ProxyCreatorSupport#createAopProxy
ProxyCreatorSupport#createAopProxy代码如下,这里我们可以看到,ProxyCreatorSupport#createAopProxy会调用DefaultAopProxyFactory#createAopProxy,并且将this作为参数传递了过去。而此时的 this,正是上面提到的创建的 ProxyFactory。
	protected final synchronized AopProxy createAopProxy() {
		if (!this.active) {
			activate();
		}
		// 这里我们需要注意的是 ,这里 createAopProxy 传入的是 this。也就是说这里参数传递实际上是ProxyFactroy
		return getAopProxyFactory().createAopProxy(this);
	}
这里我们再来看DefaultAopProxyFactory#createAopProxy的实现
	@Override
	// 这里的参数 AdvisedSupport config 即是之前创建的ProxyFactory。这里又将其传递给了AopProxy
	public AopProxy createAopProxy(AdvisedSupport config) throws AopConfigException {
		if (config.isOptimize() || config.isProxyTargetClass() || hasNoUserSuppliedProxyInterfaces(config)) {
			Class<?> targetClass = config.getTargetClass();
			if (targetClass == null) {
				throw new AopConfigException("TargetSource cannot determine target class: " +
						"Either an interface or a target is required for proxy creation.");
			}
			if (targetClass.isInterface() || Proxy.isProxyClass(targetClass)) {
				return new JdkDynamicAopProxy(config);
			}
			return new ObjenesisCglibAopProxy(config);
		}
		else {
			return new JdkDynamicAopProxy(config);
		}
	}
在这个方法中我们可以看到 Aop代理使用了 JDK动态代理和 Cglib动态代理两种动态代理模式,并根据某些参数来进行选择代理方式
从createAopProxy代码中我们可以看到几个参数:
optimize: 用来控制通过CGlib 创建的代理是否使用激进的优化策略,一般默认false,对JDK动态代理无效。proxyTargetClass:若为true,则目标类本身被代理,而不是代理目标类的接口,创建 cglib代理。hasNoUserSuppliedProxyInterfaces:是否存在代理接口
即:
- 如果目标对象实现了接口,默认会采用JDK动态代理实现AOP
- 如果目标对象实现了接口,可以强制使用CGLIB动态代理实现AOP
- 如果目标对象没有实现接口,必须采用CGLIB代理,Spring会自动在JDK动态代理和CGLIB代理之前切换。
2.2 getProxy(classLoader)
首先我们需要知道的是,调用这个方法的是createAopProxy()方法的返回值,那么就可能是JdkDynamicAopProxy.getProxy或者ObjenesisCglibAopProxy.getProxy。下面我们来详细分析一下代理生成的过程。
三、代理对象
1. JdkDynamicAopProxy
下面代码省略了JdkDynamicAopProxy部分无关代码。
对于JDK 动态代理来说,实际调用代理方法是在java.lang.reflect.InvocationHandler#invoke中,因此 JdkDynamicAopProxy#invoke是我们的重点关注对象。
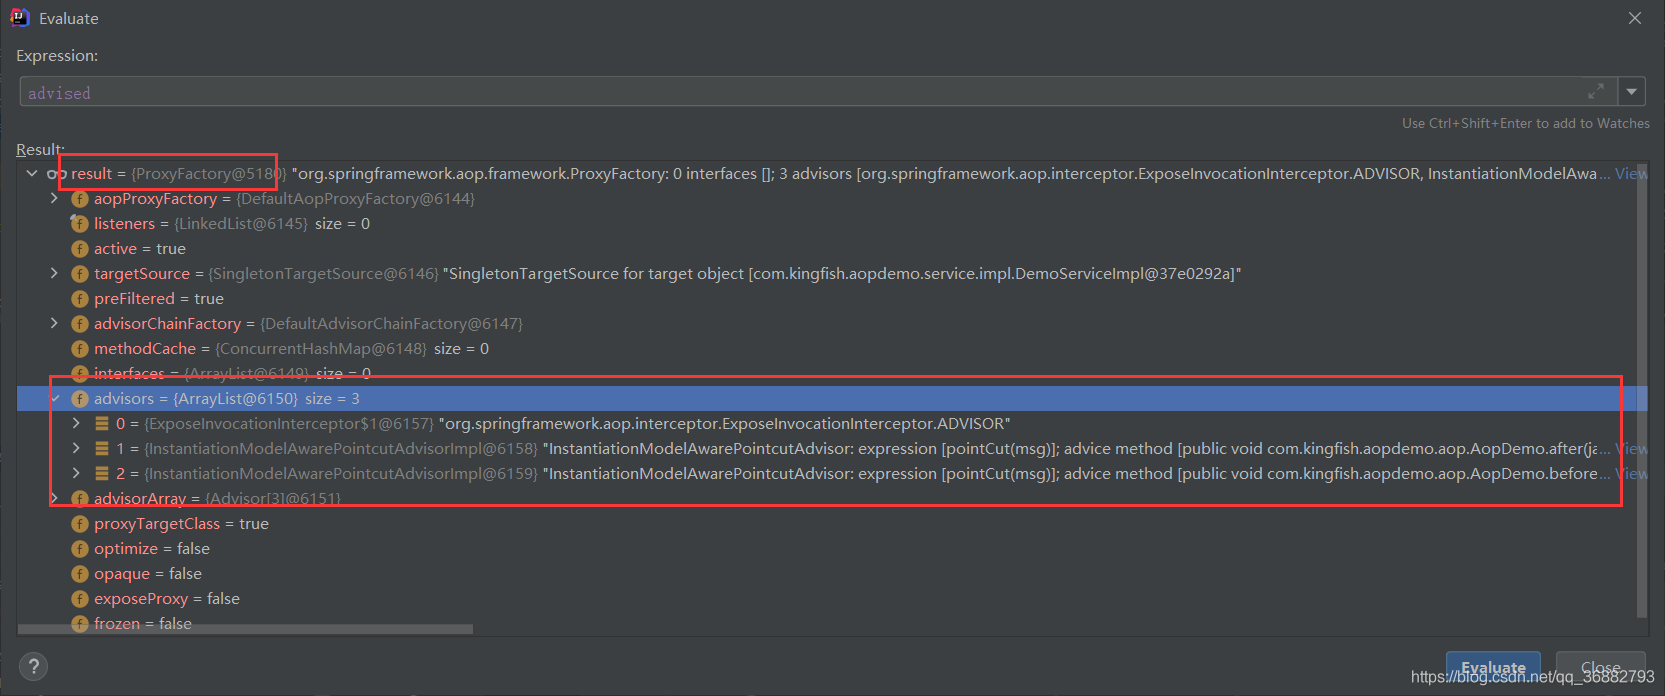
1.1 JdkDynamicAopProxy#getProxy
@Override
	public Object getProxy() {
		return getProxy(ClassUtils.getDefaultClassLoader());
	}

	@Override
	public Object getProxy(@Nullable ClassLoader classLoader) {
		if (logger.isTraceEnabled()) {
			logger.trace("Creating JDK dynamic proxy: " + this.advised.getTargetSource());
		}
		// 获取代理接口,因为是jdk代理,所以需要获取代理接口
		Class<?>[] proxiedInterfaces = AopProxyUtils.completeProxiedInterfaces(this.advised, true);
		// 发现 equals 和 hashCode 方法,如果发现,则改变 equalsDefined = true; 和 	hashCodeDefined = true;
		findDefinedEqualsAndHashCodeMethods(proxiedInterfaces);
		return Proxy.newProxyInstance(classLoader, proxiedInterfaces, this);
	}
1.2 JdkDynamicAopProxy#invoke
	@Override
	@Nullable
	public Object invoke(Object proxy, Method method, Object[] args) throws Throwable {
		Object oldProxy = null;
		boolean setProxyContext = false;
		// 获取目标源
		TargetSource targetSource = this.advised.targetSource;
		Object target = null;

		try {
			// 处理 equals 方法
			if (!this.equalsDefined && AopUtils.isEqualsMethod(method)) {
				// The target does not implement the equals(Object) method itself.
				return equals(args[0]);
			}
			// 处理 hashCode 方法
			else if (!this.hashCodeDefined && AopUtils.isHashCodeMethod(method)) {
				// The target does not implement the hashCode() method itself.
				return hashCode();
			}
			// 处理 DecoratingProxy 类
			else if (method.getDeclaringClass() == DecoratingProxy.class) {
				// There is only getDecoratedClass() declared -> dispatch to proxy config.
				return AopProxyUtils.ultimateTargetClass(this.advised);
			}
			// 处理 Class类的isAssignableFrom(Class cls) 方法
			else if (!this.advised.opaque && method.getDeclaringClass().isInterface() &&
					method.getDeclaringClass().isAssignableFrom(Advised.class)) {
				// Service invocations on ProxyConfig with the proxy config...
				return AopUtils.invokeJoinpointUsingReflection(this.advised, method, args);
			}

			Object retVal;
			// 是否暴露代理对象。有时候目标对象内部的自我调用将无法实施切面中的增强,则需要通过此属性暴露
			if (this.advised.exposeProxy) {
				// Make invocation available if necessary.
				oldProxy = AopContext.setCurrentProxy(proxy);
				setProxyContext = true;
			}

			// Get as late as possible to minimize the time we "own" the target,
			// in case it comes from a pool.
			target = targetSource.getTarget();
			Class<?> targetClass = (target != null ? target.getClass() : null);

			// Get the interception chain for this method.
			//  获取当前方法的拦截链路,其中包括将AspectJMethodBeforeAdvice、AspectJAfterAdvice、AspectJAfterReturningAdvice 转换成合适的类型(InterceptorAndDynamicMethodMatcher)
			List<Object> chain = this.advised.getInterceptorsAndDynamicInterceptionAdvice(method, targetClass);


			if (chain.isEmpty()) {
				// 拦截链路为空则直接调用切点方法
				Object[] argsToUse = AopProxyUtils.adaptArgumentsIfNecessary(method, args);
				retVal = AopUtils.invokeJoinpointUsingReflection(target, method, argsToUse);
			}
			else {
				// We need to create a method invocation...
				// 否则构建一个新的 方法调用对象 ReflectiveMethodInvocation
				// 以便于使用proceed 方法进行链接表用拦截器
				MethodInvocation invocation =
						new ReflectiveMethodInvocation(proxy, target, method, args, targetClass, chain);
				// Proceed to the joinpoint through the interceptor chain.
				// 调用方法,执行拦截器链路
				retVal = invocation.proceed();
			}

			// Massage return value if necessary.
			// 返回结果
			Class<?> returnType = method.getReturnType();
			if (retVal != null && retVal == target &&
					returnType != Object.class && returnType.isInstance(proxy) &&
					!RawTargetAccess.class.isAssignableFrom(method.getDeclaringClass())) {
				// Special case: it returned "this" and the return type of the method
				// is type-compatible. Note that we can't help if the target sets
				// a reference to itself in another returned object.
				retVal = proxy;
			}
			else if (retVal == null && returnType != Void.TYPE && returnType.isPrimitive()) {
				throw new AopInvocationException(
						"Null return value from advice does not match primitive return type for: " + method);
			}
			return retVal;
		}
		finally {
			if (target != null && !targetSource.isStatic()) {
				// Must have come from TargetSource.
				targetSource.releaseTarget(target);
			}
			if (setProxyContext) {
				// Restore old proxy.
				AopContext.setCurrentProxy(oldProxy);
			}
		}
	}
上面我们有两个方法需要注意:
List chain = this.advised.getInterceptorsAndDynamicInterceptionAdvice(method, targetClass);。这一句将 获取当前方法的拦截链路,其中包括将AspectJMethodBeforeAdvice、AspectJAfterAdvice、AspectJAfterReturningAdvice转换成 拦截器,用于后面的调用。

retVal = invocation.proceed();: 对增强方法的调用
1.2.1. this.advised.getInterceptorsAndDynamicInterceptionAdvice(method, targetClass);
在中篇中我们讲了在InstantiationModelAwarePointcutAdvisorImpl中,Spring根据Aspect系列注解的不同将方法封装成了不同的Advice :AspectJAroundAdvice、AspectJMethodBeforeAdvice、AspectJAfterAdvice、AspectJAfterReturningAdvice、AspectJAfterThrowingAdvice。
在invocation.proceed()的分析中我们会发现最终调用的增强方法为MethodInterceptor#invoke方法(这个就是2.2.2 的部分)。但是在上述五个Advice 中,只有AspectJAroundAdvice和AspectJAfterAdvice实现了MethodInterceptor接口,其余的并没有实现MethodInterceptor接口,那么这时候就需要进行一个转换,将 Advice转换成MethodInterceptor类型,该转换就是在此方法中完成。
由于this.advised.getInterceptorsAndDynamicInterceptionAdvice(method, targetClass);方法最终会调用DefaultAdvisorChainFactory#getInterceptorsAndDynamicInterceptionAdvice,所以我们这里直接看该方法
	public List<Object> getInterceptorsAndDynamicInterceptionAdvice(
			Advised config, Method method, @Nullable Class<?> targetClass) {

		// This is somewhat tricky... We have to process introductions first,
		// but we need to preserve order in the ultimate list.
		AdvisorAdapterRegistry registry = GlobalAdvisorAdapterRegistry.getInstance();
		Advisor[] advisors = config.getAdvisors();
		List<Object> interceptorList = new ArrayList<>(advisors.length);
		Class<?> actualClass = (targetClass != null ? targetClass : method.getDeclaringClass());
		Boolean hasIntroductions = null;

		for (Advisor advisor : advisors) {
			// 我们这里的Advisor 都是 PointcutAdvisor 所以这里只分析该内容
			if (advisor instanceof PointcutAdvisor) {
				// Add it conditionally.
				PointcutAdvisor pointcutAdvisor = (PointcutAdvisor) advisor;

				if (config.isPreFiltered() || pointcutAdvisor.getPointcut().getClassFilter().matches(actualClass)) {
					MethodMatcher mm = pointcutAdvisor.getPointcut().getMethodMatcher();
					boolean match;
					if (mm instanceof IntroductionAwareMethodMatcher) {
						if (hasIntroductions == null) {
							hasIntroductions = hasMatchingIntroductions(advisors, actualClass);
						}
						match = ((IntroductionAwareMethodMatcher) mm).matches(method, actualClass, hasIntroductions);
					}
					else {
						match = mm.matches(method, actualClass);
					}
					//如果代理规则与当前类匹配
					if (match) {
						// 进行转化注册
						MethodInterceptor[] interceptors = registry.getInterceptors(advisor);
						if (mm.isRuntime()) {
							// Creating a new object instance in the getInterceptors() method
							// isn't a problem as we normally cache created chains.
							for (MethodInterceptor interceptor : interceptors) {
								// 封装成 InterceptorAndDynamicMethodMatcher
								interceptorList.add(new InterceptorAndDynamicMethodMatcher(interceptor, mm));
							}
						}
						else {
							interceptorList.addAll(Arrays.asList(interceptors));
						}
					}
				}
			}
			else if (advisor instanceof IntroductionAdvisor) {
				IntroductionAdvisor ia = (IntroductionAdvisor) advisor;
				if (config.isPreFiltered() || ia.getClassFilter().matches(actualClass)) {
					Interceptor[] interceptors = registry.getInterceptors(advisor);
					interceptorList.addAll(Arrays.asList(interceptors));
				}
			}
			else {
				Interceptor[] interceptors = registry.getInterceptors(advisor);
				interceptorList.addAll(Arrays.asList(interceptors));
			}
		}
		// 返回最终的拦截器集合
		return interceptorList;
	}
我们可以看到关键的代码就是registry.getInterceptors(advisor);,所以我们这里来看 DefaultAdvisorAdapterRegistry#getInterceptors 的实现,其目的是将所有的Advisor中的Advice 转换成MethodInterceptor
	@Override
	public MethodInterceptor[] getInterceptors(Advisor advisor) throws UnknownAdviceTypeException {
		List<MethodInterceptor> interceptors = new ArrayList<>(3);
		Advice advice = advisor.getAdvice();
		// 如果 Advice 就是MethodInterceptor 类型,则直接保存
		if (advice instanceof MethodInterceptor) {
			interceptors.add((MethodInterceptor) advice);
		}
		// 否则寻找合适的适配器进行转换。
		// 这里的适配器有三个,分别是`AfterReturningAdviceAdapter`、`MethodBeforeAdviceAdapter`、`ThrowsAdviceAdapter`
		for (AdvisorAdapter adapter : this.adapters) {
			if (adapter.supportsAdvice(advice)) {
				interceptors.add(adapter.getInterceptor(advisor));
			}
		}
		if (interceptors.isEmpty()) {
			throw new UnknownAdviceTypeException(advisor.getAdvice());
		}
		return interceptors.toArray(new MethodInterceptor[0]);
	}
这里的适配器有三个,分别是AfterReturningAdviceAdapter、MethodBeforeAdviceAdapter、ThrowsAdviceAdapter。很明显就是为了上面的三个Advice类型准备的。经历过此步骤,所有的Advice 都转换为了MethodInterceptor。
我们这里挑选其中一个ThrowsAdviceAdapter看:
class ThrowsAdviceAdapter implements AdvisorAdapter, Serializable {

	@Override
	public boolean supportsAdvice(Advice advice) {
		return (advice instanceof ThrowsAdvice);
	}

	@Override
	public MethodInterceptor getInterceptor(Advisor advisor) {
		return new ThrowsAdviceInterceptor(advisor.getAdvice());
	}

}
逻辑很简答,就是将ThrowsAdvice封装成了ThrowsAdviceInterceptor。
其他两个以此类推。
1.2.2. retVal = invocation.proceed();
我们来看看ReflectiveMethodInvocation#proceed的实现,上面说过增强方法的调用实际上是在此完成的。
	public Object proceed() throws Throwable {
		// We start with an index of -1 and increment early.
		// 如果所有的增强器已经执行完了,则调用实际方法
		// interceptorsAndDynamicMethodMatchers 是在2.2.1 中解析出来的动态拦截器集合
		if (this.currentInterceptorIndex == this.interceptorsAndDynamicMethodMatchers.size() - 1) {
			// 这里调用了真正的方法  通过Method.invoke 方法
			return invokeJoinpoint();
		}
		// 获取下一个要调用的增强拦截器
		Object interceptorOrInterceptionAdvice =
				this.interceptorsAndDynamicMethodMatchers.get(++this.currentInterceptorIndex);
		if (interceptorOrInterceptionAdvice instanceof InterceptorAndDynamicMethodMatcher) {
			// Evaluate dynamic method matcher here: static part will already have
			// been evaluated and found to match.
			// 动态匹配
			InterceptorAndDynamicMethodMatcher dm =
					(InterceptorAndDynamicMethodMatcher) interceptorOrInterceptionAdvice;
			Class<?> targetClass = (this.targetClass != null ? this.targetClass : this.method.getDeclaringClass());
			// 如果当前增强匹配当前的方法,则调用增强
			if (dm.methodMatcher.matches(this.method, targetClass, this.arguments)) {
				// 调用 拦截器的 invoke 方法
				return dm.interceptor.invoke(this);
			}
			else {
				// Dynamic matching failed.
				// Skip this interceptor and invoke the next in the chain.
				// 不匹配则不执行拦截器,递归调用,遍历下一个拦截器
				return proceed();
			}
		}
		else {
			// It's an interceptor, so we just invoke it: The pointcut will have
			// been evaluated statically before this object was constructed.
			// 普通的拦截器,直接调用拦截器。我们一般都走这里
			// 将this 作为参数传递以保证当前实力中的调用链路的执行
			// 直接调用 Advice 的 invoke 方法
			return ((MethodInterceptor) interceptorOrInterceptionAdvice).invoke(this);
		}
	}
在ReflectiveMethodInvocation#process方法中的逻辑并不复杂。ReflectiveMethodInvocation中的主要职责是维护了链接调用的计数器,记录着当前调用链接的位置,以便链可以有序的进行下去,在这个方法中并没有维护各种增强的顺序,而是将此工作委托给了各个增强器,使各个增强器在内部进行逻辑实现。
1.3 总结
在JdkDynamicAopProxy#invoke方法中:
- 首先处理
equals和hashcode等方法。 - 随后调用
this.advised.getInterceptorsAndDynamicInterceptionAdvice(method, targetClass);方法将获取到拦截器。
-
因为Jdk动态代理在调用增强方法时,是通过
MethodInterceptor#invoke方法来调用,但对于AspectJAroundAdvice、AspectJMethodBeforeAdvice、AspectJAfterAdvice、AspectJAfterReturningAdvice、AspectJAfterThrowingAdvice来说,只有AspectJAroundAdvice和AspectJAfterAdvice实现了MethodInterceptor接口,其余的并没有实现MethodInterceptor接口。所以在registry.getInterceptors(advisor)中,将Advisor中的Advice都封装成MethodInterceptor,以便后面方法增强调用。 -
随后
MethodInterceptor封装成InterceptorAndDynamicMethodMatcher,其实就是一个简单的封装,以便后面处理。
关于InterceptorAndDynamicMethodMatcher的实现如下 ,可以看到其逻辑很简单:
class InterceptorAndDynamicMethodMatcher {
	// MethodInterceptor  方法拦截器,这里保存了针对于该方法的增强实现
	final MethodInterceptor interceptor;
	// 方法匹配器,用来匹配当前拦截器是否适用于当前方法
	final MethodMatcher methodMatcher;

	public InterceptorAndDynamicMethodMatcher(MethodInterceptor interceptor, MethodMatcher methodMatcher) {
		this.interceptor = interceptor;
		this.methodMatcher = methodMatcher;
	}

}
- 至此,
@Aspect系列注解修饰的方法从Advisor转换成了InterceptorAndDynamicMethodMatcher。
- 在调用
invocation.proceed();方法时,针对InterceptorAndDynamicMethodMatcher类型,会通过InterceptorAndDynamicMethodMatcher#methodMatcher判断是否适用于当前方法,如果适用则调用InterceptorAndDynamicMethodMatcher#interceptor的invoke方法来执行增强方法。
2. ObjenesisCglibAopProxy
2.1 ObjenesisCglibAopProxy#getProxy
	@Override
	public Object getProxy(@Nullable ClassLoader classLoader) {
		try {
			Class<?> rootClass = this.advised.getTargetClass();
			Assert.state(rootClass != null, "Target class must be available for creating a CGLIB proxy");

			Class<?> proxySuperClass = rootClass;
			// 如果当前类名中包含 “$$” 则被认定为是 cglib 类。
			if (rootClass.getName().contains(ClassUtils.CGLIB_CLASS_SEPARATOR)) {
				proxySuperClass = rootClass.getSuperclass();
				Class<?>[] additionalInterfaces = rootClass.getInterfaces();
				for (Class<?> additionalInterface : additionalInterfaces) {
					this.advised.addInterface(additionalInterface);
				}
			}

			// Validate the class, writing log messages as necessary.
			// 校验方法的合法性,但仅仅打印了日志
			validateClassIfNecessary(proxySuperClass, classLoader);

			// Configure CGLIB Enhancer...
			// 配置 Enhancer
			Enhancer enhancer = createEnhancer();
			if (classLoader != null) {
				enhancer.setClassLoader(classLoader);
				if (classLoader instanceof SmartClassLoader &&
						((SmartClassLoader) classLoader).isClassReloadable(proxySuperClass)) {
					enhancer.setUseCache(false);
				}
			}
			enhancer.setSuperclass(proxySuperClass);
			enhancer.setInterfaces(AopProxyUtils.completeProxiedInterfaces(this.advised));
			enhancer.setNamingPolicy(SpringNamingPolicy.INSTANCE);
			enhancer.setStrategy(new ClassLoaderAwareGeneratorStrategy(classLoader));
			// 获取代理的回调方法
			Callback[] callbacks = getCallbacks(rootClass);
			Class<?>[] types = new Class<?>[callbacks.length];
			for (int x = 0; x < types.length; x++) {
				types[x] = callbacks[x].getClass();
			}
			// fixedInterceptorMap only populated at this point, after getCallbacks call above
			enhancer.setCallbackFilter(new ProxyCallbackFilter(
					this.advised.getConfigurationOnlyCopy(), this.fixedInterceptorMap, this.fixedInterceptorOffset));
			enhancer.setCallbackTypes(types);

			// Generate the proxy class and create a proxy instance.
			// 创建代理对象
			return createProxyClassAndInstance(enhancer, callbacks);
		}
		catch (CodeGenerationException | IllegalArgumentException ex) {
			throw new AopConfigException("Could not generate CGLIB subclass of " + this.advised.getTargetClass() +
					": Common causes of this problem include using a final class or a non-visible class",
					ex);
		}
		catch (Throwable ex) {
			// TargetSource.getTarget() failed
			throw new AopConfigException("Unexpected AOP exception", ex);
		}
	}

....
	// 上面可以很明显知道,CallBack是代理增强的关键实现。
	private Callback[] getCallbacks(Class<?> rootClass) throws Exception {
		// Parameters used for optimization choices...
		// 是否暴露代理类
		boolean exposeProxy = this.advised.isExposeProxy();
		// 是否被冻结
		boolean isFrozen = this.advised.isFrozen();
		// 是否静态
		boolean isStatic = this.advised.getTargetSource().isStatic();

		// Choose an "aop" interceptor (used for AOP calls).
		// 创建 Aop 拦截器
		Callback aopInterceptor = new DynamicAdvisedInterceptor(this.advised);

		// Choose a "straight to target" interceptor. (used for calls that are
		// unadvised but can return this). May be required to expose the proxy.
		Callback targetInterceptor;
		// 根据是否包括和 师傅静态,来生成不同的拦截器
		if (exposeProxy) {
			targetInterceptor = (isStatic ?
					new StaticUnadvisedExposedInterceptor(this.advised.getTargetSource().getTarget()) :
					new DynamicUnadvisedExposedInterceptor(this.advised.getTargetSource()));
		}
		else {
			targetInterceptor = (isStatic ?
					new StaticUnadvisedInterceptor(this.advised.getTargetSource().getTarget()) :
					new DynamicUnadvisedInterceptor(this.advised.getTargetSource()));
		}

		// Choose a "direct to target" dispatcher (used for
		// unadvised calls to static targets that cannot return this).
		Callback targetDispatcher = (isStatic ?
				new StaticDispatcher(this.advised.getTargetSource().getTarget()) : new SerializableNoOp());
		// 回调集合。其中包含aopInterceptor 中包含了 Aspect 的增强
		//  advisedDispatcher 用于判断如果method是Advised.class声明的,则使用AdvisedDispatcher进行分发
		Callback[] mainCallbacks = new Callback[] {
				aopInterceptor,  // for normal advice
				targetInterceptor,  // invoke target without considering advice, if optimized
				new SerializableNoOp(),  // no override for methods mapped to this
				targetDispatcher, this.advisedDispatcher,
				new EqualsInterceptor(this.advised),
				new HashCodeInterceptor(this.advised)
		};

		Callback[] callbacks;

		// If the target is a static one and the advice chain is frozen,
		// then we can make some optimizations by sending the AOP calls
		// direct to the target using the fixed chain for that method.
		if (isStatic && isFrozen) {
			Method[] methods = rootClass.getMethods();
			Callback[] fixedCallbacks = new Callback[methods.length];
			this.fixedInterceptorMap = new HashMap<>(methods.length);

			// TODO: small memory optimization here (can skip creation for methods with no advice)
			for (int x = 0; x < methods.length; x++) {
				Method method = methods[x];
				List<Object> chain = this.advised.getInterceptorsAndDynamicInterceptionAdvice(method, rootClass);
				fixedCallbacks[x] = new FixedChainStaticTargetInterceptor(
						chain, this.advised.getTargetSource().getTarget(), this.advised.getTargetClass());
				this.fixedInterceptorMap.put(method, x);
			}

			// Now copy both the callbacks from mainCallbacks
			// and fixedCallbacks into the callbacks array.
			callbacks = new Callback[mainCallbacks.length + fixedCallbacks.length];
			System.arraycopy(mainCallbacks, 0, callbacks, 0, mainCallbacks.length);
			System.arraycopy(fixedCallbacks, 0, callbacks, mainCallbacks.length, fixedCallbacks.length);
			this.fixedInterceptorOffset = mainCallbacks.length;
		}
		else {
			callbacks = mainCallbacks;
		}
		return callbacks;
	}
以上:内容部分参考
《Spring实战》
《Spring源码深度解析》
如有侵扰,联系删除。 内容仅用于自我记录学习使用。如有错误,欢迎指正

![[附源码]Node.js计算机毕业设计大学生健康系统Express](https://img-blog.csdnimg.cn/853811809f5849c287f8532983d0f29c.png)

