1、注册https://issues.sonatype.org/账号
下面就代表注册好了,同时提交的工单也通过了
2、这里主要是goupId 需要进行认证,需要到域名注册商近一个txt的解析,以便确保这个是你的
通过下面来验证你的域名信息,这里主要是上面的工单号码要包括进去,我这里是一个链接地址作为text的返回

3、GPG签名
如果你没有设置过GPG签名,需要设置。
首先下载GPG工具
www.gnupg.org/download/
下载需要钱,没钱就付0元也可以下载,简单就下载win这个文件

下载运行后出现

遇到这种情况,就用命令行吧。
选择其中一个即可
执行一下脚本
gpg --generate-key
生成之后会填写一些个人信息
中间会填写一个passphrase,这个要记住。

通过下面的命令行,可以校验公钥的字符串发往与接收服务器是否成功。
发送
gpg --keyserver keyserver.ubuntu.com --send-keys FF490DBFEC050B856BB998716292A0B996ACB000
接收
gpg --keyserver keyserver.ubuntu.com --recv-keys FF490DBFEC050B856BB998716292A0B996ACB000

4、根据上面信息修改settings.xml和pom.xml文件,具体见附件
5、上传发布
mvn clean install deploy -P release 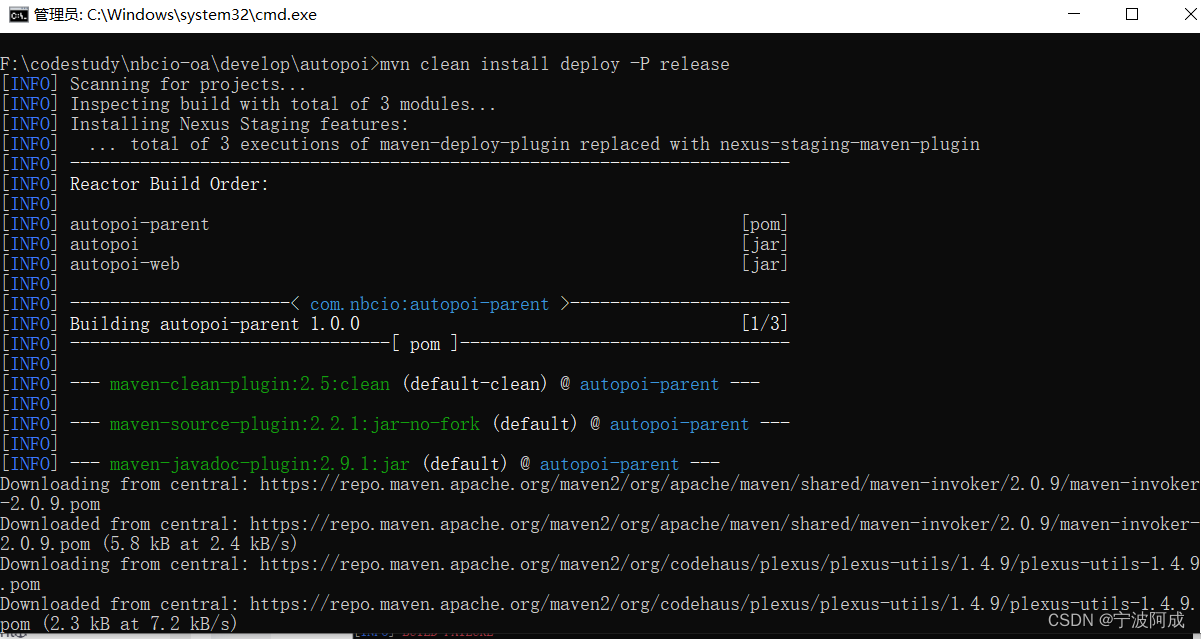
出现下面错误

原来是忘记mvn目录下的setting.xml忘记覆盖了,之后就出现下面发布正常了。

6、用之前的账号密码登录下面地址查看发布情况
Nexus Repository Manager
不过上面好像没有搜到
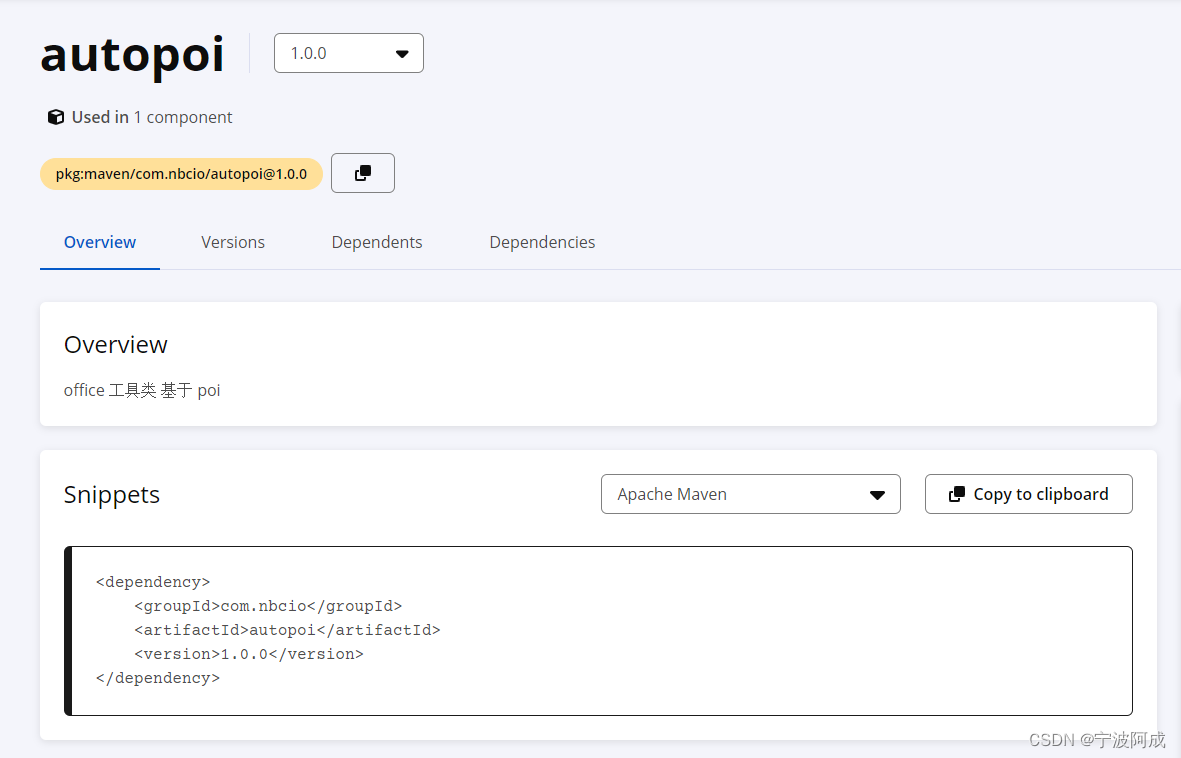
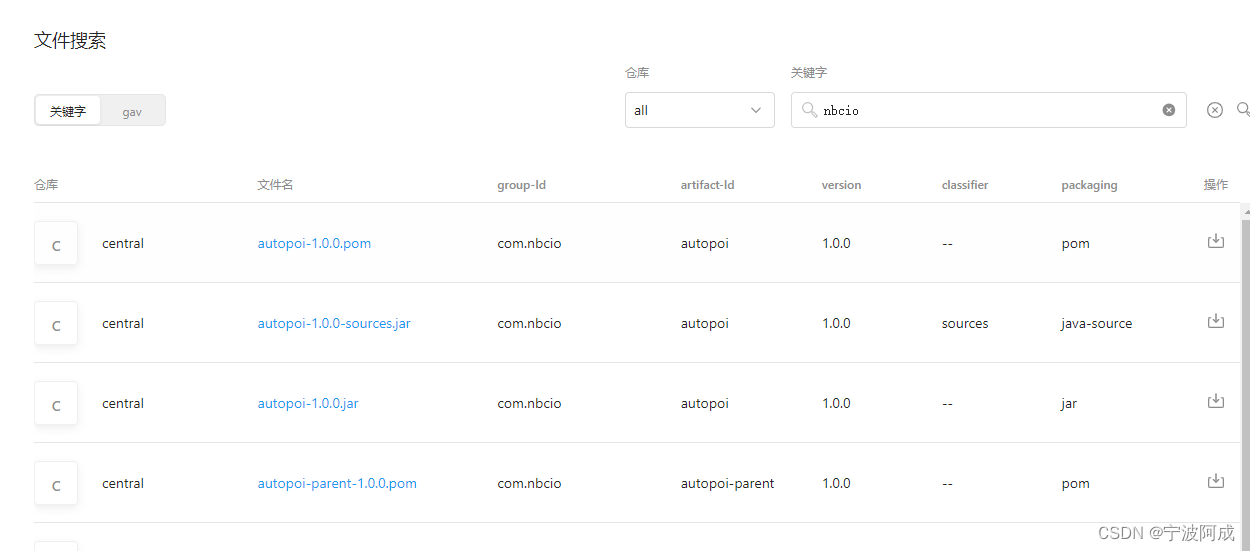
7、就可以到中央仓库中搜索到自己发布的构件了!
中央仓库搜索网站:http://search.maven.org/,可以收到了发的jar包了。
国内可以在下面阿里的仓库上搜索
仓库服务
附上:settings.xml文件
<servers>
    <server>
      <id>ossrh</id>
      <username>sonatype账号</username>
      <password>sonatype密码</password>
    </server>
  </servers>

  <profiles>
	<profile>
      <id>ossrh</id>
        <properties>
          <gpg.executable>gpg</gpg.executable>
          <gpg.passphrase>自己passphrase密码</gpg.passphrase>
        </properties>
    </profile>
  </profiles>
pom.xml文件
<project xmlns="http://maven.apache.org/POM/4.0.0"
	xmlns:xsi="http://www.w3.org/2001/XMLSchema-instance"
	xsi:schemaLocation="http://maven.apache.org/POM/4.0.0 http://maven.apache.org/xsd/maven-4.0.0.xsd">
	<modelVersion>4.0.0</modelVersion>
	<groupId>com.nbcio</groupId>
	<artifactId>autopoi-parent</artifactId>

	<version>1.0.0</version>
	<packaging>pom</packaging>

	<name>autopoi-parent</name>
	<url>http://www.nbcio.com</url>

	<modules>
		<module>autopoi</module>
		<module>autopoi-web</module>
	</modules>

	<description> office 工具类 基于 poi</description>
	<licenses>
		<license>
			<name>The Apache License, Version 2.0</name>
			<url>http://www.apache.org/licenses/LICENSE-2.0.txt</url>
		</license>
	</licenses>

	<scm>
		<connection>scm:git:https://gitee.com/nbacheng/autopoi.git</connection>
		<developerConnection>scm:git:https://gitee.com/nbacheng/autopoi.git</developerConnection>
		<url>https://gitee.com/nbacheng/autopoi</url>
	</scm>
	<developers>
		<developer>
			<name>nbacheng</name>
			<email>498871963@qq.com</email>
		</developer>
	</developers>

	<properties>
		<autopoi.version>1.0.0</autopoi.version>
		<poi.version>5.0.0</poi.version>
		<xerces.version>2.9.1</xerces.version>
		<guava.version>29.0-jre</guava.version>
		<commons-lang.version>3.10</commons-lang.version>
		<slf4j.version>1.7.30</slf4j.version>
		<spring.version>5.1.0.RELEASE</spring.version>
	</properties>
	<dependencyManagement>
		<dependencies>
			<!-- poi -->
			<dependency>
				<groupId>org.apache.poi</groupId>
				<artifactId>poi</artifactId>
				<version>${poi.version}</version>
			</dependency>
			<dependency>
				<groupId>org.apache.poi</groupId>
				<artifactId>poi-ooxml</artifactId>
				<version>${poi.version}</version>
			</dependency>
			<dependency>
				<groupId>org.apache.poi</groupId>
				<artifactId>poi-ooxml-full</artifactId>
				<version>${poi.version}</version>
			</dependency>
			<!-- sax 读取时候用到的 -->
			<dependency>
				<groupId>xerces</groupId>
				<artifactId>xercesImpl</artifactId>
				<version>${xerces.version}</version>
				<optional>true</optional>
			</dependency>
			<dependency>
				<groupId>org.apache.poi</groupId>
				<artifactId>poi-scratchpad</artifactId>
				<version>${poi.version}</version>
			</dependency>

			<!-- excel背景
			<dependency>
				<groupId>org.apache.poi</groupId>
				<artifactId>ooxml-schemas</artifactId>
				<version>1.4</version>
			</dependency>-->

			<!-- google 工具类 -->
			<dependency>
				<groupId>com.google.guava</groupId>
				<artifactId>guava</artifactId>
				<version>${guava.version}</version>
			</dependency>

			<dependency>
				<groupId>org.apache.commons</groupId>
				<artifactId>commons-lang3</artifactId>
				<version>${commons-lang.version}</version>
			</dependency>

			<!--日志 -->
			<!-- slf4j -->
			<dependency>
				<groupId>org.slf4j</groupId>
				<artifactId>slf4j-api</artifactId>
				<version>${slf4j.version}</version>
			</dependency>
			<dependency>
				<groupId>org.slf4j</groupId>
				<artifactId>slf4j-log4j12</artifactId>
				<version>${slf4j.version}</version>
				<scope>provided</scope>
			</dependency>

			<!--spring-web -->
			<dependency>
				<groupId>org.springframework</groupId>
				<artifactId>spring-webmvc</artifactId>
				<version>${spring.version}</version>
				<optional>true</optional>
			</dependency>
			<!--servlet -->
			<dependency>
				<groupId>javax.servlet</groupId>
				<artifactId>servlet-api</artifactId>
				<version>2.5</version>
				<scope>provided</scope>
				<optional>true</optional>
			</dependency>

			<!-- 模块版本 -->
			<dependency>
				<groupId>org.jeecgframework</groupId>
				<artifactId>autopoi</artifactId>
				<version>${autopoi.version}</version>
			</dependency>
		</dependencies>
	</dependencyManagement>

	<profiles>
		<profile>
			<id>release</id>
			<build>
				<plugins>
					<plugin>
						<artifactId>maven-compiler-plugin</artifactId>
						<configuration>
							<source>1.8</source>
							<target>1.8</target>
							<encoding>UTF-8</encoding>
						</configuration>
					</plugin>
					<!-- Source -->
					<plugin>
						<groupId>org.apache.maven.plugins</groupId>
						<artifactId>maven-source-plugin</artifactId>
						<version>2.2.1</version>
						<executions>
							<execution>
								<phase>package</phase>
								<goals>
									<goal>jar-no-fork</goal>
								</goals>
							</execution>
						</executions>
					</plugin>
					<!-- Javadoc -->
					<plugin>
						<groupId>org.apache.maven.plugins</groupId>
						<artifactId>maven-javadoc-plugin</artifactId>
						<version>2.9.1</version>
						<executions>
							<execution>
								<phase>package</phase>
								<goals>
									<goal>jar</goal>
								</goals>
								<configuration>
									<encoding>UTF-8</encoding>
									<additionalparam>-Xdoclint:none</additionalparam>
								</configuration>
							</execution>
						</executions>
					</plugin>
					<!--Maven GPG插件用于使用以下配置对组件进行签名-->
					<plugin>
						<groupId>org.apache.maven.plugins</groupId>
						<artifactId>maven-gpg-plugin</artifactId>
						<version>1.6</version>
						<executions>
							<execution>
								<id>sign-artifacts</id>
								<phase>verify</phase>
								<goals>
									<goal>sign</goal>
								</goals>
							</execution>
						</executions>
					</plugin>
					<!--Nexus Staging Maven插件是将组件部署到OSS并将其发布到Central Repository的推荐方法-->
					<plugin>
						<groupId>org.sonatype.plugins</groupId>
						<artifactId>nexus-staging-maven-plugin</artifactId>
						<version>1.6.7</version>
						<extensions>true</extensions>
						<configuration>
							<serverId>ossrh</serverId>
							<nexusUrl>https://s01.oss.sonatype.org/</nexusUrl>
							<autoReleaseAfterClose>true</autoReleaseAfterClose>
						</configuration>
					</plugin>
				</plugins>
			</build>
		</profile>
	</profiles>

	<distributionManagement>
		<snapshotRepository>
			<id>ossrh</id>
			<url>
				https://s01.oss.sonatype.org/content/repositories/snapshots/</url>
		</snapshotRepository>
		<repository>
			<id>ossrh</id>
			<url>
				https://s01.oss.sonatype.org/service/local/staging/deploy/maven2/</url>
		</repository>
	</distributionManagement>

	<build>
		<plugins>
			<plugin>
				<artifactId>maven-compiler-plugin</artifactId>
				<version>3.8.1</version>
				<configuration>
					<source>1.8</source>
					<target>1.8</target>
					<encoding>UTF-8</encoding>
				</configuration>
			</plugin>
			<plugin>
				<groupId>org.apache.maven.plugins</groupId>
				<artifactId>maven-surefire-plugin</artifactId>
				<version>3.0.0-M5</version>
				<configuration>
					<skipTests>true</skipTests>
				</configuration>
			</plugin>
		</plugins>
	</build>

</project>
下面是官方提供的帮助资料
Distribution Management and Authentication⚓︎
In order to configure Maven to deploy to the OSSRH Nexus Repository Manager with the Nexus Staging Maven plugin you have to configure it like this
Note: As of February 2021, all new projects began being provisioned on Nexus Repository Manager. If your project is not provisioned on Nexus Repository Manager, you will want to login to the legacy host Nexus Repository Manager.
<distributionManagement>
  <snapshotRepository>
    <id>ossrh</id>
    <url>https://s01.oss.sonatype.org/content/repositories/snapshots</url>
  </snapshotRepository>
</distributionManagement>
<build>
  <plugins>
    <plugin>
      <groupId>org.sonatype.plugins</groupId>
      <artifactId>nexus-staging-maven-plugin</artifactId>
      <version>1.6.7</version>
      <extensions>true</extensions>
      <configuration>
        <serverId>ossrh</serverId>
        <nexusUrl>https://s01.oss.sonatype.org/</nexusUrl>
        <autoReleaseAfterClose>true</autoReleaseAfterClose>
      </configuration>
    </plugin>
    ...
  </plugins>
</build>
Since OSSRH is always running the latest available version of Sonatype Nexus Repository Manager, it is best to use the latest version of the Nexus Staging Maven plugin.
Alternatively if you are using the Maven deploy plugin, which is the default behavior, you need to add a full distributionManagement section.
<distributionManagement>
  <snapshotRepository>
    <id>ossrh</id>
    <url>https://s01.oss.sonatype.org/content/repositories/snapshots</url>
  </snapshotRepository>
  <repository>
    <id>ossrh</id>
    <url>https://s01.oss.sonatype.org/service/local/staging/deploy/maven2/</url>
  </repository>
</distributionManagement>
The above configurations will get the user account details to deploy to OSSRH from your Maven settings.xml file, usually placed in ~/.m2. A minimal settings with the authentication is:
<settings>
  <servers>
    <server>
      <id>ossrh</id>
      <username>your-jira-id</username>
      <password>your-jira-pwd</password>
    </server>
  </servers>
</settings>
Note how the id element in the server element in settings.xml is identical to the id elements in the snapshotRepository and repository element as well as the serverId configuration of the Nexus Staging Maven plugin
Javadoc and Sources Attachments⚓︎
To get Javadoc and Source jar files generated, you have to configure the Javadoc and source Maven plugins.
<build>
  <plugins>
    <plugin>
      <groupId>org.apache.maven.plugins</groupId>
      <artifactId>maven-source-plugin</artifactId>
      <version>2.2.1</version>
      <executions>
        <execution>
          <id>attach-sources</id>
          <goals>
            <goal>jar-no-fork</goal>
          </goals>
        </execution>
      </executions>
    </plugin>
    <plugin>
      <groupId>org.apache.maven.plugins</groupId>
      <artifactId>maven-javadoc-plugin</artifactId>
      <version>2.9.1</version>
      <executions>
        <execution>
          <id>attach-javadocs</id>
          <goals>
            <goal>jar</goal>
          </goals>
        </execution>
      </executions>
    </plugin>
  </plugins>
</build>
GPG Signed Components⚓︎
The Maven GPG plugin is used to sign the components with the following configuration.
<build>
  <plugins>
    <plugin>
      <groupId>org.apache.maven.plugins</groupId>
      <artifactId>maven-gpg-plugin</artifactId>
      <version>1.5</version>
      <executions>
        <execution>
          <id>sign-artifacts</id>
          <phase>verify</phase>
          <goals>
            <goal>sign</goal>
          </goals>
        </execution>
      </executions>
    </plugin>
  </plugins>
</build>
It relies on the gpg command being installed and the GPG credentials being available e.g. from settings.xml. In addition you can configure the gpg command in case it is different from gpg. This is a common scenario on some operating systems.
<settings>
  <profiles>
    <profile>
      <id>ossrh</id>
      <activation>
        <activeByDefault>true</activeByDefault>
      </activation>
      <properties>
        <gpg.executable>gpg2</gpg.executable>
        <gpg.passphrase>the_pass_phrase</gpg.passphrase>
      </properties>
    </profile>
  </profiles>
</settings>
In case you have multiple keys, the local gpg will use the first listed signature key (gpg --list-signatures), if you need to use a specific key you could add the details of the gpg key inside a <configuration> section and use local settings.xml to discover the passphrase via the signature keyname.
<build>
  <plugins>
    <plugin>
      <groupId>org.apache.maven.plugins</groupId>
      <artifactId>maven-gpg-plugin</artifactId>
      <version>1.5</version>
      <executions>
        <execution>
          <id>sign-artifacts</id>
          <phase>verify</phase>
          <goals>
            <goal>sign</goal>
          </goals>
          <configuration>
            <keyname>${gpg.keyname}</keyname>
            <passphraseServerId>${gpg.keyname}</passphraseServerId>
          </configuration>
        </execution>
      </executions>
    </plugin>
  </plugins>
</build>
Are you being prompted for a passphrase or getting a gpg: signing failed: No such file or directory error?
This may be happening to you because you are using gpg version 2.1 or later. If running gpg --version shows that you are running version 2.1 or later, you must modify the configuration of the Maven GPG plugin to add additional gpgArguments. Building on the example above:
<configuration>
  <keyname>${gpg.keyname}</keyname>
  <passphraseServerId>${gpg.keyname}</passphraseServerId>
  <gpgArguments>
    <arg>--pinentry-mode</arg>
    <arg>loopback</arg>
  </gpgArguments>
</configuration>
Hint
In the example below you may need to use the last 8 characters of the signature keyid in hexadecimal format, you can find them using this command gpg --list-signatures --keyid-format 0xshort:
$ gpg --list-signatures --keyid-format 0xshort
/home/mylocaluser/.gnupg/pubring.kbx
---------------------------------
pub   rsa3072/0x3ABDEC12 2021-01-27 [SC] [expires: 2023-01-27]
      74524542545300A398653AB5242798823ABDEC12
uid           [ultimate] Other Name <otheremail@example.com>
sig 3        0x3ABDEC12 2021-01-27  Other Name <alarconj@gmail.com>
sub   rsa3072 2021-01-27 [E] [expires: 2023-01-27]
sig          0x3ABDEC12 2021-01-27  Julian Alarcon <alarconj@gmail.com>

pub   rsa3072/0x0ABA0F98 2021-06-23 [SC] [expires: 2022-03-21]
      CA925CD6C9E8D064FF05B4728190C4130ABA0F98
uid           [ultimate] Central Repo Test <central@example.com>
sig 3        0x0ABA0F98 2021-06-24  Central Repo Test <central@example.com>
sub   rsa3072/0x7C17C93B 2021-06-23 [E] [expires: 2023-06-23]
sig          0x0ABA0F98 2021-06-23  Central Repo Test <central@example.com>
You will find in the line that starts with sig 3 that 0x3ABDEC12 is the signature short keyid in hexadecimal format that you will need to pass as ${gpg.keyname}.
If you need more help setting up and configuring GPG, please read our detailed instructions.
Nexus Staging Maven Plugin for Deployment and Release⚓︎
The Nexus Staging Maven Plugin is the recommended way to deploy your components to OSSRH and release them to the Central Repository. To configure it simply add the plugin to your Maven pom.xml.
<build>
<plugins>
...
<plugin>
  <groupId>org.sonatype.plugins</groupId>
  <artifactId>nexus-staging-maven-plugin</artifactId>
  <version>1.6.7</version>
  <extensions>true</extensions>
  <configuration>
     <serverId>ossrh</serverId>
     <nexusUrl>https://s01.oss.sonatype.org/</nexusUrl>
     <autoReleaseAfterClose>true</autoReleaseAfterClose>
  </configuration>
</plugin>
If your version is a release version (does not end in -SNAPSHOT) and with this setup in place, you can run a deployment to OSSRH and an automated release to the Central Repository with the usual:
mvn clean deploy
With the property autoReleaseAfterClose set to false you can manually inspect the staging repository in the Nexus Repository Manager and trigger a release of the staging repository later with
mvn nexus-staging:release
If you find something went wrong you can drop the staging repository with
mvn nexus-staging:drop
Please read Staging Releases in the Repository Manager 2 documentation for more information about the Nexus Staging Maven Plugin.
Deprecated oss-parent⚓︎
In the past all the plugin configuration and other setup was managed by a Maven parent POM with the latest coordinates of org.sonatype.oss:oss-parent:9. This project leaked SCM, URL and other details and its usage is discouraged. Maintenance of the project has stopped and it no longer works with latest tooling such as Maven versions or Java versions. If desired, please manage your own organization-level POM in a similar manner.
Using a Profile⚓︎
Since the generation of the javadoc and source jars as well as signing components with GPG is a fairly time consuming process, these executions are typically isolated from the normal build configuration and moved into a profile. This profile is then in turn used when a deployment is performed by activating the profile.
<profiles>
  <profile>
    <id>release</id>
    <build>
      ...
      javadoc, source and gpg plugin from above
      ...
    </build>
  </profile>
</profiles>
Performing a Snapshot Deployment⚓︎
Snapshot deployment are performed when your version ends in -SNAPSHOT . You do not need to fulfill the requirements when performing snapshot deployments and can simply run
mvn clean deploy
on your project.
SNAPSHOT versions are not synchronized to the Central Repository. If you wish your users to consume your SNAPSHOT versions, they would need to add the snapshot repository to their Nexus Repository Manager, settings.xml, or pom.xml. Successfully deployed SNAPSHOT versions will be found in Index of /repositories/snapshots
Performing a Release Deployment⚓︎
In order to perform a release deployment you have to edit your version in all your POM files to use release versions. This means that they can not end in -SNAPSHOT In addition plugin and dependency declarations can also not use snapshot versions. This ensures that you only depend on other released components. Ideally they are all available in the Central Repository. This ensures that your users can retrieve your components as well as your transitive dependencies from the Central Repository.
The change of the versions for your project, and the parent references in a multi module setup, can be performed manually or with the help of the Maven versions plugin.
mvn versions:set -DnewVersion=1.2.3
Once you have updated all the versions and ensured that your build passes without deployment you can perform the deployment with the usage of the release profile with
mvn clean deploy -P release
This process is completely independent from your workflow with your SCM system. If you want to ensure that a specific version in the Central Repository corresponds to a specific revisions in your SCM system, which is a good practice, you can either perform the commits manually in a flow similar to
- Develop, develop, develop
- Commit any outstanding changes
- Verify build passes
- Update versions to release version
- Commit release version
- Run deployment
- Update versions to next snapshot version
- Commit new snapshot version
- Develop, develop, develop and rinse and repeat
or you can automate it with a script of your choice including a configuration running on a CI server or you can use the Maven release plugin, documented in the following.
Performing a Release Deployment with the Maven Release Plugin⚓︎
The Maven Release Plugin can be used to automate the changes to the Maven POM files, sanity checks, the SCM operations required and the actual deployment execution.
The configuration for the Maven release plugin should include disabling the release profile that is part of the Maven Super POM, since we are using our own profile, and specify the deploy goal together with the activation of our release profile
<plugin>
  <groupId>org.apache.maven.plugins</groupId>
  <artifactId>maven-release-plugin</artifactId>
  <version>2.5.3</version>
  <configuration>
    <autoVersionSubmodules>true</autoVersionSubmodules>
    <useReleaseProfile>false</useReleaseProfile>
    <releaseProfiles>release</releaseProfiles>
    <goals>deploy</goals>
  </configuration>
</plugin>
With the SCM connection configured correctly you can perform a release deployment to OSSRH with
mvn release:clean release:prepare
by answering the prompts for versions and tags, followed by
mvn release:perform
This execution will deploy to OSSRH and release to the Central Repository in one go, thanks to the usage of the Nexus Staging Maven Plugin with autoReleaseAfterClose set to true.
Manually Releasing the Deployment to the Central Repository⚓︎
If you are using autoReleaseAfterClose set to false you or you are using the default Maven deploy plugin, you can inspect and potentially release the deployed artifacts manually
Alternatively if you have deployed with the Nexus Staging Maven Plugin, and the deployment succeeded, you can release the repository directly on the command line. Immediately after the deployment a properties file in the target directory contains all the information required and you can simply release the staging repository with
mvn nexus-staging:release
If you have been running the deployment as part of a release done with the Maven release plugin, the deployment was done from the tag in your version control system checked out into target/checkout so you have to run the Nexus Staging plugin from there:
mvn release:perform
...
cd target/checkout
mvn nexus-staging:release
You can configure this goal to be run automatically as part of your release deployment with the release plugin by adding it as a goal execution after deploy.
<plugin>
  <groupId>org.apache.maven.plugins</groupId>
  <artifactId>maven-release-plugin</artifactId>
  <configuration>
    <goals>deploy nexus-staging:release</goals>
    ...