文章目录
- 一、Image Captioning
- 二、VQA
- 三、Feature Extraction
- 四、Image-Text Matching
一、Image Captioning
首先配置代码:
import sys
if 'google.colab' in sys.modules:
    print('Running in Colab.')
    !pip3 install transformers==4.15.0 timm==0.4.12 fairscale==0.4.4
    !git clone https://github.com/salesforce/BLIP
    %cd BLIP
这段代码用于在Google Colab环境中进行设置。代码首先检查是否在Google Colab环境中运行(‘google.colab’ in sys.modules)。如果是在Colab环境中运行,它会继续使用pip3安装特定版本的Python包。然后,它通过git clone命令克隆名为"BLIP"的GitHub代码仓库。最后,代码使用%cd命令将当前工作目录更改为"BLIP"代码仓库的目录。
这段代码的目的是在Google Colab中设置必要的环境,以便在"BLIP"代码仓库中继续执行其他相关代码。
from PIL import Image
import requests
import torch
from torchvision import transforms
from torchvision.transforms.functional import InterpolationMode

device = torch.device('cuda' if torch.cuda.is_available() else 'cpu')

def load_demo_image(image_size,device):
    img_url = 'https://storage.googleapis.com/sfr-vision-language-research/BLIP/demo.jpg'
    raw_image = Image.open(requests.get(img_url, stream=True).raw).convert('RGB')

    w,h = raw_image.size
    display(raw_image.resize((w//5,h//5)))

    transform = transforms.Compose([
        transforms.Resize((image_size,image_size),interpolation=InterpolationMode.BICUBIC),
        transforms.ToTensor(),
        transforms.Normalize((0.48145466, 0.4578275, 0.40821073), (0.26862954, 0.26130258, 0.27577711))
        ])
    image = transform(raw_image).unsqueeze(0).to(device)
    return image
这段代码用于加载演示图像并进行预处理,以便用于后续的计算机视觉任务。让我们逐行解读代码:
-
from PIL import Image: 导入PIL库中的Image模块,用于图像处理。
-
import requests: 导入requests库,用于从网络上获取图像。
-
import torch: 导入PyTorch库,用于深度学习任务。
-
from torchvision import transforms: 从torchvision库中导入transforms模块,用于图像预处理。
-
from torchvision.transforms.functional import InterpolationMode: 从torchvision.transforms.functional模块中导入InterpolationMode,用于指定图像的插值方式。
-
device = torch.device(‘cuda’ if torch.cuda.is_available() else ‘cpu’): 判断是否有可用的GPU,如果有则将device设置为cuda,否则设置为cpu。后续计算会在这个设备上执行。
-
def load_demo_image(image_size, device):: 定义了一个名为load_demo_image的函数,该函数接受图像大小image_size和计算设备device作为输入参数。
-
img_url = ‘https://storage.googleapis.com/sfr-vision-language-research/BLIP/demo.jpg’: 定义了演示图像的URL。
-
raw_image = Image.open(requests.get(img_url, stream=True).raw).convert(‘RGB’): 从给定的URL下载原始图像,并使用PIL库中的Image模块打开和转换图像格式为RGB。
-
w, h = raw_image.size: 获取原始图像的宽度和高度。
-
display(raw_image.resize((w//5, h//5))): 使用display函数显示缩小后的原始图像。
-
transform = transforms.Compose([…]): 定义一个图像预处理的变换链,包括图像大小调整、图像转换为张量、以及归一化等操作。
-
image = transform(raw_image).unsqueeze(0).to(device): 对原始图像进行预处理,并将其转换为张量。使用unsqueeze(0)将图像张量的维度从 [C, H, W] 调整为 [1, C, H, W],以匹配网络模型的输入形状。最后,将处理后的图像张量移动到之前设定的计算设备上。
-
return image: 返回预处理后的图像张量。
这段代码的作用是加载演示图像,并将其预处理成适合用于后续计算机视觉任务的张量数据。在函数调用时,您需要传入所需的图像大小和计算设备,然后可以使用返回的图像张量进行计算机视觉模型的推理和分析。
from models.blip import blip_decoder

image_size = 384
image = load_demo_image(image_size=image_size, device=device)

model_url = 'https://storage.googleapis.com/sfr-vision-language-research/BLIP/models/model_base_capfilt_large.pth'

model = blip_decoder(pretrained=model_url, image_size=image_size, vit='base')
model.eval()
model = model.to(device)

with torch.no_grad():
    # beam search
    caption = model.generate(image, sample=False, num_beams=3, max_length=20, min_length=5)
    # nucleus sampling
    # caption = model.generate(image, sample=True, top_p=0.9, max_length=20, min_length=5)
    print('caption: '+caption[0])
-
from models.blip import blip_decoder: 导入自定义的blip_decoder模型,这是"BLIP"模型的解码部分。
-
image_size = 384: 定义图像大小为384x384像素。
-
image = load_demo_image(image_size=image_size, device=device): 使用之前定义的load_demo_image函数加载演示图像,并对图像进行预处理,以适应模型的输入要求。image是经过预处理后的图像张量。
-
model_url = ‘https://storage.googleapis.com/sfr-vision-language-research/BLIP/models/model_base_capfilt_large.pth’: 定义了预训练模型的URL。
-
model = blip_decoder(pretrained=model_url, image_size=image_size, vit=‘base’): 使用blip_decoder模型的构造函数创建模型实例。此处的pretrained参数指定了预训练模型的URL,image_size参数指定了图像大小,vit参数指定了使用哪个ViT(Vision Transformer)模型,这里选择了base版本。
-
model.eval(): 将模型设置为评估模式,这会关闭一些在训练时启用的特定功能,如Dropout。
-
model = model.to(device): 将模型移动到之前设定的计算设备上。
-
with torch.no_grad():: 使用torch.no_grad()上下文管理器,以确保在推理时不会计算梯度。
-
caption = model.generate(image, sample=False, num_beams=3, max_length=20, min_length=5): 使用model.generate()方法生成图像的描述。这里使用了beam search方法来搜索最佳的描述。sample=False表示不使用采样方法,而是使用beam search。num_beams=3表示beam search时使用3个束(beam)。max_length=20表示生成的描述最长为20个词,min_length=5表示生成的描述最短为5个词。
-
print('caption: '+caption[0]): 输出生成的图像描述。
这段代码的作用是使用预训练的"BLIP"模型对加载的图像进行描述生成。它使用beam search方法在模型中进行推理,并输出生成的图像描述。您可以尝试使用不同的采样方法或调整其他参数,来观察生成描述的变化。
输出结果为:
load checkpoint from https://storage.googleapis.com/sfr-vision-language-research/BLIP/models/model*_base_caption.pth
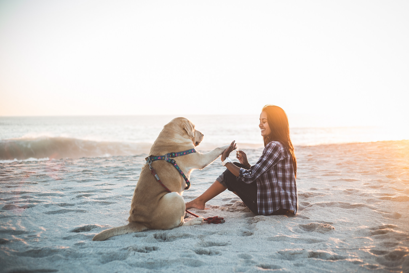
caption: a woman sitting on the beach with a dog
二、VQA
from models.blip_vqa import blip_vqa

image_size = 480
image = load_demo_image(image_size=image_size, device=device)

model_url = 'https://storage.googleapis.com/sfr-vision-language-research/BLIP/models/model_base_vqa_capfilt_large.pth'

model = blip_vqa(pretrained=model_url, image_size=image_size, vit='base')
model.eval()
model = model.to(device)

question = 'where is the woman sitting?'

with torch.no_grad():
    answer = model(image, question, train=False, inference='generate')
    print('answer: '+answer[0])
-
from models.blip_vqa import blip_vqa: 导入自定义的blip_vqa模型,这是"BLIP"模型的视觉问答部分。
-
image_size = 480: 定义图像大小为480x480像素。
-
image = load_demo_image(image_size=image_size, device=device): 使用之前定义的load_demo_image函数加载演示图像,并对图像进行预处理,以适应模型的输入要求。image是经过预处理后的图像张量。
-
model_url = ‘https://storage.googleapis.com/sfr-vision-language-research/BLIP/models/model_base_vqa_capfilt_large.pth’: 定义了视觉问答模型的预训练模型的URL。
-
model = blip_vqa(pretrained=model_url, image_size=image_size, vit=‘base’): 使用blip_vqa模型的构造函数创建模型实例。此处的pretrained参数指定了预训练模型的URL,image_size参数指定了图像大小,vit参数指定了使用哪个ViT(Vision Transformer)模型,这里选择了base版本。
-
model.eval(): 将模型设置为评估模式,这会关闭一些在训练时启用的特定功能,如Dropout。
-
model = model.to(device): 将模型移动到之前设定的计算设备上。
-
question = ‘where is the woman sitting?’: 定义了一个视觉问答问题,这里的问题是"where is the woman sitting?"。
-
with torch.no_grad():: 使用torch.no_grad()上下文管理器,以确保在推理时不会计算梯度。
-
answer = model(image, question, train=False, inference=‘generate’): 使用模型的__call__方法进行推理,输入图像和问题,以生成回答。train=False表示在推理过程中不使用训练模式。inference='generate’表示使用生成式推理方法,而不是提供答案的训练模式。
-
print('answer: '+answer[0]): 输出生成的回答。
这段代码的作用是使用预训练的"BLIP"模型进行视觉问答,根据给定的问题对加载的图像进行回答生成。它使用生成式推理方法来生成回答。您可以尝试提供不同的问题,来观察模型生成的回答。
输出结果:

load checkpoint from https://storage.googleapis.com/sfr-vision-language-research/BLIP/models/model*_vqa.pth
answer: on beach
三、Feature Extraction
from models.blip import blip_feature_extractor

image_size = 224
image = load_demo_image(image_size=image_size, device=device)

model_url = 'https://storage.googleapis.com/sfr-vision-language-research/BLIP/models/model_base.pth'

model = blip_feature_extractor(pretrained=model_url, image_size=image_size, vit='base')
model.eval()
model = model.to(device)

caption = 'a woman sitting on the beach with a dog'

multimodal_feature = model(image, caption, mode='multimodal')[0,0]
image_feature = model(image, caption, mode='image')[0,0]
text_feature = model(image, caption, mode='text')[0,0]
输出结果为:

load checkpoint from https://storage.googleapis.com/sfr-vision-language-research/BLIP/models/model_base.pth
四、Image-Text Matching
from models.blip_itm import blip_itm

image_size = 384
image = load_demo_image(image_size=image_size,device=device)

model_url = 'https://storage.googleapis.com/sfr-vision-language-research/BLIP/models/model_base_retrieval_coco.pth'

model = blip_itm(pretrained=model_url, image_size=image_size, vit='base')
model.eval()
model = model.to(device='cpu')

caption = 'a woman sitting on the beach with a dog'

print('text: %s' %caption)

itm_output = model(image,caption,match_head='itm')
itm_score = torch.nn.functional.softmax(itm_output,dim=1)[:,1]
print('The image and text is matched with a probability of %.4f'%itm_score)

itc_score = model(image,caption,match_head='itc')
print('The image feature and text feature has a cosine similarity of %.4f'%itc_score)
输出结果为:

load checkpoint from https://storage.googleapis.com/sfr-vision-language-research/BLIP/models/model_base_retrieval_coco.pth
text: a woman sitting on the beach with a dog
The image and text is matched with a probability of 0.9960
The image feature and text feature has a cosine similarity of 0.5262
![linux(进程)[6]](https://img-blog.csdnimg.cn/8041408ab06d4b28995bbcfbcab6d9c6.png)