题目
完成下面相对布局,要求:
- 中间的button在整个屏幕的中央,其他的以它为基准排列。
- Hints:利用layout_toEndof,_toRightof,_toLeftof,_toStartof完成。
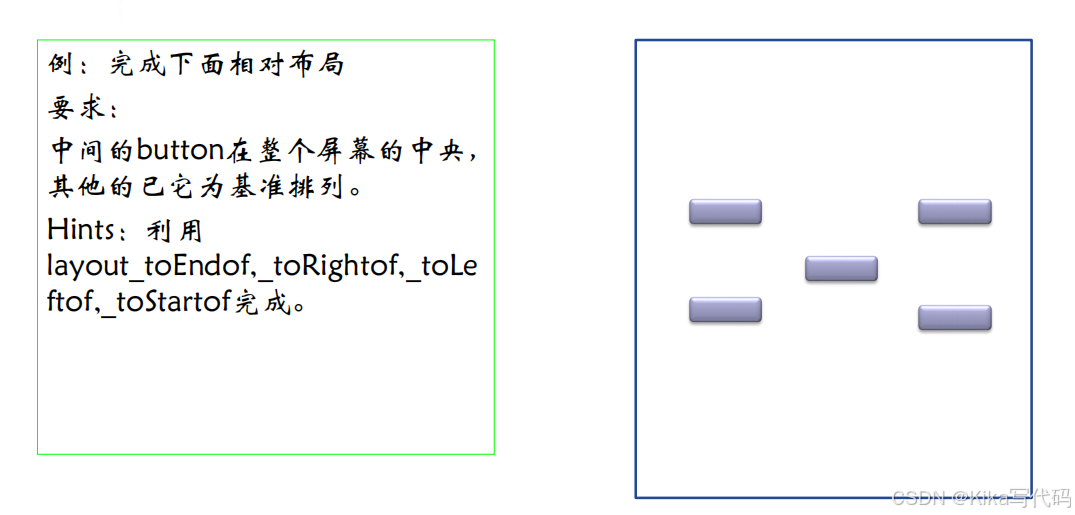
结果演示

代码实现
<?xml version="1.0" encoding="utf-8"?>
<RelativeLayout xmlns:android="http://schemas.android.com/apk/res/android"
    android:layout_width="match_parent"
    android:layout_height="match_parent">

    <!-- 中间的Button -->
    <Button
        android:id="@+id/centerButton"
        android:layout_width="wrap_content"
        android:layout_height="wrap_content"
        android:text="中心按钮"
        android:layout_centerInParent="true"/>

    <!-- 左上角的Button -->
    <Button
        android:id="@+id/topLeftButton"
        android:layout_width="wrap_content"
        android:layout_height="wrap_content"
        android:text="左上角按钮"
        android:layout_toStartOf="@id/centerButton"
        android:layout_above="@id/centerButton"
        android:layout_marginEnd="32dp"
        android:layout_marginBottom="32dp"/>

    <!-- 右上角的Button -->
    <Button
        android:id="@+id/topRightButton"
        android:layout_width="wrap_content"
        android:layout_height="wrap_content"
        android:text="右上角按钮"
        android:layout_toEndOf="@id/centerButton"
        android:layout_above="@id/centerButton"
        android:layout_marginStart="32dp"
        android:layout_marginBottom="32dp"/>

    <!-- 左下角的Button -->
    <Button
        android:id="@+id/bottomLeftButton"
        android:layout_width="wrap_content"
        android:layout_height="wrap_content"
        android:text="左下角按钮"
        android:layout_toStartOf="@id/centerButton"
        android:layout_below="@id/centerButton"
        android:layout_marginEnd="32dp"
        android:layout_marginTop="32dp"/>

    <!-- 右下角的Button -->
    <Button
        android:id="@+id/bottomRightButton"
        android:layout_width="wrap_content"
        android:layout_height="wrap_content"
        android:text="右下角按钮"
        android:layout_toEndOf="@id/centerButton"
        android:layout_below="@id/centerButton"
        android:layout_marginStart="32dp"
        android:layout_marginTop="32dp"/>
</RelativeLayout>
以下是该XML布局代码的详细解释,包括布局结构、组件定位方式以及关键属性的作用:
1. 根布局:RelativeLayout
<RelativeLayout
    android:layout_width="match_parent"
android:layout_height="match_parent">- 作用:使用相对布局(RelativeLayout)作为容器,允许子控件通过相对位置(如“在某控件上方”、“在某控件右侧”)进行定位。
- 关键属性:
android:layout_width/height="match_parent":布局占据整个屏幕。
2. 中心按钮(centerButton)
<Button
    android:id="@+id/centerButton"
    android:layout_width="wrap_content"
    android:layout_height="wrap_content"
    android:text="中心按钮"
android:layout_centerInParent="true"/>- 作用:居中显示一个按钮。
- 关键属性:
android:layout_centerInParent="true":强制按钮在父布局(RelativeLayout)的中心位置。
- 说明:此按钮作为其他按钮的参考点。
3. 左上角按钮(topLeftButton)
<Button
    android:id="@+id/topLeftButton"
    android:layout_width="wrap_content"
    android:layout_height="wrap_content"
    android:text="左上角按钮"
    android:layout_toStartOf="@id/centerButton"
    android:layout_above="@id/centerButton"
    android:layout_marginEnd="32dp"
android:layout_marginBottom="32dp"/>- 作用:定位在中心按钮的左上方,保持一定边距。
- 关键属性:
android:layout_toStartOf="@id/centerButton":按钮定位在中心按钮的左侧。android:layout_above="@id/centerButton":按钮定位在中心按钮的上方。android:layout_marginEnd="32dp":与中心按钮右侧边缘保持32dp的间距。android:layout_marginBottom="32dp":与中心按钮底部边缘保持32dp的间距。
4. 右上角按钮(topRightButton)
<Button
    android:id="@+id/topRightButton"
    android:layout_width="wrap_content"
    android:layout_height="wrap_content"
    android:text="右上角按钮"
    android:layout_toEndOf="@id/centerButton"
    android:layout_above="@id/centerButton"
    android:layout_marginStart="32dp"
android:layout_marginBottom="32dp"/>- 作用:定位在中心按钮的右上方,保持对称边距。
- 关键属性:
android:layout_toEndOf="@id/centerButton":按钮定位在中心按钮的右侧。android:layout_marginStart="32dp":与中心按钮左侧边缘保持32dp的间距。
5. 左下角按钮(bottomLeftButton)
<Button
    android:id="@+id/bottomLeftButton"
    android:layout_width="wrap_content"
    android:layout_height="wrap_content"
    android:text="左下角按钮"
    android:layout_toStartOf="@id/centerButton"
    android:layout_below="@id/centerButton"
    android:layout_marginEnd="32dp"
android:layout_marginTop="32dp"/>- 作用:定位在中心按钮的左下方,保持对称边距。
- 关键属性:
android:layout_below="@id/centerButton":按钮定位在中心按钮的下方。android:layout_marginTop="32dp":与中心按钮顶部边缘保持32dp的间距。
6. 右下角按钮(bottomRightButton)
<Button
    android:id="@+id/bottomRightButton"
    android:layout_width="wrap_content"
    android:layout_height="wrap_content"
    android:text="右下角按钮"
    android:layout_toEndOf="@id/centerButton"
    android:layout_below="@id/centerButton"
    android:layout_marginStart="32dp"
android:layout_marginTop="32dp"/>- 作用:定位在中心按钮的右下方,保持对称边距。
- 关键属性:
android:layout_marginStart="32dp":与中心按钮左侧边缘保持32dp的间距。
布局效果
-
视觉效果:
- 中心按钮位于屏幕正中央。
- 四个角的按钮分别位于中心按钮的四个方向(左上、右上、左下、右下),与中心按钮保持对称的32dp边距。
- 整体形成一个十字形布局,四个角的按钮与中心按钮对称分布。
-
定位逻辑:
- 所有按钮的定位均以中心按钮为参考点,通过
layout_toStartOf、layout_toEndOf、layout_above、layout_below等属性实现相对定位。 - 边距(margin)用于控制按钮与中心按钮之间的间距。
- 所有按钮的定位均以中心按钮为参考点,通过
关键属性总结
| 属性名 | 作用 |
|---|---|
layout_centerInParent | 将控件居中于父容器。 |
layout_toStartOf | 将控件定位在指定ID控件的左侧。 |
layout_toEndOf | 将控件定位在指定ID控件的右侧。 |
layout_above | 将控件定位在指定ID控件的上方。 |
layout_below | 将控件定位在指定ID控件的下方。 |
layout_marginStart | 控件与左侧参考控件的间距。 |
layout_marginEnd | 控件与右侧参考控件的间距。 |
潜在问题与改进建议
-
边距的对称性:
- 当前边距设置为32dp,但实际布局中可能需要根据屏幕尺寸调整,例如使用
dp单位或ConstraintLayout的比例约束。
- 当前边距设置为32dp,但实际布局中可能需要根据屏幕尺寸调整,例如使用
-
响应式设计:
- 若需适配不同屏幕尺寸,建议改用
ConstraintLayout,通过Guideline或百分比约束实现更灵活的布局。
- 若需适配不同屏幕尺寸,建议改用
-
RTL语言支持:
- 使用
layout_toStartOf和layout_toEndOf而非layout_toLeftOf和layout_toRightOf,以支持右ToLeft(RTL)语言(如阿拉伯语)。
- 使用
-
性能优化:
- RelativeLayout的复杂定位可能影响性能,若层级过深,可考虑使用
ConstraintLayout替代。
- RelativeLayout的复杂定位可能影响性能,若层级过深,可考虑使用
总结
此布局通过RelativeLayout实现了以中心按钮为基准的对称布局,展示了RelativeLayout的相对定位能力。若需更复杂的布局(如响应式设计或动画),建议结合 ConstraintLayout 进一步优化。


![[王阳明代数讲义]具身智能才气等级分评价排位系统领域投射模型讲义](https://i-blog.csdnimg.cn/direct/5593a120ff514d058e96f601782d6d1c.jpeg#pic_center)