文章目录
- 1. MinGPT 项目简介
- 2. 相关论文
- 2.1 GPT-1
- 2.2 GPT-2
- 2.3 GPT-3
- 3. 代码详解
- 3.1 项目结构
- 3.2 GPT 模型代码详解
- 3.2.1 Transformer block
- 3.2.2 GPT
- 3.3 两位数加法实验
- 3.3.1 数据集构造
- 3.3.2 训练器
- 3.3.3 模型参数设置
- 3.3.4 训练过程
1. MinGPT 项目简介
- MinGPT 是 GPT 模型的一个流行的开源 PyTorch 复现项目,包括训练和推理。该项目由特斯拉人工智能研究负责人、前 OpenAI 研究科学家 Andrej Karpathy 开发并于 2020 年在 github 发布。当时大多数可用的GPT模型实现都有点杂乱,而 minGPT 简洁干净可解释,因而颇具教育意义。MinGPT 的开源地址为:karpathy/minGPT
- GPT 不是一个复杂的模型,它做的只是将一系列 token 输入到 Transformer 中,然后得到序列中下一个 token 的概率分布,大多数复杂性只是为了提高效率而巧妙地使用批处理 (both across examples and over sequence length)。minGPT 麻雀虽小,五脏俱全。如果说 GPT 模型是所向披靡的战舰,那么 minGPT 大概算是个个头虽小但仍能乘风破浪的游艇了吧。

2. 相关论文
- 这个库的 Readme 中简介了 GPT-1, GPT-2, GPT-3 的模型结构,有一定指导意义,这里贴过来

2.1 GPT-1
- 论文地址:Improving Language Understanding by Generative Pre-Training
- GPT-1 模型大体遵循了原始 transformer,训练了 12 层的 Decoder-only Transformer、具备 masked-self attention head(768 维状态和 12 个注意力头),具体实现细节为
- 我们的模型在很大程度上遵循了原始的Transformer工作
- 我们训练了一个12层的 Decoder-only Transformer,使用了带有 masked-attention head 的结构(768维状态和12个注意力头)。对于 position-wise FFD 网络,我们使用了3072维的内部状态
- Adam最大学习率为 2.5e-4。(之后GPT-3针对这个模型大小使用了6e-4)
- 学习率衰减:在前2000次更新中线性增加到最大值,然后使用余弦计划将其退化为0
- 我们使用 64 个随机抽样的连续序列,每个序列包含 512 个 torch,进行100个 epoch 的训练
- 由于 Layernorm 在整个模型中被广泛使用,简单的 N ( 0 , 0.02 ) N(0, 0.02) N(0,0.02) 权重初始化就足够了
- 使用了 40,000 merges 的 Byte Pair Encoding(BPE)词汇表。
- 为了正则化,residual, embedding, 和 attention 都设置了 0.1 的 dropout
- 采用了修改过的 L2 正则化方法,在所有非偏置或增益权重上设置 w = 0.01 w = 0.01 w=0.01
- 激活函数采用了高斯误差线性单元(GELU)
- 我们使用了学习得到的 position embedding,而不是原始工作中提出的正弦版本
- 对于微调(finetuning):我们在分类器上添加了 0.1 的 dropout layer。学习率为 6.25e-5,批大小为 32,进行 3 个epoch的训练。我们使用线性学习率衰减计划,在训练的前 0.2% 部分进行 warmup,λ 设置为 0.5
- GPT-1 模型有 12 层,嵌入维度 d_model=768,大约有 117M 个参数
2.2 GPT-2
- 论文地址:Language Models are Unsupervised Multitask Learners
- GPT-2 将 LayerNorm 移动到每个子模块的输入位置,类似于预激活残差网络,并在最后的自注意力模块后添加了一个额外的层归一化。此外,该模型还更改了模型初始化(包括残差层初始化权重等)、扩展了词汇量、将 context 规模从 512 个 token 增加到 1024、使用更大的 batch size 等。具体实现细节为:
- LayerNorm 被移动到每个子块(attention layer、ffd layer…)的输入处,类似于预激活残差网络
- 在最后的自注意力块之后添加了额外的 LayerNorm 操作
- 考虑到模型深度上残差路径上的累积效应,将残差层的权重在初始化时缩放一个因子 1 / N 1/\sqrt{N} 1/N,其中 N N N 是残差层的数量。(weird because in their released code i can only find a simple use of the old 0.02… in their release of image-gpt I found it used for c_proj, and even then only for attn, not for mlp. huh)
- 词汇表扩展到 50,257
- 将上下文大小从 512 增加到 1024 个 token
- 使用更大的 batch size=512
- GPT-2 模型有 48 层,嵌入维度 d_model=1600,大约有 1.542B 个参数
2.3 GPT-3
- 论文地址:Language Models are Few-Shot Learners
- GPT-3 使用了和 GPT-2 相同的模型和架构,区别在于 GPT-3 在 transformer 的各层上都使用了交替密集和局部带状稀疏的注意力模式,类似于 Sparse Transformer。具体实现细节为:
- 我们使用与GPT-2相同的模型和架构,包括其中描述的修改初始化、预归一化和可逆标记化
- 在 Transformer 的各个层中,我们使用交替的 dense 和 locally banded sparse 注意力模式,类似于Sparse Transformer
- 我们的 FFD layer 尺寸始终是瓶颈层大小的四倍,dff = 4 * d_model
- 将上下文长度增加到 2048 个 token
- Adam优化器的参数设置为 β1 = 0.9,β2 = 0.95,eps = 10^-8。
- 所有模型使用 0.1 的权重 dropout 进行轻微正则化(注意:我相信GPT-1使用的是0.01,请参考上文)
- 将梯度的全局范数剪切到 1.0
- 在前 375 亿个 token 进行线性学习率 warmup,然后在 2600亿个 token 的时间内余弦衰减到其值的 10%
- 在训练的前 40-120 亿个 token 之间,根据模型尺寸,从小值(32k token)逐渐线性增加 batch size
- 始终使用完整的 2048 大小的上下文窗口,并添加特殊的 “END OF DOCUMENT” 标记分隔符。
3. 代码详解
3.1 项目结构
-
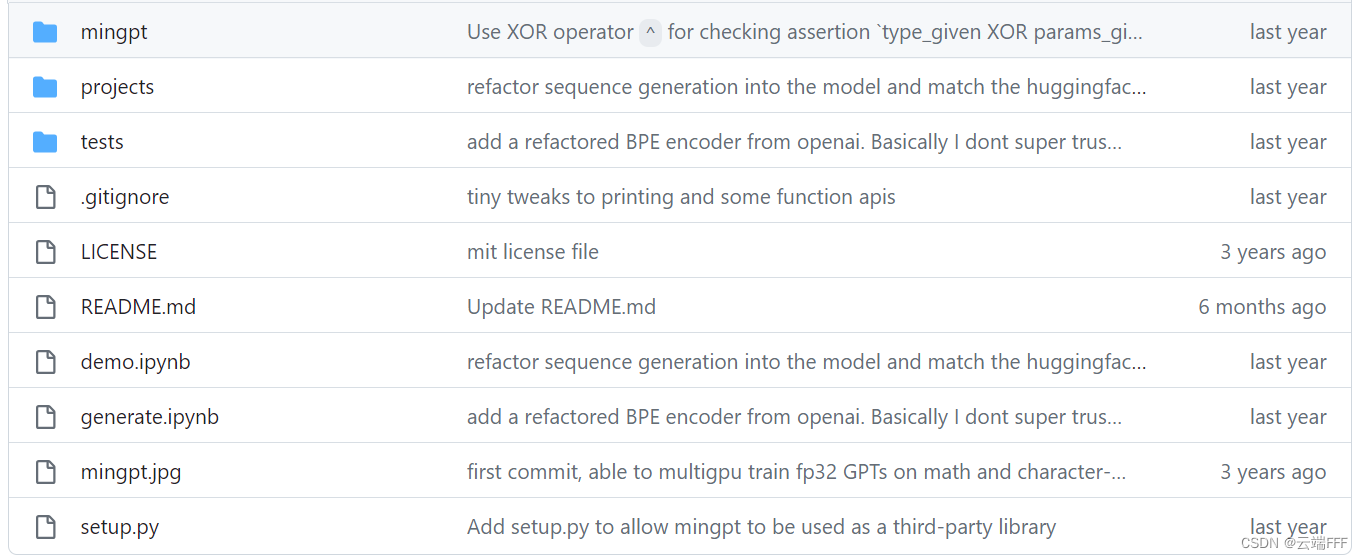
看一下项目的目录结构
-
minGPT 库由三个文件组成
minGPT/model.py包含实际的 Transformer 模型定义minGPT/bpe.py包含一个稍微重构的 Byte Pair 编码器,它用于将文本转换为整数序列,为 tokenize 做准备minGPT/trainer.py是训练模型的 (与GPT无关的) PyTorch样板代码
-
在 projects 文件夹中给出了一些使用 minGPT 库的 demos 和 projects,包括
projects/adder从零训练 GPT 做加法(灵感来自GPT-3论文中的添加部分)projects/chargpt用一些输入文本将 GPT 训练成一个 character-level language modeldemo.ipynb在一个简单的排序示例中以笔记本格式展示了GPT和Trainer的 minimal usagegenerate.ipynb展示了如何加载预训练的 GPT2 并在给定 prompt 的情况下生成文本
3.2 GPT 模型代码详解
- 本段详细分析
minGPT/model.py中的 GPT 模型实现
3.2.1 Transformer block
-
先看下 Transformer block 的定义,它是 GPT 的核心组件
class Block(nn.Module):
    """ an unassuming Transformer block """

    def __init__(self, config):
        super().__init__()
        self.ln_1 = nn.LayerNorm(config.n_embd)
        self.attn = CausalSelfAttention(config)
        self.ln_2 = nn.LayerNorm(config.n_embd)
        self.mlp = nn.ModuleDict(dict(
            c_fc    = nn.Linear(config.n_embd, 4 * config.n_embd),
            c_proj  = nn.Linear(4 * config.n_embd, config.n_embd),
            act     = NewGELU(),
            dropout = nn.Dropout(config.resid_pdrop),
        ))
        m = self.mlp
        self.mlpf = lambda x: m.dropout(m.c_proj(m.act(m.c_fc(x)))) # MLP forward

    def forward(self, x):
        x = x + self.attn(self.ln_1(x))
        x = x + self.mlpf(self.ln_2(x))
        return x
结构很清晰,如下图所示

使用了 GPT2/3 的 LayerNorm 前置结构,不过残差连接的位置不太一样,应该差别不大。其中两个核心模块是 masked self-attention 层self.attn和 FFD 层self.mlp -
FFD 层:很简单就是一个带 dropout 正则的两层 MLP,特殊之处在于使用了 gelu 激活函数,如下所示
class NewGELU(nn.Module):
    """
    Implementation of the GELU activation function currently in Google BERT repo (identical to OpenAI GPT).
    Reference: Gaussian Error Linear Units (GELU) paper: https://arxiv.org/abs/1606.08415
    """
    def forward(self, x):
        return 0.5 * x * (1.0 + torch.tanh(math.sqrt(2.0 / math.pi) * (x + 0.044715 * torch.pow(x, 3.0))))
这个激活函数是对 relu 的一个优化,增加了更多非线性成分,如下所示

-
masked self attention 层:这是 GPT 模型的核心,需要计算因果注意力
class CausalSelfAttention(nn.Module): """ A vanilla multi-head masked self-attention layer with a projection at the end. It is possible to use torch.nn.MultiheadAttention here but I am including an explicit implementation here to show that there is nothing too scary here. """ def __init__(self, config): super().__init__() assert config.n_embd % config.n_head == 0 # key, query, value projections for all heads, but in a batch self.c_attn = nn.Linear(config.n_embd, 3 * config.n_embd) # output projection self.c_proj = nn.Linear(config.n_embd, config.n_embd) # regularization self.attn_dropout = nn.Dropout(config.attn_pdrop) self.resid_dropout = nn.Dropout(config.resid_pdrop) # causal mask to ensure that attention is only applied to the left in the input sequence self.register_buffer("bias", torch.tril(torch.ones(config.block_size, config.block_size)) .view(1, 1, config.block_size, config.block_size)) self.n_head = config.n_head self.n_embd = config.n_embd def forward(self, x): B, T, C = x.size() # batch size, sequence length, embedding dimensionality (n_embd) # calculate query, key, values for all heads in batch and move head forward to be the batch dim q, k ,v = self.c_attn(x).split(self.n_embd, dim=2) k = k.view(B, T, self.n_head, C // self.n_head).transpose(1, 2) # (B, nh, T, hs) q = q.view(B, T, self.n_head, C // self.n_head).transpose(1, 2) # (B, nh, T, hs) v = v.view(B, T, self.n_head, C // self.n_head).transpose(1, 2) # (B, nh, T, hs) # causal self-attention; Self-attend: (B, nh, T, hs) x (B, nh, hs, T) -> (B, nh, T, T) att = (q @ k.transpose(-2, -1)) * (1.0 / math.sqrt(k.size(-1))) att = att.masked_fill(self.bias[:,:,:T,:T] == 0, float('-inf')) att = F.softmax(att, dim=-1) att = self.attn_dropout(att) y = att @ v # (B, nh, T, T) x (B, nh, T, hs) -> (B, nh, T, hs) y = y.transpose(1, 2).contiguous().view(B, T, C) # re-assemble all head outputs side by side # output projection y = self.resid_dropout(self.c_proj(y)) return y- 每个注意力头提取的 value,query 和 key 的维度
hs为嵌入维度n_embd的 1/n_head。虽然编程时这里仅需保证 query 和 key 的空间维度一致即可,但是考虑到嵌入维度和 vocab table 大小的关系,每个注意力头处理的嵌入维度不宜过大,这样和 n_embd 绑定是比较方便的做法。请参考:最小熵原理(六):词向量的维度应该怎么选择? - masked self attention 通过一个下三角矩阵
self.bias来实现,序列长度(config.block_size)为 5 时该张量形如
后面tensor([[[[1., 0., 0., 0., 0.], [1., 1., 0., 0., 0.], [1., 1., 1., 0., 0.], [1., 1., 1., 1., 0.], [1., 1., 1., 1., 1.]]]])att.masked_fill(self.bias[:,:,:T,:T] == 0, float('-inf'))这句就会把这些为 0 的位置替换为 -inf,从而使这些位置在经过 softmax 后权重趋近 0,实现对未来序列的遮盖。另需注意bias张量是通过self.register_buffer方法登记的,这样登记过的张量可以求梯度也可以随模型在 CPU/GPU 之间移动,但是不进行参数优化
- 每个注意力头提取的 value,query 和 key 的维度
3.2.2 GPT
- 先看初始化部分
class GPT(nn.Module): """ GPT Language Model """ @staticmethod def get_default_config(): C = CfgNode() # either model_type or (n_layer, n_head, n_embd) must be given in the config C.model_type = 'gpt' C.n_layer = None C.n_head = None C.n_embd = None # these options must be filled in externally C.vocab_size = None C.block_size = None # dropout hyperparameters C.embd_pdrop = 0.1 C.resid_pdrop = 0.1 C.attn_pdrop = 0.1 return C def __init__(self, config): super().__init__() assert config.vocab_size is not None assert config.block_size is not None self.block_size = config.block_size type_given = config.model_type is not None params_given = all([config.n_layer is not None, config.n_head is not None, config.n_embd is not None]) assert type_given ^ params_given # exactly one of these (XOR) if type_given: # translate from model_type to detailed configuration config.merge_from_dict({ # names follow the huggingface naming conventions # GPT-1 'openai-gpt': dict(n_layer=12, n_head=12, n_embd=768), # 117M params # GPT-2 configs 'gpt2': dict(n_layer=12, n_head=12, n_embd=768), # 124M params 'gpt2-medium': dict(n_layer=24, n_head=16, n_embd=1024), # 350M params 'gpt2-large': dict(n_layer=36, n_head=20, n_embd=1280), # 774M params 'gpt2-xl': dict(n_layer=48, n_head=25, n_embd=1600), # 1558M params # Gophers 'gopher-44m': dict(n_layer=8, n_head=16, n_embd=512), # (there are a number more...) # I made these tiny models up 'gpt-mini': dict(n_layer=6, n_head=6, n_embd=192), 'gpt-micro': dict(n_layer=4, n_head=4, n_embd=128), 'gpt-nano': dict(n_layer=3, n_head=3, n_embd=48), }[config.model_type]) self.transformer = nn.ModuleDict(dict( wte = nn.Embedding(config.vocab_size, config.n_embd), wpe = nn.Embedding(config.block_size, config.n_embd), drop = nn.Dropout(config.embd_pdrop), h = nn.ModuleList([Block(config) for _ in range(config.n_layer)]), ln_f = nn.LayerNorm(config.n_embd), )) self.lm_head = nn.Linear(config.n_embd, config.vocab_size, bias=False) # init all weights, and apply a special scaled init to the residual projections, per GPT-2 paper self.apply(self._init_weights) for pn, p in self.named_parameters(): if pn.endswith('c_proj.weight'): torch.nn.init.normal_(p, mean=0.0, std=0.02/math.sqrt(2 * config.n_layer)) # report number of parameters (note we don't count the decoder parameters in lm_head) n_params = sum(p.numel() for p in self.transformer.parameters()) print("number of parameters: %.2fM" % (n_params/1e6,)) def _init_weights(self, module): if isinstance(module, nn.Linear): torch.nn.init.normal_(module.weight, mean=0.0, std=0.02) if module.bias is not None: torch.nn.init.zeros_(module.bias) elif isinstance(module, nn.Embedding): torch.nn.init.normal_(module.weight, mean=0.0, std=0.02) elif isinstance(module, nn.LayerNorm): torch.nn.init.zeros_(module.bias) torch.nn.init.ones_(module.weight)- 作者使用了一个
CfgNode对象来管理参数,这个是一个类似 yacs 的轻量级参数管理类对象,具体实现在minGPT/utils.py文件中,请自行查阅。另外注意到作者设置了一系列预制参数,可以轻松定义不同规模的 GPT 模型 - GPT 模型的所有组件包含在
self.transformer成员中,wte和wpe分别是 token embedding 和 position embedding 模块,注意到它们都是nn.Embedding层;’h中包含了所有堆叠的 transformer block 层;另外self.lm_head是 GPT 模型最后的分类头,GPT 模型宏观上就是一个输出空间为vocab_size的分类器 - 接下来作者通过
self.apply(self._init_weights)对模型参数进行了初始化,这一通用性是比较强的,可以记录下复用到自己的项目中
- 作者使用了一个
- 下面作者提供了一个方法用于加载预训练的 gpt2 check point,基本都是数据形式变换,这里不多讲了
@classmethod def from_pretrained(cls, model_type): """ Initialize a pretrained GPT model by copying over the weights from a huggingface/transformers checkpoint. """ assert model_type in {'gpt2', 'gpt2-medium', 'gpt2-large', 'gpt2-xl'} from transformers import GPT2LMHeadModel # create a from-scratch initialized minGPT model config = cls.get_default_config() config.model_type = model_type config.vocab_size = 50257 # openai's model vocabulary config.block_size = 1024 # openai's model block_size model = GPT(config) sd = model.state_dict() # init a huggingface/transformers model model_hf = GPT2LMHeadModel.from_pretrained(model_type) sd_hf = model_hf.state_dict() # copy while ensuring all of the parameters are aligned and match in names and shapes keys = [k for k in sd_hf if not k.endswith('attn.masked_bias')] # ignore these transposed = ['attn.c_attn.weight', 'attn.c_proj.weight', 'mlp.c_fc.weight', 'mlp.c_proj.weight'] # basically the openai checkpoints use a "Conv1D" module, but we only want to use a vanilla nn.Linear. # this means that we have to transpose these weights when we import them assert len(keys) == len(sd) for k in keys: if any(k.endswith(w) for w in transposed): # special treatment for the Conv1D weights we need to transpose assert sd_hf[k].shape[::-1] == sd[k].shape with torch.no_grad(): sd[k].copy_(sd_hf[k].t()) else: # vanilla copy over the other parameters assert sd_hf[k].shape == sd[k].shape with torch.no_grad(): sd[k].copy_(sd_hf[k]) return model - 接下来作者实现了一个优化器构造方法
这里主要是通过权重衰减方法来进行正则化,避免过拟合。注意到作者通过一个二重遍历考察 GPT 模型所有 sub module 的所有 parameters,仅对所有def configure_optimizers(self, train_config): """ This long function is unfortunately doing something very simple and is being very defensive: We are separating out all parameters of the model into two buckets: those that will experience weight decay for regularization and those that won't (biases, and layernorm/embedding weights). We are then returning the PyTorch optimizer object. """ # separate out all parameters to those that will and won't experience regularizing weight decay decay = set() no_decay = set() whitelist_weight_modules = (torch.nn.Linear, ) blacklist_weight_modules = (torch.nn.LayerNorm, torch.nn.Embedding) for mn, m in self.named_modules(): for pn, p in m.named_parameters(): fpn = '%s.%s' % (mn, pn) if mn else pn # full param name # random note: because named_modules and named_parameters are recursive # we will see the same tensors p many many times. but doing it this way # allows us to know which parent module any tensor p belongs to... if pn.endswith('bias'): # all biases will not be decayed no_decay.add(fpn) elif pn.endswith('weight') and isinstance(m, whitelist_weight_modules): # weights of whitelist modules will be weight decayed decay.add(fpn) elif pn.endswith('weight') and isinstance(m, blacklist_weight_modules): # weights of blacklist modules will NOT be weight decayed no_decay.add(fpn) # validate that we considered every parameter param_dict = {pn: p for pn, p in self.named_parameters()} inter_params = decay & no_decay union_params = decay | no_decay assert len(inter_params) == 0, "parameters %s made it into both decay/no_decay sets!" % (str(inter_params), ) assert len(param_dict.keys() - union_params) == 0, "parameters %s were not separated into either decay/no_decay set!" \ % (str(param_dict.keys() - union_params), ) # create the pytorch optimizer object optim_groups = [ {"params": [param_dict[pn] for pn in sorted(list(decay))], "weight_decay": train_config.weight_decay}, {"params": [param_dict[pn] for pn in sorted(list(no_decay))], "weight_decay": 0.0}, ] optimizer = torch.optim.AdamW(optim_groups, lr=train_config.learning_rate, betas=train_config.betas) return optimizertorch.nn.Linear层的weight参数进行衰减,bias参数及所有torch.nn.LayerNorm、torch.nn.Embedding模块的参数都不做处理。由于模块是递归组织的,这个二重变量会重复访问很多参数,所以通过set自动去重,最后根据处理结果定义torch.optim.AdamW优化器返回关于权重衰减的理论说明,参考:机器学习基础(6)—— 使用权重衰减和丢弃法缓解过拟合问题
- 下面就是 GPT 模型的前向方法
def forward(self, idx, targets=None): device = idx.device b, t = idx.size() assert t <= self.block_size, f"Cannot forward sequence of length {t}, block size is only {self.block_size}" pos = torch.arange(0, t, dtype=torch.long, device=device).unsqueeze(0) # shape (1, t) # forward the GPT model itself tok_emb = self.transformer.wte(idx) # (b, t, n_embd) pos_emb = self.transformer.wpe(pos) # (1, t, n_embd) x = self.transformer.drop(tok_emb + pos_emb) # (b, t, n_embd) for block in self.transformer.h: x = block(x) x = self.transformer.ln_f(x) # (b, t, n_embd) logits = self.lm_head(x) # (b, t, vocab_size) # if we are given some desired targets also calculate the loss loss = None if targets is not None: loss = F.cross_entropy(logits.view(-1, logits.size(-1)), targets.view(-1), ignore_index=-1) return logits, loss- 流程很清晰:输入一个 batch 长度为 t 的 vocab index 序列
idx,用wte进行 embedding 并加上wpe位置编码后得到尺寸 (batch_size, t, n_embd) 的 token embedding 序列x,经过若干 transformer block 和后置 layer norm 层ln_f,最后经过分类头self.lm_head得到尺寸 (batch_size, t, n_embd) 的预测序列logits - 注意 GPT 模型会对每个输入 token 产生对应位置的输出,最后
logits序列长度为 t - 使用 teacher-forcing 方式进行训练,所以需要输入尺寸 (batch_size, t) 的
targets序列。将x和targets都拉平来计算分类的交叉熵损失。注意交叉熵函数中设置了ignore_index=-1,这样我们可以对 target 序列设置一些 -1 来 mask 掉无需计算 loss 的 prompt 序列
- 流程很清晰:输入一个 batch 长度为 t 的 vocab index 序列
- 最后来看 GPT 模型的预测方法
注意这里是 AutoRegress 框架:@torch.no_grad() def generate(self, idx, max_new_tokens, temperature=1.0, do_sample=False, top_k=None): """ Take a conditioning sequence of indices idx (LongTensor of shape (b,t)) and complete the sequence max_new_tokens times, feeding the predictions back into the model each time. Most likely you'll want to make sure to be in model.eval() mode of operation for this. """ for _ in range(max_new_tokens): # if the sequence context is growing too long we must crop it at block_size idx_cond = idx if idx.size(1) <= self.block_size else idx[:, -self.block_size:] # (batch_size, seq_len) # forward the model to get the logits for the index in the sequence logits, _ = self(idx_cond) # (batch_size, seq_len, vocab_size) # pluck the logits at the final step and scale by desired temperature logits = logits[:, -1, :] / temperature # (batch_size, vocab_size) # optionally crop the logits to only the top k options if top_k is not None: v, _ = torch.topk(logits, top_k) logits[logits < v[:, [-1]]] = -float('Inf') # apply softmax to convert logits to (normalized) probabilities probs = F.softmax(logits, dim=-1) # (batch_size, vocab_size) # either sample from the distribution or take the most likely element if do_sample: idx_next = torch.multinomial(probs, num_samples=1) # (batch_size, 1) else: _, idx_next = torch.topk(probs, k=1, dim=-1) # append sampled index to the running sequence and continue idx = torch.cat((idx, idx_next), dim=1) # (batch_size, seq_len+1) return idx- 输入尺寸为 (batch_size, seq_len) 的 vocab index 序列
idx,这时序列长度 seq_len 完全是 prompt 长度 - 将其经过 GPT 前向过程得到尺寸为 (batch_size, seq_len, vocab_size) 的预测
logits - 通过
logits = logits[:, -1, :] / temperature拿出最后一个位置的预测 - 根据生成方法设置(是否仅保留topk候选、是否采样生成…)得到预测的 token 结果
idx_next,将其拼接回原序列 - 回到第一步,自回归地生成下一个 token
- 输入尺寸为 (batch_size, seq_len) 的 vocab index 序列
3.3 两位数加法实验
- 本节介绍
projects/adder.py中的两位数加法实验
3.3.1 数据集构造
-
本实验仅考虑两个不超过两位的整数间的加法,这样计算的结果可能是两位数或者三位数。下面给出两个加法算式以及其对应的序列样本
85 + 50 = 135 ⟶ 8550531 6 + 39 = 45 ⟶ 0639054 85 + 50 = 135 \longrightarrow 8550531 \\ 6 + 39 = 45 \longrightarrow 0639054 85+50=135⟶85505316+39=45⟶0639054- 丢弃了不必要的 + + + 和 = = =,仅对数字进行编码
- 结果被反向编码,这样加法更容易学习(回想一下竖式加法计算的过程)
- 进行 zero-padding 以确保总是生成长度为 2+2+(2+1)=7 的序列
- 在训练和评估过程中,我们总是输入前 2+2 个 token,并希望 GPT 模型预测出接下来的 (2+1) 位完成序列
-
下面给出数据集的构造代码
class AdditionDataset(Dataset): """ Creates n-digit addition problems. For example, if n=2, then an example addition problem would be to add 85 + 50 = 135. This problem would be represented as the following string for the GPT: "8550531" This is because: - we are discarding the + and =, which are not necessary. We just encode the digits of the input numbers concatenated together. - the result 135 is encoded backwards to make the addition easier to learn for the GPT model, because of how the addition algorithm works. As one more example, the problem 6 + 39 = 45 would be encoded as: "0639054" where you will notice that we are padding with zeros to make sure that we always produce strings of the exact same size: n + n + (n + 1). When n=2, this is 7. At test time, we will feed in an addition problem by giving the first 2n digits, and hoping that the GPT model completes the sequence with the next (n+1) digits correctly. """ @staticmethod def get_default_config(): C = CN() C.ndigit = 2 return C def __init__(self, config, split): self.config = config self.split = split # train/test # split up all addition problems into either training data or test data ndigit = self.config.ndigit assert ndigit <= 3, "the lines below would be very memory inefficient, in future maybe refactor to support" num = (10**ndigit)**2 # total number of possible addition problems with ndigit numbers rng = torch.Generator() rng.manual_seed(1337) perm = torch.randperm(num, generator=rng) num_test = min(int(num*0.2), 500) # 20% of the whole dataset, or only up to 500 self.ixes = perm[:num_test] if split == 'test' else perm[num_test:] def get_vocab_size(self): return 10 # digits 0..9 def get_block_size(self): # a,b,a+b, and +1 due to potential carry overflow, # but then also -1 because very last digit doesn't ever plug back # as there is no explicit <EOS> token to predict, it is implied return 3*self.config.ndigit + 1 - 1 def __len__(self): return self.ixes.nelement() def __getitem__(self, idx): ndigit = self.config.ndigit # given a problem index idx, first recover the associated a + b idx = self.ixes[idx].item() nd = 10**ndigit a = idx // nd b = idx % nd # calculate the "label" of the addition problem a + b c = a + b # encode the digits of a, b, c into strings astr = f'%0{ndigit}d' % a bstr = f'%0{ndigit}d' % b cstr = (f'%0{ndigit+1}d' % c)[::-1] # reverse c to make addition easier render = astr + bstr + cstr dix = [int(s) for s in render] # convert each character to its token index # x will be input to GPT and y will be the associated expected outputs x = torch.tensor(dix[:-1], dtype=torch.long) y = torch.tensor(dix[1:], dtype=torch.long) # predict the next token in the sequence y[:ndigit*2-1] = -1 # we will only train in the output locations. -1 will mask loss to zero return x, y -
打印一些生成的样本和标签看一看
(tensor([9, 9, 3, 2, 1, 3]), tensor([-1, -1, -1,  1,  3,  1]))
(tensor([5, 6, 2, 1, 7, 7]), tensor([-1, -1, -1,  7,  7,  0]))
(tensor([5, 5, 0, 3, 8, 5]), tensor([-1, -1, -1,  8,  5,  0]))
(tensor([3, 8, 6, 2, 0, 0]), tensor([-1, -1, -1,  0,  0,  1]))
(tensor([9, 9, 0, 5, 4, 0]), tensor([-1, -1, -1,  4,  0,  1]))
(tensor([8, 9, 9, 6, 5, 8]), tensor([-1, -1, -1,  5,  8,  1]))
(tensor([4, 0, 8, 9, 9, 2]), tensor([-1, -1, -1,  9,  2,  1]))
...
这一下子可能看不清,我把第一条和第三条的 AutoRegress 过程示意图放在下面
99 + 32 = 131
------------------------
-1  -1  -1  1   3   1
9   9   3   2   1   3   1


55 + 3 = 58
------------------------
-1  -1  -1  8   5   0
5   5   0   3   8   5   0
注意设为 -1 的部分被 mask 掉不计算 loss(联系 3.2.2 节的 GPT forward 函数中损失计算部分)
3.3.2 训练器
- 在 trainer 类中实现训练循环
这个训练实现得相当直观,只需注意class Trainer: @staticmethod def get_default_config(): C = CN() # device to train on C.device = 'auto' # dataloder parameters C.num_workers = 4 # optimizer parameters C.max_iters = None C.batch_size = 64 C.learning_rate = 3e-4 C.betas = (0.9, 0.95) C.weight_decay = 0.1 # only applied on matmul weights C.grad_norm_clip = 1.0 return C def __init__(self, config, model, train_dataset): self.config = config self.model = model self.optimizer = None self.train_dataset = train_dataset self.callbacks = defaultdict(list) # determine the device we'll train on if config.device == 'auto': self.device = 'cuda' if torch.cuda.is_available() else 'cpu' else: self.device = config.device self.model = self.model.to(self.device) print("running on device", self.device) # variables that will be assigned to trainer class later for logging and etc self.iter_num = 0 self.iter_time = 0.0 self.iter_dt = 0.0 def add_callback(self, onevent: str, callback): self.callbacks[onevent].append(callback) def set_callback(self, onevent: str, callback): self.callbacks[onevent] = [callback] def trigger_callbacks(self, onevent: str): for callback in self.callbacks.get(onevent, []): callback(self) def run(self): model, config = self.model, self.config # setup the optimizer self.optimizer = model.configure_optimizers(config) # setup the dataloader train_loader = DataLoader( self.train_dataset, sampler=torch.utils.data.RandomSampler(self.train_dataset, replacement=True, num_samples=int(1e10)), shuffle=False, pin_memory=True, batch_size=config.batch_size, num_workers=config.num_workers, ) model.train() self.iter_num = 0 self.iter_time = time.time() data_iter = iter(train_loader) while True: # fetch the next batch (x, y) and re-init iterator if needed try: batch = next(data_iter) except StopIteration: data_iter = iter(train_loader) batch = next(data_iter) batch = [t.to(self.device) for t in batch] x, y = batch # forward the model logits, self.loss = model(x, y) # backprop and update the parameters model.zero_grad(set_to_none=True) self.loss.backward() torch.nn.utils.clip_grad_norm_(model.parameters(), config.grad_norm_clip) self.optimizer.step() self.trigger_callbacks('on_batch_end') self.iter_num += 1 tnow = time.time() self.iter_dt = tnow - self.iter_time self.iter_time = tnow # termination conditions if config.max_iters is not None and self.iter_num >= config.max_iters: break- 这里不是按把训练数据集轮一遍算做一个 epoch,训练若干 epoch 这样,而是设定一个目标的迭代周期
config.max_iters,不断轮询训练集直到训练 batch 数量达标为止 - 作者注册了一个回调函数
self.trigger_callbacks('on_batch_end'),每个 batch 训练后调用它,这个函数的函数体将在训练主函数中实现
- 这里不是按把训练数据集轮一遍算做一个 epoch,训练若干 epoch 这样,而是设定一个目标的迭代周期
3.3.3 模型参数设置
- 作者使用 CfgNode 对象来管理参数,这是个类似 yacs 的轻量级参数管理类对象,具体实现在
minGPT/utils.py文件中,请自行查阅def get_config(): C = CN() # system C.system = CN() C.system.seed = 3407 C.system.work_dir = './out/adder' # data C.data = AdditionDataset.get_default_config() # model C.model = GPT.get_default_config() C.model.model_type = 'gpt-nano' # trainer C.trainer = Trainer.get_default_config() C.trainer.learning_rate = 5e-4 # the model we're using is so small that we can go a bit faster return C
3.3.4 训练过程
- 没有特别值得说的,基本就是定义数据集、定义 trainer、定义模型,开始训练后按一定周期建议模型性能。直接贴代码吧
if __name__ == '__main__': # get default config and overrides from the command line, if any config = get_config() config.merge_from_args(sys.argv[1:]) print(config) setup_logging(config) set_seed(config.system.seed) # construct train and test datasets train_dataset = AdditionDataset(config.data, split='train') test_dataset = AdditionDataset(config.data, split='test') # construct the model config.model.vocab_size = train_dataset.get_vocab_size() config.model.block_size = train_dataset.get_block_size() model = GPT(config.model) # construct the trainer object config.trainer.max_iters = 5001 trainer = Trainer(config.trainer, model, train_dataset) train_losses = [] accuracies = [] # helper function for the evaluation of a model def eval_split(trainer, split, max_batches=None): dataset = {'train':train_dataset, 'test':test_dataset}[split] ndigit = config.data.ndigit results = [] mistakes_printed_already = 0 factors = torch.tensor([[10**i for i in range(ndigit+1)][::-1]]).to(trainer.device) loader = DataLoader(dataset, batch_size=100, num_workers=0, drop_last=False) for b, (x, y) in enumerate(loader): x = x.to(trainer.device) # isolate the first two digits of the input sequence alone d1d2 = x[:, :ndigit*2] # let the model sample the rest of the sequence d1d2d3 = model.generate(d1d2, ndigit+1, do_sample=False) # using greedy argmax, not sampling # isolate the last digit of the sampled sequence d3 = d1d2d3[:, -(ndigit+1):] d3 = d3.flip(1) # reverse the digits to their "normal" order # decode the integers from individual digits d1i = (d1d2[:,:ndigit] * factors[:,1:]).sum(1) d2i = (d1d2[:,ndigit:ndigit*2] * factors[:,1:]).sum(1) d3i_pred = (d3 * factors).sum(1) d3i_gt = d1i + d2i # manually calculate the ground truth # evaluate the correctness of the results in this batch correct = (d3i_pred == d3i_gt).cpu() # Software 1.0 vs. Software 2.0 fight RIGHT on this line haha for i in range(x.size(0)): results.append(int(correct[i])) if not correct[i] and mistakes_printed_already < 5: # only print up to 5 mistakes to get a sense mistakes_printed_already += 1 print("GPT claims that %d + %d = %d but gt is %d" % (d1i[i], d2i[i], d3i_pred[i], d3i_gt[i])) if max_batches is not None and b+1 >= max_batches: break rt = torch.tensor(results, dtype=torch.float) print("%s final score: %d/%d = %.2f%% correct" % (split, rt.sum(), len(results), 100*rt.mean())) if split == 'test': accuracies.append(100*rt.mean()) return rt.sum() # iteration callback top_score = 0 def batch_end_callback(trainer): global top_score train_losses.append(trainer.loss.item()) if trainer.iter_num % 10 == 0: print(f"iter_dt {trainer.iter_dt * 1000:.2f}ms; iter {trainer.iter_num}: train loss {trainer.loss.item():.5f}") if trainer.iter_num % 500 == 0: # evaluate both the train and test score train_max_batches = {1: None, 2: None, 3: 5}[config.data.ndigit] # if ndigit=2 we can afford the whole train set, ow no model.eval() with torch.no_grad(): train_score = eval_split(trainer, 'train', max_batches=train_max_batches) test_score = eval_split(trainer, 'test', max_batches=None) score = train_score + test_score # save the model if this is the best score we've seen so far if score > top_score: top_score = score print(f"saving model with new top score of {score}") ckpt_path = os.path.join(config.system.work_dir, "model.pt") torch.save(model.state_dict(), ckpt_path) # revert model to training mode model.train() trainer.set_callback('on_batch_end', batch_end_callback) # run the optimization trainer.run() # show performance fig, (ax1, ax2) = plt.subplots(2, 1, figsize=(8, 6)) x = np.arange(len(train_losses)) ax1.plot(x, train_losses, label='Train Loss') ax2.set_xlabel('iter') ax1.set_ylabel('Loss') ax1.legend() x = np.arange(len(accuracies)) * 500 ax2.plot(x, accuracies, label='Accuracy') ax2.set_xlabel('iter') ax2.set_ylabel('Accuracy') ax2.legend() plt.subplots_adjust(hspace=0.4) plt.show() - 代码中绘图部分是我添加的,train loss 和 accuracy 的变化曲线如下


