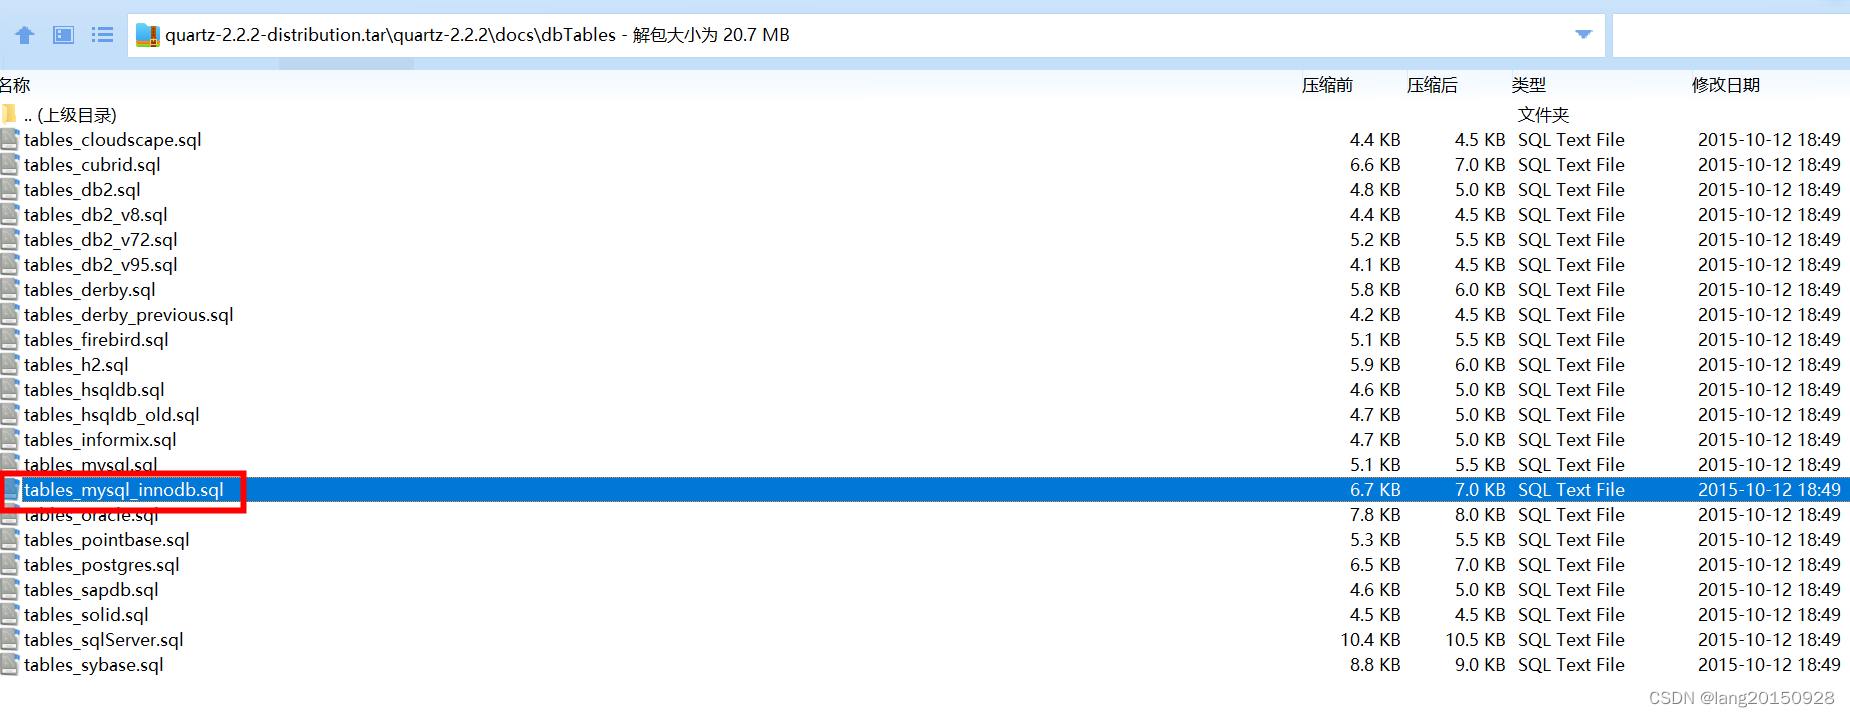
数据库准备
准备一个MySQL数据库,版本为8.0,然后创建一个库,并从quartz官方的版本包中找到名称为tables_mysql_innodb.sql的脚本执行进去(脚本内容文后也有提供)。
项目依赖说明
创建一个Maven项目,引入以下依赖
<dependency>
    <groupId>org.quartz-scheduler</groupId>
    <artifactId>quartz</artifactId>
    <version>2.2.1</version>
</dependency>
<dependency>
    <groupId>org.quartz-scheduler</groupId>
    <artifactId>quartz-jobs</artifactId>
    <version>2.2.1</version>
</dependency>
<dependency>
    <groupId>mysql</groupId>
    <artifactId>mysql-connector-java</artifactId>
    <version>8.0.16</version>
</dependency>
<dependency>
    <groupId>com.alibaba</groupId>
    <artifactId>druid</artifactId>
	<version>1.1.17</version>
</dependency>
Quartz简单demo
首先创建一个Job,在Quartz当中通过实现Job来执行业务逻辑
package org.quartz.myexample;

import org.quartz.Job;
import org.quartz.JobExecutionContext;
import org.quartz.JobExecutionException;
import org.quartz.SchedulerException;

import java.time.LocalDateTime;

public class HelloJob implements Job {

    /**
     * 传递给 execute() 方法的 JobExecutionContext 对象中保存着该 job 运行时的一些信息 ,执行 job 的 scheduler 的引用,
     * 触发 job 的 trigger 的引用,JobDetail 对象引用,以及一些其它信息。
     */
    @Override
    public void execute(JobExecutionContext context) throws JobExecutionException {
        Object tv1 = context.getTrigger().getJobDataMap().get("t1");
        Object tv2 = context.getTrigger().getJobDataMap().get("t2");
        Object jv1 = context.getJobDetail().getJobDataMap().get("j1");
        Object jv2 = context.getJobDetail().getJobDataMap().get("j2");
        Object sv = null;
        try {
            sv = context.getScheduler().getContext().get("skey");
        } catch (SchedulerException e) {
            e.printStackTrace();
        }
        System.out.println(tv1 + ":" + tv2);
        System.out.println(jv1 + ":" + jv2);
        System.out.println(sv);
        System.out.println("hello:" + LocalDateTime.now());
    }
}
然后,获取Scheduler实例,创建一个Trigger和JobDetail,并使用scheduler进行调度,最后启动Scheduler,分别为下面源码中的第一、二、三、四步骤。
package org.quartz.myexample;

import org.quartz.*;
import org.quartz.impl.StdSchedulerFactory;

import java.util.Date;

/**
 * -Dorg.quartz.properties=D:\Tools\activtiDemo\src\main\resources\quartz.properties
 */
public class QuartzTest {

    public static void main(String[] args) {
        try {
        	// 第一步
            // Grab the scheduler instance from the Factory
            Scheduler scheduler = StdSchedulerFactory.getDefaultScheduler();
            scheduler.getContext().put("skey", "svalue");
			// 第二步
            // Trigger the job to run now, and then repeat every 40 seconds
            Trigger trigger = TriggerBuilder.newTrigger()
                    .withIdentity("mytrigger", "group1")
                    .usingJobData("t1", "tv1")
//                    .startNow()
                    .withSchedule(SimpleScheduleBuilder.simpleSchedule()
                            .withIntervalInSeconds(3)
                            .repeatForever())
                    .build();

            trigger.getJobDataMap().put("t2", "tv2");

            // define the job and tie it to our HelloJob class
            JobDetail job = JobBuilder.newJob(HelloJob.class)
                    .usingJobData("j1", "jv1")
                    .withIdentity("myjob", "group1")
                    .build();
            job.getJobDataMap().put("j2", "jv2");

            scheduler.deleteJob(job.getKey());

			// 第三步
            // Tell quartz to schedule the job using our trigger
            /**
             * 为什么既有 Job,又有 Trigger 呢?很多任务调度器并不区分 Job 和 Trigger。有些调度器只是简单地通过一个执行时间
             * 和一些 job 标识符来定义一个 Job;其它的一些调度器将 Quartz 的 Job 和 Trigger 对象合二为一。在开发 Quartz 的时候,
             * 我们认为将调度和要调度的任务分离是合理的。在我们看来,这可以带来很多好处。
             *
             * 例如,Job 被创建后,可以保存在 Scheduler 中,与 Trigger 是独立的,同一个 Job可以有多个 Trigger;
             * 这种松耦合的另一个好处是,当与 Scheduler 中的 Job 关联的 trigger 都过期时,可以配置 Job 稍后被重新调度,
             * 而不用重新定义 Job;还有,可以修改或者替换 Trigger,而不用重新定义与之关联的 Job。
             */
            scheduler.scheduleJob(job, trigger);
            // and start it
            // 第四步
            scheduler.start();

            Thread.sleep(Integer.MAX_VALUE);

            scheduler.shutdown();

        } catch (SchedulerException | InterruptedException e) {
            e.printStackTrace();
        }
    }
程序配置
编辑一个quartz.properties文件,内容如下
# Default Properties file for use by StdSchedulerFactory
# to create a Quartz Scheduler Instance, if a different
# properties file is not explicitly specified.
#

## 此调度程序的名称
org.quartz.scheduler.instanceName: DefaultQuartzScheduler
org.quartz.scheduler.skipUpdateCheck=true

org.quartz.threadPool.threadCount: 10
org.quartz.threadPool.threadPriority: 5

org.quartz.jobStore.class = org.quartz.impl.jdbcjobstore.JobStoreTX
org.quartz.jobStore.driverDelegateClass = org.quartz.impl.jdbcjobstore.StdJDBCDelegate
org.quartz.jobStore.tablePrefix = QRTZ_
org.quartz.jobStore.dataSource = myDS
org.quartz.dataSource.myDS.connectionProvider.class:com.alibaba.druid.support.quartz.DruidQuartzConnectionProvider
org.quartz.dataSource.myDS.driverClassName = com.mysql.cj.jdbc.Driver
org.quartz.dataSource.myDS.url = jdbc:mysql://localhost:3306/quartz?characterEncoding=utf-8
org.quartz.dataSource.myDS.username = root
org.quartz.dataSource.myDS.password = root
org.quartz.dataSource.myDS.maxActive = 5

#============================================================================
# Other Example Delegates
#============================================================================
#org.quartz.jobStore.driverDelegateClass=org.quartz.impl.jdbcjobstore.DB2v6Delegate
#org.quartz.jobStore.driverDelegateClass=org.quartz.impl.jdbcjobstore.DB2v7Delegate
#org.quartz.jobStore.driverDelegateClass=org.quartz.impl.jdbcjobstore.DriverDelegate
#org.quartz.jobStore.driverDelegateClass=org.quartz.impl.jdbcjobstore.HSQLDBDelegate
#org.quartz.jobStore.driverDelegateClass=org.quartz.impl.jdbcjobstore.MSSQLDelegate
#org.quartz.jobStore.driverDelegateClass=org.quartz.impl.jdbcjobstore.PointbaseDelegate
#org.quartz.jobStore.driverDelegateClass=org.quartz.impl.jdbcjobstore.PostgreSQLDelegate
#org.quartz.jobStore.driverDelegateClass=org.quartz.impl.jdbcjobstore.StdJDBCDelegate
#org.quartz.jobStore.driverDelegateClass=org.quartz.impl.jdbcjobstore.WebLogicDelegate
#org.quartz.jobStore.driverDelegateClass=org.quartz.impl.jdbcjobstore.oracle.OracleDelegate
#org.quartz.jobStore.driverDelegateClass=org.quartz.impl.jdbcjobstore.oracle.WebLogicOracleDelegate
程序执行
执行QuartzTest时,需要指定启动参数读取配置文件,比如
-Dorg.quartz.properties=D:\Tools\activtiDemo\src\main\resources\quartz.properties
源码分析
1. 启动流程
通过StdSchedulerFactory#getDefaultScheduler获取一个调度器对象。在此过程中会执行org.quartz.impl.StdSchedulerFactory#instantiate()方法完成初始化操作。
此过程中会创建用于任务执行的工作线程
// Get ThreadPool Properties
// ~~~~~~~~~~~~~~~~~~~~~~~~~~~~~~~~~~~~~~~~~~~~~~~

String tpClass = cfg.getStringProperty(PROP_THREAD_POOL_CLASS, SimpleThreadPool.class.getName());

if (tpClass == null) {
    initException = new SchedulerException(
            "ThreadPool class not specified. ");
    throw initException;
}

try {
    tp = (ThreadPool) loadHelper.loadClass(tpClass).newInstance();
} catch (Exception e) {
    initException = new SchedulerException("ThreadPool class '"
            + tpClass + "' could not be instantiated.", e);
    throw initException;
}
tProps = cfg.getPropertyGroup(PROP_THREAD_POOL_PREFIX, true);
try {
    setBeanProps(tp, tProps);
} catch (Exception e) {
    initException = new SchedulerException("ThreadPool class '"
            + tpClass + "' props could not be configured.", e);
    throw initException;
}
线程池实现类使用的默认值,而线程池大小设置为10,线程优先级为正常值(NORM_PRIORITY)。
org.quartz.threadPool.threadCount: 10
org.quartz.threadPool.threadPriority: 5
以及创建JobStore对象
// Get JobStore Properties
// ~~~~~~~~~~~~~~~~~~~~~~~~~~~~~~~~~~~~~~~~~~~~~~~~~

String jsClass = cfg.getStringProperty(PROP_JOB_STORE_CLASS,
        RAMJobStore.class.getName());

if (jsClass == null) {
    initException = new SchedulerException(
            "JobStore class not specified. ");
    throw initException;
}

try {
    js = (JobStore) loadHelper.loadClass(jsClass).newInstance();
} catch (Exception e) {
    initException = new SchedulerException("JobStore class '" + jsClass
            + "' could not be instantiated.", e);
    throw initException;
}

SchedulerDetailsSetter.setDetails(js, schedName, schedInstId);

tProps = cfg.getPropertyGroup(PROP_JOB_STORE_PREFIX, true, new String[] {PROP_JOB_STORE_LOCK_HANDLER_PREFIX});
try {
    setBeanProps(js, tProps);
} catch (Exception e) {
    initException = new SchedulerException("JobStore class '" + jsClass
            + "' props could not be configured.", e);
    throw initException;
}
对应配置为
org.quartz.jobStore.class = org.quartz.impl.jdbcjobstore.JobStoreTX
org.quartz.jobStore.driverDelegateClass = org.quartz.impl.jdbcjobstore.StdJDBCDelegate
org.quartz.jobStore.tablePrefix = QRTZ_
org.quartz.jobStore.dataSource = myDS
默认使用的是内存数据库,但我们这里需要使用外部数据库。
配置了以上参数之后,首先会构造一个JobStoreTX对象,然后分别设置对象以下的属性。
protected Class<? extends DriverDelegate> delegateClass = StdJDBCDelegate.class;
protected String dsName;
protected String tablePrefix = DEFAULT_TABLE_PREFIX;
这里可以看出来,其实driverDelegateClass和tablePrefix是可以不用在配置文件中指定,默认值就是上面配置的值。整个Quartz的调度都离不开中间数据,这些中间数据都是靠JobStore来保存的。JobStoreTX指定使用数据库来保存数据,肯定就离不开数据源了。
初始化JobStore之后,就来创建数据源了
// Set up any DataSources
// ~~~~~~~~~~~~~~~~~~~~~~~~~~~~~~~~~~~~~~~~~~~~~~~~~~

String[] dsNames = cfg.getPropertyGroups(PROP_DATASOURCE_PREFIX);
for (int i = 0; i < dsNames.length; i++) {
    PropertiesParser pp = new PropertiesParser(cfg.getPropertyGroup(
            PROP_DATASOURCE_PREFIX + "." + dsNames[i], true));

    String cpClass = pp.getStringProperty(PROP_CONNECTION_PROVIDER_CLASS, null);

    // custom connectionProvider...
    if(cpClass != null) {
        ConnectionProvider cp = null;
        try {
            cp = (ConnectionProvider) loadHelper.loadClass(cpClass).newInstance();
        } catch (Exception e) {
            initException = new SchedulerException("ConnectionProvider class '" + cpClass
                    + "' could not be instantiated.", e);
            throw initException;
        }

        try {
            // remove the class name, so it isn't attempted to be set
            pp.getUnderlyingProperties().remove(
                    PROP_CONNECTION_PROVIDER_CLASS);

            setBeanProps(cp, pp.getUnderlyingProperties());
            cp.initialize();
        } catch (Exception e) {
            initException = new SchedulerException("ConnectionProvider class '" + cpClass
                    + "' props could not be configured.", e);
            throw initException;
        }

        dbMgr = DBConnectionManager.getInstance();
        dbMgr.addConnectionProvider(dsNames[i], cp);
 	}
 // ... 其他场景省略
这里相关的配置参数为
org.quartz.jobStore.dataSource = myDS
org.quartz.dataSource.myDS.connectionProvider.class:com.alibaba.druid.support.quartz.DruidQuartzConnectionProvider
org.quartz.dataSource.myDS.driverClassName = com.mysql.cj.jdbc.Driver
org.quartz.dataSource.myDS.url = jdbc:mysql://191.168.1.60:3306/quartz?characterEncoding=utf-8
org.quartz.dataSource.myDS.username = tools_user
org.quartz.dataSource.myDS.password = xams_tools_20230714
org.quartz.dataSource.myDS.maxActive = 5
指定了一个名称为myDS数据源,类型为DruidQuartzConnectionProvider,这个数据源是druid数据源专门为Quartz准备的,从上面的源码看,自定义的数据源必须实现ConnectionProvider接口,而DruidQuartzConnectionProvider正好实现了这个接口,并且继承了DruidDataSource。
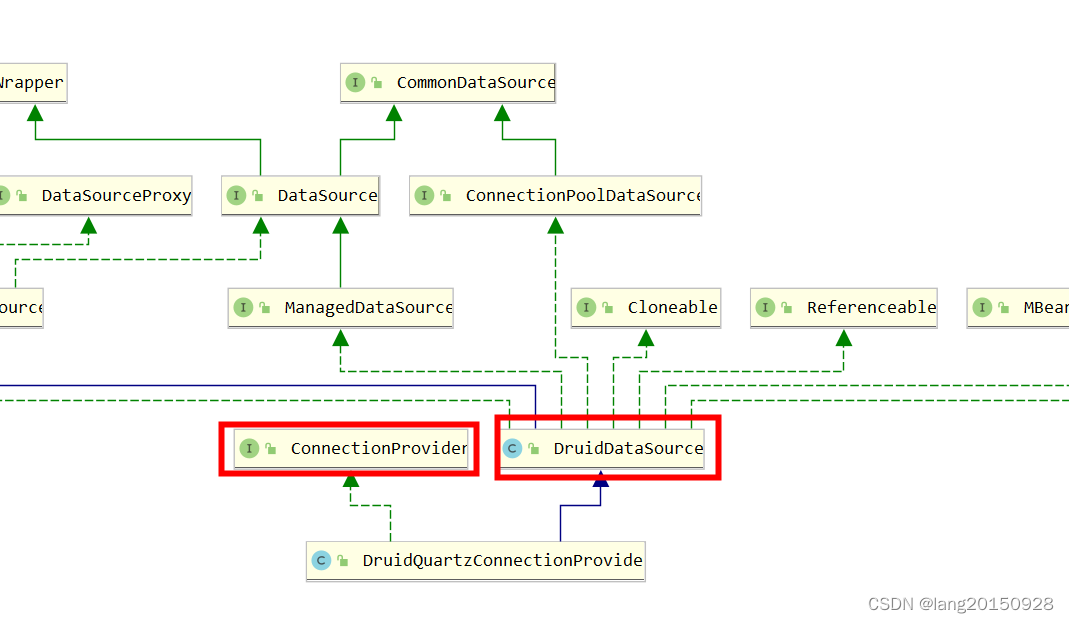
创建完这个连接提供者对象之后,就会交给DBConnectionManager数据库连接管理器来管理。看起来这里跟JobStoreTX没有任何关系,其实这种联系需要等到真正获取连接的时候,才会体现出来。JobStoreTX每次获取连接的时候,会从连接管理器中通过DataSource名称来查找连接。
protected Connection getConnection() throws JobPersistenceException {
    Connection conn;
    try {
        conn = DBConnectionManager.getInstance().getConnection(
                getDataSource());
此时就会根据数据池名称(我们配置的为myDS)查找到对应的数据源对象获取连接了。
public Connection getConnection(String dsName) throws SQLException {
    ConnectionProvider provider = providers.get(dsName);
    if (provider == null) {
        throw new SQLException("There is no DataSource named '"
                + dsName + "'");
    }

    return provider.getConnection();
}
所以以上这些配置最终就定义好了JobStore要操作的数据库了。
2. 创建Job和Trigger并调度
通过构造者模式创建Job和Trigger对象然后调用scheduler.scheduleJob(job, trigger)将Job绑定到Trigger,构造对象不涉及数据库操作,只是简单构造对象,这里不详细。一旦调用scheduleJob方法,在org.quartz.core.QuartzScheduler#scheduleJob(org.quartz.JobDetail, org.quartz.Trigger)方法中,首先会针对Job和Trigger做各种属性检查,然后调用resources.getJobStore().storeJobAndTrigger(jobDetail, trig)来持久化。对应的实现为
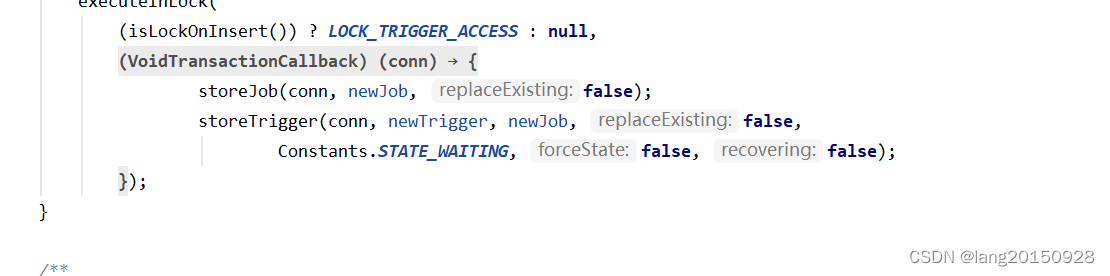
org.quartz.impl.jdbcjobstore.JobStoreSupport#storeJobAndTrigger
public void storeJobAndTrigger(final JobDetail newJob,
        final OperableTrigger newTrigger)
    throws JobPersistenceException {
    executeInLock(
        (isLockOnInsert()) ? LOCK_TRIGGER_ACCESS : null,
        new VoidTransactionCallback() {
            public void executeVoid(Connection conn) throws JobPersistenceException {
                storeJob(conn, newJob, false);
                storeTrigger(conn, newTrigger, newJob, false,
                        Constants.STATE_WAITING, false, false);
            }
        });
}
这里会将storeJob和storeTrigger会放在一个事务当中进行操作,并且使用内存排他锁防止并发。保存Job和Tigger的操作都比较简单,无非是将结果保存到库当中,不过要注意的是,如果Job的JobKey已经存在了,则会报错。
因为storeJob中的第三个参数为false,指定不允许替换。最后执行org.quartz.impl.jdbcjobstore.StdJDBCDelegate#insertJobDetail方法,将Job插入到数据库当中,对应源码如下
public int insertJobDetail(Connection conn, JobDetail job)
     throws IOException, SQLException {
     ByteArrayOutputStream baos = serializeJobData(job.getJobDataMap());

     PreparedStatement ps = null;

     int insertResult = 0;

     try {
         ps = conn.prepareStatement(rtp(INSERT_JOB_DETAIL));
         ps.setString(1, job.getKey().getName());
         ps.setString(2, job.getKey().getGroup());
         ps.setString(3, job.getDescription());
         ps.setString(4, job.getJobClass().getName());
         setBoolean(ps, 5, job.isDurable());
         setBoolean(ps, 6, job.isConcurrentExectionDisallowed());
         setBoolean(ps, 7, job.isPersistJobDataAfterExecution());
         setBoolean(ps, 8, job.requestsRecovery());
         setBytes(ps, 9, baos);

         insertResult = ps.executeUpdate();
     } finally {
         closeStatement(ps);
     }

     return insertResult;
 }
可以看出,这里使用的是标准的原生JDBC来操作数据库,这里的常量org.quartz.impl.jdbcjobstore.StdJDBCConstants#INSERT_JOB_DETAIL定义了操作的数据库SQL。内容为
    // Table names
    String TABLE_JOB_DETAILS = "JOB_DETAILS";

    String INSERT_JOB_DETAIL = "INSERT INTO "
            + TABLE_PREFIX_SUBST + TABLE_JOB_DETAILS + " ("
            + COL_SCHEDULER_NAME + ", " + COL_JOB_NAME
            + ", " + COL_JOB_GROUP + ", " + COL_DESCRIPTION + ", "
            + COL_JOB_CLASS + ", " + COL_IS_DURABLE + ", "
            + COL_IS_NONCONCURRENT +  ", " + COL_IS_UPDATE_DATA + ", "
            + COL_REQUESTS_RECOVERY + ", "
            + COL_JOB_DATAMAP + ") " + " VALUES(" + SCHED_NAME_SUBST + ", ?, ?, ?, ?, ?, ?, ?, ?, ?)";
操作的表为自定义表前缀加上JOB_DETAILS,前缀为QRTZ_,所以这里Job定义保存到了QRTZ_JOB_DETAILS表当中。
StdJDBCConstants这个类中定义了Quartz当中所有操作数据库的SQL定义,很具有参考意义
保存Trigger同样不允许覆盖,另外内部会检查Job是否存在,这里传入的状态为WAITING状态,代表任务处于等待的状态,当然在org.quartz.impl.jdbcjobstore.JobStoreSupport#storeTrigger方法中会涉及到一些状态转换的情况,由于是第一次创建这里不涉及,所以最后保存的状态也是WAITING,保存Trigger的表为QRTZ_TRIGGERS,但Trigger通常没有Job简单,org.quartz.impl.jdbcjobstore.StdJDBCDelegate#insertTrigger源码如下
try {
     ps = conn.prepareStatement(rtp(INSERT_TRIGGER));
     ps.setString(1, trigger.getKey().getName());
     ps.setString(2, trigger.getKey().getGroup());
     ps.setString(3, trigger.getJobKey().getName());
     ps.setString(4, trigger.getJobKey().getGroup());
     ps.setString(5, trigger.getDescription());
     if(trigger.getNextFireTime() != null)
         ps.setBigDecimal(6, new BigDecimal(String.valueOf(trigger
                 .getNextFireTime().getTime())));
     else
         ps.setBigDecimal(6, null);
     long prevFireTime = -1;
     if (trigger.getPreviousFireTime() != null) {
         prevFireTime = trigger.getPreviousFireTime().getTime();
     }
     ps.setBigDecimal(7, new BigDecimal(String.valueOf(prevFireTime)));
     ps.setString(8, state);

     TriggerPersistenceDelegate tDel = findTriggerPersistenceDelegate(trigger);

     String type = TTYPE_BLOB;
     if(tDel != null)
         type = tDel.getHandledTriggerTypeDiscriminator();
     ps.setString(9, type);

     ps.setBigDecimal(10, new BigDecimal(String.valueOf(trigger
             .getStartTime().getTime())));
     long endTime = 0;
     if (trigger.getEndTime() != null) {
         endTime = trigger.getEndTime().getTime();
     }
     ps.setBigDecimal(11, new BigDecimal(String.valueOf(endTime)));
     ps.setString(12, trigger.getCalendarName());
     ps.setInt(13, trigger.getMisfireInstruction());
     setBytes(ps, 14, baos);
     ps.setInt(15, trigger.getPriority());

     insertResult = ps.executeUpdate();

     if(tDel == null)
         insertBlobTrigger(conn, trigger);
     else
         tDel.insertExtendedTriggerProperties(conn, trigger, state, jobDetail);

 } finally {
     closeStatement(ps);
 }
这里不但要计算下一次的触发事件nextFireTime,还需要通过TriggerPersistenceDelegate来处理一些特殊Trigger的额外属性。
protected void addDefaultTriggerPersistenceDelegates() {
    addTriggerPersistenceDelegate(new SimpleTriggerPersistenceDelegate());
    addTriggerPersistenceDelegate(new CronTriggerPersistenceDelegate());
    addTriggerPersistenceDelegate(new CalendarIntervalTriggerPersistenceDelegate());
    addTriggerPersistenceDelegate(new DailyTimeIntervalTriggerPersistenceDelegate());
}

public TriggerPersistenceDelegate findTriggerPersistenceDelegate(OperableTrigger trigger)  {
    for(TriggerPersistenceDelegate delegate: triggerPersistenceDelegates) {
        if(delegate.canHandleTriggerType(trigger))
            return delegate;
    }

    return null;
}
其实这里有四种特殊情况,还包括一种通用情况,从org.quartz.impl.jdbcjobstore.Constants类中以上属性可以看出。
// TRIGGER TYPES
/** Simple Trigger type. */
String TTYPE_SIMPLE = "SIMPLE";

/** Cron Trigger type. */
String TTYPE_CRON = "CRON";

/** Calendar Interval Trigger type. */
String TTYPE_CAL_INT = "CAL_INT";

/** Daily Time Interval Trigger type. */
String TTYPE_DAILY_TIME_INT = "DAILY_I";

/** A general blob Trigger type. */
String TTYPE_BLOB = "BLOB";
比如org.quartz.impl.jdbcjobstore.CronTriggerPersistenceDelegate#canHandleTriggerType的实现为
public boolean canHandleTriggerType(OperableTrigger trigger) {
    return ((trigger instanceof CronTriggerImpl) && !((CronTriggerImpl)trigger).hasAdditionalProperties());
}
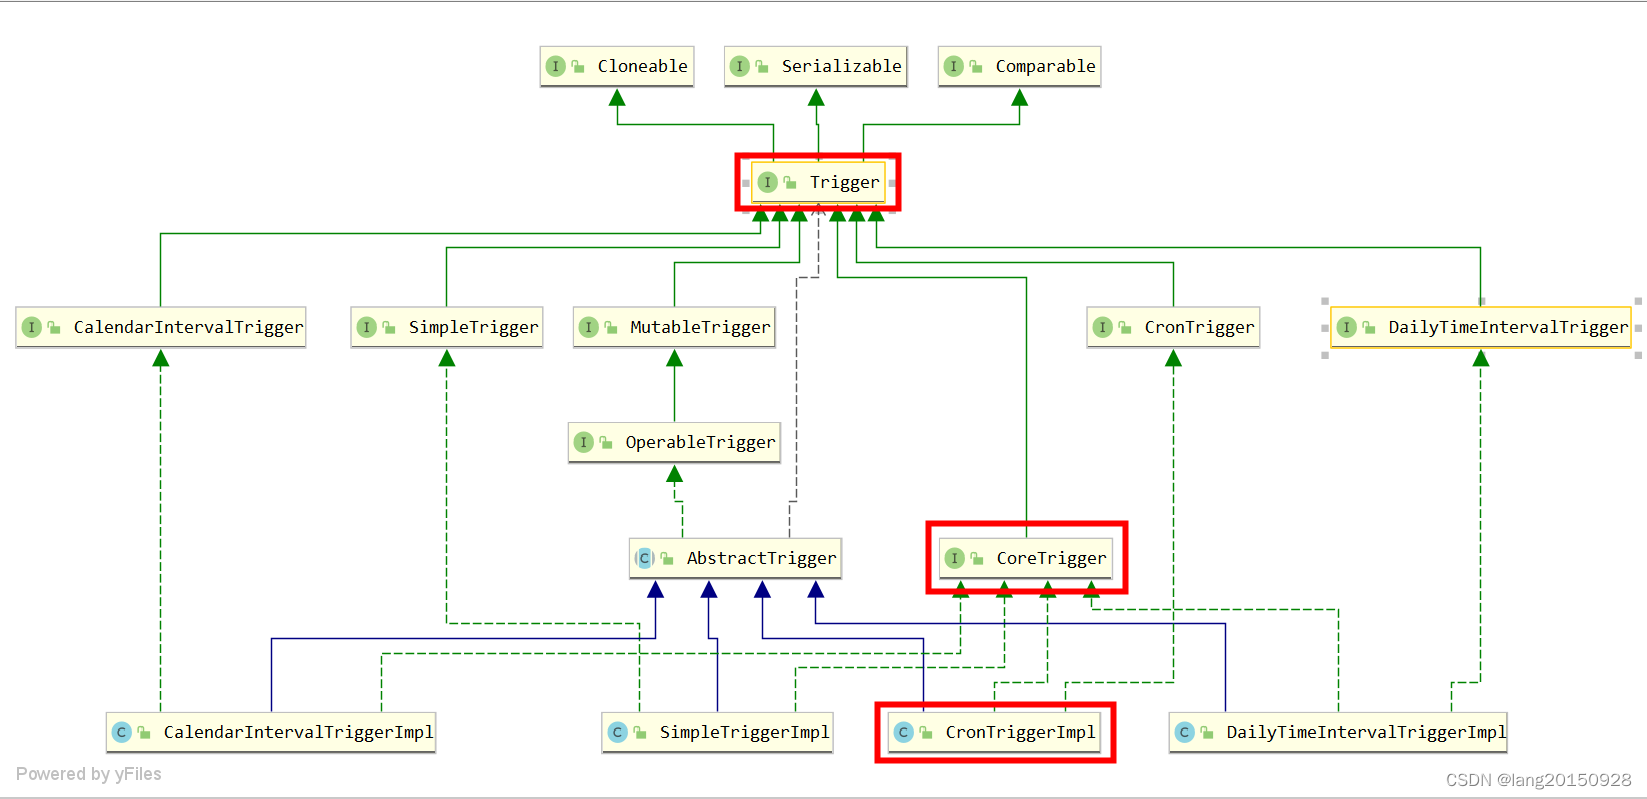
CronTriggerImpl是CronTrigger的实现类,也属于一种Trigger。如果当前传入的是这种类型的Trigger,会在保存数据到QRTZ_TRIGGERS的同时,会调用CronTriggerPersistenceDelegate#insertExtendedTriggerProperties方法将一些额外的参数保存到QRTZ_CRON_TRIGGERS表当中。如下所示
CronTrigger cronTrigger = (CronTrigger)trigger;

PreparedStatement ps = null;

try {
    ps = conn.prepareStatement(Util.rtp(INSERT_CRON_TRIGGER, tablePrefix, schedNameLiteral));
    ps.setString(1, trigger.getKey().getName());
    ps.setString(2, trigger.getKey().getGroup());
    ps.setString(3, cronTrigger.getCronExpression());
    ps.setString(4, cronTrigger.getTimeZone().getID());

    return ps.executeUpdate();
} finally {
    Util.closeStatement(ps);
}
这其中就包含了Cron表达式以及时区编号。如果是最普通的Trigger,则将Trigger定义序列化保存到QRTZ_BLOB_TRIGGERS表当中。
public int insertBlobTrigger(Connection conn, OperableTrigger trigger)
    throws SQLException, IOException {
    PreparedStatement ps = null;
    ByteArrayOutputStream os = null;

    try {
        // update the blob
        os = new ByteArrayOutputStream();
        ObjectOutputStream oos = new ObjectOutputStream(os);
        oos.writeObject(trigger);
        oos.close();

        byte[] buf = os.toByteArray();
        ByteArrayInputStream is = new ByteArrayInputStream(buf);

        ps = conn.prepareStatement(rtp(INSERT_BLOB_TRIGGER));
        ps.setString(1, trigger.getKey().getName());
        ps.setString(2, trigger.getKey().getGroup());
        ps.setBinaryStream(3, is, buf.length);

        return ps.executeUpdate();
    } finally {
        closeStatement(ps);
    }
}
总结一下
| Trigger Type | TriggerPersistenceDelegate | 操作表 |
|---|---|---|
| SIMPLE | SimpleTriggerPersistenceDelegate | QRTZ_SIMPLE_TRIGGERS |
| CRON | CronTriggerPersistenceDelegate | QRTZ_CRON_TRIGGERS |
| CAL_INT | CalendarIntervalTriggerPersistenceDelegate | QRTZ_SIMPROP_TRIGGERS |
| DAILY_I | DailyTimeIntervalTriggerPersistenceDelegate | QRTZ_SIMPROP_TRIGGERS |
| BLOB |
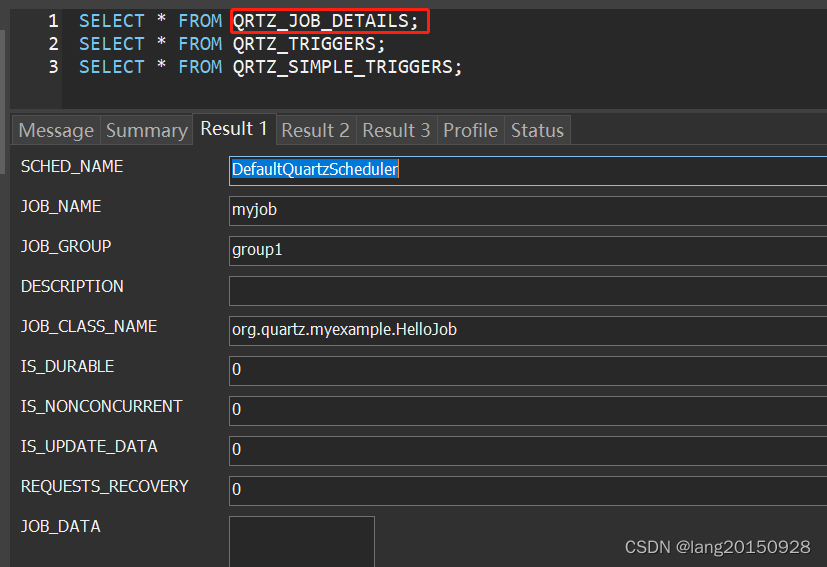
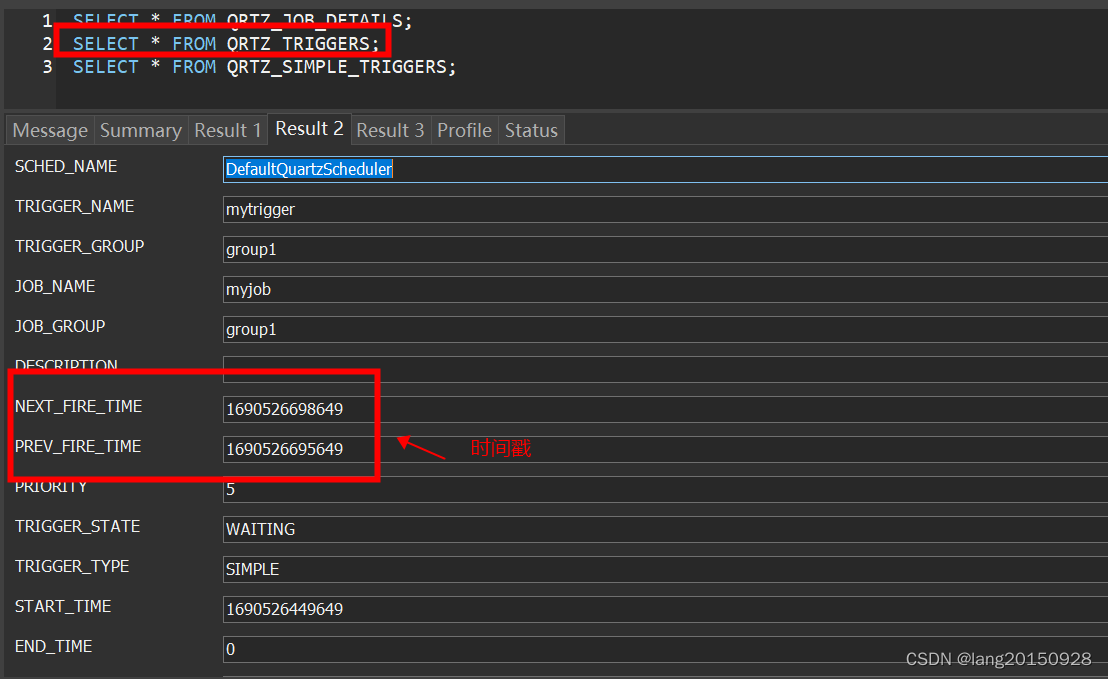
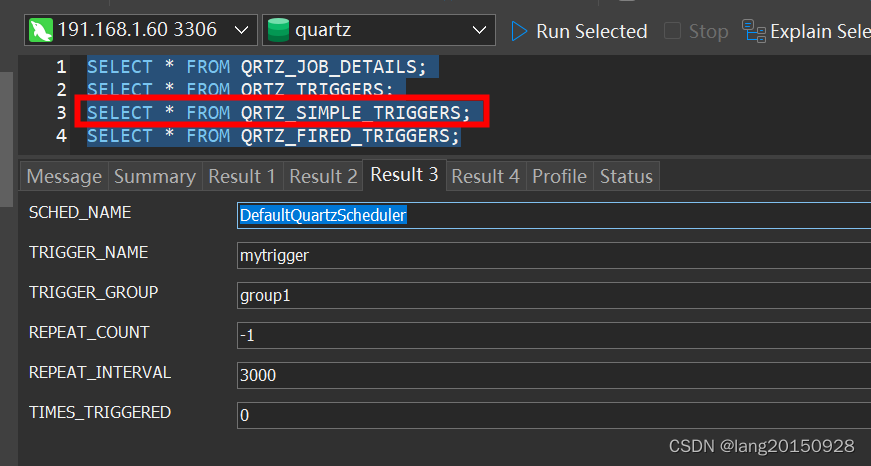
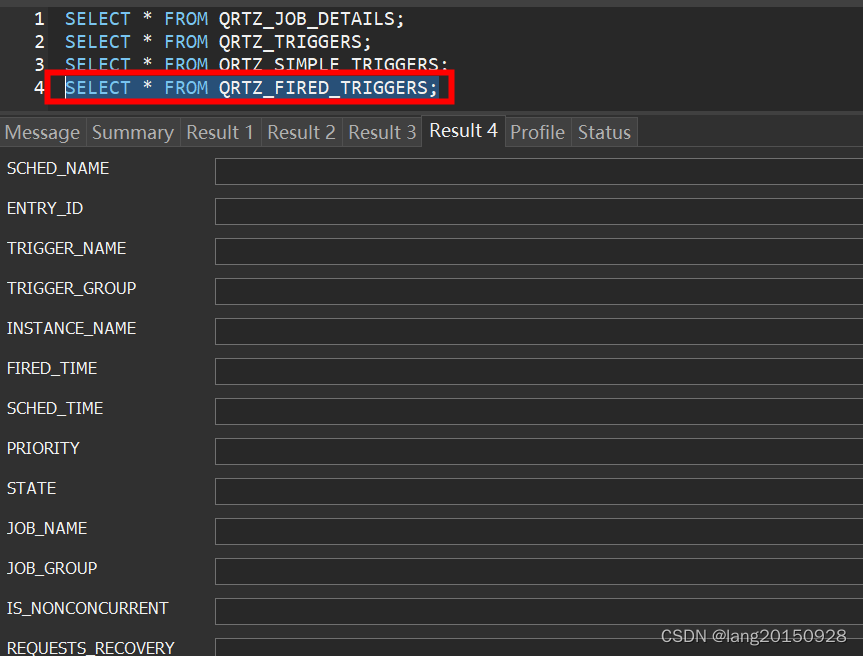
在当前案例中,通过以上操作之后,最终涉及三张表,
SELECT * FROM QRTZ_JOB_DETAILS;
SELECT * FROM QRTZ_TRIGGERS;
SELECT * FROM QRTZ_SIMPLE_TRIGGERS;
数据库中的数据情况如下

3. 启动任务调度器
通过scheduler.start()操作会真实启动调度器,前面无论什么操作,创建的任务并不会真实执行,因为调度线程schedThread(org.quartz.core.QuartzScheduler#schedThread)的paused属性一直还是true,所以这个线程并不能真正进入任务的调度。当然scheduler.start()并不仅仅只是将这个状态修改了,而且针对数据库中的任务调度数据进行了初始化。源码如下:
if (initialStart == null) {
    initialStart = new Date();
    this.resources.getJobStore().schedulerStarted();
    startPlugins();
} else {
    resources.getJobStore().schedulerResumed();
}

schedThread.togglePause(false);
可以看到,这里首先是调用了org.quartz.spi.JobStore#schedulerStarted,然后开启了插件,再触发了paused状态改变。
org.quartz.impl.jdbcjobstore.JobStoreSupport#schedulerStarted中主要是通知JobStore做一些调度开始前的集群初始化或者恢复任务初始化状态,然后启动一个MisfireHandler线程来处理错过触发的任务。默认情况下,Quartz都是单机的,需要配置以下的参数才会是集群模式,所以这里不深入讲解。另外关于任务错过触发以及处理的逻辑这里也不是重点,先不介绍。
org.quartz.jobStore.isClustered=true
这里介绍一下任务恢复操作,对应的源码为org.quartz.impl.jdbcjobstore.JobStoreSupport#recoverJobs()。
/**
 * Recover any failed or misfired jobs and clean up the data store as
 * appropriate.
 *
 * @throws JobPersistenceException if jobs could not be recovered
 */
protected void recoverJobs() throws JobPersistenceException {
    executeInNonManagedTXLock(
        LOCK_TRIGGER_ACCESS,
        new VoidTransactionCallback() {
            public void executeVoid(Connection conn) throws JobPersistenceException {
                recoverJobs(conn);
            }
        }, null);
}
整个恢复工作还是比较复杂的。主要包含以下部分
- 将
QRTZ_TRIGGERS表中BLOCKED和ACQUIRED状态恢复为WAITING状态,PAUSED_BLOCKED和PAUSED_BLOCKED状态修改为PAUSED。
// update inconsistent job states
int rows = getDelegate().updateTriggerStatesFromOtherStates(conn,
        STATE_WAITING, STATE_ACQUIRED, STATE_BLOCKED);

rows += getDelegate().updateTriggerStatesFromOtherStates(conn,
            STATE_PAUSED, STATE_PAUSED_BLOCKED, STATE_PAUSED_BLOCKED);
- 处理错过触发的任务,主要是从
QRTZ_TRIGGERS表中查找错过触发的trigger,然后根据触发器的misfireInstruction属性重新计算下一次触发事件,然后更新数据库的过程。这里和上面谈及的MisfireHandler线程的操作基本一致,只是调用的recoverMisfiredJobs方法中的recovering参数一个为false,一个为true的差别。此处也不详述。
// clean up misfired jobs
recoverMisfiredJobs(conn, true);
- 查找
QRTZ_FIRED_TRIGGERS表中REQUESTS_RECOVERY字段为1(true)的数据,并重新计算下一次触发时间,然后新增一条Trigger数据插入到QRTZ_TRIGGERS表中。
// recover jobs marked for recovery that were not fully executed
List<OperableTrigger> recoveringJobTriggers = getDelegate()
        .selectTriggersForRecoveringJobs(conn);
getLog()
        .info(
                "Recovering "
                        + recoveringJobTriggers.size()
                        + " jobs that were in-progress at the time of the last shut-down.");

for (OperableTrigger recoveringJobTrigger: recoveringJobTriggers) {
    if (jobExists(conn, recoveringJobTrigger.getJobKey())) {
        recoveringJobTrigger.computeFirstFireTime(null);
        storeTrigger(conn, recoveringJobTrigger, null, false,
                STATE_WAITING, false, true);
    }
}
getLog().info("Recovery complete.");
- 删除已完成的触发器
从QRTZ_TRIGGERS表中查询状态为COMPLETE的触发器,然后将其删除。如果触发器对应的任务是非持久的(isDurable属性为false),任务也会被删除掉。
// remove lingering 'complete' triggers...
List<TriggerKey> cts = getDelegate().selectTriggersInState(conn, STATE_COMPLETE);
for(TriggerKey ct: cts) {
    removeTrigger(conn, ct);
}
getLog().info(
    "Removed " + cts.size() + " 'complete' triggers.");

// clean up any fired trigger entries
int n = getDelegate().deleteFiredTriggers(conn);
总结一下:恢复工作就是将未完成的工作重新计算触发时间,并修改状态为WAITING状态,对于已经完成的工作,则删除触发器,甚至是任务。
4. 任务调度
在QuartzSchedulerThread线程启动之后,run方法中会一直处于等待状态,直到在上一步中paused被设置为false。
 while (paused && !halted.get()) {
     try {
         // wait until togglePause(false) is called...
         sigLock.wait(1000L);
     } catch (InterruptedException ignore) {
     }
 }
接下来只要工作线程池有可用线程时,就会进入任务查询和任务执行之中。
int availThreadCount = qsRsrcs.getThreadPool().blockForAvailableThreads();
整体分为三个部分
- 查询下一波待触发的Triggers
triggers = qsRsrcs.getJobStore().acquireNextTriggers(
                                now + idleWaitTime, Math.min(availThreadCount, qsRsrcs.getMaxBatchSize()), qsRsrcs.getBatchTimeWindow());
可以看到这里查询的主要逻辑在org.quartz.spi.JobStore#acquireNextTriggers方法中,这个方法涉及三个参数,分别为
- noLaterThan:满足条件的Trigger的下一次触发时间的最大值,因为任务肯定需要在被执行之前被查询出来,所以这个值必须大于零,要不然没有意义。默认值为30000+当前时间戳,也就是查询未来30s内要执行的Trigger,用户可以通过参数
org.quartz.scheduler.idleWaitTime来指定。 - maxCount:本次查询的最大数量,这个值等于工作线程的可用数量,因为结果列表大于可用工作线程的数量,还是需要等待的
- timeWindow:时间窗口,其实是对noLaterThan的一个补充,默认值为0,可以通过参数
org.quartz.scheduler.batchTriggerAcquisitionFireAheadTimeWindow来配置。真正查询的时候,会将noLaterThan + timeWindow作为DriverDelegate#selectTriggerToAcquire(java.sql.Connection, long, long, int)中noLaterThan参数的值。 - noEarlierThan:这个参数倒不是
acquireNextTriggers中的参数,而是DriverDelegate#selectTriggerToAcquire的参数,和noLaterThan一样,也是用于限制Trigger的条件,只不过noLaterThan用于限制最大值,而noEarlierThan限制最小值。这个值默认为60000L。如下图所示
private long misfireThreshold = 60000L; // one minute

public long getMisfireThreshold() {
    return misfireThreshold;
}

/**
 * The the number of milliseconds by which a trigger must have missed its
 * next-fire-time, in order for it to be considered "misfired" and thus
 * have its misfire instruction applied.
 *
 * @param misfireThreshold the misfire threshold to use, in millis
 */
@SuppressWarnings("UnusedDeclaration") /* called reflectively */
public void setMisfireThreshold(long misfireThreshold) {
    if (misfireThreshold < 1) {
        throw new IllegalArgumentException(
                "Misfirethreshold must be larger than 0");
    }
    this.misfireThreshold = misfireThreshold;
}

protected long getMisfireTime() {
    long misfireTime = System.currentTimeMillis();
    if (getMisfireThreshold() > 0) {
        misfireTime -= getMisfireThreshold();
    }

    return (misfireTime > 0) ? misfireTime : 0;
}
可以通过参数org.quartz.jobStore.misfireThreshold来配置,但是不能小于1。真正的查询方法如下
List<TriggerKey> keys = getDelegate().selectTriggerToAcquire(conn, noLaterThan + timeWindow, getMisfireTime(), maxCount);
对应的SQL语句为
SELECT TRIGGER_NAME, TRIGGER_GROUP, NEXT_FIRE_TIME, PRIORITY FROM QRTZ_TRIGGERS WHERE SCHED_NAME = {1} AND TRIGGER_STATE = ? AND NEXT_FIRE_TIME <= ? AND (MISFIRE_INSTR = -1 OR (MISFIRE_INSTR != -1 AND NEXT_FIRE_TIME >= ?)) ORDER BY NEXT_FIRE_TIME ASC, PRIORITY DESC
其中{1}是调度器的实例名字DefaultQuartzScheduler,通过参数org.quartz.scheduler.instanceName指定的。默认值为QuartzScheduler。而TRIGGER_STATE是在方法中写死的。如下所示
ps = conn.prepareStatement(rtp(SELECT_NEXT_TRIGGER_TO_ACQUIRE));

// Set max rows to retrieve
if (maxCount < 1)
    maxCount = 1; // we want at least one trigger back.
ps.setMaxRows(maxCount);

// Try to give jdbc driver a hint to hopefully not pull over more than the few rows we actually need.
// Note: in some jdbc drivers, such as MySQL, you must set maxRows before fetchSize, or you get exception!
ps.setFetchSize(maxCount);

ps.setString(1, STATE_WAITING);
ps.setBigDecimal(2, new BigDecimal(String.valueOf(noLaterThan)));
ps.setBigDecimal(3, new BigDecimal(String.valueOf(noEarlierThan)));
rs = ps.executeQuery();
所以以上的查询语句最后类似于
SELECT TRIGGER_NAME, TRIGGER_GROUP, NEXT_FIRE_TIME, PRIORITY
FROM QRTZ_TRIGGERS
WHERE SCHED_NAME = 'DefaultQuartzScheduler'
AND TRIGGER_STATE = 'WAITING'
AND NEXT_FIRE_TIME <= #{noLaterThan}
AND ( MISFIRE_INSTR = -1 OR (MISFIRE_INSTR != -1 AND NEXT_FIRE_TIME >= #{noEarlierThan}))
ORDER BY NEXT_FIRE_TIME ASC, PRIORITY DESC
这里MISFIRE_INSTR为-1则代表当任务错过触发之后会被立即触发,对应以下常量。
/**
 * Instructs the <code>{@link Scheduler}</code> that the
 * <code>Trigger</code> will never be evaluated for a misfire situation,
 * and that the scheduler will simply try to fire it as soon as it can,
 * and then update the Trigger as if it had fired at the proper time.
 *
 * <p>NOTE: if a trigger uses this instruction, and it has missed
 * several of its scheduled firings, then several rapid firings may occur
 * as the trigger attempt to catch back up to where it would have been.
 * For example, a SimpleTrigger that fires every 15 seconds which has
 * misfired for 5 minutes will fire 20 times once it gets the chance to
 * fire.</p>
 */
public static final int MISFIRE_INSTRUCTION_IGNORE_MISFIRE_POLICY = -1;
对于非-1的,需要额外的机制处理,这里限制在noEarlierThan时间内的才算满足条件。
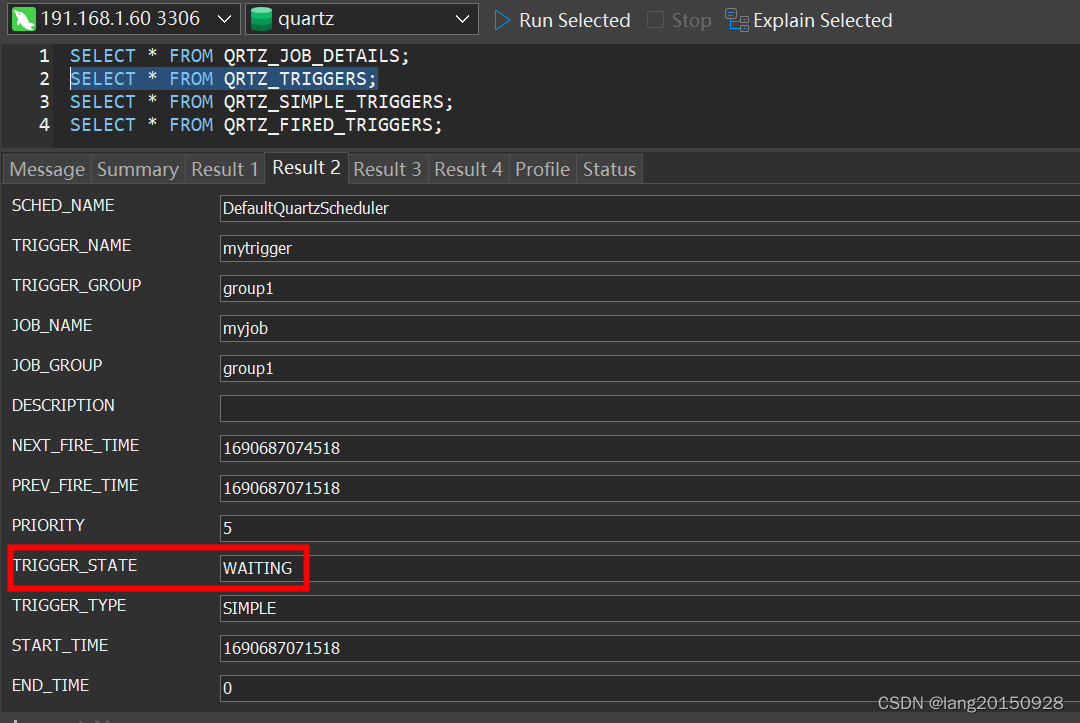
通过以上语句如果有值,则会再次验证触发器和Job是否存在。这里除了QRTZ_TRIGGERS表之外,还有插入的时候涉及的相关表,比如QRTZ_SIMPLE_TRIGGERS或是QRTZ_CRON_TRIGGERS,取决于TRIGGER_TYPE,前面总结过,这里顺带提一下。因为如果报错找不到,不一定是QRTZ_TRIGGERS少了数据。如果以上都没有问题,则会执行以下操作。
// We now have a acquired trigger, let's add to return list.
// If our trigger was no longer in the expected state, try a new one.
int rowsUpdated = getDelegate().updateTriggerStateFromOtherState(conn, triggerKey, STATE_ACQUIRED, STATE_WAITING);
if (rowsUpdated <= 0) {
    continue; // next trigger
}
nextTrigger.setFireInstanceId(getFiredTriggerRecordId());
getDelegate().insertFiredTrigger(conn, nextTrigger, STATE_ACQUIRED, null);
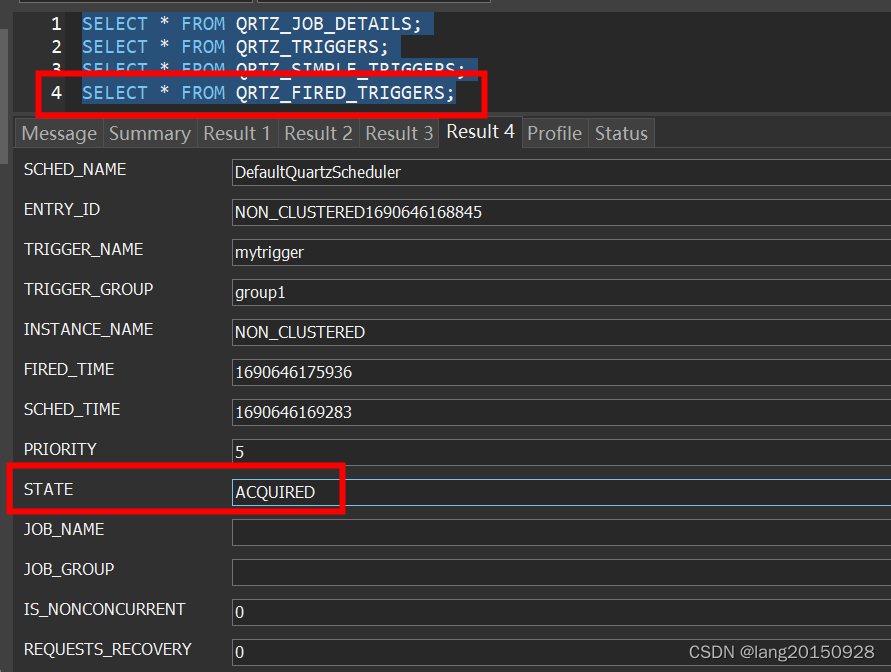
这里首先会将QRTZ_TRIGGERS表中的数据状态从WAITING更改为ACQUIRED,注意这里其实是一个CAS操作,如果失败了,任务不会被触发(continue操作了)。修改成功,则会往QRTZ_FIRED_TRIGGERS表中插入一条数据,状态为ACQUIRED。
UPDATE QRTZ_TRIGGERS
SET TRIGGER_STATE = 'ACQUIRED'
WHERE SCHED_NAME = 'DefaultQuartzScheduler'
AND TRIGGER_NAME = ? AND TRIGGER_GROUP = ?
AND TRIGGER_STATE = 'WAITING'
INSERT INTO QRTZ_FIRED_TRIGGERS
(SCHED_NAME, ENTRY_ID, TRIGGER_NAME, TRIGGER_GROUP, INSTANCE_NAME, FIRED_TIME, SCHED_TIME, STATE, JOB_NAME, JOB_GROUP, IS_NONCONCURRENT, REQUESTS_RECOVERY, PRIORITY) VALUES
('DefaultQuartzScheduler', ?, ?, ?, ?, ?, ?, 'ACQUIRED', ?, ?, ?, ?, ?)
此时数据库中相关数据如下图

- 修改Trigger状态为executing
源码对应为
List<TriggerFiredResult> res = qsRsrcs.getJobStore().triggersFired(triggers);
最终调用org.quartz.impl.jdbcjobstore.JobStoreSupport#triggerFired,这里首先会检查Trigger的状态是否为ACQUIRED,主要是保证没有被并发修改。
// Make sure trigger wasn't deleted, paused, or completed...
try { // if trigger was deleted, state will be STATE_DELETED
    String state = getDelegate().selectTriggerState(conn,
            trigger.getKey());
    if (!state.equals(STATE_ACQUIRED)) {
        return null;
    }
} catch (SQLException e) {
    throw new JobPersistenceException("Couldn't select trigger state: "
            + e.getMessage(), e);
}
还要检查Job是否存在,通常不会有问题。
try {
    job = retrieveJob(conn, trigger.getJobKey());
    if (job == null) { return null; }
} catch (JobPersistenceException jpe) {
    try {
        getLog().error("Error retrieving job, setting trigger state to ERROR.", jpe);
        getDelegate().updateTriggerState(conn, trigger.getKey(),
                STATE_ERROR);
    } catch (SQLException sqle) {
        getLog().error("Unable to set trigger state to ERROR.", sqle);
    }
    throw jpe;
}
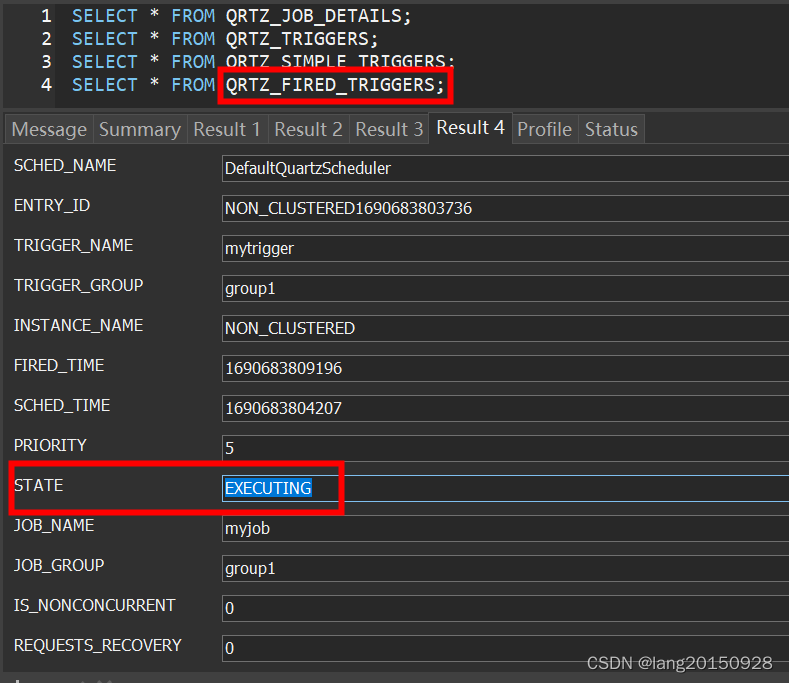
修改QRTZ_FIRED_TRIGGERS表中对应数据的状态为EXECUTING(原来的状态为ACQUIRED)。
 try {
     getDelegate().updateFiredTrigger(conn, trigger, STATE_EXECUTING, job);
 } catch (SQLException e) {
     throw new JobPersistenceException("Couldn't insert fired trigger: "
             + e.getMessage(), e);
 }
还会根据任务是否支持并发、Trigger是否还有下一次触发时间(比如一次性触发不会再次触发),会修改Trigger的状态以及下一次触发时间。
// call triggered - to update the trigger's next-fire-time state...
trigger.triggered(cal);

String state = STATE_WAITING;
boolean force = true;

if (job.isConcurrentExectionDisallowed()) {
    state = STATE_BLOCKED;
    force = false;
// ... 并发情况省略
}

if (trigger.getNextFireTime() == null) {
    state = STATE_COMPLETE;
    force = true;
}

storeTrigger(conn, trigger, job, true, state, force, false);
本案例中会将Trigger的状态改为WAITING,并修改下一次触发时间。最后QRTZ_FIRED_TRIGGERS表中的状态为EXECUTING,QRTZ_TRIGGERS中除了下一次触发时间,其他不变。
- 将任务交给工作线程执行
JobRunShell shell = null;
 try {
     shell = qsRsrcs.getJobRunShellFactory().createJobRunShell(bndle);
     shell.initialize(qs);
 } catch (SchedulerException se) {
     qsRsrcs.getJobStore().triggeredJobComplete(triggers.get(i), bndle.getJobDetail(), CompletedExecutionInstruction.SET_ALL_JOB_TRIGGERS_ERROR);
     continue;
 }

 if (qsRsrcs.getThreadPool().runInThread(shell) == false) {
     // this case should never happen, as it is indicative of the
     // scheduler being shutdown or a bug in the thread pool or
     // a thread pool being used concurrently - which the docs
     // say not to do...
     getLog().error("ThreadPool.runInThread() return false!");
     qsRsrcs.getJobStore().triggeredJobComplete(triggers.get(i), bndle.getJobDetail(), CompletedExecutionInstruction.SET_ALL_JOB_TRIGGERS_ERROR);
 }
}
这里会将触发器包装到一个JobRunShell任务里面,这里JobRunShell具体类型取决于JobRunShellFactory类型,而这个工厂的类型在org.quartz.impl.StdSchedulerFactory#initialize()方法中相关源码如下所示
boolean wrapJobInTx = false;
wrapJobInTx = cfg.getBooleanProperty(PROP_SCHED_WRAP_JOB_IN_USER_TX,
        wrapJobInTx);
// Fire everything up
// ~~~~~~~~~~~~~~~~~~~~~~~~~~~~~~~~~~~~~~~~~~~~~~~~~~~~~~
try {
    JobRunShellFactory jrsf = null; // Create correct run-shell factory...

    if (userTXLocation != null) {
        UserTransactionHelper.setUserTxLocation(userTXLocation);
    }

    if (wrapJobInTx) {
        jrsf = new JTAJobRunShellFactory();
    } else {
        jrsf = new JTAAnnotationAwareJobRunShellFactory();
    }
// ... 其他省略
默认值为JTAAnnotationAwareJobRunShellFactory,如果参数org.quartz.scheduler.wrapJobExecutionInUserTransaction配置为true,则使用JTAJobRunShellFactory。
这里会调用JTAAnnotationAwareJobRunShellFactory#createJobRunShell创建一个JobRunShell对象。源码如下
/**
 * <p>
 * Called by the <class>{@link org.quartz.core.QuartzSchedulerThread}
 * </code> to obtain instances of <code>
 * {@link org.quartz.core.JobRunShell}</code>.
 * </p>
 */
public JobRunShell createJobRunShell(TriggerFiredBundle bundle)
        throws SchedulerException {
    ExecuteInJTATransaction jtaAnnotation = ClassUtils.getAnnotation(bundle.getJobDetail().getJobClass(), ExecuteInJTATransaction.class);
    if(jtaAnnotation == null)
        return new JobRunShell(scheduler, bundle);
    else {
        int timeout = jtaAnnotation.timeout();
        if (timeout >= 0) {
            return new JTAJobRunShell(scheduler, bundle, timeout);
        } else {
            return new JTAJobRunShell(scheduler, bundle);
        }
    }
}
由于Job实现类上面没有注解,所以会创建一个基础的JobRunShell对象。接下来会执行初始化,初始化主要是通过反射创建一个Job对象,也就是本案例中的HelloJob实例。这里创建对象又用到了工厂模式,不同的工厂逻辑不同,这里org.quartz.spi.JobFactory主要有以下三个实现类。

其中SimpleJobFactory只会创建一个HelloJob实例,而org.quartz.simpl.PropertySettingJobFactory则会通过反射尝试为这个实例设置属性。本案例中HelloJob并没有属性,所以用哪个关系不大。SpringBeanJobFactory则是Spring提供的一个实现,使用了Spring的依赖注入来填充属性。默认实现为PropertySettingJobFactory,可以通过org.quartz.impl.StdScheduler#setJobFactory方法进行修改。
JobRunShell本身是一个Runnable实现类,最终工作线程会调用run方法来执行具体的Job。
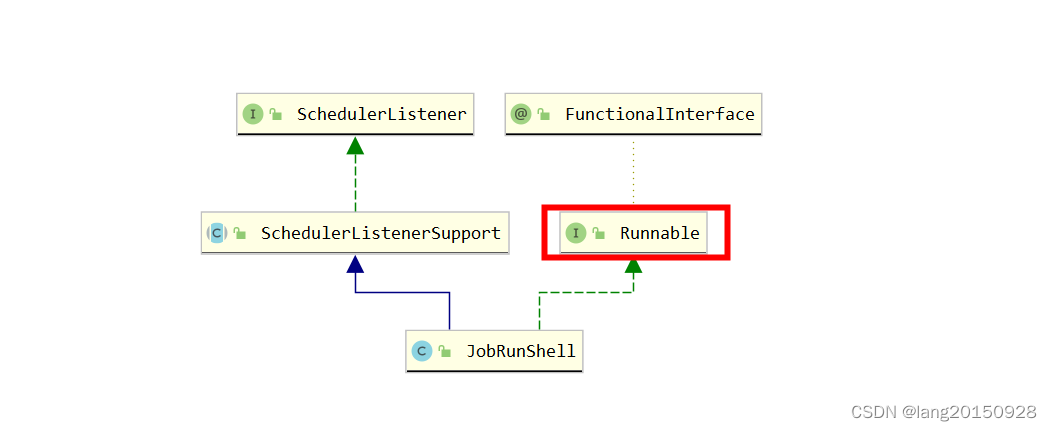
其实现如下
public void run() {
    qs.addInternalSchedulerListener(this);

    try {
        OperableTrigger trigger = (OperableTrigger) jec.getTrigger();
        JobDetail jobDetail = jec.getJobDetail();

        do {

            JobExecutionException jobExEx = null;
            Job job = jec.getJobInstance();

            try {
                begin();
            } catch (SchedulerException se) {
             // ... 异常处理逻辑
            }

            // notify job & trigger listeners...
            try {
                if (!notifyListenersBeginning(jec)) {
                    break;
                }
            } catch(VetoedException ve) {
               // ... 异常处理逻辑
            }

            long startTime = System.currentTimeMillis();
            long endTime = startTime;

            // execute the job
            try {
                log.debug("Calling execute on job " + jobDetail.getKey());
                job.execute(jec);
                endTime = System.currentTimeMillis();
            } catch (JobExecutionException jee) {
             	// ... 异常处理逻辑
            } catch (Throwable e) {
             	// ... 异常处理逻辑
            }

            jec.setJobRunTime(endTime - startTime);

            // notify all job listeners
            if (!notifyJobListenersComplete(jec, jobExEx)) {
                break;
            }

            CompletedExecutionInstruction instCode = CompletedExecutionInstruction.NOOP;

            // update the trigger
            try {
                instCode = trigger.executionComplete(jec, jobExEx);
            } catch (Exception e) {
                // If this happens, there's a bug in the trigger...
                SchedulerException se = new SchedulerException(
                        "Trigger threw an unhandled exception.", e);
                qs.notifySchedulerListenersError(
                        "Please report this error to the Quartz developers.",
                        se);
            }

            // notify all trigger listeners
            if (!notifyTriggerListenersComplete(jec, instCode)) {
                break;
            }

            // update job/trigger or re-execute job
            if (instCode == CompletedExecutionInstruction.RE_EXECUTE_JOB) {
                jec.incrementRefireCount();
                try {
                    complete(false);
                } catch (SchedulerException se) {
                    qs.notifySchedulerListenersError("Error executing Job ("
                            + jec.getJobDetail().getKey()
                            + ": couldn't finalize execution.", se);
                }
                continue;
            }

            try {
                complete(true);
            } catch (SchedulerException se) {
                qs.notifySchedulerListenersError("Error executing Job ("
                        + jec.getJobDetail().getKey()
                        + ": couldn't finalize execution.", se);
                continue;
            }

            qs.notifyJobStoreJobComplete(trigger, jobDetail, instCode);
            break;
        } while (true);

    } finally {
        qs.removeInternalSchedulerListener(this);
    }
}
这里在真正执行任务的前后为子类保留了扩展(默认没有实现),如下所示
protected void begin() throws SchedulerException {
}

protected void complete(boolean successfulExecution)
    throws SchedulerException {
}
另外还有一些监听器通知的操作,简化一下如下所示
begin();
notifyListenersBeginning(jec);
job.execute(jec);  // 真正执行任务
notifyJobListenersComplete(jec, jobExEx);
CompletedExecutionInstruction instCode = CompletedExecutionInstruction.NOOP;
instCode = trigger.executionComplete(jec, jobExEx);
notifyTriggerListenersComplete(jec, instCode);
complete(true);
qs.notifyJobStoreJobComplete(trigger, jobDetail, instCode);
其中job.execute(jec)会执行真实Job实现逻辑,而trigger.executionComplete会决定instCode 结果值,最后在qs.notifyJobStoreJobComplete中会执行org.quartz.spi.JobStore#triggeredJobComplete方法,会根据instCode 的值更新QRTZ_TRIGGERS表中的状态值,
- SET_TRIGGER_COMPLETE 修改状态为COMPLETE
- SET_TRIGGER_ERROR 修改状态为ERROR
- SET_ALL_JOB_TRIGGERS_COMPLETE 修改状态为COMPLETE
- SET_ALL_JOB_TRIGGERS_ERROR 修改状态为 ERROR
- NOOP 不做修改 状态保持为
WAITING
并最终删除QRTZ_FIRED_TRIGGERS表中的值。结果如下

总结一下触发器状态的变化如下表所示
| 表名 | scheduleJob | acquireNextTriggers | triggersFired | triggeredJobComplete |
|---|---|---|---|---|
| QRTZ_TRIGGERS | WAITING | (CAS)ACQUIRED | WAITING | WAITING |
| QRTZ_FIRED_TRIGGERS | ACQUIRED | EXECUTING |
上面在
acquireNextTriggers时修改QRTZ_TRIGGERS状态使用的CAS操作防止并发操作。这里修改失败,也不会有后续操作。
附录一
tables_mysql_innodb.sql脚本内容
#
# In your Quartz properties file, you'll need to set
# org.quartz.jobStore.driverDelegateClass = org.quartz.impl.jdbcjobstore.StdJDBCDelegate
#
#
# By: Ron Cordell - roncordell
#  I didn't see this anywhere, so I thought I'd post it here. This is the script from Quartz to create the tables in a MySQL database, modified to use INNODB instead of MYISAM.

DROP TABLE IF EXISTS QRTZ_FIRED_TRIGGERS;
DROP TABLE IF EXISTS QRTZ_PAUSED_TRIGGER_GRPS;
DROP TABLE IF EXISTS QRTZ_SCHEDULER_STATE;
DROP TABLE IF EXISTS QRTZ_LOCKS;
DROP TABLE IF EXISTS QRTZ_SIMPLE_TRIGGERS;
DROP TABLE IF EXISTS QRTZ_SIMPROP_TRIGGERS;
DROP TABLE IF EXISTS QRTZ_CRON_TRIGGERS;
DROP TABLE IF EXISTS QRTZ_BLOB_TRIGGERS;
DROP TABLE IF EXISTS QRTZ_TRIGGERS;
DROP TABLE IF EXISTS QRTZ_JOB_DETAILS;
DROP TABLE IF EXISTS QRTZ_CALENDARS;

CREATE TABLE QRTZ_JOB_DETAILS(
SCHED_NAME VARCHAR(120) NOT NULL,
JOB_NAME VARCHAR(200) NOT NULL,
JOB_GROUP VARCHAR(200) NOT NULL,
DESCRIPTION VARCHAR(250) NULL,
JOB_CLASS_NAME VARCHAR(250) NOT NULL,
IS_DURABLE VARCHAR(1) NOT NULL,
IS_NONCONCURRENT VARCHAR(1) NOT NULL,
IS_UPDATE_DATA VARCHAR(1) NOT NULL,
REQUESTS_RECOVERY VARCHAR(1) NOT NULL,
JOB_DATA BLOB NULL,
PRIMARY KEY (SCHED_NAME,JOB_NAME,JOB_GROUP))
ENGINE=InnoDB;

CREATE TABLE QRTZ_TRIGGERS (
SCHED_NAME VARCHAR(120) NOT NULL,
TRIGGER_NAME VARCHAR(200) NOT NULL,
TRIGGER_GROUP VARCHAR(200) NOT NULL,
JOB_NAME VARCHAR(200) NOT NULL,
JOB_GROUP VARCHAR(200) NOT NULL,
DESCRIPTION VARCHAR(250) NULL,
NEXT_FIRE_TIME BIGINT(13) NULL,
PREV_FIRE_TIME BIGINT(13) NULL,
PRIORITY INTEGER NULL,
TRIGGER_STATE VARCHAR(16) NOT NULL,
TRIGGER_TYPE VARCHAR(8) NOT NULL,
START_TIME BIGINT(13) NOT NULL,
END_TIME BIGINT(13) NULL,
CALENDAR_NAME VARCHAR(200) NULL,
MISFIRE_INSTR SMALLINT(2) NULL,
JOB_DATA BLOB NULL,
PRIMARY KEY (SCHED_NAME,TRIGGER_NAME,TRIGGER_GROUP),
FOREIGN KEY (SCHED_NAME,JOB_NAME,JOB_GROUP)
REFERENCES QRTZ_JOB_DETAILS(SCHED_NAME,JOB_NAME,JOB_GROUP))
ENGINE=InnoDB;

CREATE TABLE QRTZ_SIMPLE_TRIGGERS (
SCHED_NAME VARCHAR(120) NOT NULL,
TRIGGER_NAME VARCHAR(200) NOT NULL,
TRIGGER_GROUP VARCHAR(200) NOT NULL,
REPEAT_COUNT BIGINT(7) NOT NULL,
REPEAT_INTERVAL BIGINT(12) NOT NULL,
TIMES_TRIGGERED BIGINT(10) NOT NULL,
PRIMARY KEY (SCHED_NAME,TRIGGER_NAME,TRIGGER_GROUP),
FOREIGN KEY (SCHED_NAME,TRIGGER_NAME,TRIGGER_GROUP)
REFERENCES QRTZ_TRIGGERS(SCHED_NAME,TRIGGER_NAME,TRIGGER_GROUP))
ENGINE=InnoDB;

CREATE TABLE QRTZ_CRON_TRIGGERS (
SCHED_NAME VARCHAR(120) NOT NULL,
TRIGGER_NAME VARCHAR(200) NOT NULL,
TRIGGER_GROUP VARCHAR(200) NOT NULL,
CRON_EXPRESSION VARCHAR(120) NOT NULL,
TIME_ZONE_ID VARCHAR(80),
PRIMARY KEY (SCHED_NAME,TRIGGER_NAME,TRIGGER_GROUP),
FOREIGN KEY (SCHED_NAME,TRIGGER_NAME,TRIGGER_GROUP)
REFERENCES QRTZ_TRIGGERS(SCHED_NAME,TRIGGER_NAME,TRIGGER_GROUP))
ENGINE=InnoDB;

CREATE TABLE QRTZ_SIMPROP_TRIGGERS
  (
    SCHED_NAME VARCHAR(120) NOT NULL,
    TRIGGER_NAME VARCHAR(200) NOT NULL,
    TRIGGER_GROUP VARCHAR(200) NOT NULL,
    STR_PROP_1 VARCHAR(512) NULL,
    STR_PROP_2 VARCHAR(512) NULL,
    STR_PROP_3 VARCHAR(512) NULL,
    INT_PROP_1 INT NULL,
    INT_PROP_2 INT NULL,
    LONG_PROP_1 BIGINT NULL,
    LONG_PROP_2 BIGINT NULL,
    DEC_PROP_1 NUMERIC(13,4) NULL,
    DEC_PROP_2 NUMERIC(13,4) NULL,
    BOOL_PROP_1 VARCHAR(1) NULL,
    BOOL_PROP_2 VARCHAR(1) NULL,
    PRIMARY KEY (SCHED_NAME,TRIGGER_NAME,TRIGGER_GROUP),
    FOREIGN KEY (SCHED_NAME,TRIGGER_NAME,TRIGGER_GROUP)
    REFERENCES QRTZ_TRIGGERS(SCHED_NAME,TRIGGER_NAME,TRIGGER_GROUP))
ENGINE=InnoDB;

CREATE TABLE QRTZ_BLOB_TRIGGERS (
SCHED_NAME VARCHAR(120) NOT NULL,
TRIGGER_NAME VARCHAR(200) NOT NULL,
TRIGGER_GROUP VARCHAR(200) NOT NULL,
BLOB_DATA BLOB NULL,
PRIMARY KEY (SCHED_NAME,TRIGGER_NAME,TRIGGER_GROUP),
INDEX (SCHED_NAME,TRIGGER_NAME, TRIGGER_GROUP),
FOREIGN KEY (SCHED_NAME,TRIGGER_NAME,TRIGGER_GROUP)
REFERENCES QRTZ_TRIGGERS(SCHED_NAME,TRIGGER_NAME,TRIGGER_GROUP))
ENGINE=InnoDB;

CREATE TABLE QRTZ_CALENDARS (
SCHED_NAME VARCHAR(120) NOT NULL,
CALENDAR_NAME VARCHAR(200) NOT NULL,
CALENDAR BLOB NOT NULL,
PRIMARY KEY (SCHED_NAME,CALENDAR_NAME))
ENGINE=InnoDB;

CREATE TABLE QRTZ_PAUSED_TRIGGER_GRPS (
SCHED_NAME VARCHAR(120) NOT NULL,
TRIGGER_GROUP VARCHAR(200) NOT NULL,
PRIMARY KEY (SCHED_NAME,TRIGGER_GROUP))
ENGINE=InnoDB;

CREATE TABLE QRTZ_FIRED_TRIGGERS (
SCHED_NAME VARCHAR(120) NOT NULL,
ENTRY_ID VARCHAR(95) NOT NULL,
TRIGGER_NAME VARCHAR(200) NOT NULL,
TRIGGER_GROUP VARCHAR(200) NOT NULL,
INSTANCE_NAME VARCHAR(200) NOT NULL,
FIRED_TIME BIGINT(13) NOT NULL,
SCHED_TIME BIGINT(13) NOT NULL,
PRIORITY INTEGER NOT NULL,
STATE VARCHAR(16) NOT NULL,
JOB_NAME VARCHAR(200) NULL,
JOB_GROUP VARCHAR(200) NULL,
IS_NONCONCURRENT VARCHAR(1) NULL,
REQUESTS_RECOVERY VARCHAR(1) NULL,
PRIMARY KEY (SCHED_NAME,ENTRY_ID))
ENGINE=InnoDB;

CREATE TABLE QRTZ_SCHEDULER_STATE (
SCHED_NAME VARCHAR(120) NOT NULL,
INSTANCE_NAME VARCHAR(200) NOT NULL,
LAST_CHECKIN_TIME BIGINT(13) NOT NULL,
CHECKIN_INTERVAL BIGINT(13) NOT NULL,
PRIMARY KEY (SCHED_NAME,INSTANCE_NAME))
ENGINE=InnoDB;

CREATE TABLE QRTZ_LOCKS (
SCHED_NAME VARCHAR(120) NOT NULL,
LOCK_NAME VARCHAR(40) NOT NULL,
PRIMARY KEY (SCHED_NAME,LOCK_NAME))
ENGINE=InnoDB;

CREATE INDEX IDX_QRTZ_J_REQ_RECOVERY ON QRTZ_JOB_DETAILS(SCHED_NAME,REQUESTS_RECOVERY);
CREATE INDEX IDX_QRTZ_J_GRP ON QRTZ_JOB_DETAILS(SCHED_NAME,JOB_GROUP);

CREATE INDEX IDX_QRTZ_T_J ON QRTZ_TRIGGERS(SCHED_NAME,JOB_NAME,JOB_GROUP);
CREATE INDEX IDX_QRTZ_T_JG ON QRTZ_TRIGGERS(SCHED_NAME,JOB_GROUP);
CREATE INDEX IDX_QRTZ_T_C ON QRTZ_TRIGGERS(SCHED_NAME,CALENDAR_NAME);
CREATE INDEX IDX_QRTZ_T_G ON QRTZ_TRIGGERS(SCHED_NAME,TRIGGER_GROUP);
CREATE INDEX IDX_QRTZ_T_STATE ON QRTZ_TRIGGERS(SCHED_NAME,TRIGGER_STATE);
CREATE INDEX IDX_QRTZ_T_N_STATE ON QRTZ_TRIGGERS(SCHED_NAME,TRIGGER_NAME,TRIGGER_GROUP,TRIGGER_STATE);
CREATE INDEX IDX_QRTZ_T_N_G_STATE ON QRTZ_TRIGGERS(SCHED_NAME,TRIGGER_GROUP,TRIGGER_STATE);
CREATE INDEX IDX_QRTZ_T_NEXT_FIRE_TIME ON QRTZ_TRIGGERS(SCHED_NAME,NEXT_FIRE_TIME);
CREATE INDEX IDX_QRTZ_T_NFT_ST ON QRTZ_TRIGGERS(SCHED_NAME,TRIGGER_STATE,NEXT_FIRE_TIME);
CREATE INDEX IDX_QRTZ_T_NFT_MISFIRE ON QRTZ_TRIGGERS(SCHED_NAME,MISFIRE_INSTR,NEXT_FIRE_TIME);
CREATE INDEX IDX_QRTZ_T_NFT_ST_MISFIRE ON QRTZ_TRIGGERS(SCHED_NAME,MISFIRE_INSTR,NEXT_FIRE_TIME,TRIGGER_STATE);
CREATE INDEX IDX_QRTZ_T_NFT_ST_MISFIRE_GRP ON QRTZ_TRIGGERS(SCHED_NAME,MISFIRE_INSTR,NEXT_FIRE_TIME,TRIGGER_GROUP,TRIGGER_STATE);

CREATE INDEX IDX_QRTZ_FT_TRIG_INST_NAME ON QRTZ_FIRED_TRIGGERS(SCHED_NAME,INSTANCE_NAME);
CREATE INDEX IDX_QRTZ_FT_INST_JOB_REQ_RCVRY ON QRTZ_FIRED_TRIGGERS(SCHED_NAME,INSTANCE_NAME,REQUESTS_RECOVERY);
CREATE INDEX IDX_QRTZ_FT_J_G ON QRTZ_FIRED_TRIGGERS(SCHED_NAME,JOB_NAME,JOB_GROUP);
CREATE INDEX IDX_QRTZ_FT_JG ON QRTZ_FIRED_TRIGGERS(SCHED_NAME,JOB_GROUP);
CREATE INDEX IDX_QRTZ_FT_T_G ON QRTZ_FIRED_TRIGGERS(SCHED_NAME,TRIGGER_NAME,TRIGGER_GROUP);
CREATE INDEX IDX_QRTZ_FT_TG ON QRTZ_FIRED_TRIGGERS(SCHED_NAME,TRIGGER_GROUP);

commit;