系列文章
【如何训练一个中英翻译模型】LSTM机器翻译seq2seq字符编码(一)
【如何训练一个中英翻译模型】LSTM机器翻译模型训练与保存(二)
【如何训练一个中英翻译模型】LSTM机器翻译模型部署(三)
【如何训练一个中英翻译模型】LSTM机器翻译模型部署之onnx(python)(四)
目录
- 一、事前准备
- 二、.h5模型保存为TFSaveModel格式样例
- 三、模型转换
- 1、encoder_model的转换
- 1).h5模型保存为TFSaveModel
- 2)TFSaveModel格式模型保存为onnx模型
- 3)onnx模型简化
- 2、decoder_model的转换
- 1).h5模型保存为TFSaveModel
- 2)TFSaveModel格式模型保存为onnx模型
- 3)onnx模型简化
- 4、onnx模型推理
- 1)加载模型数据
- 2)查看模型输入输出信息
- 3)模型推理搭建
- 4)模型推理
- 5)完整代码
一、事前准备
先把要用到的几个工具说一下:
ncnn:https://github.com/Tencent/ncnn
tf2onnx:https://github.com/onnx/tensorflow-onnx
netron:https://netron.app
onnxsim:https://github.com/daquexian/onnx-simplifier
onnxruntime:https://github.com/microsoft/onnxruntime
以上工具的安装与使用后面会抽空补充一下,在这里先记录下,以免忘记了
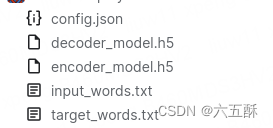
有了工具之后,我们还需要以下几个文件:
这几个文件可以在前面的文章【如何训练一个中译英翻译器】LSTM机器翻译模型训练与保存(二)训练一个模型并保存模型得到,最快的方式就是运行文章最后的kaggle notebook,直接得到文件,然后下载下来即可
二、.h5模型保存为TFSaveModel格式样例
要将tf模型转为onnx模型,我们需要先将格式为.h5的tf模型保存为saved_model的格式,先给出样例:
import tensorflow as tf
from keras.models import load_model

# 加载Keras模型
model = load_model('encoder_model.h5')

# 转换为SavedModel类型
tf.saved_model.save(model, 'TFSaveModel')
三、模型转换
1、encoder_model的转换
1).h5模型保存为TFSaveModel
import tensorflow as tf
from keras.models import load_model

# 加载Keras模型
model = load_model('encoder_model.h5')

# 转换为SavedModel类型
tf.saved_model.save(model, 'TFSaveModel')
2)TFSaveModel格式模型保存为onnx模型
python3 -m tf2onnx.convert --saved-model TFSaveModel --output onnxModel/encoder_model.onnx
3)onnx模型简化
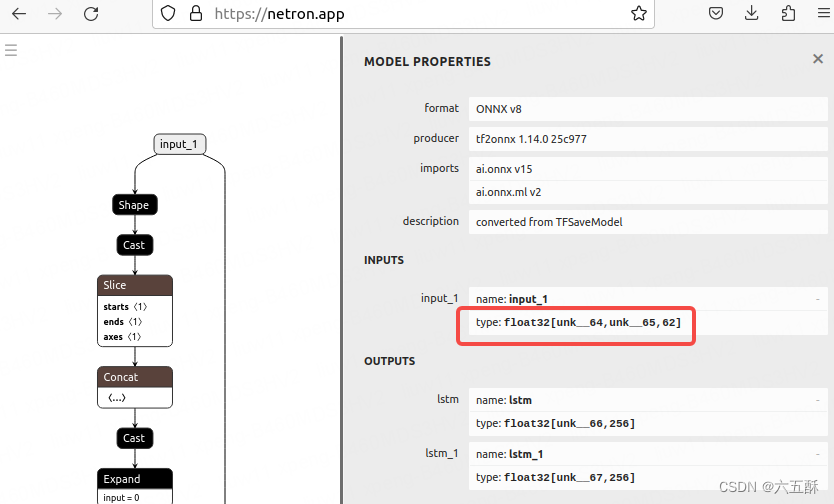
打开https://netron.app/来看下网络结构,主要是先看输入部分的维度(网络结构后面会细讲)
可以看到输入维度:
input_1:[unk__64、unk__65、62]
我们需要将 unk__64、unk__65 这两个改为具体数值,否则在导出ncnn模型时会报一些op不支持的错误,那么问题来了,要怎么改,我也不知道啊!!!
哈哈哈,开完笑的,都写出来了,怎么会不知道,请听我慢慢说来。
 [unk__64、unk__65、62]
其实数据第一个unk__64是batch,第二个unk__65是输入句子的最大长度,第三个62是字符总数量,我们在推理时,batch size一般为1,所以这个input_1的shape就是[1,max_encoder_seq_length, num_encoder_tokens](num_encoder_tokens模型已经帮我们填好了)
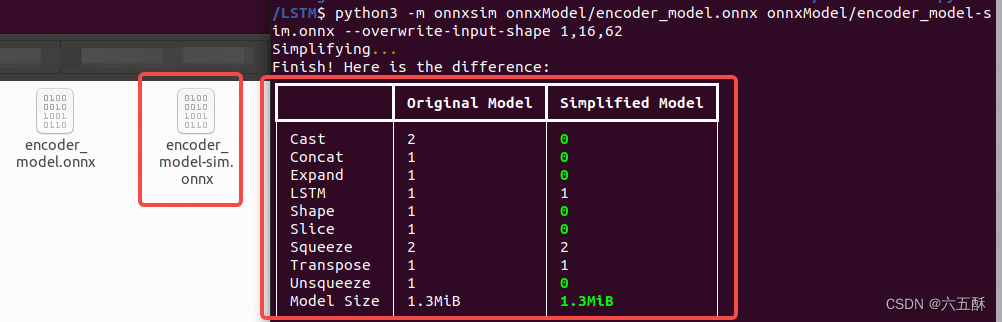
max_encoder_seq_length, num_encoder_tokens 这两个参数可以在训练的时候获取到了,拿到这个input shape 之后,对onnx模型进行simplify,我训练出来的模型时得到的shape是[1,16,62],因此执行以下命令:
python3 -m onnxsim onnxModel/encoder_model.onnx onnxModel/encoder_model-sim.onnx --overwrite-input-shape 1,16,62
可得到简化后的onnx模型
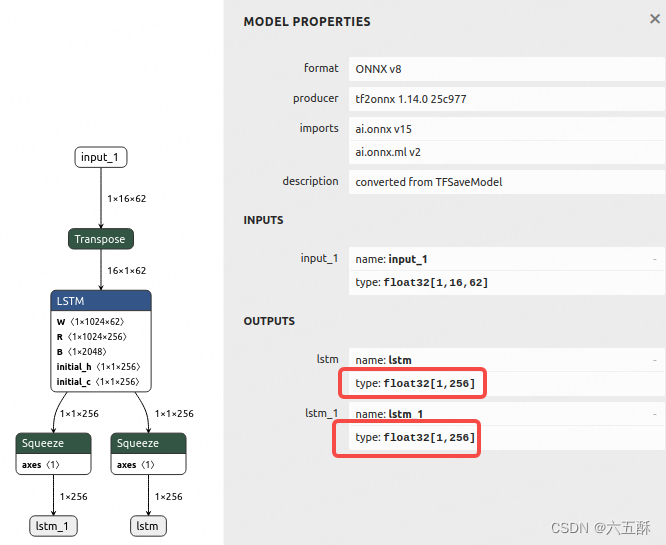
这个时候,我们再用https://netron.app打开encoder_model-sim.onnx,可以看到encoder模型的输出了,有两个输出,均为[1,256]的维度
2、decoder_model的转换
然后我们需要对decoder_model.h5也进行转换,
1).h5模型保存为TFSaveModel
import tensorflow as tf
from keras.models import load_model

# 加载Keras模型
model = load_model('decoder_model.h5')

# 转换为SavedModel类型
tf.saved_model.save(model, 'TFSaveModel')
2)TFSaveModel格式模型保存为onnx模型
python3 -m tf2onnx.convert --saved-model TFSaveModel --output onnxModel/decoder_model.onnx
3)onnx模型简化
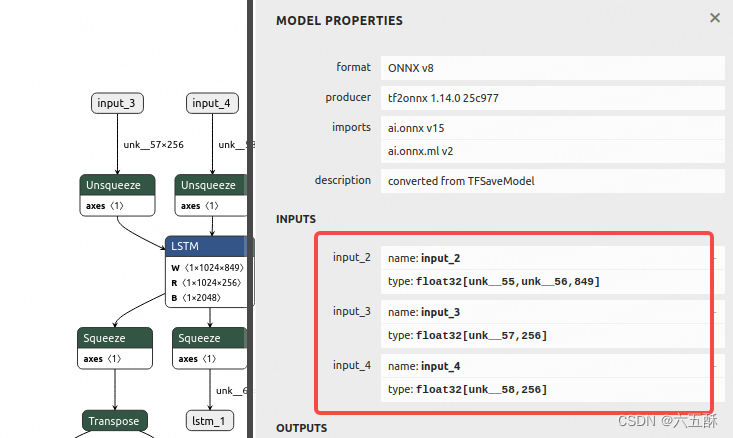
同样打开模型来看,能看到一共有三个输入:
input_2:[unk__55,unk__56,849]
input_3:[unk__57,256]
input_4:[unk__58,256]
其中,input_3、input_4为encoder的输出,因此可以得到这两个输入维度均为[1,256]
那么,input_2的维度是多少,我们接着往下看。
我们想一想,解码器除了接受编码器的数据,还有什么数据没给它,没有错,就是target_characters的特征,对于英译中而言就是中文的字符,要解码器解出中文,肯定要把中文数据给它,要不然你让解码器去解空气啊,实际上这个 input_2的维度就是
target_seq = np.zeros((1, 1, num_decoder_tokens))
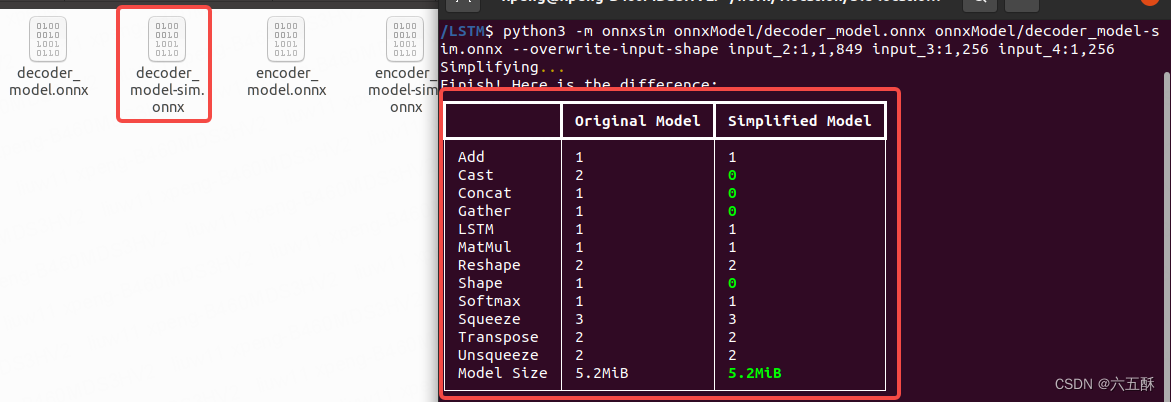
num_decoder_tokens同样可以在训练的时候获取到(至于不知道怎么来的,可以看这个系列文章的第一、二篇),我这边得到的num_decoder_tokens是849,当然实际上这个模型的 input_2:[unk__55,unk__56,849]已经给了num_decoder_tokens,我们只需要把unk__55,unk__56都改为1就可以了,即[1,1,849],那么对onnx进行simplify
python3 -m onnxsim onnxModel/decoder_model.onnx onnxModel/decoder_model-sim.onnx --overwrite-input-shape input_2:1,1,849 input_3:1,256 input_4:1,256
成功完成simplify可得到:
4、onnx模型推理
到最后一步了,导出onnx模型后,要试试这个模型怎么样,所以拿过来推理一波,推理代码是从前面文章【如何训练一个中译英翻译器】LSTM机器翻译模型训练与保存(二)的第小6节模型加载与推理里面的代码改过来的,感兴趣的小伙伴可以去看看两者的差异
1)加载模型数据
模型数据的加载主要是加载input_words.txt、target_words.txt、config.json、encoder_model-sim.onnx、decoder_model-sim.onnx 这几个文件
input_words.txt、target_words.txt:为输入输出字符表
config.json:为最长输入长度与最长输出长度
encoder_model-sim.onnx、decoder_model-sim.onnx :为导出的onnx模型
import onnxruntime
import numpy as np
# 加载字符
# 从 input_words.txt 文件中读取字符串
with open('config/input_words.txt', 'r') as f:
    input_words = f.readlines()
    input_characters = [line.rstrip('\n') for line in input_words]

# 从 target_words.txt 文件中读取字符串
with open('config/target_words.txt', 'r', newline='') as f:
    target_words = [line.strip() for line in f.readlines()]
    target_characters = [char.replace('\\t', '\t').replace('\\n', '\n') for char in target_words]

#字符处理,以方便进行编码
input_token_index = dict([(char, i) for i, char in enumerate(input_characters)])
target_token_index = dict([(char, i) for i, char in enumerate(target_characters)])

# something readable.
reverse_input_char_index = dict(
    (i, char) for char, i in input_token_index.items())
reverse_target_char_index = dict(
    (i, char) for char, i in target_token_index.items())
num_encoder_tokens = len(input_characters) # 英文字符数量
num_decoder_tokens = len(target_characters) # 中文文字数量

import json
with open('config/config.json', 'r') as file:
    loaded_data = json.load(file)

# 从加载的数据中获取max_encoder_seq_length和max_decoder_seq_length的值
max_encoder_seq_length = loaded_data["max_encoder_seq_length"]
max_decoder_seq_length = loaded_data["max_decoder_seq_length"]


encoderSess = onnxruntime.InferenceSession('onnxModel/encoder_model-sim.onnx')
decoderSess = onnxruntime.InferenceSession('onnxModel/decoder_model-sim.onnx')
2)查看模型输入输出信息
查看输入输出信息主要是为了获取输入名称,在进行模型输入的时候,要先知道模型有哪些输入,维度是多少,才能输入正确的数据
print("----------------- 输入部分 -----------------")
input_tensors = encoderSess.get_inputs()  # 该 API 会返回列表
for input_tensor in input_tensors:         # 因为可能有多个输入,所以为列表

    input_info = {
        "name" : input_tensor.name,
        "type" : input_tensor.type,
        "shape": input_tensor.shape,
    }
    print(input_info)

print("----------------- 输出部分 -----------------")
output_tensors = encoderSess.get_outputs()  # 该 API 会返回列表
for output_tensor in output_tensors:         # 因为可能有多个输出,所以为列表

    output_info = {
        "name" : output_tensor.name,
        "type" : output_tensor.type,
        "shape": output_tensor.shape,
    }
    print(output_info)


print("----------------- 输入部分 -----------------")
input_tensors = decoderSess.get_inputs()  # 该 API 会返回列表
for input_tensor in input_tensors:         # 因为可能有多个输入,所以为列表

    input_info = {
        "name" : input_tensor.name,
        "type" : input_tensor.type,
        "shape": input_tensor.shape,
    }
    print(input_info)

print("----------------- 输出部分 -----------------")
output_tensors = decoderSess.get_outputs()  # 该 API 会返回列表
for output_tensor in output_tensors:         # 因为可能有多个输出,所以为列表

    output_info = {
        "name" : output_tensor.name,
        "type" : output_tensor.type,
        "shape": output_tensor.shape,
    }
    print(output_info)
3)模型推理搭建
def decode_sequence(input_seq):
    # Encode the input as state vectors.
    states_value = encoderSess.run(None, {'input_1': input_seq})
    # Generate empty target sequence of length 1.
    target_seq = np.zeros((1, 1, num_decoder_tokens), dtype=np.float32)
    # Populate the first character of target sequence with the start character.
    target_seq[0, 0, target_token_index['\t']] = 1.
    # this target_seq you can treat as initial state
    # Sampling loop for a batch of sequences
    # (to simplify, here we assume a batch of size 1).
    stop_condition = False
    decoded_sentence = ''
    while not stop_condition:
        output_tokens, h, c = decoderSess.run(None, {'input_2': target_seq, 'input_3': states_value[0], 'input_4': states_value[1]})
        # Sample a token
        # argmax: Returns the indices of the maximum values along an axis
        # just like find the most possible char
        sampled_token_index = np.argmax(output_tokens[0, -1, :])
        # find char using index
        sampled_char = reverse_target_char_index[sampled_token_index]
        # and append sentence
        decoded_sentence += sampled_char
        # Exit condition: either hit max length
        # or find stop character.
        if (sampled_char == '\n' or len(decoded_sentence) > max_decoder_seq_length):
            stop_condition = True
        # Update the target sequence (of length 1).
        # append then ?
        # creating another new target_seq
        # and this time assume sampled_token_index to 1.0
        target_seq = np.zeros((1, 1, num_decoder_tokens), dtype=np.float32)
        target_seq[0, 0, sampled_token_index] = 1.
        # Update states
        # update states, frome the front parts
        states_value = [h, c]
    return decoded_sentence


input_text = "Call me."
encoder_input_data = np.zeros(
    (1,max_encoder_seq_length, num_encoder_tokens),
    dtype='float32')
for t, char in enumerate(input_text):
    # 3D vector only z-index has char its value equals 1.0
    encoder_input_data[0,t, input_token_index[char]] = 1.
4)模型推理
input_seq = encoder_input_data
decoded_sentence = decode_sequence(input_seq)
print('-')
print('Input sentence:', input_text)
print('Decoded sentence:', decoded_sentence)
5)完整代码
import onnxruntime
import numpy as np
# 加载字符
# 从 input_words.txt 文件中读取字符串
with open('config/input_words.txt', 'r') as f:
    input_words = f.readlines()
    input_characters = [line.rstrip('\n') for line in input_words]

# 从 target_words.txt 文件中读取字符串
with open('config/target_words.txt', 'r', newline='') as f:
    target_words = [line.strip() for line in f.readlines()]
    target_characters = [char.replace('\\t', '\t').replace('\\n', '\n') for char in target_words]

#字符处理,以方便进行编码
input_token_index = dict([(char, i) for i, char in enumerate(input_characters)])
target_token_index = dict([(char, i) for i, char in enumerate(target_characters)])

# something readable.
reverse_input_char_index = dict(
    (i, char) for char, i in input_token_index.items())
reverse_target_char_index = dict(
    (i, char) for char, i in target_token_index.items())
num_encoder_tokens = len(input_characters) # 英文字符数量
num_decoder_tokens = len(target_characters) # 中文文字数量

import json
with open('config/config.json', 'r') as file:
    loaded_data = json.load(file)

# 从加载的数据中获取max_encoder_seq_length和max_decoder_seq_length的值
max_encoder_seq_length = loaded_data["max_encoder_seq_length"]
max_decoder_seq_length = loaded_data["max_decoder_seq_length"]


encoderSess = onnxruntime.InferenceSession('onnxModel/encoder_model-sim.onnx')
decoderSess = onnxruntime.InferenceSession('onnxModel/decoder_model-sim.onnx')


print("----------------- 输入部分 -----------------")
input_tensors = encoderSess.get_inputs()  # 该 API 会返回列表
for input_tensor in input_tensors:         # 因为可能有多个输入,所以为列表

    input_info = {
        "name" : input_tensor.name,
        "type" : input_tensor.type,
        "shape": input_tensor.shape,
    }
    print(input_info)

print("----------------- 输出部分 -----------------")
output_tensors = encoderSess.get_outputs()  # 该 API 会返回列表
for output_tensor in output_tensors:         # 因为可能有多个输出,所以为列表

    output_info = {
        "name" : output_tensor.name,
        "type" : output_tensor.type,
        "shape": output_tensor.shape,
    }
    print(output_info)


print("----------------- 输入部分 -----------------")
input_tensors = decoderSess.get_inputs()  # 该 API 会返回列表
for input_tensor in input_tensors:         # 因为可能有多个输入,所以为列表

    input_info = {
        "name" : input_tensor.name,
        "type" : input_tensor.type,
        "shape": input_tensor.shape,
    }
    print(input_info)

print("----------------- 输出部分 -----------------")
output_tensors = decoderSess.get_outputs()  # 该 API 会返回列表
for output_tensor in output_tensors:         # 因为可能有多个输出,所以为列表

    output_info = {
        "name" : output_tensor.name,
        "type" : output_tensor.type,
        "shape": output_tensor.shape,
    }
    print(output_info)


def decode_sequence(input_seq):
    # Encode the input as state vectors.
    states_value = encoderSess.run(None, {'input_1': input_seq})
    # Generate empty target sequence of length 1.
    target_seq = np.zeros((1, 1, num_decoder_tokens), dtype=np.float32)
    # Populate the first character of target sequence with the start character.
    target_seq[0, 0, target_token_index['\t']] = 1.
    # this target_seq you can treat as initial state
    # Sampling loop for a batch of sequences
    # (to simplify, here we assume a batch of size 1).
    stop_condition = False
    decoded_sentence = ''
    while not stop_condition:
        output_tokens, h, c = decoderSess.run(None, {'input_2': target_seq, 'input_3': states_value[0], 'input_4': states_value[1]})
        # Sample a token
        # argmax: Returns the indices of the maximum values along an axis
        # just like find the most possible char
        sampled_token_index = np.argmax(output_tokens[0, -1, :])
        # find char using index
        sampled_char = reverse_target_char_index[sampled_token_index]
        # and append sentence
        decoded_sentence += sampled_char
        # Exit condition: either hit max length
        # or find stop character.
        if (sampled_char == '\n' or len(decoded_sentence) > max_decoder_seq_length):
            stop_condition = True
        # Update the target sequence (of length 1).
        # append then ?
        # creating another new target_seq
        # and this time assume sampled_token_index to 1.0
        target_seq = np.zeros((1, 1, num_decoder_tokens), dtype=np.float32)
        target_seq[0, 0, sampled_token_index] = 1.
        # Update states
        # update states, frome the front parts
        states_value = [h, c]
    return decoded_sentence


input_text = "Call me."
encoder_input_data = np.zeros(
    (1,max_encoder_seq_length, num_encoder_tokens),
    dtype='float32')
for t, char in enumerate(input_text):
    # 3D vector only z-index has char its value equals 1.0
    encoder_input_data[0,t, input_token_index[char]] = 1.


input_seq = encoder_input_data
decoded_sentence = decode_sequence(input_seq)
print('-')
print('Input sentence:', input_text)
print('Decoded sentence:', decoded_sentence)
可以看到运行结果:

代码比较简单,然后也有加一些注释,就不再细讲了,要不然就显得有点啰嗦,有疑问的可以留言,欢迎交流!