JDBCTemplate
是Spring对JDBC的封装,使用JDBCTemplate方便实现对数据的操作。
<!-- orm:Object relationship mapping m对象 关系 映射-->
引入依赖
<!--        基于Maven依赖的传递性,导入spring-content依赖即可导入当前所需的所有jar包-->
        <dependency>
            <groupId>org.springframework</groupId>
            <artifactId>spring-context</artifactId>
            <version>5.2.5.RELEASE</version>
        </dependency>
        <!--        Mybatis核心-->
        <dependency>
            <groupId>org.mybatis</groupId>
            <artifactId>mybatis</artifactId>
            <version>3.5.9</version>
        </dependency>
        <!--        junit-->
        <dependency>
            <groupId>junit</groupId>
            <artifactId>junit</artifactId>
            <version>4.12</version>
            <scope>test</scope>
        </dependency>
        <!--        MySQL-->
        <dependency>
            <groupId>mysql</groupId>
            <artifactId>mysql-connector-java</artifactId>
            <version>8.0.18</version>
        </dependency>
        <!--        LomBok-->
        <dependency>
            <groupId>org.projectlombok</groupId>
            <artifactId>lombok</artifactId>
            <version>1.18.10</version>
        </dependency>
        <!--        log4j日志-->
        <dependency>
            <groupId>log4j</groupId>
            <artifactId>log4j</artifactId>
            <version>1.2.12</version>
        </dependency>
<!--        spring持久层jar包-->
<!--        orm:Object relationship mapping m对象 关系 映射-->
        <dependency>
            <groupId>org.springframework</groupId>
            <artifactId>spring-orm</artifactId>
            <version>5.3.1</version>
        </dependency>
<!--        德鲁伊数据库连接池-->
        <dependency>
            <groupId>com.alibaba</groupId>
            <artifactId>druid</artifactId>
            <version>1.1.21</version>
        </dependency>
创建实体类
User
package com.lobo.entity;

import lombok.AllArgsConstructor;
import lombok.Data;
import lombok.NoArgsConstructor;
import lombok.ToString;

/**
 * className: User<br/>
 * author: MacieSerenity <br/>
 * date: 2022-08-14 14:24
 **/
@Data
@NoArgsConstructor
@AllArgsConstructor
@ToString
public class User {
    private Integer id;
    private String username;
    private String password;
    private Integer age;
    private String email;
}
准备DataSource
jdbc-config.properties
#jdbc.properties
jdbc.driver=com.mysql.cj.jdbc.Driver
jdbc.url=jdbc:mysql://localhost:3306/mybatisstudy?useUnicode=true&characterEncoding=utf8&serverTimezone=GMT
jdbc.username=root
jdbc.password=li1473606768
Spring配置文件
<?xml version="1.0" encoding="UTF-8"?>
<beans xmlns="http://www.springframework.org/schema/beans"
       xmlns:xsi="http://www.w3.org/2001/XMLSchema-instance"
       xmlns:context="http://www.springframework.org/schema/context"
       xsi:schemaLocation="
       http://www.springframework.org/schema/beans
       http://www.springframework.org/schema/beans/spring-beans.xsd
       http://www.springframework.org/schema/context
       https://www.springframework.org/schema/context/spring-context-4.2.xsd">

<!--    引入jdbc-config.properties文件-->
    <context:property-placeholder location="classpath:jdbc-config.properties"/>

    <bean class="com.alibaba.druid.pool.DruidDataSource" id="druidDataSource" >
        <property name="driverClassName" value="${jdbc.driver}" />
        <property name="url" value="${jdbc.url}" />
        <property name="username" value="${jdbc.username}" />
        <property name="password" value="${jdbc.password}" />
    </bean>

    <bean class="org.springframework.jdbc.core.JdbcTemplate" >
        <property name="dataSource" ref="druidDataSource" ></property>
    </bean>
</beans>
注意,Druid数据库连接池配置的property的name=“driverClassName”,不要打错了
测试
package com.lobo;

import com.lobo.entity.User;
import org.junit.Test;
import org.junit.runner.RunWith;
import org.springframework.beans.factory.annotation.Autowired;
import org.springframework.jdbc.core.BeanPropertyRowMapper;
import org.springframework.jdbc.core.JdbcTemplate;
import org.springframework.test.context.ContextConfiguration;
import org.springframework.test.context.junit4.SpringJUnit4ClassRunner;

import java.util.List;

/**
 * className: test<br/>
 * author: MacieSerenity <br/>
 * date: 2022-08-14 10:28
 **/

@RunWith(SpringJUnit4ClassRunner.class)
@ContextConfiguration("classpath:spring-jdbc.xml")
public class test {
    //@RunWith(SpringJUnit4ClassRunner.class)
    //指定当前测试类在spring的测试环境中执行,此时就可以通过依赖注入的方式直接获取IOC容器中的bean

    //@ContextConfiguration
    //设置Spring测试环境的配置文件

    @Autowired
    private JdbcTemplate jdbcTemplate;

    @Test
    public void testJdbcTemplateInsert(){
        String preparedSql="insert into t_user(username,password,age,gender,email) values (?,?,?,?,?)";
        jdbcTemplate.update(preparedSql,"admin","123",30,"男","hello@123.com");
    }

    @Test
    public void testJdbcTemplateQuery(){
        String sql = "select * from t_user where id = ?";

        User user = jdbcTemplate.queryForObject(sql, new BeanPropertyRowMapper<>(User.class), 1);
        System.out.println(user);
    }

    @Test
    public void getAllUser(){
        String sql = "select * from t_user";
        List<User> query = jdbcTemplate.query(sql, new BeanPropertyRowMapper<>(User.class));
        query.forEach(System.out::println);
    }

    @Test
    public void testGetCount(){
        String sql = "select count(*) from t_user";
        Integer integer = jdbcTemplate.queryForObject(sql, Integer.class);
        System.out.println(integer);
    }
}
声明式事务
编程式事务
Connection conn=null;
try{
	//开启事务
	conn.setAutoCommit(false);

    //核心操作

    //提交事务
	conn.commit()

}catch(Exception e){

    //回滚事务
    conn.rollBack();
	e.printStackTrace();

}finally{
    //释放数据库连接
    conn.close()
}
以上方式存在的缺陷:
操作繁琐、复用性不高
声明式事务
由于事务的代码相对固定,所以框架就可以将固定模式的代码抽取出来,进行相关的封装。
封装之后:提高开发效率,消除冗余代码、可以对健壮性、性能等方面优化。
编程式事务:程序员自己写代码实现功能
声明式事务:通过配置让框架自动实现功能
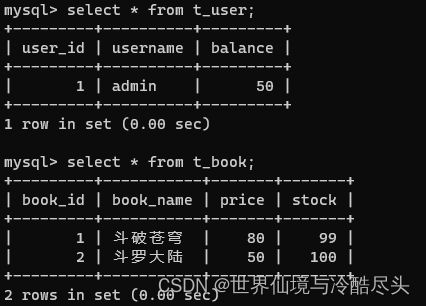
创建测试表:t_book和t_user
drop table if exists t_book;
CREATE TABLE t_book(
book_id int(11) NOT NULL AUTO_INCREMENT COMMENT '主键',
book_name varchar(20) DEFAULT NULL COMMENT '图书名称',
price int(11) DEFAULT NULL COMMENT '价格',
stock int(10) unsigned DEFAULT NULL COMMENT '库存(无符号)',
PRIMARY KEY (book_id)
) ENGINE=InnoDB AUTO_INCREMENT=3 DEFAULT CHARSET=utf8;

insert into t_book(book_id,book_name,price,stock) values (1,'斗破苍穹' ,80,100),(2,'斗罗大陆',50,100);

drop table if exists t_user;
CREATE TABLE t_user(
user_id int(11) NOT NULL AUTO_INCREMENT COMMENT '主键',
username varchar (20) DEFAULT NULL COMMENT '用户名',
balance int(10) unsigned DEFAULT NULL COMMENT ' 余额(无符号) ',
PRIMARY KEY (user_id)
) ENGINE=InnoDB AUTO_INCREMENT=2 DEFAULT CHARSET=utf8;
insert into t_user(user_id,username,balance) values (1,'admin',50);
创建Controller、Service、Dao层
package com.lobo.controller;
@Controller
public class BookController {
    @Autowired
    private BookService bookService;
    public void buyBook(Integer userId,Integer bookId){
        bookService.buyBook(userId,bookId);
    }
}


-----service接口
package com.lobo.service;
public interface BookService {
    /**
     * 买书
     * @param userId 用户ID
     * @param bookId 图书ID
     */
    void buyBook(Integer userId, Integer bookId);
}
-----service实现类
package com.lobo.service.impl;
@Service
public class BookServiceImpl implements BookService {
    @Autowired
    private BookDao bookDao;
    @Override
    public void buyBook(Integer userId, Integer bookId) {
        //1、查询图书价格
        Integer price =bookDao.getPriceByBookId(bookId);
        //2、更新图书库存
        bookDao.updateStock(bookId);
        //3、更新用户余额
        bookDao.updateBalance(userId,price);
    }
}

-------Dao接口
package com.lobo.dao;
public interface BookDao {
    /**
     * 根据图书ID获取价格
     * @param bookId 图书ID
     * @return 图书的价格
     */
    Integer getPriceByBookId(Integer bookId);

    /**
     * 更新图书库存
     * @param bookId 图书ID
     */
    void updateStock(Integer bookId);

    /**
     * 更新用户余额
     * @param userId 用户ID
     * @param price 价格
     */
    void updateBalance(Integer userId, Integer price);
}

-------Dao层实现
package com.lobo.dao.impl;

import com.lobo.dao.BookDao;
import org.springframework.beans.factory.annotation.Autowired;
import org.springframework.jdbc.core.JdbcTemplate;
import org.springframework.stereotype.Repository;

/**
 * className: BookDaoImpl<br/>
 * author: MacieSerenity <br/>
 * date: 2022-08-14 15:30
 **/
@Repository
public class BookDaoImpl implements BookDao {

    @Autowired
    private JdbcTemplate jdbcTemplate;

    @Override
    public Integer getPriceByBookId(Integer bookId) {
        String sql = "select price from t_book where book_id =?";
        return jdbcTemplate.queryForObject(sql,Integer.class,bookId);
    }

    @Override
    public void updateStock(Integer bookId) {
        String sql = "update t_book set stock = stock - 1 where book_id= ?";
        jdbcTemplate.update(sql,bookId);
    }

    @Override
    public void updateBalance(Integer userId, Integer price) {
        String sql="update t_user set balance = balance - ? where user_id =?";
        jdbcTemplate.update(sql,price,userId);
    }
}
创建配置文件
<?xml version="1.0" encoding="UTF-8"?>
<beans xmlns="http://www.springframework.org/schema/beans"
       xmlns:xsi="http://www.w3.org/2001/XMLSchema-instance"
       xmlns:context="http://www.springframework.org/schema/context"
       xsi:schemaLocation="
       http://www.springframework.org/schema/beans
       http://www.springframework.org/schema/beans/spring-beans.xsd
       http://www.springframework.org/schema/context
       https://www.springframework.org/schema/context/spring-context-4.2.xsd">


<!--    包扫描-->
    <context:component-scan base-package="com.lobo"/>


    <!--    引入jdbc-config.properties文件-->
    <context:property-placeholder location="classpath:jdbc-config.properties"/>

    <bean class="com.alibaba.druid.pool.DruidDataSource" id="druidDataSource" >
        <property name="driverClassName" value="${jdbc.driver}" />
        <property name="url" value="${jdbc.url}" />
        <property name="username" value="${jdbc.username}" />
        <property name="password" value="${jdbc.password}" />
    </bean>

    <bean class="org.springframework.jdbc.core.JdbcTemplate" id="jdbcTemplate">
        <property name="dataSource" ref="druidDataSource"/>
    </bean>
</beans>
创建测试类
package com.lobo;
@RunWith(SpringJUnit4ClassRunner.class)
@ContextConfiguration("classpath:tx-annotation.xml")
public class testBuyBook {
    @Autowired
    private BookController bookController;
    @Test
    public void buyBook(){
        bookController.buyBook(1,1);
    }
}
错误:
org.springframework.dao.DataIntegrityViolationException: PreparedStatementCallback; SQL [update t_user set balance = balance - ? where user_id =?]; Data truncation: BIGINT UNSIGNED value is out of range in '(`mybatisstudy`.`t_user`.`balance` - 80)'; nested exception is com.mysql.cj.jdbc.exceptions.MysqlDataTruncation: Data truncation: BIGINT UNSIGNED value is out of range in '(`mybatisstudy`.`t_user`.`balance` - 80)'
因为图书价格为80,而用户ID为1的用户只有80,50-80之后就会变为-30,而我们使用的是无符号的数来表示,这样变成负数之后,就会超出范围。
此时,由于没有开启事务,第一个方法update了图书的库存,而第二个方法扣除用户余额时失败。
我们应该将这几个方法封装在一个事务当中,一旦有某一个程序执行错误,我们都需要将整个事务回滚。
开启事务
需要在配置文件中开启事务,以及开启@Transactional注解
在tx-annotation.xml的spring配置类中添加以下内容
<!--    配置事务管理器-->
    <bean class="org.springframework.jdbc.datasource.DataSourceTransactionManager" id="dataSourceTransactionManager">
        <property name="dataSource" ref="druidDataSource" />
    </bean>

<!--    开启事务的注解驱动,注意是使用的tx-->
<!--    将事务管理器中的通知作用到切面中-->
<!--    将@Transaction注解所表示的方法或者类中的所有方法使用事务进行管理-->
<!--    若事务管理器bean的id默认为transactionManager,则该属性可以不用填写-->
    <tx:annotation-driven transaction-manager="dataSourceTransactionManager" />
记住要选择tx:annotation-driven中tx结尾的标签

然后在需要进行事务管理的方法或者类中,使用@Transactional进行标记(一般事务标记在Service层中)
package com.lobo.service.impl;
...
@Service
public class BookServiceImpl implements BookService {

    @Autowired
    private BookDao bookDao;

    @Override
    @Transactional
    public void buyBook(Integer userId, Integer bookId) {
        //1、查询图书价格
        Integer price =bookDao.getPriceByBookId(bookId);
        //2、更新图书库存
        bookDao.updateStock(bookId);
        //3、更新用户余额
        bookDao.updateBalance(userId,price);
    }
}
* 声明式事务的配置步骤:
* 1、在Spring的配置文件中配置事务管理器
* 2、开启事务的注解驱动

* 只需要在需要被事务管理的方法上,添加@Transactional注解,该方法就会被事务管理器管理
声明式事务的属性
只读
告诉数据库,我们当前的操作没有任何修改或者写的操作,这样数据库就可以针对查询操作来进行优化:
@Transactional(readOnly=true)
若在声明了只读的方法或者类中,使用了增删改操作,会抛出以下异常:
SQLException:Connection is read-only,Queries leading to data modification are not allowd;
不光可以防止脏读,开启高隔离后,多个读操作成一个事务还可以防止不可重复读
超时
事务执行的过程中,有可能会因为某些问题导致程序卡主,从而长时间占用数据库资源,而长时间占用资源大概率是因为程序运行出现了问题(程序、数据库、网络等)
此时这个出现问题的程序就应该回滚,释放资源。
@Transactional(timeout = 3)
3表示3秒,以秒为单位
默认是-1,也就是永久等待
可以使用TimeUnit.SECONDS.sleep(5);来测试
若超时,会抛出以下异常:
TransactionTimeOutException:Transaction time out:deadline was ...
抛出异常后,强制回滚
回滚策略
声明式事务默认只对所有的运行时异常进行回滚,编译时异常不进行回滚。
因为什么进行回滚:
rollbackForClassName
rollbackFor
    (一般不使用前两个)

不因为什么进行回滚:
noRollBackFor
noRollbackForClassName
如果在事务运行中,出现了计算错误的异常(举例),我们不希望对计算错误的异常进行回滚,则可以使用
这里的noRollBackFor的参数是一个数组对象,当数组内的对象只有一个时,可以不使用{}包裹,而数组内有多个时,需要使用{}进行包裹,且用逗号分割
@Transaction(noRollBackFor = ArithmeticException.class)
或者
@Transaction(noRollBackFor = java.lang.ArithmeticException )  全类名
隔离级别
事务的隔离级别
读未提交 read uncommited
只存在理论上,允许事务A读取事务B未提交的修改

读已提交 read commited
事务A只能读取事务B已经提交的修改,可能会产生脏读

可重复读 repeatable read
事务A可以多次读取一个字段中相同的值,事务A执行期间,禁止其它事务对这个字段进行更新,也就是当前事务只会读取到同一个值。可能会产生幻读

序列化 serializable
确保事务A可以多次从一个表中读取到相同的行,在事务A执行期间,禁止其他事务对这个表进行添加、更新、删除操作。可以避免任何并发问题,但是性能低下。
| 隔离级别 | 脏读 | 不可重复读 | 幻读 |
|---|---|---|---|
| 读未提交read uncommited | 是 | 是 | 是 |
| 读已提交read commited | 否 | 是 | 是 |
| 可重复读repeatable read | 否 | 否 | 是 |
| 序列化serializable | 否 | 否 | 否 |
各个数据库产品对事务隔离级别的支持
| 隔离级别 | Oracle | MySQL |
|---|---|---|
| read uncommited | x | v |
| read commited | v | v |
| repeatable read | x | v |
| serializable | v | v |
使用方式:
@Transactional(isolation= Isolation.DEFAULT)//使用数据默认的隔离级别
@Transactional(isolation= Isolation.READ_UNCOMMITED)//读未提交
@Transactional(isolation= Isolation.READ_COMMITTED)//读已提交
@Transactional(isolation= Isolation.REPEATABLE_READ)//可重复读
@Transactional(isolation= Isolation.SERIALIZABLE)//序列化
事务的传播性
停止事务的传播
新建CheckoutService接口
package com.lobo.service;
...
public interface CheckoutService {
    /**
     * 为多本书结账
     * @param userId 用户ID
     * @param bookIds 图书ID
     */
    void checkOut(Integer userId, Integer[] bookIds);
}
CheckoutServiceImpl
package com.lobo.service.impl;
...
@Service
public class CheckoutServiceImpl implements CheckoutService {

    @Autowired
    private BookService bookService;

    @Override
    @Transactional
    public void checkOut(Integer userId, Integer[] bookIds) {
        for(Integer bookId:bookIds){
            bookService.buyBook(userId,bookId);
        }
    }
}
我们在这个新的类中添加了一个事务,这个方法的功能是调用Service中的其它事务
package com.lobo.service.impl;
...
@Service
public class BookServiceImpl implements BookService {

    @Autowired
    private BookDao bookDao;

    @Override
    @Transactional(propagation = Propagation.REQUIRES_NEW)
    public void buyBook(Integer userId, Integer bookId) {
        //1、查询图书价格
        Integer price =bookDao.getPriceByBookId(bookId);
        //2、更新图书库存
        bookDao.updateStock(bookId);
        //3、更新用户余额
        bookDao.updateBalance(userId,price);
    }
}
可以看出我们的循环是一个事务,而循环内调用的buyBook又是另外一个事务。
测试:
  @Test
    public void buyBook(){
        bookController.checkOut(1,new Integer[]{1,2});
    }
@Transactional(propagation = Propagation.REQUIRED) //默认值
@Transactional(propagation = Propagation.REQUIERS_NEW) //开启新事务(使用自己的事务)
当设置为默认时,买两本书的任何一本买不起,都会直接触发事务的回滚,回滚到一开始还没有买书的位置;
而设置为第二种开启新的事务时,其中每一次执行BuyBook都是一次新的事务,无法购买第二本书不会影响第一本书的购买,即便是回滚,也是回滚到买第二本书之前。
mysql> select * from t_user;
+---------+----------+---------+
| user_id | username | balance |
+---------+----------+---------+
|       1 | admin    |      20 |
+---------+----------+---------+
1 row in set (0.00 sec)

mysql> select * from t_book;
+---------+-----------+-------+-------+
| book_id | book_name | price | stock |
+---------+-----------+-------+-------+
|       1 | 斗破苍穹  |    80 |    98 |
|       2 | 斗罗大陆  |    50 |   100 |
+---------+-----------+-------+-------+
2 rows in set (0.00 sec)
当设置为默认时,会使用所有的事务,也就是事务的嵌套,将多个事务视作一个事务,被嵌套的任何一个事务失败或者超时,都会使最外面的事务失效回滚。
而设置为 Propagation.REQUIERS_NEW 时,在遇见@Transactional注解时,会自动创建一个新的事务,这个事务独立于其它被嵌套的事务,独立执行。
两个属性中,回滚的地方才是区别(大回滚和小回滚)
基于xml配置文件的声明式事务
想要基于XML配置文件配置声明式事务的话,必须引入aspect的依赖
<!--       spring 切面-->
        <dependency>
            <groupId>org.springframework</groupId>
            <artifactId>spring-aspects</artifactId>
            <version>5.3.1</version>
        </dependency>
然后需要在XML文件中写入:
<?xml version="1.0" encoding="UTF-8"?>
<beans xmlns="http://www.springframework.org/schema/beans"
xmlns:xsi="http://www.w3.org/2001/XMLSchema-instance"
xmlns:context="http://www.springframework.org/schema/context" xmlns:tx="http://www.springframework.org/schema/tx"
xmlns:aop="http://www.springframework.org/schema/aop"
xsi:schemaLocation="http://www.springframework.org/schema/beans
http://www.springframework.org/schema/beans/spring-beans.xsd
http://www.springframework.org/schema/context
https://www.springframework.org/schema/context/spring-context-4.2.xsd http://www.springframework.org/schema/tx http://www.springframework.org/schema/tx/spring-tx.xsd http://www.springframework.org/schema/aop https://www.springframework.org/schema/aop/spring-aop.xsd">
<!-- 包扫描-->
<context:component-scan base-package="com.lobo"/>
<!-- 引入jdbc-config.properties文件-->
<context:property-placeholder location="classpath:jdbc-config.properties"/>
<bean class="com.alibaba.druid.pool.DruidDataSource" id="druidDataSource" >
<property name="driverClassName" value="${jdbc.driver}" />
<property name="url" value="${jdbc.url}" />
<property name="username" value="${jdbc.username}" />
<property name="password" value="${jdbc.password}" />
</bean>
<bean class="org.springframework.jdbc.core.JdbcTemplate" id="jdbcTemplate">
<property name="dataSource" ref="druidDataSource"/>
</bean>
<!-- 配置事务管理器-->
<bean class="org.springframework.jdbc.datasource.DataSourceTransactionManager" id="dataSourceTransactionManager">
<property name="dataSource" ref="druidDataSource" />
</bean>
<!-- 开启事务的注解驱动,注意是使用的tx-->
<!-- 将事务管理器中的通知作用到切面中-->
<!-- 将@Transaction注解所表示的方法或者类中的所有方法使用事务进行管理-->
<!-- 若事务管理器bean的id默认为transactionManager,则该属性可以不用填写-->
<!-- <tx:annotation-driven transaction-manager="dataSourceTransactionManager" />-->
<!-- 基于xml的配置事务管理需要注释上面这句-->
<!-- 配置事务通知,id为唯一标识,transaction-manager指定使用的事务管理器-->
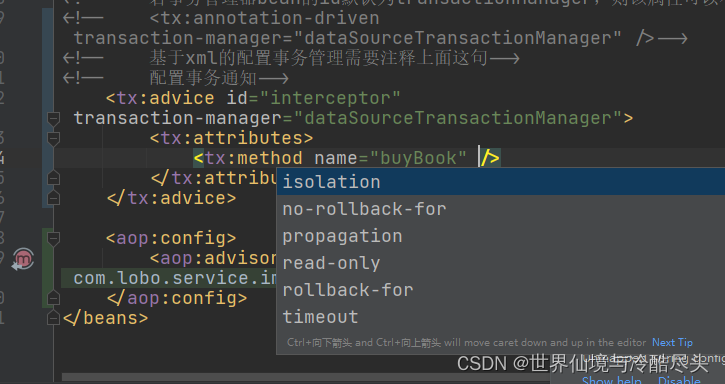
<tx:advice id="interceptor" transaction-manager="dataSourceTransactionManager">
<tx:attributes>
<!-- tx:method指配置具体的事务方法-->
<!-- name属性:指定方法名,可以使用星号代表多个字符-->
<!-- <tx:method name="buyBook" />-->
<!-- 将查询方法的read-only指定为true,为读取做优化-->
<tx:method name="get*" read-only="true" />
<tx:method name="query*" read-only="true" />
<tx:method name="find*" read-only="true" />
<!-- read-only:设置只读-->
<!-- rollback-for:设置回滚的异常-->
<!-- no-rollback-for:设置不回滚的异常-->
<!-- isolation设置事务的隔离级别-->
<!-- timeout设置事务的超时属性-->
<!-- propagation设置事物的传播级别-->
<tx:method name="save*" read-only="false" rollback-for="java.lang.Exception" propagation="REQUIRES_NEW" />
<tx:method name="update*" read-only="false" rollback-for="java.lang.Exception" propagation="REQUIRES_NEW" />
<tx:method name="delete*" read-only="false" rollback-for="java.lang.Exception" propagation="REQUIRES_NEW" />
</tx:attributes>
</tx:advice>
<aop:config>
<aop:advisor advice-ref="interceptor" pointcut="execution(* com.lobo.service.impl.*.*(..))" />
</aop:config>
</beans>