1. 卷积神经网络CNN
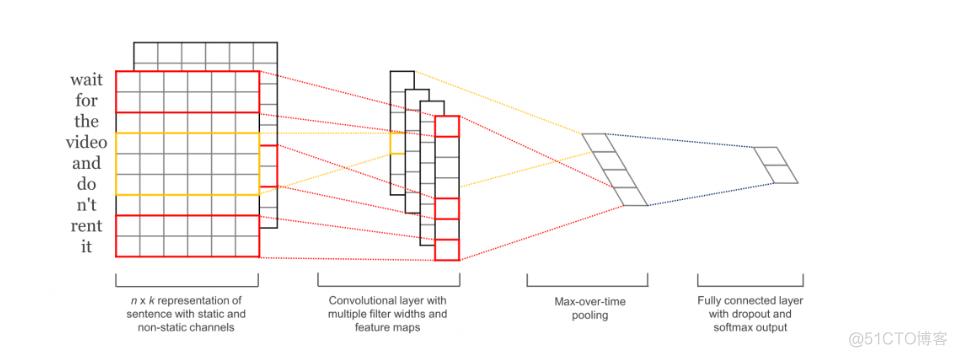
卷积神经网络(Convolutional Neural Network,CNN)是一种深度学习神经网络的架构,主要用于图像识别、图像分类和计算机视觉等任务。它是由多层神经元组成的神经网络,其中包含卷积层、池化层和全连接层等组件。
CNN的设计受到了生物视觉系统的启发,其中最重要的组件是卷积层。卷积层通过使用一系列称为卷积核(或过滤器)的小矩阵,对输入图像进行卷积操作。这个卷积操作可以理解为滑动窗口在输入图像上的移动,对窗口中的图像部分和卷积核进行逐元素相乘并相加,从而生成输出特征图。这个过程可以有效地提取输入图像中的局部特征,例如边缘、纹理等信息。
随后,通常会应用池化层来降低特征图的空间维度,减少模型中的参数数量,以及提取更加抽象的特征。常见的池化操作包括最大池化和平均池化,它们分别选择局部区域中的最大值或平均值作为池化后的值。
最后,通过一个或多个全连接层对池化后的特征进行处理,将其映射到特定的输出类别。全连接层通常是传统的神经网络结构,其输出用于执行分类、回归或其他任务。
卷积神经网络在图像处理领域表现出色,因为它们能够自动从原始像素中学习特征,并且能够处理大量数据,从而实现较高的准确性。在过去的几年里,CNN在计算机视觉和其他领域的许多任务上取得了显著的突破,成为深度学习的重要组成部分。
2. tf.keras.layers.Conv1D
tf.keras.layers.Conv1D(
    filters,
    kernel_size,
    strides=1,
    padding="valid",
    data_format="channels_last",
    dilation_rate=1,
    groups=1,
    activation=None,
    use_bias=True,
    kernel_initializer="glorot_uniform",
    bias_initializer="zeros",
    kernel_regularizer=None,
    bias_regularizer=None,
    activity_regularizer=None,
    kernel_constraint=None,
    bias_constraint=None,
    **kwargs
)
一维卷积层(例如时间卷积(temporal convolution))。
该层创建一个卷积核,该卷积核与单个空间(或时间)维度上的层输入进行卷积,以产生输出张量。 如果 use_bias 为 True,则创建偏差向量并将其添加到输出中。 最后,如果激活不是 None,它也会应用于输出。
当将此层用作模型中的第一层时,请提供 input_shape 参数(整数元组或 None,例如 (10, 128) 表示 10 个 128 维向量的向量序列,或 (None, 128) 表示可变长度 128 维向量的序列。
3. 例子
3.1 简单的一层卷积网络
定义一个一维的卷积,卷积核的shape的(,2),输入的shape是(None, 1)。 biase没有,filter是1.
定义输入数据和卷积核,然后输入到卷积网络中,输出结果。
def case1():
    # Create a Conv1D model
    model = tf.keras.Sequential([
        tf.keras.layers.Conv1D(filters=1, kernel_size=2, activation='linear', use_bias=False,
                               input_shape=(None, 1)),
    ])
    model.summary()

    # Input sequence and filter
    input_sequence = np.array([1, 2, 3, 4, 5, 6])
    filter_kernel = np.array([2, -1])

    # Reshape the input sequence and filter to fit Conv1D
    input_sequence = input_sequence.reshape(1, -1, 1)
    filter_kernel = filter_kernel.reshape(-1, 1, 1)

    # Set the weights of the Conv1D layer to the filter_kernel
    model.layers[0].set_weights([filter_kernel])

    # Perform 1D Convolution
    output_sequence = model.predict(input_sequence).flatten()

    print("Input Sequence:", input_sequence.flatten(), "shape:", input_sequence.shape)
    print("Filter:", filter_kernel.flatten(), " shape :",filter_kernel.shape )
    print("Output Sequence:", output_sequence)

if __name__ == '__main__':
    case1()
输出
Model: "sequential"
_________________________________________________________________
 Layer (type)                Output Shape              Param #
=================================================================
 conv1d (Conv1D)             (None, None, 1)           2

=================================================================
Total params: 2
Trainable params: 2
Non-trainable params: 0
_________________________________________________________________
1/1 [==============================] - 0s 121ms/step
Input Sequence: [1 2 3 4 5 6] shape: (1, 6, 1)
Filter: [ 2 -1]  shape : (2, 1, 1)
Output Sequence: [0. 1. 2. 3. 4.]

Process finished with exit code 0
3.2 . 自定激活函数
为了验证激活函数是在卷积后调用, 特写下面代码。你们可以根据输入和输出做校验。
def case_custom_activation():
    # Input sequence and filter
    input_sequence = np.array([1, 2, 3, 4, 5, 6])
    filter_kernel = np.array([2, -1])

    # Reshape the input sequence and filter to fit Conv1D
    input_sequence = input_sequence.reshape(1, -1, 1)
    filter_kernel = filter_kernel.reshape(-1, 1, 1)

    def custom_activation(x):
        # return tf.square(tf.nn.tanh(x))
        return tf.square(x)

    # Create a Conv1D model
    model = keras.Sequential([
        keras.layers.Conv1D(filters=1, kernel_size=2, activation=custom_activation, use_bias=False,
                               input_shape=(None, 1)),
    ])

    model.summary()

    # Set the weights of the Conv1D layer to the filter_kernel
    model.layers[0].set_weights([filter_kernel])

    # Perform 1D Convolution
    output_sequence = model.predict(input_sequence).flatten()

    print("Input Sequence:", input_sequence.flatten(), "shape:", input_sequence.shape)
    print("Filter:", filter_kernel.flatten(), " shape :",filter_kernel.shape )
    print("Output Sequence:", output_sequence)

if __name__ == '__main__':
    case_custom_activation()
输出
Model: "sequential"
_________________________________________________________________
 Layer (type)                Output Shape              Param #
=================================================================
 conv1d (Conv1D)             (None, None, 1)           2

=================================================================
Total params: 2
Trainable params: 2
Non-trainable params: 0
_________________________________________________________________
1/1 [==============================] - 0s 57ms/step
Input Sequence: [1 2 3 4 5 6] shape: (1, 6, 1)
Filter: [ 2 -1]  shape : (2, 1, 1)
Output Sequence: [ 0.  1.  4.  9. 16.]
3.3. 验证偏置
和上面代码唯一不同是,定义了偏置。
def cnn1d_biase():
    # Input sequence and filter
    input_sequence = np.array([1, 2, 3, 4, 5, 6])
    filter_kernel = np.array([2, -1])
    biase = np.array([2])

    # Reshape the input sequence and filter to fit Conv1D
    input_sequence = input_sequence.reshape(1, -1, 1)
    filter_kernel = filter_kernel.reshape(-1, 1, 1)

    def custom_activation(x):
        # return tf.square(tf.nn.tanh(x))
        return tf.square(x)

    # Create a Conv1D model
    model = keras.Sequential([
        keras.layers.Conv1D(filters=1, kernel_size=2, activation=custom_activation,
                               input_shape=(None, 1)),
    ])

    model.summary()

    print(model.layers[0].get_weights()[0].shape)
    print(model.layers[0].get_weights()[1].shape)

    # Set the weights of the Conv1D layer to the filter_kernel
    model.layers[0].set_weights([filter_kernel, biase])

    # Perform 1D Convolution
    output_sequence = model.predict(input_sequence).flatten()

    print("Input Sequence:", input_sequence.flatten(), "shape:", input_sequence.shape)
    print("Filter:", filter_kernel.flatten(), " shape :", filter_kernel.shape)
    print("Output Sequence:", output_sequence)


if __name__ == '__main__':
    cnn1d_biase()
输出
Model: "sequential"
_________________________________________________________________
 Layer (type)                Output Shape              Param #
=================================================================
 conv1d (Conv1D)             (None, None, 1)           3

=================================================================
Total params: 3
Trainable params: 3
Non-trainable params: 0
_________________________________________________________________
(2, 1, 1)
(1,)
1/1 [==============================] - 0s 60ms/step
Input Sequence: [1 2 3 4 5 6] shape: (1, 6, 1)
Filter: [ 2 -1]  shape : (2, 1, 1)
Output Sequence: [ 4.  9. 16. 25. 36.]

Process finished with exit code 0

