这一篇,我们继续在Docker上折腾。之前我们已经展示了如何在容器上搭建安全产品的部署环境,这里我们需要更进一步,讨论如何在容器上搭建开发与调试环境。这是学习安全产品并且自己构建安全产品的基础步骤。
〇、精简系统上的操作技巧
使用Docker来进行各种环境的构建,讲究的就是一个精简性。所以从dockerhub上获取的镜像,一般来说都是极尽精简之能事,下载下来以后没有ifconfig、vi之类的常用命令,简直是常事中的常事。在一些场合,这也许会让人抓狂,比如yum的repo不对,但是想改需要vi吧,但是vi又需要yum来安装之类的……所以掌握一些基本指令的系统配置方式,是docker操作的居家旅行之必备技能。
1. 获取Linux内核版本
可以使用uname -srm命令来获取Linux的内核版本。如我们在上一篇的讨论,如果我们是在容器中执行该命令,得到的这个内核版本是宿主机的。因为容器使用的就是宿主机的内核。
[root@84305a744396 /]# uname -srm
Linux 5.15.79.1-microsoft-standard-WSL2 x86_64
|
2. 获取Linux操作系统类型
在Linux系统中,RH类的操作系统的类型通常在/etc/redhat-release或centos-release、system-release文件中,可以使用cat直接查看。
镜像centos:centos7
| [root@84305a744396 /]# cat /etc/redhat-release
CentOS Linux release 7.9.2009 (Core)
[root@84305a744396 etc]# cat centos-release
CentOS Linux release 7.9.2009 (Core)
|
镜像centos:latest
| [root@d82d5e77c2d9 /]# cat /etc/redhat-release
CentOS Linux release 8.4.2105
|
镜像ubuntu:latest
ubuntu的镜像在/etc/lsb-release和os-release中也都有
| root@afb1923c4725:/etc# cat lsb-release
DISTRIB_ID=Ubuntu
DISTRIB_RELEASE=22.04
DISTRIB_CODENAME=jammy
DISTRIB_DESCRIPTION="Ubuntu 22.04.1 LTS"
root@afb1923c4725:/etc# cat os-release
PRETTY_NAME="Ubuntu 22.04.1 LTS"
NAME="Ubuntu"
VERSION_ID="22.04"
VERSION="22.04.1 LTS (Jammy Jellyfish)"
VERSION_CODENAME=jammy
ID=ubuntu
ID_LIKE=debian
HOME_URL="https://www.ubuntu.com/"
SUPPORT_URL="https://help.ubuntu.com/"
BUG_REPORT_URL="https://bugs.launchpad.net/ubuntu/"
PRIVACY_POLICY_URL="https://www.ubuntu.com/legal/terms-and-policies/privacy-policy"
UBUNTU_CODENAME=jammy
|
镜像debian:latest
| root@a543554a631b:/etc# cat os-release
PRETTY_NAME="Debian GNU/Linux 11 (bullseye)"
NAME="Debian GNU/Linux"
VERSION_ID="11"
VERSION="11 (bullseye)"
VERSION_CODENAME=bullseye
ID=debian
HOME_URL="https://www.debian.org/"
SUPPORT_URL="https://www.debian.org/support"
BUG_REPORT_URL="https://bugs.debian.org/"
root@a543554a631b:/etc#
root@a543554a631b:/etc# cat debian_version
11.5
|
其实debian_version这个文件在Ubuntu下也有,但是并不显示版本号
3. 文件编辑技巧
(1)手敲
可以使用echo '文本'>file文件的方式,一行一行手敲进去。利用单引号,在换行的时候echo并不会结束输入,并且会将换行操作记录为一个换行符号,从而可以让我们将标准输入当作一个编辑器来使用——当然,每一行回车前最好检查保证正确,不然改起来就有点麻烦。
一个小窍门,如果是在虚拟机上,可以在外面用文本编辑器编译好,直接复制,然后粘贴在第一个单引号的后面,再补上第二个单引号。
大致的效果是这样的:
| [root@d82d5e77c2d9 /]# echo 'the first line
>the second line
>the third line'>1.txt
[root@d82d5e77c2d9 /]# cat 1.txt
the first line
the second line
the third line
[root@d82d5e77c2d9 /]#
|
(2)使用命令行编辑器sed
参考菜鸟教程中对sed的描述,这货完全可以当作一个以行为单位的编译器来使用的。用得熟的话,一些小的改动,也许你根本就会懒得去装个vi。 所以我一直怀疑这个东西是不是Super Editor的简写。例如:
插入行
| [root@d82d5e77c2d9 /]# sed -e '2i between the first and the second line' 1.txt
the first line
between the first and the second line
the second line
the third line
[root@d82d5e77c2d9 /]#
|
新增行:
| [root@d82d5e77c2d9 /]# sed -e '2a between the second and the third line' 1.txt
the first line
the second line
between the second and the third line
the third line
[root@d82d5e77c2d9 /]#
|
删除行:
| [root@d82d5e77c2d9 /]# sed -e '1d' 1.txt
the second line
the third line
[root@d82d5e77c2d9 /]# sed -e '1,3d' 1.txt
[root@d82d5e77c2d9 /]#
|
需要注意1,3d指删除1到3行,不是1和3行
替换行
| [root@d82d5e77c2d9 /]# sed -e '1,2c these two lines has been changed' 1.txt
these two lines has been changed
the third line
[root@d82d5e77c2d9 /]#
|
行查找匹配
| [root@d82d5e77c2d9 /]# sed -e '/line/q' 1.txt
the first line
[root@d82d5e77c2d9 /]# sed -e '/line/p;q' 1.txt
the first line
the first line
[root@d82d5e77c2d9 /]#
|
行匹配在''表示的script中以/……/形式框出的正则来匹配行,但是这前后一定要更上一个命令,前面一般是s,后面说;后面一般是p 打印,d 删除, c 替换, q退出。不同命令间用';'隔离,这里用了一个q,表示第一次匹配后就退出,不然会逐个匹配下去。
复合指令
| [root@d82d5e77c2d9 /]# sed -e '/second/p' 1.txt
the first line
the second line
the second line
the third line
[root@d82d5e77c2d9 /]# sed -e '/second/{/line/d}' 1.txt
the first line
the third line
|
这里没有使用q来退出匹配。所以会输出从第一行到最后一行的匹配过程,并打印其中匹配的结果。然后一个比较花的方法是使用花括号执行复合指令操作,比如对匹配结果再进行匹配后删除。
这种复合指令一个比较爽的用途就是用来替换行中的字符——这就很有点像编辑器了。
| [root@d82d5e77c2d9 /]# sed -e '/second/{s/line/string/}' 1.txt
the first line
the second string
the third line
|
当然全局替换也可以。
行中替换
| [root@d82d5e77c2d9 /]# sed -e 's/e/E/' 1.txt
thE first line
thE second line
thE third line
|
全局行中替换
| [root@d82d5e77c2d9 /]# sed -e 's/e/E/g' 1.txt
thE first linE
thE sEcond linE
thE third linE
|
需要注意的是,我们一直使用了-e这个参数。这个参数的意思是从文件中读取内容进行操作,并将操作结果发到标准输出,所以不会改变原始文件;如果需要直接修改文件,则应该使用-i参数,当然这个操作就有点危险了。
另外,使用管道操作,sed也可以不加任何参数。比如配合行号输出工具nl,可以比较直观的操作行如下:
| [root@d82d5e77c2d9 /]# nl 1.txt
1 the first line
2 the second line
3 the third line
[root@d82d5e77c2d9 /]# nl 1.txt|sed '/second/d'
1 the first line
3 the third line
[root@d82d5e77c2d9 /]#
|
PS:如果sed后面正则匹配的内容中包含'/'符号,则用来标记正则表达式开始结束及指令分割的符号就不能再用'/'了,可以用'@'或'|'代替。这种情况通常再更换系统镜像源时碰到:
| root@afb1923c4725:/etc# sed -i "s@http://.*archive.ubuntu.com@https://mirrors.tuna.tsinghua.edu.cn@g" /etc/apt/sources.list
root@afb1923c4725:/etc# sed -i "s@http://.*security.ubuntu.com@https://mirrors.tuna.tsinghua.edu.cn@g" /etc/apt/sources.list
|
4. 网络配置
(1)编辑配置文件
通常情况下,我们都可以通过网络配置工具进行系统的网络配置。在没有工具的情况下,也可以通过编辑配置文件的方式进行网络的配置。毕竟在Linux系统中,万物皆文件嘛。
Redhat、Centos、 Fedora类:
RedHat、CentOS、 Fedora类系统中,网络设备在/etc/sysconfig/network-scripts下
| [root@pig network-scripts]# pwd
/etc/sysconfig/network-scripts
[root@pig network-scripts]# ls
ifcfg-ens160
[root@pig network-scripts]# cat ifcfg-ens160
TYPE=Ethernet
PROXY_METHOD=none
BROWSER_ONLY=no
BOOTPROTO=none
DEFROUTE=yes
IPV4_FAILURE_FATAL=no
IPV6INIT=yes
IPV6_AUTOCONF=yes
IPV6_DEFROUTE=yes
IPV6_FAILURE_FATAL=no
NAME=ens160
UUID=………………
DEVICE=ens160
ONBOOT=yes
IPADDR=192.168.21.11
PREFIX=24
GATEWAY=192.168.21.2
DNS1=192.168.21.2
[root@pig network-scripts]#
[root@pig ~]# ifconfig
ens160: flags=4163<UP,BROADCAST,RUNNING,MULTICAST> mtu 1500
inet 192.168.21.11 netmask 255.255.255.0 broadcast 192.168.21.255
inet6 fe80::20c:29ff:fec0:ce6f prefixlen 64 scopeid 0x20<link>
ether …… txqueuelen 1000 (Ethernet)
RX packets 5419 bytes 5644002 (5.3 MiB)
RX errors 0 dropped 0 overruns 0 frame 0
TX packets 3162 bytes 392403 (383.2 KiB)
TX errors 0 dropped 0 overruns 0 carrier 0 collisions 0
lo: flags=73<UP,LOOPBACK,RUNNING> mtu 65536
inet 127.0.0.1 netmask 255.0.0.0
inet6 ::1 prefixlen 128 scopeid 0x10<host>
loop txqueuelen 1000 (Local Loopback)
RX packets 0 bytes 0 (0.0 B)
RX errors 0 dropped 0 overruns 0 frame 0
TX packets 0 bytes 0 (0.0 B)
TX errors 0 dropped 0 overruns 0 carrier 0 collisions 0
virbr0: flags=4099<UP,BROADCAST,MULTICAST> mtu 1500
inet 192.168.122.1 netmask 255.255.255.0 broadcast 192.168.122.255
ether …… txqueuelen 1000 (Ethernet)
RX packets 0 bytes 0 (0.0 B)
RX errors 0 dropped 0 overruns 0 frame 0
TX packets 0 bytes 0 (0.0 B)
TX errors 0 dropped 0 overruns 0 carrier 0 collisions 0
|
Ubuntu、Debian类:
Ubuntu、Debian类的操作系统,网络设备在/etc/network/interfaces文件中统一列出,而不是如centos那样每个设备一个文件放在network-scripts目录下面。
虽然在实机和虚拟机中可以直接配置网络的文件设备,但在容器中就不太行了。估计是因为容器的网络是虚拟的,这个虚拟和虚拟机里的虚拟网卡还不一样。虚拟机里面是真的虚拟了网卡这个设备——比如在windows中的设备管理器中能看到这个网卡。但是在容器中,这个设备是不存在的。比如:
centos:centos7镜像
| [root@e3212bf28ac9 sysconfig]# pwd
/etc/sysconfig
[root@e3212bf28ac9 sysconfig]# ls
anaconda cbq ip6tables-config iptables-config rdisc
[root@e3212bf28ac9 sysconfig]# ifconfig
eth0: flags=4163<UP,BROADCAST,RUNNING,MULTICAST> mtu 1500
inet 172.17.0.6 netmask 255.255.0.0 broadcast 172.17.255.255
ether 02:42:ac:11:00:06 txqueuelen 0 (Ethernet)
RX packets 32072 bytes 47330073 (45.1 MiB)
RX errors 0 dropped 0 overruns 0 frame 0
TX packets 16643 bytes 903699 (882.5 KiB)
TX errors 0 dropped 0 overruns 0 carrier 0 collisions 0
lo: flags=73<UP,LOOPBACK,RUNNING> mtu 65536
inet 127.0.0.1 netmask 255.0.0.0
loop txqueuelen 1000 (Local Loopback)
RX packets 0 bytes 0 (0.0 B)
RX errors 0 dropped 0 overruns 0 frame 0
TX packets 0 bytes 0 (0.0 B)
TX errors 0 dropped 0 overruns 0 carrier 0 collisions 0
|
可以看到,容器中,/etc/sysconfig/network-scripts这个目录根本不存在。但是如果安装了ifconfig工具,又确实能够看到一个eth0的网卡。猜测这个网卡是docker通过“非设备”的方式模拟出来的(显然我也没打算、没时间主要是没能力深究)。同样,在debian/ubuntu类的系统中,本应该出现的/etc/network/interfaces目录也没有。
一个结论就是,容器的IP地址等等,应该基于docker network相关的命令去配,基于docker本身来管理,而不是在容器内部去折腾。当然,如果指示需要知道IP地址,完全可以在/etc/hosts的最后一行看到;至于DNS策略,可以通过/etc/resolv.conf配置。
| [root@84305a744396 etc]# cat hosts
127.0.0.1 localhost
::1 localhost ip6-localhost ip6-loopback
fe00::0 ip6-localnet
ff00::0 ip6-mcastprefix
ff02::1 ip6-allnodes
ff02::2 ip6-allrouters
172.17.0.2 84305a744396
[root@84305a744396 etc]# cat resolv.conf
# DNS requests are forwarded to the host. DHCP DNS options are ignored.
nameserver 192.168.65.5
|
(2)典型网络工具
Linux中,常用的网络工具有如ifconfig、ip、route、ping、traceroute、nslookup、dig、netstat、ss、lsof等。如果我们实在需要在容器中查看网络配置,下面介绍这中间几个不太常用的典型工具。
在Centos等RH类的系统中通常使用yum工具来管理软件包。yum提供了provides功能,可以查询提供某个命令的软件包名称:
| [root@84305a744396 etc]# yum provides ifconfig
Loaded plugins: fastestmirror, ovl
Loading mirror speeds from cached hostfile
* base: mirrors.bupt.edu.cn
* extras: mirrors.bupt.edu.cn
* updates: mirrors.bupt.edu.cn
net-tools-2.0-0.25.20131004git.el7.x86_64 : Basic networking tools
Repo : base
Matched from:
Filename : /sbin/ifconfig
|
依靠这一命令,可以查出以上工具都需要采用那些命令包安装。但在Ubuntu系统中,并没有yum这样的工具,只能通过apt search来查询是否存在与centos中名称相似的包。不过好在,绝大部分都还是能够查到的。
| | Redhat,CentOS, Fedora | Ubuntu,Debian |
| ifconfig | net-tools | net-tools |
| route | net-tools | net-tools |
| netstat | net-tools | net-tools |
| ip | iproute | iproute2 |
| ss | iproute | iproute2 |
| ping | iputils | iputils-ping |
| traceroute | traceroute | traceroute |
| nslookup | bind-utils | |
| dig | bind-utils | |
| lsof | lsof | lsof |
PS:也许你会说,我们可以通过在Ubuntu中安装yum来达成目的……我只能说,在Ubuntu中安装yum并不容易,而且就算安上,也查不出来:
| root@afb1923c4725:/etc# cat /etc/os-release
PRETTY_NAME="Ubuntu 22.04.1 LTS"
NAME="Ubuntu"
VERSION_ID="22.04"
VERSION="22.04.1 LTS (Jammy Jellyfish)"
VERSION_CODENAME=jammy
ID=ubuntu
ID_LIKE=debian
HOME_URL="https://www.ubuntu.com/"
SUPPORT_URL="https://help.ubuntu.com/"
BUG_REPORT_URL="https://bugs.launchpad.net/ubuntu/"
PRIVACY_POLICY_URL="https://www.ubuntu.com/legal/terms-and-policies/privacy-policy"
UBUNTU_CODENAME=jammy
root@afb1923c4725:/etc# yum provides ifconfig
No Matches found
root@afb1923c4725:/etc#
|
ss
ss主要用于查看使用socket的网络连接,参数l代表查看正在监听端口的网络连接,t代表tcp,u代表udp,r代表raw
| [root@pig ~]# ss -ltuw
Netid State Recv-Q Send-Q Local Address:Port Peer Address:Port Process
icmp6 UNCONN 0 0 *:ipv6-icmp *:*
udp UNCONN 0 0 0.0.0.0%virbr0:bootps 0.0.0.0:*
udp UNCONN 0 0 0.0.0.0:sunrpc 0.0.0.0:*
udp UNCONN 0 0 0.0.0.0:mdns 0.0.0.0:*
udp UNCONN 0 0 127.0.0.1:323 0.0.0.0:*
udp UNCONN 0 0 0.0.0.0:53582 0.0.0.0:*
udp UNCONN 0 0 [::]:sunrpc [::]:*
|
lsof
lsof主要用于查看系统中打开的文件,由于网络连接在Linux中也属于文件,所以可以使用-i参数来指示查看。
| [root@pig ~]# lsof -i
COMMAND PID USER FD TYPE DEVICE SIZE/OFF NODE NAME
systemd 1 root 28u IPv4 23675 0t0 TCP *:sunrpc (LISTEN)
systemd 1 root 29u IPv4 23676 0t0 UDP *:sunrpc
systemd 1 root 31u IPv6 23677 0t0 TCP *:sunrpc (LISTEN)
systemd 1 root 32u IPv6 23678 0t0 UDP *:sunrpc
rpcbind 895 rpc 4u IPv4 23675 0t0 TCP *:sunrpc (LISTEN)
rpcbind 895 rpc 5u IPv4 23676 0t0 UDP *:sunrpc
rpcbind 895 rpc 6u IPv6 23677 0t0 TCP *:sunrpc (LISTEN)
rpcbind 895 rpc 7u IPv6 23678 0t0 UDP *:sunrpc
avahi-dae 939 avahi 15u IPv4 28499 0t0 UDP *:mdns
avahi-dae 939 avahi 16u IPv6 28500 0t0 UDP *:mdns
avahi-dae 939 avahi 17u IPv4 28501 0t0 UDP *:53582
|
nslookup
nslookup用来查看域名服务器及域名查询结果。从下例可以看到,使用系统默认的域名服务器,及使用指定的域名服务器(8.8.8.8),查询www.sohu.com得到的IP地址是不一样的。这是因为DNS服务器通常被用来作为网络负载均衡的一种手段,不同地域的DNS服务器对同一域名,通常按照目标服务器就近原则进行解析。
| [root@pig ~]# nslookup www.sohu.com
Server: 192.168.21.2
Address: 192.168.21.2#53
Non-authoritative answer:
www.sohu.com canonical name = www.sohu.com.dsa.dnsv1.com.
www.sohu.com.dsa.dnsv1.com canonical name = best.sched.d0-dk.tdnsdp1.cn.
Name: best.sched.d0-dk.tdnsdp1.cn
Address: 123.125.46.125
Name: best.sched.d0-dk.tdnsdp1.cn
Address: 123.125.46.76
Name: best.sched.d0-dk.tdnsdp1.cn
Address: 2408:80f0:4105:b:2f::
[root@pig ~]# nslookup www.sohu.com 8.8.8.8
Server: 8.8.8.8
Address: 8.8.8.8#53
Non-authoritative answer:
www.sohu.com canonical name = www.sohu.com.dsa.dnsv1.com.
www.sohu.com.dsa.dnsv1.com canonical name = best.sched.d0-dk.tdnsdp1.cn.
Name: best.sched.d0-dk.tdnsdp1.cn
Address: 123.125.46.125
Name: best.sched.d0-dk.tdnsdp1.cn
Address: 123.125.46.76
Name: best.sched.d0-dk.tdnsdp1.cn
Address: 2408:80f0:4105:b:2f::
|
5.更改操作系统的镜像源
使用dockerhub上的一些镜像,有可能会遇到镜像源失效的情况,或者一些镜像源在墙外无法访问的情况,又或者一些软件包在给定的镜像源中没有提供的情况。要解决这些问题,需要更改系统的镜像源。
(1)CentOS类系统的镜像源更改
Centos的软件包安装工具是yum和rpm。镜像源文件在/etc/yum.repo.d/目录下,每个后缀为repo的文件都是一个源。这样比较简单,不要的可以建一个old子目录全搬进去。之前我们在CENTOS上的网络安全工具(一)Suricata 离线部署_lhyzws的博客-CSDN博客_离线安装epel-release一文中有过介绍。不赘述。
以阿里镜像源为例,在官方镜像网站上找到对应镜像源的网页centos镜像_centos下载地址_centos安装教程-阿里巴巴开源镜像站 (aliyun.com),自然会有安装的操作步骤:
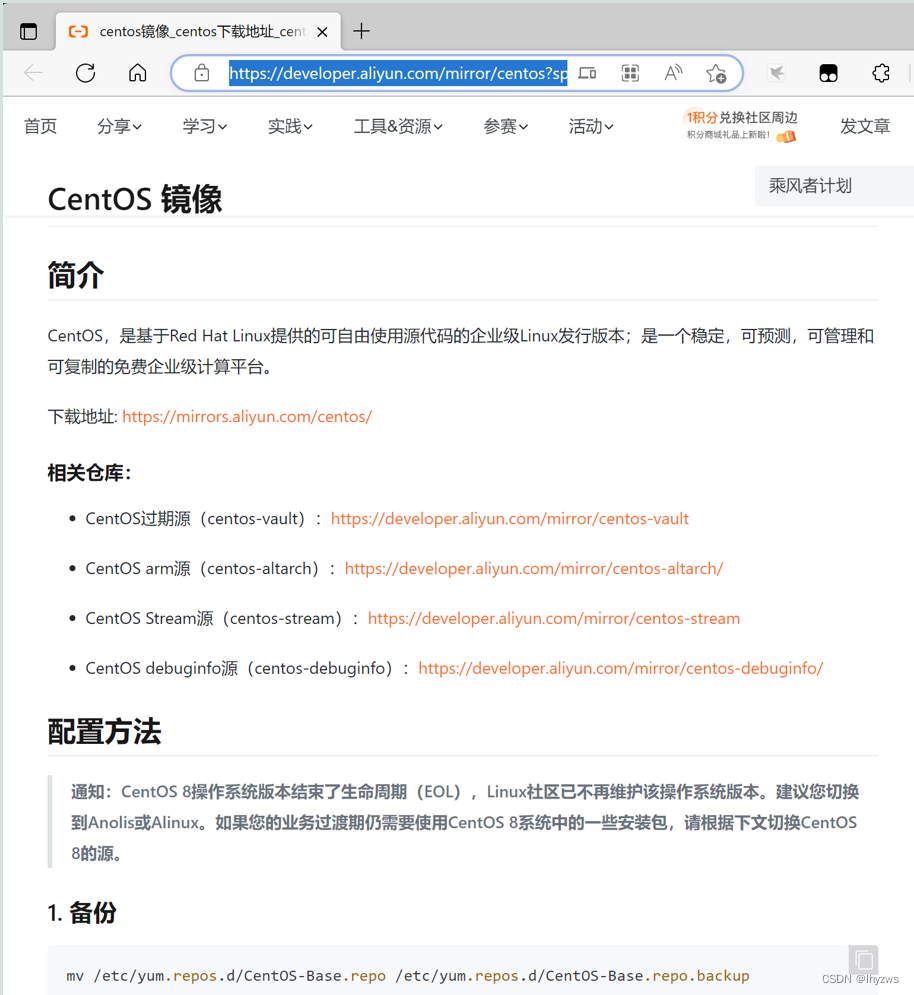
由于centos8在2021年底已经结束了官方支持,相关镜像源已经下线,所以我们需要借助国内镜像源切换到centos-vault。这里就以centos:latest镜像(8.4)为实验对象:
| [root@d82d5e77c2d9 yum.repos.d]# cat /etc/centos-release
CentOS Linux release 8.4.2105
[root@d82d5e77c2d9 yum.repos.d]# yum makecache
Failed to set locale, defaulting to C.UTF-8
CentOS Linux 8 - AppStream 41 B/s | 38 B 00:00
Error: Failed to download metadata for repo 'appstream': Cannot prepare internal mirrorlist: No URLs in mirrorlist
[root@d82d5e77c2d9 yum.repos.d]#
|
可见,不换源时,yum无法正常工作。
按照网站上方式,使用wget或者curl下载镜像源(哪个能用用哪个),就可以恢复正常试用了:
| [root@d82d5e77c2d9 yum.repos.d]# mkdir old
[root@d82d5e77c2d9 yum.repos.d]# mv *.repo old
[root@d82d5e77c2d9 yum.repos.d]# wget -O /etc/yum.repos.d/CentOS-Base.repo https://mirrors.aliyun.com/repo/Centos-vault-8.5.2111.repo
bash: wget: command not found
[root@d82d5e77c2d9 yum.repos.d]# curl -o /etc/yum.repos.d/CentOS-Base.repo https://mirrors.aliyun.com/repo/Centos-vault-8.5.2111.repo
% Total % Received % Xferd Average Speed Time Time Time Current
Dload Upload Total Spent Left Speed
100 2495 100 2495 0 0 6055 0 --:--:-- --:--:-- --:--:-- 6055
[root@d82d5e77c2d9 yum.repos.d]# ls
CentOS-Base.repo old
[root@d82d5e77c2d9 yum.repos.d]# yum makecache
Failed to set locale, defaulting to C.UTF-8
CentOS-8.5.2111 - Base - mirrors.aliyun.com 330 kB/s | 4.6 MB 00:14
CentOS-8.5.2111 - Extras - mirrors.aliyun.com 31 kB/s | 10 kB 00:00
CentOS-8.5.2111 - AppStream - mirrors.aliyun.com 222 kB/s | 8.4 MB 00:38
Metadata cache created.
[root@d82d5e77c2d9 yum.repos.d]#
|
(2)Ubuntu类系统的镜像源更改
Ubuntu的软件包安装工具是apt、apt-get和dpkg。镜像源则统一记录在/etc/apt/sources.list中。
查找镜像源
以清华大学开源软件镜像站 | Tsinghua Open Source Mirror为例,在镜像列表中找到Ubuntu系统,点击后面的问号。
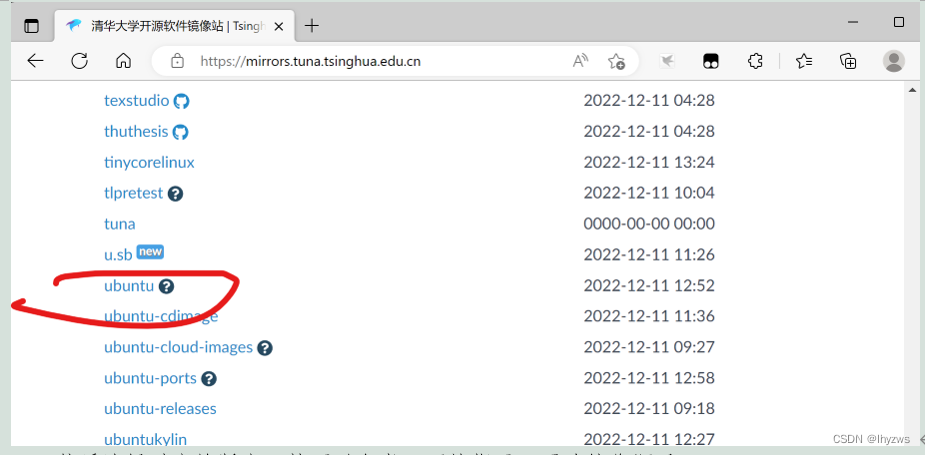
然后选择对应的版本,就可以参考下面的指示,更改镜像源了
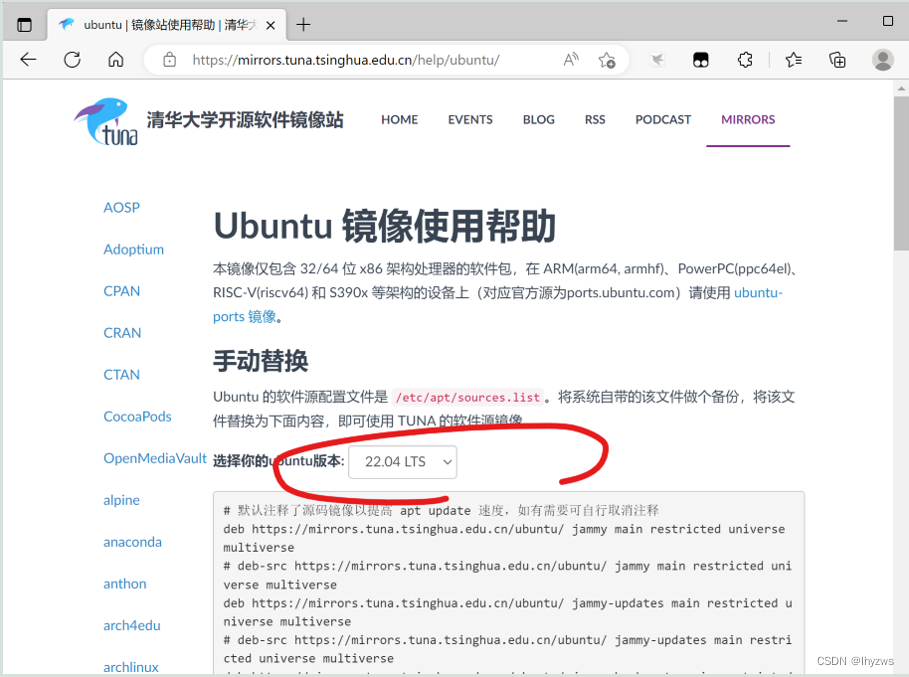
更改镜像源
以ubuntu:latest镜像(CODENAME:jammy)为例来说明。按照清华镜像上的方式,使用sed编辑sources.list文件,可以看出,实际就是用清华镜像源替换了原先ubuntu的网络地址。
| root@16c8bcdd6fb8:/etc/apt# cp sources.list sources.list.bak
root@16c8bcdd6fb8:/etc/apt# sed -i "s@http://.*archive.ubuntu.com@https://mirrors.tuna.tsinghua.edu.cn@g" /etc/apt/sources.list
root@16c8bcdd6fb8:/etc/apt# sed -i "s@http://.*security.ubuntu.com@https://mirrors.tuna.tsinghua.edu.cn@g" /etc/apt/sources.list
root@16c8bcdd6fb8:/etc/apt#
|
然而在更新时,却被告之证书不被信任,镜像站被忽略
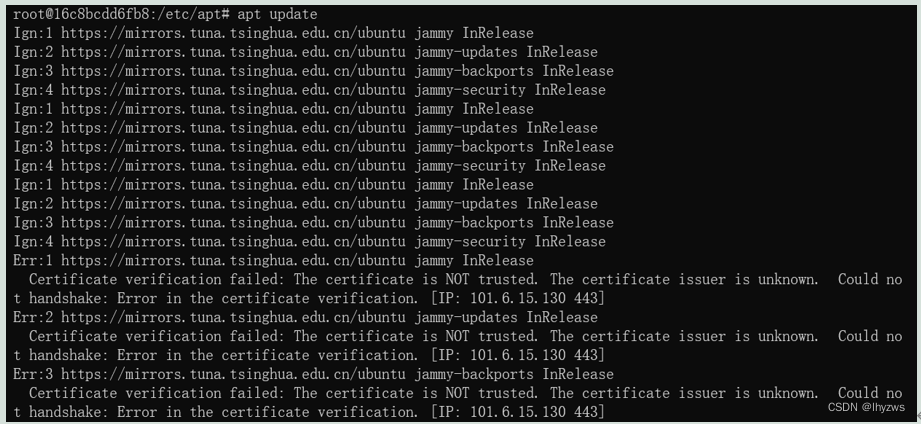
这个通常是由于证书组件没有安装,或者对http源使用https连接造成,需要安装apt-transport-https 和 ca-certificates 这2个工具。需要注意的是,应该在更换源之前就执行,否则因为源没更换成功,会执行失败:
| root@16c8bcdd6fb8:/etc/apt# apt install ca-certificates
Reading package lists... Done
Building dependency tree... Done
Reading state information... Done
The following additional packages will be installed:
openssl
The following NEW packages will be installed:
ca-certificates openssl
0 upgraded, 2 newly installed, 0 to remove and 2 not upgraded.
Need to get 1327 kB of archives.
After this operation, 2478 kB of additional disk space will be used.
Do you want to continue? [Y/n] y
Get:1 http://archive.ubuntu.com/ubuntu jammy-updates/main amd64 openssl amd64 3.0.2-0ubuntu1.7 [1183 kB]
Get:2 http://archive.ubuntu.com/ubuntu jammy-updates/main amd64 ca-certificates all 20211016ubuntu0.22.04.1 [144 kB]
Fetched 1327 kB in 9s (149 kB/s)
debconf: delaying package configuration, since apt-utils is not installed
Selecting previously unselected package openssl.
(Reading database ... 4395 files and directories currently installed.)
Preparing to unpack .../openssl_3.0.2-0ubuntu1.7_amd64.deb ...
Unpacking openssl (3.0.2-0ubuntu1.7) ...
Selecting previously unselected package ca-certificates.
Preparing to unpack .../ca-certificates_20211016ubuntu0.22.04.1_all.deb ...
Unpacking ca-certificates (20211016ubuntu0.22.04.1) ...
Setting up openssl (3.0.2-0ubuntu1.7) ...
Setting up ca-certificates (20211016ubuntu0.22.04.1) ...
debconf: unable to initialize frontend: Dialog
debconf: (No usable dialog-like program is installed, so the dialog based frontend cannot be used. at /usr/share/perl5/Debconf/FrontEnd/Dialog.pm line 78.)
debconf: falling back to frontend: Readline
debconf: unable to initialize frontend: Readline
debconf: (Can't locate Term/ReadLine.pm in @INC (you may need to install the Term::ReadLine module) (@INC contains: /etc/perl /usr/local/lib/x86_64-linux-gnu/perl/5.34.0 /usr/local/share/perl/5.34.0 /usr/lib/x86_64-linux-gnu/perl5/5.34 /usr/share/perl5 /usr/lib/x86_64-linux-gnu/perl-base /usr/lib/x86_64-linux-gnu/perl/5.34 /usr/share/perl/5.34 /usr/local/lib/site_perl) at /usr/share/perl5/Debconf/FrontEnd/Readline.pm line 7.)
debconf: falling back to frontend: Teletype
Updating certificates in /etc/ssl/certs...
124 added, 0 removed; done.
Processing triggers for ca-certificates (20211016ubuntu0.22.04.1) ...
Updating certificates in /etc/ssl/certs...
0 added, 0 removed; done.
Running hooks in /etc/ca-certificates/update.d...
done.
|
| root@16c8bcdd6fb8:/etc/apt# apt install apt-transport-https
Reading package lists... Done
Building dependency tree... Done
Reading state information... Done
The following NEW packages will be installed:
apt-transport-https
0 upgraded, 1 newly installed, 0 to remove and 2 not upgraded.
Need to get 1506 B of archives.
After this operation, 169 kB of additional disk space will be used.
Get:1 http://archive.ubuntu.com/ubuntu jammy-updates/universe amd64 apt-transport-https all 2.4.8 [1506 B]
Fetched 1506 B in 1s (2795 B/s)
debconf: delaying package configuration, since apt-utils is not installed
Selecting previously unselected package apt-transport-https.
(Reading database ... 4849 files and directories currently installed.)
Preparing to unpack .../apt-transport-https_2.4.8_all.deb ...
Unpacking apt-transport-https (2.4.8) ...
Setting up apt-transport-https (2.4.8) ...
root@16c8bcdd6fb8:/etc/apt#
|
这样再更新镜像源就能够成功了:
| root@16c8bcdd6fb8:/etc/apt# mv sources.list sources.list.bak
root@16c8bcdd6fb8:/etc/apt# mv sources.list.tuna sources.list
root@16c8bcdd6fb8:/etc/apt# apt update
Get:1 https://mirrors.tuna.tsinghua.edu.cn/ubuntu jammy InRelease [270 kB]
Get:2 https://mirrors.tuna.tsinghua.edu.cn/ubuntu jammy-updates InRelease [114 kB]
Get:3 https://mirrors.tuna.tsinghua.edu.cn/ubuntu jammy-backports InRelease [99.8 kB]
Get:4 https://mirrors.tuna.tsinghua.edu.cn/ubuntu jammy-security InRelease [110 kB]
Get:5 https://mirrors.tuna.tsinghua.edu.cn/ubuntu jammy/main amd64 Packages [1792 kB]
Get:6 https://mirrors.tuna.tsinghua.edu.cn/ubuntu jammy/universe amd64 Packages [17.5 MB]
Get:7 https://mirrors.tuna.tsinghua.edu.cn/ubuntu jammy/restricted amd64 Packages [164 kB]
Get:8 https://mirrors.tuna.tsinghua.edu.cn/ubuntu jammy/multiverse amd64 Packages [266 kB]
Get:9 https://mirrors.tuna.tsinghua.edu.cn/ubuntu jammy-updates/multiverse amd64 Packages [8150 B]
Get:10 https://mirrors.tuna.tsinghua.edu.cn/ubuntu jammy-updates/restricted amd64 Packages [629 kB]
Get:11 https://mirrors.tuna.tsinghua.edu.cn/ubuntu jammy-updates/main amd64 Packages [958 kB]
Get:12 https://mirrors.tuna.tsinghua.edu.cn/ubuntu jammy-updates/universe amd64 Packages [963 kB]
Get:13 https://mirrors.tuna.tsinghua.edu.cn/ubuntu jammy-backports/universe amd64 Packages [7278 B]
Get:14 https://mirrors.tuna.tsinghua.edu.cn/ubuntu jammy-backports/main amd64 Packages [3520 B]
Get:15 https://mirrors.tuna.tsinghua.edu.cn/ubuntu jammy-security/main amd64 Packages [659 kB]
Get:16 https://mirrors.tuna.tsinghua.edu.cn/ubuntu jammy-security/universe amd64 Packages [780 kB]
Get:17 https://mirrors.tuna.tsinghua.edu.cn/ubuntu jammy-security/restricted amd64 Packages [582 kB]
Get:18 https://mirrors.tuna.tsinghua.edu.cn/ubuntu jammy-security/multiverse amd64 Packages [4732 B]
Fetched 24.9 MB in 22s (1137 kB/s)
Reading package lists... Done
Building dependency tree... Done
Reading state information... Done
2 packages can be upgraded. Run 'apt list --upgradable' to see them.
root@16c8bcdd6fb8:/etc/apt#
|
其它镜像源更换中可能产生的问题
其它镜像源还包括阿里巴巴开源镜像站-OPSX镜像站-阿里云开发者社区 (aliyun.com):
| deb http://mirrors.aliyun.com/ubuntu/ bionic main restricted universe multiverse
deb http://mirrors.aliyun.com/ubuntu/ bionic-security main restricted universe multiverse
deb http://mirrors.aliyun.com/ubuntu/ bionic-updates main restricted universe multiverse
deb http://mirrors.aliyun.com/ubuntu/ bionic-proposed main restricted universe multiverse
deb http://mirrors.aliyun.com/ubuntu/ bionic-backports main restricted universe multiverse
|

中科大源
USTC Open Source Software Mirror
| deb https://mirrors.ustc.edu.cn/ubuntu/ bionic main restricted universe multiverse
deb https://mirrors.ustc.edu.cn/ubuntu/ bionic-updates main restricted universe multiverse
deb https://mirrors.ustc.edu.cn/ubuntu/ bionic-backports main restricted universe multiverse
deb https://mirrors.ustc.edu.cn/ubuntu/ bionic-security main restricted universe multiverse
deb https://mirrors.ustc.edu.cn/ubuntu/ bionic-proposed main restricted universe multiverse
|
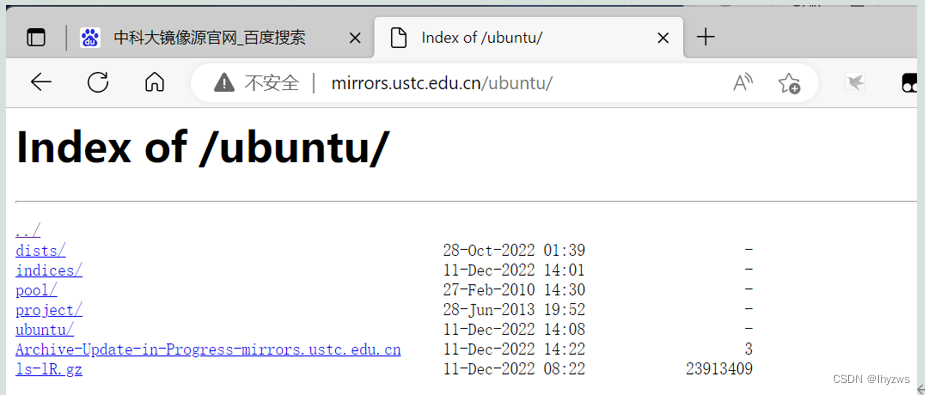
163源Index of /ubuntu/ (163.com)
| deb http://mirrors.163.com/ubuntu/ bionic main restricted universe multiverse
deb http://mirrors.163.com/ubuntu/ bionic-security main restricted universe multiverse
deb http://mirrors.163.com/ubuntu/ bionic-updates main restricted universe multiverse
deb http://mirrors.163.com/ubuntu/ bionic-proposed main restricted universe multiverse
deb http://mirrors.163.com/ubuntu/ bionic-backports main restricted universe multiverse
|
替换这些镜像站,也只需要用镜像源网址替换ubuntu镜像源的网址即可。当然,之前先运行apt update,并依托ubuntu官方源先将apt-transort-https和ca-certificates安装好。
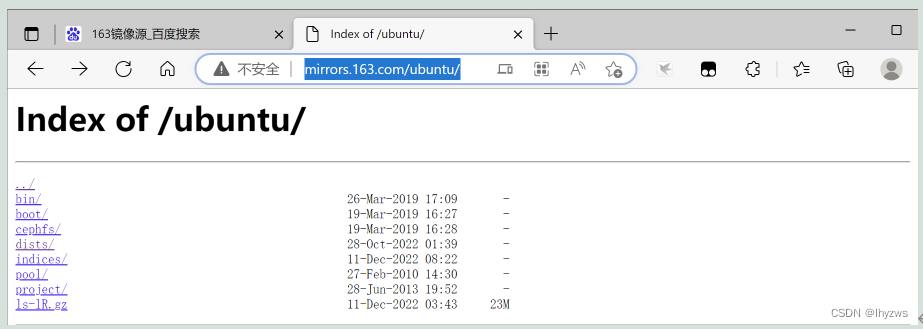
这次我们直接手敲镜像源:
| root@fa906b5d6257:/etc/apt# cp sources.list sources.list.bak
root@fa906b5d6257:/etc/apt# echo 'deb http://mirrors.163.com/ubuntu/ bionic main restricted universe multiverse
deb http://mirrors.163.com/ubuntu/ bionic-security main restricted universe multiverse
deb http://mirrors.163.com/ubuntu/ bionic-updates main restricted universe multiverse
deb http://mirrors.163.com/ubuntu/ bionic-proposed main restricted universe multiverse
deb http://mirrors.163.com/ubuntu/ bionic-backports main restricted universe multiverse' | sed 's/bionic/jammy/g' >sources.list
root@fa906b5d6257:/etc/apt# cat sources.list
deb http://mirrors.163.com/ubuntu/ jammy main restricted universe multiverse
deb http://mirrors.163.com/ubuntu/ jammy-security main restricted universe multiverse
deb http://mirrors.163.com/ubuntu/ jammy-updates main restricted universe multiverse
deb http://mirrors.163.com/ubuntu/ jammy-proposed main restricted universe multiverse
deb http://mirrors.163.com/ubuntu/ jammy-backports main restricted universe multiverse
root@fa906b5d6257:/etc/apt#
|
注意命令中红色的部分,用来将系统的CODENAME替换为ubuntu:lastest镜像的CODENAME,即jammy。
如果忘记改了,会造成源和目标系统的版本不匹配,一般会遭遇如下的错误,造成镜像源更新失败。
| root@fa906b5d6257:/etc/apt# cat sources.list
deb http://mirrors.aliyun.com/ubuntu/ bionic main restricted universe multiverse
deb http://mirrors.aliyun.com/ubuntu/ bionic-security main restricted universe multiverse
deb http://mirrors.aliyun.com/ubuntu/ bionic-updates main restricted universe multiverse
deb http://mirrors.aliyun.com/ubuntu/ bionic-proposed main restricted universe multiverse
deb http://mirrors.aliyun.com/ubuntu/ bionic-backports main restricted universe multiverse
root@fa906b5d6257:/etc/apt# apt update
Get:1 http://mirrors.aliyun.com/ubuntu bionic InRelease [242 kB]
Get:2 http://mirrors.aliyun.com/ubuntu bionic-security InRelease [88.7 kB]
Err:1 http://mirrors.aliyun.com/ubuntu bionic InRelease
The following signatures couldn't be verified because the public key is not available: NO_PUBKEY 3B4FE6ACC0B21F32
Get:3 http://mirrors.aliyun.com/ubuntu bionic-updates InRelease [88.7 kB]
Err:2 http://mirrors.aliyun.com/ubuntu bionic-security InRelease
The following signatures couldn't be verified because the public key is not available: NO_PUBKEY 3B4FE6ACC0B21F32
Get:4 http://mirrors.aliyun.com/ubuntu bionic-proposed InRelease [242 kB]
Err:3 http://mirrors.aliyun.com/ubuntu bionic-updates InRelease
|
当然,这可以通过配置服务器密钥来解决:
这之前还是需要安装gnupg,或者gnupg1、gnupg2,同样需要在换源之前。
| root@fa906b5d6257:/etc/apt# apt-key adv --keyserver keyserver.ubuntu.com --recv-keys 3B4FE6ACC0B21F32
Warning: apt-key is deprecated. Manage keyring files in trusted.gpg.d instead (see apt-key(8)).
Executing: /tmp/apt-key-gpghome.FHBpzwPG77/gpg.1.sh --keyserver keyserver.ubuntu.com --recv-keys 3B4FE6ACC0B21F32
gpg: key 3B4FE6ACC0B21F32: public key "Ubuntu Archive Automatic Signing Key (2012) <ftpmaster@ubuntu.com>" imported
gpg: Total number processed: 1
gpg: imported: 1
|
然后就可以update了,当然还是会又警告,毕竟版本不匹配不是?
| root@fa906b5d6257:/etc/apt# apt update
Get:1 http://mirrors.aliyun.com/ubuntu bionic InRelease [242 kB]
……………………
Get:21 http://mirrors.aliyun.com/ubuntu bionic-backports/universe amd64 Packages [20.5 kB]
Get:22 http://mirrors.aliyun.com/ubuntu bionic-backports/main amd64 Packages [64.0 kB]
Fetched 26.6 MB in 1min 52s (237 kB/s)
Reading package lists... Done
Building dependency tree... Done
Reading state information... Done
All packages are up to date.
W: http://mirrors.aliyun.com/ubuntu/dists/bionic/InRelease: Key is stored in legacy trusted.gpg keyring (/etc/apt/trusted.gpg), see the DEPRECATION section in apt-key(8) for details.
……………………
W: http://mirrors.aliyun.com/ubuntu/dists/bionic-backports/InRelease: Key is stored in legacy trusted.gpg keyring (/etc/apt/trusted.gpg), see the DEPRECATION section in apt-key(8) for details.
root@fa906b5d6257:/etc/apt#
|
(3)关于Yum的安装
之前说过,yum provides是一个不错的工具,但是在ubuntu、dibian中并没有。所以好多习惯使用yum的网友意图在ubuntu上安装yum。如前所述,且不说安好了不一定好用,就连安装也不是那么容易的。
比如,即使是更换安装源,在jammy版本的系统上,是没有yum软件的:
| root@16c8bcdd6fb8:/etc/apt# cat /etc/os-release
PRETTY_NAME="Ubuntu 22.04.1 LTS"
NAME="Ubuntu"
VERSION_ID="22.04"
VERSION="22.04.1 LTS (Jammy Jellyfish)"
VERSION_CODENAME=jammy
ID=ubuntu
ID_LIKE=debian
HOME_URL="https://www.ubuntu.com/"
SUPPORT_URL="https://help.ubuntu.com/"
BUG_REPORT_URL="https://bugs.launchpad.net/ubuntu/"
PRIVACY_POLICY_URL="https://www.ubuntu.com/legal/terms-and-policies/privacy-policy"
UBUNTU_CODENAME=jammy
root@fa906b5d6257:/etc/apt# apt install yum
Reading package lists... Done
Building dependency tree... Done
Reading state information... Done
E: Unable to locate package yum
|
在安装bionic版本源的jammy版本系统上:
| root@fa906b5d6257:/etc/apt# cat /etc/os-release
PRETTY_NAME="Ubuntu 22.04.1 LTS"
NAME="Ubuntu"
VERSION_ID="22.04"
VERSION="22.04.1 LTS (Jammy Jellyfish)"
VERSION_CODENAME=jammy
ID=ubuntu
ID_LIKE=debian
HOME_URL="https://www.ubuntu.com/"
SUPPORT_URL="https://help.ubuntu.com/"
BUG_REPORT_URL="https://bugs.launchpad.net/ubuntu/"
PRIVACY_POLICY_URL="https://www.ubuntu.com/legal/terms-and-policies/privacy-policy"
UBUNTU_CODENAME=jammy
root@fa906b5d6257:/etc/apt# cat sources.list
deb http://mirrors.aliyun.com/ubuntu/ bionic main restricted universe multiverse
deb http://mirrors.aliyun.com/ubuntu/ bionic-security main restricted universe multiverse
deb http://mirrors.aliyun.com/ubuntu/ bionic-updates main restricted universe multiverse
deb http://mirrors.aliyun.com/ubuntu/ bionic-proposed main restricted universe multiverse
deb http://mirrors.aliyun.com/ubuntu/ bionic-backports main restricted universe multiverse
root@fa906b5d6257:/etc/apt# apt install yum
Reading package lists... Done
Building dependency tree... Done
Reading state information... Done
Some packages could not be installed. This may mean that you have
requested an impossible situation or if you are using the unstable
distribution that some required packages have not yet been created
or been moved out of Incoming.
The following information may help to resolve the situation:
The following packages have unmet dependencies:
perl : Depends: perl-base (= 5.26.1-6ubuntu0.6) but 5.34.0-3ubuntu1.1 is to be installed
Recommends: netbase but it is not going to be installed
perl-base : Breaks: perl (< 5.34.0~) but 5.26.1-6ubuntu0.6 is to be installed
E: Error, pkgProblemResolver::Resolve generated breaks, this may be caused by held packages.
root@fa906b5d6257:/etc/apt#
|
虽然能找到软件包,但是会出现版本错误。当然,一顿折腾之下——比如安装build-essential,选择模块固定版本安装等等,也有安装成功的可能性——我确实成功了一次,但难以复制。作罢。
但是直接使用ubuntu:bionic版本的镜像,基本就是顺滑地安装上了,源都不用换:
| C:\Users\lhyzw>docker run -it --name bionic1 ubuntu:bionic bash
root@d1b919780437:/# apt update
Get:1 http://archive.ubuntu.com/ubuntu bionic InRelease [242 kB]
………………
Get:18 http://archive.ubuntu.com/ubuntu bionic-backports/main amd64 Packages [64.0 kB]
Fetched 26.7 MB in 1min 29s (300 kB/s)
Reading package lists... Done
Building dependency tree
Reading state information... Done
All packages are up to date.
root@d1b919780437:/# apt install yum
Reading package lists... Done
Building dependency tree
Reading state information... Done
The following additional packages will be installed:
ca-certificates dbus debugedit file krb5-locales libapparmor1 libarchive13 libasn1-8-heimdal libcap2
………………
xdg-user-dirs xz-utils
Suggested packages:
default-dbus-session-bus | dbus-session-bus rpm-i18n lrzip gdbm-l10n krb5-doc krb5-user
……………………
|
所以,如果真的想用yum,别折腾了,找对版本是最重要的。
PS,Ubuntu各版本别名:
| Ubuntu版本一览表 |
| 版本号 | 代号 | 发布时间 |
| 22.04 | Jammy Jellyfish | 2022-04-22 |
| 21.10 | Impish Indri | 2021-10-14 |
| 21.04 | Hirsute Hippo | 2021-04-22 [13] |
| 20.10 | Groovy Gorilla | 2020-10-22 |
| 20.04 LTS | Focal Fossa | 2020-04-23 |
| 19.10 | Eoan Ermine | 2019-10-17 |
| 19.04 | Disco Dingo | 2019-4-19 |
| 18.10 | Cosmic Cuttlefish | 2018-10-18 |
| 18.04 LTS | Bionic Beaver | 2018-04-26 |
| 17.10(GNOME成为默认桌面环境) | Artful Aardvark | 2017-10-21 |
| 17.04 | Zesty Zapus | 2017-04-13 |
| 16.10 | Yakkety Yak | 2016-10-20 |
| 16.04 LTS | Xenial Xerus | 2016-04-21 |
| 15.10 | Wily Werewolf | 2015-10-23 |
| 15.04 | Vivid Vervet | 2015-04-22 |
| 14.10 | Utopic Unicorn | 2014-10-23 |
| 14.04 LTS | Trusty Tahr | 2014-04-18 |
| 13.10 | Saucy Salamander | 2013-10-17 |
| 13.04 | Raring Ringtail | 2013-04-25 |
| 12.10 | Quantal Quetzal | 2012-10-18 |
| 12.04 LTS | Precise Pangolin | 2012-04-26 |
| 11.10 | Oneiric Ocelot | 2011-10-13 |
| 11.04(Unity成为默认桌面环境) | Natty Narwhal | 2011-04-28 |
| 10.10 | Maverick Meerkat | 2010-10-10 |
| 10.04 LTS | Lucid Lynx | 2010-04-29 |
| 9.10 | Karmic Koala | 2009-10-29 |
| 9.04 | Jaunty Jackalope | 2009-04-23 |
| 8.10 | Intrepid Ibex | 2008-10-30 |
| 8.04 LTS | Hardy Heron | 2008-04-24 |
| 7.10 | Gutsy Gibbon | 2007-10-18 |
| 7.04 | Feisty Fawn | 2007-04-19 |
| 6.10 | Edgy Eft | 2006-10-26 |
| 6.06 LTS | Dapper Drake | 2006-06-01 |
| 5.10 | Breezy Badger | 2005-10-13 |
| 5.04 | Hoary Hedgehog | 2005-04-08 |
| 4.10(初始发布版本) | Warty Warthog | 2004-10-20 |
6.Linux操作系统分类
上文在举例时,基本将Linux系统分做了2类来梳理:一类是Redhat类,还包括了Centos和 Fedora;另一类是Debian,包括Ubuntu等。其原因来自于Linux的历史。细节可以参考(9条消息) Redhat与Debian系介绍(Linux各种发行版本概述)_酷炫人笨笨熊的博客-CSDN博客_redhat和debian。
里面2张图比较有意思:
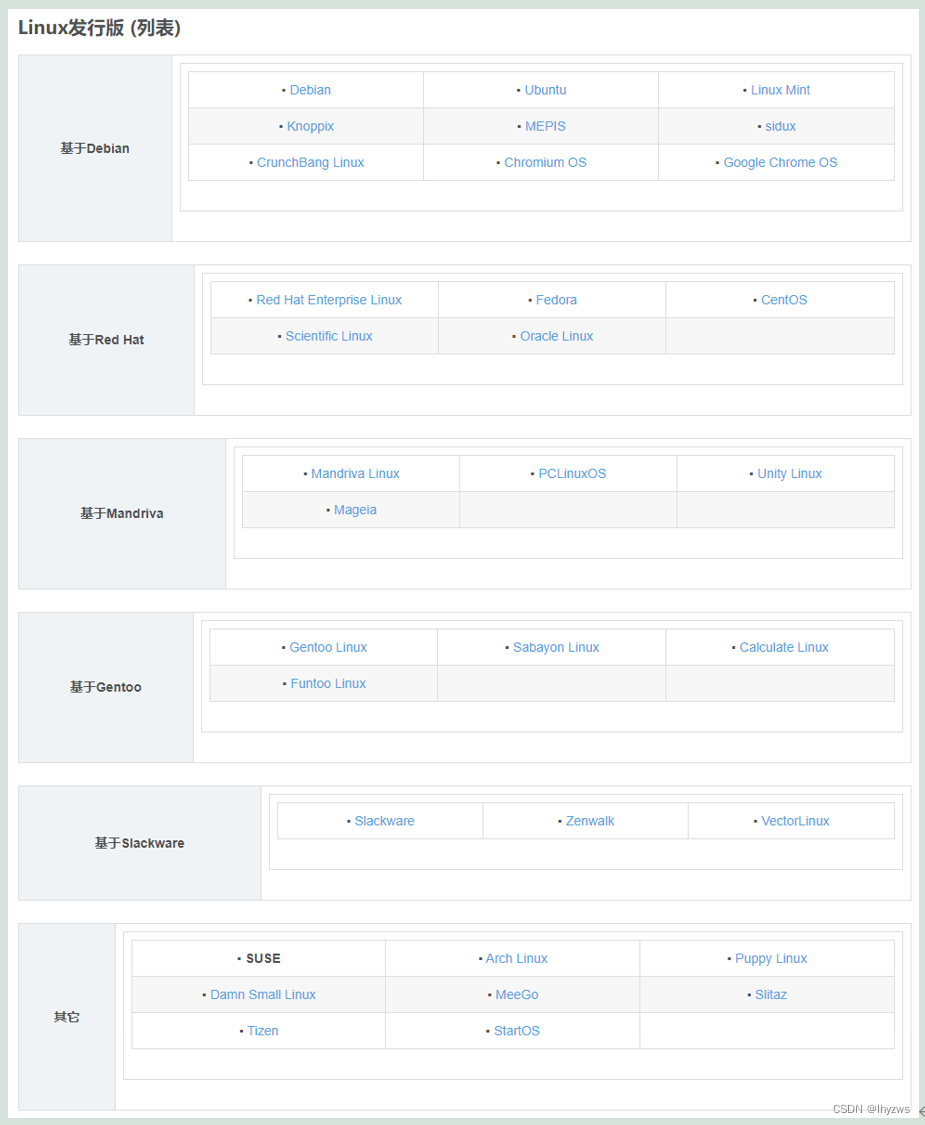
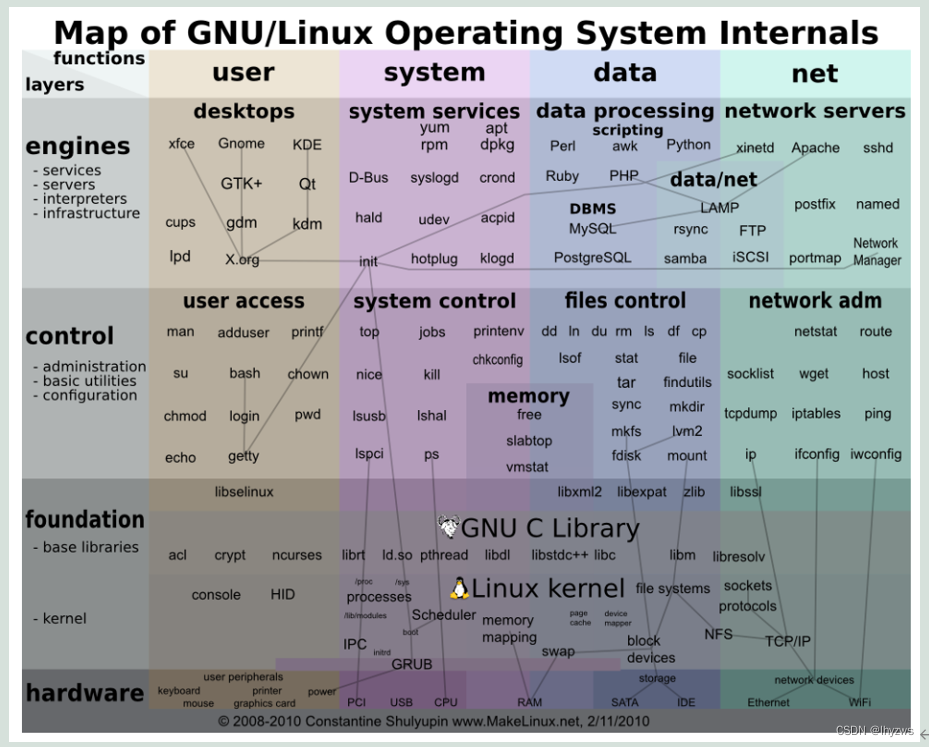


](https://img-blog.csdnimg.cn/img_convert/32e4e5eb993fe0514c9785a254e84e88.jpeg)







![[附源码]JAVA毕业设计医药垃圾分类管理系统(系统+LW)](https://img-blog.csdnimg.cn/dc5b7a96bada4377aa20de907e280e61.png)

