Routing模块功能
Apollo的routing模块读取高精地图原始信息,用于根据输入RoutingRequest信息在base_map中选取匹配最近的点作为导航轨迹的起点和终点,读取依据base_map生成的routing_map作为生成topo_graph的,然后通过Astar算法在拓扑图中搜索连接起始点的最优路径RoutingResponse,作为输出发送出去。
Routing模块主要步骤
在地图上寻求两点之间的最短距离之时,我们可以把道路交叉口(junction)作为节点(Node),将道路长度作为边(Edge),通过最短路径搜索算法(Astar/BFS/DFS…),求得两点之间的最短路径,并进行输出。
一般情况下,我们所获得的地图格式并非是适用于搜索最短路径的拓扑格式,所以需要对地图进行转换。因此,Routing模块可以归结为以下步骤:
- 获取地图的原始数据,节点和道路信息。
- 通过上述信息,构建有向图。
- 采用最短路径算法,找到两点之间的最短距离
TopoCreater建图
Apollo的建图所构造的拓扑图的节点和上述传统的节点不一致。对于自动驾驶,道路的构建是需要达到车道线级的,而传统的以路为边、以交叉口为节点的方式则不适用。
Apollo采取了如下的定义方式:点代表了车道,而边则是车道之间的相对关系,如下图所示。

下图则是Apollo中道路(road)与车道(lane)的概念。
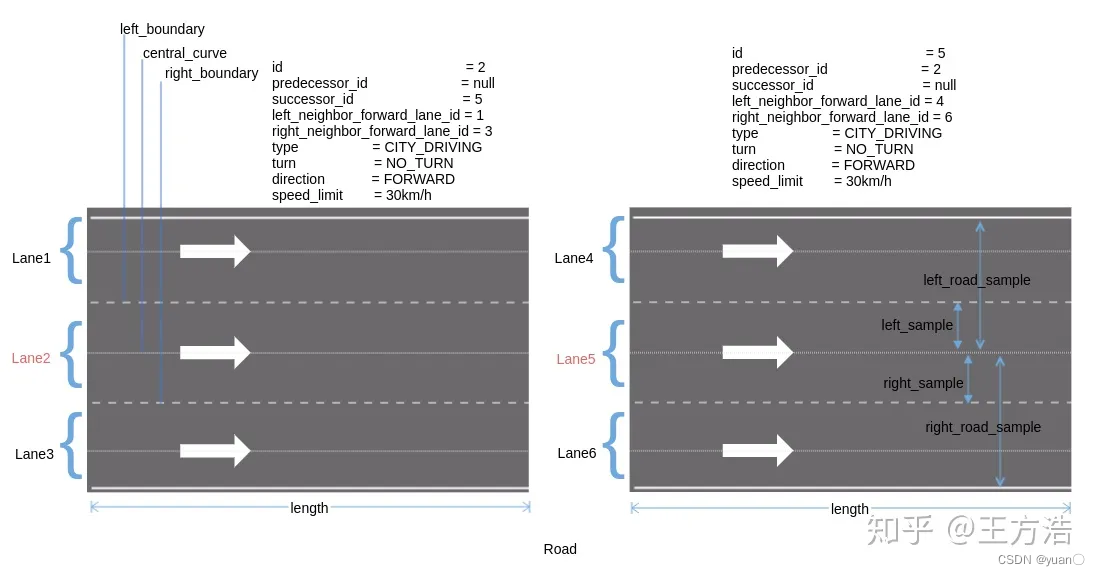
在Apollo中,Node和Edge在protobuf中定义,位于modules/routing/proto/topo_graph.proto中。
出口:对应车道虚线的部分,或者自己定义的一段允许变道的路段
路段代价:限速或者拐弯的路段会增加成本,代价系数在routing_config.pb.txt中定义
中心线:虚拟的,用于生成参考线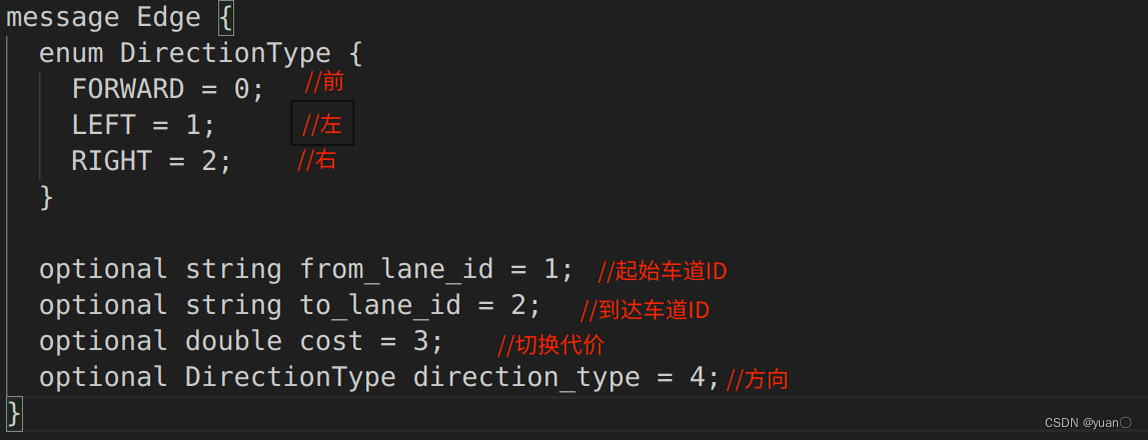
建图流程
建图部分的代码在routing/topo_creator下,文件结构如下:
.
├── BUILD
├── edge_creator.cc            // 建边
├── edge_creator.h
├── graph_creator.cc           // 建图
├── graph_creator.h
├── graph_creator_test.cc
├── node_creator.cc            // 建节点
├── node_creator.h
└── topo_creator.cc           // main函数
具体流程与代码讲解这篇博客(https://zhuanlan.zhihu.com/p/65533164)已经讲解得十分详细.
PS1:apollo地图读取有两种格式,一种是Opendrive格式,通过OpendriveAdapter来读取,另外一种是apollo自己定义的格式。
PS2: routing_map文件,有2种格式txt和bin
PS3:小结一下创建的图的流程,首先是从base_map中读取道路信息,之后遍历道路,先创建节点,然后创建节点的边,之后把图(点和边的信息)保存到routing_map中,所以routing_map中就是grap_protobuf格式的固化,后面routing模块会读取创建好的routing_map通过Astar算法来进行路径规划。
创建节点
创建节点的过程,主要在函数GetPbNode()中实现:
void GetPbNode(const hdmap::Lane& lane, const std::string& road_id,
               const RoutingConfig& routingconfig, Node* const node) {
  // 1. 初始化节点信息
  InitNodeInfo(lane, road_id, node);
  // 2. 初始化节点代价
  InitNodeCost(lane, routingconfig, node);
}
初始化节点信息
void InitNodeInfo(const Lane& lane, const std::string& road_id,
                  Node* const node) {
  double lane_length = GetLaneLength(lane); // 长度
  node->set_lane_id(lane.id().id());  // 车道ID
  node->set_road_id(road_id);   // 道路ID
  // 根据lane的边界,添加能够变道的路段
  AddOutBoundary(lane.left_boundary(), lane_length, node->mutable_left_out());
  AddOutBoundary(lane.right_boundary(), lane_length, node->mutable_right_out());
  node->set_length(lane_length);
  node->mutable_central_curve()->CopyFrom(lane.central_curve());
  node->set_is_virtual(true);
  if (!lane.has_junction_id() ||
      lane.left_neighbor_forward_lane_id_size() > 0 ||
      lane.right_neighbor_forward_lane_id_size() > 0) {
    node->set_is_virtual(false);
  }
}
初始化节点代价:根据道路长度和速度限制来计算代价
void InitNodeCost(const Lane& lane, const RoutingConfig& routing_config,
                  Node* const node) {
  double lane_length = GetLaneLength(lane);
  double speed_limit =
      lane.has_speed_limit() ? lane.speed_limit() : routing_config.base_speed();
  double ratio = speed_limit >= routing_config.base_speed()
                     ? std::sqrt(routing_config.base_speed() / speed_limit)
                     : 1.0;
  // 1. 根据道路长度和速度限制来计算代价
  double cost = lane_length * ratio;
  if (lane.has_turn()) {
    // left_turn_penalty: 50.0
    // right_turn_penalty: 20.0
    // uturn_penalty: 100.0
    if (lane.turn() == Lane::LEFT_TURN) {
      cost += routing_config.left_turn_penalty();
    } else if (lane.turn() == Lane::RIGHT_TURN) {
      cost += routing_config.right_turn_penalty();
    } else if (lane.turn() == Lane::U_TURN) {
      cost += routing_config.uturn_penalty();
    }
  }
  node->set_cost(cost);
}
创建边
创建边的流程在函数GetPbEdge()中:
void GetPbEdge(const Node& node_from, const Node& node_to,
               const Edge::DirectionType& type,
               const RoutingConfig& routing_config, Edge* edge) {
  // 设置起始,终止车道和类型
  edge->set_from_lane_id(node_from.lane_id());
  edge->set_to_lane_id(node_to.lane_id());
  edge->set_direction_type(type);

  // 默认代价为0,即直接向前开的代价
  edge->set_cost(0.0);
  if (type == Edge::LEFT || type == Edge::RIGHT) {
    const auto& target_range =
        (type == Edge::LEFT) ? node_from.left_out() : node_from.right_out();
    double changing_area_length = 0.0;
    for (const auto& range : target_range) {
      changing_area_length += range.end().s() - range.start().s();
    }
    // 计算代价
    double ratio = 1.0;
    // base_changing_length: 50.0
    if (changing_area_length < routing_config.base_changing_length()) {
      ratio = std::pow(
          changing_area_length / routing_config.base_changing_length(), -1.5);
    }
    edge->set_cost(routing_config.change_penalty() * ratio);
  }
}
Routing Component
Apollo每个模块依赖于cyber进行注册相关信息,对于每一个模块的查看,需要从component文件开始.
routing_component.h
#pragma once
#include <memory>
#include "modules/routing/routing.h"

namespace apollo {
namespace routing {

class RoutingComponent final
    : public ::apollo::cyber::Component<RoutingRequest> {
 public:
  // default用来控制默认构造函数的生成。显式地指示编译器生成该函数的默认版本。
  RoutingComponent() = default;
  ~RoutingComponent() = default;

 public:
  bool Init() override;
  // 收到routing request的时候触发
  bool Proc(const std::shared_ptr<RoutingRequest>& request) override;

 private:
  // routing消息发布handle
  std::shared_ptr<::apollo::cyber::Writer<RoutingResponse>> response_writer_ =
      nullptr;
  std::shared_ptr<::apollo::cyber::Writer<RoutingResponse>>
      response_history_writer_ = nullptr;
  // Routing类
  Routing routing_;
  std::shared_ptr<RoutingResponse> response_ = nullptr;
  // 定时器
  std::unique_ptr<::apollo::cyber::Timer> timer_;
  // 锁
  std::mutex mutex_;
};
// 在cyber框架中注册routing模块
CYBER_REGISTER_COMPONENT(RoutingComponent)

}  // namespace routing
}  // namespace apollo
routing_component.cc
#include "modules/routing/routing_component.h"
#include <utility>
#include "modules/common/adapters/adapter_gflags.h"
#include "modules/routing/common/routing_gflags.h"

DECLARE_string(flagfile);

namespace apollo {
namespace routing {

bool RoutingComponent::Init() {
  // 加载并检查config配置文件
  // 消息类型定义在modules/routing/proto/routing_config.proto中
  RoutingConfig routing_conf;
  ACHECK(cyber::ComponentBase::GetProtoConfig(&routing_conf))
      << "Unable to load routing conf file: "
      << cyber::ComponentBase::ConfigFilePath();

  AINFO << "Config file: " << cyber::ComponentBase::ConfigFilePath()
        << " is loaded.";

  // 设置消息qos,控制流量,创建消息发布response_writer_
  apollo::cyber::proto::RoleAttributes attr;
  attr.set_channel_name(routing_conf.topic_config().routing_response_topic());
  auto qos = attr.mutable_qos_profile();
  qos->set_history(apollo::cyber::proto::QosHistoryPolicy::HISTORY_KEEP_LAST);
  qos->set_reliability(
      apollo::cyber::proto::QosReliabilityPolicy::RELIABILITY_RELIABLE);
  qos->set_durability(
      apollo::cyber::proto::QosDurabilityPolicy::DURABILITY_TRANSIENT_LOCAL);
  response_writer_ = node_->CreateWriter<RoutingResponse>(attr);

  // 历史消息发布,和response_writer_类似
  apollo::cyber::proto::RoleAttributes attr_history;
  attr_history.set_channel_name(
      routing_conf.topic_config().routing_response_history_topic());
  auto qos_history = attr_history.mutable_qos_profile();
  qos_history->set_history(
      apollo::cyber::proto::QosHistoryPolicy::HISTORY_KEEP_LAST);
  qos_history->set_reliability(
      apollo::cyber::proto::QosReliabilityPolicy::RELIABILITY_RELIABLE);
  qos_history->set_durability(
      apollo::cyber::proto::QosDurabilityPolicy::DURABILITY_TRANSIENT_LOCAL);
  response_history_writer_ = node_->CreateWriter<RoutingResponse>(attr_history);

  // 创建定时器
  std::weak_ptr<RoutingComponent> self =
      std::dynamic_pointer_cast<RoutingComponent>(shared_from_this());
  timer_.reset(new ::apollo::cyber::Timer(
      FLAGS_routing_response_history_interval_ms,
      [self, this]() {
        auto ptr = self.lock();
        if (ptr) {
          std::lock_guard<std::mutex> guard(this->mutex_);
          if (this->response_ != nullptr) {
            auto timestamp = apollo::cyber::Clock::NowInSeconds();
            response_->mutable_header()->set_timestamp_sec(timestamp);
            this->response_history_writer_->Write(*response_);
          }
        }
      },
      false));
  timer_->Start();

  // 执行Routing类
  return routing_.Init().ok() && routing_.Start().ok();
}

// 接收"RoutingRequest"消息,输出"RoutingResponse"响应。
bool RoutingComponent::Proc(const std::shared_ptr<RoutingRequest>& request) {
  auto response = std::make_shared<RoutingResponse>();
  // 响应routing_请求
  if (!routing_.Process(request, response.get())) {
    return false;
  }
  // 填充响应头部信息,并且发布
  common::util::FillHeader(node_->Name(), response.get());
  response_writer_->Write(response);
  {
    std::lock_guard<std::mutex> guard(mutex_);
    response_ = std::move(response);
  }
  return true;
}

}  // namespace routing
}  // namespace apollo
了解完routing-component的大致功能,接下来便可以看看Routing的具体实现.
Routing具体实现
routing的具体实现在routing.h和routing.cc中.
routing模块的信息输入包括两个固定信息:高精地图原始信息(base_map)和生成的拓扑图(routing_map),一个外部输入的起始点请求信息(RoutingRequest)。输出路由导航的结果.
Routing模块初始化
首先看Routing的初始化函数:
// 初始化函数
apollo::common::Status Routing::Init() {
  // 读取拓扑地图routing_map的文件位置信息
  const auto routing_map_file = apollo::hdmap::RoutingMapFile();
  AINFO << "Use routing topology graph path: " << routing_map_file;
  // 在Navigator类加载指定的graph图
  navigator_ptr_.reset(new Navigator(routing_map_file));

  // 通过map模块提供的功能包,读取原始地图信息,即包括点和边的信息
  // 据此查找routing request请求的点距离最近的lane,并且返回对应的lane id.
  hdmap_ = apollo::hdmap::HDMapUtil::BaseMapPtr();
  ACHECK(hdmap_) << "Failed to load map file:" << apollo::hdmap::BaseMapFile();

  return apollo::common::Status::OK();
}
Navigator的初始化
Routing内部会通过Navigator来搜索路径。因为需要搜索路径,所以Navigator需要完整的拓扑地图。
Navigator::Navigator(const std::string& topo_file_path) {
  Graph graph;
  if (!cyber::common::GetProtoFromFile(topo_file_path, &graph)) {
    AERROR << "Failed to read topology graph from " << topo_file_path;
    return;
  }

  graph_.reset(new TopoGraph());
  if (!graph_->LoadGraph(graph)) {
    AINFO << "Failed to init navigator graph failed! File path: "
          << topo_file_path;
    return;
  }
  black_list_generator_.reset(new BlackListRangeGenerator);
  result_generator_.reset(new ResultGenerator);
  is_ready_ = true;
  AINFO << "The navigator is ready.";
}
在Navigator构造函数中,会完成拓扑地图的加载。同时还初始化了BlackListRangeGenerator(黑名单路段生成)与ResultGenerator(结果生成)两个类的对象。
bool Navigator::Init(const RoutingRequest& request, const TopoGraph* graph,
                     std::vector<const TopoNode*>* const way_nodes,
                     std::vector<double>* const way_s) {
  Clear();
  // 获取routing请求,对应图中的节点
  if (!GetWayNodes(request, graph_.get(), way_nodes, way_s)) {
    AERROR << "Failed to find search terminal point in graph!";
    return false;
  }
    // 根据请求生成对应的黑名单lane
  black_list_generator_->GenerateBlackMapFromRequest(request, graph_.get(),
                                                     &topo_range_manager_);
  return true;
}
在routing请求中可以指定黑名单路和车道,这样routing请求将不会计算这些车道。
Routing Process主流程
Process主流程执行的过程如下:
bool Routing::Process(const std::shared_ptr<RoutingRequest>& routing_request,
                      RoutingResponse* const routing_response) {
  CHECK_NOTNULL(routing_response);
  AINFO << "Get new routing request:" << routing_request->DebugString();

  // 找到routing_request节点最近的路
  // FillLaneInfoIfMissing从地图中选取最佳匹配点
  const auto& fixed_requests = FillLaneInfoIfMissing(*routing_request);
  double min_routing_length = std::numeric_limits<double>::max();
  for (const auto& fixed_request : fixed_requests) {
    RoutingResponse routing_response_temp;
    // 是否能够找到规划路径
    if (navigator_ptr_->SearchRoute(fixed_request, &routing_response_temp)) {
      const double routing_length =
          routing_response_temp.measurement().distance();
      if (routing_length < min_routing_length) {
        routing_response->CopyFrom(routing_response_temp);
        min_routing_length = routing_length;
      }
    }
    FillParkingID(routing_response);
  }
  if (min_routing_length < std::numeric_limits<double>::max() &&
      SupplementParkingRequest(routing_response)) {
    monitor_logger_buffer_.INFO("Routing success!");
    return true;
  }

  AERROR << "Failed to search route with navigator.";
  monitor_logger_buffer_.WARN("Routing failed! " +
                              routing_response->status().msg());
  return false;
}
FillLaneInfoIfMissing的详细解释这篇博文有作阐述https://zhuanlan.zhihu.com/p/459954010
Navigator主函数
Navigator本身并没有实现路径搜索的算法。它仅仅是借助其他类来完成路由路径的搜索过程。其主函数在SearchRoute中(这篇博客对其有详细的讲解https://paul.pub/apollo-routing/#id-routing_configproto)。
主要完成以下任务:
1.对请求参数进行检查;
2.判断自身是否处于就绪状态;
3.初始化请求需要的参数;
4.执行搜索算法;
5.组装搜索结果;
SearchRoute的核心是SearchRouteByStrategy,这篇博客对其有详细的讲解https://zhuanlan.zhihu.com/p/65533164
主要完成以下任务:
1.设定路径搜索算法(AStar)
2.遍历每一个routing_request节点,设置TopoRangeManager(NodeSRange的管理器。可以进行查找,添加,排序和合并操作);AddBlackMapFromTerminal添加黑名单,根据起点和终点将车道作分割;创建子图SubTopoGraph(由搜索算法所用);获取起点和终点;通过AStar查找最优路径;保存结果到node_vec
3.合并Route结果
AStarStrategy
Navigator::SearchRoute方法调用了类自身的SearchRouteByStrategy方法。在这个方法中,会借助AStarStrategy来完成路径的搜索。
AStarStrategy类是抽象类Strategy子类,即可以通过实现另一种算法替换掉AStar。
AStar基本原理可以参考这篇博客:https://blog.csdn.net/sinat_52032317/article/details/127077625
AStar的具体实现流程参考这篇博客https://zhuanlan.zhihu.com/p/459954010
以及这篇
https://www.jianshu.com/p/2ee0d6b19b5f
// 输入:起点、终点、读取的拓扑地图以及根据起点终点生成的子拓扑图、到起点到达终点的点集:
bool AStarStrategy::Search(const TopoGraph* graph,
                           const SubTopoGraph* sub_graph,
                           const TopoNode* src_node, const TopoNode* dest_node,
                           std::vector<NodeWithRange>* const result_nodes) {
  Clear();
  AINFO << "Start A* search algorithm.";
  // 该优先列表将f最小的值作为最优点
  std::priority_queue<SearchNode> open_set_detail;
  // 将地图选取的起点作为搜索的第一个点,计算起点到终点的代价值(曼哈顿距离)并作为f
  SearchNode src_search_node(src_node);
  src_search_node.f = HeuristicCost(src_node, dest_node);
  // 将该点加入到开放列表之中
  open_set_detail.push(src_search_node);
  open_set_.insert(src_node);
  g_score_[src_node] = 0.0;
  enter_s_[src_node] = src_node->StartS();
  // 定义当前节点
  SearchNode current_node;
  std::unordered_set<const TopoEdge*> next_edge_set;
  std::unordered_set<const TopoEdge*> sub_edge_set;
  while (!open_set_detail.empty()) {
    // 若open集非空,选取最优的为当前节点,开始搜索
    current_node = open_set_detail.top();
    const auto* from_node = current_node.topo_node;
    // 若当前点等于目标点,结束搜索
    if (current_node.topo_node == dest_node) {
      // ReconstructL:从终点到起点进行反向搜索,获取轨迹点
      if (!Reconstruct(came_from_, from_node, result_nodes)) {
        AERROR << "Failed to reconstruct route.";
        return false;
      }
      return true;
    }
    // 将当前点从搜索点集中清除
    open_set_.erase(from_node);
    open_set_detail.pop();
    // 跳过closed集中添加的点
    if (closed_set_.count(from_node) != 0) {
      // if showed before, just skip...
      continue;
    }
    // 将当前点添加到closed集中
    closed_set_.emplace(from_node);

    // if residual_s is less than FLAGS_min_length_for_lane_change, only move
    // forward
    const auto& neighbor_edges =
        (GetResidualS(from_node) > FLAGS_min_length_for_lane_change &&
         change_lane_enabled_)
            ? from_node->OutToAllEdge()
            : from_node->OutToSucEdge();
    double tentative_g_score = 0.0;
    next_edge_set.clear();
    for (const auto* edge : neighbor_edges) {
      sub_edge_set.clear();
      sub_graph->GetSubInEdgesIntoSubGraph(edge, &sub_edge_set);
      next_edge_set.insert(sub_edge_set.begin(), sub_edge_set.end());
    }

    for (const auto* edge : next_edge_set) {
      const auto* to_node = edge->ToNode();
      // 跳过closed集中的点
      if (closed_set_.count(to_node) == 1) {
        continue;
      }
      // 跳过不能换到到达的点
      if (GetResidualS(edge, to_node) < FLAGS_min_length_for_lane_change) {
        continue;
      }
      // 将当前节点的g值和能够达到的点的cost值相加
      // GetCostToNeighbor返回相邻节点的cost和边edge的cost
      tentative_g_score =
          g_score_[current_node.topo_node] + GetCostToNeighbor(edge);
      // 若下一点需要换道才能到达,cost会减少部分值
      if (edge->Type() != TopoEdgeType::TET_FORWARD) {
        tentative_g_score -=
            (edge->FromNode()->Cost() + edge->ToNode()->Cost()) / 2;
      }
      // 计算能够达到点的f值
      double f = tentative_g_score + HeuristicCost(to_node, dest_node);
      if (open_set_.count(to_node) != 0 && f >= g_score_[to_node]) {
        continue;
      }
      // if to_node is reached by forward, reset enter_s to start_s
      if (edge->Type() == TopoEdgeType::TET_FORWARD) {
        enter_s_[to_node] = to_node->StartS();
      } else {
        // else, add enter_s with FLAGS_min_length_for_lane_change
        double to_node_enter_s =
            (enter_s_[from_node] + FLAGS_min_length_for_lane_change) /
            from_node->Length() * to_node->Length();
        // enter s could be larger than end_s but should be less than length
        to_node_enter_s = std::min(to_node_enter_s, to_node->Length());
        // if enter_s is larger than end_s and to_node is dest_node
        if (to_node_enter_s > to_node->EndS() && to_node == dest_node) {
          continue;
        }
        enter_s_[to_node] = to_node_enter_s;
      }

      g_score_[to_node] = f;
      // 初始化下一节点
      SearchNode next_node(to_node);
      next_node.f = f;
      open_set_detail.push(next_node);
      came_from_[to_node] = from_node;
      // 将能够达到的点加入open集
      if (open_set_.count(to_node) == 0) {
        open_set_.insert(to_node);
      }
    }
  }
  AERROR << "Failed to find goal lane with id: " << dest_node->LaneId();
  return false;
}
Routing模块总体结构

总结: Routing模块首先读取高精地图原始信息,利用TopoCreator创建点、边,生成拓扑地图。读取到RoutingRequest的消息(一系列点)之后,Navigator类依据拓扑地图和TopoRangeManager使用AStar算法在拓扑图中搜索连接起始点的最优路径RoutingResponse,作为输出发送出去。
参考
[1] apollo介绍之Routing模块(六)https://zhuanlan.zhihu.com/p/65533164
[2] Apollo星火计划学习笔记——第七讲自动驾驶规划技术原理1https://blog.csdn.net/sinat_52032317/article/details/128300053#t6
[3] Apollo 导航模块记录(routing模块)https://zhuanlan.zhihu.com/p/459954010
[4] Cyber RT基础入门与实践https://apollo.baidu.com/community/article/1093
[5] 入门必看丨解析百度Apollo之Routing模块https://mp.weixin.qq.com/s?__biz=MzI1NjkxOTMyNQ==&mid=2247490369&idx=1&sn=3a3f1dafc46782da311a2fc910e6095a&scene=21#wechat_redirect
[6] 解析百度Apollo之Routing模块https://paul.pub/apollo-routing/
