day01
day01集群LVS配置LVS NAT模式配置LVS NAT模式步骤LVS DR模式配置LVS DR模式
集群
-
将很多机器组织到一起,作为一个整体对外提供服务
-
集群在扩展性、性能方面都可以做到很灵活
-
集群分类:
- 负载均衡集群:Load Balance
- 高可用集群:High Availability
- 高性能计算:High Performance Computing
LVS
-
LVS:Linux Virtual Server,Linux虚拟服务器
-
实现负载均衡集群
-
作者:章文嵩。国防科技大学读博士期间编写
-
LVS的工作模式:
- NAT:网络地址转换
- DR:路由模式
- TUN:隧道模式
-
术语:
- 调度器:LVS服务器
- 真实服务器Real Server:提供服务的服务器
- VIP:虚拟地址,提供给用户访问的地址
- DIP:指定地址,LVS服务器上与真实服务器通信的地址
- RIP:真实地址,真实服务器的地址
-
常见的调度算法,共10个,常用的有4个:
- 轮询rr:Real Server轮流提供服务
- 加权轮询wrr:根据服务器性能设置权重,权重大的得到的请求更多
- 最少连接lc:根据Real Server的连接数分配请求
- 加权最少连接wlc:类似于wrr,根据权重分配请求
配置LVS NAT模式
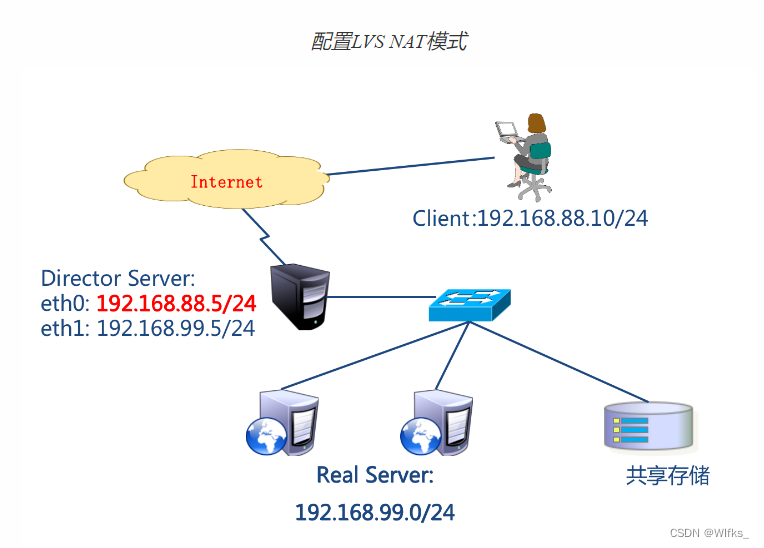

-
环境准备
- pubserver:eth0->192.168.88.240,eth1->192.168.99.240
- client1:eth0->192.168.88.10,网关192.168.88.5
- lvs1: eth0 -> 192.168.88.5;eth1->192.168.99.5
- web1:eth1->192.168.99.100;网关192.168.99.5
- web2:eth1->192.168.99.200;网关192.168.99.5
# 创建4台虚拟机
[root@myhost ~]# vm clone client1 lvs1 web{1..2}
# 初始化虚拟机
[root@myhost ~]# virsh console client1 # 连接client1控制台
localhost login: root
Password: a
# 登陆之后,将以下内容粘贴到终端
hostnamectl set-hostname client1
nmcli connection modify "System eth0" con-name eth0
nmcli connection modify eth0 ipv4.method manual ipv4.addresses 192.168.88.10/24 autoconnect yes ipv4.gateway 192.168.88.5
nmcli connection down eth0
nmcli connection up eth0
# 退出
[root@localhost ~]# exit
# 退出之后,按ctrl+]可回到真机
# 真机通过ssh连接client1
[root@myhost ~]# rm -f ~/.ssh/known_hosts
[root@myhost ~]# ssh 192.168.88.10
# 配置第2台机器作为lvs1
[root@myhost ~]# virsh console lvs1
localhost login: root
Password: a
# 登陆之后,将以下内容复制到命令行
hostnamectl set-hostname lvs1
nmcli connection modify "System eth0" con-name eth0
nmcli connection modify eth0 ipv4.method manual ipv4.addresses 192.168.88.5/24 autoconnect yes
nmcli connection down eth0
nmcli connection up eth0
rm -f /etc/sysconfig/network-scripts/ifcfg-eth1
nmcli connection add con-name eth1 ifname eth1 type ethernet autoconnect yes ipv4.method manual ipv4.addresses 192.168.99.5/24
reboot # 重启系统,使得eth1网卡生效
# 按ctrl+]可回到真机
# 真机通过ssh连接lvs1
[root@myhost ~]# ssh 192.168.88.5
# 配置第3台机器作为web1
[root@myhost ~]# virsh console web1
localhost login: root
Password: a
# 登陆之后,将以下内容复制到命令行
hostnamectl set-hostname web1
nmcli connection modify "System eth0" con-name eth0
nmcli connection modify eth0 autoconnect no
rm -f /etc/sysconfig/network-scripts/ifcfg-eth1
nmcli connection add con-name eth1 ifname eth1 type ethernet autoconnect yes ipv4.method manual ipv4.addresses 192.168.99.100/24 ipv4.gateway 192.168.99.5
reboot
# 按ctrl+]可回到真机
# 真机通过ssh连接web1
[root@myhost ~]# ssh 192.168.99.100
# 配置第4台机器作为web2
[root@myhost ~]# virsh console web2
localhost login: root
Password: a
# 登陆之后,将以下内容复制到命令行
hostnamectl set-hostname web2
nmcli connection modify "System eth0" con-name eth0
nmcli connection modify eth0 autoconnect no
rm -f /etc/sysconfig/network-scripts/ifcfg-eth1
nmcli connection add con-name eth1 ifname eth1 type ethernet autoconnect yes ipv4.method manual ipv4.addresses 192.168.99.200/24 ipv4.gateway 192.168.99.5
reboot
# 按ctrl+]可回到真机
# 真机通过ssh连接web2
[root@myhost ~]# ssh 192.168.99.200
- 虚拟机已关闭selinux和防火墙 。
- 在pubserver上准备管理环境
# 创建工作目录
[root@pubserver ~]# mkdir cluster
[root@pubserver ~]# cd cluster/
#创建主配置文件
[root@pubserver cluster]# vim ansible.cfg
[defaults]
inventory = inventory
host_key_checking = false # 不检查主机密钥
# 创建主机清单文件及相关变量
[root@pubserver cluster]# vim inventory
[clients]
client1 ansible_host=192.168.88.10
[webservers]
web1 ansible_host=192.168.99.100
web2 ansible_host=192.168.99.200
[lb]
lvs1 ansible_host=192.168.88.5
[all:vars] # all是ansible自带的组,表示全部主机
ansible_ssh_user=root
ansible_ssh_pass=a
# 创建文件目录,用于保存将要拷贝到远程主机的文件
[root@pubserver cluster]# mkdir files
# 编写yum配置文件
[root@pubserver cluster]# vim files/local88.repo
[BaseOS]
name = BaseOS
baseurl = ftp://192.168.88.240/dvd/BaseOS
enabled = 1
gpgcheck = 0
[AppStream]
name = AppStream
baseurl = ftp://192.168.88.240/dvd/AppStream
enabled = 1
gpgcheck = 0
[rpms]
name = rpms
baseurl = ftp://192.168.88.240/rpms
enabled = 1
gpgcheck = 0
[root@pubserver cluster]# vim files/local99.repo
[BaseOS]
name = BaseOS
baseurl = ftp://192.168.99.240/dvd/BaseOS
enabled = 1
gpgcheck = 0
[AppStream]
name = AppStream
baseurl = ftp://192.168.99.240/dvd/AppStream
enabled = 1
gpgcheck = 0
[rpms]
name = rpms
baseurl = ftp://192.168.99.240/rpms
enabled = 1
gpgcheck = 0
# 编写用于上传yum配置文件的playbook
[root@pubserver cluster]# vim 01-upload-repo.yml
---
- name: config repos.d
hosts: all
tasks:
- name: delete repos.d # 删除repos.d目录
file:
path: /etc/yum.repos.d
state: absent
- name: create repos.d # 创建repos.d目录
file:
path: /etc/yum.repos.d
state: directory
mode: '0755'
- name: config local88 # 上传repo文件到88网段
hosts: clients,lb
tasks:
- name: upload local88
copy:
src: files/local88.repo
dest: /etc/yum.repos.d/
- name: config local99 # 上传repo文件到99网段
hosts: webservers
tasks:
- name: upload local99
copy:
src: files/local99.repo
dest: /etc/yum.repos.d/
[root@pubserver cluster]# ansible-playbook 01-upload-repo.yml
配置LVS NAT模式步骤
- 配置2台web服务器
# 创建首页文件,文件中包含ansible facts变量
[root@pubserver cluster]# vim files/index.html
Welcome from {{ansible_hostname}}
# 配置web服务器
[root@pubserver cluster]# vim 02-config-webservers.yml
---
- name: config webservers
hosts: webservers
tasks:
- name: install nginx # 安装nginx
yum:
name: nginx
state: present
- name: upload index # 上传首页文件到web服务器
template:
src: files/index.html
dest: /usr/share/nginx/html/index.html
- name: start nginx # 启动服务
service:
name: nginx
state: started
enabled: yes
[root@pubserver cluster]# ansible-playbook 02-config-webservers.yml
# 在lvs1上测试到web服务器的访问
[root@lvs1 ~]# curl http://192.168.99.100
Welcome from web1
[root@lvs1 ~]# curl http://192.168.99.200
Welcome from web2
- 确保lvs1的ip转发功能已经打开。该功能需要改变内核参数
# 查看ip转发功能的内核参数
[root@lvs1 ~]# sysctl -a # 查看所有的内核参数
[root@lvs1 ~]# sysctl -a | grep ip_forward # 查看ip_foward参数
net.ipv4.ip_forward = 1 # 1表示打开转发,0表示关闭转发
# 设置打开ip_forward功能
[root@pubserver cluster]# vim 03-sysctl.yml
---
- name: config sysctl
hosts: lb
tasks:
- name: set ip_forward
sysctl: # 用于修改内核参数的模块
name: net.ipv4.ip_forward # 内核模块名
value: '1' # 内核模块的值
sysctl_set: yes # 立即设置生效
sysctl_file: /etc/sysctl.conf # 配置写入文件
[root@pubserver cluster]# ansible-playbook 03-sysctl.yml
# 测试从客户端到服务器的访问
[root@client1 ~]# curl http://192.168.99.100
Welcome from web1
[root@client1 ~]# curl http://192.168.99.200
Welcome from web2
- 安装LVS
[root@pubserver cluster]# vim 04-inst-lvs.yml
---
- name: install lvs
hosts: lb
tasks:
- name: install lvs # 安装lvs
yum:
name: ipvsadm
state: present
[root@pubserver cluster]# ansible-playbook 04-inst-lvs.yml
- ipvsadm使用说明
[root@lvs1 ~]# ipvsadm
-A: 添加虚拟服务器
-E: 编辑虚拟服务器
-D: 删除虚拟服务器
-t: 添加tcp服务器
-u: 添加udp服务器
-s: 指定调度算法。如轮询rr/加权轮询wrr/最少连接lc/加权最少连接wlc
-a: 添加虚拟服务器后,向虚拟服务器中加入真实服务器
-r: 指定真实服务器
-w: 设置权重
-m: 指定工作模式为NAT
-g: 指定工作模式为DR
- 配置LVS
# 为web服务器创建虚拟服务器,使用rr调度算法
[root@lvs1 ~]# ipvsadm -A -t 192.168.88.5:80 -s rr
# 查看配置
[root@lvs1 ~]# ipvsadm -Ln # L是列出,n是使用数字,而不是名字
# 向虚拟服务器中添加RIP
[root@lvs1 ~]# ipvsadm -a -t 192.168.88.5:80 -r 192.168.99.100 -w 1 -m
[root@lvs1 ~]# ipvsadm -a -t 192.168.88.5:80 -r 192.168.99.200 -w 2 -m
# 查看配置
[root@lvs1 ~]# ipvsadm -Ln
# 验证
[root@client1 ~]# for i in {1..6}
> do
> curl http://192.168.88.5
> done
Welcome from web2
Welcome from web1
Welcome from web2
Welcome from web1
Welcome from web2
Welcome from web1
# 删除配置。(如果配置有错,用以下命令删除重配置)
[root@lvs1 ~]# ipvsadm -D -t 192.168.88.5:80
# 修改调度模式为加权轮询
[root@lvs1 ~]# ipvsadm -E -t 192.168.88.5:80 -s wrr
# 验证配置
[root@client1 ~]# for i in {1..6}; do curl http://192.168.88.5; done
Welcome from web2
Welcome from web2
Welcome from web1
Welcome from web2
Welcome from web2
Welcome from web1
LVS DR模式

-
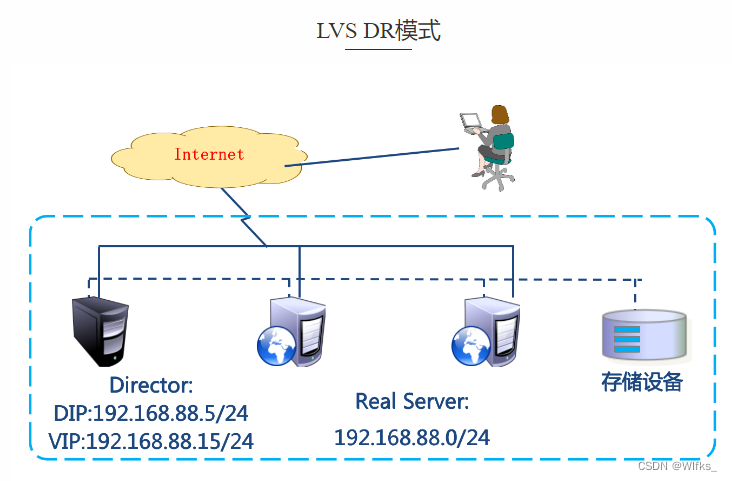
LVS DR模式,LVS主机和web服务器都是单网卡。它们连在同一网络中
-
修改实验环境
- client1:eth0-> 192.168.88.10
- lvs1:eth0->192.168.88.5,删除eth1的IP
- web1:eth0->192.168.88.100,删除eth1的IP
- web2:eth0->192.168.88.200,删除eth1的IP
# 删除lvs虚拟服务器配置
[root@lvs1 ~]# ipvsadm -D -t 192.168.88.5:80
[root@lvs1 ~]# ipvsadm -Ln
# 删除lvs1上eth1的配置
[root@lvs1 ~]# nmcli connection modify eth1 ipv4.method disabled ipv4.addresses ''
[root@lvs1 ~]# nmcli connection down eth1
# 修改web1的配置:停掉eth1的地址。配置eth0的地址为192.168.88.100
# 进入网卡配置文件目录
[root@web1 ~]# cd /etc/sysconfig/network-scripts/
# eth0网卡的配置文件叫ifcfg-eth0
[root@web1 network-scripts]# ls ifcfg-eth*
ifcfg-eth0 ifcfg-eth1
# 配置eth0地址
[root@web1 network-scripts]# vim ifcfg-eth0
TYPE=Ethernet # 网络类型为以太网
BOOTPROTO=none # IP地址是静态配置的,也可以用static
NAME=eth0 # 为设备重命名
DEVICE=eth0 # 网卡设备名
ONBOOT=yes # 开机激活网卡
IPADDR=192.168.88.100 # IP地址
PREFIX=24 # 子网掩码长度
GATEWAY=192.168.88.254 # 网关
[root@web1 ~]# systemctl restart NetworkManager # 重启网络服务
# 在web1上停掉eth1
[root@web1 ~]# vim /etc/sysconfig/network-scripts/ifcfg-eth1
TYPE=Ethernet
BOOTPROTO=none
NAME=eth1
DEVICE=eth1
ONBOOT=no
[root@web1 ~]# nmcli connection down eth1 # 终端卡住,关掉它,在新终端重新连
# 修改web2的网络
[root@web2 ~]# vim /etc/sysconfig/network-scripts/ifcfg-eth0
TYPE=Ethernet
BOOTPROTO=none
NAME=eth0
DEVICE=eth0
ONBOOT=yes
IPADDR=192.168.88.200
PREFIX=24
GATEWAY=192.168.88.254
[root@web2 ~]# systemctl restart NetworkManager
[root@web2 ~]# vim /etc/sysconfig/network-scripts/ifcfg-eth1
TYPE=Ethernet
BOOTPROTO=none
NAME=eth1
DEVICE=eth1
ONBOOT=no
[root@web2 ~]# nmcli connection down eth1
# 修改pubserver的主机清单文件
[root@pubserver cluster]# cp inventory inventory.bak
[root@pubserver cluster]# vim inventory
[clients]
client1 ansible_host=192.168.88.10
[webservers]
web1 ansible_host=192.168.88.100
web2 ansible_host=192.168.88.200
[lb]
lvs1 ansible_host=192.168.88.5
[all:vars]
ansible_ssh_user=root
ansible_ssh_pass=a
# 修改2台web服务器yum配置文件中的地址
[root@web1 ~]# sed -i 's/99/88/' /etc/yum.repos.d/local99.repo
[root@web1 ~]# cat /etc/yum.repos.d/local99.repo
[BaseOS]
name = BaseOS
baseurl = ftp://192.168.88.240/dvd/BaseOS
enabled = 1
gpgcheck = 0
[AppStream]
name = AppStream
baseurl = ftp://192.168.88.240/dvd/AppStream
enabled = 1
gpgcheck = 0
[rpms]
name = rpms
baseurl = ftp://192.168.88.240/rpms
enabled = 1
gpgcheck = 0
配置LVS DR模式
- 在lvs1的eth0上配置vip 192.168.88.15。
[root@pubserver cluster]# vim 05-config-lvsvip.yml
---
- name: config lvs vip
hosts: lb
tasks:
- name: add vip
lineinfile: # 确保文件中有某一行内容
path: /etc/sysconfig/network-scripts/ifcfg-eth0
line: IPADDR2=192.168.88.15
notify: restart eth0 # 通知执行handlers中的任务
handlers: # 被通知执行的任务写到这里
- name: restart eth0
shell: nmcli connection down eth0; nmcli connection up eth0
[root@pubserver cluster]# ansible-playbook 05-config-lvsvip.yml
# 在lvs1查看添加的IP地址
[root@lvs1 ~]# ip a s eth0 | grep 88
inet 192.168.88.5/24 brd 192.168.88.255 scope global noprefixroute eth0
inet 192.168.88.15/24 brd 192.168.88.255 scope global secondary noprefixroute eth0
- 在2台web服务器的lo上配置vip 192.168.88.15。
lo:0网卡需要使用network-scripts提供的配置文件进行配置。
[root@pubserver cluster]# vim 06-config-webvip.yml
---
- name: config webservers vip
hosts: webservers
tasks:
- name: install network-scripts # 安装服务
yum:
name: network-scripts
state: present
- name: add lo:0 # 创建lo:0的配置文件
copy:
dest: /etc/sysconfig/network-scripts/ifcfg-lo:0
content: |
DEVICE=lo:0
NAME=lo:0
IPADDR=192.168.88.15
NETMASK=255.255.255.255
NETWORK=192.168.88.15
BROADCAST=192.168.88.15
ONBOOT=yes
notify: activate lo:0
handlers:
- name: activate lo:0 # 激活网卡
shell: ifup lo:0
[root@pubserver cluster]# ansible-playbook 06-config-webvip.yml
# 查看结果
[root@web1 ~]# cd /etc/sysconfig/network-scripts/
[root@web1 network-scripts]# cat ifcfg-lo:0
DEVICE=lo:0
NAME=lo:0
IPADDR=192.168.88.15
NETMASK=255.255.255.255
NETWORK=192.168.88.15
BROADCAST=192.168.88.15
ONBOOT=yes
[root@web1 network-scripts]# ifconfig # 可以查看到lo:0网卡信息
lo:0: flags=73<UP,LOOPBACK,RUNNING> mtu 65536
inet 192.168.88.15 netmask 255.255.255.255
loop txqueuelen 1000 (Local Loopback)
- 在2台web服务器上配置内核参数,使得它们不响应对192.168.88.15的请求
[root@web1 ~]# sysctl -a | grep arp_ignore
net.ipv4.conf.all.arp_ignore = 1
net.ipv4.conf.lo.arp_ignore = 0
[root@web1 ~]# sysctl -a | grep arp_announce
net.ipv4.conf.all.arp_announce = 2
net.ipv4.conf.lo.arp_announce = 0
[root@web1 ~]# vim /etc/sysctl.conf
net.ipv4.conf.all.arp_ignore = 1
net.ipv4.conf.lo.arp_ignore = 1
net.ipv4.conf.all.arp_announce = 2
net.ipv4.conf.lo.arp_announce = 2
[root@web1 ~]# sysctl -p
[root@web2 ~]# vim /etc/sysctl.conf
net.ipv4.conf.all.arp_ignore = 1
net.ipv4.conf.lo.arp_ignore = 1
net.ipv4.conf.all.arp_announce = 2
net.ipv4.conf.lo.arp_announce = 2
[root@web2 ~]# sysctl -p
- 在lvs1上配置虚拟服务器
# 创建虚拟服务器
[root@lvs1 ~]# ipvsadm -A -t 192.168.88.15:80 -s wlc
# 向虚拟服务器中加真实服务器
[root@lvs1 ~]# ipvsadm -a -t 192.168.88.15:80 -r 192.168.88.100 -w 1 -g
[root@lvs1 ~]# ipvsadm -a -t 192.168.88.15:80 -r 192.168.88.200 -w 2 -g
# 查看配置
[root@lvs1 ~]# ipvsadm -Ln
# 客户验证
[root@client1 ~]# for i in {1..6}; do curl http://192.168.88.15/; done
Welcome from web2
Welcome from web1
Welcome from web2
Welcome from web2
Welcome from web1
Welcome from web2
附:出错时,排错步骤:
# 在lvs上可以访问到web服务器
[root@lvs1 ~]# curl http://192.168.88.100/
192.168.99.100
[root@lvs1 ~]# curl http://192.168.88.200/
apache web server2
# 查看vip
[root@lvs1 ~]# ip a s eth0 | grep 88
inet 192.168.88.5/24 brd 192.168.88.255 scope global noprefixroute eth0
inet 192.168.88.15/24 brd 192.168.88.255 scope global secondary noprefixroute eth0
[root@web1 ~]# ifconfig lo:0
lo:0: flags=73<UP,LOOPBACK,RUNNING> mtu 65536
inet 192.168.88.15 netmask 255.255.255.255
loop txqueuelen 1000 (Local Loopback)
# 查看内核参数
[root@web1 ~]# sysctl -p
net.ipv4.conf.all.arp_ignore = 1
net.ipv4.conf.lo.arp_ignore = 1
net.ipv4.conf.all.arp_announce = 2
net.ipv4.conf.lo.arp_announce = 2
# 查看规则
[root@lvs1 ~]# ipvsadm -Ln
IP Virtual Server version 1.2.1 (size=4096)
Prot LocalAddress:Port Scheduler Flags
-> RemoteAddress:Port Forward Weight ActiveConn InActConn
TCP 192.168.88.15:80 wlc
-> 192.168.88.100:80 Route 1 0 12
-> 192.168.88.200:80 Route 2 0 18
知识点思维导图:FlowUs 息流 - 新一代生产力工具

![[LitCTF 2023]作业管理系统](https://img-blog.csdnimg.cn/img_convert/d7b272a051cd43dab7aefabff39d81f8.png)
