authorization server && client && resource 使用1
OAuth2介绍
OAuth(Open Authorization)是一个关于授权(authorization)的开放网络标准,允许用户授权第三方应用访问他们存储在另外的服务提供者上的信息,而不需要将用户名和密码提供给第三方移动应用或分享他们数据的所有内容。OAuth在全世界得到广泛应用,目前的版本是2.0版。
OAuth协议:https://tools.ietf.org/html/rfc6749
协议特点:
- 简单:不管是OAuth服务提供者还是应用开发者,都很易于理解与使用;
- 安全:没有涉及到用户密钥等信息,更安全更灵活;
- 开放:任何服务提供商都可以实现OAuth,任何软件开发商都可以使用OAuth;
应用场景
- 原生app授权:app登录请求后台接口,为了安全认证,所有请求都带token信息,如果登录验证、请求后台数据。
- 前后端分离单页面应用:前后端分离框架,前端请求后台数据,需要进行oauth2安全认证,比如使用vue、react后者h5开发的app
- 第三方应用授权登录,比如QQ,微博,微信的授权登录。
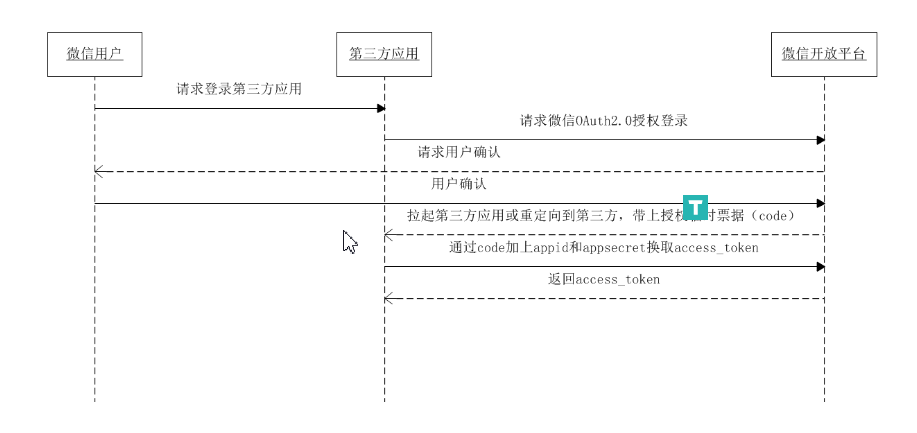
以京东网页版实现微信登录举例
https://www.jd.com/
微信授权流程:https://developers.weixin.qq.com/doc/oplatform/Mobile_App/WeChat_Login/Development_Guide.html
1、京东登录界面点击微信登陆后会跳转微信的授权界面,跳转地址如下
https://open.weixin.qq.com/connect/qrconnect?appid=wx827225356b689e24&state=1EC2B9742BA091FED370F70E7ED0C8B38F6E9F18DD3EABB7727B9ADF9DD890AF2A752F715F0758104B8ACE702BD33943&redirect_uri=https://qq.jd.com/new/wx/callback.action?view=null&uuid=ee27ab419d08487ebaaadb2b5ea40b6d&response_type=code&scope=snsapi_login#wechat_redirect

appid     微信开发平台注册京东商城app后产生,一般还会有一个AppSecret(保密),这个链接就是告诉微信,我是京东
state  用于防护跨站点攻击,京东生成,微信回调的时候附带上,然后京东确认请求中附带了这个,就允许你的请求通过

redirect_uri 回调地址 回调地址中的response_type=code
2、用户扫码允许登录,允许后微信会回调京东的回调地址
https://qq.jd.com/new/wx/callback.action?view=null&uuid=b1210c9abf3343b787f548070017f333&code=061XCb000kghXO1xvA300uTEFH1XCb0V&state=A0A0614EC80D0E69D8EB5FAEBF204DD2FA97B88C29576231B35C3782E1945DED977C38E2A939C405BC9EAE63D1DABCE1
个AppSecret(
主要是这个code,京东后端会根据appid AppSecret 和这个code获取到用户的部分信息,从而进行登录
3、可能获取用户信息后,为了安全,登录前还会验证手机号
基本概念
- (1)Third-party application:第三方应用程序,又称"客户端"(client),即例子中的京东。
- (2)HTTP service:HTTP服务提供商,简称"服务提供商",即例子中的微信。
- (3)Resource Owner:资源所有者,又称"用户"(user)。
- (4)User Agent:用户代理,比如浏览器。
- (5)Authorization server:授权服务器,即服务提供商专门用来处理认证授权的服务器。
- (6)Resource server:资源服务器,即服务提供商存放用户生成的资源的服务器。它与授权服务器,可以是同一台服务器,也可以是不同的服务器。
OAuth的作用就是让"客户端"安全可控地获取"用户"的授权,与"服务提供商"进行交互。
** 优缺点**
优点:
- 更安全,客户端不接触用户密码,服务器端更易集中保护
- 广泛传播并被持续采用
- 短寿命和封装的token
- 资源服务器和授权服务器解耦
- 集中式授权,简化客户端
- HTTP/JSON友好,易于请求和传递token
- 考虑多种客户端架构场景
- 客户可以具有不同的信任级别
缺点:
- 协议框架太宽泛,造成各种实现的兼容性和互操作性差
- 不是一个认证协议,本身并不能告诉你任何用户信息。
OAuth2的设计思路
OAuth2官网:https://datatracker.ietf.org/doc/html/draft-ietf-oauth-v2-1-07
OAuth在"客户端"与"服务提供商"之间,设置了一个授权层(authorization layer)。“客户端"不能直接登录"服务提供商”,只能登录授权层,以此将用户与客户端区分开来。"客户端"登录授权层所用的令牌(token),与用户的密码不同。用户可以在登录的时候,指定授权层令牌的权限范围和有效期,"客户端"登录授权层以后,"服务提供商"根据令牌的权限范围和有效期,向"客户端"开放用户储存的资料。
        +--------+                               +---------------+
        |        |--(1)- Authorization Request ->|   Resource    |
        |        |                               |     Owner     |
        |        |<-(2)-- Authorization Grant ---|               |
        |        |                               +---------------+
        |        |
        |        |                               +---------------+
        |        |--(3)-- Authorization Grant -->| Authorization |
        | Client |                               |     Server    |
        |        |<-(4)----- Access Token -------|               |
        |        |                               +---------------+
        |        |
        |        |                               +---------------+
        |        |--(5)----- Access Token ------>|    Resource   |
        |        |                               |     Server    |
        |        |<-(6)--- Protected Resource ---|               |
        +--------+                               +---------------+

                      Figure 1: Abstract Protocol Flow
(A)用户打开客户端以后,客户端要求用户给予授权。
(B)用户同意给予客户端授权。
(C)客户端使用上一步获得的授权,向授权服务器申请令牌。
(D)授权服务器对客户端进行认证以后,确认无误,同意发放令牌。
(E)客户端使用令牌,向资源服务器申请获取资源。
(F)资源服务器确认令牌无误,同意向客户端开放资源。
令牌(token)与密码(password)的作用是一样的,都可以进入系统,但是有三点差异。
(1)令牌是短期的,到期会自动失效,用户自己无法修改。密码一般长期有效,用户不修改,就不会发生变化。
(2)令牌可以被数据所有者撤销,会立即失效。密码一般不允许被他人撤销。
(3)令牌有权限范围(scope)。对于网络服务来说,只读令牌就比读写令牌更安全。密码一般是完整权限。
上面这些设计,保证了令牌既可以让第三方应用获得权限,同时又随时可控,不会危及系统安全。这就是 OAuth 2.0 的优点。
客户端授权模式
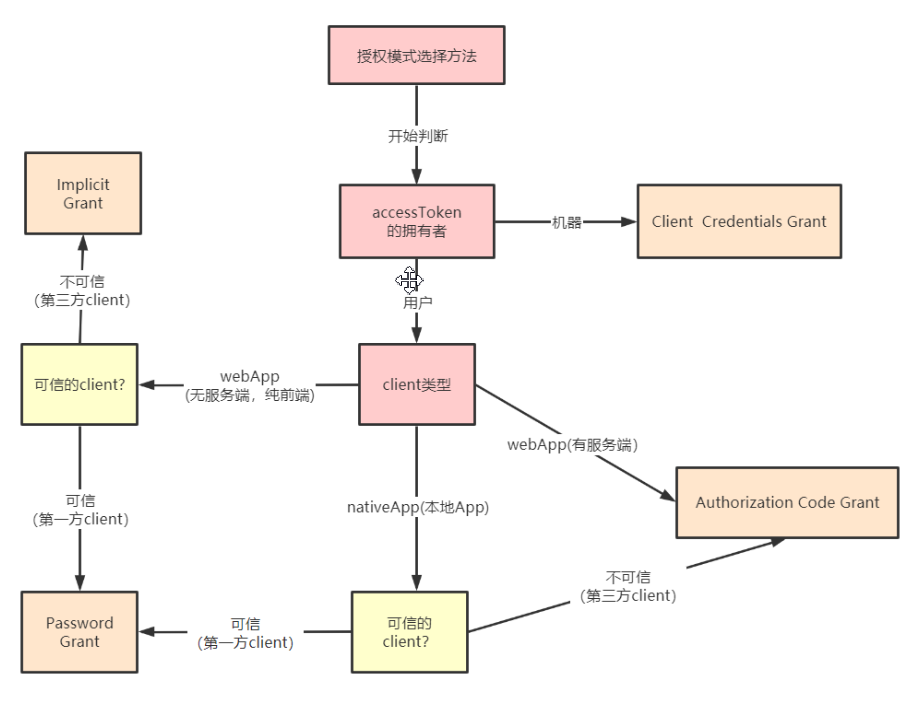
客户端必须得到用户的授权(authorization grant),才能获得令牌(access token)。OAuth 2.0 对于如何颁发令牌的细节,规定得非常详细。具体来说,一共分成四种授权类型(authorization grant),即四种颁发令牌的方式,适用于不同的互联网场景。
- 授权码模式(authorization code)
- 密码模式(resource owner password credentials)
- 简化(隐式)模式(implicit)
- 客户端模式(client credentials)
不管哪一种授权方式,第三方应用申请令牌之前,都必须先到系统备案,说明自己的身份,然后会拿到两个身份识别码:客户端 ID(client ID)和客户端密钥(client secret)。这是为了防止令牌被滥用,没有备案过的第三方应用,是不会拿到令牌的。
授权码模式
授权码(authorization code)方式,指的是第三方应用先申请一个授权码,然后再用该码获取令牌。
这种方式是最常用的流程,安全性也最高,它适用于那些有后端的 Web 应用。授权码通过前端传送,令牌则是储存在后端,而且所有与资源服务器的通信都在后端完成。这样的前后端分离,可以避免令牌泄漏。
适用场景:目前市面上主流的第三方验证都是采用这种模式
应用场景中的京东和微信的例子
    +----------+
    | Resource |
    |   Owner  |
    +----------+
          ^
          |
          |
    +-----|----+          Client Identifier      +---------------+
    | .---+---------(1)-- & Redirection URI ---->|               |
    | |   |    |                                 |               |
    | |   '---------(2)-- User authenticates --->|               |
    | | User-  |                                 | Authorization |
    | | Agent  |                                 |     Server    |
    | |        |                                 |               |
    | |    .--------(3)-- Authorization Code ---<|               |
    +-|----|---+                                 +---------------+
      |    |                                         ^      v
      |    |                                         |      |
      ^    v                                         |      |
    +---------+                                      |      |
    |         |>---(4)-- Authorization Code ---------'      |
    |  Client |          & Redirection URI                  |
    |         |                                             |
    |         |<---(5)----- Access Token -------------------'
    +---------+       (w/ Optional Refresh Token)

                     Figure 3: Authorization Code Flow


客户端标识符:Client Identifier
它的步骤如下:
- (A)用户访问客户端,后者将前者导向授权服务器。
- (B)用户选择是否给予客户端授权。
- (C)假设用户给予授权,授权服务器将用户导向客户端事先指定的"重定向URI"(redirection URI),同时附上一个授权码。
- (D)客户端收到授权码,附上早先的"重定向URI",向授权服务器申请令牌。这一步是在客户端的后台的服务器上完成的,对用户不可见。
- (E)授权服务器核对了授权码和重定向URI,确认无误后,向客户端发送访问令牌(access token)和更新令牌(refresh token)。
简化(隐式)模式
有些 Web 应用是纯前端应用,没有后端。这时就不能用上面的方式了,必须将令牌储存在前端。RFC 6749 就规定了第二种方式,允许直接向前端颁发令牌,这种方式没有授权码这个中间步骤,所以称为(授权码)“隐藏式”(implicit)
简化模式不通过第三方应用程序的服务器,直接在浏览器中向授权服务器申请令牌,跳过了"授权码"这个步骤,所有步骤在浏览器中完成,令牌对访问者是可见的,且客户端不需要认证。
这种方式把令牌直接传给前端,是很不安全的。因此,只能用于一些安全要求不高的场景,并且令牌的有效期必须非常短,通常就是会话期间(session)有效,浏览器关掉,令牌就失效了。
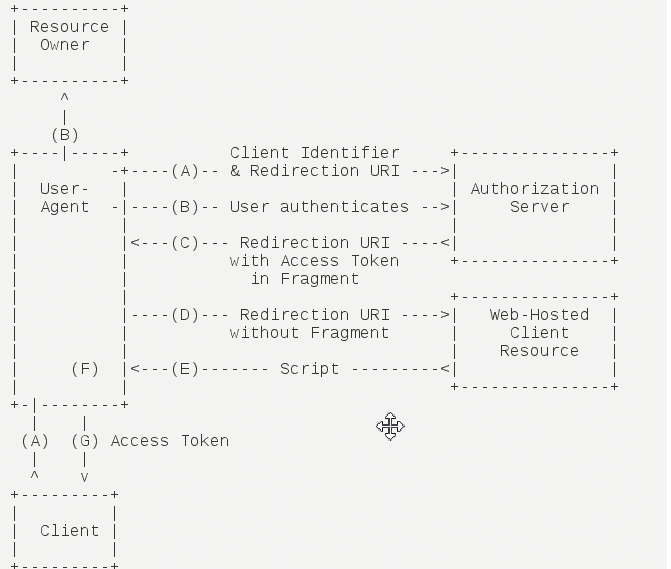
它的步骤如下:
- (A)客户端将用户导向授权服务器。
- (B)用户决定是否给于客户端授权。
- (C)假设用户给予授权,授权服务器将用户导向客户端指定的"重定向URI",并在URI的Hash部分包含了访问令牌。
- (D)浏览器向资源服务器发出请求,其中不包括上一步收到的Hash值。
- (E)资源服务器返回一个网页,其中包含的代码可以获取Hash值中的令牌。
- (F)浏览器执行上一步获得的脚本,提取出令牌。
- (G)浏览器将令牌发给客户端。
1、A 网站提供一个链接,要求用户跳转到 B 网站,授权用户数据给 A 网站使用。
> https://b.com/oauth/authorize?
>   response_type=token&          # response_type参数为token,表示要求直接返回令牌
>   client_id=CLIENT_ID&
>   redirect_uri=CALLBACK_URL&
>   scope=read
>
2、用户跳转到 B 网站,登录后同意给予 A 网站授权。这时,B 网站就会跳回redirect_uri参数指定的跳转网址,并且把令牌作为 URL 参数,传给 A 网站。
https://a.com/callback#token=ACCESS_TOKEN #token参数就是令牌,A 网站直接在前端拿到令牌。
密码模式
如果你高度信任某个应用,RFC 6749 也允许用户把用户名和密码,直接告诉该应用。该应用就使用你的密码,申请令牌,这种方式称为"密码式"(password)。
在这种模式中,用户必须把自己的密码给客户端,但是客户端不得储存密码。这通常用在用户对客户端高度信任的情况下,比如客户端是操作系统的一部分,或者由一个著名公司出品。而授权服务器只有在其他授权模式无法执行的情况下,才能考虑使用这种模式。
适用场景:自家公司搭建的授权服务器
      +----------+
     | Resource |
     |  Owner   |
     |          |
     +----------+
          v
          |    Resource Owner
         (A) Password Credentials
          |
          v
     +---------+                                  +---------------+
     |         |>--(B)---- Resource Owner ------->|               |
     |         |         Password Credentials     | Authorization |
     | Client  |                                  |     Server    |
     |         |<--(C)---- Access Token ---------<|               |
     |         |    (w/ Optional Refresh Token)   |               |
     +---------+                                  +---------------+

            Figure 5: Resource Owner Password Credentials Flow
它的步骤如下:
- (A)用户向客户端提供用户名和密码。
- (B)客户端将用户名和密码发给授权服务器,向后者请求令牌。
- (C)授权服务器确认无误后,向客户端提供访问令牌。
客户端模式
客户端模式(Client Credentials Grant)指客户端以自己的名义,而不是以用户的名义,向"服务提供商"进行授权。
**适用于没有前端的命令行应用,即在命令行下请求令牌。**一般用来提供给我们完全信任的服务器端服务。
比如我的服务后端要访问第三方提供的接口
    +---------+                                  +---------------+
    |         |                                  |               |
    |         |>--(1)- Client Authentication --->| Authorization |
    | Client  |                                  |     Server    |
    |         |<--(2)---- Access Token ---------<|               |
    |         |                                  |               |
    +---------+                                  +---------------+

                 Figure 4: Client Credentials Grant
它的步骤如下:
(A)客户端向授权服务器进行身份认证,并要求一个访问令牌。
(B)授权服务器确认无误后,向客户端提供访问令牌。
org.springframework.boot.autoconfigure.security.oauth2.client.servlet.OAuth2ClientAutoConfiguration,\
org.springframework.boot.autoconfigure.security.oauth2.client.reactive.ReactiveOAuth2ClientAutoConfiguration,\
org.springframework.boot.autoconfigure.security.oauth2.resource.servlet.OAuth2ResourceServerAutoConfiguration,\
org.springframework.boot.autoconfigure.security.oauth2.resource.reactive.ReactiveOAuth2ResourceServerAutoConfiguration,\
令牌的使用
A 网站拿到令牌以后,就可以向 B 网站的 API 请求数据了。
此时,每个发到 API 的请求,都必须带有令牌。具体做法是在请求的头信息,加上一个Authorization字段,令牌就放在这个字段里面。
> curl -H "Authorization: Bearer ACCESS_TOKEN" \
> "https://api.b.com"
也可放在请求参数里
更新令牌
令牌的有效期到了,如果让用户重新走一遍上面的流程,再申请一个新的令牌,很可能体验不好,而且也没有必要。OAuth 2.0 允许用户自动更新令牌。
  +--------+                                           +---------------+
  |        |--(1)------- Authorization Grant --------->|               |
  |        |                                           |               |
  |        |<-(2)----------- Access Token -------------|               |
  |        |               & Refresh Token             |               |
  |        |                                           |               |
  |        |                            +----------+   |               |
  |        |--(3)---- Access Token ---->|          |   |               |
  |        |                            |          |   |               |
  |        |<-(4)- Protected Resource --| Resource |   | Authorization |
  | Client |                            |  Server  |   |     Server    |
  |        |--(5)---- Access Token ---->|          |   |               |
  |        |                            |          |   |               |
  |        |<-(6)- Invalid Token Error -|          |   |               |
  |        |                            +----------+   |               |
  |        |                                           |               |
  |        |--(7)----------- Refresh Token ----------->|               |
  |        |                                           |               |
  |        |<-(8)----------- Access Token -------------|               |
  +--------+           & Optional Refresh Token        +---------------+

               Figure 2: Refreshing an Expired Access Token
spring authorization server
官方文档:https://spring.io/projects/spring-authorization-server
Spring Security是一个能够为基于Spring的企业应用系统提供声明式的安全访问控制解决方案的安全框架。Spring Security 主要实现了Authentication(认证,解决who are you? ) 和 Access Control(访问控制,也就是what are you allowed to do?,也称为Authorization)。Spring Security在架构上将认证与授权分离,并提供了扩展点。
认证(Authentication) :用户认证就是判断一个用户的身份是否合法的过程,用户去访问系统资源时系统要求验证用户的身份信息,身份合法方可继续访问,不合法则拒绝访问。常见的用户身份认证方式有:用户名密码登录,二维码登录,手机短信登录,指纹认证等方式。
授权(Authorization): 授权是用户认证通过根据用户的权限来控制用户访问资源的过程,拥有资源的访问权限则正常访问,没有权限则拒绝访问。
将OAuth2和Spring Security集成,就可以得到一套完整的安全解决方案。我们可以通过Spring Security OAuth2构建一个授权服务器来验证用户身份以提供access_token,并使用这个access_token来从资源服务器请求数据。
依赖版本使用说明
配置 spring security,然后发现spring cloud自从2020.0.0(含)以上版本就移除了spring-cloud-security-dependencies依赖,所以从2020.0.0版本开始,无法引入spring-cloud-starter-oauth2,
oauth2授权服务分离为一个独立的project:spring authorization server,
-
Spring 团队正式宣布 Spring Security OAuth 停止维护,该项目将不会再进行任何的迭代;
-
作为 SpringBoot 3.0 的过渡版本 SpringBoot 2.7.0 过期了大量关于 SpringSecurity 的配置类,如沿用旧版本过期配置无法向上升级;
-
Spring团队原计划只提供 OAuth2 中的 Client 和 Resource Server功能。无奈广大人民强烈请求提供Authorization Server 功能,所以Spring团队便单独启动了一个项目做支持,名为Spring Authorization Server。官方说明:Announcing the Spring Authorization Server
总之之前的项目你可以引入spring-boot-starter-security和spring-security-oauth2,由于我这里用的是最新的springCloud alibaba 版本,其中spring boot对应的版本是2.6.11 。所以spring-boot-starter-security版本是2.6.11,其中spring security core的版本是5.6.7,而spring-security-oauth2最新的版本依赖的security是4.x版本,。。。
然后就是上面说的spring-cloud-starter-oauth2,这里面包含了spring-boot-starter-security和spring-security-oauth2相关的依赖,具体可以看maven中央仓库上的依赖版本,总之版本也落后了。不过似乎可以单独引入,不过我这里就不尝试了
所以按照OAuth2的概念,这里项目构建分为资源服务和授权服务,虽然这两个服务可以放在一起,但是初学的话还是分开吧,其中授权服务引入spring authorization server,资源 服务就保持spring-boot-starter-security从spring boot 父依赖中继承的版本
授权服务
官方文档:https://spring.io/projects/spring-authorization-server
0.4.0版本:https://docs.spring.io/spring-authorization-server/docs/0.4.0/reference/html/getting-started.html
已经到了1.0.0版本,更新时间是2022-11-21,
依赖
引入依赖
        <dependency>
            <groupId>org.springframework.security</groupId>
            <artifactId>spring-security-oauth2-authorization-server</artifactId>
            <version>0.4.0</version>
        </dependency>
直接使用1.0.0,运行报错,编译报错,然后发现spring-security-oauth2-authorization-server对应的似乎是spring 6.0,所以这里降低一个版本,类文件具有错误的版本 61.0, 应为 52.0 这个应该对应的是java的版本
java: 无法访问org.springframework.security.oauth2.server.authorization.client.InMemoryRegisteredClientRepository
  错误的类文件: /D:/maven/repository/org/springframework/security/spring-security-oauth2-authorization-server/1.0.0/spring-security-oauth2-authorization-server-1.0.0.jar!/org/springframework/security/oauth2/server/authorization/client/InMemoryRegisteredClientRepository.class
    类文件具有错误的版本 61.0, 应为 52.0
    请删除该文件或确保该文件位于正确的类路径子目录中。
然后由于父项目中dependencyManagement中spring-boot-starter-parent引入的security 相关依赖覆盖了spring-security-oauth2-authorization-server中security相关依赖,然后部分类找不到,这里在子项目中中添加dependencyManagement来避免这种情况,已经试过了父项目中排除依赖不好使,如果没有父项目的话,看具体情况
    <!-- 存放子项目可能用到的依赖,子项目中根据需要单独引入,子项目中引入时不需要声明版本号 -->
    <dependencyManagement>
        <dependencies>
            <!--SpringBoot的版本管理-->
<!--            <dependency>-->
<!--                <groupId>org.springframework.boot</groupId>-->
<!--                <artifactId>spring-boot-starter-parent</artifactId>-->
<!--                <version>2.7.5</version>-->
<!--                <type>pom</type>-->
<!--                <scope>import</scope>-->
<!--            </dependency>-->

            <dependency>
                <groupId>org.springframework.security</groupId>
                <artifactId>spring-security-bom</artifactId>
                <version>5.8.0</version>
                <type>pom</type>
                <scope>import</scope>
            </dependency>

        </dependencies>
    </dependencyManagement>

官方配置
配置上都有标号,后面用到
// 注意这个类,不要搞错了
import com.nimbusds.jose.proc.SecurityContext;


@Configuration
public class SecurityConfig {

	@Bean
	@Order(1)// 1
	public SecurityFilterChain authorizationServerSecurityFilterChain(HttpSecurity http)
			throws Exception {
		OAuth2AuthorizationServerConfiguration.applyDefaultSecurity(http);
		http.getConfigurer(OAuth2AuthorizationServerConfigurer.class)
				.oidc(Customizer.withDefaults());	// Enable OpenID Connect 1.0
		http
				// Redirect to the login page when not authenticated from the
				// authorization endpoint
				.exceptionHandling((exceptions) -> exceptions
						.authenticationEntryPoint(
								new LoginUrlAuthenticationEntryPoint("/login"))
				)
				// Accept access tokens for User Info and/or Client Registration
				.oauth2ResourceServer(OAuth2ResourceServerConfigurer::jwt);

		return http.build();
	}


	@Bean
	@Order(2) // 2
	public SecurityFilterChain defaultSecurityFilterChain(HttpSecurity http)
			throws Exception {
		http.authorizeHttpRequests().requestMatchers(HttpMethod.POST,"/oauth2/token").permitAll()
				.anyRequest().authenticated();
				// Form login handles the redirect to the login page from the
				// authorization server filter chain
		http.formLogin(Customizer.withDefaults());

		return http.build();
	}

	/**
	 * 此处相当于实现UserDetailsService这个接口,为啥能这么写就不知道了
	 * */
	@Bean// 3
	public UserDetailsService userDetailsService() {
		UserDetails userDetails = User.withDefaultPasswordEncoder()
				.username("sry")
				.password("123456")
				.roles("USER")
				.build();

		return new InMemoryUserDetailsManager(userDetails);
	}

	@Bean // 4
	public RegisteredClientRepository registeredClientRepository() {
		RegisteredClient registeredClient = RegisteredClient.withId(UUID.randomUUID().toString())
				.clientId("messaging-client")
				.clientSecret("{noop}secret")
				.clientAuthenticationMethod(ClientAuthenticationMethod.CLIENT_SECRET_BASIC)
				.authorizationGrantType(AuthorizationGrantType.AUTHORIZATION_CODE)
				.authorizationGrantType(AuthorizationGrantType.REFRESH_TOKEN)
				.authorizationGrantType(AuthorizationGrantType.CLIENT_CREDENTIALS)
				.redirectUri("http://127.0.0.1:8080/login/oauth2/code/messaging-client-oidc")
				.redirectUri("https://www.baidu.com")
				.scope(OidcScopes.OPENID)
				.scope(OidcScopes.PROFILE)
				.scope("message.read")
				.scope("message.write")
				.clientSettings(ClientSettings.builder().requireAuthorizationConsent(true).build())
				.build();

		return new InMemoryRegisteredClientRepository(registeredClient);
	}

	@Bean // 5
	public JWKSource<SecurityContext> jwkSource() {
		KeyPair keyPair = generateRsaKey();
		RSAPublicKey publicKey = (RSAPublicKey) keyPair.getPublic();
		RSAPrivateKey privateKey = (RSAPrivateKey) keyPair.getPrivate();
		RSAKey rsaKey = new RSAKey.Builder(publicKey)
				.privateKey(privateKey)
				.keyID(UUID.randomUUID().toString())
				.build();
		JWKSet jwkSet = new JWKSet(rsaKey);
		return new ImmutableJWKSet<>(jwkSet);
	}

	private static KeyPair generateRsaKey() {
		KeyPair keyPair;
		try {
			KeyPairGenerator keyPairGenerator = KeyPairGenerator.getInstance("RSA");
			keyPairGenerator.initialize(2048);
			keyPair = keyPairGenerator.generateKeyPair();
		}
		catch (Exception ex) {
			throw new IllegalStateException(ex);
		}
		return keyPair;
	}

	@Bean // 6
	public JwtDecoder jwtDecoder(JWKSource<SecurityContext> jwkSource) {
		return OAuth2AuthorizationServerConfiguration.jwtDecoder(jwkSource);
	}

	@Bean// 7
	public AuthorizationServerSettings authorizationServerSettings() {
		return AuthorizationServerSettings.builder().build();
	}

}
授权码模式流程1
客户端获取授权码
和我上一篇 Spring Security基础使用中的认证流程类似
主要是获取客户端跳转授权服务器获取授权码,并且用户确认的流程
访问
http://localhost:8080/oauth2/authorize?response_type=code&client_id=messaging-client&scope=message.read&redirect_uri=https://www.baidu.com
1、OAuth2AuthorizationEndpointFilter
OAuth2AuthorizationEndpointFilter#doFilterInternal 根据url确定是否是授权服务相关的请求,不是的话就走下一个过滤器
		// 验证是否授权服务相关请求
		if (!this.authorizationEndpointMatcher.matches(request)) {
			filterChain.doFilter(request, response);
			return;
		}
		......
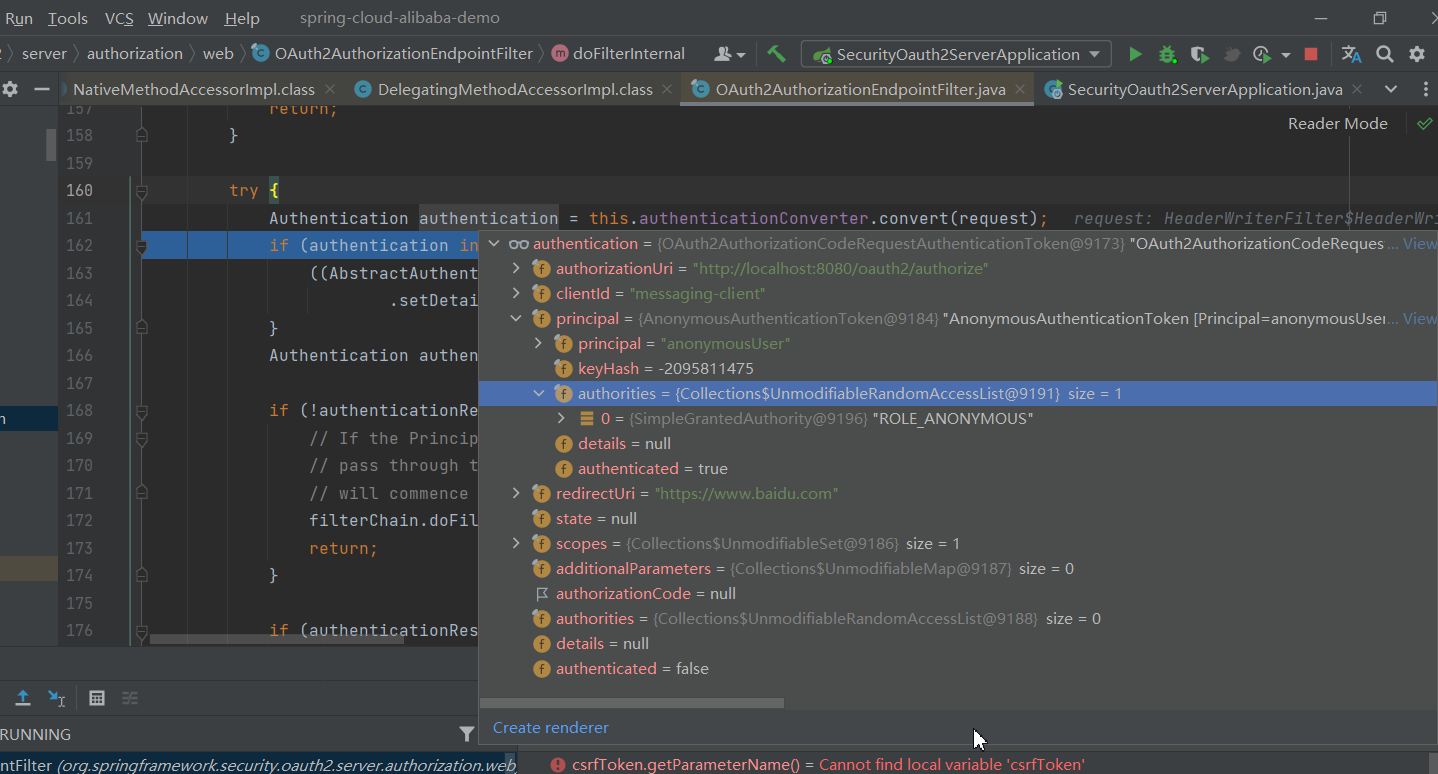
         // 通过一个认证转换器,将请求转换成我们的认证对象,可以理解成拿到用户名密码信息一样,具体内容如图
         // 默认是DeleGatingAuthenticationConverter
		Authentication authentication = this.authenticationConverter.convert(request);
		......
            // 进行具体的认证操作,默认是ProviderManager#authenticate
			Authentication authenticationResult = this.authenticationManager.authenticate(authentication);
2、
ProviderManager#authenticate中获取入认证提供者进行认证,并且这是一个复用的类,之前UsernamePasswordAuthenticationFilter也是调用这里获取用户密码信息用于认证
Class<? extends Authentication> toTest = authentication.getClass();
......
for (AuthenticationProvider provider : getProviders()) {
    		// 获取认证信息提供者是否适配于当前认证
			if (!provider.supports(toTest)) {
				continue;
			}
			......
 // 获取用户信息的流程OAuth2AuthorizationCodeRequestAuthenticationProvider#authenticate
				result = provider.authenticate(authentication);
			// 认证成功处理,认证失败抛出异常
        		if (result != null) {
					copyDetails(authentication, result);
					break;
				}
		}
3、OAuth2AuthorizationCodeRequestAuthenticationProvider
OAuth2AuthorizationCodeRequestAuthenticationProvider#authenticate中
// 注释1 根据请求中的客户端id ,获取存在授权服务器的客户端信息,获取失败抛出异常
RegisteredClient registeredClient = this.registeredClientRepository.findByClientId(
    authorizationCodeRequestAuthentication.getClientId());
if (registeredClient == null) {
    throwError(OAuth2ErrorCodes.INVALID_REQUEST, OAuth2ParameterNames.CLIENT_ID,
               authorizationCodeRequestAuthentication, null);
}
......
//注释2 组装请求中的客户端信息和授权服务后端获取的授权信息
		OAuth2AuthorizationCodeRequestAuthenticationContext authenticationContext =
				OAuth2AuthorizationCodeRequestAuthenticationContext.with(authorizationCodeRequestAuthentication)
						.registeredClient(registeredClient)
						.build();
		//注释三 将服务端的信息和请求中的信息对比
		this.authenticationValidator.accept(authenticationContext);
.......
//注释四 上述对比成功后,判断这个客户端是否支持授权码的认证模式
		if (!registeredClient.getAuthorizationGrantTypes().contains(AuthorizationGrantType.AUTHORIZATION_CODE)) {
			throwError(OAuth2ErrorCodes.UNAUTHORIZED_CLIENT, OAuth2ParameterNames.CLIENT_ID,
					authorizationCodeRequestAuthentication, registeredClient);
		}
......
// 注释5 此处验证用户处于登录状态
		Authentication principal = (Authentication) authorizationCodeRequestAuthentication.getPrincipal();
		if (!isPrincipalAuthenticated(principal)) {
			if (this.logger.isTraceEnabled()) {
				this.logger.trace("Did not authenticate authorization code request since principal not authenticated");
			}
			// Return the authorization request as-is where isAuthenticated() is false
			return authorizationCodeRequestAuthentication;
		}

		// 注释6 根据配置的不同,返回不同的认证凭据
		if (requireAuthorizationConsent(registeredClient, authorizationRequest, currentAuthorizationConsent)) {

	//注释7 保存Oauth2授权状态
			this.authorizationService.save(authorization);

		//注释8 返回认证成功的凭据
			return new OAuth2AuthorizationConsentAuthenticationToken(authorizationRequest.getAuthorizationUri(),
					registeredClient.getClientId(), principal, state, currentAuthorizedScopes, null);
		}
.....

		// 保存Oauth2授权状态
		this.authorizationService.save(authorization);
		// 返回认证成功的凭据
		return new OAuth2AuthorizationCodeRequestAuthenticationToken(authorizationRequest.getAuthorizationUri(),
				registeredClient.getClientId(), principal, authorizationCode, redirectUri,
				authorizationRequest.getState(), authorizationRequest.getScopes());
4、
OAuth2AuthorizationCodeRequestAuthenticationValidator#accept执行会进入这个类的validateRedirectUri方法中,validateRedirectUri中验证了一下服务端配置的重定向地址是否包含了请求中的重定向地址,没有抛出异常,前端响应400
5、
此处接第四步的注释5,就像本文示例中京东跳转微信的认证界面由用户扫码一样,前面的步骤验证了京东的appid在微信授权服务器有对应的信息,重定向地址也对应的上,再之后就是需要用户扫码登录,确定需要登录京东的用户的身份
所以这里判断用户没有登录后会进入AuthorizationFilter#doFilter中,没有认证就会抛出异常
throw new AccessDeniedException("Access Denied");
需要说明的是,在我引入依赖的这个版本中FilterSecurityInterceptor(判断用户是否有权限访问资源)已经废弃,替代的是AuthorizationFilter
6、
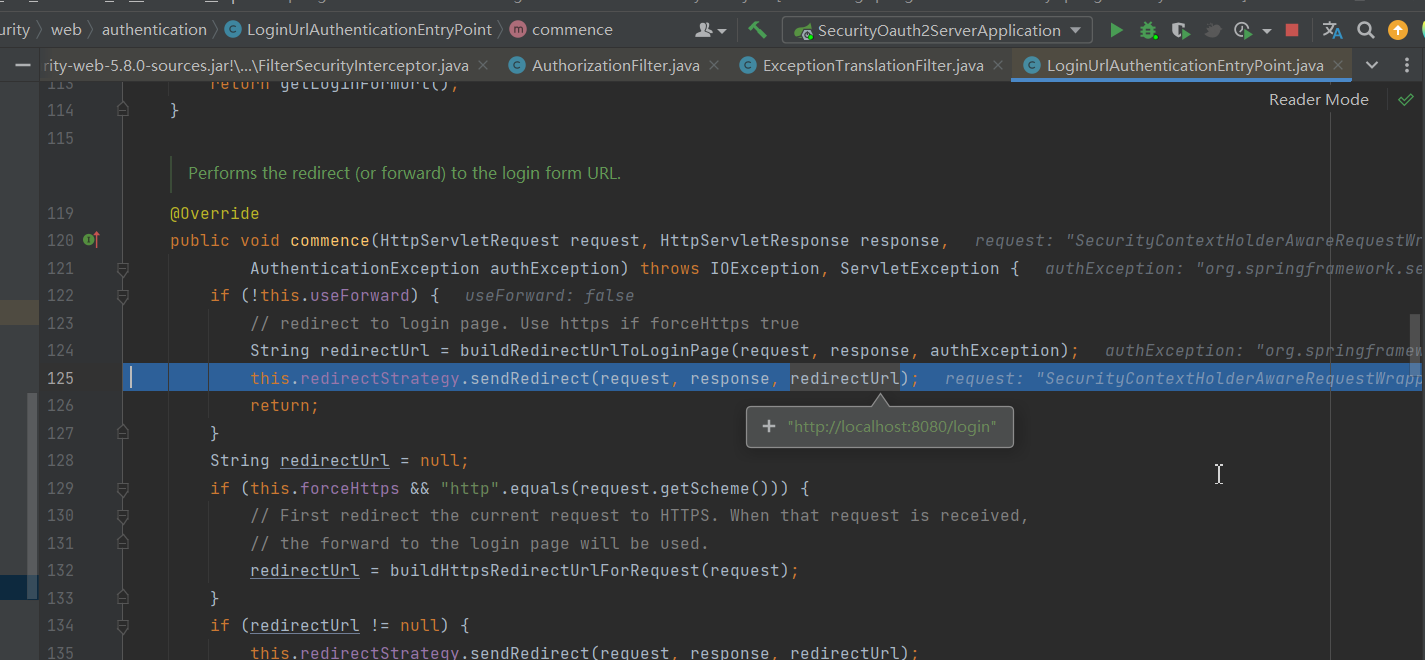
AuthorizationFilter抛出异常后ExceptionTranslationFilter#doFilter中会对继承自securityException的异常进行处理
handleSpringSecurityException(request, response, chain, securityException);
ExceptionTranslationFilter#handleSpringSecurityException
handleAccessDeniedException(request, response, chain, (AccessDeniedException) exception);
然后最终
7、
如果你没有特殊配置的话就到了我们Sercuity默认的登录界面,登录页面的生成参考DefaultLoginPageGeneratingFilter ,然后就是我们的登录流程,这个之前Spring Security 基础使用中讲过了,—
8、
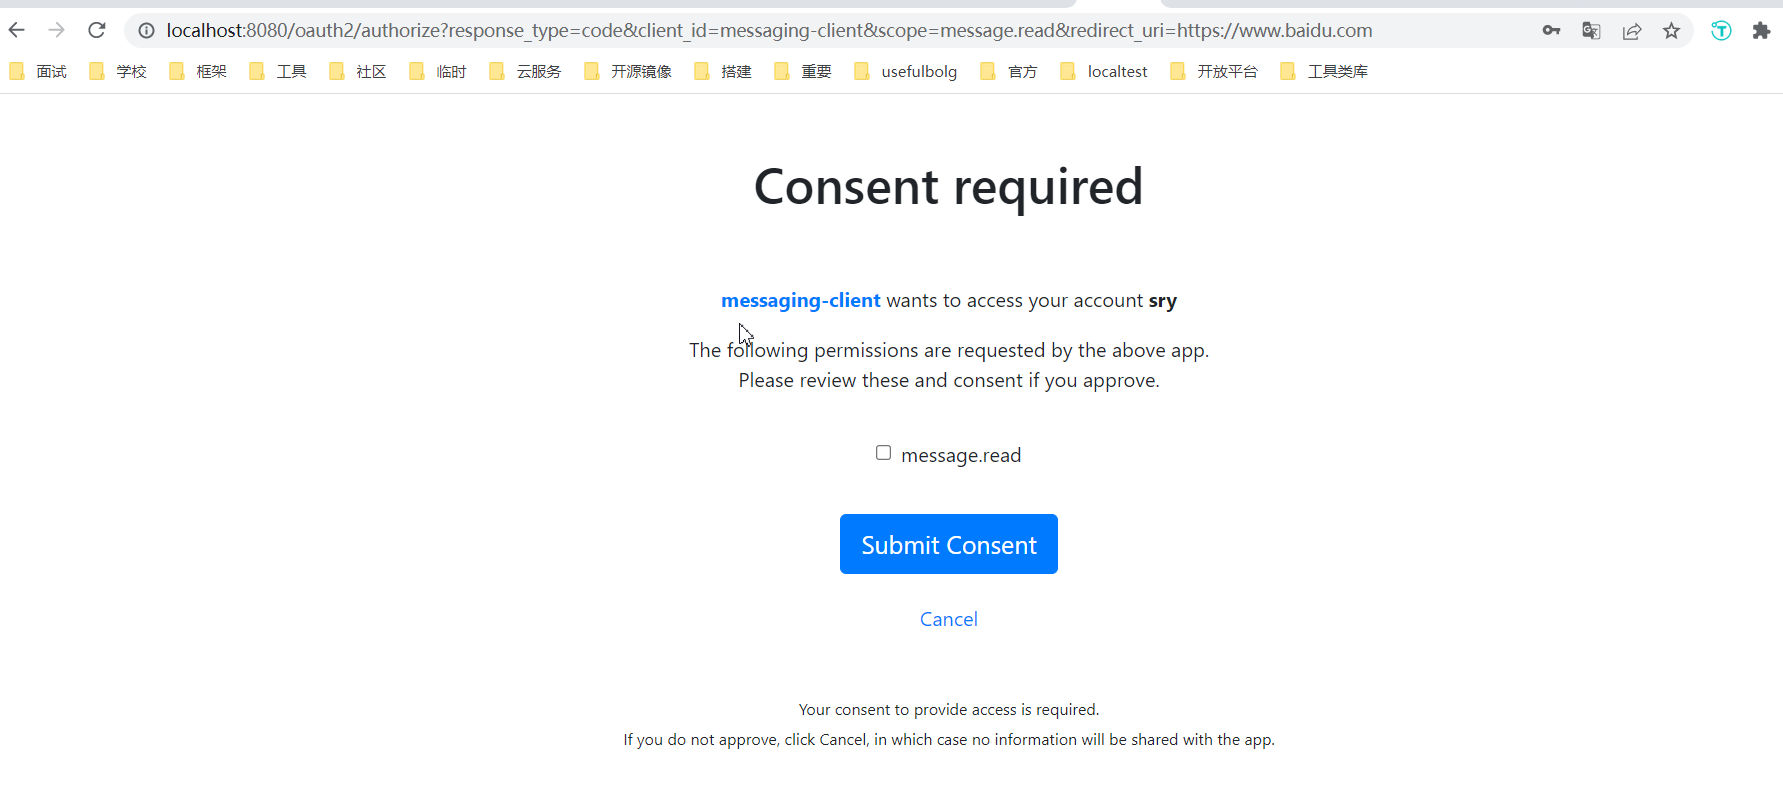
然后就是我们访问资源路径,如果没有权限,跳转登录界面成功后,会直接为我们跳转之前的资源路径,至于这个逻辑的实现代码在哪,我还没找到,待定,总之就是登陆成功之后还是会访问第一步中的地址,我们还是会进入OAuth2AuthorizationEndpointFilter这个过滤器,然后在OAuth2AuthorizationEndpointFilter#sendAuthorizationConsent中返回一个生成的授权界面,用户会在这个界面上进行授权,就像我们京东和微信的示例中,扫码后手机上有一个确认授权的流程一样
9、
用户确认后,请求http://localhost:8080/oauth2/authorize这个地址,

10、
然后会再次进入OAuth2AuthorizationEndpointFilter#doFilterInternal,然后就会生成一个code,重定向到回调地址
https://www.baidu.com/?code=b624wgO9MLepWKe411MqZi0-Gqpl8kDFGLhcScr9mVxZiSOkgOyRaQaIq-jjH3QPeZ4Mg2h4x_0cyjZWtdAo0VBUewbqp7tJ5nOiq6Kh6cPU7CHrLeT8BprgMtRzG7FO
客户端拿到这个地址后就可以去授权服务器申请token,再通过token访问资源服务器
通过授权码获取认证token
1、发起请求
加密clientId,clientSecret,然后发起请求
"Basic "+Base64.getEncoder().encodeToString(String.format("%s:%s",clientId,clientSecret).getBytes(StandardCharsets.UTF_8))
可以通过在线的base64 加密
# messaging-client:secret  加密后放在请求头Authorization中
Basic bWVzc2FnaW5nLWNsaWVudDpzZWNyZXQ=
http://localhost:8080/oauth2/token
grant_type
redirect_uri
code


2、OAuth2ClientAuthenticationFilter认证
请求进入OAuth2ClientAuthenticationFilter#doFilterInternal中或获取(FilterSecurityInterceptor过滤器之前,否则FilterSecurityInterceptor判定认证不通过,抛出异常,就重定向到登录界面),如果请求不成功返回登录界面,可以具体看一下OAuth2ClientAuthenticationFilter

// 注释一,尝试从请求中获取认证对象,有的话就返回
Authentication authenticationRequest = this.authenticationConverter.convert(request);

			if (authenticationRequest != null) {
			// 验证client_id的正确性,每个字符都在36和126之间
				validateClientIdentifier(authenticationRequest);
                // 注释二 进行具体认证
                Authentication authenticationResult = this.authenticationManager.authenticate(authenticationRequest);
                // 将请求中的认证对象存放到SecurityContext上下文中当然此时还是认证未通过状态
                this.authenticationSuccessHandler.onAuthenticationSuccess(request, response, authenticationResult);
注释一后续
DelegatingAuthenticationConverter#convert
	public Authentication convert(HttpServletRequest request) {
		Assert.notNull(request, "request cannot be null");
		for (AuthenticationConverter converter : this.converters) {
			Authentication authentication = converter.convert(request);
			if (authentication != null) {
				return authentication;
			}
		}
		return null;
	}
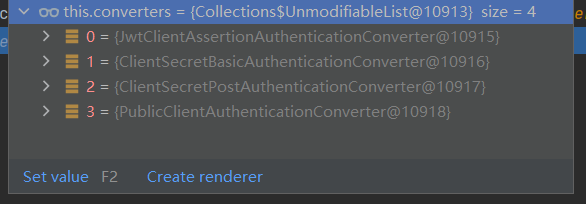
进入ClientSecretBasicAuthenticationConverter#convert,有多个并列的AuthenticationConverter,只要有一个获取成功即可,所以你可以参考其他AuthenticationConverter,只要请求中的参数或请求头和对应的AuthenticationConverter对应上即可,总之ClientSecretBasicAuthenticationConverter中解析Authorization请求头后,返回一个认证对象,如下,当然这里主要是将请求中的数据组装成认证对象
		return new OAuth2ClientAuthenticationToken(clientID, ClientAuthenticationMethod.CLIENT_SECRET_BASIC, clientSecret,
				OAuth2EndpointUtils.getParametersIfMatchesAuthorizationCodeGrantRequest(request));
注释二后续
ProviderManager#authenticate
ClientSecretAuthenticationProvider#authenticate生效
// 获取授权服务端的客户端注册信息
RegisteredClient registeredClient =this.registeredClientRepository.findByClientId(clientId);
.......
// 验证请求参数中的code,最终会InMemoryOAuth2AuthorizationService#findByToken获取服务端的code
    //存放的逻辑查看 客户端获取授权码 中第三步  注释7
this.codeVerifierAuthenticator.authenticateIfAvailable(clientAuthentication, registeredClient);

...
    //一些其他验证,
似乎服务端的code失效时间没有设定,所以我用同一个code一直可以认证成功
3、 OAuth2TokenEndpointFilter
失败流程
认证成功后就到了下一个过滤器 OAuth2TokenEndpointFilter
OAuth2TokenEndpointFilter
// 异常捕获后处理,直接响应400,响应异常描述
this.authenticationFailureHandler.onAuthenticationFailure(request, response, ex);
ProviderManager#authenticate
// 铺货AuthenticationProvider中的异常,向上抛出org.springframework.security.oauth2.core.OAuth2AuthenticationException
OAuth2AuthorizationCodeAuthenticationProvider#authenticate
// 总之一系列的验证,比如会验证code是否失效,验证失败会抛出异常
ProviderManager中有会
成功流程
// 处理成功后的响应
this.authenticationSuccessHandler.onAuthenticationSuccess(request, response, accessTokenAuthentication);
OAuth2TokenEndpointFilter#sendAccessTokenResponse
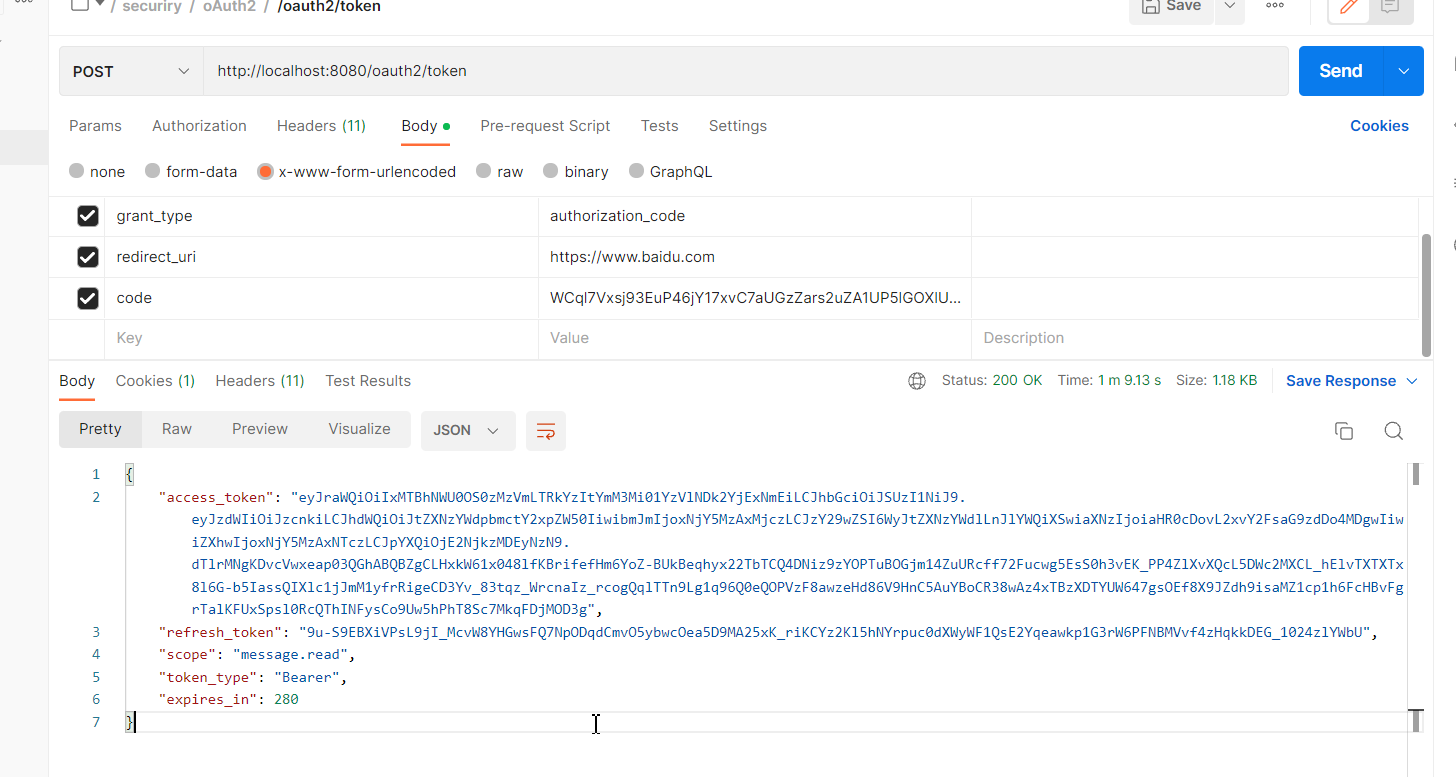
简化模式
这个版本中简化模式似乎已经被弃用
似乎支持授权码模式,可能支持其他模式要在配置中指定类型转换器
It is not recommended to use the implicit flow due to the inherent risks of returning access tokens in an HTTP redirect without any confirmation that it has been received by the client.
See Also:
OAuth 2.0 Implicit Grant
	@Deprecated
	public static final AuthorizationGrantType IMPLICIT = new AuthorizationGrantType("implicit");
OAuth2AuthorizationCodeRequestAuthenticationConverter#convert

		} else if (!responseType.equals(OAuth2AuthorizationResponseType.CODE.getValue())) {
			throwError(OAuth2ErrorCodes.UNSUPPORTED_RESPONSE_TYPE, OAuth2ParameterNames.RESPONSE_TYPE);
		}
密码模式
已弃用最新的OAuth 2.0安全性最佳当前实践不允许使用资源所有者密码凭据授予。参见参考OAuth 2.0安全最佳当前实践。
Deprecated
The latest OAuth 2.0 Security Best Current Practice disallows the use of the Resource Owner Password Credentials grant. See reference OAuth 2.0 Security Best Current Practice.
    @Deprecated
    public static final AuthorizationGrantType PASSWORD = new AuthorizationGrantType("password");
客户端模式
http://localhost:8080/oauth/token?grant_type=client_credentials&scope=all&client_id=client&client_secret=123123
从本文FilterChainProxy(过滤器顺序和是否执行)部分可以看出我们请求获取token的接口需要使用POST方法
所以请求参照本文 通过授权码获取认证token 部分,http://localhost:8080/oauth2/token,请求参数有变动
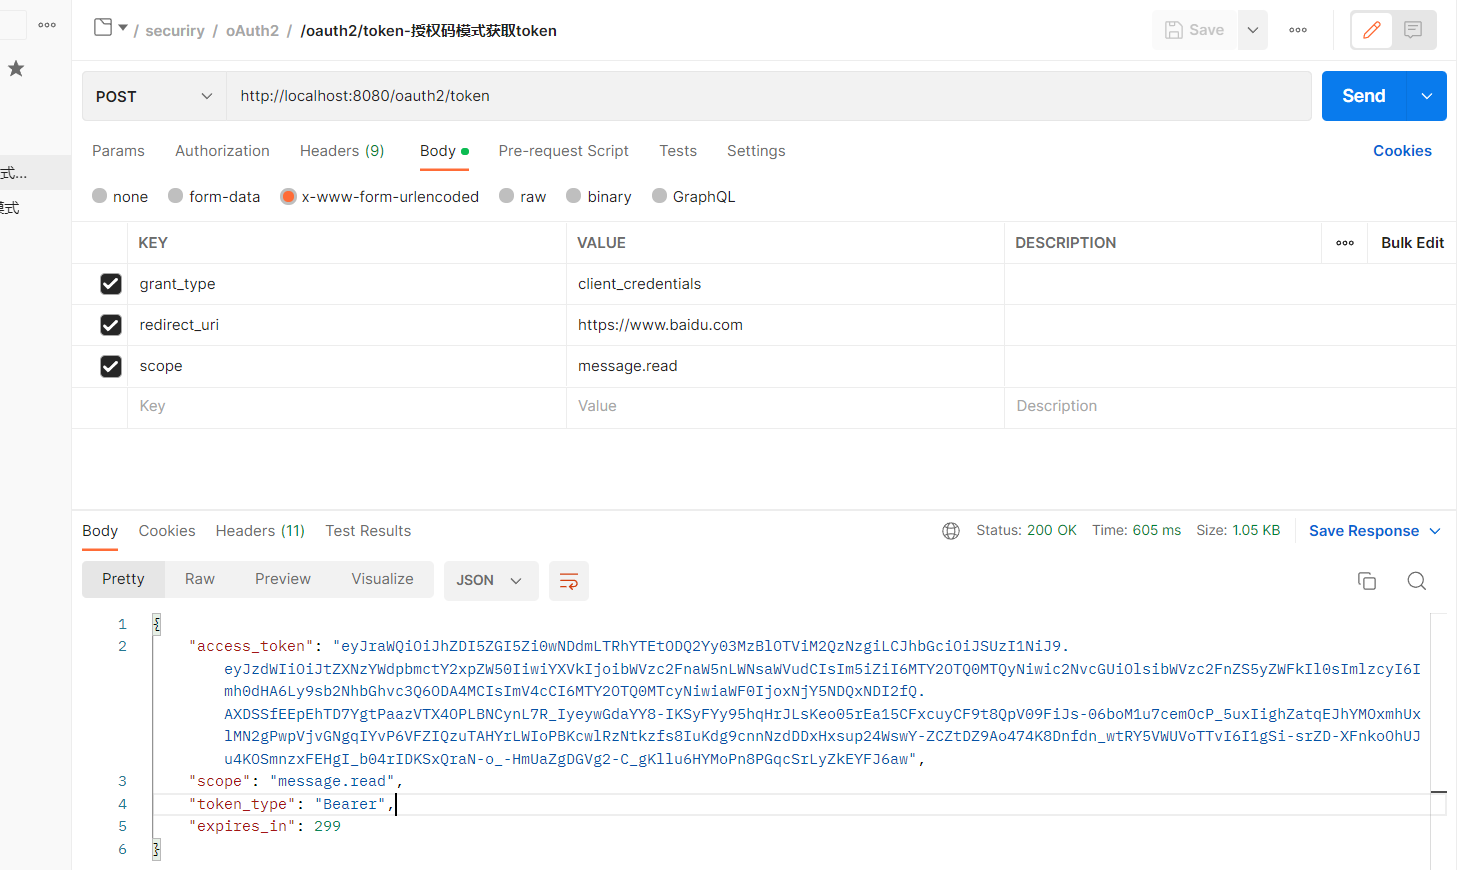
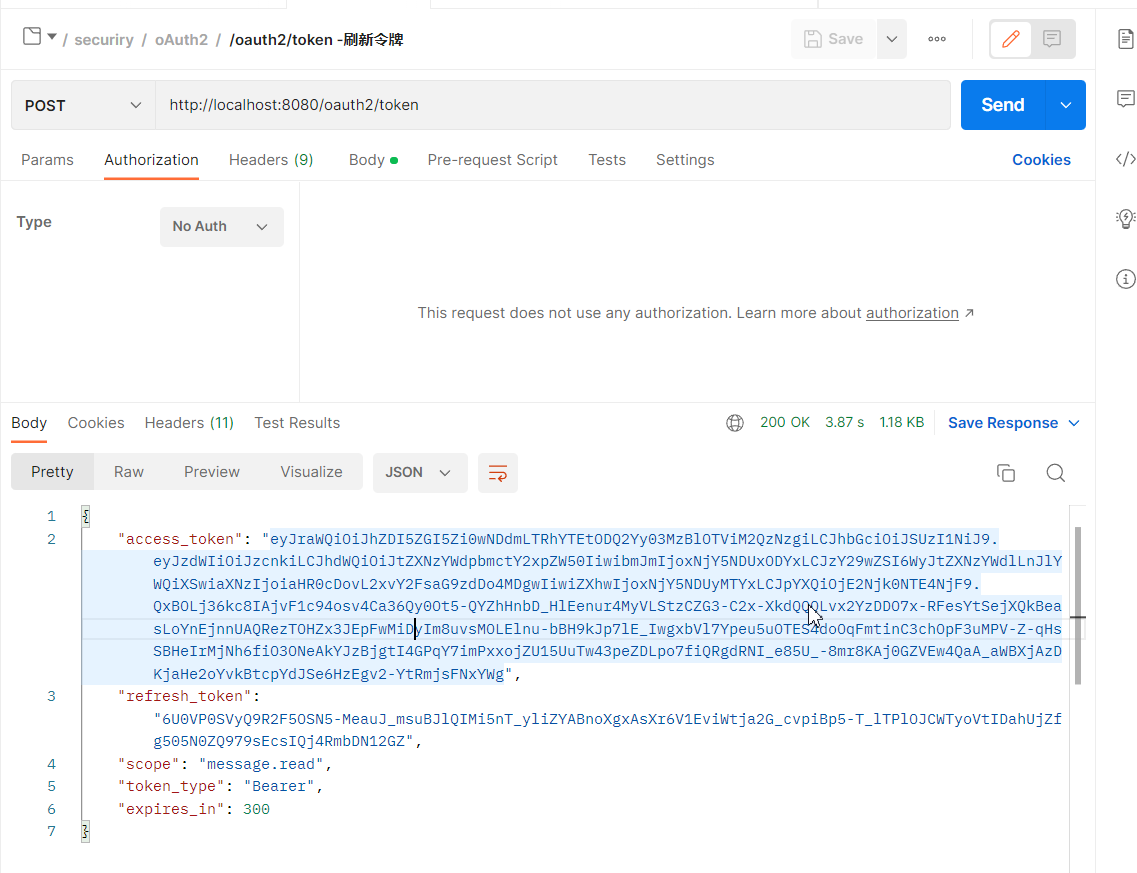
刷新令牌
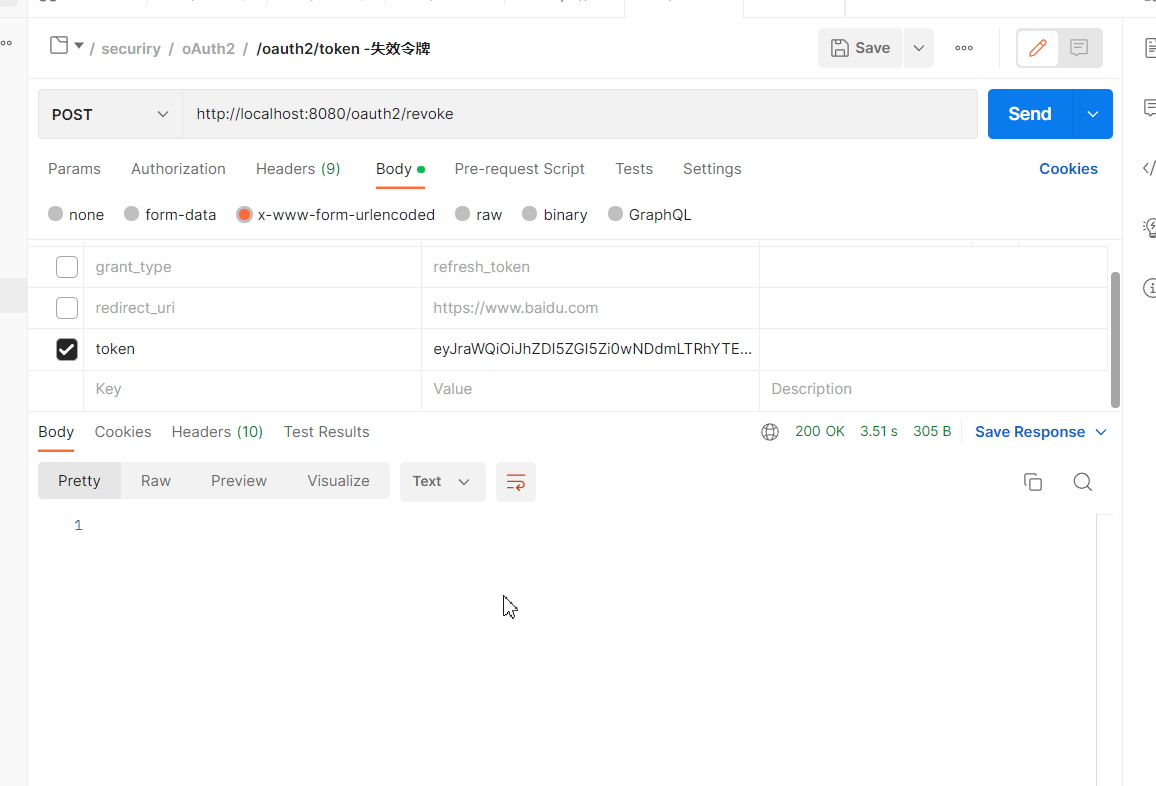
撤销令牌
响应200,响应中无数据
其他请求
获取JWT公钥
授权服务端必须使用了JWT存放公钥,才可以获取到
http://localhost:8080/oauth2/jwks GET

{
    "keys": [
        {
            "kty": "RSA",
            "e": "AQAB",
            "kid": "597b0fb7-f7be-4db6-bf73-a4edba8beca0",
            "n": "kYt2M4E1cZznLpbxhiGoSam8zr42E41_iobLlEIGbWquYtG_xEi9RynApAgxmqUD6Qs59PMgbS2WYy_f4uXQkwY8_2G-LRl4fK6UDNuU2f6J-wFr0_n_KK4ag0XTyA8N4GzE2NC9OgeW40tRp6cvb0eMune4nHZyzaK0_hIkdRW552IrxzaD_ei8y6hQ67jgagIhkBqTSaPvm1G6CPASdRwi0qUbeaAxLg1l4LfGFEFmXc3jMmnwYnsYg3A1rgWXHenX96LOQg81h09h6ZlXtZ3ziTTjXJPVLJelbY0a1LE66JVAW0S9KXXCz8MRLkxrx5UPmlsgQIvjNjx1SSIqvQ"
        }
    ]
}
.well-known/openid-configuration
一些 端点信息,具体就不知道啥用了
http://localhost:8080/.well-known/openid-configuration

{
    "issuer": "http://localhost:8080",
    "authorization_endpoint": "http://localhost:8080/oauth2/authorize",
    "token_endpoint": "http://localhost:8080/oauth2/token",
    "token_endpoint_auth_methods_supported": [
        "client_secret_basic",
        "client_secret_post",
        "client_secret_jwt",
        "private_key_jwt"
    ],
    "jwks_uri": "http://localhost:8080/oauth2/jwks",
    "userinfo_endpoint": "http://localhost:8080/userinfo",
    "response_types_supported": [
        "code"
    ],
    "grant_types_supported": [
        "authorization_code",
        "client_credentials",
        "refresh_token"
    ],
    "revocation_endpoint": "http://localhost:8080/oauth2/revoke",
    "revocation_endpoint_auth_methods_supported": [
        "client_secret_basic",
        "client_secret_post",
        "client_secret_jwt",
        "private_key_jwt"
    ],
    "introspection_endpoint": "http://localhost:8080/oauth2/introspect",
    "introspection_endpoint_auth_methods_supported": [
        "client_secret_basic",
        "client_secret_post",
        "client_secret_jwt",
        "private_key_jwt"
    ],
    "subject_types_supported": [
        "public"
    ],
    "id_token_signing_alg_values_supported": [
        "RS256"
    ],
    "scopes_supported": [
        "openid"
    ]
}
.well-known/oauth-authorization-server
{
    "issuer": "http://localhost:8080",
    "authorization_endpoint": "http://localhost:8080/oauth2/authorize",
    "token_endpoint": "http://localhost:8080/oauth2/token",
    "token_endpoint_auth_methods_supported": [
        "client_secret_basic",
        "client_secret_post",
        "client_secret_jwt",
        "private_key_jwt"
    ],
    "jwks_uri": "http://localhost:8080/oauth2/jwks",
    "response_types_supported": [
        "code"
    ],
    "grant_types_supported": [
        "authorization_code",
        "client_credentials",
        "refresh_token"
    ],
    "revocation_endpoint": "http://localhost:8080/oauth2/revoke",
    "revocation_endpoint_auth_methods_supported": [
        "client_secret_basic",
        "client_secret_post",
        "client_secret_jwt",
        "private_key_jwt"
    ],
    "introspection_endpoint": "http://localhost:8080/oauth2/introspect",
    "introspection_endpoint_auth_methods_supported": [
        "client_secret_basic",
        "client_secret_post",
        "client_secret_jwt",
        "private_key_jwt"
    ],
    "code_challenge_methods_supported": [
        "S256"
    ]
}
/oauth2/introspect
[外链图片转存失败,源站可能有防盗链机制,建议将图片保存下来直接上传(img-obmCziiD-1670330425558)(C:\Users\17736\AppData\Roaming\Typora\typora-user-images\image-20221127171004315.png)]
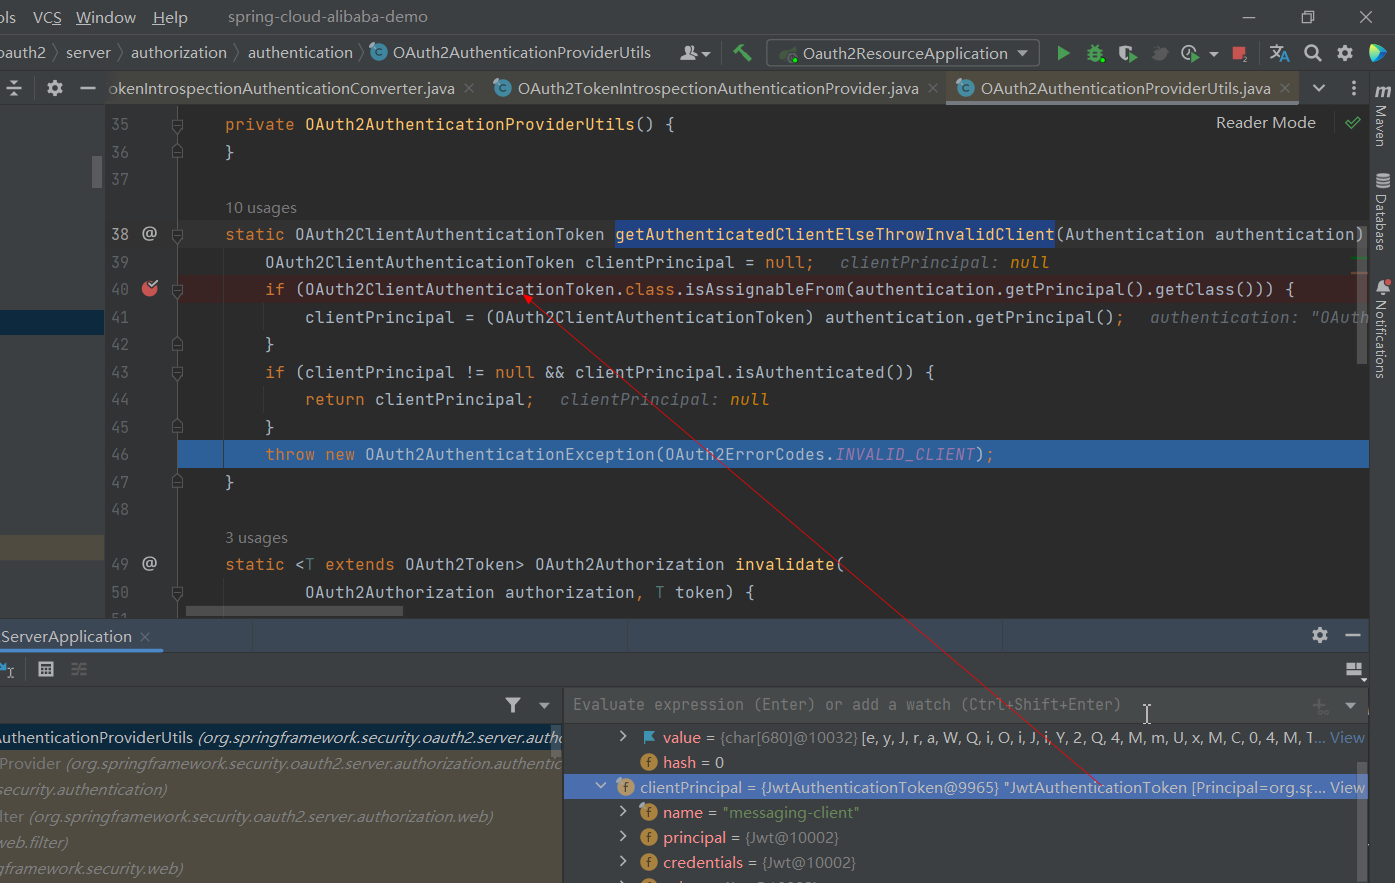
似乎是对应opaquetoken模式,总之我这边拿不到数据
果选用Opaque token模式,相对应的端点就是/oauth2/introspect。这个再说吧,无语了
获取用户信息
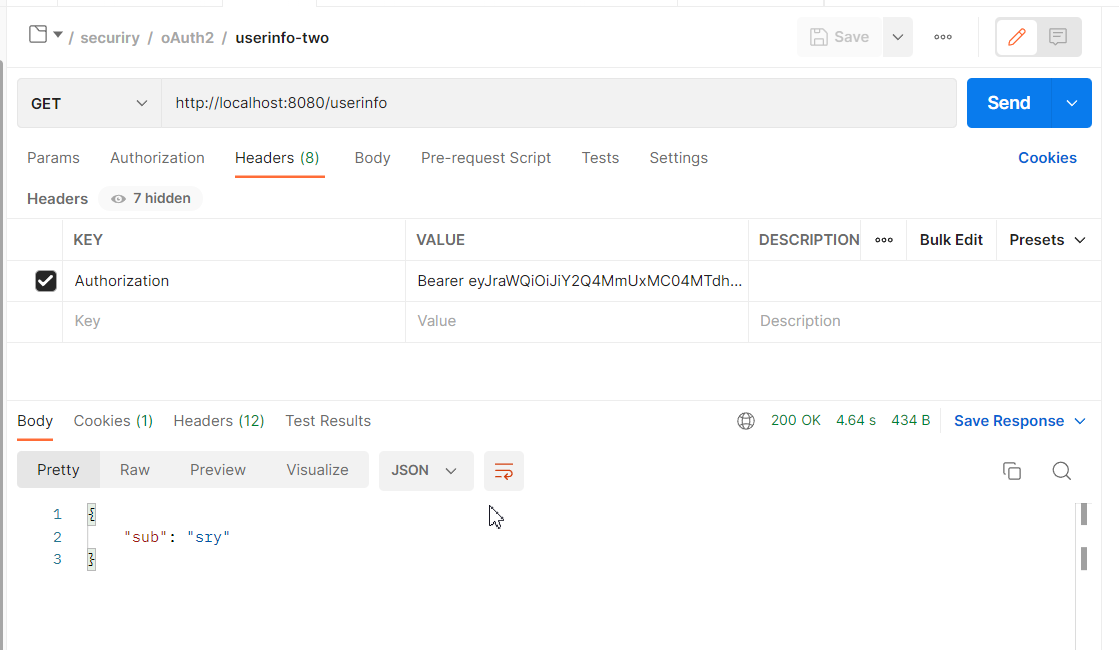
如果获取不到,可以看下这个方法,需要申请openid作用域权限(表示申请的是一个id_token),应该只有授权码模式可以访问,客户端模式下报无效的token,
id_token和accesstoken :https://blog.csdn.net/qq_26878363/article/details/115394602
https://blog.csdn.net/li371518473/article/details/120365656
OidcUserInfoAuthenticationProvider#authenticate
		if (!authorizedAccessToken.getToken().getScopes().contains(OidcScopes.OPENID)) {
			throw new OAuth2AuthenticationException(OAuth2ErrorCodes.INSUFFICIENT_SCOPE);
		}
日志打印
哪怕是认证失败,我们控制台也没有显示报错信息,因为Security打印日志的级别是trace
		if (!isPrincipalAuthenticated(principal)) {
			if (this.logger.isTraceEnabled()) {
				this.logger.trace("Did not authenticate authorization code request since principal not authenticated");
			}
			// Return the authorization request as-is where isAuthenticated() is false
			return authorizationCodeRequestAuthentication;
		}
设置记录器的记录日志的级别,如果日志还是不够,建议把web也去掉
logging:
  level:
    org.springframework.security.web: trace
    org.springframework.security.oauth2: trace
配置说明
配置生效
配置生效的逻辑具体是调用到OAuth2AuthorizationServerConfigurer#init中,然后这里面还会创建一些配置类,配置类中的配置又会被过滤器使用,至于怎么调用过来的,有待进一步了解
OAuth2AuthorizationServerConfiguration
核心模块说明
官方文档
registeredClient
注册客户端,授权码流程中,客户端首先需要在授权服务器注册自身的信息,比如京东需要到微信开放平台注册应用
- id: The ID that uniquely identifies the RegisteredClient.
- clientId: 唯一标识已注册客户端的id。
- clientIdIssuedAt: 颁发客户端标识符的时间。
- clientSecret: 客户的秘密。该值应使用SpringSecurity的密码编码器进行编码。
- clientSecretExpiresAt: 客户端密钥过期的时间。
- clientName: 用于客户端的描述性名称。该名称可以在某些情况下使用,例如在同意页面中显示客户端名称时。
- clientAuthenticationMethods: 客户端可以使用的身份验证方法。支持的值是客户端secret basic、客户端secret post、私钥jwt、客户端secretjwt和none(公共客户端)。
- authorizationGrantTypes: 客户端可以使用的授权授权类型。支持的值包括授权代码、客户端凭据和刷新令牌。
- redirectUris: 客户端可以在基于重定向的流中使用的注册重定向URI(例如,授权代码授予)。
- scopes: 允许客户端请求的作用域。
- clientSettings: 客户端的自定义设置–例如,需要PKCE、需要授权同意等。
- tokenSettings: 颁发给客户端的OAuth2令牌的自定义设置,例如,访问/刷新令牌生存时间、重用刷新令牌等。
RegisteredClientRepository
字面上的意思,注册客户端的存储仓库,这个仓库的配置会由OAuth2AuthorizationServerConfigurer来生效
@Bean
public SecurityFilterChain authorizationServerSecurityFilterChain(HttpSecurity http) throws Exception {
	OAuth2AuthorizationServerConfigurer authorizationServerConfigurer =
		new OAuth2AuthorizationServerConfigurer();
	http.apply(authorizationServerConfigurer);

	authorizationServerConfigurer
		.registeredClientRepository(registeredClientRepository);

	...

	return http.build();
}
OAuth2Authorization
OAuth2Authorization是OAuth2授权的表示,在客户端凭据授权授予类型的情况下,OAuth2AAuthorization保存与资源所有者或其自身授予客户端的授权相关的状态。
大白话就是授权服务器记录的授权相关信息,可以理解成登录后存在服务端的session里的用户信息,是服务端记录OAuth2 授权状态的对象
OAuth2AuthorizationService
OAuth2AuthorizationService是存储新授权和查询现有授权的中心组件。其他组件在遵循特定协议流时使用它,例如,客户端身份验证、授权授权处理、令牌内省、令牌撤销、动态客户端注册等。
提供的OAuth2Authorization Service的实现是InMemoryOAuth2AAuthorizationService和JdbcOAuth2AAuthorizationService。InMemoryOAuth2AAuthorizationService实现将OAuth2AAuthorization实例存储在内存中,建议仅在开发和测试期间使用。JdbcOAuth2AuthorizationService是一个Jdbc实现,它通过使用Jdbc操作持久化OAuth2AAuthorization实例。
授权服务器流程1 第三步 中注释7 部分使用了
OAuth2TokenContext
OAuth2Token上下文是一个上下文对象,它保存与OAuth2Ttoken相关的信息。被 OAuth2TokenGenerator 和 OAuth2TokenCustomizer使用
OAuth2AuthorizationConsent
授权同意对象,例如,授权代码授权,它保存资源所有者授予客户端的权限。
- registeredClientId:唯一标识注册客户端的Id。
- principalName:资源所有者的主体名称。
- authorities:资源所有者授予客户端的权限。权限可以表示范围、声明、权限、角色等。
OAuth2AuthorizationConsentService
OAuth2AuthorizationConsent同意的存储和移除工作
实现有InMemoryOAuth2AuthorizationConsentService和JdbcOAuth2AuthorizationConsentService
OAuth2TokenGenerator
OAuth2TokenGenerator负责根据OAuth2TokenContext所包含的信息生成OAuth2Token。
OAuth2TokenCustomizer
OAuth2Token Customizer提供了自定义OAuth2Ttoken属性的能力,这些属性可以在提供的OAuth2Taken上下文中访问。OAuth2Token生成器使用它来在生成OAuth2Taken之前自定义其属性。
authorization Request Converter():添加一个身份验证转换器(预处理器),用于尝试从Http Servlet Request中提取OAuth2授权请求(或同意)到OAuth2Authorization Code Request Authentication Token或OAuth2AAuthorization consent Authentication Token的实例。authorization Request Converters():设置消费者提供对默认和(可选)添加的验证转换器列表的访问权限,允许添加、删除或自定义特定的验证转换器。
@Bean
public OAuth2TokenGenerator<?> tokenGenerator() {
	JwtEncoder jwtEncoder = ...
	JwtGenerator jwtGenerator = new JwtGenerator(jwtEncoder);
	OAuth2AccessTokenGenerator accessTokenGenerator = new OAuth2AccessTokenGenerator();
	accessTokenGenerator.setAccessTokenCustomizer(accessTokenCustomizer());
	OAuth2RefreshTokenGenerator refreshTokenGenerator = new OAuth2RefreshTokenGenerator();
	return new DelegatingOAuth2TokenGenerator(
			jwtGenerator, accessTokenGenerator, refreshTokenGenerator);
}

@Bean
public OAuth2TokenCustomizer<OAuth2TokenClaimsContext> accessTokenCustomizer() {
	return context -> {
		OAuth2TokenClaimsSet.Builder claims = context.getClaims();
		// Customize claims

	};
}
相关过滤器说明
OAuth2TokenEndpointFilter
处理不同 Grant Type,并真正颁发 Token(AccessToken 和 RefreshToken)的过滤器。这个过滤器是颁发的核心,并且处理的事情比较复杂,在后面从流程介绍时再进一步说明。
2.1.4. OAuth2TokenIntrospectionEndpointFilter
授权服务器会颁发 Token,同时,也负责要验证颁发出的 Token 的有效性。此过滤器被调用用于确认 Token 的有效性,Token 有效则返回属于这个 Token 的一些认证授权信息。
AuthorizationServerContextFilter
AuthorizationServerContext的持有者,它使用ThreadLocal将AuthorizationServerContext与当前线程关联。
AuthorizationServerContext 保存授权服务器运行时环境信息的上下文。
FilterChainProxy(过滤器顺序和是否执行)
1、首先你可以在SecurityFilterAutoConfiguration中过滤器链的初始化,具体我也没看
2、当请求进入DelegatingFilterProxy
DelegatingFilterProxy#doFilter
					// 这里会拿到过滤器链
					delegateToUse = initDelegate(wac);
// 这里进入下一个过滤器的doFilter中
invokeDelegate(delegateToUse, request, response, filterChain);
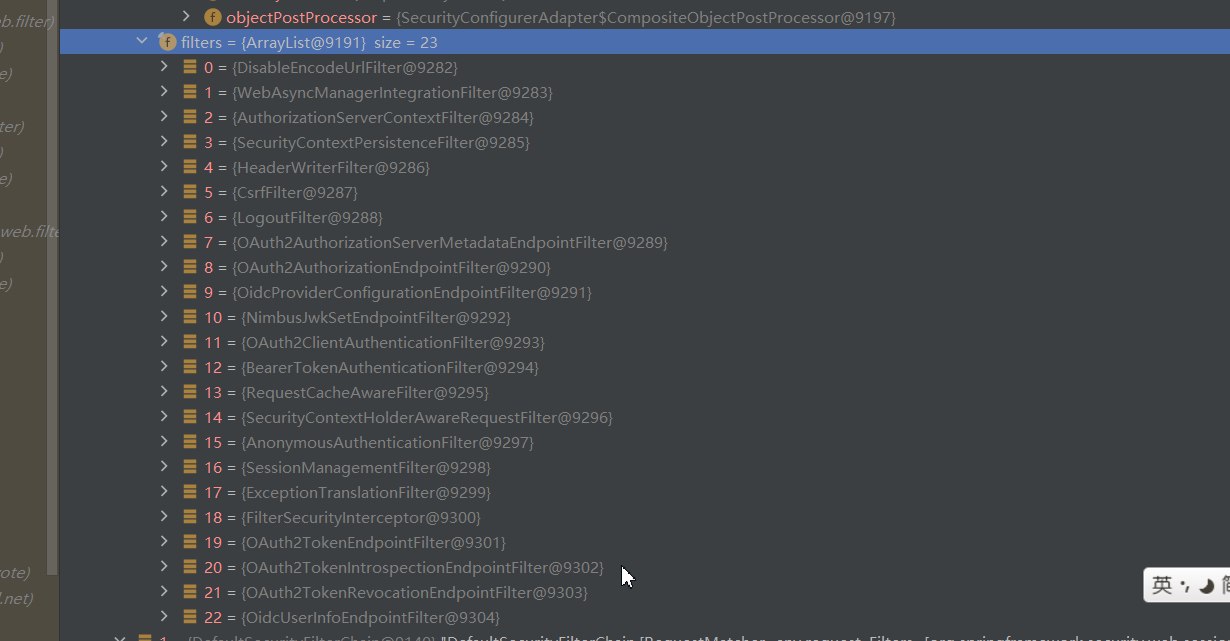
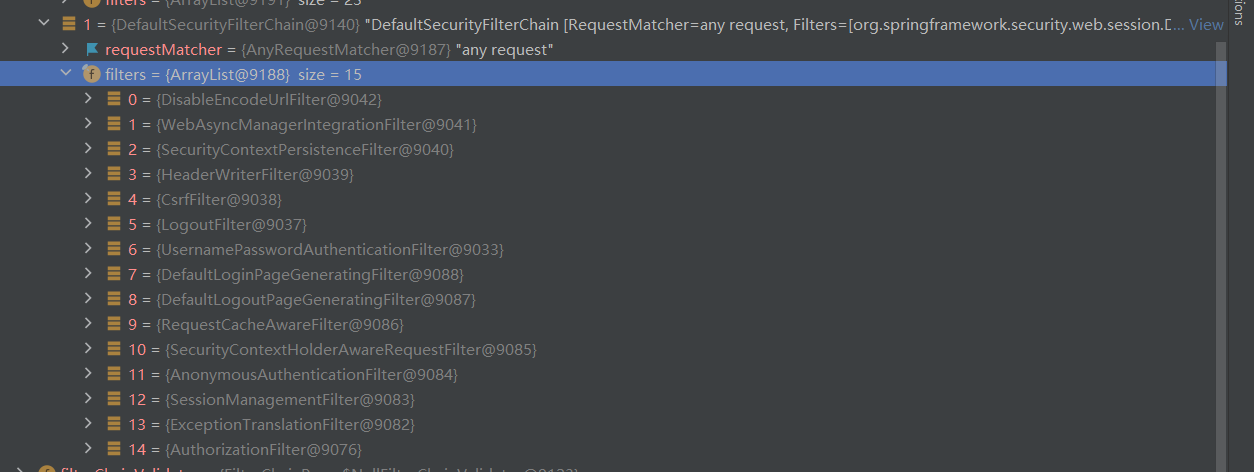
如下图,你可以看到这里面包含了两个过滤器链,其中一个匹配特定请求,长度只有15,另一个匹配所有请求,长度23
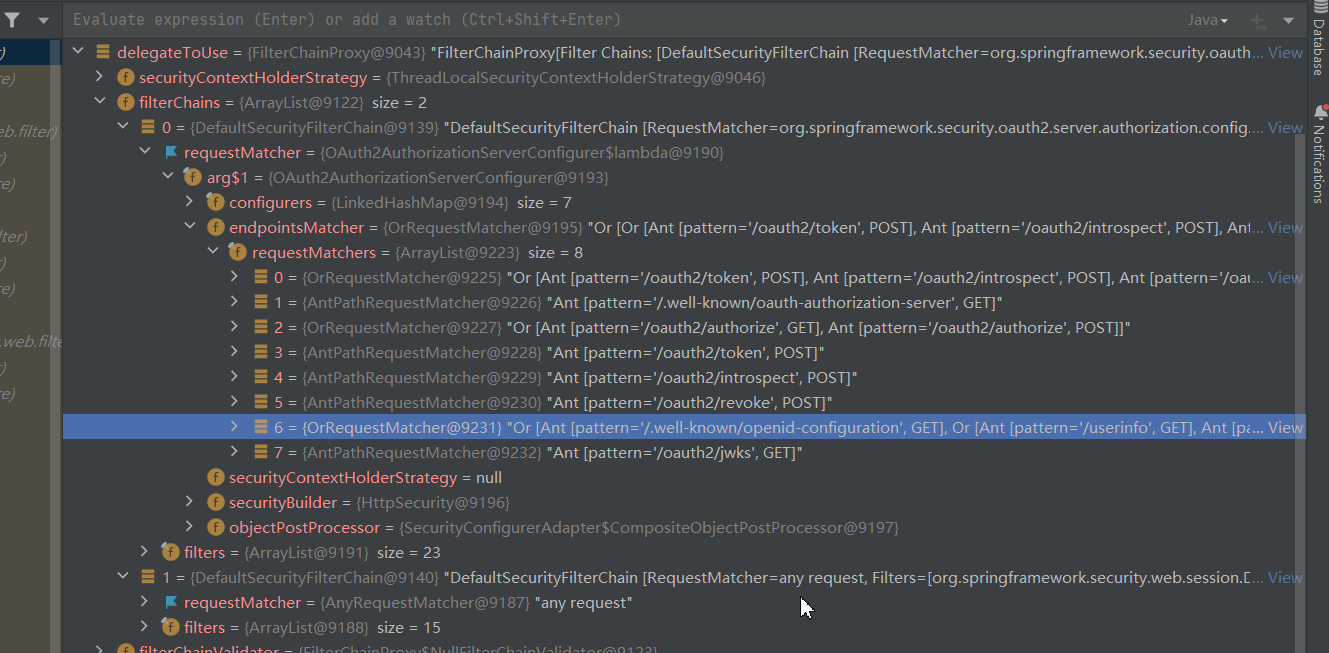
3、FilterChainProxy#doFilter中决定了使用哪一个过滤器链
// 根据请求决定使用哪一个过滤器链
FirewalledRequest firewallRequest = this.firewall.getFirewalledRequest((HttpServletRequest) request);
		HttpServletResponse firewallResponse = this.firewall.getFirewalledResponse((HttpServletResponse) response);
		List<Filter> filters = getFilters(firewallRequest);

// VirtualFilterChain是doFilter的内部类,filters代表需要执行的一系列过滤器
VirtualFilterChain virtualFilterChain = new VirtualFilterChain(firewallRequest, chain, filters);
virtualFilterChain.doFilter(firewallRequest, firewallResponse);
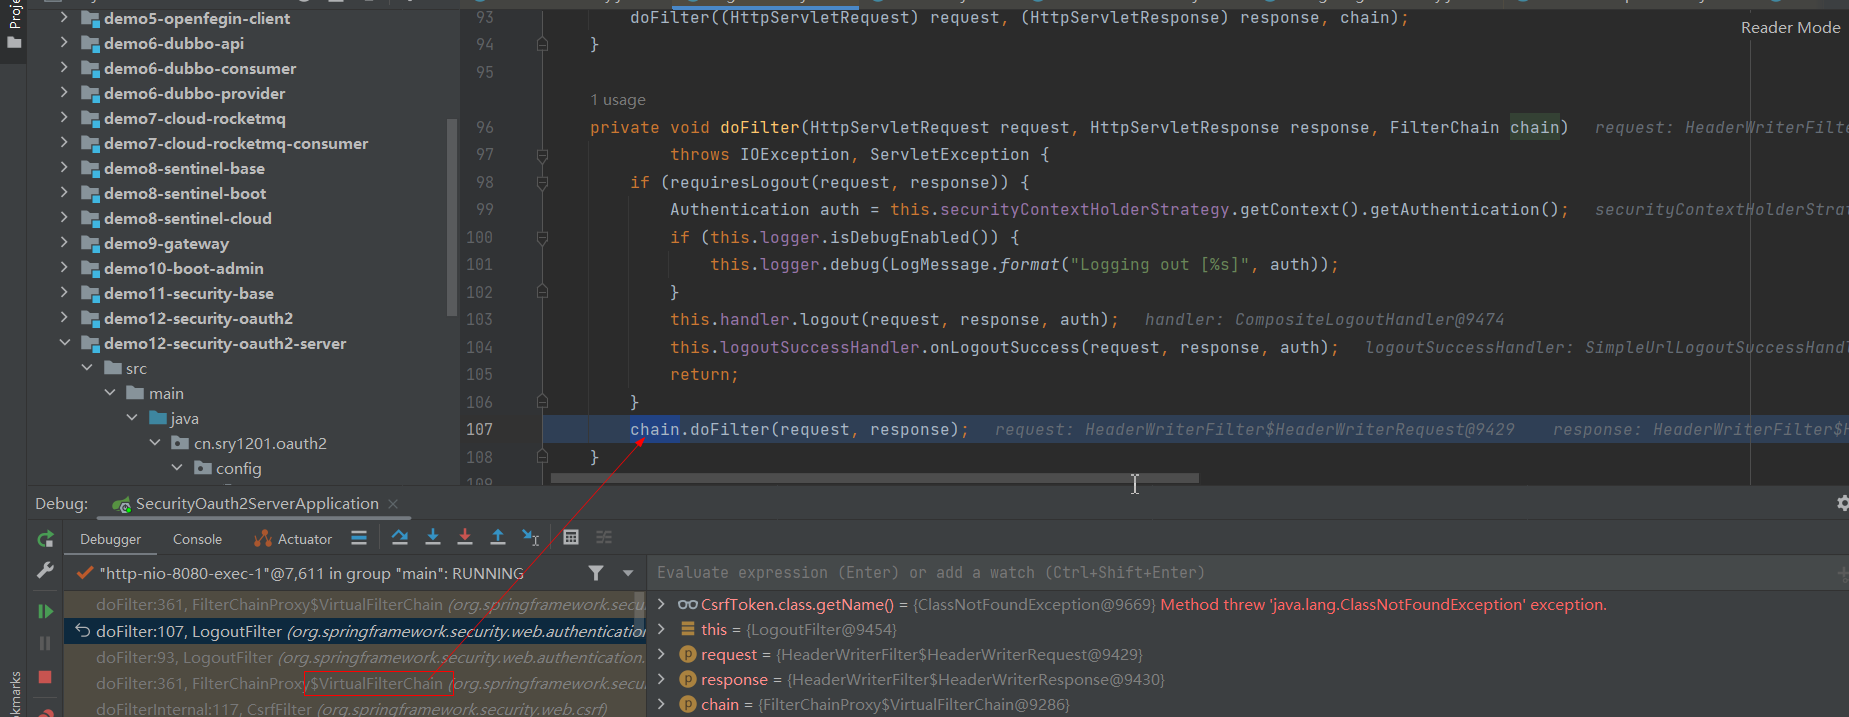
4、VirtualFilterChain#doFilter中实现了过滤器按照过滤器链顺序执行,大致是这样
			// additionalFilters是上一步初始化VirtualFilterChain传入的filters
			Filter nextFilter = this.additionalFilters.get(this.currentPosition - 1);
		.....
			nextFilter.doFilter(request, response, this);
OncePerRequestFilter
链接:https://www.jianshu.com/p/de66fc745da8
OncePerRequestFilter是Spring Boot里面的一个过滤器抽象类,其同样在Spring Security里面被广泛用到
这个过滤器抽象类通常被用于继承实现并在每次请求时只执行一次过滤,这里面是如何实现的,我们可以通过源码找到答案,通过增加标记的方式来实现过滤器只被执行一次
BearerTokenAuthenticationFilter
会获取请求头Authorization中的token,根据正则匹配^Bearer (?[a-zA-Z0-9-._~+/]+=*)$
OAuth2TokenRevocationEndpointFilter
OAuth2TokenIntrospectionEndpointFilter
NimbusJwkSetEndpointFilter
处理http://localhost:8080/oauth2/jwks请求
oauth2-client
上面讲的是授权服务器相关流程,其中客户端请求服务端是通过浏览器和postman来模拟的,这里正式说一下oauth2-client使用
官方文档:https://docs.spring.io/spring-security/reference/5.8/servlet/oauth2/client/authorization-grants.html
依赖
注意版本选择,这里我随意选了一个
        <dependency>
            <groupId>org.springframework.boot</groupId>
            <artifactId>spring-boot-starter-oauth2-client</artifactId>
            <version>2.7.5</version>
        </dependency>
oauth2-client 结合github示例
配置类
可以使用配置文件,这里以配置类演示
@Configuration
public class OAuth2LoginConfig {

	@Bean
	public SecurityFilterChain filterChain(HttpSecurity http) throws Exception {
		http
			.authorizeHttpRequests(authorize -> authorize
				.anyRequest().authenticated()
			)
			.oauth2Login(withDefaults());
		return http.build();
	}

	@Bean
	public ClientRegistrationRepository clientRegistrationRepository() {
		return new InMemoryClientRegistrationRepository(this.clientRegistration());
	}

	private ClientRegistration clientRegistration() {
		return CommonOAuth2Provider.GITHUB.getBuilder("github")
				.clientId("94158244d72e7f4ff083")
				.clientSecret("061e3180bc1dd525e33742c28effa74b8d01378b")
				.build();
	}
}
配置后测试请查看认证流程
认证流程
1、首先我们访问根路径(对应的有一个接口),没有权限AuthorizationFilter#doFilter中抛出异常
2、ExceptionTranslationFilter#doFilter捕获异常,然后LoginUrlAuthenticationEntryPoint#commence中根据重定向策略http://127.0.0.1:8090/oauth2/authorization/github到这个地址
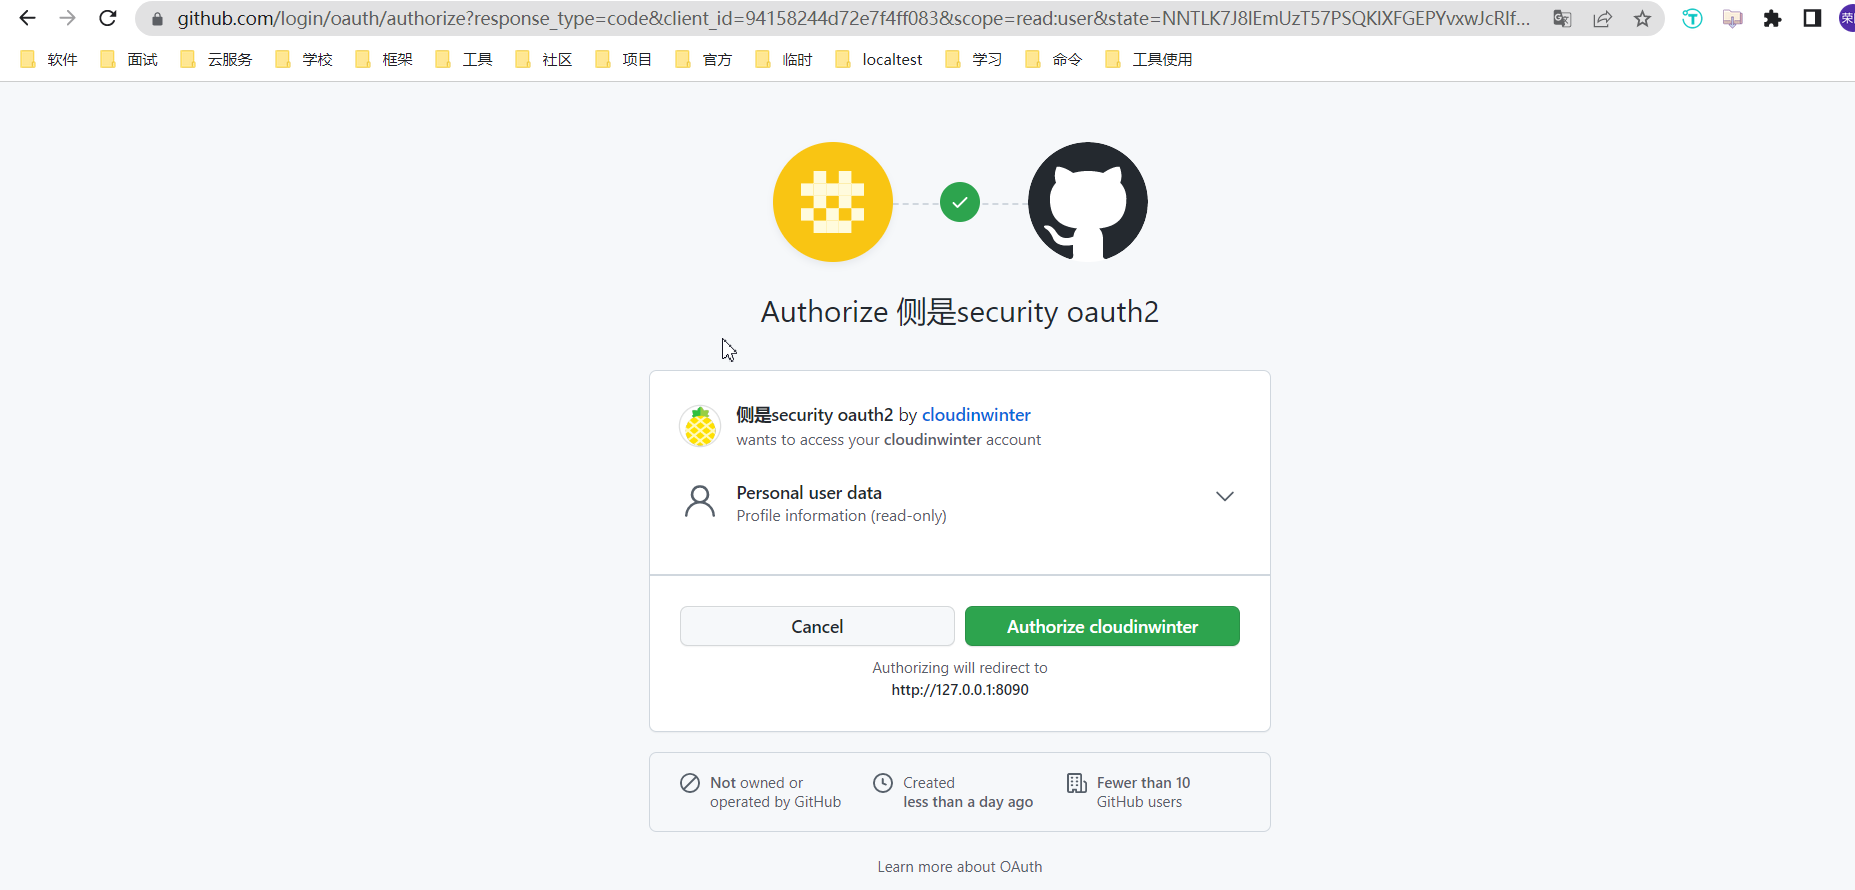
3、重定向后OAuth2AuthorizationRequestRedirectFilter#sendRedirectForAuthorization中再次重定向到https://github.com/login/oauth/authorize?response_type=code&client_id=94158244d72e7f4ff083&scope=read:user&state=MgqnQCjadKeeduo7dPgw8W5Nw-3vqGfj0O_tfkWvWXw%3D&redirect_uri=http://127.0.0.1:8090/login/oauth2/code/github
5、然后就会重定向回127.0.0.1:8090,附带code,由于重定向是浏览器再次发起请求,所以本地地址也没事
http://127.0.0.1:8090/login/oauth2/code/github?code=cc7a9e71188106a4c4ea&state=wnchl7QnDqRem4T3G7mbO1kOXzINvbt77ksUBjzvPI4%3D
6、重定向回本地之后,本地会根据code,请求github获取OAuth2LoginAuthenticationFilter#attemptAuthentication
		OAuth2LoginAuthenticationToken authenticationResult = (OAuth2LoginAuthenticationToken) this
				.getAuthenticationManager().authenticate(authenticationRequest);
7、如果你想再次测试,清楚github端的token,还有调用本地的/logout接口(获取token成功后,对于本地应用就已经是登录状态了),不会访问github了。
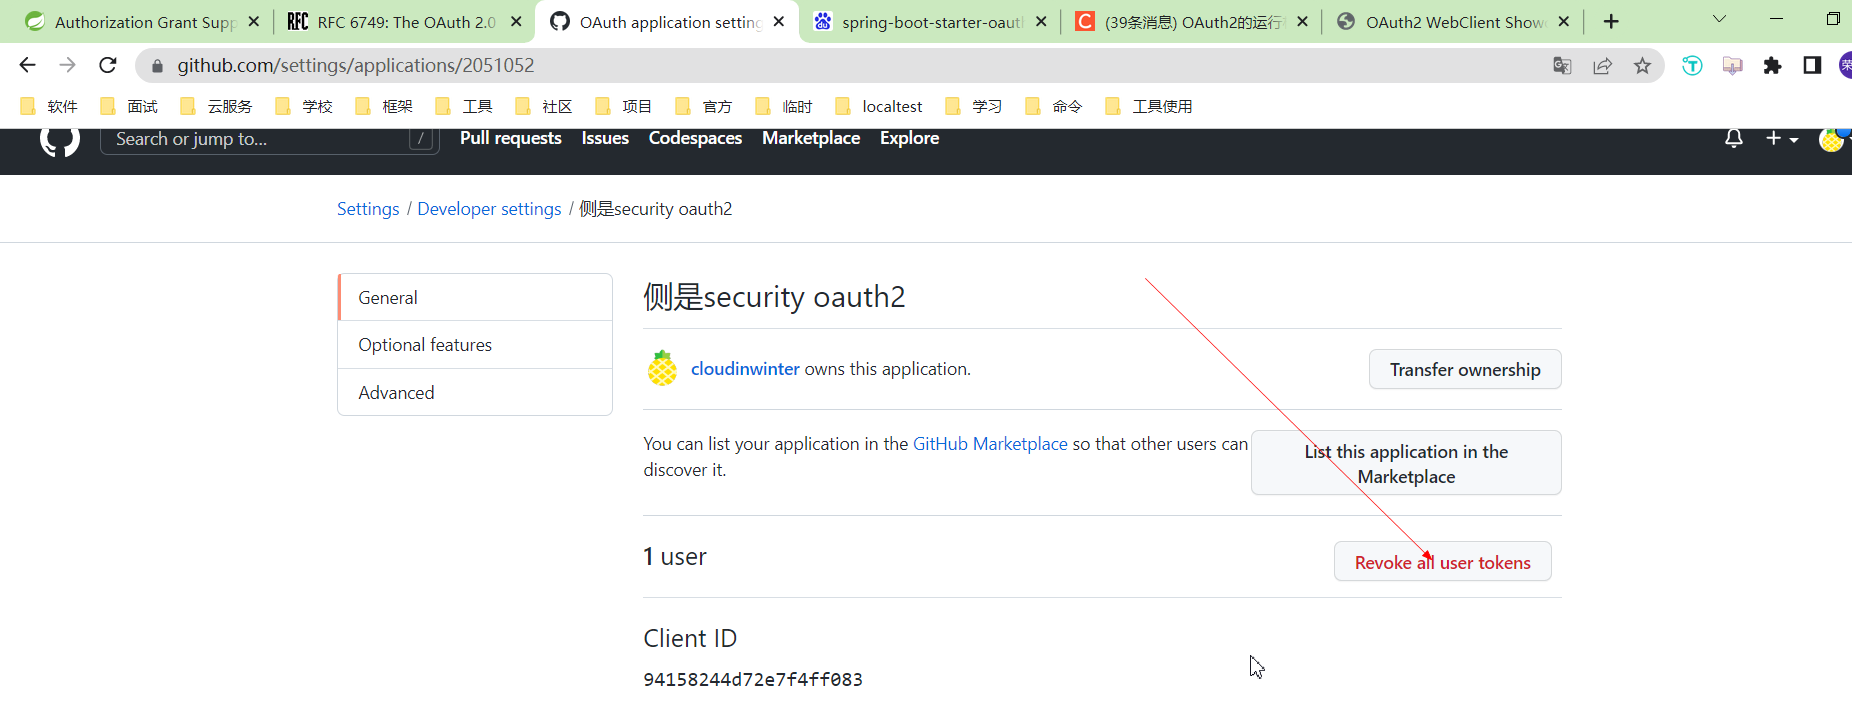
8、关于刷新token和其他场景待定。
oauth2-client结合本地授权中心示例
上面的是结合github示例。Spring Security框架定义了一个名为CommonOAuth2Provider的类。这个类部分定义了可以用于身份验证的最常见提供程序的ClientRegistration实例,其中包括:
- GitHub
- Okta
所以我们只配置了 clientId 和clientSecret,其他地址都默认即可,但是针对我们自己创建的授权中心,还是需要单独配置一些额外的地址
package cn.sry1201.oauth2.config;

import org.springframework.context.annotation.Bean;
import org.springframework.context.annotation.Configuration;
import org.springframework.security.config.annotation.web.builders.HttpSecurity;
import org.springframework.security.oauth2.client.registration.ClientRegistration;
import org.springframework.security.oauth2.client.registration.ClientRegistrationRepository;
import org.springframework.security.oauth2.client.registration.InMemoryClientRegistrationRepository;
import org.springframework.security.oauth2.core.AuthorizationGrantType;
import org.springframework.security.oauth2.core.ClientAuthenticationMethod;
import org.springframework.security.oauth2.core.oidc.IdTokenClaimNames;
import org.springframework.security.web.SecurityFilterChain;

import static org.springframework.security.config.Customizer.withDefaults;

/**
 * @author 17736
 */
@Configuration
public class OAuth2LoginConfig2 {

    @Bean
    public SecurityFilterChain filterChain(HttpSecurity http) throws Exception {
        http
                .authorizeHttpRequests(authorize -> authorize
                        .anyRequest().authenticated()
                )
                .oauth2Login(withDefaults());
        return http.build();
    }

    @Bean
    public ClientRegistrationRepository clientRegistrationRepository() {
        return new InMemoryClientRegistrationRepository(this.localClientRegistration());
    }

    // 尝试通过http://localhost:8080/.well-known/openid-configuration获取相关接口
    private ClientRegistration localClientRegistration() {
        return ClientRegistration.withRegistrationId("messaging-client")
                .clientId("messaging-client")
                .clientSecret("secret")
                .clientAuthenticationMethod(ClientAuthenticationMethod.CLIENT_SECRET_BASIC)
                .authorizationGrantType(AuthorizationGrantType.AUTHORIZATION_CODE)
                .redirectUri("http://127.0.0.1:8090/login/oauth2/code/messaging-client")
                .scope("openid", "profile", "message.read", "message.write")
                .authorizationUri("http://127.0.0.1:8080/oauth2/authorize")
                .tokenUri("http://127.0.0.1:8080/oauth2/token")
                .userInfoUri("http://127.0.0.1:8080/userinfo")
                .userNameAttributeName(IdTokenClaimNames.SUB)
                .jwkSetUri("http://127.0.0.1:8080/oauth2/jwks")
                .clientName("messaging-client")
                .build();
    }
}
客户端和授权服务器对应的配置要一致,特别是授权服务器的redirecturi的配置,首先说明,这个配置类和上面授权服务器的配置类是对应不上的
总之我走完整个流程后访问成功了

请求授权服务器报错
[invalid_request] localhost is not allowed for the redirect_uri (http://localhost:8090/login/oauth2/code/messaging-client). Use the IP literal (127.0.0.1) instead.
可以考虑加一个过滤器,没测试,从示例中复制的,我这里直接改成127.0.0.1
@Component
@Order(Ordered.HIGHEST_PRECEDENCE)
public class LoopbackIpRedirectFilter extends OncePerRequestFilter {

	@Override
	protected void doFilterInternal(HttpServletRequest request, HttpServletResponse response, FilterChain filterChain)
			throws ServletException, IOException {
		if (request.getServerName().equals("localhost") && request.getHeader("host") != null) {
			UriComponents uri = UriComponentsBuilder.fromHttpRequest(new ServletServerHttpRequest(request))
					.host("127.0.0.1").build();
			response.sendRedirect(uri.toUriString());
			return;
		}
		filterChain.doFilter(request, response);
	}

}
OAuth2TokenIntrospectionEndpointFilter#doFilterInternal 中处理回调请求时,会获取session,然后获取不到报错了,如果你遇到了
server:
  port: 8090
  servlet:
    #防止Cookie冲突,冲突会导致登录验证不通过
    session:
      cookie:
        name: OAUTH2-CLIENT-SESSIONID${server.port}
oauth2-resource
官方文档
客户端认证后通过后访问资源服务器
依赖
        <dependency>
            <groupId>org.springframework.boot</groupId>
            <artifactId>spring-boot-starter-oauth2-resource-server</artifactId>
            <version>2.7.5</version>
        </dependency>
配置和配置类
需要说明的是我没有找到
@EnableResourceServer这个注解,官方示例中也没有这个注解
spring:
  security:
    oauth2:
      resourceserver:
        jwt:
          jwk-set-uri: http://localhost:8080/oauth2/jwks
@EnableWebSecurity
public class OAuth2ResourceServerSecurityConfiguration {

	@Value("${spring.security.oauth2.resourceserver.jwt.jwk-set-uri}")
	String jwkSetUri;

	@Bean
	public SecurityFilterChain securityFilterChain(HttpSecurity http) throws Exception {
		// @formatter:off
		http
				.authorizeHttpRequests((authorize) -> authorize
						.antMatchers(HttpMethod.GET, "/message/**").hasAuthority("SCOPE_message:read")
						.antMatchers(HttpMethod.POST, "/message/**").hasAuthority("SCOPE_message:write")
						.anyRequest().authenticated()
				)
				.oauth2ResourceServer(OAuth2ResourceServerConfigurer::jwt);
		// @formatter:on
		return http.build();
	}

	@Bean
	JwtDecoder jwtDecoder() {
		return NimbusJwtDecoder.withJwkSetUri(this.jwkSetUri).build();
	}

}
资源服务访问流程
1、首先访问任意接口,都是返回的401(没权限,响应体中无任何数据)
2、然后就是客户端从授权服务器获取到token,通过token请求资源服务器,资源服务器任意请求路径,附带请求头Authorization
Bearer + 空格 + token

3、然后主要是请求进入BearerTokenAuthenticationFilter#doFilterInternal中会被拦截
// 处理请求成认证对象
AuthenticationManager authenticationManager = this.authenticationManagerResolver.resolve(request);
Authentication authenticationResult = authenticationManager.authenticate(authenticationRequest);
然后又是熟悉的步骤ProviderManager#authenticate中会根据配置的认证提供者进行认证
这里认证提供者是JwtAuthenticationProvider#authenticate
4、然后就会进入校验token的阶段,NimbusJwtDecoder#decode获取JWT秘钥-公钥
// 这里会请求授权服务器获取公钥
Jwt createdJwt = this.createJwt(token, jwt);
            return this.validateJwt(createdJwt);
然后总之一路调用下去,RemoteJWKSet#get,到这里就会调用远程的 http://localhost:8080/oauth2/jwks
			synchronized (this) {
					jwkSet = jwkSetCache.get();
					if (jwkSetCache.requiresRefresh() || jwkSet == null) {
						// Retrieve JWK set from URL
						jwkSet = updateJWKSetFromURL();
					}
				}
jwt和用户信息
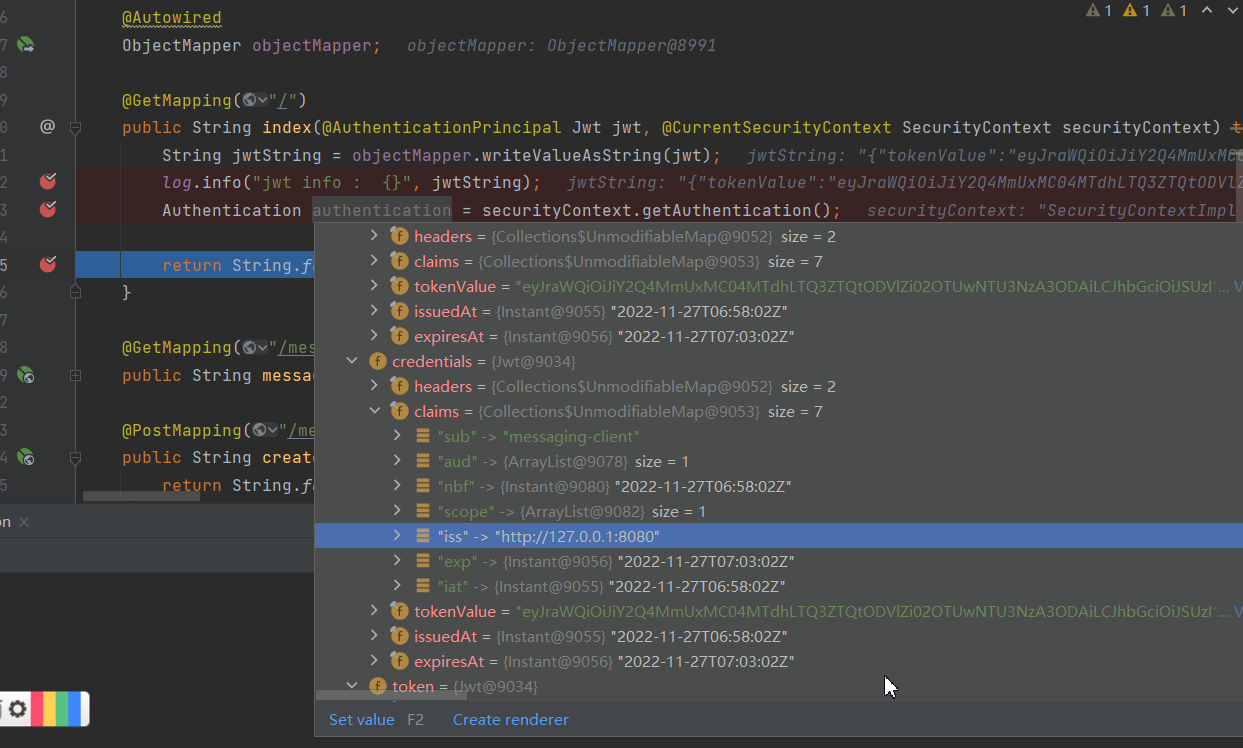
可以通过参数注入的方式获取相关数据,资源服务器这边似乎获取不到具体是哪个用户登录的,如果需要的话,可能需要在jwt的playload中增加相关信息
	@GetMapping("/")
	public String index(@AuthenticationPrincipal Jwt jwt, @CurrentSecurityContext SecurityContext securityContext) throws JsonProcessingException {
		String jwtString = objectMapper.writeValueAsString(jwt);
		log.info("jwt info :  {}", jwtString);
		Authentication authentication = securityContext.getAuthentication();

		return String.format("Hello, %s!", jwt.getSubject());
	}
{
    "tokenValue":"eyJraWQiOiJiY2Q4MmUxMC04MTdhLTQ3ZTQtODVlZi02OTUwNTU3NzA3ODAiLCJhbGciOiJSUzI1NiJ9.eyJzdWIiOiJtZXNzYWdpbmctY2xpZW50IiwiYXVkIjoibWVzc2FnaW5nLWNsaWVudCIsIm5iZiI6MTY2OTUzMjI4Miwic2NvcGUiOlsibWVzc2FnZS5yZWFkIl0sImlzcyI6Imh0dHA6Ly8xMjcuMC4wLjE6ODA4MCIsImV4cCI6MTY2OTUzMjU4MiwiaWF0IjoxNjY5NTMyMjgyfQ.SJiNhrJnHYLZPNckZFloK2ieyv7LB1AILo7JvDeG3miDX5MmGsec8I2k_EFDNfpE78SmbPusAuw8I40TOKAwFAmmGqyS_3crKNmPwfrGSTJEZDj6fZGPUNjOyEgR4cYLtyrMl8Nq371_6Ii3NsA9-DdvUYE2Sf2A84PmD2DwNTXnxAg-9qtD4wKTzpX7MYdfr2iw4fCGzq9GLa1Udkb1_EAi21DTdaJRykMiiwHE99wz0mgfyl-yenJ0NV7siLsjnfWqPYQ6HEb601bvnOreD0YFG9sxjhXBJYAk5qXrY3BiIyrmNAXCtNjV0_ix_65IeQtyl1IojSxDSnFtBgVVBA",
    "issuedAt":"2022-11-27T06:58:02Z",
    "expiresAt":"2022-11-27T07:03:02Z",
    "headers":{
        "kid":"bcd82e10-817a-47e4-85ef-695055770780",
        "alg":"RS256"
    },
    "claims":{
        "sub":"messaging-client",
        "aud":[
            "messaging-client"
        ],
        "nbf":"2022-11-27T06:58:02Z",
        "scope":[
            "message.read"
        ],
        "iss":"http://127.0.0.1:8080",
        "exp":"2022-11-27T07:03:02Z",
        "iat":"2022-11-27T06:58:02Z"
    },
    "notBefore":"2022-11-27T06:58:02Z",
    "subject":"messaging-client",
    "audience":[
        "messaging-client"
    ],
    "issuer":"http://127.0.0.1:8080",
    "id":null
}
OAuth2ResourceServerProperties
配置类,会读取配置文件中的数据
