flask前后端项目--实例-前端部分:-4-vue-Element Plus组件添加事项
一、实验测试步骤
1.Element Plus添加
1.先备份App.VUE,然后修改app.vue的内容,数据来源资Element Plus的表格table
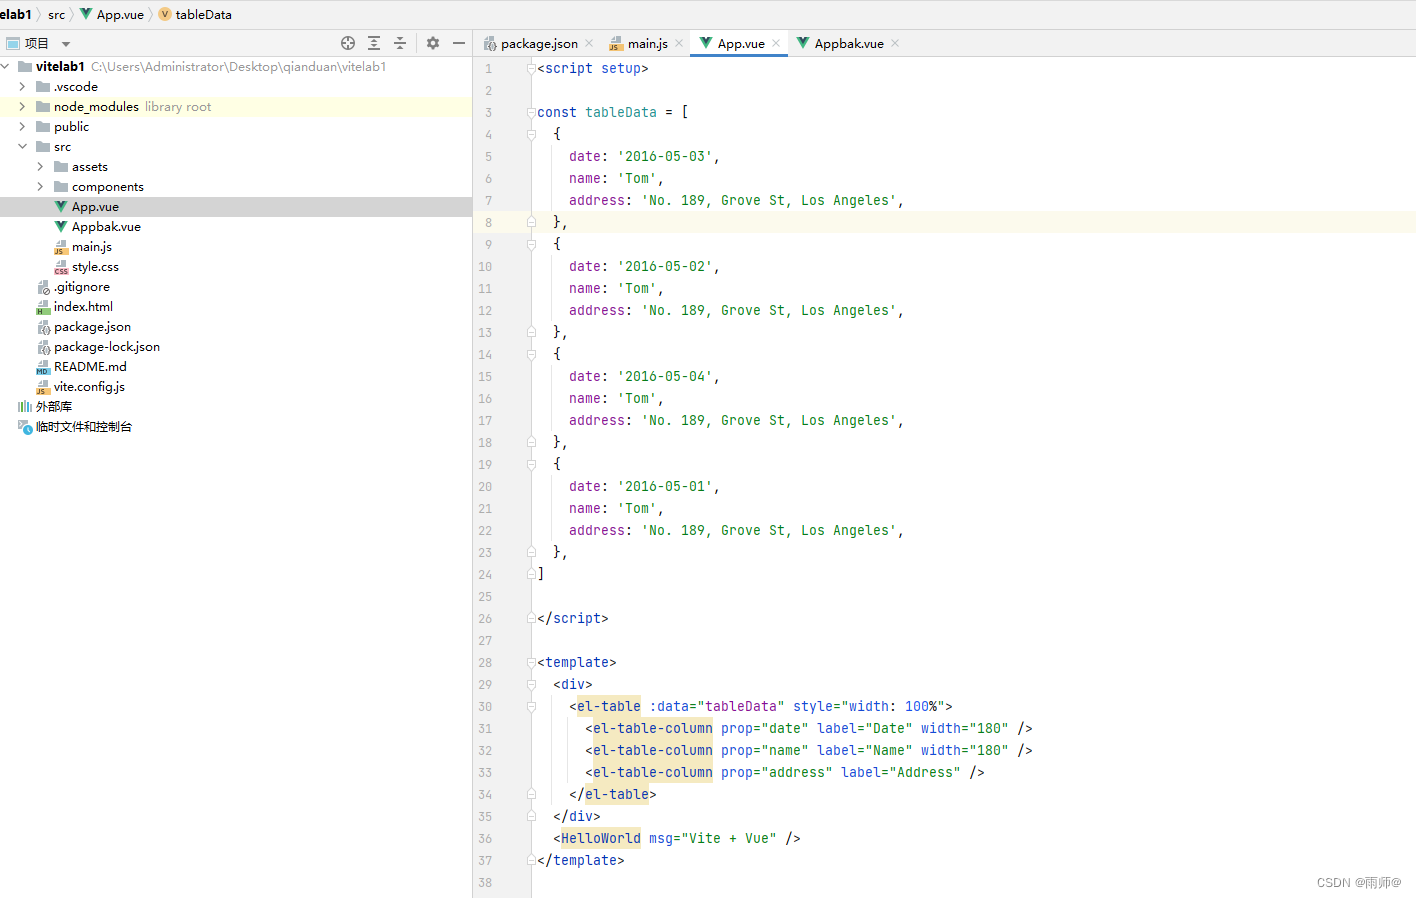
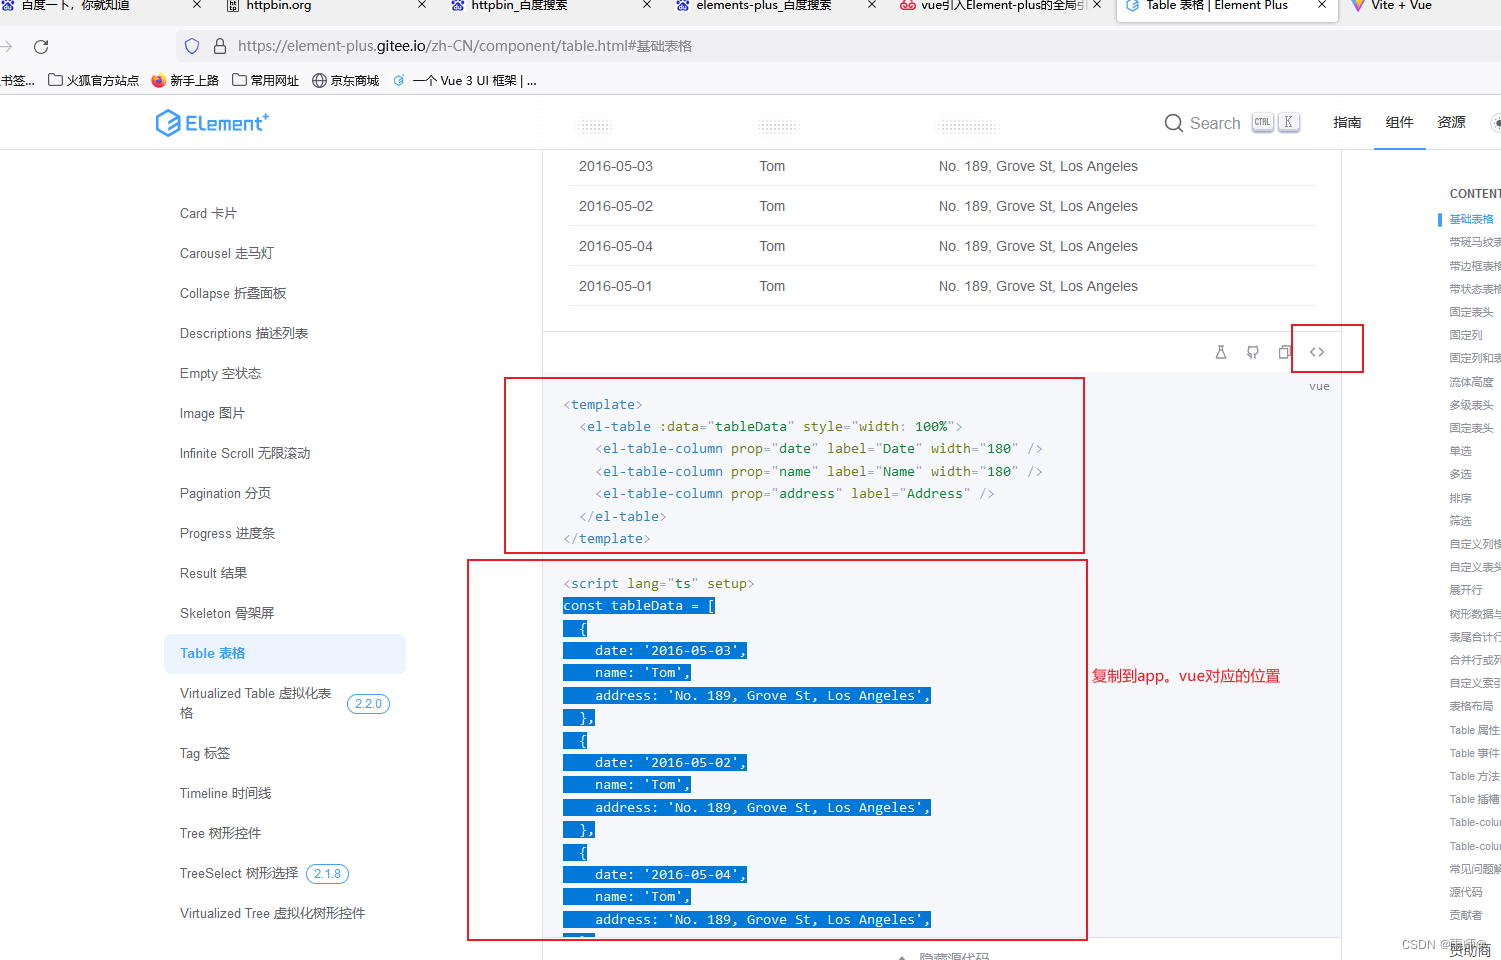
2. 数据来源资Element Plus的表格table
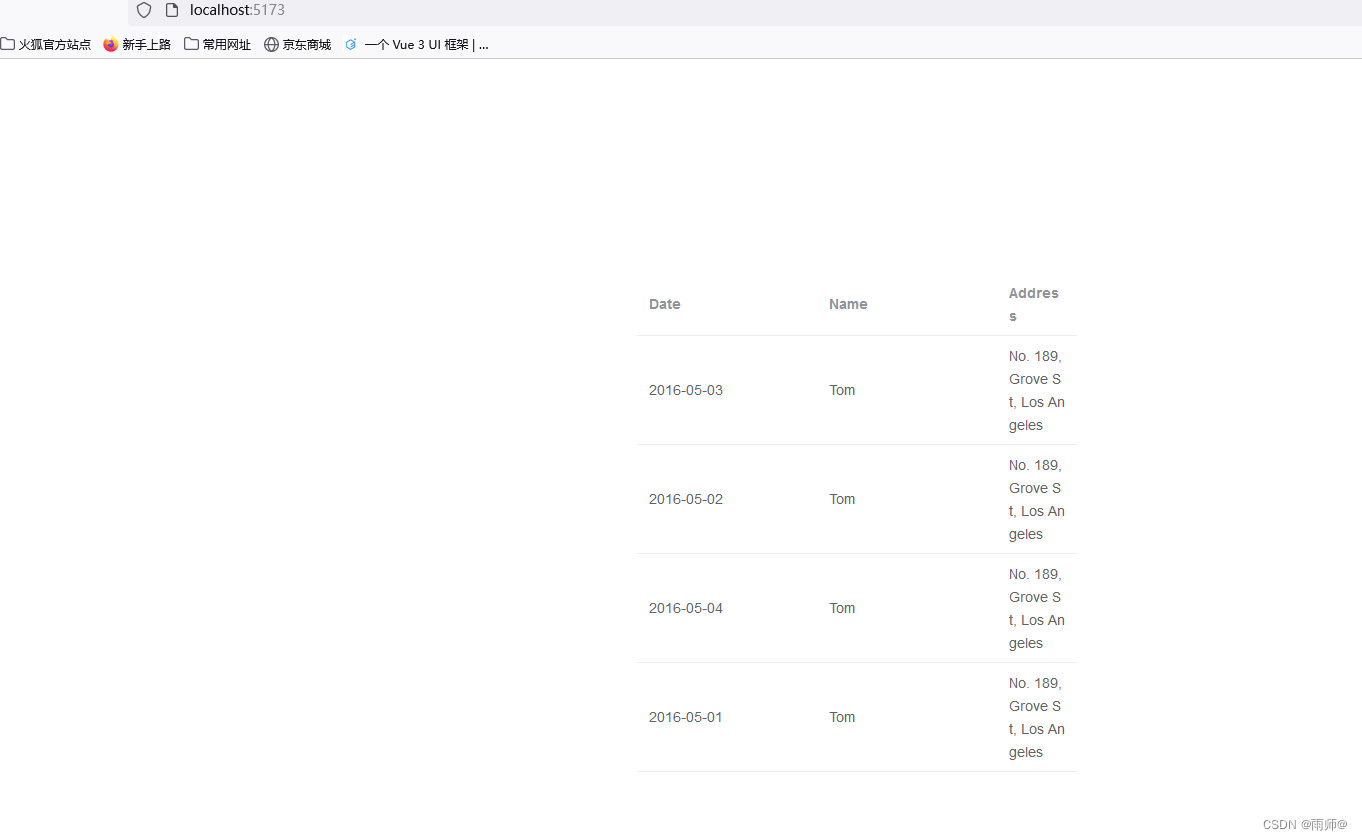
3. 运行服务,展示界面数据,说明复制的数据是正确
二、实际项目代码
实施前记得备份修改的数据
2.1修改前端魔板内容,展示的内容
<template>
  <div style="margin: 0 auto;width: 100%">
    <h1 style="text-align: center"> 图书管理系统</h1>
<!--    添加图书按钮-->
    <el-button type="primary" @click="add_dialog_visible=true" size="small">添加图书</el-button>

<!--    展示数据的表格-->
    <el-table :data="books" style="margin: 20px auto;">
      <el-table-column label="编号" prop="book_number"></el-table-column>
      <el-table-column label="书名" prop="book_name"></el-table-column>
      <el-table-column label="类型" prop="book_type"></el-table-column>
      <el-table-column label="价格" prop="book_prize"></el-table-column>
      <el-table-column label="作者" prop="book_author"></el-table-column>
      <el-table-column label="出版社" prop="book_publisher"></el-table-column>
      <el-table-column label="操作" align="right" width="200px">
        <template #default="scope">

         <el-button size="small" @click="handleEdit(scope.$index,scope.row)">编辑</el-button>
          <el-button size="small" type="danger" @click="handleDelete(scope.$index,scope.row)">删除</el-button>


        </template>
      </el-table-column>

    </el-table>

  </div>

</template>
2.2代码部分内容:
<script setup>
  import axios from "axios";
  import {reactive,ref,onMounted} from "vue";
  import {ElMessageBox}from 'element-plus'

  const books=reactive([])

  //请求后端数据,像后端请求数据
  const getStudent=()=>{
    axios.get("http://127.0.0.1:5000/books",).then(
        res=>{
          //删除旧的数据
          books.splice(0,books.length)
          //解压新的数据并且添加
          books.push(...res.data.results)
          console.log("更新数据")
        }
    )

  }

  //在页面上删除数据
  const handleDelete=(index,scope)=>{
    console.log(index,scope)
    axios.delete("http://127.0.0.1:5000/books/${scope.id}").then(

        ()=>{getStudent()}

    )
  }

  //页面加载完毕后再获取后台数据,生命周期的一个钩子函数
  onMounted(()=>{
    getStudent()
  })


</script>
三、展示界面
3.1后台启动:
3.2.前台运行
3.3界面展示--已经从后端获取了数据

备注内容信息
3.4备注:---前端
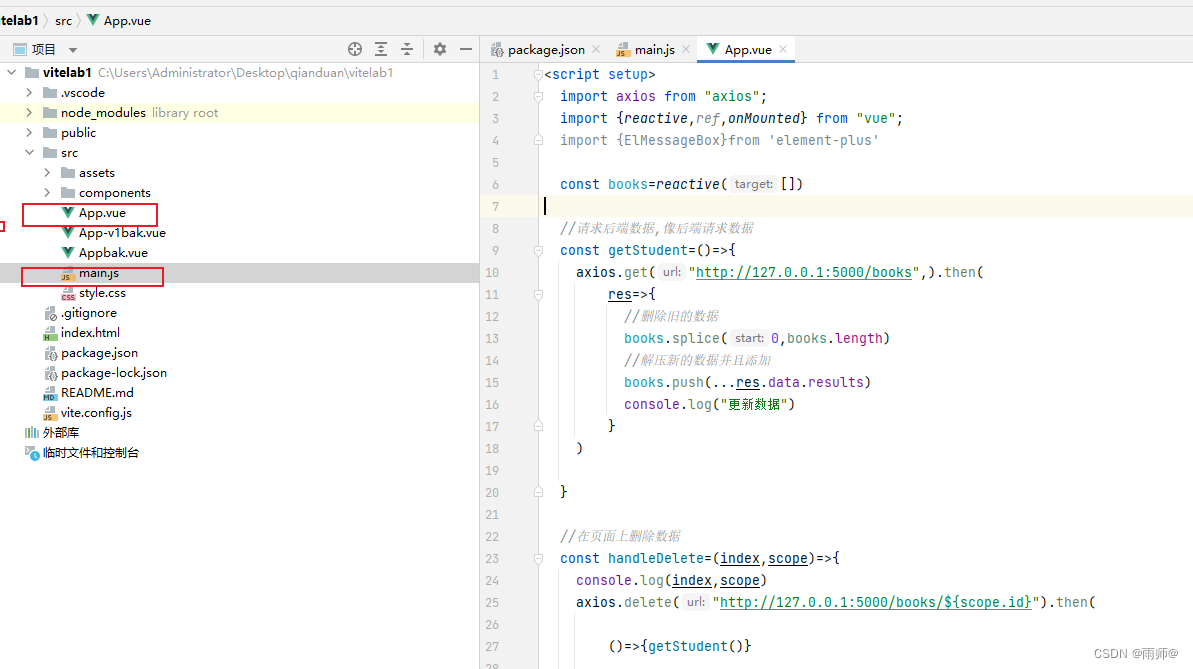
前端APP.vue中所有代码
<script setup>
  import axios from "axios";
  import {reactive,ref,onMounted} from "vue";
  import {ElMessageBox}from 'element-plus'

  const books=reactive([])

  //请求后端数据,像后端请求数据
  const getStudent=()=>{
    axios.get("http://127.0.0.1:5000/books",).then(
        res=>{
          //删除旧的数据
          books.splice(0,books.length)
          //解压新的数据并且添加
          books.push(...res.data.results)
          console.log("更新数据")
        }
    )

  }

  //在页面上删除数据
  const handleDelete=(index,scope)=>{
    console.log(index,scope)
    axios.delete("http://127.0.0.1:5000/books/${scope.id}").then(

        ()=>{getStudent()}

    )
  }

  //页面加载完毕后再获取后台数据,生命周期的一个钩子函数
  onMounted(()=>{
    getStudent()
  })


</script>

<template>
  <div style="margin: 0 auto;width: 100%">
    <h1 style="text-align: center"> 图书管理系统</h1>
<!--    添加图书按钮-->
    <el-button type="primary" @click="add_dialog_visible=true" size="small">添加图书</el-button>

<!--    展示数据的表格-->
    <el-table :data="books" style="margin: 20px auto;">
      <el-table-column label="编号" prop="book_number"></el-table-column>
      <el-table-column label="书名" prop="book_name"></el-table-column>
      <el-table-column label="类型" prop="book_type"></el-table-column>
      <el-table-column label="价格" prop="book_prize"></el-table-column>
      <el-table-column label="作者" prop="book_author"></el-table-column>
      <el-table-column label="出版社" prop="book_publisher"></el-table-column>
      <el-table-column label="操作" align="right" width="200px">
        <template #default="scope">

         <el-button size="small" @click="handleEdit(scope.$index,scope.row)">编辑</el-button>
          <el-button size="small" type="danger" @click="handleDelete(scope.$index,scope.row)">删除</el-button>


        </template>
      </el-table-column>

    </el-table>

  </div>

</template>

<style scoped>

</style>
man.js代码
import {createApp, reactive} from 'vue'
import './style.css'
import App from './App.vue'


import ElementPlus from 'element-plus'
import 'element-plus/dist/index.css'


createApp(App).use(ElementPlus).mount('#app')
// createApp(App).mount('#app')
3.5后端所有代码--后端代码组织结构

后端提供的接口代码:
extension.py
from flask_sqlalchemy import SQLAlchemy
from flask_cors import CORS


db=SQLAlchemy()


#跨域请求的问题
cors=CORS()

# 所有的其他扩展 文件都是在这里编写
models.py
from extension import db


class Book(db.Model):
    __tablename__='book'
    id=db.Column(db.Integer,primary_key=True,autoincrement=True)
    book_number=db.Column(db.String(255),nullable=False)
    book_name = db.Column(db.String(255), nullable=False)
    book_type = db.Column(db.String(255), nullable=False)
    book_price = db.Column(db.Float, nullable=False)
    author = db.Column(db.String(255))
    book_publisher=db.Column(db.String(255))


    # 初始化数据,制作数据
    @staticmethod
    def init_db():
        res=[
            (1,'001','猪儿八级天宫','小说',100,'猪八戒','xx出版'),
            (2,'002','孙悟空天宫','小说',000,'孙悟空','xx出版'),
        ]

        for ret in res:
            book=Book()
            book.id=ret[0]
            book.book_number=ret[1]
            book.book_name=ret[2]
            book.book_type=ret[3]
            book.book_price=ret[4]
            book.author=ret[5]
            book.book_publisher=ret[6]

            db.session.add(book)

        db.session.commit()
app.py
from flask import Flask,request
from flask.views import MethodView

from extension import db,cors
from  models import Book


app = Flask(__name__)

app.config['SQLALCHEMY_DATABASE_URI']='sqlite:///books.sqlite'
app.config['SQLAlCHEMY_TRACK_MODIFICATIONS']=False
db.init_app(app)
cors.init_app(app)


# api提供类
class BookApi(MethodView):
    def get(self,book_id):
        #没有传查询的参数,就是默认查询所有
        if not book_id:
            books:[Book]=Book.query.all()

            # 列表推导式,从books中取出数据分别赋值给book对象的不同字段,形成给book对象赋值过程
            results=[
                {
                 'id':book.id,
                 'book_name':book.book_name,
                 'book_type':book.book_type,
                 'book_price':book.book_price,
                 'book_number':book.book_number,
                 'book_publisher':book.book_publisher,
                 'author':book.author,


                 }for book in books
            ]
            return {
                'status':'success',
                'message':'数据查询成功',
                'results':results
            }
        #传查询的参数,就是按照查询的参数进行查询数据
        book: [Book] = Book.query.get(book_id)
        return {
            'status': 'success',
            'message': '数据查询成功',
            'result':{
                'id': book.id,
                'book_name': book.book_name,
                'book_type': book.book_type,
                'book_price': book.book_price,
                'book_number': book.book_number,
                'book_publisher': book.book_publisher,
                'author': book.author,

            }

        }


    def post(self):
        # json上传数据的过程
        form=request.json
        book=Book()
        book.book_number=form.get('book_number')
        book.book_name=form.get('book_name')
        book.book_type=form.get('book_type')
        book.book_price=form.get('book_price')
        book.author=form.get('author')
        book.book_publisher=form.get('book_publisher')

        db.session.add(book)
        db.session.commit()

        return {
            'status':'success',
            'message':'数据添加成功!'
        }

    def delete(self,book_id):
        book=Book.query.get(book_id)
        db.session.delete(book)
        db.session.commit()

        return {
            'status':'success',
            'message':'数据delete成功!'
        }

    def put(self,book_id):
        book:Book=Book.query.get(book_id)

        book.book_type=request.json.get('book_type')
        book.book_name=request.json.get('book_name')
        book.book_price=request.json.get('book_price')
        book.book_number=request.json.get('book_number')
        book.book_publisher=request.json.get('book_publisher')
        book.author=request.json.get('author')
        db.session.commit()

        return {
            'status': 'success',
            'message': '数据update成功!'
        }


# api提供类的注册的连接,测试可以参考下面的url进行测试

book_view=BookApi.as_view('book_api')
app.add_url_rule('/books',defaults={'book_id':None},view_func=book_view,methods=['GET',])
app.add_url_rule('/books',view_func=book_view,methods=['POST',])
app.add_url_rule('/books/<int:book_id>',view_func=book_view,methods=['GET','PUT','DELETE'])


@app.route('/')
def hello_world():  # put application's code here
    return 'Hello World!'


@app.route("/login")
def login():
    return "login"

#生成数据库文件,在程序目录下可以找bools。sqlite这个数据库
#然后再终端中运行‘flask create ’这个命令,就是可以最终生成数据库了
#如果提示报错,多生成几次

@app.cli.command()
def create():
    db.drop_all()
    db.create_all()
    Book.init_db()


if __name__ == '__main__':
    app.run(debug=True)





![[附源码]计算机毕业设计基于Web的绿色环保网站Springboot程序](https://img-blog.csdnimg.cn/3e59ea8ec78b4091a5eba0c556c5b643.png)
