用了这么久的 SpringBoot ,我们再来回顾一下它,本文介绍 Spring Boot 的自动配置,这是它区别于 Spring 的最大的点,本文的自动配置项目包含三个项目,建议拉取仓库里的代码进行实践:尹煜 / AutoConfigDemo · GitCode
目录
1 介绍
2 自动配置原理
2.1 启动类注解
① @SpringBootApplication
② @SpringBootConfiguration
② @EnableAutoConfiguration
③ @ComponentScan(包扫描)
2.2 条件类注解
① 类条件
② 属性条件
③ Bean 条件
④ 资源条件
⑤ Web 应用条件
⑥ 其他条件
3 手动实现自动配置
3.1 资源配置
3.2 项目代码展示
① 主项目(autoconfigure-demo)
② 副项目(geektime-spring-boot-autoconfigure)
③ 副项目(greeting)
3.3 自动/手动配置实现
① 自动配置
② 手动配置
③ 关闭配置
1 介绍
Spring Boot 目的在于简化 Spring 繁琐的 XML 配置,本质依然还是Spring框架,使用 Spring Boot后可不再使用任何 XML 配置来启动一个服务,使得使用微服务架构时可以更加快速的建立一个应用。
Spring Boot 特点:
- 提供了固定的配置来简化配置,即约定大于配置
- 尽可能地自动配置 Spring 和第三方库,即能自动装配
- 内嵌容器,创建独立的 Spring 应用
- 让测试变的简单,内置了JUnit、Spring Boot Test等多种测试框架,方便测试
- 提供可用于生产的特性,如度量、运行状况检查和外部化配置
- 完全不需要生成代码,也不需要 XML 配置
2 自动配置原理
首先引用一张 Spring Boot 的自动配置原理流程图 👇
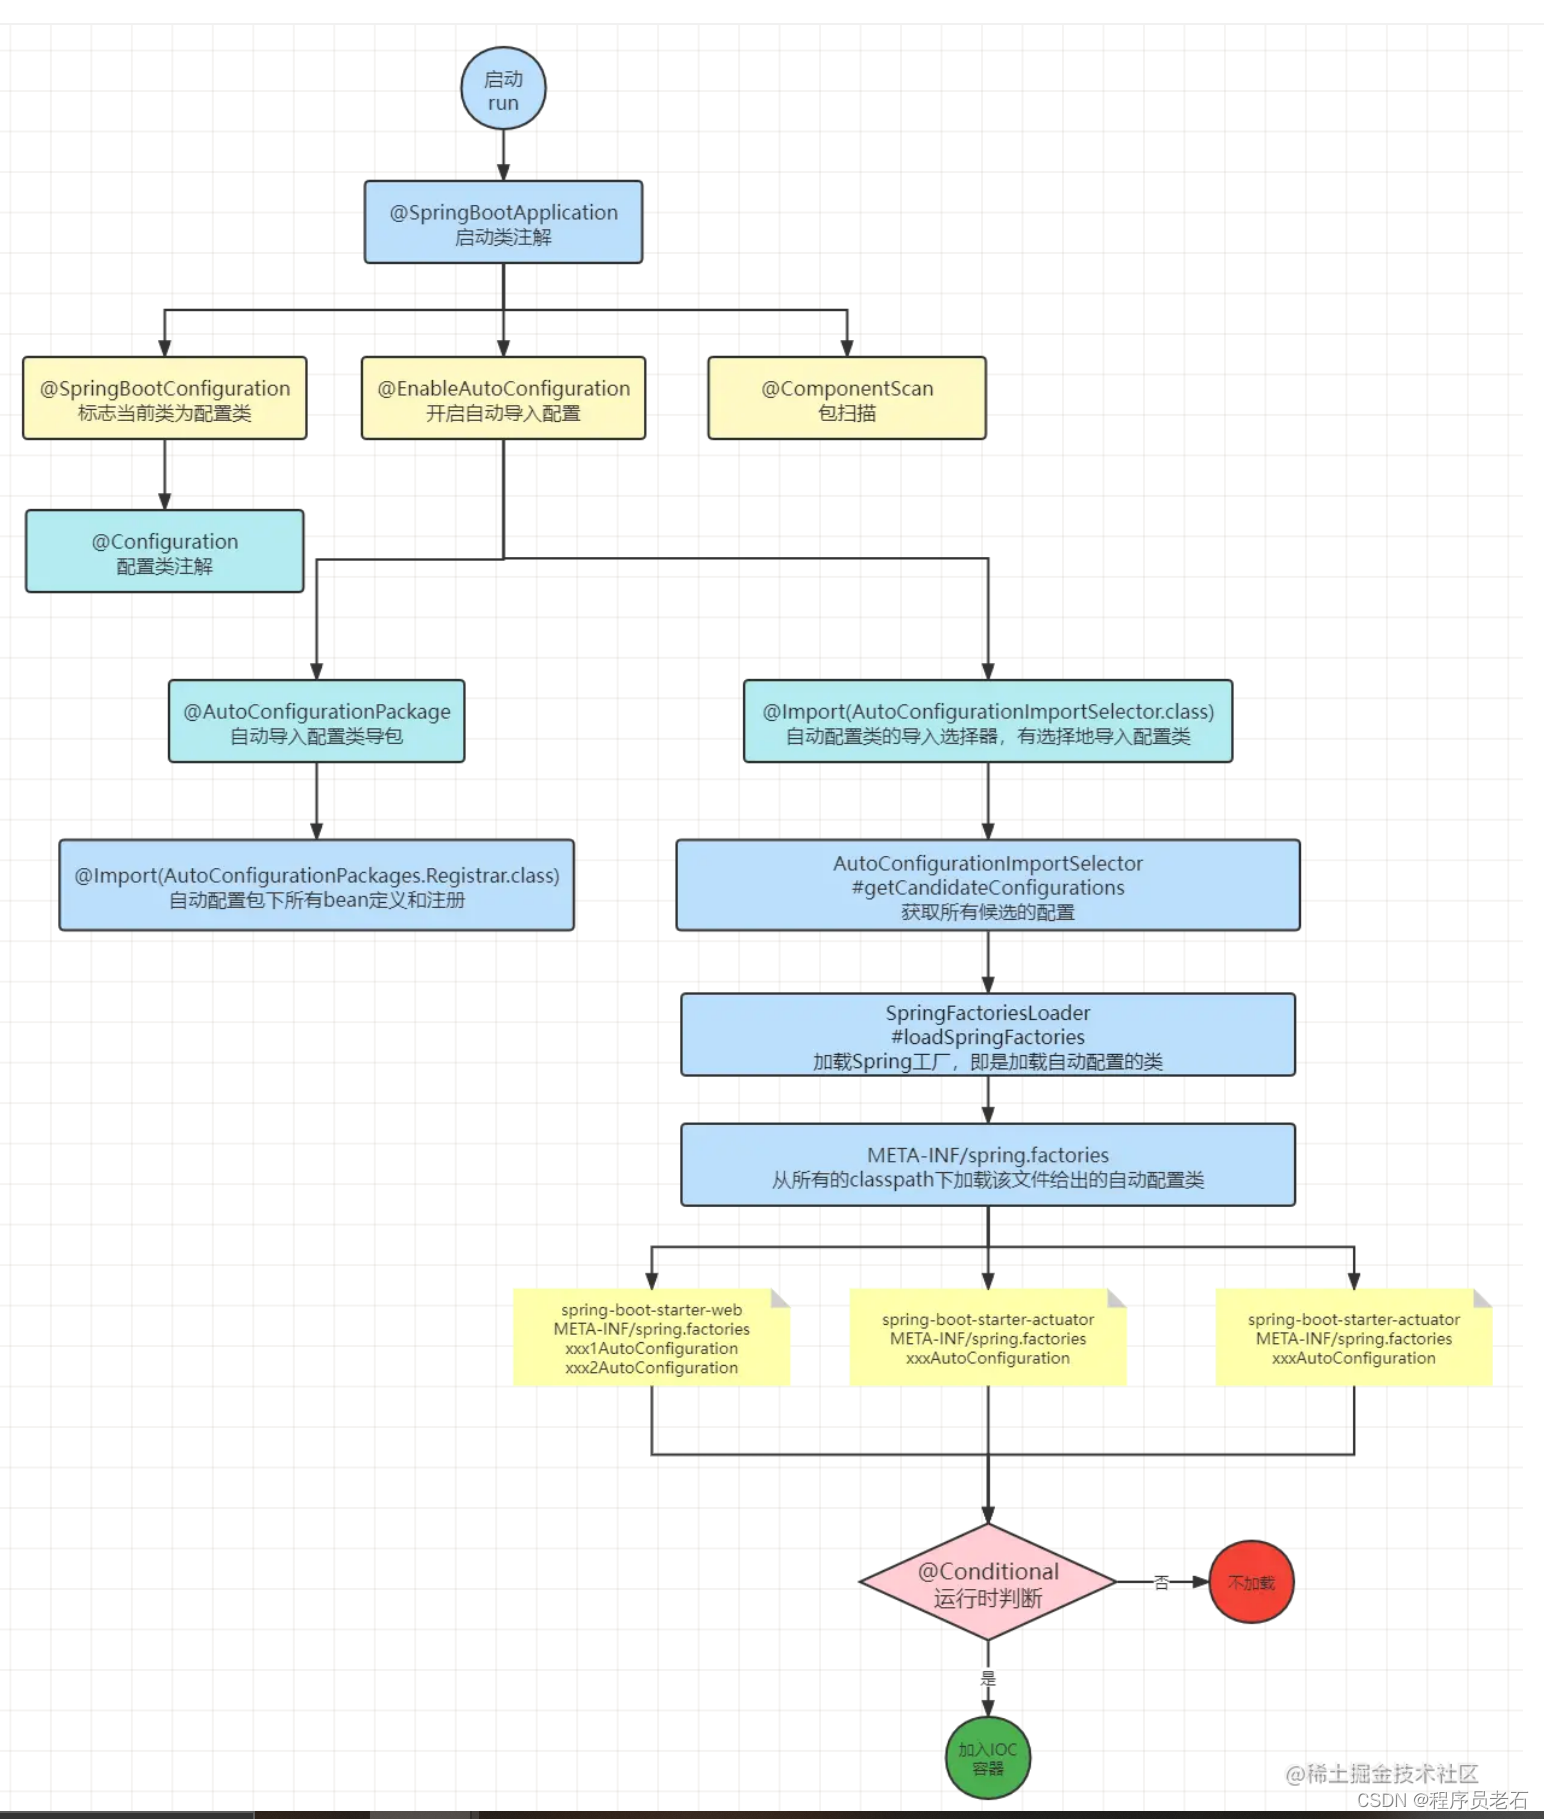
2.1 启动类注解
① @SpringBootApplication
这是 Spring Boot 启动类的注解,也是自动配置的开始 👇
@SpringBootApplication
public class SpringbootWorkApplication {
    public static void main(String[] args) {
        SpringApplication.run(SpringbootWorkApplication.class, args);
    }
}
@SpringBootApplication 用于标注在 SpringBoot 的主配置类上,也就是说项目应该运行该类的 main 方法来启动 SpringBoot 项目;其本质是一个组合注解,进入该注释的代码 👇
@Target({ElementType.TYPE})
@Retention(RetentionPolicy.RUNTIME)
@Documented
@Inherited
@SpringBootConfiguration
@EnableAutoConfiguration
@ComponentScan(
    excludeFilters = {@Filter(
    type = FilterType.CUSTOM,
    classes = {TypeExcludeFilter.class}
), @Filter(
    type = FilterType.CUSTOM,
    classes = {AutoConfigurationExcludeFilter.class}
)}
)
public @interface SpringBootApplication {
查看该类的元信息,其实主要包含以下注解:
② @SpringBootConfiguration
查看一下它的源码 👇
@Target({ElementType.TYPE})
@Retention(RetentionPolicy.RUNTIME)
@Documented
@Configuration
@Indexed
public @interface SpringBootConfiguration {
    @AliasFor(
        annotation = Configuration.class
    )
    boolean proxyBeanMethods() default true;
}- @Target:用于定义注解的使用位置,如果没有该项,表示注解可以用于任何地方。ElementType.TYPE 表示类,接口或者枚举。
- @Retention:用于指明修饰的注解的生存周期,即会保留到哪个阶段。RUNTIME 表示运行级别保留,编译后的class文件中存在,在jvm运行时保留,可以被反射调用。
- @Documented:指明修饰的注解,可以被例如 javadoc 此类的工具文档化,只负责标记,没有成员取值。
- @Configuration:表明这个一个 Spring Boot 的配置类,可以向容器中注入组件。
② @EnableAutoConfiguration
顾名思义,该注释含义是启动自动配置~
查看它的源码:
@Target({ElementType.TYPE})
@Retention(RetentionPolicy.RUNTIME)
@Documented
@Inherited
@AutoConfigurationPackage   //自动导包
@Import({AutoConfigurationImportSelector.class}) //自动配置导入选择
public @interface EnableAutoConfiguration {
    String ENABLED_OVERRIDE_PROPERTY = "spring.boot.enableautoconfiguration";

    Class<?>[] exclude() default {};

    String[] excludeName() default {};
}
- @Inherited:用于标注一个父类的注解是否可以被子类继承,如果一个注解需要被其子类所继承,则在声明时直接使用@Inherited注解即可。如果没有写此注解,则无法被子类继承。
- @AutoConfigurationPackage:自动导入配置包
- @Import({AutoConfigurationImportSelector.class}):开启自动配置类的导包的选择器,即是导入哪些类,有选择性的导入。
③ @ComponentScan(包扫描)
- 该注释用于 Configuration 类的组件扫描指令
- 提供与 Spring XML 的 context:component-scan 元素并行的支持
- 可以通过 basePackageClasses 或 basePackages 来定义要扫描的特定包, 如果没有定义特定的包,将从声明该注解的类的包开始扫描
- 也可在启动类做如下配置,用于排除某些特定类包的扫描
@SpringBootApplication(exclude = {DataSourceAutoConfiguration.class,
        DataSourceTransactionManagerAutoConfiguration.class,
        JdbcTemplateAutoConfiguration.class})
public class DataSourceDemoApplication implements CommandLineRunner {
    public static void main(String[] args) {
        SpringApplication.run(DataSourceDemoApplication.class, args);
    }
}
2.2 条件类注解
@Conditional :所有注解都基于它,是spring4引入的注解
后边的项目也将使用条件类注释来测试自动配置和手动配置~
① 类条件
- @ConditionalOnClass:当存在一个类时,如何做
- @ConditionalOnMissingClass:当不存在一个类时,如何做
② 属性条件
- @ConditionalOnProperty:特定的属性为什么时,做什么,如果不存在,赋给他一个默认的值
③ Bean 条件
- @ConditionalOnBean:存在某个bean时,如何做
- @ConditionalOnMissingBean:不存在某个bean时,如何做
- @ConditionalOnSingleCandidate:Spring容器中是否存在且只存在一个对应的实例。只有3个属性value、type、search,跟ConditionalOnBean中的这3种属性值意义一样
④ 资源条件
- @ConditionalOnResource:是否存在指定的资源文件。只有一个属性 resources,是个 String 数组,会从类加载器中去查询对应的资源文件是否存在
⑤ Web 应用条件
- @ConditionalOnWebApplication:如果是web应用,如何做
- @ConditionalOnNotWebApplication:如果不是web应用,如何做
⑥ 其他条件
- @ConditionalOnExpression sper:表达式计算结果是怎么样的
- @ConditionalOnJava:在特定的java版本上能做哪些事情
- @ConditionalOnJndi Jndi:条件是如何的
3 手动实现自动配置
以下资源来自《玩转 Spring 全家桶》课程,项目源码:尹煜 / AutoConfigDemo · GitCode
3.1 资源配置
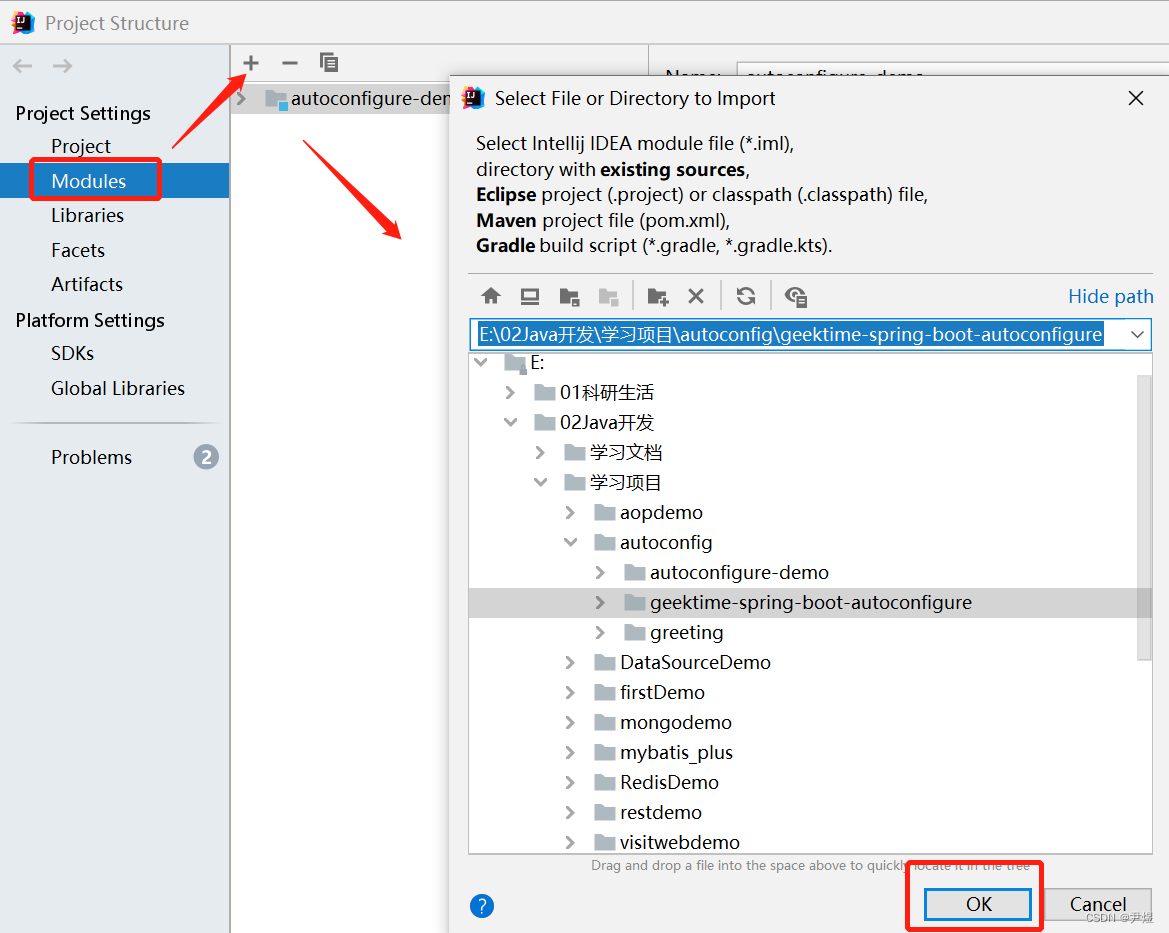
首先需要将三个项目通过 IDEA 合并在一起,主项目是 autoconfigure-demo:

首先通过 IDEA 打开主项目,然后按照下述流程逐一导入两外两个项目即可 👇

3.2 项目代码展示
项目源码:尹煜 / AutoConfigDemo · GitCode
因涉及到三个项目,且彼此呈依赖关系,因此会有点难以理解,本文希望尽可能讲得清楚一些~
① 主项目(autoconfigure-demo)
路径:geektime/spring/hello/AutoconfigureDemoApplication.java
@SpringBootApplication
public class AutoconfigureDemoApplication {

	public static void main(String[] args) {
		SpringApplication.run(AutoconfigureDemoApplication.class, args);
	}

//	@Bean
//	public GreetingApplicationRunner greetingApplicationRunner() {
//		return new GreetingApplicationRunner("Spring!");
//	}
}
路径:src/main/resources/application.properties
greeting.enabled=true 用于搭配 @ConditionalOnProperty 的条件判断,见于第2个项目的启动类
greeting.enabled=true路径:autoconfigure-demo\pom.xml
	<parent>
		<groupId>org.springframework.boot</groupId>
		<artifactId>spring-boot-starter-parent</artifactId>
		<version>2.1.3.RELEASE</version>
		<relativePath/> <!-- lookup parent from repository -->
	</parent>
	<groupId>geektime.spring.hello</groupId>
	<artifactId>autoconfigure-demo</artifactId>
	<version>0.0.1-SNAPSHOT</version>
	<name>autoconfigure-demo</name>
	<description>Demo project for Spring Boot</description>

	<dependencies>
		<dependency>
			<groupId>org.springframework.boot</groupId>
			<artifactId>spring-boot-starter</artifactId>
		</dependency>

		<!-- 以下是手工实现的自动配置 -->
		<dependency>
			<groupId>geektime.spring.hello</groupId>
			<artifactId>geektime-spring-boot-autoconfigure</artifactId>
			<version>0.0.1-SNAPSHOT</version>
		</dependency>

		<!-- 以下是基于Spring Boot的自动配置 -->
		<dependency>
			<groupId>geektime.spring.hello</groupId>
			<artifactId>greeting</artifactId>
			<version>0.0.1-SNAPSHOT</version>
		</dependency>

		<dependency>
			<groupId>org.springframework.boot</groupId>
			<artifactId>spring-boot-starter-test</artifactId>
			<scope>test</scope>
		</dependency>
	</dependencies>
② 副项目(geektime-spring-boot-autoconfigure)
路径:geektime/spring/hello/greeting/GreetingAutoConfiguration.java
@Configuration
@ConditionalOnClass(GreetingApplicationRunner.class)//当classpath中 存在GreetingApplicationRunner时 才能生效
public class GreetingAutoConfiguration {
    @Bean
    @ConditionalOnMissingBean(GreetingApplicationRunner.class)//不存在GreetingApplicationRunner这个类型的bean的时候,才能生效
    @ConditionalOnProperty(name = "greeting.enabled", havingValue = "true", matchIfMissing = true)//greeting.enabled这个属性为true 才能执行,如果没有配置这个值,就默认值为true
    public GreetingApplicationRunner greetingApplicationRunner() {
        return new GreetingApplicationRunner();
    }
}
路径:src/main/resources/META-INF/spring.factories
模拟 Spring Boot 的自动配置(自动配置时,Spring Boot 会扫描到类路径下的META-INF/spring.factories 配置文件,把 EnableAutoConfiguration 对应的的 Bean 值添加到容器中)
org.springframework.boot.autoconfigure.EnableAutoConfiguration=\
geektime.spring.hello.greeting.GreetingAutoConfiguration
路径:geektime-spring-boot-autoconfigure\pom.xml
该副项目也依赖 greeting 项目
	<dependencyManagement>
		<dependencies>
			<dependency>
				<groupId>org.springframework.boot</groupId>
				<artifactId>spring-boot-dependencies</artifactId>
				<version>${spring-boot.version}</version>
				<type>pom</type>
				<scope>import</scope>
			</dependency>
		</dependencies>
	</dependencyManagement>

	<dependencies>
		<dependency>
			<groupId>org.springframework.boot</groupId>
			<artifactId>spring-boot-autoconfigure</artifactId>
		</dependency>
		<dependency>
			<groupId>geektime.spring.hello</groupId>
			<artifactId>greeting</artifactId>
			<version>0.0.1-SNAPSHOT</version>
			<scope>provided</scope>
		</dependency>
	</dependencies>
③ 副项目(greeting)
路径:geektime/spring/hello/greeting/GreetingApplicationRunner.java
用于检验自动配置成果!
@Slf4j
public class GreetingApplicationRunner implements ApplicationRunner {

    private String name;

    public GreetingApplicationRunner(){
        this("OK!");
    }

    public GreetingApplicationRunner(String name) {
        this.name = name;
        log.info("Initializing GreetingApplicationRunner.{}",name);
    }

    public void run(ApplicationArguments args) throws Exception {
        log.info("Hello everyone! We all like Spring! ");
    }
}
路径:greeting\pom.xml
	<dependencyManagement>
		<dependencies>
			<dependency>
				<groupId>org.springframework.boot</groupId>
				<artifactId>spring-boot-dependencies</artifactId>
				<version>${spring-boot.version}</version>
				<type>pom</type>
				<scope>import</scope>
			</dependency>
		</dependencies>
	</dependencyManagement>

	<dependencies>
		<dependency>
			<groupId>org.springframework.boot</groupId>
			<artifactId>spring-boot</artifactId>
		</dependency>

		<dependency>
			<groupId>org.projectlombok</groupId>
			<artifactId>lombok</artifactId>
			<optional>true</optional>
		</dependency>

		<dependency>
			<groupId>org.slf4j</groupId>
			<artifactId>slf4j-api</artifactId>
		</dependency>
	</dependencies>
以上,所有文件展示完毕~
3.3 自动/手动配置实现
① 自动配置
Ⅰ 注解主项目(autoconfigure-demo)中 AutoconfigureDemoApplication 启动类中的 bean
Ⅱ application.properties 中 greeting.enabled=true
启动主项目的启动类,日志输出显示自动配置成功,使用的是使用空参构造的配置--自动配置 👇

② 手动配置
Ⅰ 启动主项目(autoconfigure-demo)中 AutoconfigureDemoApplication 启动类中的 bean 👇
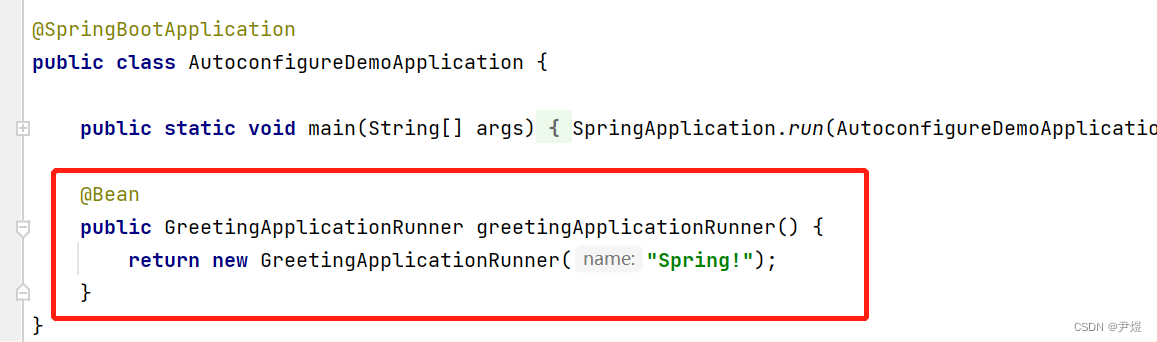
Ⅱ application.properties 中 greeting.enabled=true
启动主项目的启动类,日志输出显示手动配置成功,使用的是有参构造--手动配置 👇

③ 关闭配置
Ⅰ 注解主项目(autoconfigure-demo)中 AutoconfigureDemoApplication 启动类中的 bean
Ⅱ application.properties 中 greeting.enabled=false
启动主项目的启动类,日志输出显示该 bean 未被创建--关闭配置 👇

参考文章
SpringBoot自动配置原理_程序员老石的博客-CSDN博客_springboot自动配置原理
动手实现自己的自动配置_L# S@的博客-CSDN博客


![Yocto系列讲解[驱动篇]89 - 内核通知事件notifier chain驱动示例](https://img-blog.csdnimg.cn/f64e1f114d7045eaa57a680daec4395b.png)


![[附源码]JAVA毕业设计心理学网站(系统+LW)](https://img-blog.csdnimg.cn/90afb46962664607818512323224633d.png)