本周概要
- 导航守卫
- 全局守卫
- 路由独享的守卫
- 组件内守卫
- 导航解析流程
14.10 导航守卫
在 14.4 嵌套路由 小节中已经使用过一个组件内的导航守卫:beforeRouteUpdate 。Vue Router 提供的导航守卫主要用于在导航过程中重定向或取消路由,或添加权限验证、数据获取等业务逻辑。
导航守卫分为3类:全局守卫、路由独享的守卫、组件内守卫,可以用于路由导航过程中的不同阶段。每一个导航守卫都有两个参数:to 和 from ,其含义已在 14.4 嵌套路由 小节介绍过,此处不再赘述。
14.10.1 全局守卫
全局守卫分为全局前置守卫、全局解析守卫和全局后置钩子。
- 全局前置守卫
当一个导航触发时,全局前置守卫按照创建的顺序调用。守卫可以是异步解析执行,此时导航在所有守卫解析完之前一直处于挂起状态。全局前置守卫使用 router.beforeEach() 注册。代码如下所示:
const router = createRouter({...})
router.beforeEach((to,from) => {
  // ...
  // 显式返回 false 以取消导航
  return false;
})
除了返回 false 取消导航外,还可以返回一个路由位置对象,这将导致路由重定向到另一个位置,如同正在调用 router.push() 方法一样,可以传递诸如 replace:true 或 name:‘home’ 之类的选项。返回路由位置对象时,将删除当前导航,并使用相同的 from 创建一个新的导航。
如果遇到意外情况,也可能抛出一个 Error 对象,这也将取消导航并调用通过 router.onError() 注册的任何回调。
如果没有任何返回值、undefined 或 true ,则验证导航,并调用下一个导航守卫。
上面所有的工作方式都与异步函数和 Promise 相同。例如:
router.beforeEach(async (to,from) => {
  // canUserAccess() 返回 true 或 false
  return await canUserAccess(to)
})
- 全局解析守卫
全局解析守卫使用 router.beforeResolve() 注册。它和 router.beforeEach() 类似,区别在于,在导航被确认之前,在所有组件内守卫和异步路由组件被解析之后,解析守卫被调用。
下面的例子用于确保用户已经定义了自定义 meta 属性 requiresCamera 的路由提供了对相机的访问。
router.beforeResolve(async to => {
  if(to.meta.requiresCamera){
    try {
      await askForCameraPermission()
    } catch (error) {
      // ... 处理错误,然后取消导航
      return false
    }else{
    	// ...意外错误,取消导航并将错误传递给全局处理程序
    	throw error
    }
  }
})
- 全局后置钩子
全局后置钩子使用 router.afterEach() 注册,它在导航被确认之后调用。
router.afterEach((to,from) => {
  sendToAnalytics(to.fullPath)
})
与守卫不同的是,全局后置钩子不接受可选的 next() 函数,也不会改变导航。
全局后置钩子对于分析、更改页面标题、可访问性功能(如发布页面)和许多其他功能都非常有用。
全局后置钩子还可以接受一个表示导航失败的 failure 参数,作为第 3 个参数。代码如下:
router.afterEach((to,from,failure) => {
  if(!failure){
    sendToAnalytics(to.fullPath)
  }
})
- 实际应用
下面利用全局守卫来解决两个实际开发中的问题。
(1)登录验证
第一个问题是登录验证。对于受保护的资源,需要用户登录后才能访问,如果用户没有登录,那么就将用户导航到登录页面。为此,可以利用全局前置守卫来完成用户登录与否的判断。
继续前面的例子,在components 目录下新建 Login.vue。如下:
<template>
    <div>
        <h3>{{ info }}</h3>
        <table>
            <caption>用户登录</caption>
            <tbody>
                <tr>
                    <td><label>用户名:</label></td>
                    <td><input type="text" v-model.trim="username"></td>
                </tr>
                <tr>
                    <td><label>密码:</label></td>
                    <td><input type="password" v-model.trim="password"></td>
                </tr>
                <tr>
                    <td cols="2">
                        <input type="submit" value="登录" @click.prevent="login" />
                    </td>
                </tr>
            </tbody>
        </table>
    </div>
</template>
<script>
export default {
    data() {
        return {
            username: "",
            password: "",
            info: ""   //用于保存登录失败后的提示信息
        }
    },
    methods: {
        login() {
            //实际场景中,这里应该通过Ajax向服务端发起请求来验证
            if ("lisi" == this.username && "1234" == this.password) {
                //sessionStorage中存储的都是字符串值,因此这里实际存储的将是字符串"true"
                sessionStorage.setItem("isAuth", true);
                this.info = "";
                //如果存在查询参数
                if (this.$route.query.redirect) {
                    let redirect = this.$route.query.redirect;
                    //跳转至进入登录页前的路由
                    this.$router.replace(redirect);
                } else {
                    //否则跳转至首页
                    this.$router.replace('/');
                }
            }
            else {
                sessionStorage.setItem("isAuth", false);
                this.username = "";
                this.password = "";
                this.info = "用户名或密码错误";
            }

        }
    }
}
</script>
修改路由配置文件 index.js ,如下:
import {createRouter, createWebHistory} from 'vue-router'
//import Home from '@/components/Home'
import News from '@/components/News'
import Books from '@/components/Books'
import Videos from '@/components/Videos'
import Book from '@/components/Book'
import Login from '@/components/Login'

const router = createRouter({
  //history: createWebHashHistory(),
  history: createWebHistory(),
  routes: [
    {
      path: '/',
      redirect: {
        name: 'news'
      }
    },
    {
      path: '/news',
      name: 'news',
      component: News,
    },
    {
      path: '/books',
      name: 'books',
      component: Books,
      /*
      children: [
        {path: '/book/:id', name: 'book', component: Book, props: true}
      ]*/
    },
    {
      path: '/videos',
      name: 'videos',
      component: Videos,
    },
    {
      path: '/book/:id',
      name: 'book',
      components: {bookDetail: Book},
    },
    {
      path: '/login',
      name: 'login',
      component: Login,
    }
  ]
})

router.beforeEach(to => {
  //判断目标路由是否是/login,如果是,则直接返回true
  if(to.path == '/login'){
    return true;
  }
  else{
    //否则判断用户是否已经登录,注意这里是字符串判断
    if(sessionStorage.isAuth === "true"){
      return true;
    }
    //如果用户访问的是受保护的资源,且没有登录,则跳转到登录页面
    //并将当前路由的完整路径作为查询参数传给Login组件,以便登录成功后返回先前的页面
    else{
      return {
        path: '/login',
        query: {redirect: to.fullPath}
      }
    }
  }
})

router.afterEach(to => {
  document.title = to.meta.title;
})

export default router
需要注意的是:代码中的 if(to.path == ‘/login’){ return true } 不能缺少,如果写成下面的代码,会造成死循环。
router.beforEach( to => {
  if(sessionStorage.isAuth === 'true'){
    return true;
  }else{
    return {
      path:'/login',
      query:{redirect:to.fullPath}
    }
  }
} )
例如初次访问 /news ,此时用户还没有登录,条件判断为 false,进入 else 语句,路由跳转到 /login ,然后又执行 router.beforeEach() 注册全局前置守卫,条件判断依然为 false,再次进入 else 语句,最后导致页面死掉。
为了方便访问登录页面,可以在 App.vue 中添加一个登录的导航链接。如下:
<router-link to:"{name:'login'}">登录</router-link>
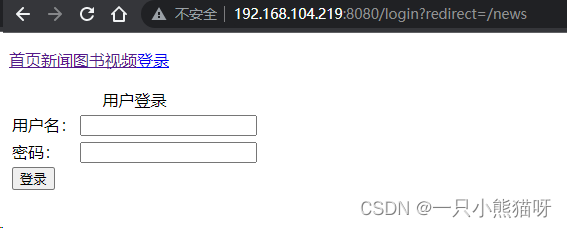
完成上述修改后,运行项目。出现登录页面后,输入正确的用户名(lisi)和密码(1234),看看路由的跳转,如下:

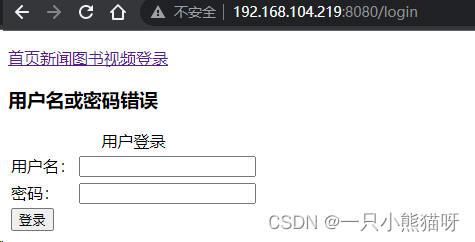
之后输入错误的用户名和密码,再看看路由的跳转,如下:
(2)页面标题
下面解决第二个问题,就是路由跳转后的页面标题问题。因为在单页应用程序中,实际只有一个页面,因此在页面切换时,标题不会发生改变。
在定义路由时,在 routes 配置中的每个路由对象(也称为路由记录)都可以使用一个 meta 字段来为路由对象提供一个元数据信息。我们可以为每个组件在它的路由记录里添加 meta 字段,在该字段中设置页面的标题,然后在全局后置钩子中设置目标路由页面的标题。
全局后置钩子是在导航确认后,DOM 更新前调用,因此在这个钩子中设置页面标题是比较合适的。
修改路由配置文件 index.js 。如下:
import {createRouter, createWebHistory} from 'vue-router'
//import Home from '@/components/Home'
import News from '@/components/News'
import Books from '@/components/Books'
import Videos from '@/components/Videos'
import Book from '@/components/Book'
import Login from '@/components/Login'

const router = createRouter({
  //history: createWebHashHistory(),
  history: createWebHistory(),
  routes: [
    {
      path: '/',
      redirect: {
        name: 'news'
      }
    },
    {
      path: '/news',
      name: 'news',
      component: News,
      meta: {
        title: '新闻'
      }

    },
    {
      path: '/books',
      name: 'books',
      component: Books,
      meta: {
        title: '图书列表'
      }
      /*
      children: [
        {path: '/book/:id', name: 'book', component: Book, props: true}
      ]*/
    },
    {
      path: '/videos',
      name: 'videos',
      component: Videos,
      meta: {
        title: '视频'
      }
    },
    {
      path: '/book/:id',
      name: 'book',
      meta: {
        title: '图书'
      },
      components: {bookDetail: Book},
    },
    {
      path: '/login',
      name: 'login',
      component: Login,
      meta: {
        title: '登录'
      }
    }
  ]
})

router.afterEach(to => {
  document.title = to.meta.title;
})

export default router
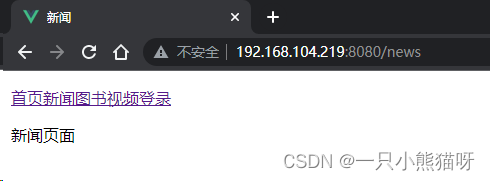
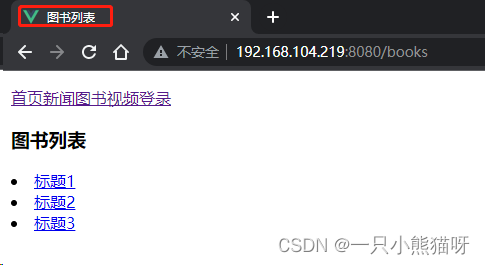
运行项目,此时每个页面有自己的标题。如下:
meta 字段也可以用于对有限资源的保护,在需要保护的路由对象中添加一个需要验证属性,然后在全局前置守卫中判断,如果访问的是受保护的资源,继续判断用户是否已经登录,如果没有,则跳转到登录页面。如下:
{
  path: '/videos',
  name: 'videos',
  component: Videos,
  meta: {
    title: '视频',
    requiresAuth:true
  }
}
在全局前置守卫中进行判断(index.js)。如下:
import { createRouter, createWebHistory } from 'vue-router'
//import Home from '@/components/Home'
import News from '@/components/News'
import Books from '@/components/Books'
import Videos from '@/components/Videos'
import Book from '@/components/Book'
import Login from '@/components/Login'

const router = createRouter({
  //history: createWebHashHistory(),
  history: createWebHistory(),
  routes: [
    {
      path: '/',
      redirect: {
        name: 'news'
      }
    },
    {
      path: '/news',
      name: 'news',
      component: News,
      meta: {
        title: '新闻'
      }

    },
    {
      path: '/books',
      name: 'books',
      component: Books,
      meta: {
        title: '图书列表'
      }
      /*
      children: [
        {path: '/book/:id', name: 'book', component: Book, props: true}
      ]*/
    },
    {
      path: '/videos',
      name: 'videos',
      component: Videos,
      meta: {
        title: '视频',
        requiresAuth: true
      }
    },
    {
      path: '/book/:id',
      name: 'book',
      meta: {
        title: '图书'
      },
      components: { bookDetail: Book },
    },
    {
      path: '/login',
      name: 'login',
      component: Login,
      meta: {
        title: '登录'
      }
    }
  ]
})

router.beforeEach(to => {
  // 判断该路由是否需要登录权限
  if (to.matched.some(record => record.meta.requiresAuth)) {
    // 路由需要验证,判断用户是否已经登录
    if (sessionStorage.isAuth === "true") {
      return true;
    } else {
      return {
        path: '/login',
        query: { redirect: to.fullPath }
      }
    }
  } else {
    return true
  }
})

router.afterEach(to => {
  document.title = to.meta.title;
})

export default router
路由位置对象的 matched 属性是一个数组,包含了当前路由的所有嵌套路径片段的路由记录。
重启项目,此时访问首页没问题,如下:

但是访问视频则需要登录,如下:
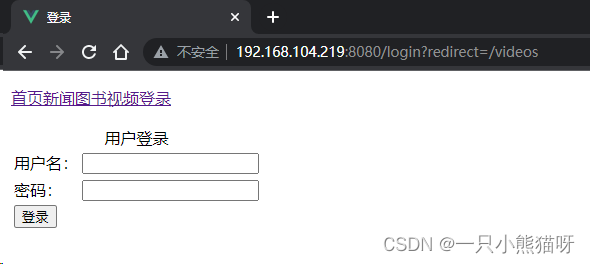
登录之后,显示如下:

14.10.2 路由独享的守卫
路由独享的守卫是在路由的配置对象中直接定义的 beforeEnter 守卫。代码如下所示:
const routes = [
  {
    path:'/users/:id',
    component:UserDetails,
    beforeEnter:( to,from ) => {
      // reject the navigation
      return false;
    }
  }
]
beforeEnter 守卫在全局前置守卫调用后,只在进入路由时触发,他们不会再参数、查询参数或 hash 发生变化时触发。
例如,从 /user/2 到 /user/3 ,或者从 /user/2#info 到 /user/2#project ,均不会触发 beforeEnter 守卫。beforeEnter 守卫只有在从不同的路由导航过来时才会触发。
也可以给 beforeEnter 传递一个函数数组,这在为不同的路由复用守卫时很有用。代码如下:
function removeQueryParams(to){
  if (Object.key(to.query).length) {
    return {
      path:to.path,
      query:{},
      hash:to.hash
    }
  }
}
function removeHash (to){
  if(to.hash) {
    return {
      path:to.path,
      query:to.query,
      hash:''
    }
  }
}
const routes = [
  {
    path:'/users/:id',
    component:UserDetails,
    beforeEnter:[removeQueryParams,removeHash]
  },
  {
    path:'/about',
    component:UserDetails,
    beforeEnter:[removeQueryParams]
  }
]
14.10.3 组件内守卫
在 14.4 节 中使用的 beforeRouteUpdate 守卫就是组件内守卫。除此之外,还有两个组件内守卫:beforeRouteEnter 和 beforeRouteLeave。
const UserDetails = {
  template : '...',
  beforeRouteEnter(to,from){
    // 在渲染该组件的路由被确认之前调用
    // 不能通过 this 访问组件实例,因为在守卫执行前,组件实例还没有被创建
  },
  beforeRouteUpdate(to,from){
    // 在渲染该组件的路由,但是在该组件被复用时调用
    // 例如,对于一个带参数的路由 /users/:id,在 /user/1 和 /user/2 之间跳转时
    // 相同的 UserDetails 组件实例将会被复用,而这个守卫就会在这种情况下被调用
    // 可以访问组件实例的 this
  }
  beforeRouteLeave(to,from){
  	// 导航即将离开该组件的路由时调用
  	// 可以访问组件实例的 this
  }
}
beforeRouteEnter 守卫不能访问 this,因为该守卫是在导航确认钱被调用,这是新进入的组件基本还没有创建。
但是,可以通过向可选的 next() 函数参数传递一个回调来访问实例,组件实例将作为参数传递给回调。当导航确认后会执行回调,而这个时候,组件实例已经创建完成。如下:
beforeRouteEnter(to,from,next){
  next(vm => {
    // 通过 vm 访问组件实例
  })
}
需要注意的是,beforeRouteEnter 是唯一支持将回调传递给 next() 函数的导航守卫。对于 beforeRouteUpdate 和 beforeRouteLeave ,由于this 已经可用,因此不需要传递回调,自然也就没必要支持想 next() 函数传递回调了。
下面利用 beforeRouteEnter 的这个机制,修改 Book.vue ,将 created 钩子用 beforeRouteEnter 守卫替换。如下:
Book.vue
<template>
    <p> 图书ID:{{ book.id }} </p>
    <p> 标题:{{ book.title }} </p>
    <p> 描述:{{ book.desc }} </p>
</template>

<script>
import Books from '@/assets/books'
import { onBeforeRouteUpdate } from 'vue-router';
export default {
    data() {
        return {
            book: {}
        }
    },
    // created() {
    //     this.book = Books.find((item) => item.id == this.$route.params.id);
    //     this.$watch(
    //         () => this.$route.params,
    //         (toParams) => {
    //             console.log(toParams)
    //             this.book = Books.find((item) => item.id == toParams.id);
    //         }
    //     )
    // }
    methods:{
        setBook(book){
            this.book = book;
        }
    },
    beforeRouteEnter (to,from,next){
        let book = Books.find((item) => item.id == to.params.id);
        next (vm => vm.setBook(book));
    },
    beforeRouteUpdate(to){
        this.book = null;
        this.book = Books.find((item) => item.id == to.params.id)
    }
}
</script>
beforeRouteLeave 守卫通常用来防止用户在还未保存修改前突然离开,可以通过返回 false 取消导航。如下:
beforeRouteLeave (to,from){
  const answer = window.confirm('Do you really want to leave ? you have unsaved changes!');
  if(!answer){
    return false;
  }
}
14.10.4 导航解析流程
完整的导航解析流程如下:
- 导航被触发
- 在失活的组件中调用 beforeRouteLeave 守卫
- 调用全局的 beforeEach 守卫
- 在复用的组件中调用 beforeRouteUpdate 守卫
- 调用路由配置中的 beforeEnter 守卫
- 解析异步路由组件
- 在被激活的组件中调用 beforeRouteEnter 守卫
- 调用全局的 beforeResolve 守卫
- 导航被确认
- 调用全局的 afterEach 钩子
- 触发 DOM 更新
- 用创建好的实例调用 beforeRouteEnter 守卫传给 next() 函数的回调函数
可以在 14.1.1 小节中的 routes.html 页面添加所有的导航守卫,利用 console.log() 语句输出守卫信息,然后观察一下各个守卫调用的顺序,就能更好的理解守卫调用的时机。


