treeshaking
treeshaking本质是去除多余代码算法。在前端的性能优化中,es6 推出了tree shaking机制,tree shaking就是当我们在项目中引入其他模块时,他会自动将我们用不到的代码,或者永远不会执行的代码摇掉,在Uglify阶段查出,不打包到bundle中。
学习treeshaking的目的也是是为了后面学习rollup打包原理做铺垫。在 rollup 中,一个文件就是一个模块。每一个模块都会根据文件的代码生成一个 AST 语法抽象树,rollup 需要对每一个 AST 节点进行分析。分析 AST 节点,就是看看这个节点有没有调用函数或方法。如果有,就查看所调用的函数或方法是否在当前作用域,如果不在就往上找,直到找到模块顶级作用域为止。如果本模块都没找到,说明这个函数、方法依赖于其他模块,需要从其他模块引入。rollup只处理函数和顶层的import/export变量。
0前置知识-安装相关依赖
安装webpack
npm install webpack webpack-cli --save-dev
初始化项目
npm init -y
查看webpack打包后的内容
npx webpack ./test1.js
安装nodemon
nodemon 一个辅助node.js开发的工具,当目录中的文件更改时,会自动重启node应用程序
npm i nodemon -g
测试代码命令:nodemon ./index.js
参数:watch
安装acorn
npm i acorn -d -s
const acorn = require('acorn');acorn的默认用法非常简单,直接来段代码字符串parse一下就出来AST结构了:
let acorn = require("acorn");

console.log(acorn.parse("for(let i=0;i<10;i+=1){console.log(i);}", {ecmaVersion: 2020}));
解析后的AST语法树
Node {
  type: 'Program',
  start: 0,
  end: 39,
  body: [
    Node {
      type: 'ForStatement',
      start: 0,
      end: 39,
      init: [Node],
      test: [Node],
      update: [Node],
      body: [Node]
    }
  ],
  sourceType: 'script'
}
可以看到这个 AST 的类型为 program,表明这是一个程序。body 则包含了这个程序下面所有语句对应的 AST 子节点。每个节点都有一个 type 类型,例如 Identifier,说明这个节点是一个标识符;
安装magic-string
magic-string是一个操作字符串和生成source-map的工具。magic-string 是 rollup 作者写的一个关于字符串操作的库。
安装命令:
npm i magic-string -D -S
下面是 github 上的示例:
var MagicString = require('magic-string');
var magicString = new MagicString('export var name = "beijing"');
//类似于截取字符串
console.log(magicString.snip(0,6).toString()); // export
//从开始到结束删除字符串(索引永远是基于原始的字符串,而非改变后的)
console.log(magicString.remove(0,7).toString()); // var name = "beijing"

//很多模块,把它们打包在一个文件里,需要把很多文件的源代码合并在一起
let bundleString = new MagicString.Bundle();
bundleString.addSource({
    content:'var a = 1;',
    separator:'\n'
});
bundleString.addSource({
    content:'var b = 2;',
    separator:'\n'
});
/* let str = '';
str += 'var a = 1;\n'
str += 'var b = 2;\n'
console.log(str); */
console.log(bundleString.toString());
// var a = 1;
//var b = 2;
其中引入方法
const MagicString = require('magic-string');magic-string的好处是会生成sourcemap
一、初识AST语法解析
抽象语法树(Abstract Syntax Tree,AST),或简称语法树(Syntax tree),是源代码语法结构的一种抽象表示。它以树状的形式表现编程语言的语法结构,树上的每个节点都表示源代码中的一种结构。通过操纵这颗树,我们可以精准的定位到声明语句、赋值语句、运算语句等等,实现对代码的分析、优化、变更等操作。
你可以简单理解为 它就是你所写代码的的树状结构化表现形式。webpack、UglifyJs、lint等工具的核心都是通过ast抽象语法书实现的,实现对代码的检查、分析。底层是调用的js parser 来生成抽象语法树。
AST工作流
- Parse(解析) 将源代码转换成抽象语法树,树上有很多的estree节点
- Transform(转换) 对抽象语法树进行转换
- Generate(代码生成) 将上一步经过转换过的抽象语法树生成新的代码

新建文件source.js
const a = ()=>'a888888'
const b = ()=>'b'
a()
在AST生成树网站预览结果
AST explorer
可以根据AST生成的数据逐层分析出变量信息
{
  "type": "Program",
  "start": 0,
  "end": 46,
  "body": [
    {
      "type": "VariableDeclaration",
      "start": 0,
      "end": 23,
      "declarations": [
        {
          "type": "VariableDeclarator",
          "start": 6,
          "end": 23,
          "id": {
            "type": "Identifier",
            "start": 6,
            "end": 7,
            "name": "a"
          },
          "init": {
            "type": "ArrowFunctionExpression",
            "start": 10,
            "end": 23,
            "id": null,
            "expression": true,
            "generator": false,
            "async": false,
            "params": [],
            "body": {
              "type": "Literal",
              "start": 14,
              "end": 23,
              "value": "a888888",
              "raw": "'a888888'"
            }
          }
        }
      ],
      "kind": "const"
    },
    {
      "type": "VariableDeclaration",
      "start": 24,
      "end": 41,
      "declarations": [
        {
          "type": "VariableDeclarator",
          "start": 30,
          "end": 41,
          "id": {
            "type": "Identifier",
            "start": 30,
            "end": 31,
            "name": "b"
          },
          "init": {
            "type": "ArrowFunctionExpression",
            "start": 34,
            "end": 41,
            "id": null,
            "expression": true,
            "generator": false,
            "async": false,
            "params": [],
            "body": {
              "type": "Literal",
              "start": 38,
              "end": 41,
              "value": "b",
              "raw": "'b'"
            }
          }
        }
      ],
      "kind": "const"
    },
    {
      "type": "ExpressionStatement",
      "start": 42,
      "end": 45,
      "expression": {
        "type": "CallExpression",
        "start": 42,
        "end": 45,
        "callee": {
          "type": "Identifier",
          "start": 42,
          "end": 43,
          "name": "a"
        },
        "arguments": [],
        "optional": false
      }
    }
  ],
  "sourceType": "module"
}
可以看到上面的拆解中,每一个块都有 type、start、end、body 这几个字段。其中 type 表达当前块的类型。比如 FunctionDeclaration 表示函数定义,Identifier 表示标识符、BlockStatement 表示块语句、ReturnStatement 表示返回语句等。start 表示该块开始的位置,end 表示该块结束的位置,body 表示子块。其他的字段根据块的性质不同有所不同。
新增index.js文件
//文件形式读取source.js
//fs模块  node.js中文件处理工具
const fs = require('fs');//引入
//读文件 readFileSync方法是同步读取文件,第一个参数表示文件路径,第二个参数表示读文件的编码方式(可省略)
const code = fs.readFileSync('./source.js').toString();
console.log('-------------source code----------------')
console.log(code);

//acorn 一个将代码解析为AST语法树的工具
const acorn = require('acorn');
const ast = acorn.parse(code,{ecmaVersion:'7'});//指定解析的js ECMAScript版本
console.log('--------------parsed as AST-------------')
ast.body.map(node=>{
    console.log(node)
})

//MagicString 一个处理字符串的工具
const MagicString = require('magic-string');
const m = new MagicString(code);
console.log('--------------output node-------------')
console.log('index  info')
ast.body.map((node,index)=>{
    console.log(index+'     ',m.snip(node.start,node.end).toString())//打印每个节点的信息
})


//分离声明和调用类型
const VariableDeclaration = []
const ExpressionStatement =[]
//对象当做map用 key是变量名,value是变量对应的节点
const VariableObj ={}
//statement数组 存放变量的声明和使用
const statementArr = []
ast.body.map(node=>{
    if(node.type == 'VariableDeclaration') {
        VariableDeclaration.push(node);//声明节点数组
        //取声明数组的变量名key和节点value
        const key = node.declarations[0].id.name
        VariableObj[key] = node
    } else if (node.type == 'ExpressionStatement') {
        //对于引用的数组
        ExpressionStatement.push(node);//引用节点数组
    }
})
//取变量名
console.log('---------variableDeclaration name--------------')
VariableDeclaration.map(node=>{
    console.log(node.declarations[0].id.name)

})

console.log('----------expressionStatement --------------')
ExpressionStatement.map(node=>{
    // console.log(node.expression.callee.name)
    console.log(node)
})

ExpressionStatement.map(node=>{
    statementArr.push(VariableObj[node.expression.callee.name])//把表达式中使用的变量名的定义语句push到数组中
    statementArr.push(node)//将表达式也push到数组中,未在表达式中调用的变量将不会遍历其VariableObj数组,也即过滤掉
})
console.log('------------treeshaking result----------')
// console.log(statementArr)
statementArr.map((node,index)=>{
    console.log(index,m.snip(node.start,node.end).toString())
})
执行语句nodemon ./index.js
输出
-------------source code----------------
const a = ()=>'a888888'
const b = ()=>'b'
a()

--------------parsed as AST-------------
Node {
  type: 'VariableDeclaration',
  start: 0,
  end: 23,
  declarations: [
    Node {
      type: 'VariableDeclarator',
      start: 6,
      end: 23,
      id: [Node],
      init: [Node]
    }
  ],
  kind: 'const'
}
Node {
  type: 'VariableDeclaration',
  start: 25,
  end: 42,
  declarations: [
    Node {
      type: 'VariableDeclarator',
      start: 31,
      end: 42,
      id: [Node],
      init: [Node]
    }
  ],
  kind: 'const'
}
Node {
  type: 'ExpressionStatement',
  start: 44,
  end: 47,
  expression: Node {
    type: 'CallExpression',
    start: 44,
    end: 47,
    callee: Node { type: 'Identifier', start: 44, end: 45, name: 'a' },
    arguments: []
  }
}
--------------output node-------------
index  info
0      const a = ()=>'a888888'
1      const b = ()=>'b'
2      a()
---------variableDeclaration name--------------
a
b
----------expressionStatement --------------
Node {
  type: 'ExpressionStatement',
  start: 44,
  end: 47,
  expression: Node {
    type: 'CallExpression',
    start: 44,
    end: 47,
    callee: Node { type: 'Identifier', start: 44, end: 45, name: 'a' },
    arguments: []
  }
}
------------treeshaking result----------
0 const a = ()=>'a888888'
1 a()
二、treeShaking节点遍历方法
采用TDD测试驱动开发方式
新增walk.js函数
首先,测试一下进入与退出函数
const walk = (ast, callObj)=>{
    callObj.enter(ast)
    callObj.leave(ast)
}
module.exports = walk
编写walk.spec.js函数
测试ast是对象的情况
//walk.spec.js
//测试walk函数
describe('walk函数',()=>{
    test('单个节点',()=>{
        const ast = {
            a:1,
            // child:[{b:2}]
        }
        const walk = require('../walk')
        const mockEnter = jest.fn()//fn方法是jest工厂方法
        const mockLeave = jest.fn()
        //walk函数遍历ast对象,对于单个节点,进入时调用enter函数,退出时调用leave函数
        walk(ast,{
            enter:mockEnter,
            leave:mockLeave
        })
        //判断mockEnter是否被调用
        let calls = mockEnter.mock.calls //calls是数组,每调用一次增加一项
        expect(calls.length).toBe(1)//断言,ast={a:1}
        expect(calls[0][0]).toEqual({a:1})

        calls = mockLeave.mock.calls //在对leave是否调用进行判断
        expect(calls.length).toBe(1)//断言,ast={a:1}
        expect(calls[0][0]).toEqual({a:1})
    })
})
测试

由测试结果可以看出walk函数可以对{a:1}进行测试
使用--watchAll实时监听jest
jest --watchAll实现打印所有变量的变量名
实现过程:调用walk节点变量方法,自定义walk中的入参enter函数:根据node中ast语法树变量名type属性为VariableDeclaration取出所有的变量

新建test.js
//文件形式读取source.js
//fs模块  node.js中文件处理工具
const fs = require('fs');//引入
//读文件 readFileSync方法是同步读取文件,第一个参数表示文件路径,第二个参数表示读文件的编码方式(可省略)
const code = fs.readFileSync('./source.js').toString();
console.log('-------------source code----------------')
console.log(code);

//引入walk函数
const walk = require('./src/walk')
//acorn 一个将代码解析为AST语法树的工具
const acorn = require('acorn');
const ast = acorn.parse(code,{ecmaVersion:'7'});//指定解析的js ECMAScript版本
console.log('--------------walk ast-------------')
ast.body.map(node=>{
    walk(node,{
        enter:(node)=>{
            // console.log('enter---------------lalala')
            if(node && typeof node === 'object') {
                if(node.type === 'VariableDeclaration'){
                    console.log(node.declarations[0].id.name)
                    // console.log(JSON.stringify(node.declarations[0].id.name,'\t','\t'))
                }
            }
        },
        leave:(node) =>{
            // console.log('leave----------------lalala')
        }
    })
})
ast.body才是节点,打印结果如下

提升:找出任意层级的变量名
示例:
输入
const a,b =1
if(true) {
const c ='123'
}
function fn1() {
const d =1
}
const e =3
-----------------------------------
输出
a
b
c
fn1 =>d
e
-------------------------------------
新增source2.js
存放原程序
const a=2
const b =1
if(true) {
const c ='123'
}
function fn1() {
const d =1
}
新增test.js
//test.js
//文件形式读取source2.js
//fs模块  node.js中文件处理工具
const fs = require('fs');//引入
//读文件 readFileSync方法是同步读取文件,第一个参数表示文件路径,第二个参数表示读文件的编码方式(可省略)
const code = fs.readFileSync('./source2.js').toString();
console.log('-------------source code----------------')
console.log(code);

//引入walk函数
const walk = require('./src/walk')
//acorn 一个将代码解析为AST语法树的工具
const acorn = require('acorn');
const ast = acorn.parse(code,{ecmaVersion:'7'});//指定解析的js ECMAScript版本
console.log('--------------walk ast-------------')
const statements = []
const parseAST = (ast)=>{
    ast.body.map(node=>{
        // console.log(node)
        walk(node,{
            enter:(node)=>{
                if(node.type === 'VariableDeclaration'){
                    console.log(node.declarations[0].id.name)
                }
                //是个函数
                if(node.type === 'FunctionDeclaration'){
                    console.log('=>'+node.id.name)
                }
            },
            leave:(node) =>{

            }
        })
    })

}
parseAST(ast)
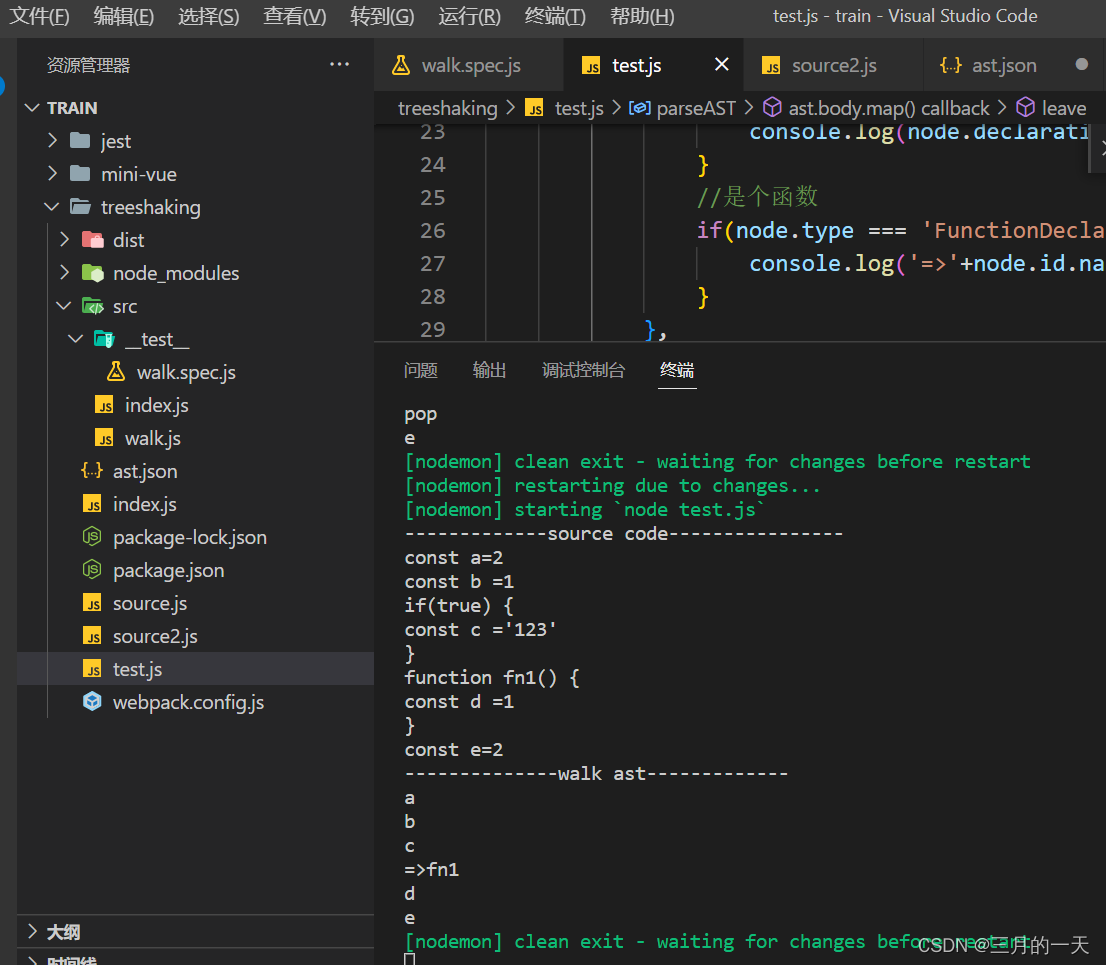
测试结果
nodemon test.js
三、作用域模拟
新建一个scope作用域实现类似于下面的结果
const a = '1'
function(){
    const b = 2
}
新增src/scope.js文件
module.exports = class Scope{
    //定义构造方法
    constructor(option){
        //初始化names
        this.names=[]
        if(option){
            this.parent = option.parent
        }
    }
    //新增方法,每次添加一个变量名到作用域中
    add(name){
        this.names.push(name)
    }
    //判断对象中是否包含某个变量名,谁调用,this指向谁
    contains(name){
        return this.names.includes(name) || this.parent && this.parent.contains(name)
    }
    findDefiningScope(name){
        //如果调用方的names中包含name,返回调用方本身,否则沿着调用方的作用域链逐层向上寻找
        if(this.names.includes(name)){
            return this
        } else if(this.parent){//如果存在父作用域,递归寻找父作用域中是否含有该方法
            return this.parent.findDefiningScope(name)
        } else {
            return null
        }
    }
}
升级contains(name)方法
findDefiningScope方法可以获取调用对象,如果找到一个对象即该对象包含name属性
module.exports = class Scope{
    //定义构造方法
    constructor(option){
        //初始化names
        this.names=[]
        if(option){
            this.parent = option.parent
        }
    }
    //新增方法,每次添加一个变量名到作用域中
    add(name){
        this.names.push(name)
    }
    //判断对象中是否包含某个变量名,谁调用,this指向谁
    contains(name){
        // return this.names.includes(name) || this.parent && this.parent.contains(name)
        //等价与下面  其中!!表示取字符串的布尔类型表示
        return !! this.findDefiningScope(name)
    }
    //返回实际的作用域对象
    findDefiningScope(name){
        //如果调用方的names中包含name,返回调用方本身,否则沿着调用方的作用域链逐层向上寻找
        if(this.names.includes(name)){
            return this
        } else if(this.parent){//如果存在父作用域,递归寻找父作用域中是否含有该方法
            return this.parent.findDefiningScope(name)
        } else {
            return null
        }
    }
}
新增src/__test__/scope.spec.js文件
describe('scope',()=>{
    test('scope',()=>{
        const Scope = require('../scope')
        //实例化Scope,命名为route
        const root = new Scope()
        root.add('a')
        //定义一个child子作用域,嵌套在Parent父作用域
        const child = new Scope({'parent':root})
        child.add('b')

        //编写断言
        expect(child.findDefiningScope('a')).toBe(root)//'child中是否有a',a在父作用域链上,按作用域规则可以找到
        expect(child.contains('a')).toEqual(true)//toEqual比较每项每个的值

        expect(child.findDefiningScope('b')).toBe(child)//toBe比较的是地址
        expect(child.contains('b')).toBe(true)

        // expect(child.findDefiningScope('c')).toBe(null)
        // expect(child.contains('c')).toEqual(false)
    })
})
增加三级作用域,测试
describe('scope',()=>{
    test('scope',()=>{
        const Scope = require('../scope')
        //实例化Scope,命名为route
        const root = new Scope()
        root.add('a')
        //定义一个child子作用域,嵌套在Parent父作用域
        const child = new Scope({'parent':root})
        child.add('b')
        //定义一个三级作用域,孙子节点
        const childChild = new Scope({'parent':child})
        childChild.add('c')

        //编写断言
        expect(child.findDefiningScope('a')).toBe(root)//'child中是否有a',a在父作用域链上,按作用域规则可以找到
        expect(child.contains('a')).toEqual(true)//toEqual比较每项每个的值

        expect(child.findDefiningScope('b')).toBe(child)//toBe比较的是地址
        expect(child.contains('b')).toBe(true)

        expect(child.findDefiningScope('c')).toBe(null)
        expect(child.contains('c')).toEqual(false)

        expect(childChild.findDefiningScope('b')).toBe(child)
        expect(childChild.contains('b')).toEqual(true)
    })
})
四、整合节点遍历和作用域函数
新建analyze.js文件
//analyze.js
//输入是一个ast 输出是已经分析好的scope
const acorn = require('acorn')
const fs = require('fs')
const { node } = require('webpack')
const {walk} = require('../walk')
const code = fs.readFileSync('../source.js').toString()
const ast = acorn.parse(code,{ecmaVersion:7})
const Scope = require('./scope')

module.exports = function analyze(ast) {
    const root = new Scope()
    ast.body.map(node=>{
        walk(node,{
            enter:(node)=>{
                if(node.type === 'Identifier'){
                    root.add(node.name)
                    // console.log(node.Identifier.name)
                }
                //是个函数 如果存在函数,函数在子作用域里
                if(node.type === 'FunctionDeclaration'){
                    // console.log('=>'+node.id.name)
                }
            },
            leave:(node) =>{

            }
        })
    })
    return new Scope()
}
新增analyze.spec.js文件
describe('analyze',()=>{
    test('analyze 1',()=>{
        const analyze = require('../analyze')
        //测试ast到scope
        const acorn = require('acorn')
        const fs = require('fs')
        const {walk} = require('../walk')
        const code = `
const a =1`
        const ast = acorn.parse(code,{ecmaVersion:7})
        const root = analyze(ast)
        expect(root.findDefiningScope('a')).toBe(root)
        expect(root.contains('a')).toEqual(true)

    })
})


