目录
一、图的基本概念
二、图的存储结构
1、邻接矩阵
2、邻接表
三、图的遍历
1、DFS
2、BFS
四、最小生成树
1、Kruskal算法
2、Prim算法
五、最短路径问题
1、Dijkstra
2、Bellman-Ford
3、Floyd-Warshall
总结
一、图的基本概念

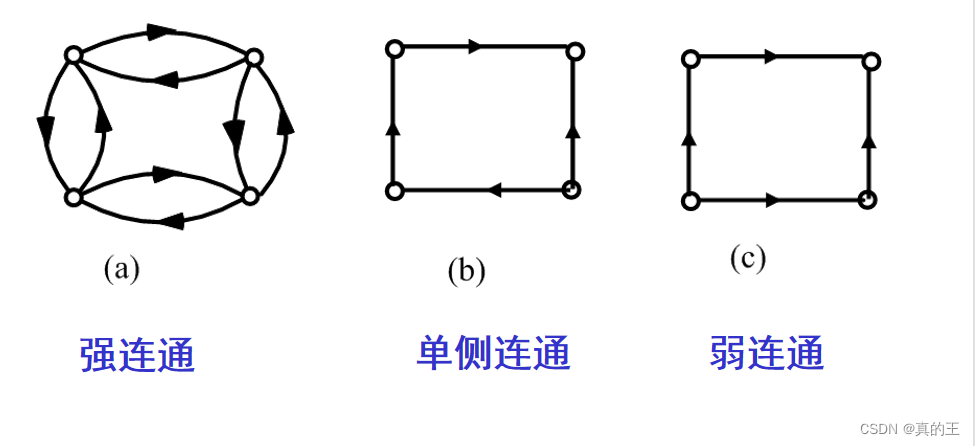
二、图的存储结构
图的存储结构主要分为两种
1、邻接矩阵
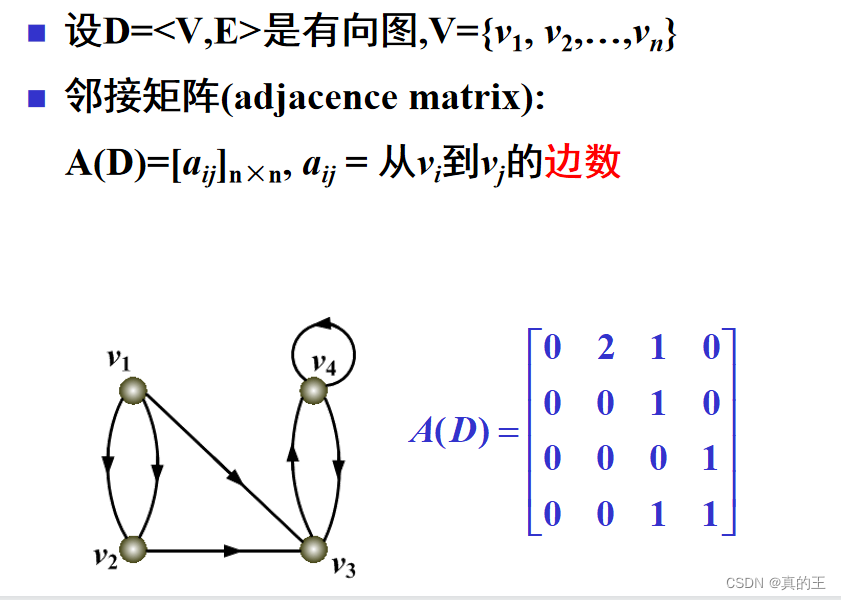
一般邻接矩阵的行和列的下标都是代表顶点
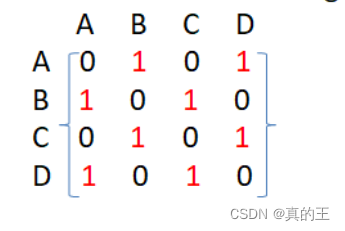
邻接矩阵能够O(1)判断两个顶点的连接关系,并且取得权值
邻接矩阵存储方式非常适合存储稠密图
相对而言它并不适合查找与该点相连的所有顶点,时间复杂度O(N),(它要遍历该顶点所在的行)
namespace matrix
{
    template <class V, class W, W MAX_W = INT_MAX, bool Direction = false>
    class Graph
    {

    public:
        Graph(const V *vertexs, size_t n)
        {
            _vertexs.reserve(n);
            for (size_t i = 0; i < n; i++)
            {
                _vertexs.emplace_back(vertexs[i]);
                _v2index[vertexs[i]] = i;
            }

            _matrix.resize(n);
            for (size_t i = 0; i < n; i++)
            {
                _matrix[i].resize(n, MAX_W);
            }
        }

        void AddEdge(const V &src, const V &dst, const W &w)
        {
            size_t srci = GetVertexIndex(src);
            size_t dsti = GetVertexIndex(dst);

            _AddEdge(srci, dsti, w);
        }

        void Print()
        {
            // 顶点
            for (size_t i = 0; i < _vertexs.size(); ++i)
            {
                std::cout << "[" << i << "]"
                          << "->" << _vertexs[i] << std::endl;
            }
            std::cout << std::endl;

            // 矩阵
            // 横下标
            std::cout << "  ";
            for (size_t i = 0; i < _vertexs.size(); ++i)
            {
                printf("%4d", i);
            }
            std::cout << std::endl;

            for (size_t i = 0; i < _matrix.size(); ++i)
            {
                std::cout << i << " "; // 竖下标
                for (size_t j = 0; j < _matrix[i].size(); ++j)
                {
                    if (_matrix[i][j] == MAX_W)
                    {
                        printf("%4c", '*');
                    }
                    else
                    {
                        printf("%4d", _matrix[i][j]);
                    }
                }
                std::cout << std::endl;
            }
            std::cout << std::endl;
        }

    private:
        size_t GetVertexIndex(const V &v)
        {
            auto pos = _v2index.find(v);
            if (pos != _v2index.end())
            {
                return pos->second;
            }
            else
            {
                throw "顶点不存在,无法转换为下标";
                return -1;
            }
        }

        void _AddEdge(size_t srci, size_t dsti, const W &w)
        {
            _matrix[srci][dsti] = w;
            if (distance == false)
            {
                _matrix[dsti][srci] = w;
            }
        }


    private:
        std::vector<V> _vertexs;             //点集
        std::unordered_map<V, int> _v2index; //点与下标映射关系
        std::vector<std::vector<W>> _matrix; //邻接矩阵
    };
这里图的模板参数
template <class V, class W, W MAX_W = INT_MAX, bool Direction = false>分别指:V是顶点的类型,W是权值的类型,MAX_W是初始化的权值,设定为最大,代表两点之间没有相连,Direction是否为有向图
我们观察无向图的邻接矩阵会发现,无向图邻接矩阵是关于主对角线对称的,所以在添加边时就需要将它的对称点也加上边
   void test_Graph()
    {
        Graph<char, int, INT_MAX, true> g("0123", 4);
        g.AddEdge('0', '1', 1);
        g.AddEdge('0', '3', 4);
        g.AddEdge('1', '3', 2);
        g.AddEdge('1', '2', 9);
        g.AddEdge('2', '3', 8);
        g.AddEdge('2', '1', 5);
        g.AddEdge('2', '0', 3);
        g.AddEdge('3', '2', 6);

        g.Print();
    }
2、邻接表
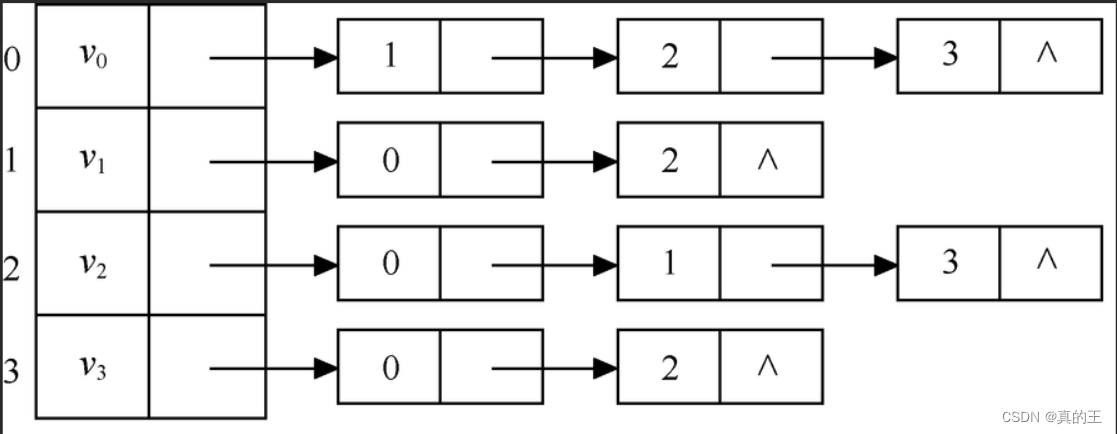
邻接表类似于哈希桶,邻接表它有入度表和出度表,分别用来存储指向该点的顶点和从该顶点出发的顶点
它比较适合存储稀疏图,查找一个顶点连接出去的边
不适合确定两个顶点是否相连以及权值
邻接表的各个接口类似于邻接矩阵,实现方法也类似
namespace link_table
{
    template <class W>
    struct Edge
    {
        size_t dsti; //出点
        W _w;        //权值

        Edge *_next;

        Edge(size_t dsti, const W &w)
            : _dsti(dsti), _w(w)
        {
        }
    };

    template <class V, class W, W MAX_W = INT_MAX, bool Direction = false>
    class Graph
    {
        typedef Edge<W> Edge;

    public:
        Graph(const V *vertexs, size_t n)
        {
            _vertexs.reserve(n);
            for (size_t i = 0; i < n; i++)
            {
                _vertexs.emplace_back(vertexs[i]);
                _v2index[vertexs[i]] = i;
            }

            _tables.resize(n, nullptr);
        }

        size_t GetVertexIndex(const V &v)
        {
            auto pos = _v2index.find(v);
            if (pos != _v2index.end())
            {
                return pos->second;
            }
            else
            {
                throw "顶点不存在,无法转换为下标";
                return -1;
            }
        }

        void AddEdge(const V &src, const V &dst, const W &w)
        {
            size_t srci = GetVertexIndex(src);
            size_t dsti = GetVertexIndex(dst);

            Edge *edgeS = new Edge(w);
            edgeS->_next = _tables[srci];
            _tables[srci] = edgeS;

            if (Direction == false)
            {
                Edge *edgeD = new Edge(w);
                edgeD->_next = _tables[dsti];
                _tables[dsti] = edgeD;
            }
        }

        void Print()
        {
            // 顶点
            for (size_t i = 0; i < _vertexs.size(); ++i)
            {
                cout << "[" << i << "]"
                     << "->" << _vertexs[i] << endl;
            }
            cout << endl;

            for (size_t i = 0; i < _tables.size(); ++i)
            {
                cout << _vertexs[i] << "[" << i << "]->";
                Edge *cur = _tables[i];
                while (cur)
                {
                    cout << "[" << _vertexs[cur->_dsti] << ":" << cur->_dsti << ":" << cur->_w << "]->";
                    cur = cur->_next;
                }
                cout << "nullptr" << endl;
            }
        }

    private:
        std::vector<V> _vertexs;             //顶点集合
        std::unordered_map<V, int> _v2index; //顶点与下标的关系
        std::vector<Edge *> _tables;
    };
}
三、图的遍历
图的遍历主要分为两种,深度优先遍历(DFS),广度优先遍历(BFS)
1、DFS
深度优先遍历,就好像一个人做事情,不撞到南墙不回头,它是不断的向深处遍历,直到不能够继续遍历下去就会返回,二叉树的前序遍历就是典型的DFS
再比如现在要找东西,假设有三个抽屉,东西在哪个抽屉不清楚,现在要将他们找到,深度优先遍历的做法是:将一个抽屉一次性全部遍历完,再去递归遍历其它盒子
对应到图来说就是寻找与某个点相连的路径
        void DFS(const V &src)
        {
            size_t srci = GetVertexIndex(src);

            std::vector<bool> visted(_vertexs.size(), false);
            _DFS(srci, visted);
        }

        void _DFS(size_t srci, std::vector<bool> &visted)
        {
            std::cout << srci << " : " << _vertexs[srci] << std::endl;
            visted[srci] = true;

            for (size_t i = 0; i < _vertexs.size(); i++)
            {
                if (_matrix[srci][i] == MAX_W || visted[i] == true)
                {
                    continue;
                }
                _DFS(i, visted);
            }
        }
    void test_DFS()
    {
        Graph<char, int, INT_MAX, true> g("0123", 4);
        g.AddEdge('0', '1', 1);
        g.AddEdge('0', '3', 4);
        g.AddEdge('1', '3', 2);
        g.AddEdge('1', '2', 9);
        g.AddEdge('2', '3', 8);
        g.AddEdge('2', '1', 5);
        g.AddEdge('2', '0', 3);
        g.AddEdge('3', '2', 6);

        g.Print();

        g.DFS('1');
    }
2、BFS
还是以找东西为例
假设有三个抽屉,东西在哪个抽屉不清楚,现在要将他们找到,广度优先遍历的做法是:
1、先将三个抽屉打开,在最外层找一遍
2、将每一个抽屉中红色的盒子打开,再找一遍
3、将红色盒子中的绿色盒子打开,再找一遍
直到找完所有的盒子,注意:每一个盒子只能找一次,不能重复找
广度优先遍历一般是借助于队列来实现
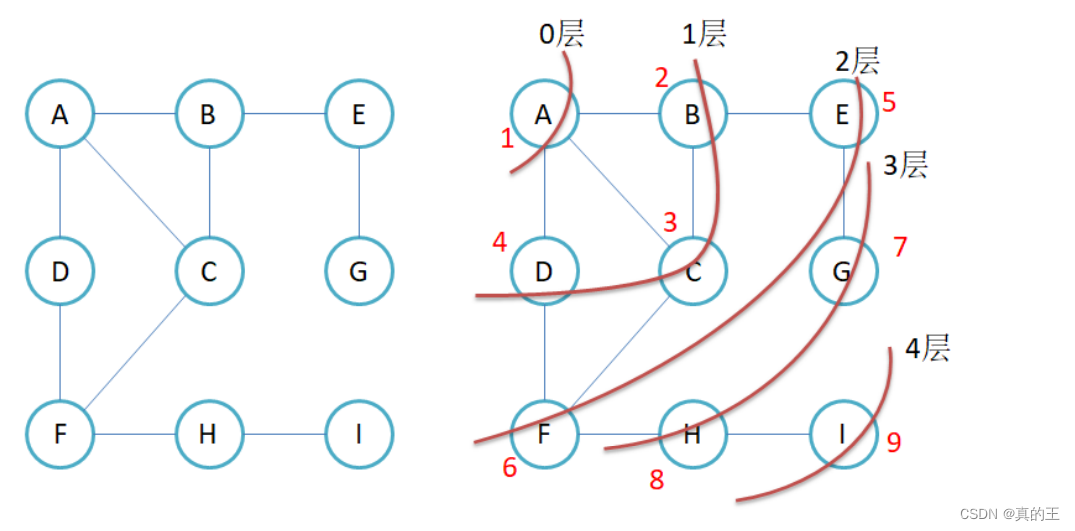
它是以某一点为起点,向它的周围搜索
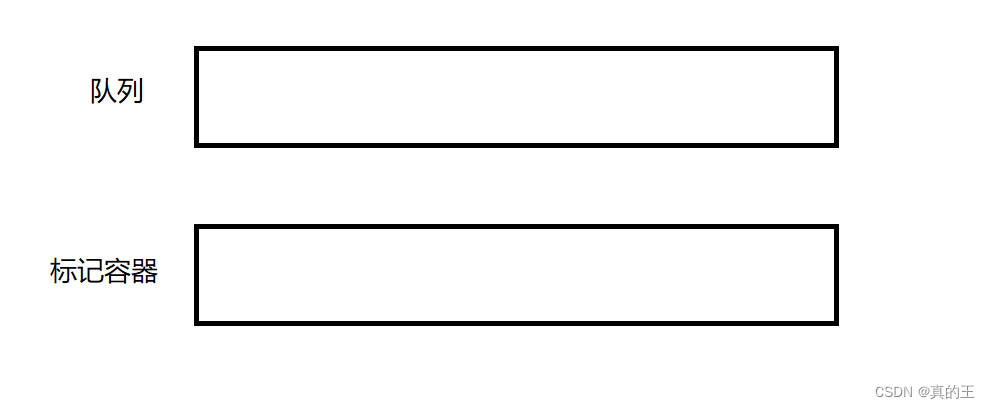
标记容器会标记重复搜索过的顶点
在入队列时就标记一下,这样就可以防止像A出去的时候入的BCD
像B出的时候入的ACE,那么入队列时AC就不会重复进入队列了
但是这种思路是有一点问题的
如果给的图不是强连通图呢? 它有若干连通分支怎么办?
答案很简单,在一个连通分支中,BFS一定会遍历该连通分支所有的顶点,标记容器中剩下的没有被标记的就是其余连通分支的顶点,再次重复上述过程,不停遍历,直到标记容器中所有元素都被标记
        void BFS(const V &src)
        {
            size_t srci = GetVertexIndex(src);

            // 队列和标记数组
            std::queue<int> q;
            std::vector<bool> visited(_vertexs.size(), false);

            q.emplace(srci);
            visited[srci] = true;

            while (!q.empty())
            {
                int cur = q.front();
                q.pop();
                std::cout << cur << " : " << _vertexs[cur] << std::endl;
                for (size_t i = 0; i < _matrix.size(); i++)
                {
                    if (_matrix[cur][i] == MAX_W || visited[i] == true)
                    {
                        continue;
                    }
                    q.emplace(i);
                    visited[i] = true;
                }
            }
            std::cout << std::endl;
        }
void test_BFS()
{
Graph<char, int, INT_MAX, true> g("0123", 4);
g.AddEdge('0', '1', 1);
g.AddEdge('0', '3', 4);
g.AddEdge('1', '3', 2);
g.AddEdge('1', '2', 9);
g.AddEdge('2', '3', 8);
g.AddEdge('2', '1', 5);
g.AddEdge('2', '0', 3);
g.AddEdge('3', '2', 6);
g.Print();
g.BFS('0');
}
四、最小生成树
1、Kruskal算法
它总共分为两大步骤
1、每次选一条边,共选n-1条边
2、在不构成回路的情况下,尽量选权值最小的边
最小生成树不是唯一的,但是他们的权值是相同的
我们先将原图拷贝一份,不拷贝邻接矩阵,因为最小生成树也是一个图,然后选择权值小的边,添加到我们的最小生成树中
选择的边尽量选择权值小的,这里选边可以借助于优先级队列,建一个小堆
每次去堆里面取数据,同时要避免成环,这里可以采用并查集来解决,一条边是有两个顶点的
如果两个顶点已经在一个集合中了,添加就会造成环,所以添加不在同一个集合的顶点,并且将添加边的两个顶点合并到同一集合中,直到堆中数据为空,然后比较添加的边的数量是否等于n-1
如果等于,那么他就是最小生成树,不等于就没有最小生成树。
   W Kruskal(self &minTree)
        {
            size_t n = _vertexs.size();

            minTree._vertexs = _vertexs;
            minTree._v2index = _v2index;
            minTree._matrix.resize(n);
            for (size_t i = 0; i < n; i++)
            {
                minTree._matrix[i].resize(n, MAX_W);
            }
            // 根据边的权值排序
            std::priority_queue<Edge, std::vector<Edge>, std::greater<Edge>> minque;
            for (size_t i = 0; i < n; i++)
            {
                for (size_t j = 0; j < n; j++)
                {
                    if (i < j && _matrix[i][j] != MAX_W)
                    {
                        minque.emplace(i, j, _matrix[i][j]);
                    }
                }
            }

            // 选出n-1条边
            size_t size = 0;
            W totalW = W(); // 权值总和
            UnionFindSet ufs(n);
            while (!minque.empty())
            {
                Edge min = minque.top();
                minque.pop();

                if (!ufs.InSet(min._srci, min._dsti))
                {
                    std::cout << _vertexs[min._srci] << "->" << _vertexs[min._dsti] << " : " << min._w << std::endl;
                    minTree._AddEdge(min._srci, min._dsti, min._w);
                    ufs.Union(min._srci, min._dsti);
                    size++;
                    totalW += min._w;
                }
                else
                {
                    std::cout << "构成环: ";
                    std::cout << _vertexs[min._srci] << " -> " << _vertexs[min._dsti] << " : " << min._w << std::endl;
                }
            }

            if (size == n - 1)
            {
                return totalW;
            }
            else
            {
                return W();
            }
        }
2、Prim算法
普里姆算法(Prim算法),图论中的一种算法,可在加权连通图里搜索最小生成树。意即由此算法搜索到的边子集所构成的树中,不但包括了连通图里的所有顶点(英语:Vertex (graph theory)),且其所有边的权值之和亦为最小。该算法于1930年由捷克数学家沃伊捷赫·亚尔尼克(英语:Vojtěch Jarník)发现;并在1957年由美国计算机科学家罗伯特·普里姆(英语:Robert C. Prim)独立发现;1959年,艾兹格·迪科斯彻再次发现了该算法。因此,在某些场合,普里姆算法又被称为DJP算法、亚尔尼克算法或普里姆-亚尔尼克算法。
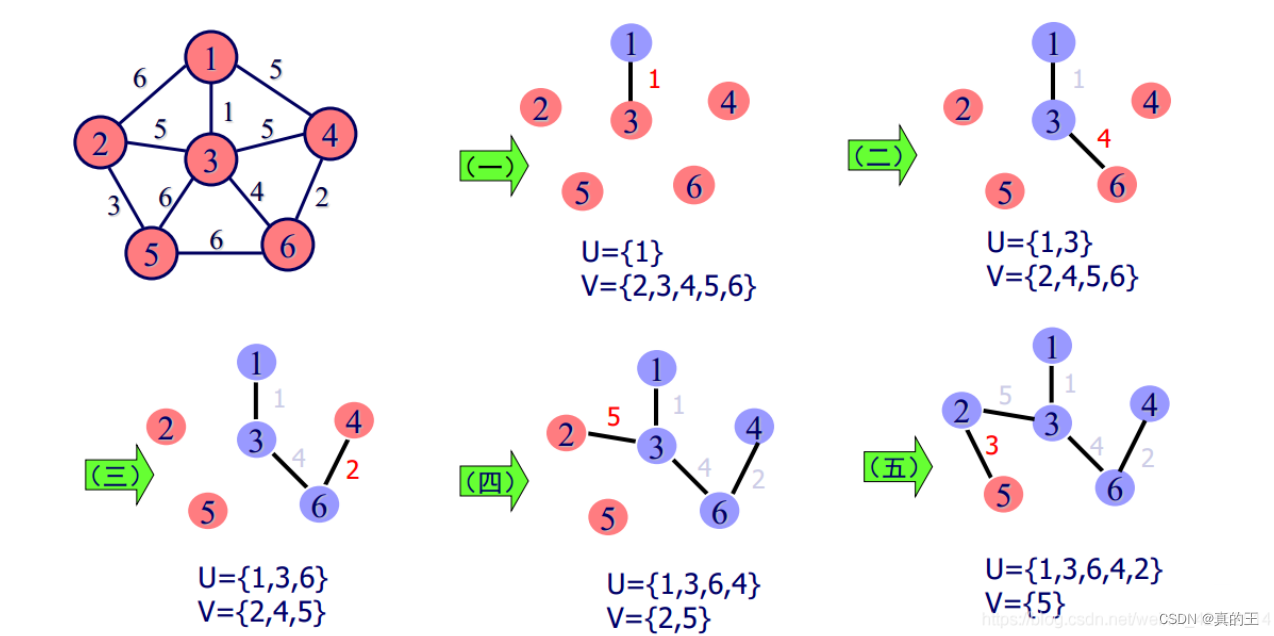
Prim算法也是利用了贪心算法,不过它与克鲁斯卡尔算法的贪心策略不同,克鲁斯卡尔算法是采用全局最优解的方式,从全局选择权值最小的边,而普利姆算法是采用局部最优解,逐渐推到全局最优解,所以普利姆算法需要给出一个起始点
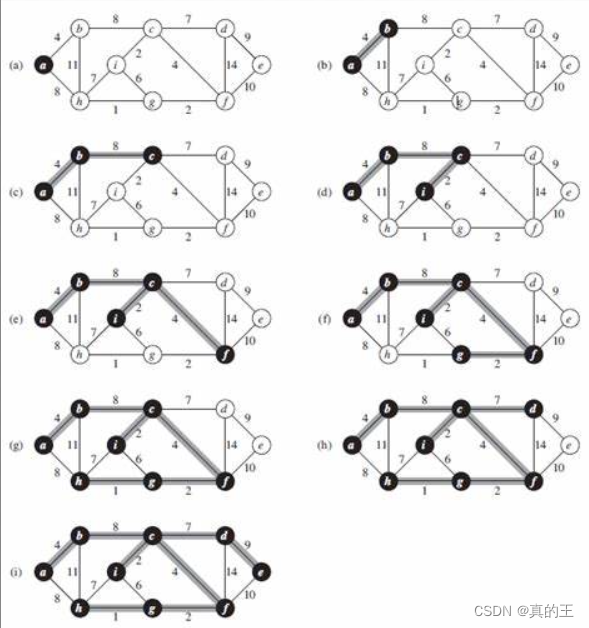
这里我们让a点作为起始点,然后a连通的有两个顶点b,h
然后比较ab,ah的权值,ab边权值小于bh权值,所以选择ab边
b又连接c,h ,bc权值比bh小,所以选择bc,重复上述过程,直到选择了n - 1条边
Prim算法与Kruskal算法相比,它天然的避开了圈,所以它并不需要进行判断是否会形成圈
我们将其分为两个集合,一个集合为已选点集合,另一个是未选点集合
我们在两个集合之间选权值最小的边,直到未选集合为空
这里要注意,虽然Prim算法天然避免形成圈,但是我们在选择权值最小边的时候很容易形成圈
这里可以不用借助于其它数据结构来解决,最小边的目标点在已选集合中,就会构成圈
我们还是使用优先级队列来对边进行排序,每次选择权值最小的边
将目标点放到已选集合中,在未选集合中删掉该点
然后将目标点所连的点全部进入优先级队列中,继续寻找 ,直到优先级队列为空,或者已经找到了n - 1条边
       W Prim(self &minTree, const W &src)
        {
            size_t srci = GetVertexIndex(src);
            size_t n = _vertexs.size();

            minTree._vertexs = _vertexs;
            minTree._v2index = _v2index;
            minTree._matrix.resize(n);
            for (size_t i = 0; i < n; i++)
            {
                minTree._matrix[i].resize(n, MAX_W);
            }

            std::vector<bool> X(n, false);
            std::vector<bool> Y(n, true);
            X[srci] = true;
            Y[srci] = false;

            std::priority_queue<Edge, std::vector<Edge>, std::greater<Edge>> minq;
            for (size_t i = 0; i < n; i++)
            {
                if (_matrix[srci][i] != MAX_W)
                {
                    minq.emplace(srci, i, _matrix[srci][i]);
                }
            }

            std::cout << "Prim开始选边" << std::endl;
            size_t size = 0;
            W totalW = W();

            while (!minq.empty())
            {
                Edge min = minq.top();
                minq.pop();

                if (X[min._dsti])
                {
                    std::cout << "构成环: ";
                    std::cout << _vertexs[min._srci] << " -> " << _vertexs[min._dsti] << " : " << _matrix[min._srci][min._dsti] << std::endl;
                }
                else
                {
                    minTree._AddEdge(min._srci, min._dsti, min._w);
                    X[min._dsti] = true;
                    Y[min._dsti] = false;
                    size++;
                    totalW += min._w;

                    if (size == n - 1)
                    {
                        break;
                    }

                    for (size_t i = 0; i < n; i++)
                    {
                        if (_matrix[min._dsti][i] != MAX_W && Y[i])
                        {
                            minq.emplace(min._dsti, i, _matrix[min._dsti][i]);
                        }
                    }
                }
            }

            if (size == n - 1)
            {
                return totalW;
            }
            else
            {
                return W();
            }
        }
void TestGraphMinTree()
{
const char str[] = "abcdefghi";
Graph<char, int> g(str, strlen(str));
g.AddEdge('a', 'b', 4);
g.AddEdge('a', 'h', 8);
// g.AddEdge('a', 'h', 9);
g.AddEdge('b', 'c', 8);
g.AddEdge('b', 'h', 11);
g.AddEdge('c', 'i', 2);
g.AddEdge('c', 'f', 4);
g.AddEdge('c', 'd', 7);
g.AddEdge('d', 'f', 14);
g.AddEdge('d', 'e', 9);
g.AddEdge('e', 'f', 10);
g.AddEdge('f', 'g', 2);
g.AddEdge('g', 'h', 1);
g.AddEdge('g', 'i', 6);
g.AddEdge('h', 'i', 7);
Graph<char, int> kminTree;
std::cout << "Kruskal:" << g.Kruskal(kminTree) << std::endl;
kminTree.Print();
std::cout << std::endl
<< std::endl;
Graph<char, int> pminTree;
std::cout << "Prim:" << g.Prim(pminTree, 'a') << std::endl;
pminTree.Print();
std::cout << std::endl;
for (size_t i = 0; i < strlen(str); ++i)
{
std::cout << "Prim:" << g.Prim(pminTree, str[i]) << std::endl;
}
}五、最短路径问题
1、Dijkstra
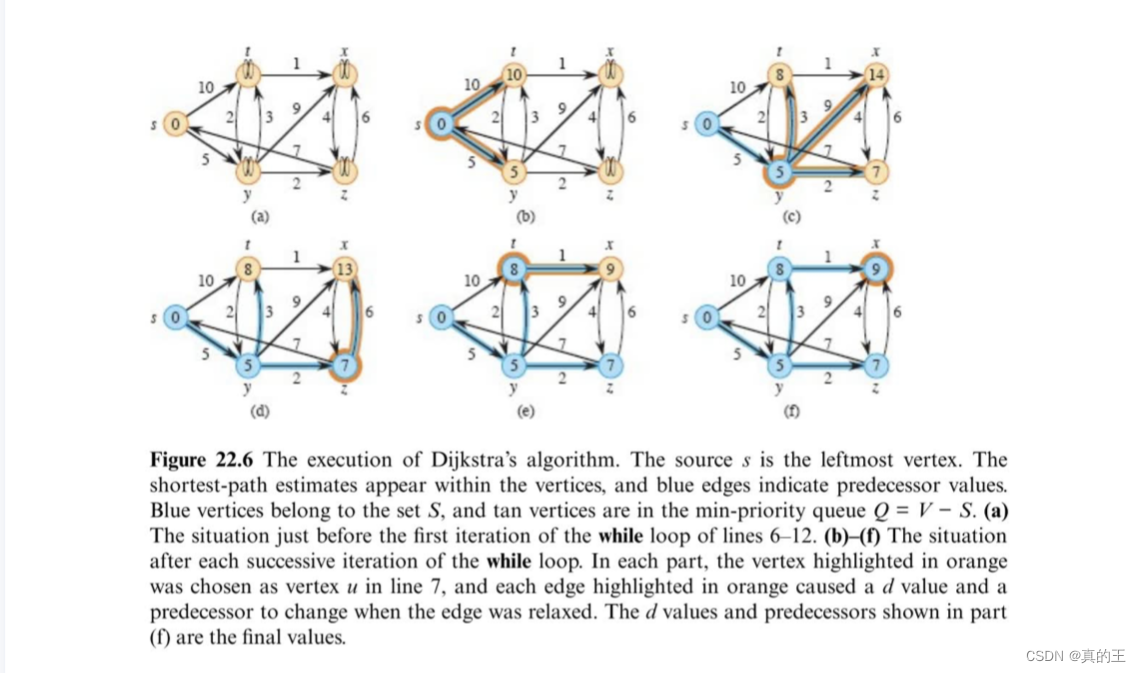
迪杰斯特拉算法选择的是顶点,更新该点与它连接点的路径长度,选择路径长度最短点,重复操作
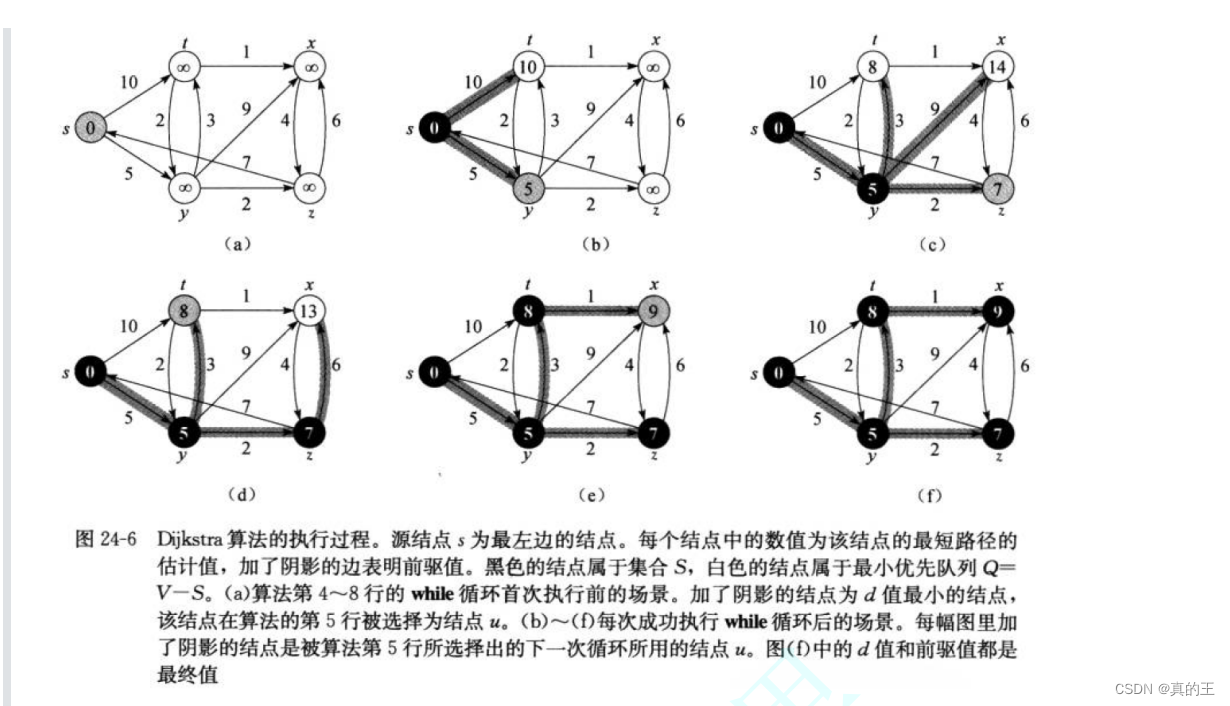
总之迪杰斯特拉算法只需要对每一个顶点进行计算,去找与它相连的路径最短点,然后让路径最短点重复上述过程,因为每次选择的都是最短距离的点,所以在整体上达到了最短
因为是对每一个顶点操作,会不停的更新节点距离
这里迪杰斯特拉算法我们化简,使用两个一维数组,dist代表每一个点,距离给出的起始点的最短距离
另一个一维数组是pPath,用来记录当前节点的上一个节点的下标
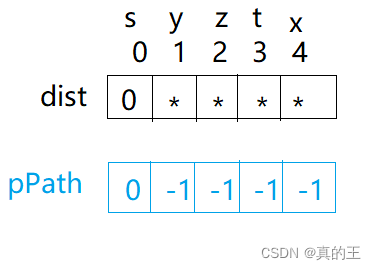
s y z t x是5个不同的点
0,1,2,3,4是这5个点的映射下标
然后选择边
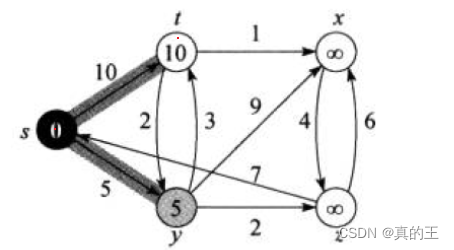
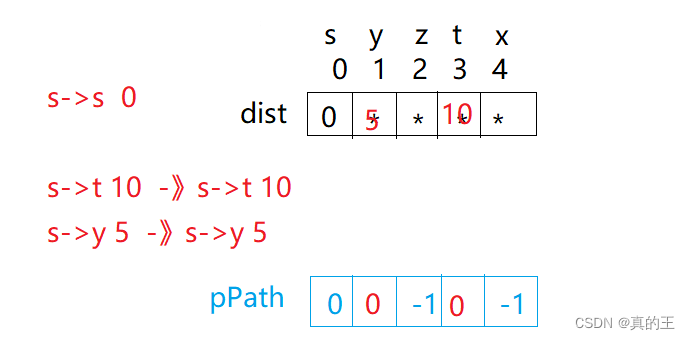
因为s->s,s->t,s->y,的距离是确定的,更新dist和pPath。
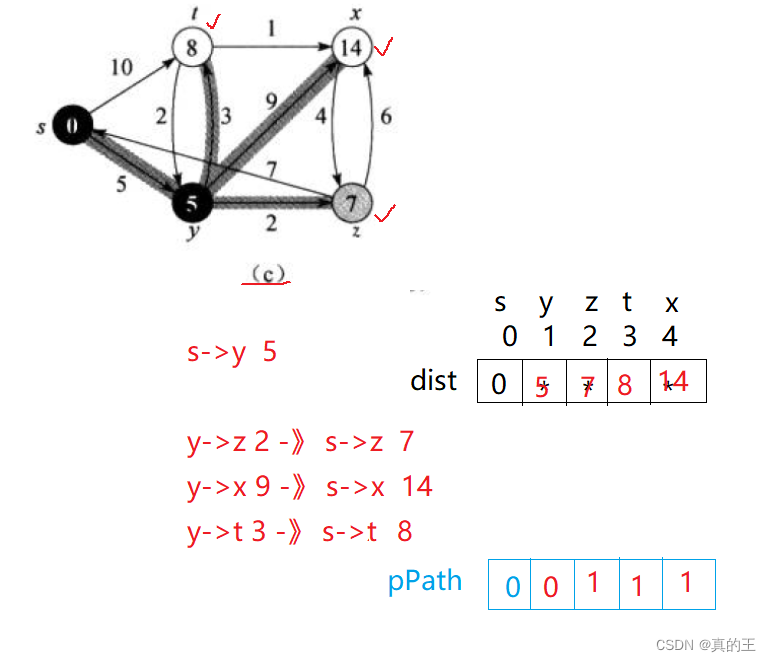
接下来因为y是与s连接的距离最短的点,所以在从y点,计算与它连接的最短的距离
y->z的距离是2,那么s->z的距离就是s->y + y->z的距离,让原本的s->z的距离与s->y +y -> z的距离相比,选择距离最短的,同时记录z的上一个节点s的下标
与y相连的其它点也进行同样操作,直到图中每一个顶点都被计算过
        void Dijkstra(const V &src, std::vector<W> &dist, std::vector<int> &pPath)
        {
            size_t srci = GetVertexIndex(src);
            size_t n = _vertexs.size();
            dist.resize(n, MAX_W);
            pPath.resize(n, -1);

            dist[srci] = 0;
            pPath[srci] = srci;

            std::vector<bool> S(n, false);

            for (size_t j = 0; j < n; j++)
            {
                int u = 0;
                W min = MAX_W;
                for (size_t i = 0; i < n; i++)
                {
                    if (S[i] == false && dist[i] < min)
                    {
                        u = i;
                        min = dist[i];
                    }
                }

                S[u] = true;
                for (size_t v = 0; v < n; v++)
                {
                    if (S[v] == false && _matrix[u][v] != MAX_W && _matrix[u][v] + dist[u] < dist[v])
                    {
                        dist[v] = dist[u] + _matrix[u][v];
                        pPath[v] = u;
                    }
                }
            }
        }
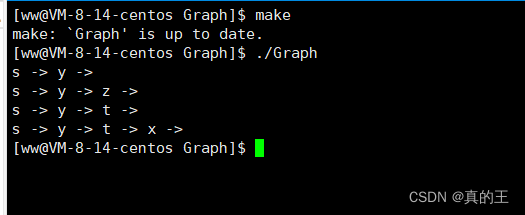
这里不太好观察最短路径,实现一个打印最短路径的函数
dist中存储的是每一个节点的上一个节点,所以我们需要正着遍历一遍之后reverse
对于每一个节点来说都是这样
        void PrintShortPath(const V &src, const std::vector<W> &dist, std::vector<int> &pPath)
        {
            size_t srci = GetVertexIndex(src);
            size_t n = _vertexs.size();

            for (size_t i = 0; i < n; i++)
            {
                if (i != srci)//起始节点最初不用入栈
                {
                    std::vector<int> path;
                    size_t parenti = i;
                    while (parenti != srci)
                    {
                        path.emplace_back(parenti);
                        parenti = pPath[parenti];
                    }
                    path.emplace_back(srci);
                    std::reverse(path.begin(), path.end());

                    for (const auto &index : path)
                    {
                        std::cout << _vertexs[index] << " -> ";
                    }
                    std::cout << std::endl;
                }
            }
        }
void TestGraphDijkstra()
{
const char *str = "syztx";
Graph<char, int, INT_MAX, true> g(str, strlen(str));
g.AddEdge('s', 't', 10);
g.AddEdge('s', 'y', 5);
g.AddEdge('y', 't', 3);
g.AddEdge('y', 'x', 9);
g.AddEdge('y', 'z', 2);
g.AddEdge('z', 's', 7);
g.AddEdge('z', 'x', 6);
g.AddEdge('t', 'y', 2);
g.AddEdge('t', 'x', 1);
g.AddEdge('x', 'z', 4);
std::vector<int> dist;
std::vector<int> parentPath;
g.Dijkstra('s', dist, parentPath);
g.PrintShortPath('s', dist, parentPath);
// 图中带有负权路径时,贪心策略则失效了。
// 测试结果可以看到s->t->y之间的最短路径没更新出来
// const char *str = "sytx";
// Graph<char, int, INT_MAX, true> g(str, strlen(str));
// g.AddEdge('s', 't', 10);
// g.AddEdge('s', 'y', 5);
// g.AddEdge('t', 'y', -7);
// g.AddEdge('y', 'x', 3);
// std::vector<int> dist;
// std::vector<int> parentPath;
// g.Dijkstra('s', dist, parentPath);
// g.PrintShortPath('s', dist, parentPath);
// const char *str = "syztx";
// Graph<char, int, INT_MAX, true> g(str, strlen(str));
// g.AddEdge('s', 't', 6);
// g.AddEdge('s', 'y', 7);
// g.AddEdge('y', 'z', 9);
// g.AddEdge('y', 'x', -3);
// g.AddEdge('z', 's', 2);
// g.AddEdge('z', 'x', 7);
// g.AddEdge('t', 'x', 5);
// g.AddEdge('t', 'y', 8);
// g.AddEdge('t', 'z', -4);
// g.AddEdge('x', 't', -2);
// std::vector<int> dist;
// std::vector<int> parentPath;
// g.Dijkstra('s', dist, parentPath);
// g.PrintShortPath('s', dist, parentPath);
}
2、Bellman-Ford
贝尔曼-福特算法(英语:Bellman–Ford algorithm),求解单源最短路径问题的一种算法,由理查德·贝尔曼(Richard Bellman) 和莱斯特·福特创立的。有时候这种算法也被称为 Moore-Bellman-Ford 算法,因为Edward F. Moore也为这个算法的发展做出了贡献。它的原理是对图进行|V| - 1 次松弛操作,得到所有可能的最短路径。其优于迪科斯彻算法的方面是边的权值可以为负数、实现简单,缺点是时间复杂度过高,高达O(|V| * |E|)。但算法可以进行若干种优化,提高了效率。贝尔曼-福特算法与迪科斯彻算法类似,都以松弛操作为基础,即估计的最短路径值渐渐地被更加准确的值替代,直至得到最优解。在两个算法中,计算时每个边之间的估计距离值都比真实值大,并且被新找到路径的最小长度替代。 然而,迪科斯彻算法以贪心法选取未被处理的具有最小权值的节点,然后对其的出边进行松弛操作;而贝尔曼-福特算法简单地对所有边进行松弛操作,共|V| - 1次,其中|V|是图的点的数量。在重复地计算中,已计算得到正确的距离的边的数量不断增加,直到所有边都计算得到了正确的路径。这样的策略使得贝尔曼-福特算法比迪科斯彻算法适用于更多种类的输入。
这里也可以看出Bellman-Ford算法是一种暴力求解算法
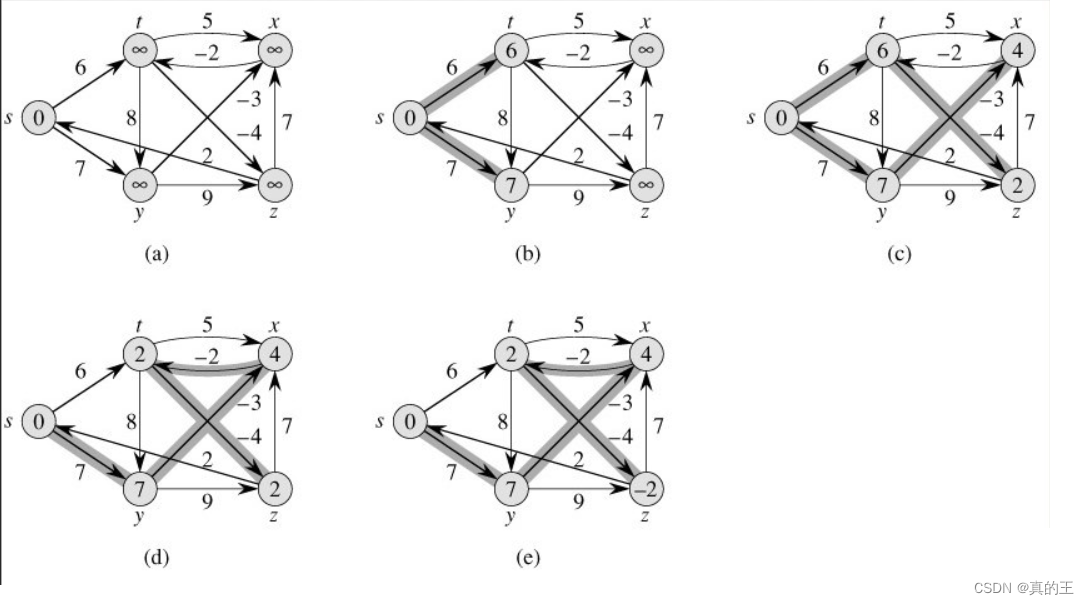
Bellman-Ford算法的执行过程,源节点为s,节点中的数值为该节点的距离,加了阴影的边表示前驱节点值,本图的例子中,每一次的松弛操作对边的处理次序都是(t, x), (t, y), (t, z), (y, x), (y, z), (z, x), (z, s), (s, t), (s, y) 如果没有负权回路该算法则会返回true
        bool BellmanFord(const V &src, std::vector<W> &dist, std::vector<int> &pPath)
        {
            size_t srci = GetVertexIndex(src);
            size_t n = _vertexs.size();
            dist.resize(n, MAX_W);
            pPath.resize(n, -1);

            dist[srci] = W();

            for (size_t k = 0; k < n; k++)
            {
                bool update = false;
                std::cout << "更新到: " << k + 1 << "轮" << std::endl;
                for (size_t i = 0; i < n; i++)
                {
                    for (size_t j = 0; j < n; j++)
                    {
                        if (_matrix[i][j] != MAX_W && dist[i] + _matrix[i][j] < dist[j])
                        {
                            update = true;
                            std::cout << _vertexs[i] << " -> " << _vertexs[j] << " : " << _matrix[i][j] << std::endl;
                            dist[j] = dist[i] + _matrix[i][j];
                            pPath[j] = i;
                        }
                    }
                }

                if (update == false)
                {
                    break;
                }
            }
            //检验是否具有负权回路,如果有直接跳出,避免死循环
            for (size_t i = 0; i < n; i++)
            {
                for (size_t j = 0; j < n; j++)
                {
                    if (dist[i] + _matrix[i][j] < dist[j])
                    {
                        return false;
                    }
                }
            }
            return true;
        }
这里总共套了三层for循环
第一层k,代表的是更新的轮数,每一个节点最多更新n轮,同时设定一个标记位,如果上一轮没有更新节点就直接退出
第二第三层i, j 代表节点 i 到节点 j 的距离,每次都选它的最短距离
    void testBellmanFord()
    {
        const char *str = "syztx";
        Graph<char, int, INT_MAX, true> g(str, strlen(str));
        g.AddEdge('s', 't', 6);
        g.AddEdge('s', 'y', 7);
        g.AddEdge('y', 'z', 9);
        g.AddEdge('y', 'x', -3);
        // g.AddEdge('y', 's', 1); // 新增
        g.AddEdge('z', 's', 2);
        g.AddEdge('z', 'x', 7);
        g.AddEdge('t', 'x', 5);
        // g.AddEdge('t', 'y', -8); //更改
        g.AddEdge('t', 'y', 8);

        g.AddEdge('t', 'z', -4);
        g.AddEdge('x', 't', -2);
        std::vector<int> dist;
        std::vector<int> parentPath;
        if (g.BellmanFord('s', dist, parentPath))
            g.PrintShortPath('s', dist, parentPath);
        else
            std::cout << "带负权回路" << std::endl;
    }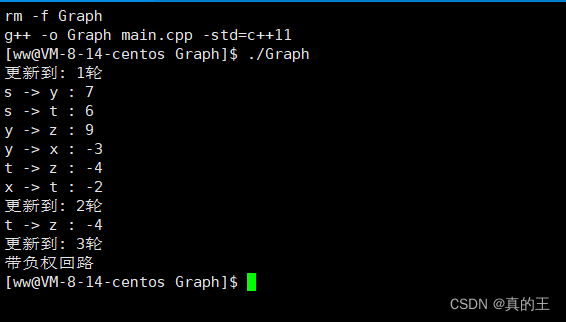
这里采用了带负权回路的测试用例,目前没有算法能够解决带有负权回路的情况
3、Floyd-Warshall
Floyd-Warshall算法的原理是动态规划
设Di,j,k为从i到j的只以(1……k)集合中的节点为中间节点的最短路径的长度
1、若最短路径经过点k,则Di,j,k = Di,k,k-1 + Dk, j, k-1
2、若最短路径不经过点k,则Di,j,k = Di,j,k-1
在实际算法中,为了节约空间,可以直接在原来的空间上进行迭代,这样空间可降至二维
因为本算法是动态规划,所以必然符合动态规划三部曲
1、确定下标含义
2、确定状态转移方程
3、确定遍历方向
dp[i][j][k] 代表从i点到j点经过k个点的最短路径
状态转移方程,前面已经说明
确定遍历方向,因为状态转移方程很明显是从前面往后面推,所以应该是正向遍历
同时我们压缩空间,在BellmanFord算法的dist和pPath数组扩展到二维
这个算法整体上十分简单
       // 多源最短路径,不需要给出源点
        void FloydWarshall(std::vector<std::vector<W>> &dist, std::vector<std::vector<int>> &pPath)
        {
            size_t n = _vertexs.size();
            dist.resize(n, std::vector<W>(n, MAX_W));
            pPath.resize(n, std::vector<int>(n, -1));

            // 动规三部曲,1、初始化
            // 将直接相连的顶点初始化
            for (size_t i = 0; i < n; i++)
            {
                for (size_t j = 0; j < n; j++)
                {
                    if (_matrix[i][j] != MAX_W)
                    {
                        dist[i][j] = _matrix[i][j];
                        pPath[i][j] = i;
                    }

                    if (i == j)
                    {
                        dist[i][j] = W();
                    }
                }
            }

            // 2、确定遍历顺序
            // 3、状态转移方程
            for (size_t k = 0; k < n; k++)
            {
                for (size_t i = 0; i < n; i++)
                {
                    for (size_t j = 0; j < n; j++)
                    {
                        if (dist[i][k] != MAX_W && dist[k][j] != MAX_W && dist[i][k] + dist[k][j] < dist[i][j])
                        {
                            dist[i][j] = dist[i][k] + dist[k][j];
                            pPath[i][j] = pPath[k][j];
                        }
                    }
                }
            }

            // 打印结果Debug

            // 打印权值
            for (size_t i = 0; i < n; i++)
            {
                for (size_t j = 0; j < n; j++)
                {
                    if (dist[i][j] == MAX_W)
                    {
                        printf("%3c", '*');
                    }
                    else
                    {
                        printf("%3d", dist[i][j]);
                    }
                }
                std::cout << "\n";
            }
            std::cout << "\n";

            // 打印路径,下标
            for (size_t i = 0; i < n; i++)
            {
                for (size_t j = 0; j < n; j++)
                {
                    printf("%3d", pPath[i][j]);
                }
                std::cout << "\n";
            }
            std::cout << "\n";

            std::cout << "----------------------------------------------" << std::endl;
        }
因为初始化部分就已经将不经过k点的情况给初始化了,所以在后面迭代过程中没有对这种情况进行讨论
    void testFloydWarshall()
    {
        const char *str = "12345";
        Graph<char, int, INT_MAX, true> g(str, strlen(str));
        g.AddEdge('1', '2', 3);
        g.AddEdge('1', '3', 8);
        g.AddEdge('1', '5', -4);
        g.AddEdge('2', '4', 1);
        g.AddEdge('2', '5', 7);
        g.AddEdge('3', '2', 4);
        g.AddEdge('4', '1', 2);
        g.AddEdge('4', '3', -5);
        g.AddEdge('5', '4', 6);
        std::vector<std::vector<int>> vvDist;
        std::vector<std::vector<int>> vvParentPath;
        g.FloydWarshall(vvDist, vvParentPath);

        // 打印任意两点之间的最短路径
        for (size_t i = 0; i < strlen(str); ++i)
        {
            g.PrintShortPath(str[i], vvDist[i], vvParentPath[i]);
            std::cout << std::endl;
        }
    }
总结
以上就是今天要讲的内容,本文仅仅简单介绍了图论相关简单内容。

