OpenAI推出的ChatGPT模型让我们看到了通用人工智能的发展潜力,我也找了GPT的相关论文来进行研究。OpenAI在2017年的论文Improving Language Understanding by Generative Pre-Training提出了GPT的第一个版本,我也基于这个论文来用Tensorflow进行了复现。
数据集的下载
GPT是基于bookcorpus数据集来进行预训练的。在huggingface.co网站里面提供了相关的数据集。以下代码是下载数据集并展示第一条数据
from datasets import load_dataset
dataset = load_dataset("bookcorpusopen", split="train")
dataset["train"][0]
这个数据集总共包括了17868本图书,其中每本图书对应title和text两个字段,我们将基于Text来进行训练。按照GPT论文的描述,其采用了BPE来对文本进行tokenizer,在Huggingface里面有一篇文章解释了BPE的原理和训练细节,Byte-Pair Encoding tokenization - Hugging Face NLP Course,这里我直接采用huggingface的tokenizer预训练好的gpt模型。
from transformers import OpenAIGPTTokenizer
block_size=513

tokenizer = OpenAIGPTTokenizer.from_pretrained('openai-gpt')

def tokenize_function(examples):
    token_ids = [tokenizer(text) for text in examples["text"]]
    total_length = [len(t["input_ids"]) for t in token_ids]
    total_length = [(l//(block_size+1))*(block_size+1) for l in total_length]
    result = []
    label = []

    for i in range(len(total_length)):
        result.extend([token_ids[i]["input_ids"][j:j+block_size+1] for j in range(0, total_length[i], block_size+1)])
    return {"token_ids": result}

ds_test = ds['train'].select(range(10000))

tokenized_datasets = ds_test.map(
    tokenize_function, batched=True, num_proc=8, remove_columns=["title", "text"], batch_size=100
)

tokenized_datasets.save_to_disk("data/boocorpusopen_10000_512tokens")
在以上代码中,我把数据集的每本书的text文本通过tokenizer来转化为token id,然后每513个tokenid保存为一条数据记录,因为在GPT论文中是对512个token进行训练的,因此我们在训练时取这513个token的前512个作为训练,然后对应的第2-513个token作为label,最后把处理后的数据集保存到本地。
因为我将要在tensorflow的模型中进行训练,还要把这个数据集转化为tensorflow dataset的格式。我们可以直接调用tokenized_datasets.to_tf_dataset函数来进行转化,但是我发现这样转换之后,要读取dataset的数据很慢。因此我先把数据集转化为TFRecords的文件格式,这样读取速度就能加快很多,以下的代码把每10万条记录保存为一个tfrecord文件,每个文件大约100M。
import tensorflow as tf
from tqdm import tqdm

def _int64_feature(value):
    """Returns an int64_list from a bool / enum / int / uint."""
    return tf.train.Feature(int64_list=tf.train.Int64List(value=value))

def serialize_example(token_ids):
    feature = {
        'token_ids': _int64_feature(token_ids)
    }

    example_proto = tf.train.Example(features=tf.train.Features(feature=feature))
    return example_proto.SerializeToString()

records_num = 100000
count = 0
for record in tqdm(ds):
    if count%records_num == 0:
        writer = tf.io.TFRecordWriter("bookcorpus_"+str(count//records_num)+".tfrecords")
    writer.write(serialize_example(record['token_ids']))
    count += 1
    if count%records_num == 0:
        writer.close()
if writer:
    writer.close()
之后我们就可以读取数据了
data_dir = "/data/datasets/bookcorpus_tf/"
filenames = os.listdir(data_dir)
filenames = [data_dir+f for f in filenames]
tf_ds = tf.data.TFRecordDataset(filenames)
tf_ds = tf_ds\
    .map(_parse_function, num_parallel_calls=tf.data.AUTOTUNE)\
    .shuffle(buffer_size=batch_size*100)\
    .prefetch(tf.data.experimental.AUTOTUNE)\
    .batch(batch_size)
我们可以检查一下Batch的数据,取出数据并用tokenizer来解码
data = next(iter(tf_ds))
tokenizer.decode(data['token_ids'][0])
结果如下:
"i was sitting to the left of alex, and tinker was to his right, with lilla sitting to the right of her. tinker was leaning over to alex, chatting away, when her hand suddenly gently slid along his thigh, and onto his crotch. oops! now that was a surprise. unexpected, to say the least. right out of the blue. alex looked at me in desperation, and i initially laughed. we hadn't really thought about any sexual side to the situation, we had just considered the girls to be friends. plus, honestly, while they were very nice people, they weren't at all our cup of tea, so to speak. besides, what exactly was the situation down there, in the lady garden? had operations been done? would we end up comparing who had the bigger penis? we didn't know, and we didn't want to find out. it was time to get out of there. we both went into time - to - go mode. \n'you know, we got ta get up early in the morning, so we better hit the road.'i yelled to all and sundry. \n alex was already on his feet, yelling out something similar as well. we started heading to the door. the girls were calling after us, but i couldn't hear what they were saying, over the music, and the blood pumping in my head. i just waved back at them. \n it was with some relief that we found ourselves back out in the industrial wasteland. \n'fuck, what a surprise!'alex said as we ran off in the darkness.'i didn't see that coming. i hope they won't be upset with us. i thought they had sex for money, anyway.'\n'maybe on their night off they like a bit of young cock? fucked if i know. you should have seen the look on your face, man!'\n'shit, i don't want to think about it.'\n'don't worry, i won't be letting you forget this one.'\n we were pretty relieved, and happy to be out of that situation, and pretty much laughed about it all the way home. i would be pulling alex's leg over that one for a long time to come. mind you, probably lilla hadn't been far away from making a move on me, if it had all gone successfully with tinker and alex. sometimes it all comes down to who is the person closest to the door, or, as in that case, who is in the"现在数据集我们已经准备好了。
建立GPT模型
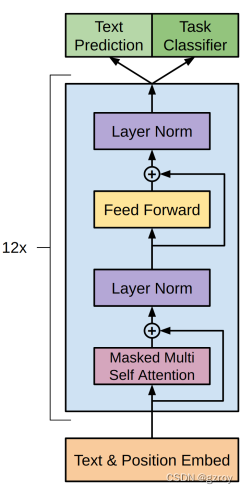
根据论文的描述,GPT只采用了Transformer里面的Decoder,因为Encoder是通过查看整个训练数据的上下文来建立Token之间的联系的,但是对于文本生成来说,只能通过上文来预测之后的token,因此只能采用Decoder。论文的模型架构如下,共采用了12个Decoder组合而成,每个Decoder包含了12个Attention Head:
关于Transformer模型的解读,可以见我以前写的博客基于Tensorflow实现一个Transformer翻译器_tensorflow transformer_gzroy的博客-CSDN博客
首先是定义multi attention head,代码如下:
def scaled_dot_product_attention(q, k, v, mask):
    """Calculate the attention weights.
    q, k, v must have matching leading dimensions.
    k, v must have matching penultimate dimension, i.e.: seq_len_k = seq_len_v.
    The mask has different shapes depending on its type(padding or look ahead)
    but it must be broadcastable for addition.
    Args:
    q: query shape == (..., seq_len_q, depth)
    k: key shape == (..., seq_len_k, depth)
    v: value shape == (..., seq_len_v, depth_v)
    mask: Float tensor with shape broadcastable
          to (..., seq_len_q, seq_len_k). Defaults to None.
    Returns:
    output, attention_weights
    """
    matmul_qk = tf.matmul(q, k, transpose_b=True)  # (..., seq_len_q, seq_len_k)

    # scale matmul_qk
    dk = tf.cast(tf.shape(k)[-1], tf.float32)
    scaled_attention_logits = matmul_qk / tf.math.sqrt(dk)

    # add the mask to the scaled tensor.
    if mask is not None:
        scaled_attention_logits += (mask * -1e9)

    # softmax is normalized on the last axis (seq_len_k) so that the scores
    # add up to 1.
    attention_weights = tf.nn.softmax(scaled_attention_logits, axis=-1)  # (..., seq_len_q, seq_len_k)

    output = tf.matmul(attention_weights, v)  # (..., seq_len_q, depth_v)

    return output, attention_weights

class MultiHeadAttention(tf.keras.layers.Layer):
    def __init__(self,*, d_model, num_heads):
        super(MultiHeadAttention, self).__init__()
        self.num_heads = num_heads
        self.d_model = d_model

        assert d_model % self.num_heads == 0

        self.depth = d_model // self.num_heads

        self.wq = tf.keras.layers.Dense(d_model)
        self.wk = tf.keras.layers.Dense(d_model)
        self.wv = tf.keras.layers.Dense(d_model)

        self.dense = tf.keras.layers.Dense(d_model)

    def split_heads(self, x, batch_size):
        """Split the last dimension into (num_heads, depth).
        Transpose the result such that the shape is (batch_size, num_heads, seq_len, depth)
        """
        x = tf.reshape(x, (batch_size, -1, self.num_heads, self.depth))
        return tf.transpose(x, perm=[0, 2, 1, 3])

    def call(self, v, k, q, mask):
        batch_size = tf.shape(q)[0]

        q = self.wq(q)  # (batch_size, seq_len, d_model)
        k = self.wk(k)  # (batch_size, seq_len, d_model)
        v = self.wv(v)  # (batch_size, seq_len, d_model)

        q = self.split_heads(q, batch_size)  # (batch_size, num_heads, seq_len_q, depth)
        k = self.split_heads(k, batch_size)  # (batch_size, num_heads, seq_len_k, depth)
        v = self.split_heads(v, batch_size)  # (batch_size, num_heads, seq_len_v, depth)

        # scaled_attention.shape == (batch_size, num_heads, seq_len_q, depth)
        # attention_weights.shape == (batch_size, num_heads, seq_len_q, seq_len_k)
        scaled_attention, attention_weights = scaled_dot_product_attention(
            q, k, v, mask)

        scaled_attention = tf.transpose(scaled_attention, perm=[0, 2, 1, 3])  # (batch_size, seq_len_q, num_heads, depth)

        concat_attention = tf.reshape(scaled_attention,
                                      (batch_size, -1, self.d_model))  # (batch_size, seq_len_q, d_model)

        output = self.dense(concat_attention)  # (batch_size, seq_len_q, d_model)

        return output, attention_weights
然后是Feed forward层,代码如下
def point_wise_feed_forward_network(d_model, dff):
    return tf.keras.Sequential([
      tf.keras.layers.Dense(dff, activation='relu'),  # (batch_size, seq_len, dff)
      tf.keras.layers.Dense(d_model)  # (batch_size, seq_len, d_model)
    ])
定义一个decoder layer,把以上的两个层组合起来:
class DecoderLayer(tf.keras.layers.Layer):
    def __init__(self,*, d_model, num_heads, dff, rate=0.1):
        super(DecoderLayer, self).__init__()
        self.mha = MultiHeadAttention(d_model=d_model, num_heads=num_heads)

        self.ffn = point_wise_feed_forward_network(d_model, dff)

        self.layernorm1 = tf.keras.layers.LayerNormalization(epsilon=1e-6)
        self.layernorm2 = tf.keras.layers.LayerNormalization(epsilon=1e-6)

        self.dropout1 = tf.keras.layers.Dropout(rate)
        self.dropout2 = tf.keras.layers.Dropout(rate)

    def call(self, x, training, look_ahead_mask):
        attn, attn_weights_block = self.mha(x, x, x, look_ahead_mask)  # (batch_size, target_seq_len, d_model)
        attn = self.dropout1(attn, training=training)
        out1 = self.layernorm1(attn + x)

        ffn_output = self.ffn(out1)  # (batch_size, target_seq_len, d_model)
        ffn_output = self.dropout2(ffn_output, training=training)
        out2 = self.layernorm2(ffn_output + out1)  # (batch_size, target_seq_len, d_model)

        return out2, attn_weights_bloc
最后就是定义一个GPT模型,模型里面包括了12个Decoder layer。
class Decoder(tf.keras.layers.Layer):
    def __init__(self,*, num_layers, d_model, num_heads, dff, target_vocab_size, rate=0.1):
        super(Decoder, self).__init__()

        self.d_model = d_model
        self.num_layers = num_layers

        self.embedding = tf.keras.layers.Embedding(target_vocab_size, d_model)
        self.pos_encoding = tf.reshape(tf.range(target_vocab_size-block_size, target_vocab_size), shape=[1, -1])

        self.dec_layers = [
            DecoderLayer(d_model=d_model, num_heads=num_heads, dff=dff, rate=rate)
            for _ in range(num_layers)]
        self.dropout = tf.keras.layers.Dropout(rate)

    def call(self, x, training, look_ahead_mask):
        #seq_len = tf.shape(x)[1]
        attention_weights = {}

        x = self.embedding(x)  # (batch_size, block_size, d_model)
        x *= tf.math.sqrt(tf.cast(self.d_model, tf.float32))
        x += self.embedding(self.pos_encoding)

        x = self.dropout(x, training=training)

        for i in range(self.num_layers):
            x, block1 = self.dec_layers[i](x, training, look_ahead_mask)

            attention_weights[f'decoder_layer{i+1}_block1'] = block1

        # x.shape == (batch_size, target_seq_len, d_model)
        return x, attention_weights


target_vocab_size = vocab_size + block_size

transformer = Transformer(
    num_layers=num_layers,
    d_model=d_model,
    num_heads=num_heads,
    dff=dff,
    target_vocab_size=target_vocab_size,
    rate=dropout_rate)
解释一下上面的代码,输入的序列Token通过嵌入向量的变换,每个Token映射到一个768维的向量。然后这个序列的向量需要添加位置信息,按照论文的解释,这里没有采用正弦余弦的位置信息,而是采用嵌入向量的方式。例如词汇表由40000个词,对应40000个token,我们的输入序列是包括512个token,因此新增40000-40511这512个token对应输入序列的各个位置,然后把这个位置token对应的嵌入向量加到输入序列的嵌入向量中,使得输入包含每个token的位置信息。
训练模型
要训练模型,我们需要定义一个Loss函数,来计算模型的Loss值。
因为我们是根据给定上文的若干个token,模型预测下一个token,因此我们计算这个预测的CategoryCrossEntropy,代码如下:
loss_object = tf.keras.losses.SparseCategoricalCrossentropy(
    from_logits=True, reduction='none')

def loss_function(real, pred):
    mask = tf.math.logical_not(tf.math.equal(real, 0))
    loss_ = loss_object(real, pred)

    mask = tf.cast(mask, dtype=loss_.dtype)
    loss_ *= mask

    return tf.reduce_sum(loss_)/tf.reduce_sum(mask)

train_loss = tf.keras.metrics.Mean(name='train_loss')
为了在训练过程中了解模型的预测性能,我们还需要定义一个准确度的指标
def accuracy_function(real, pred):
    accuracies = tf.equal(real, tf.argmax(pred, axis=2))

    mask = tf.math.logical_not(tf.math.equal(real, 0))
    accuracies = tf.math.logical_and(mask, accuracies)

    accuracies = tf.cast(accuracies, dtype=tf.float32)
    mask = tf.cast(mask, dtype=tf.float32)
    return tf.reduce_sum(accuracies)/tf.reduce_sum(mask)

train_accuracy = tf.keras.metrics.Mean(name='train_accuracy')
按照论文的描述,采用了Adam optimizer来优化模型,学习率在最初的2000个Batch的训练中由0增加到0.00025,然后采用余弦衰减,在100个Epoch后降为0。在新版的Tensorflow里面有一个新的CosineDecay可以直接调用
epoch_steps = 1680000//batch_size
epochs = 100
decay_steps = epoch_steps*epochs
initial_learning_rate = 0
warmup_steps = 2000
target_learning_rate = 0.00025
lr_warmup_decayed_fn = tf.keras.optimizers.schedules.CosineDecay(
    initial_learning_rate, decay_steps, warmup_target=target_learning_rate,
    warmup_steps=warmup_steps
)

optimizer = tf.keras.optimizers.Adam(lr_warmup_decayed_fn, beta_1=0.9, beta_2=0.98, epsilon=1e-9)
在训练过程中,我们要保存中间过程的训练结果,为此定义checkpoint
checkpoint_path = './checkpoints/train'

#定义两个trackable object需要保存
ckpt = tf.train.Checkpoint(transformer=transformer, optimizer=optimizer)

ckpt_manager = tf.train.CheckpointManager(ckpt, checkpoint_path, max_to_keep=5)

# if a checkpoint exists, restore the latest checkpoint.
if ckpt_manager.latest_checkpoint:
    ckpt.restore(ckpt_manager.latest_checkpoint)
    print('Latest checkpoint restored!!')
定义一个训练函数,计算loss并调用optimizer来进行优化,如以下代码:
train_step_signature = [
    tf.TensorSpec(shape=(None, None), dtype=tf.int64),
    tf.TensorSpec(shape=(None, None), dtype=tf.int64)
]
@tf.function(input_signature=train_step_signature)
def train_step(inp, tar):
    with tf.GradientTape() as tape:
        predictions, _ = transformer(inp, training = True)
        loss = loss_function(tar, predictions)

    gradients = tape.gradient(loss, transformer.trainable_variables)
    optimizer.apply_gradients(zip(gradients, transformer.trainable_variables))

    train_loss(loss)
    train_accuracy(accuracy_function(tar, predictions))
最后我们就可以进行模型的训练了,在训练过程中我们将每100个batch打印loss值和预测准确度,然后每个Epoch结束时用checkpoint来保存训练结果。
for epoch in range(EPOCHS):
    start = time.time()

    train_loss.reset_states()
    train_accuracy.reset_states()

    # inp -> portuguese, tar -> english
    for (batch, inputs) in enumerate(tf_ds):
        try:
            train_step(inputs[...,:-1], inputs[...,1:])
        except ValueError:
            print(inputs)
            break

        if batch % 10 == 0:
            print(f'Epoch {epoch + 1} Batch {batch} Loss {train_loss.result():.4f} Accuracy {train_accuracy.result():.4f}')
            if batch == 100:
                break

    if (epoch + 1) % 5 == 0:
        ckpt_save_path = ckpt_manager.save()
        print(f'Saving checkpoint for epoch {epoch+1} at {ckpt_save_path}')

    print(f'Epoch {epoch + 1} Loss {train_loss.result():.4f} Accuracy {train_accuracy.result():.4f}')

    print(f'Time taken for 1 epoch: {time.time() - start:.2f} secs\n')
训练结果
我本地的GPU是一个2080的卡,只有12GB内存。按照论文的描述,是采用了8块P600显卡训练了30天。我没有这么多的显卡资源,因此只简单的训练了几个Epoch,可以看到Loss值在训练过程中不断下降以及预测下一个Token的准确度的增加。稍后我将训练更多的EPOCH,然后在这个训练的模型上进行有监督的学习,以完成不同的NLP任务(例如文本分类,文本问答等等)。