Debezium系列之:基于debezium将mysql数据库数据更改流式传输到 Elasticsearch和PostgreSQL数据库
- 一、背景
- 二、技术路线
- 三、配置
- 四、从mysql同步数据到Elasticsearch和PostgreSQL数据库
- 五、总结
一、背景
- 基于 Debezium 的端到端数据流用例,将数据流式传输到 Elasticsearch 服务器,以利用其出色的功能对我们的数据进行全文搜索。
- 同时把数据流式传输到 PostgreSQL 数据库,通过 SQL 查询语言来优化对数据的访问。
二、技术路线
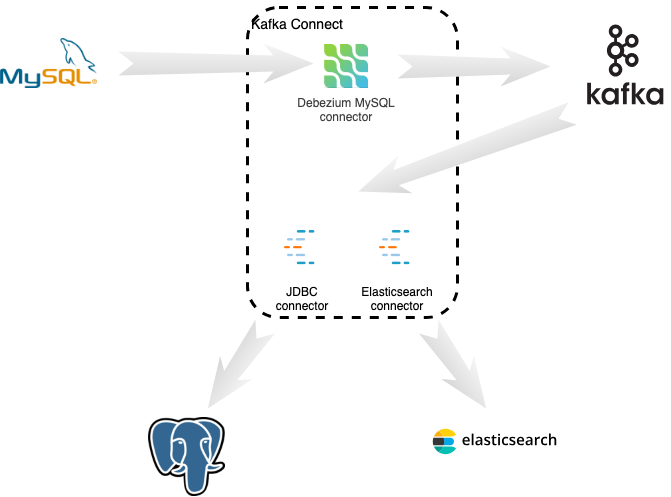
下面的图表显示了数据如何流经我们的分布式系统。首先,Debezium MySQL 连接器不断捕获 MySQL 数据库中的更改,并将每个表的更改发送到单独的 Kafka 主题。然后,Confluence JDBC 接收器连接器不断读取这些主题并将事件写入 PostgreSQL 数据库。同时,Confluence Elasticsearch 连接器不断读取这些相同的主题并将事件写入 Elasticsearch。
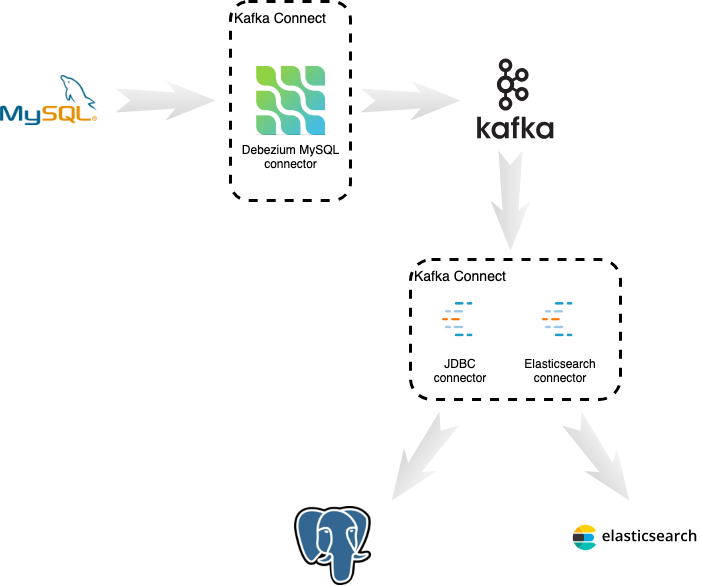
我们将把这些组件部署到几个不同的进程中。在此示例中,我们将所有三个连接器部署到单个 Kafka Connect 实例,该实例将代表所有连接器向 Kafka 写入和读取(在生产中,可能需要将连接器分开以实现更好的性能)。
三、配置
我们将使用此 Docker Compose 文件来快速部署演示。该部署由以下 Docker 映像组成:
-
Apache ZooKeeper
-
Apache Kafka
-
一个丰富的 Kafka Connect / Debezium 图像,有一些变化:
- PostgreSQL JDBC 驱动程序放置在 /kafka/libs 目录中
- Confluence JDBC 连接器放置在 /kafka/connect/kafka-connect-jdbc 目录中
-
MySQL
-
PostgreSQL
-
Elasticsearch
Debezium 源连接器以及 JDBC 和 Elasticsearch 连接器的消息格式不同,因为它们是单独开发的,并且各自关注的目标略有不同。 Debezium 发出更复杂的事件结构,以便捕获所有可用信息。特别是,更改事件包含已更改记录的旧状态和新状态。另一方面,两个接收器连接器都期望一条简单的消息,该消息仅表示要写入的记录状态。
Debezium 的 UnwrapFromEnvelope 单消息转换 (SMT) 将复杂的更改事件结构折叠为两个接收器连接器所期望的相同的基于行的格式,并有效地充当上述两种格式之间的消息转换器。
四、从mysql同步数据到Elasticsearch和PostgreSQL数据库
当所有组件启动后,我们将注册 Elasticsearch Sink 连接器写入 Elasticsearch 实例。我们希望在源以及 PostgreSQL 和 Elasticsearch 中使用相同的密钥(主 id):
curl -i -X POST -H "Accept:application/json" \
    -H  "Content-Type:application/json" http://localhost:8083/connectors/ \
    -d @es-sink.json
我们正在使用此注册请求:
{
  {
    "name": "elastic-sink",
    "config": {
      "connector.class":
          "io.confluent.connect.elasticsearch.ElasticsearchSinkConnector",
      "tasks.max": "1",
      "topics": "customers",
      "connection.url": "http://elastic:9200",
      "transforms": "unwrap,key",
      "transforms.unwrap.type": "io.debezium.transforms.UnwrapFromEnvelope",        (1)
      "transforms.key.type": "org.apache.kafka.connect.transforms.ExtractField$Key",(2)
      "transforms.key.field": "id",                                                 (2)
      "key.ignore": "false",                                                        (3)
      "type.name": "customer"                                                       (4)
    }
  }
}
该请求配置这些选项:
- 1.从 Debezium 的更改数据消息中仅提取新行的状态
- 2.从密钥结构中提取 id 字段,然后将相同的密钥用于源和两个目标。这是为了解决 Elasticsearch 连接器仅支持数字类型和字符串作为键的事实。如果我们不提取 ID,则由于密钥类型未知,消息将被连接器过滤掉。
- 3.使用事件中的密钥而不是生成合成密钥
- 4.事件将在 Elasticsearch 中注册的类型
接下来我们将注册 JDBC Sink 连接器写入 PostgreSQL 数据库:
curl -i -X POST -H "Accept:application/json" \
    -H  "Content-Type:application/json" http://localhost:8083/connectors/ \
    -d @jdbc-sink.json
最后,必须设置源连接器:
curl -i -X POST -H "Accept:application/json" \
    -H  "Content-Type:application/json" http://localhost:8083/connectors/ \
    -d @source.json
让我们检查一下数据库和搜索服务器是否同步。客户表的所有行都应该在源数据库 (MySQL) 以及目标数据库 (Postgres) 和 Elasticsearch 中找到:
docker-compose exec mysql bash -c 'mysql -u $MYSQL_USER  -p$MYSQL_PASSWORD inventory -e "select * from customers"'
+------+------------+-----------+-----------------------+
| id   | first_name | last_name | email                 |
+------+------------+-----------+-----------------------+
| 1001 | Sally      | Thomas    | sally.thomas@acme.com |
| 1002 | George     | Bailey    | gbailey@foobar.com    |
| 1003 | Edward     | Walker    | ed@walker.com         |
| 1004 | Anne       | Kretchmar | annek@noanswer.org    |
+------+------------+-----------+-----------------------+
docker-compose exec postgres bash -c 'psql -U $POSTGRES_USER $POSTGRES_DB -c "select * from customers"'
 last_name |  id  | first_name |         email
-----------+------+------------+-----------------------
 Thomas    | 1001 | Sally      | sally.thomas@acme.com
 Bailey    | 1002 | George     | gbailey@foobar.com
 Walker    | 1003 | Edward     | ed@walker.com
 Kretchmar | 1004 | Anne       | annek@noanswer.org
curl 'http://localhost:9200/customers/_search?pretty'
{
  "took" : 42,
  "timed_out" : false,
  "_shards" : {
    "total" : 5,
    "successful" : 5,
    "failed" : 0
  },
  "hits" : {
    "total" : 4,
    "max_score" : 1.0,
    "hits" : [
      {
        "_index" : "customers",
        "_type" : "customer",
        "_id" : "1001",
        "_score" : 1.0,
        "_source" : {
          "id" : 1001,
          "first_name" : "Sally",
          "last_name" : "Thomas",
          "email" : "sally.thomas@acme.com"
        }
      },
      {
        "_index" : "customers",
        "_type" : "customer",
        "_id" : "1004",
        "_score" : 1.0,
        "_source" : {
          "id" : 1004,
          "first_name" : "Anne",
          "last_name" : "Kretchmar",
          "email" : "annek@noanswer.org"
        }
      },
      {
        "_index" : "customers",
        "_type" : "customer",
        "_id" : "1002",
        "_score" : 1.0,
        "_source" : {
          "id" : 1002,
          "first_name" : "George",
          "last_name" : "Bailey",
          "email" : "gbailey@foobar.com"
        }
      },
      {
        "_index" : "customers",
        "_type" : "customer",
        "_id" : "1003",
        "_score" : 1.0,
        "_source" : {
          "id" : 1003,
          "first_name" : "Edward",
          "last_name" : "Walker",
          "email" : "ed@walker.com"
        }
      }
    ]
  }
}
在连接器仍在运行的情况下,我们可以向 MySQL 数据库添加一个新行,然后检查它是否已复制到 PostgreSQL 数据库和 Elasticsearch 中:
docker-compose exec mysql bash -c 'mysql -u $MYSQL_USER  -p$MYSQL_PASSWORD inventory'

mysql> insert into customers values(default, 'John', 'Doe', 'john.doe@example.com');
Query OK, 1 row affected (0.02 sec)
docker-compose exec -postgres bash -c 'psql -U $POSTGRES_USER $POSTGRES_DB -c "select * from customers"'
 last_name |  id  | first_name |         email
-----------+------+------------+-----------------------
...
Doe        | 1005 | John       | john.doe@example.com
(5 rows)
curl 'http://localhost:9200/customers/_search?pretty'
...
{
  "_index" : "customers",
  "_type" : "customer",
  "_id" : "1005",
  "_score" : 1.0,
  "_source" : {
    "id" : 1005,
    "first_name" : "John",
    "last_name" : "Doe",
    "email" : "john.doe@example.com"
  }
}
...
五、总结
我们设置了一个复杂的流数据管道来将 MySQL 数据库与另一个数据库以及 Elasticsearch 实例同步。我们设法在所有系统中保留相同的标识符,这使我们能够将整个系统的记录关联起来。
将数据更改从主数据库近乎实时地传播到 Elasticsearch 等搜索引擎可以实现许多有趣的用例。除了全文搜索的不同应用之外,我们还可以考虑使用 Kibana 创建仪表板和各种可视化效果,以进一步深入了解数据。

