🚀 作者简介:一名在后端领域学习,并渴望能够学有所成的追梦人。
🚁 个人主页:不 良
🔥 系列专栏:🛸C++ 🛹Linux
📕 学习格言:博观而约取,厚积而薄发
🌹 欢迎进来的小伙伴,如果小伙伴们在学习的过程中,发现有需要纠正的地方,烦请指正,希望能够与诸君一同成长! 🌹
文章目录
- 认识list
- list的构造
- 容量操作
- empty函数
- size函数
- resize函数
- 插入和删除操作
- push_back和pop_back
- push_front和pop_front
- insert函数
- erase函数
- swap函数
- clear函数
- 迭代器
- begin和end函数
- rbegin和rend函数
- 元素获取
- front函数
- back函数
- 操作函数
- sort函数
- remove函数
- remove_if函数
- unique函数
- reverse函数
- assign函数
- splice函数
认识list
- list是一种可以在常数时间复杂度O(1)内对任意位置进行插入删除的序列式容器,并且该容器可以前后双向迭代。
- list的底层是双向链表结构,双向链表中每个元素存储在互不相关的独立结点当中,在结点中通过指针指向其前一个元素和后一个元素。
- list与forward_list非常相似,最主要的不同在于forward_list是单链表,只能进行单方向迭代。
- 与其他容器相比,list通常在任意位置进行插入、删除元素的执行效率更高。
- list和forward_list最大的缺陷是不支持在任意位置的随机访问,其次,list还需要一些额外的空间,以保存每个结点之间的关联信息(对于存储的类型较小元素来说这可能是一个重要的因素)。
list的构造
| 构造函数( (constructor)) | 接口说明 |
|---|---|
| list (size_type n, const value_type& val = value_type()) | 构造的list中包含n个值为val的元素 |
| list() | 构造空的list |
| list (const list& x) | 拷贝构造函数 |
| list (InputIterator first, InputIterator last) | 用[first, last)区间中的元素构造list |
使用:
#include <iostream>
#include <list>
#include <vector>
using namespace std;
int main()
{
	//构造空的list
	list<int> l1;
	for (auto e : l1)
	{
		cout << e << " ";
	}

	//构造含有5个值为6的int类型
	list<int> l2(5,6);
	for (auto e : l2)
	{
		cout << e << " ";
	}
	cout << endl;
	//6 6 6 6 6

	vector<int> v1(3, 4);
	//list<int> l3(v1.begin(),v1.end());
	list<int> l3(l2.begin(), l2.end());
	for (auto e : l3)
	{
		cout << e << " ";
	}
	//6 6 6 6 6
	cout << endl;

	//拷贝构造函数
	list<int> l4(l2);
	for (auto e : l3)
	{
		cout << e << " ";
	}
	//6 6 6 6 6
	return 0;
}
容量操作
| 函数声明 | 接口说明 |
|---|---|
| empty | 检测list是否为空,是返回true,否则返回false |
| size | 返回list中有效节点的个数 |
| resize | 扩容并且初始化 |
empty函数
检测list是否为空,如果是返回true,不是返回false。
#include <iostream>
#include <list>
using namespace std;
int main()
{
	list<int> l1;
	cout << l1.empty() << endl;//1
}
size函数
返回list中有效节点的个数。
#include <iostream>
#include <list>
using namespace std;
int main()
{
	list<int> l1(5,3);
	cout << l1.size() << endl;//5
}
resize函数
扩容并且初始化。
resize函数和之前的string类和vector类函数的resize函数规则差不多:
-
当所给值大于当前的size时,将size扩大到该值,并且将扩大的数据初始化为第二个参数所给值,若未给出,则默认为容器所存储类型的默认构造函数所构造出来的值;
-
当所给值小于当前的size时,将size缩小到该值。
#include <iostream>
#include <list>
using namespace std;

int main()
{
	list<int> l1(2, 6);
	for (auto e : l1)
	{
		cout << e << " ";
	}
	cout << endl; //6 6
	l1.resize(4, 8); //将size扩大到4并且将扩大的值初始化为8
	for (auto e : l1)
	{
		cout << e << " ";
	}
	cout << endl; //6 6 8 8
	l1.resize(2); //将size缩到2
	for (auto e : l1)
	{
		cout << e << " ";
	}
	cout << endl; //6 6
	return 0;
}
插入和删除操作
| 函数声明 | 接口说明 |
|---|---|
| push_back | 尾插 |
| push_front | 头插 |
| pop_front | 头删 |
| pop_back | 尾删 |
| insert | 在指定的迭代器位置或区间插入数据 |
| erase | 删除指定迭代器位置或迭代器区间的数据 |
| swap | 交换两个list中的元素 |
| clear | 清除list中的所有元素 |
push_back和pop_back
push_back是尾插,pop_back尾删。
使用:
下面的代码功能是依次在list尾部插入数据 1 2 3 4 5 6 7,插入完成之后打印;
打印之后再从尾部删除数据7 和 6:
#include <iostream>
#include <list>
using namespace std;
int main()
{
	list<int> l1;
	for (int i = 1; i < 8; i++)
	{
		l1.push_back(i);
	}
	for (auto e : l1)
	{
		cout << e << " ";
	}
	cout << endl;
	//1 2 3 4 5 6 7
	l1.pop_back();
	l1.pop_back();
	for (auto e : l1)
	{
		cout << e << " ";
	}
	cout << endl;
	//1 2 3 4 5
}
push_front和pop_front
头插和头删。
使用:
#include <iostream>
#include <list>
using namespace std;
int main()
{
    list<int> l1;
    for (int i = 1; i < 8; i++)
    {
        l1.push_front(i);
    }
    for (auto e : l1)
    {
        cout << e << " ";
    }
    cout << endl;
    //7 6 5 4 3 2 1
    l1.pop_front();
    l1.pop_front();
    for (auto e : l1)
    {
        cout << e << " ";
    }
    cout << endl;
    // 5 4 3 2 1
}
insert函数
//在指定的迭代器位置插入数据
iterator insert (iterator position, const value_type& val);
//在指定的迭代器位置插入n个val值
void insert (iterator position, size_type n, const value_type& val);
//在指定迭代器位置插入一段迭代器区间(左闭右开)
template <class InputIterator>
    void insert (iterator position, InputIterator first, InputIterator last);
在指定的迭代器位置插入数据
iterator insert (iterator position, const value_type& val);
使用:
#include <iostream>
#include <list>
using namespace std;
int main()
{
    list<int> l1;
    l1.push_back(0);
    auto it = l1.begin();
    l1.insert(it, 100);//在头部插入值100
    for (auto e : l1)
    {
        cout << e << " ";
    }
    cout << endl;
    //输出100 0
}
在指定的迭代器位置插入n个val值
void insert (iterator position, size_type n, const value_type& val);
使用:
#include <iostream>
#include <list>
using namespace std;
int main()
{
	list<int> l1;
	l1.push_back(0);
	auto it = l1.begin();
	l1.insert(it,3, 100);//在头部插入3个值为100的数据
	for (auto e : l1)
	{
		cout << e << " ";
	}
	cout << endl;
	//输出100 100 100 0
}
在指定迭代器位置插入一段迭代器区间
凡是和迭代器相关的基本上都是左闭右开。
#include <iostream>
#include <list>
using namespace std;
int main()
{
	list<int> l1;
	list<int> l2(4, 5);
	auto it = l1.begin();
	l1.insert(it,l2.begin(),l2.end());//在头部插入l2的begin到end的数据,左闭右开
	for (auto e : l1)
	{
		cout << e << " ";
	}
	cout << endl;
	//输出5 5 5 5
}
erase函数
//删除指定迭代器位置的值
iterator erase (iterator position);
//删除指定迭代器区间的值
iterator erase (iterator first, iterator last);
使用:
#include <iostream>
#include <list>
using namespace std;
int main()
{
	list<int> l1;
	for (int i = 1; i < 8; i++)
	{
		l1.push_front(i);
	}
	for (auto e : l1)
	{
		cout << e << " ";
	}
	cout << endl;
	//输出7 6 5 4 3 2 1
	// 删除指定迭代器位置
	//删除数据5
	auto it = find(l1.begin(), l1.end(), 5);//使用find函数查找
	l1.erase(it);
	for (auto e : l1)
	{
		cout << e << " ";
	}
	cout << endl;
	//输出7 6 4 3 2 1

	//删除指定迭代器区间
	//删除从6到2之间的数据,左闭右开,所以要找到指向数据1的迭代器
	auto it1 = find(l1.begin(), l1.end(), 6);
	auto it2 = find(l1.begin(), l1.end(), 1);
	l1.erase(it1,it2);
	for (auto e : l1)
	{
		cout << e << " ";
	}
	cout << endl;
	//输出7 1
}
前面说过,此处大家可将迭代器暂时理解成类似于指针,迭代器失效即迭代器所指向的节点的无效,即该节点被删除了。因为list的底层结构为带头结点的双向循环链表,因此在list中进行插入时是不会导致list的迭代器失效的,只有在删除时才会失效,并且失效的只是指向被删除节点的迭代器,其他迭代器不会受到影响。
所以erase()函数执行后,所指向的节点已被删除,迭代器失效,所以在下一次使用时,必须先给其赋值。
swap函数
交换两个list中的元素
void swap (list& x);
使用:
#include <iostream>
#include <list>
using namespace std;
int main()
{
	list<int> l1(2,6);
	list<int> l2(4, 5);
	//遍历l1
	for (auto e : l1)
	{
		cout << e << " ";
	}
	//输出6 6
	cout << endl;
	//遍历l2
	for (auto e : l2)
	{
		cout << e << " ";
	}
	//输出5 5 5 5
	cout << endl;

	l1.swap(l2);//交换l1和l2

    //遍历l1
	for (auto e : l1)
	{
		cout << e << " ";
	}
	//输出5 5 5 5
	cout << endl;
	//遍历l2
	for (auto e : l2)
	{
		cout << e << " ";
	}
	//输出6 6
	cout << endl;
}
clear函数
清除list中的所有元素
void clear();
使用:
#include <iostream>
#include <list>
using namespace std;
int main()
{
	list<int> l1(2,6);
	//遍历l1
	for (auto e : l1)
	{
		cout << e << " ";
	}
	//输出6 6
	l1.clear();//清除l1中元素

	for (auto e : l1)
	{
		cout << e << " ";
	}
	//什么也不输出
}
迭代器
我们可以将迭代器理解成指针,指向list中的某个节点。
| 函数声明 | 接口说明 |
|---|---|
| begin + end | 返回第一个元素的迭代器+返回最后一个元素下一个位置的迭代器 |
| rbegin + rend | 返回第一个元素的reverse_iterator,即end位置,返回最后一个元素下一个位置的 reverse_iterator,即begin位置 |
迭代器都是左闭右开
begin和end函数
使用:
#include <iostream>
#include <list>
#include <vector>
using namespace std;
int main()
{
    list<int> l1;
    for (int i = 0; i < 5; i++)
    {
        l1.push_back(i);
    }
    //正向迭代器的使用
    //正向遍历
    list<int>::iterator it = l1.begin();
    while (it != l1.end())//遍历
    {
        cout << *it << " ";
        it++;
    }
    //输出 0 1 2 3 4
    cout << endl;
}
rbegin和rend函数
#include <iostream>
#include <list>
#include <vector>
using namespace std;
int main()
{
    list<int> l1;
    for (int i = 0; i < 5; i++)
    {
        l1.push_back(i);
    }
	//反向迭代器的使用
    //反向遍历
    list<int>::reverse_iterator rit = l1.rbegin();
    while (rit != l1.rend())
    {
        cout << *rit << " ";
        rit++;
    }
    //输出 4 3 2 1 0
    cout << endl;
}
元素获取
| 函数声明 | 接口说明 |
|---|---|
| front | 返回list的第一个节点中值的引用 |
| back | 返回list的最后一个节点中值的引用 |
front函数
front函数用于获取list容器当中的第一个元素的引用(能够修改元素)。
使用:
#include <iostream>
#include <list>
using namespace std;
int main()
{
	list<int> l1(2,6);
	//遍历l1
	for (auto e : l1)
	{
		cout << e << " ";
	}
	//输出6 6
    cout << l1.front() << endl;//获取第一个元素,输出6
	l1.front() = 100; //获取第一个元素并将第一个元素改为100

	for (auto e : l1)
	{
		cout << e << " ";
	}
	//输出100 6
}
back函数
back函数用于获取list容器当中的最后一个元素(能够修改元素)。
使用:
#include <iostream>
#include <list>
using namespace std;
int main()
{
	list<int> l1(2,6);
	//遍历l1
	for (auto e : l1)
	{
		cout << e << " ";
	}
	//输出6 6
	cout << l1.back() << endl;//获取最后一个元素,输出6
	l1.back() = 100; //获取最后一个元素并将其改为100

	for (auto e : l1)
	{
		cout << e << " ";
	}
	//输出 6 100
}
操作函数
| 函数声明 | 接口说明 |
|---|---|
| sort | 将容器当中的数据默认排为升序 |
| remove | 删除容器中指定值的元素 |
| remove_if | 删除容器中满足条件的元素 |
| unique | 删除容器当中连续的重复元素 |
| reverse | 将容器当中元素的位置进行翻转逆置 |
| assign | 新内容分配给容器替换容器当前内容 |
| splice | 两个list容器之间的拼接 |
sort函数
算法库中的sort函数代码如下:是通过指针相减算出来的,而list容器不是连续的地址所以这种算法对于list来说并不适用。

list容器中的sort函数使用的是归并排序,算法库中的sort使用的是快排,快排是三个数取中间数同样不适用list。
从功能上来说迭代器要分三类:
1.单向迭代器 ++
2.双向迭代器(list) ++ –
3.随机迭代器(vector string) ++ – + -
在函数使用的时候如果模板中是双向不能使用单向,如果是单向可以传随机和双向。
算法库中的sort函数迭代器要传随机迭代器:

sort函数使用:
#include <iostream>
#include <list>
using namespace std;
int main()
{
	list<int> l1;
	//遍历l1
	for (int i = 13; i >= 3; i--)
	{
		l1.push_back(i);
	}
	//输出6 6

	for (auto e : l1)
	{
		cout << e << " ";
	}
	//输出13 12 11 10 9 8 7 6 5 4 3
	l1.sort();
	for (auto e : l1)
	{
		cout << e << " ";
	}
	//输出 3 4 5 6 7 8 9 10 11 12 13
}
但是在实际中我们很少使用list的sort排序,因为性能不行。
比较vector和list容器的sort排序时间:
#include <iostream>
#include <algorithm>
#include <vector>
#include <list>
using namespace std;
int main()
{

	//list和vector的sort函数性能测试
	srand(time(nullptr));
	list<int> l1;
	vector<int> v1;
	const int N = 1000000;

	v1.reserve(N);
	for (int i = 0; i < N; i++)
	{
		auto e = rand();//随机数
		v1.push_back(e);//插入
		l1.push_back(e);//插入
	}
	int begin1 = clock();
	sort(v1.begin(), v1.end());
	int end1 = clock();
	int begin2 = clock();
	l1.sort();
	int end2 = clock();
	cout << "vector sort:" << (end1 - begin1) << endl;//vector排序时间
	cout << "list sort:" <<  (end2 - begin2) << endl;//list排序时间
在release下进行测试:
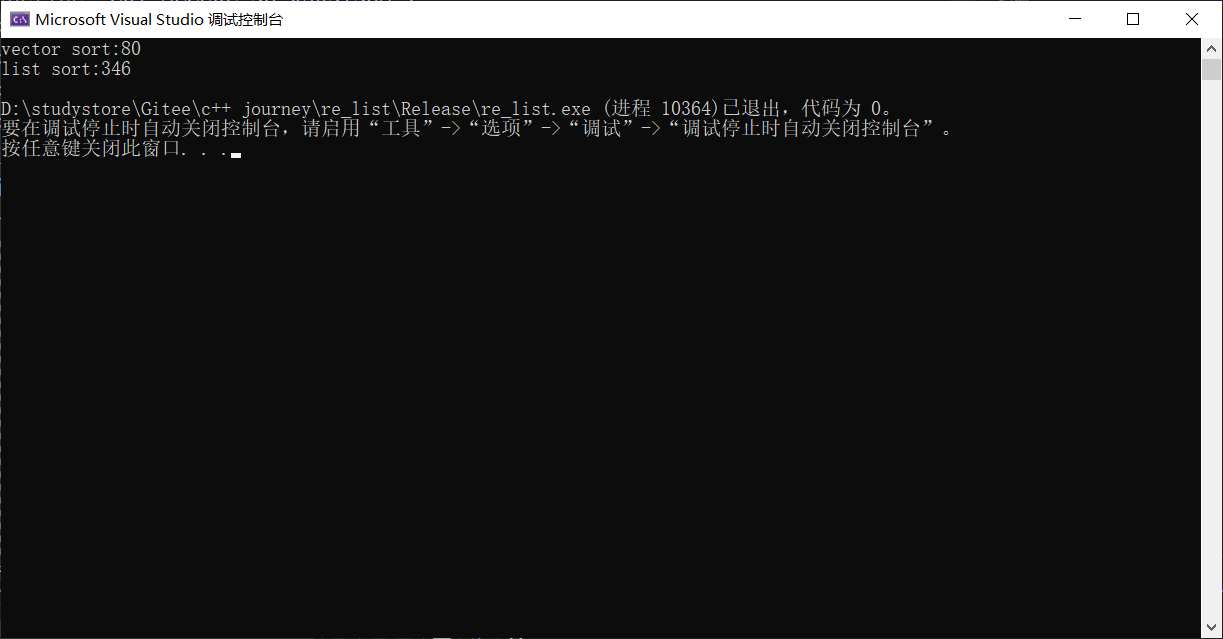
我们再尝试先将list容器中的数据放在vector中,然后再排序,排完序之后再放到list容器中:
#include <iostream>
#include <algorithm>
#include <vector>
#include <list>
using namespace std;
int main()
{

	//list和vector的sort函数性能测试
	srand(time(nullptr));
	list<int> l1;
	vector<int> v1;
	const int N = 1000000;

	v1.reserve(N);
	for (int i = 0; i < N; i++)
	{
		auto e = rand();//随机数
		v1.push_back(e);//插入
		l1.push_back(e);//插入
	}
	//vector排序时间
	int begin1 = clock();
	sort(v1.begin(), v1.end());
	int end1 = clock();


	int begin2 = clock();
	//将l1中的数据放在vector中排序
	vector<int> v2;
	v2.reserve(N);
	for (auto e : l1)
	{
		v2.push_back(e);
	}
	//排序
	sort(v2.begin(), v2.end());
	//排序之后再将其放到list中
	for (auto e : v2)
	{
		l1.push_back(e);
	}
	int end2 = clock();
	cout << "vector sort:" << (end1 - begin1) << endl;//vector排序时间
	cout << "list sort:" <<  (end2 - begin2) << endl;//list排序时间
}
运行结果:
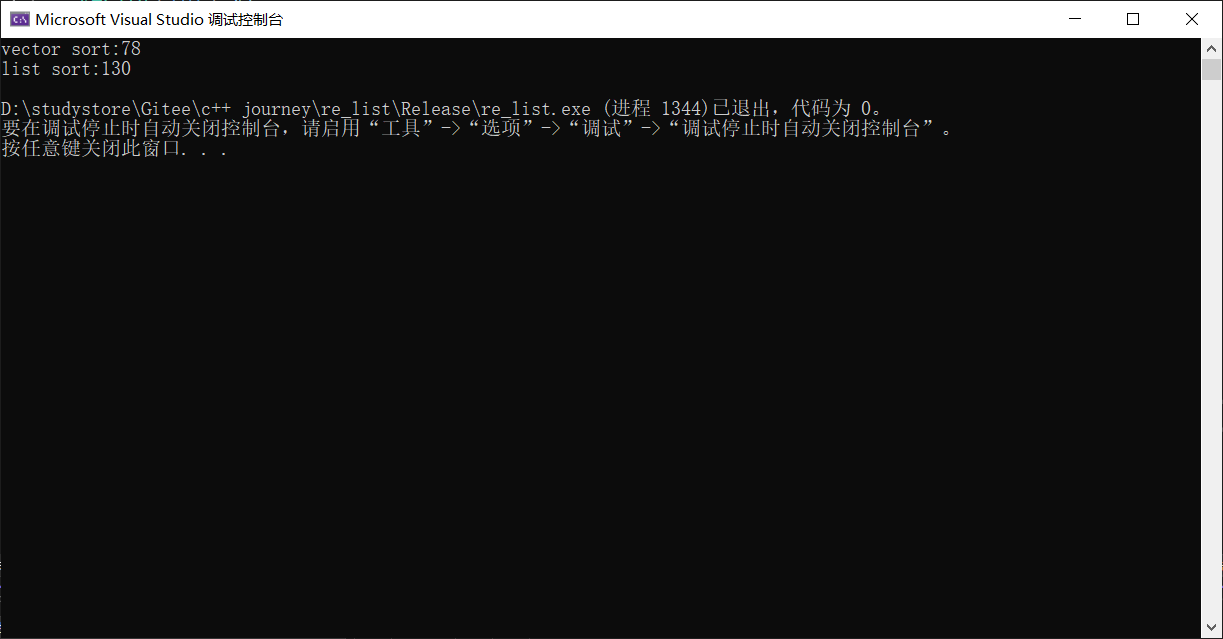
通过两个结果比较,可见即便是将list放到vector中再排序再放回list中都要比list中的sort函数直接排序要快。
remove函数
删除容器中指定值的元素。
void remove (const value_type& val);
使用:
#include <iostream>
#include <list>
using namespace std;
int main()
{
	list<int> l1;
	for (int i = 1; i < 8; i++)
	{
		l1.push_front(i);
	}
	for (auto e : l1)
	{
		cout << e << " ";
	}
	cout << endl;
	//输出7 6 5 4 3 2 1
	l1.remove(6);
	for (auto e : l1)
	{
		cout << e << " ";
	}
	cout << endl;
	//输出7 5 4 3 2 1
}
remove_if函数
remove_if函数用于删除容器当中满足条件的元素。
template <class Predicate>//函数模板
  void remove_if (Predicate pred);
使用:
#include <iostream>
#include <list>
using namespace std;

bool single_digit(const int& val)
{
	return val > 4;
}
int main()
{

	list<int> l1;
	for (int i = 1; i < 8; i++)
	{
		l1.push_front(i);
	}
	for (auto e : l1)
	{
		cout << e << " ";
	}
	cout << endl;
	//输出7 6 5 4 3 2 1
	lt.remove_if(single_digit); //删除容器当中值大于4的元素
	for (auto e : lt)
	{
		cout << e << " ";
	}
	cout << endl; //10 18
	return 0;
}
unique函数
删除容器当中连续的重复元素。
删除连续的重复元素并不能做到去重的效果,如果要做到去重就要提前排好序,否则的话只能保证两个相邻的元素不重复。
#include <iostream>
#include <list>
using namespace std;
int main()
{

	list<int> l1;
	for (int i = 1; i < 8; i++)
	{
		l1.push_back(i);
		if (i % 2 == 0) {
			l1.push_back(i);
		}
	}
	for (auto e : l1)
	{
		cout << e << " ";
	}
	cout << endl;
	//输出1 2 2 3 4 4 5 6 6 7
	l1.push_back(6);//尾插6
	l1.unique();//去除连续的重复数据
	for (auto e : l1)
	{
		cout << e << " ";
	}
	cout << endl;
	//输出1 2 3 4 5 6 7 6
}
reverse函数
将容器当中元素的位置进行翻转逆置。
void reverse();
使用:
#include <iostream>
#include <list>
using namespace std;
int main()
{

	list<int> l1;
	for (int i = 1; i < 8; i++)
	{
		l1.push_back(i);
	}
	for (auto e : l1)
	{
		cout << e << " ";
	}
	cout << endl;
	//输出1 2 3 4 5 6 7
	l1.reverse();//翻转逆置
	for (auto e : l1)
	{
		cout << e << " ";
	}
	//输出7 6 5 4 3 2 1
	cout << endl;
}
assign函数
将新内容分配给容器替换容器当前内容,assign有两种方式:
1.将所给迭代器区间当中的内容分配给容器。
2.将n个值为val的数据分配给容器。
//将所给迭代器区间当中的内容分配给容器
template <class InputIterator>
  void assign (InputIterator first, InputIterator last);
//将n个值为val的数据分配给容器
void assign (size_type n, const value_type& val);
使用:
#include <iostream>
#include <list>
using namespace std;
int main()
{
	list<int> l1;
	list<int> l2(12, 8);
	for (int i = 1; i < 8; i++)
	{
		l1.push_back(i);
	}
	for (auto e : l1)
	{
		cout << e << " ";
	}
	cout << endl;
	//输出1 2 3 4 5 6 7
	//将n个值为val的数据分配给容器替换当前内容
	l1.assign(5, 6);
	for (auto e : l1)
	{
		cout << e << " ";
	}
	//输出6 6 6 6 6
	cout << endl;

	//将所给迭代器区间当中的内容分配给容器
	l1.assign(l2.begin(), l2.end());
	for (auto e : l1)
	{
		cout << e << " ";
	}
	//输出8 8 8 8 8 8 8 8 8 8 8 8
	cout << endl;
}
splice函数
splice函数用于两个list容器之间的拼接,三种拼接方式:
//将整个容器拼接到另一个容器的指定迭代器位置
void splice (iterator position, list& x);
//将容器当中的某一个数据拼接到另一个容器的指定迭代器位置
void splice (iterator position, list& x, iterator i);
//将容器指定迭代器区间的数据拼接到另一个容器的指定迭代器位置
void splice (iterator position, list& x, iterator first, iterator last);
容器当中的数据被拼接到另一个容器之后在之前的容器中就不存在了。
使用:
#include <iostream>
#include <list>
using namespace std;
int main()
{
	list<int> l1(2, 6);
	list<int> l2(2, 8);
	l1.splice(l1.begin(), l2); //将容器lt2拼接到容器lt1的开头
	for (auto e : l1)
	{
		cout << e << " ";
	}
	cout << endl; //8 8 6 6

	list<int> l3(2, 6);
	list<int> l4(2, 8);
	l3.splice(l3.begin(), l4, l4.begin()); //将容器lt4的第一个数据拼接到容器lt3的开头
	for (auto e : l3)
	{
		cout << e << " ";
	}
	cout << endl; //8 6 6

	list<int> l5(4, 8);
	list<int> l6(4, 6);
	l5.splice(l5.begin(), l6, l6.begin(), l6.end()); //将容器lt6的指定迭代器区间内的数据拼接到容器lt5的开头
	for (auto e : l5)
	{
		cout << e << " ";
	}
	cout << endl; //6 6 6 6 8 8 8 8
	return 0;
}

