摘要:本文主要描述了FFmpeg中用于打开编解码器接口avcodec_open2大致流程的具体调用流程,详细描述了该接口被调用时所作的具体工作。
关键字:ffmpeg、avcodec_open2大致流程
注意:读者需要了解FFmpeg的基本使用流程,以及一些FFmpeg的基本常识,了解FFmpegIO相关的内容,以及大致的解码流程。
1 avcodec_open2大致流程
打开codec(codec和编码器统称为codec)前需要通过avcodec_find_decoder找到具体的codec,该函数的实现本身就是遍历FFmpeg内部的一个全局codec_list,该列表存储了目前FFmpeg设置成的所有codec和编码器的AVCodec指针。
找到codecAVCodec之后需要自己通过avcodec_alloc_context3创建一个AVCodecContext的对象,该对象描述了当前codec的上下文,包含了一些流相关的信息,而AVCodec仅仅描述codec本身和流无关。一切准备好之后就需要调用avcodec_open2打开codec。
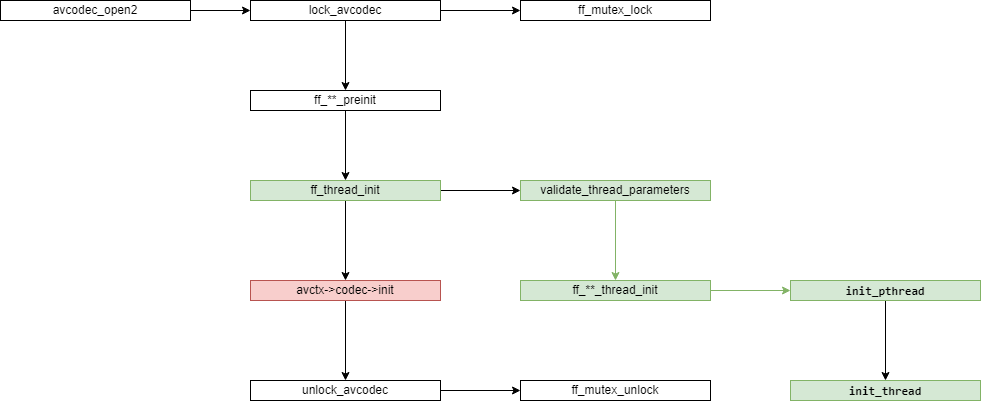
2 调用流程详情
从上面的流程中能够看出来avcodec_open2主要做了三件事情:
- 参数检查与设置;
- 初始化codec线程;
- 初始化codec。
参数设置基本上都是一个基本涉及解码过程的参数。首先是进行一些基本的参数设置与检查然后对codec的加锁,该锁是一个全局锁,所以这部分是线程安全的。FFmpeg使用的锁和线程相关都是pthread。
static AVMutex codec_mutex = AV_MUTEX_INITIALIZER;
中间还有一些基本的参数设置与检查就不细细描述了。
初始化codec时会创建一个AVCodecDescriptorcodec描述,这个也是从一个内部的全局表格codec_descriptors中搜索得到的。之后会根据当前codec的类型分别调用ff_encode_preinit和ff_decode_preinit做一些基本的初始化,这里面也是对当前codec的一些基本参数设置和一些和codec本身相关的对象的创建。而最终的codec初始化就是调用具体的codec初始化函数指针进行。
avctx->codec->init就是一个函数指针,每个codec对象都有初始化,编解码相关的接口,这里直接调用的是具体codec内部的函数指针。比如H264解码的AVCodec的指针为如下所示。
const AVCodec ff_h264_decoder = {
    .name                  = "h264",
    .long_name             = NULL_IF_CONFIG_SMALL("H.264 / AVC / MPEG-4 AVC / MPEG-4 part 10"),
    .type                  = AVMEDIA_TYPE_VIDEO,
    .id                    = AV_CODEC_ID_H264,
    .priv_data_size        = sizeof(H264Context),
    .init                  = h264_decode_init,
    .close                 = h264_decode_end,
    .decode                = h264_decode_frame,
    //....
}
线程初始化。ff_thread_init用于初始化codec运行时的解码线程内部会创建多个线程的context并初始化,初始化最终调用的是pthread_***_init接口进行初始化。
err = init_pthread(fctx, thread_ctx_offsets);
if (err < 0) {
    free_pthread(fctx, thread_ctx_offsets);
    av_freep(&avctx->internal->thread_ctx);
    return err;
}

fctx->async_lock = 1;
fctx->delaying = 1;

if (codec->type == AVMEDIA_TYPE_VIDEO)
    avctx->delay = src->thread_count - 1;

fctx->threads = av_mallocz_array(thread_count, sizeof(PerThreadContext));
if (!fctx->threads) {
    err = AVERROR(ENOMEM);
    goto error;
}

for (; i < thread_count; ) {
    PerThreadContext *p  = &fctx->threads[i];
    int first = !i;

    err = init_thread(p, &i, fctx, avctx, src, codec, first);
    if (err < 0)
        goto error;
}
3 其他细节
avcodec_open2参数部分针对解码器和编码器的不同有区分,具体的代码就是下面这部分
    if (av_codec_is_decoder(avctx->codec)) {
        if (!avctx->bit_rate)
            //这里的码率获取是根据数据源的不同而不同的,非音频流都是返回avtx的bitrate。而音频流则需要根据当前的解码器参数进行计算避免参数不一致
            avctx->bit_rate = get_bit_rate(avctx);
        /* validate channel layout from the decoder */
        if (avctx->channel_layout) {
            int channels = av_get_channel_layout_nb_channels(avctx->channel_layout);
            if (!avctx->channels)
                avctx->channels = channels;
            else if (channels != avctx->channels) {
                char buf[512];
                av_get_channel_layout_string(buf, sizeof(buf), -1, avctx->channel_layout);
                av_log(avctx, AV_LOG_WARNING,
                       "Channel layout '%s' with %d channels does not match specified number of channels %d: "
                       "ignoring specified channel layout\n",
                       buf, channels, avctx->channels);
                avctx->channel_layout = 0;
            }
        }
        if (avctx->channels && avctx->channels < 0 ||
            avctx->channels > FF_SANE_NB_CHANNELS) {
            ret = AVERROR(EINVAL);
            goto free_and_end;
        }
        if (avctx->bits_per_coded_sample < 0) {
            ret = AVERROR(EINVAL);
            goto free_and_end;
        }

#if FF_API_AVCTX_TIMEBASE
        if (avctx->framerate.num > 0 && avctx->framerate.den > 0)
            avctx->time_base = av_inv_q(av_mul_q(avctx->framerate, (AVRational){avctx->ticks_per_frame, 1}));
#endif
    }
预先初始化时解码器和编码器分别调用的ff_decode_preinit和ff_encode_preinit。
ff_decode_preinit主要就是初始化AVBSFContext,其他都是对参数进行校验。
ff_encode_preinit中会检查编码器和编码器Context的参数是不是能够对上如果对不上就会尝试校正,这些参数包括音频通道数,视频色彩范围,音频采样率、音频layout等等。







](https://img-blog.csdnimg.cn/f4125da150c448d79014f6d0bb6c465e.png)