一、前言
通过以下系列章节:
docker-compose 实现Seata Server高可用部署 | Spring Cloud 51
Seata AT 模式理论学习、事务隔离及部分源码解析 | Spring Cloud 52
Spring Boot集成Seata利用AT模式分布式事务示例 | Spring Cloud 53
Seata XA 模式理论学习、使用及注意事项 | Spring Cloud54
Seata TCC 模式理论学习、生产级使用示例搭建及注意事项 | Spring Cloud55
Seata TCC 模式下解决幂等、悬挂、空回滚问题 | Spring Cloud56
Seata Saga 模式理论学习、生产级使用示例搭建及注意事项(一) | Spring Cloud57
Seata Saga 模式理论学习、生产级使用示例搭建及注意事项(二) | Spring Cloud58
Seata 四种模式对比总结 | Spring Cloud 59
我们完成了对Seata及其AT、XA、TCC、Saga事务模式的理论和多维度对比总结,并通过业务示例搭建对其使用也有了深入的了解。
分库分表是数据库扩展中最常用的处理方法,ShardingSphere 作为使用最广泛的数据分片中间件,ShardingSphere 实现了对分布式事务Seata的支持,保证了数据一致性。在这篇文章中,我们使用ShardingSphere整合Seata在数据分片场景下进行(远程)分布式事务调用,并对集成过程中需注意的事项进行详解说明。
为删减不必要的篇幅,本章会应用到一些往期章节的内容,现整理如下,请自行查阅了解:
ShardingSphere实现数据分片实现相关内容:
Spring Boot集成ShardingSphere实现数据分片(一) | Spring Cloud 40
Spring Boot集成ShardingSphere实现数据分片(二) | Spring Cloud 41
Spring Boot集成ShardingSphere实现数据分片(三) | Spring Cloud 42
ShardingSphere 5.3 系列配置升级指南:
ShardingSphere 5.3 系列Spring 配置升级指南 | Spring Cloud 47
Seata利用AT模式分布式事务示例相关内容:
docker-compose 实现Seata Server高可用部署 | Spring Cloud 51
Seata AT 模式理论学习、事务隔离及部分源码解析 | Spring Cloud 52
Spring Boot集成Seata利用AT模式分布式事务示例 | Spring Cloud 53
二、项目总体结构
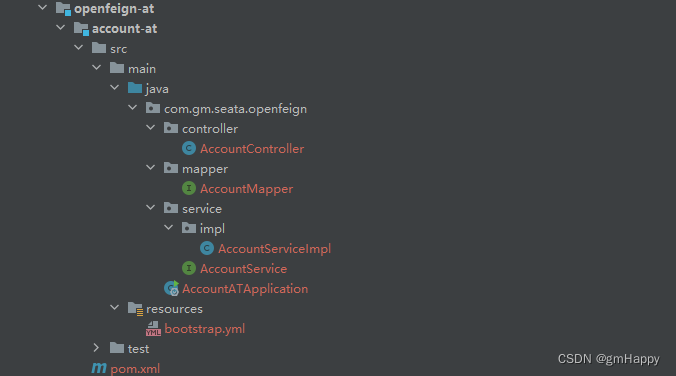
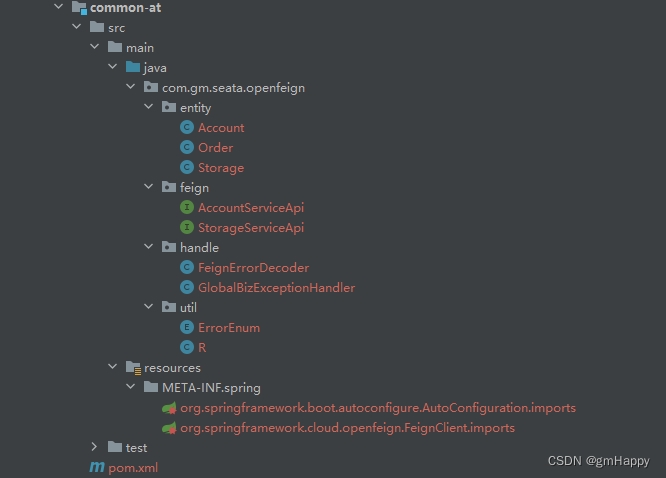
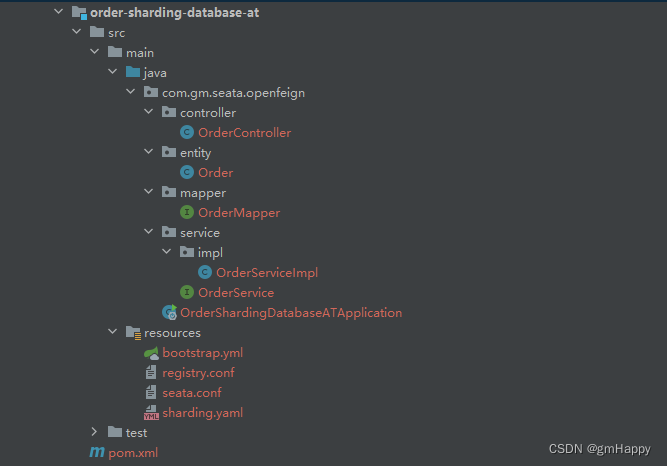
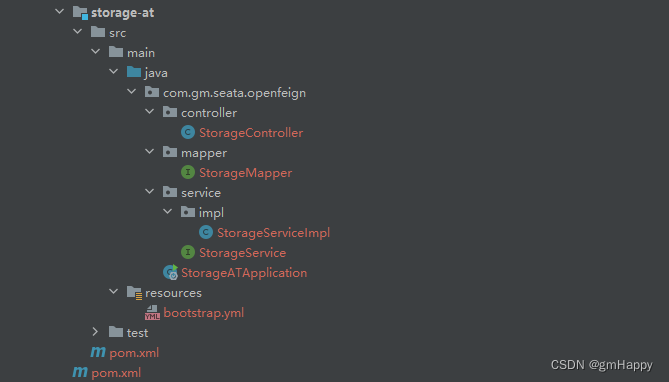
目录结构解析:
-
common-at:公共模块,包含:实体类、openfeign接口、统一异常处理等。 -
account-at:账户服务,可以查询/修改用户的账户信息。为RM (Resource Manager)- 资源管理器 角色。管理分支事务处理的资源,与
TC交互以注册分支事务和报告分支事务的状态,并驱动分支事务提交或回滚。 -
storage-at:仓储服务,可以查询/修改商品的库存数量。为RM (Resource Manager)- 资源管理器 角色。
以上部分内容请参照:Spring Boot集成Seata利用AT模式分布式事务示例 | Spring Cloud 53,以此为基础无任何改动。
-
order-sharding-database-at:订单服务,可以下订单。为TM (Transaction Manager)- 事务管理器 角色。本章重点,使用
ShardingSphere定义数据分片规则,集成Seata开启分布式事务,并进行远程微服务调用。
三、order-sharding-database-at 搭建
3.1 完整依赖
seata/openfeign-at/order-sharding-database-at/pom.xml:
<?xml version="1.0" encoding="UTF-8"?>
<project xmlns="http://maven.apache.org/POM/4.0.0"
         xmlns:xsi="http://www.w3.org/2001/XMLSchema-instance"
         xsi:schemaLocation="http://maven.apache.org/POM/4.0.0 http://maven.apache.org/xsd/maven-4.0.0.xsd">
    <parent>
        <artifactId>openfeign-at</artifactId>
        <groupId>com.gm</groupId>
        <version>0.0.1-SNAPSHOT</version>
    </parent>
    <modelVersion>4.0.0</modelVersion>

    <artifactId>order-sharding-database-at</artifactId>

    <properties>
        <maven.compiler.source>8</maven.compiler.source>
        <maven.compiler.target>8</maven.compiler.target>
        <project.build.sourceEncoding>UTF-8</project.build.sourceEncoding>
    </properties>

    <dependencies>
        <dependency>
            <groupId>com.gm</groupId>
            <artifactId>common-at</artifactId>
            <version>0.0.1-SNAPSHOT</version>
        </dependency>
        <dependency>
            <groupId>org.springframework.cloud</groupId>
            <artifactId>spring-cloud-starter-bootstrap</artifactId>
        </dependency>
        <dependency>
            <groupId>org.springframework.cloud</groupId>
            <artifactId>spring-cloud-starter-loadbalancer</artifactId>
        </dependency>
        <dependency>
            <groupId>org.springframework.cloud</groupId>
            <artifactId>spring-cloud-starter-openfeign</artifactId>
        </dependency>
        <dependency>
            <groupId>com.alibaba.cloud</groupId>
            <artifactId>spring-cloud-starter-alibaba-nacos-discovery</artifactId>
        </dependency>
        <dependency>
            <groupId>org.springframework.boot</groupId>
            <artifactId>spring-boot-starter-test</artifactId>
            <scope>test</scope>
        </dependency>
        <dependency>
            <groupId>org.springframework.boot</groupId>
            <artifactId>spring-boot-starter-web</artifactId>
        </dependency>
        <dependency>
            <groupId>org.springframework.boot</groupId>
            <artifactId>spring-boot-starter-actuator</artifactId>
        </dependency>
        <dependency>
            <groupId>com.mysql</groupId>
            <artifactId>mysql-connector-j</artifactId>
        </dependency>
        <dependency>
            <groupId>com.baomidou</groupId>
            <artifactId>mybatis-plus-boot-starter</artifactId>
            <version>3.5.3.1</version>
        </dependency>
        <dependency>
            <groupId>com.gm</groupId>
            <artifactId>common-tcc</artifactId>
            <version>0.0.1-SNAPSHOT</version>
            <scope>compile</scope>
        </dependency>

        <!-- 解决shardingsphere集成依赖版本冲突和算法依赖包 -->
        <dependency>
            <groupId>org.yaml</groupId>
            <artifactId>snakeyaml</artifactId>
            <version>1.33</version>
        </dependency>
        <dependency>
            <groupId>org.apache.velocity</groupId>
            <artifactId>velocity-engine-core</artifactId>
            <version>2.3</version>
        </dependency>
        <dependency>
            <groupId>org.apache.shardingsphere</groupId>
            <artifactId>shardingsphere-jdbc-core</artifactId>
            <version>5.3.2</version>
        </dependency>
        <dependency>
            <groupId>org.apache.shardingsphere</groupId>
            <artifactId>shardingsphere-transaction-base-seata-at</artifactId>
            <version>5.3.2</version>
            <!-- 排除掉shardingsphere-transaction-base-seata-at默认的seata版本,以免版本不一致出现问题-->
            <exclusions>
                <exclusion>
                    <groupId>io.seata</groupId>
                    <artifactId>seata-all</artifactId>
                </exclusion>
            </exclusions>
        </dependency>

        <!-- 注意一定要引入对版本,要引入spring-cloud版本seata,而不是springboot版本的seata-->
        <!-- 引入spring-cloud-starter-alibaba-seata解决openfeign远程调用传递xid问题 -->
        <dependency>
            <groupId>com.alibaba.cloud</groupId>
            <artifactId>spring-cloud-starter-alibaba-seata</artifactId>
            <!-- 排除掉springcloud默认的seata版本,以免版本不一致出现问题-->
            <exclusions>
                <exclusion>
                    <groupId>io.seata</groupId>
                    <artifactId>seata-spring-boot-starter</artifactId>
                </exclusion>
                <exclusion>
                    <groupId>io.seata</groupId>
                    <artifactId>seata-all</artifactId>
                </exclusion>
            </exclusions>
        </dependency>
        <dependency>
            <groupId>io.seata</groupId>
            <artifactId>seata-all</artifactId>
            <version>1.6.1</version>
            <!-- Could not deserialize ATN with version 4 (expected 3). -->
            <exclusions>
                <exclusion>
                    <groupId>org.antlr</groupId>
                    <artifactId>antlr4</artifactId>
                </exclusion>
            </exclusions>
        </dependency>

    </dependencies>
    <build>
        <plugins>
            <plugin>
                <groupId>org.springframework.boot</groupId>
                <artifactId>spring-boot-maven-plugin</artifactId>
            </plugin>
        </plugins>
    </build>

</project>
请自行查看各依赖包上方注释,已对各情况进行详细说明。
3.2 完整配置文件
项目配置文件共分为以下四个:
- bootstrap.yml
- seata.conf
- registry.conf
- registry.conf
3.2.1 bootstrap.yml
server:
  port: 3012

spring:
  application:
    name: @artifactId@
  cloud:
    nacos:
      username: @nacos.username@
      password: @nacos.password@
      discovery:
        server-addr: ${NACOS_HOST:nacos1.kc}:${NACOS_PORT:8848}
  datasource:
    driver-class-name: org.apache.shardingsphere.driver.ShardingSphereDriver
    url: jdbc:shardingsphere:classpath:sharding.yaml

# 此处配置是为了实现利用openfeign传播xid
seata:
  enabled: true


management:
  endpoints:
    web:
      exposure:
        include: '*'

logging:
  level:
    io.seata: info

# mybatis-plus配置控制台打印完整带参数SQL语句
mybatis-plus:
  configuration:
    log-impl: org.apache.ibatis.logging.stdout.StdOutImpl
注意事项:
seata.enabled=true此配置是为了实现利用openfeign传播全局事务的xid。
3.2.2 seata.conf
client {
    application.id = order-sharding-database-at
    transaction.service.group = mygroup
}
参照以下源码对Seata进行相关配置,org.apache.shardingsphere.transaction.base.seata.at.SeataATShardingSphereTransactionManager:
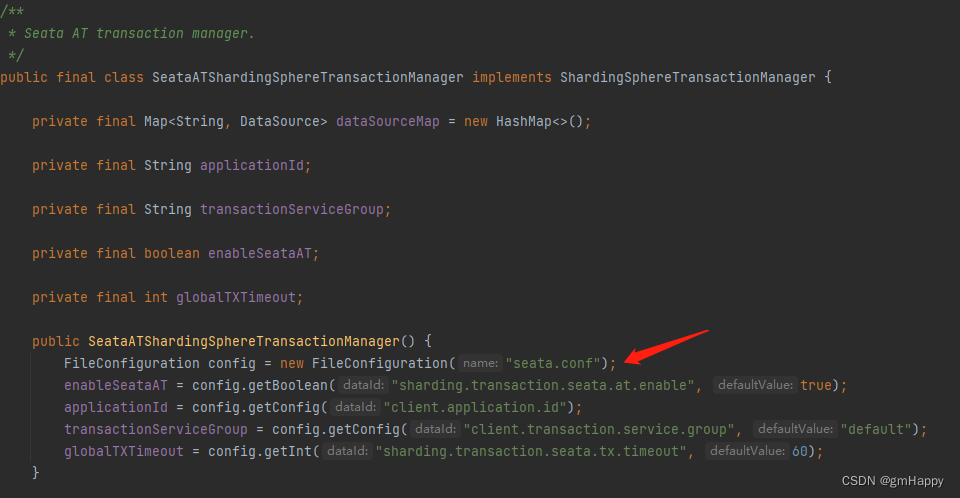
事务管理器SeataATShardingSphereTransactionManager在初始化时会读取配置文件seata.conf,加载以上配置信息。
3.2.3 registry.conf
Seata注册中心及配置中心配置:
registry {
  type = "nacos"

  nacos {
    application = "seata-server"
    serverAddr = "192.168.0.31:8848"
    group = "DEFAULT_GROUP"
    namespace = "a4c150aa-fd09-4595-9afe-c87084b22105"
    cluster = "default"
    username = "nacos"
    password = "nacos"
  }
}

config {
  type = "nacos"

  nacos {
    serverAddr = "192.168.0.31:8848"
    namespace = "a4c150aa-fd09-4595-9afe-c87084b22105"
    group = "DEFAULT_GROUP"
    username = "nacos"
    password = "nacos"
    dataId = "seataServer.properties"
  }
}
3.2.4 sharding.yaml
shardingsphere定义数据分片规则和分布式事务配置:
dataSources:
  ds1:
    dataSourceClassName: com.zaxxer.hikari.HikariDataSource
    driverClassName: com.mysql.cj.jdbc.Driver
    jdbcUrl: jdbc:mysql://192.168.0.35:3306/db1?useUnicode=true&characterEncoding=UTF-8&rewriteBatchedStatements=true&allowMultiQueries=true&serverTimezone=Asia/Shanghai
    username: root
    password: '1qaz@WSX'
    connectionTimeoutMilliseconds: 30000
    idleTimeoutMilliseconds: 60000
    maxLifetimeMilliseconds: 1800000
    maxPoolSize: 50
    minPoolSize: 1

  ds2:
    dataSourceClassName: com.zaxxer.hikari.HikariDataSource
    driverClassName: com.mysql.cj.jdbc.Driver
    jdbcUrl: jdbc:mysql://192.168.0.46:3306/db2?useUnicode=true&characterEncoding=UTF-8&rewriteBatchedStatements=true&allowMultiQueries=true&serverTimezone=Asia/Shanghai
    username: root
    password: '1qaz@WSX'
    connectionTimeoutMilliseconds: 30000
    idleTimeoutMilliseconds: 60000
    maxLifetimeMilliseconds: 1800000
    maxPoolSize: 50
    minPoolSize: 1

rules:

  - !TRANSACTION
    defaultType: BASE
    providerType: Seata

  - !SHARDING
    # 数据分片规则配置
    tables:
      # 指定某个表的分片配置,逻辑表名
      t_share_order:
        # 这个配置是告诉sharding有多少个库和多少个表及所在实际的数据库节点,由数据源名 + 表名组成(参考 Inline 语法规则)
        actualDataNodes: ds$->{1..2}.t_share_order
        # 配置库分片策略
        databaseStrategy:
          # 用于单分片键的标准分片场景
          standard:
            # 分片列名称
            shardingColumn: id
            # 分片算法名称
            shardingAlgorithmName: t_share_order_database_inline
        # 分布式序列策略
        keyGenerateStrategy:
          # 自增列名称,缺省表示不使用自增主键生成器
          column: id
          # 分布式序列算法名称
          keyGeneratorName: snowflake
    # 分片算法配置
    shardingAlgorithms:
      # 分片算法名称
      t_share_order_database_inline:
        # 分片算法类型
        type: INLINE
        # 分片算法属性配置
        props:
          algorithm-expression: ds$->{id % 2 + 1}
    # 分布式序列算法配置(如果是自动生成的,在插入数据的sql中就不要传id,null也不行,直接插入字段中就不要有主键的字段)
    keyGenerators:
      # 分布式序列算法名称
      snowflake:
        # 分布式序列算法类型
        type: SNOWFLAKE

props:
  sql-show: true #显示sql
shardingsphere数据分片请见官网:
https://shardingsphere.apache.org/document/5.3.2/cn/user-manual/shardingsphere-jdbc/yaml-config/rules/sharding/
shardingsphere分布式事务支持请见官网:https://shardingsphere.apache.org/document/5.3.2/cn/user-manual/shardingsphere-jdbc/yaml-config/rules/transaction/
3.3 数据源配置
因sharding.yaml中配置的数据分片规则和使用Seata AT事务模式,故数据源如下:
3.3.1 ds1 建表语句
create DATABASE db1;
user db1;

-- ----------------------------
-- Table structure for t_share_order
-- ----------------------------
DROP TABLE IF EXISTS `t_share_order`;
CREATE TABLE `t_share_order`  (
  `id` bigint NOT NULL AUTO_INCREMENT,
  `user_id` varchar(255) CHARACTER SET utf8mb3 COLLATE utf8mb3_general_ci NULL DEFAULT NULL,
  `commodity_code` varchar(255) CHARACTER SET utf8mb3 COLLATE utf8mb3_general_ci NULL DEFAULT NULL,
  `count` int NULL DEFAULT 0,
  `money` decimal(10, 2) NULL DEFAULT 0.00,
  PRIMARY KEY (`id`) USING BTREE
) ENGINE = InnoDB AUTO_INCREMENT = 1 CHARACTER SET = utf8mb3 COLLATE = utf8mb3_general_ci ROW_FORMAT = Dynamic;

-- for AT mode you must to init this sql for you business database. the seata server not need it.
CREATE TABLE IF NOT EXISTS `undo_log`
(
    `branch_id`     BIGINT       NOT NULL COMMENT 'branch transaction id',
    `xid`           VARCHAR(128) NOT NULL COMMENT 'global transaction id',
    `context`       VARCHAR(128) NOT NULL COMMENT 'undo_log context,such as serialization',
    `rollback_info` LONGBLOB     NOT NULL COMMENT 'rollback info',
    `log_status`    INT(11)      NOT NULL COMMENT '0:normal status,1:defense status',
    `log_created`   DATETIME(6)  NOT NULL COMMENT 'create datetime',
    `log_modified`  DATETIME(6)  NOT NULL COMMENT 'modify datetime',
    UNIQUE KEY `ux_undo_log` (`xid`, `branch_id`)
) ENGINE = InnoDB
  AUTO_INCREMENT = 1
  DEFAULT CHARSET = utf8mb4 COMMENT ='AT transaction mode undo table';
3.3.2 ds2 建表语句
create DATABASE db2;
user db2;

-- ----------------------------
-- Table structure for t_share_order
-- ----------------------------
DROP TABLE IF EXISTS `t_share_order`;
CREATE TABLE `t_share_order`  (
  `id` bigint NOT NULL AUTO_INCREMENT,
  `user_id` varchar(255) CHARACTER SET utf8mb3 COLLATE utf8mb3_general_ci NULL DEFAULT NULL,
  `commodity_code` varchar(255) CHARACTER SET utf8mb3 COLLATE utf8mb3_general_ci NULL DEFAULT NULL,
  `count` int NULL DEFAULT 0,
  `money` decimal(10, 2) NULL DEFAULT 0.00,
  PRIMARY KEY (`id`) USING BTREE
) ENGINE = InnoDB AUTO_INCREMENT = 1 CHARACTER SET = utf8mb3 COLLATE = utf8mb3_general_ci ROW_FORMAT = Dynamic;

-- for AT mode you must to init this sql for you business database. the seata server not need it.
CREATE TABLE IF NOT EXISTS `undo_log`
(
    `branch_id`     BIGINT       NOT NULL COMMENT 'branch transaction id',
    `xid`           VARCHAR(128) NOT NULL COMMENT 'global transaction id',
    `context`       VARCHAR(128) NOT NULL COMMENT 'undo_log context,such as serialization',
    `rollback_info` LONGBLOB     NOT NULL COMMENT 'rollback info',
    `log_status`    INT(11)      NOT NULL COMMENT '0:normal status,1:defense status',
    `log_created`   DATETIME(6)  NOT NULL COMMENT 'create datetime',
    `log_modified`  DATETIME(6)  NOT NULL COMMENT 'modify datetime',
    UNIQUE KEY `ux_undo_log` (`xid`, `branch_id`)
) ENGINE = InnoDB
  AUTO_INCREMENT = 1
  DEFAULT CHARSET = utf8mb4 COMMENT ='AT transaction mode undo table';
3.4 功能搭建
3.4.1 启动类
com/gm/seata/openfeign/OrderShardingDatabaseATApplication.java:
import org.springframework.boot.SpringApplication;
import org.springframework.boot.autoconfigure.SpringBootApplication;
import org.springframework.cloud.client.discovery.EnableDiscoveryClient;
import org.springframework.cloud.openfeign.EnableFeignClients;

@SpringBootApplication
@EnableDiscoveryClient
@EnableFeignClients("com.gm.seata.openfeign.feign")
public class OrderShardingDatabaseATApplication {

    public static void main(String[] args) {
        SpringApplication.run(OrderShardingDatabaseATApplication.class, args);
    }
}
3.4.2 实体类
com/gm/seata/openfeign/entity/Order.java:
import com.baomidou.mybatisplus.annotation.IdType;
import com.baomidou.mybatisplus.annotation.TableId;
import com.baomidou.mybatisplus.annotation.TableName;
import lombok.Data;
import java.math.BigDecimal;

@Data
@TableName("t_share_order")
public class Order {

    @TableId(type = IdType.ASSIGN_ID)
    private Long id;

    private String userId;

    private String commodityCode;

    private int count;

    private BigDecimal money;
}
注意事项:
- 此处的
@TableName("t_share_order")与sharding.yaml中的逻辑表名相对应- 字段
userId上使用注解@TableId(type = IdType.ASSIGN_ID)表示主键生成策略使用mybatis-plus内置的雪花算法,且要求类型为Long,而不能为long(策略不生效,id=0)。
3.4.3 Mapper类
com/gm/seata/openfeign/mapper/OrderMapper.java:
import com.baomidou.mybatisplus.core.mapper.BaseMapper;
import com.gm.seata.openfeign.entity.Order;
import org.apache.ibatis.annotations.Mapper;

@Mapper
public interface OrderMapper extends BaseMapper<Order> {

}
3.4.4 Service类
com/gm/seata/openfeign/service/OrderService.java:
public interface OrderService {

    /**
     * 创建订单
     *
     * @param userId
     * @param commodityCode
     * @param count
     * @return
     */
    boolean createOrder(String userId, String commodityCode, Integer count);
}
com/gm/seata/openfeign/service/impl/OrderServiceImpl.java:
import com.gm.seata.openfeign.entity.Order;
import com.gm.seata.openfeign.feign.AccountServiceApi;
import com.gm.seata.openfeign.feign.StorageServiceApi;
import com.gm.seata.openfeign.mapper.OrderMapper;
import com.gm.seata.openfeign.service.OrderService;
import io.seata.core.context.RootContext;
import io.seata.spring.annotation.GlobalTransactional;
import lombok.extern.slf4j.Slf4j;
import org.springframework.beans.factory.annotation.Autowired;
import org.springframework.stereotype.Service;
import org.springframework.transaction.annotation.Transactional;
import java.math.BigDecimal;

@Slf4j
@Service
public class OrderServiceImpl implements OrderService {

    @Autowired
    OrderMapper orderMapper;

    @Autowired
    StorageServiceApi storageServiceApi;

    @Autowired
    AccountServiceApi accountServiceApi;

    @Transactional
    /*@GlobalTransactional*/
    @Override
    public boolean createOrder(String userId, String commodityCode, Integer count) {

        String xid = RootContext.getXID();
        log.info("全局事务 xid:{}", xid);

        Order order = new Order();
        order.setCount(count);
        order.setCommodityCode(commodityCode);
        order.setUserId(userId);
        order.setMoney(new BigDecimal(count * 100.0));
        int i = orderMapper.insert(order);

        try {
            storageServiceApi.deduct(commodityCode, count);
        } catch (Exception e) {
            throw new RuntimeException(e.getMessage());
        }
        try {
            accountServiceApi.deduct(userId, new BigDecimal(count * 100.0));
        } catch (Exception e) {
            throw new RuntimeException(e.getMessage());
        }


        return i == 1;
    }
}
注意事项:
- 想要分布式事务生效,调用方法上必须添加注解
@Transactional,此时因集成shardingsphere对Seata AT模式的支持 ,在TM(Transaction Manager) - 事务管理器 角色 的调用方法上可不添加@GlobalTransactional注解
参考源码org.apache.shardingsphere.transaction.base.seata.at.SeataATShardingSphereTransactionManager:
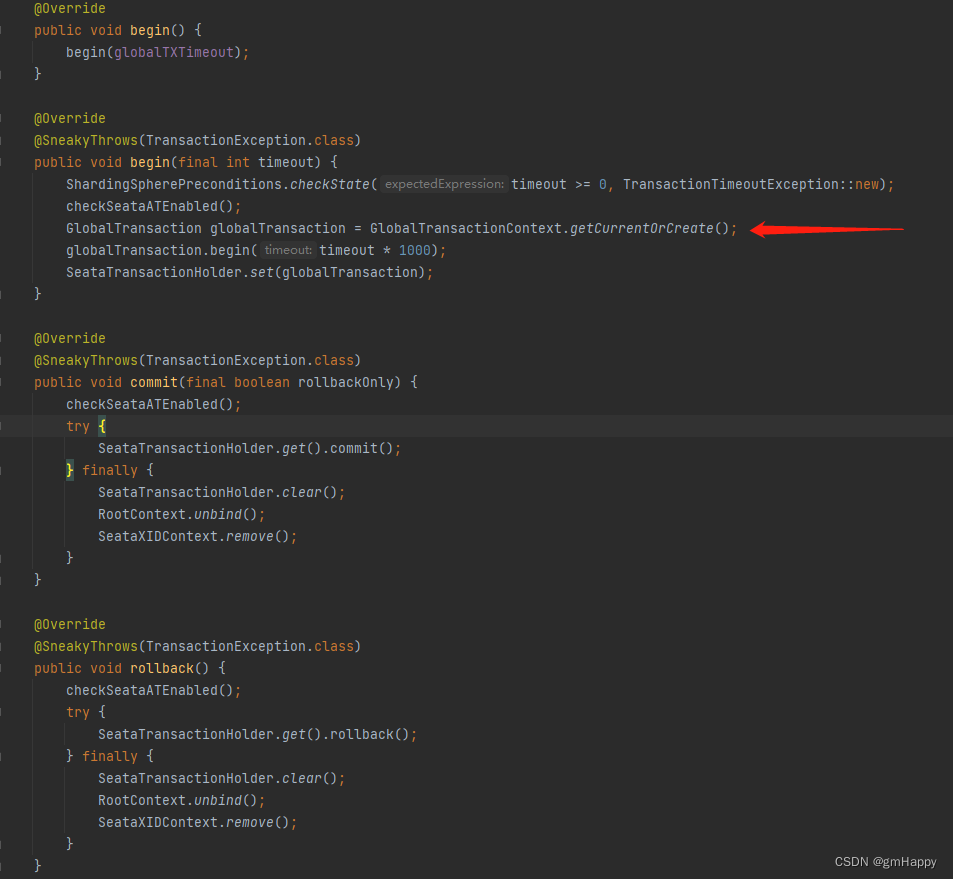
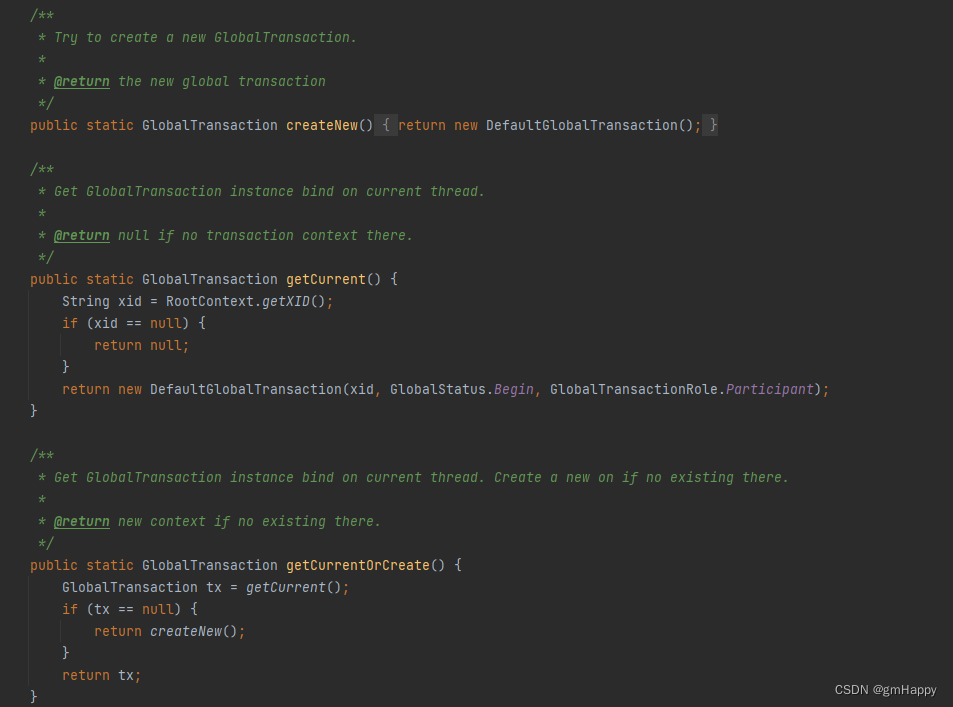
在通过事务管理器SeataATShardingSphereTransactionManager开启事务时,会读取已存在的全局事务或创建新的全局事务,故无需显性添加@GlobalTransactional注解。
3.4.5 Controller类
com/gm/seata/openfeign/controller/OrderController.java:
import com.gm.seata.openfeign.service.OrderService;
import com.gm.seata.openfeign.util.ErrorEnum;
import com.gm.seata.openfeign.util.R;
import lombok.extern.slf4j.Slf4j;
import org.springframework.beans.factory.annotation.Autowired;
import org.springframework.web.bind.annotation.RequestMapping;
import org.springframework.web.bind.annotation.RequestMethod;
import org.springframework.web.bind.annotation.RequestParam;
import org.springframework.web.bind.annotation.RestController;

@Slf4j
@RestController
public class OrderController {

    @Autowired
    OrderService orderService;

    /**
     * 商品下单购买
     *
     * @param userId
     * @param commodityCode
     * @param count
     * @return
     */
    @RequestMapping(value = "buy", method = RequestMethod.GET)
    public R<String> buy(@RequestParam("userId") String userId, @RequestParam("commodityCode") String commodityCode, @RequestParam("count") Integer count) {
        try {
            orderService.createOrder(userId, commodityCode, count);
            return R.ok("下单成功", "");
        } catch (Exception e) {
            e.printStackTrace();
            int code = Integer.parseInt(e.getMessage());
            return R.restResult("下单失败", code, ErrorEnum.getEnumByCode(code).getTitle());
        }
    }
}
四、示例测试
请求地址:http://127.0.0.1:3012/buy?userId=user1&count=2&commodityCode=iphone
每请求一次,扣除余额200元,扣除库存2个
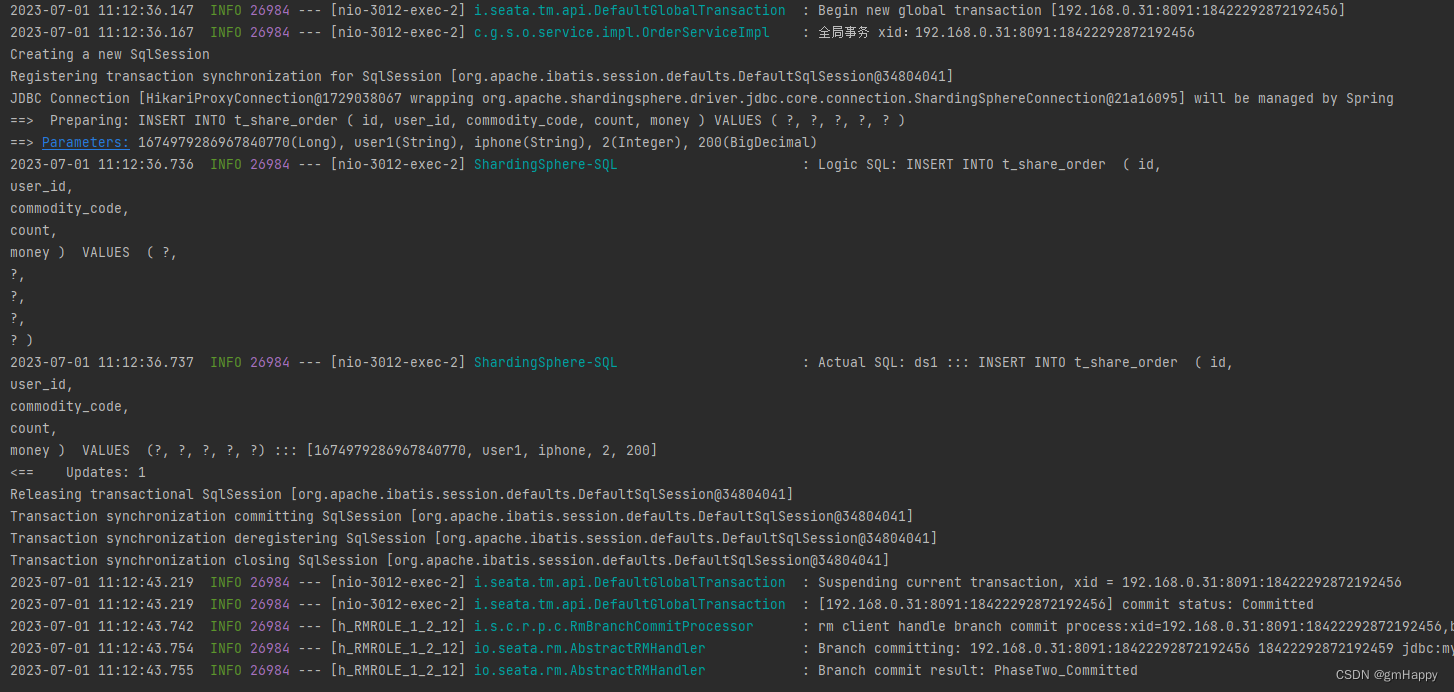
4.1 全局事务提交成功
4.2 全局事务回滚成功
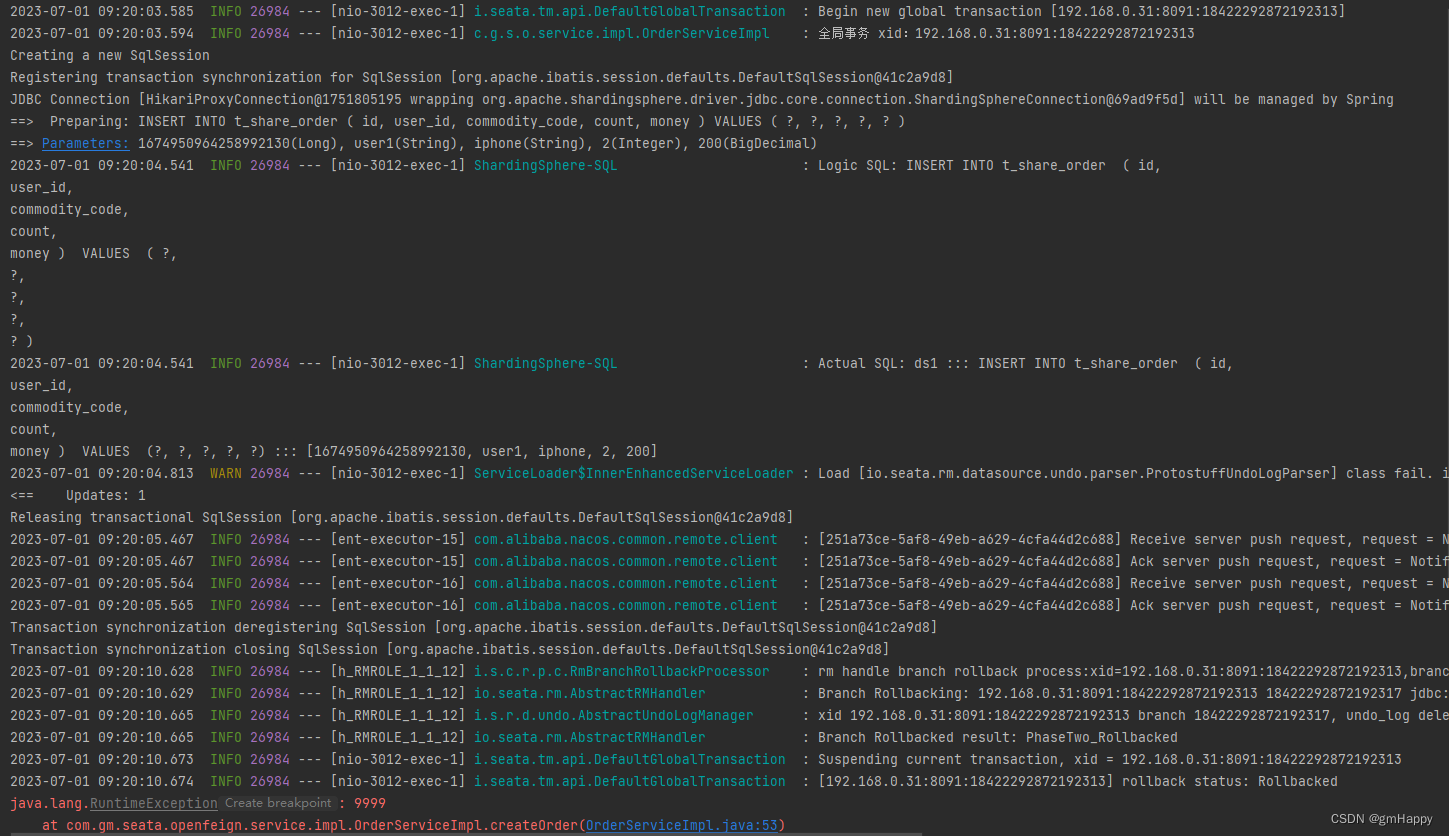
此时根据日志查看对应数据源的t_share_order表,发现其中并未新增数据。


