需要源码和数据集请点赞关注收藏后评论区留言私信~~~
一、深度卷积神经网络模型结构
1:LeNet-5
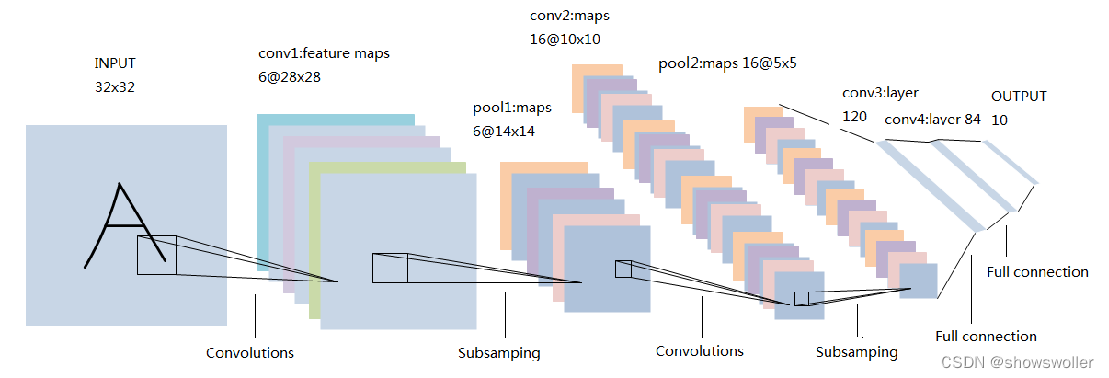
LeNet-5卷积神经网络首先将输入图像进行了两次卷积与池化操作,然后是两次全连接层操作,最后使用Softmax分类器作为多分类输出,它对手写数字的识别十分有效,取得了超过人眼的识别精度,被应用于邮政编码和支票号码,但是它网络结构简单,难以处理复杂的图像分类问题
2:AlexNet
随着高效的并行计算处理器(GPU)的兴起,人们建立了更高效的卷积神经网络,它是一个8层的神经网络模型,包括5个卷积层以及响应的池化层,3个全连接层

3:ZF-Net
它所使用的卷积神经网络结构是基于AlexNet进行了调整,主要的改进是把第一个卷积层的卷积核滤波器的尺寸从11×11更改为7×7大小,并且步长从4减小到2,这个改进使得输出特征图的尺寸增加到100×100,相当于增加了网络的宽度,可以保留更多的原始像素信息

4:VGG-Net
VGG网络设计的原理是利用增加网络模型的深度来提高网络的性能,VGG网络的组成可以分为八个部分,包括五个卷积池化组合,两个全连接特征层和一个全连接分类层,每个卷积池化组合是由1-4个的卷积层进行串联所组成的,所有卷积层的卷积核的尺寸大小是3×3

5:GoogLeNet
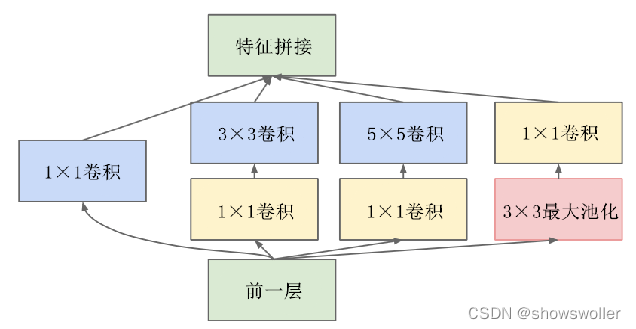
该网络模型的基本结构是利用Inception模块进行级联,在实现了扩大卷积神经网络的层数时,网络参数却得到了降低,这样可以对计算资源进行充分使用,使得算法的计算效率大大提高
6:ResNet
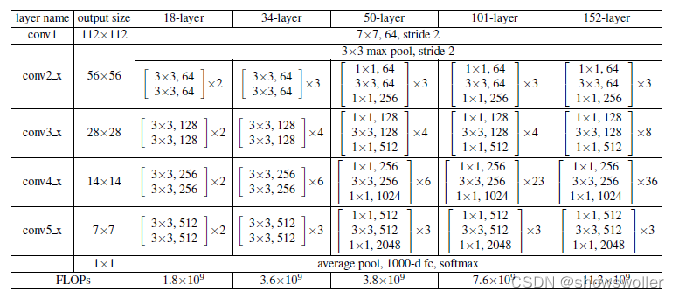
ResNet的主要思想就是在标准的前馈卷积网络中,加上一个绕过一些层的跳跃连接,每绕过一层就会产生出一个残差块,卷积层预测添加输入张量的残差。ResNet将网络层数提高到了152层,虽然大幅增加了网络的层数,却将训练更深层的神经网络的难度降低了,同时也显著提升了准确率。

二、ResNet图像识别分类实战
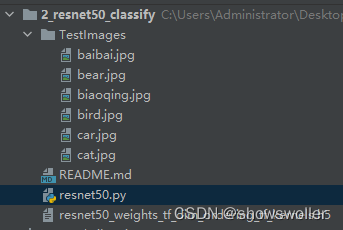
项目结构如下


三、代码
部分代码如下 需要全部代码和数据集请点赞关注收藏后评论区留言私信~~~
# -*- coding: utf-8 -*-
'''ResNet50 model for Keras.

# Reference:

- [Deep Residual Learning for Image Recognition](https://arxiv.org/abs/1512.03385)

Adapted from code contributed by BigMoyan.
'''
from __future__ import print_function

import numpy as np
import warnings

from keras.layers import Input
from keras import layers
from keras.layers import Dense
from keras.layers import Activation
from keras.layers import Flatten
from keras.layers import Conv2D
from keras.layers import MaxPooling2D
from keras.layers import GlobalMaxPooling2D
from keras.layers import ZeroPadding2D
from keras.layers import AveragePooling2D
from keras.layers import GlobalAveragePooling2D
from keras.layers import BatchNormalization
from keras.models import Model
from keras.preprocessing import image
import keras.backend as K
from keras.utils import layer_utils
from keras.utils.data_utils import get_file
from keras.applications.imagenet_utils import decode_predictions
from keras.applications.imagenet_utils import preprocess_input
from keras.applications.imagenet_utils import  obtain_input_shape
from keras.utils.layer_utils import get_source_inputs

#要先去这里下载训练模型 没网搞不了
WEIGHTS_PATH = 'https://github.com/fchollet/deep-learning-models/releases/download/v0.2/resnet50_weights_tf_dim_ordering_tf_kernels.h5'
WEIGHTS_PATH_NO_TOP = 'https://github.com/fchollet/deep-learning-models/releases/download/v0.2/resnet50_weights_tf_dim_ordering_tf_kernels_notop.h5'

#定义标识模块实现偏差函数
def identity_block(input_tensor, kernel_size, filters, stage, block):
    '''''
        描述:实现偏差单元
        参数 :  X – 输入数据
                k_stride – 卷积核步长
                k_size – 卷积核尺寸
                stage – 网络位置
                block – 图层名称
        返回值:X的激活结果
        '''

    filters1, filters2, filters3 = filters
    if K.image_data_format() == 'channels_last':
        bn_axis = 3
    else:
        bn_axis = 1
    #定义偏差
    conv_name_base = 'res' + str(stage) + block + '_branch'
    bn_name_base = 'bn' + str(stage) + block + '_branch'
    #1 主要路径 卷积->池化->激活
    x = Conv2D(filters1, (1, 1), name=conv_name_base + '2a')(input_tensor)
    x = BatchNormalization(axis=bn_axis, name=bn_name_base + '2a')(x)
    x = Activation('relu')(x)
    #2 主要路径 卷积->池化->激活
    x = Conv2D(filters2, kernel_size,
               padding='same', name=conv_name_base + '2b')(x)
    x = BatchNormalization(axis=bn_axis, name=bn_name_base + '2b')(x)
    x = Activation('relu')(x)
    #3主要路径 卷积->池化
    x = Conv2D(filters3, (1, 1), name=conv_name_base + '2c')(x)
    x = BatchNormalization(axis=bn_axis, name=bn_name_base + '2c')(x)

    x = layers.add([x, input_tensor])
    x = Activation('relu')(x)
    return x

#定义卷积块以实现卷积操作
def conv_block(input_tensor, kernel_size, filters, stage, block, strides=(2, 2)):
    """conv_block is the block that has a conv layer at shortcut
    描述:实现卷积操作
    参数 :  X – 输入数据
            k_stride – 卷积核步长
            k_size – 卷积核尺寸
            stage – 图层名
            block – 模块名
            stride – 与卷积核不同的步长
    返回值:    X -- X的卷积结果

    """
    filters1, filters2, filters3 = filters
    if K.image_data_format() == 'channels_last':
        bn_axis = 3
    else:
        bn_axis = 1
    conv_name_base = 'res' + str(stage) + block + '_branch'
    bn_name_base = 'bn' + str(stage) + block + '_branch'

    x = Conv2D(filters1, (1, 1), strides=strides,
               name=conv_name_base + '2a')(input_tensor)
    x = BatchNormalization(axis=bn_axis, name=bn_name_base + '2a')(x)
    x = Activation('relu')(x)

    x = Conv2D(filters2, kernel_size, padding='same',
               name=conv_name_base + '2b')(x)
    x = BatchNormalization(axis=bn_axis, name=bn_name_base + '2b')(x)
    x = Activation('relu')(x)

    x = Conv2D(filters3, (1, 1), name=conv_name_base + '2c')(x)
    x = BatchNormalization(axis=bn_axis, name=bn_name_base + '2c')(x)

    shortcut = Conv2D(filters3, (1, 1), strides=strides,
                      name=conv_name_base + '1')(input_tensor)
    shortcut = BatchNormalization(axis=bn_axis, name=bn_name_base + '1')(shortcut)

    x = layers.add([x, shortcut])
    x = Activation('relu')(x)
    return x

#定义resNet50函数来设置resNet50网络
def ResNet50(include_top=True, weights='imagenet',
             input_tensor=None, input_shape=None,
             pooling=None,
             classes=1000):

    '''''
    描述 : 建立resNet50 网络
    参数 :  input_shape  -- 输入数据
            classes – 类的数目
    返回值 :模型—keras模型

    #将输入定义为具有形状的张量


    # Raises
        ValueError: in case of invalid argument for `weights`,
            or invalid input shape.
    '''
    if weights not in {'imagenet', None}:
        raise ValueError('The `weights` argument should be either '
                         '`None` (random initialization) or `imagenet` '
                         '(pre-training on ImageNet).')

    if weights == 'imagenet' and include_top and classes != 1000:
        raise ValueError('If using `weights` as imagenet with `include_top`'
                         ' as true, `classes` should be 1000')

    # Determine proper input shape
    input_shape = obtain_input_shape(input_shape,
                                      default_size=224,
                                      min_size=197,
                                      data_format=K.image_data_format(),
                                      require_flatten=include_top or weights)

    if input_tensor is None:
        img_input = Input(shape=input_shape)
    else:
        if not K.is_keras_tensor(input_tensor):
            img_input = Input(tensor=input_tensor, shape=input_shape)
        else:
            img_input = input_tensor
    if K.image_data_format() == 'channels_last':
        bn_axis = 3
    else:
        bn_axis = 1

    x = ZeroPadding2D((3, 3))(img_input)
    x = Conv2D(64, (7, 7), strides=(2, 2), name='conv1')(x)
    x = BatchNormalization(axis=bn_axis, name='bn_conv1')(x)
    x = Activation('relu')(x)
    x = MaxPooling2D((3, 3), strides=(2, 2))(x)

    x = conv_block(x, 3, [64, 64, 256], stage=2, block='a', strides=(1, 1))
    x = identity_block(x, 3, [64, 64, 256], stage=2, block='b')
    x = identity_block(x, 3, [64, 64, 256], stage=2, block='c')

    x = conv_block(x, 3, [128, 128, 512], stage=3, block='a')
    x = identity_block(x, 3, [128, 128, 512], stage=3, block='b')
    x = identity_block(x, 3, [128, 128, 512], stage=3, block='c')
    x = identity_block(x, 3, [128, 128, 512], stage=3, block='d')

    x = conv_block(x, 3, [256, 256, 1024], stage=4, block='a')
    x = identity_block(x, 3, [256, 256, 1024], stage=4, block='b')
    x = identity_block(x, 3, [256, 256, 1024], stage=4, block='c')
    x = identity_block(x, 3, [256, 256, 1024], stage=4, block='d')
    x = identity_block(x, 3, [256, 256, 1024], stage=4, block='e')
    x = identity_block(x, 3, [256, 256, 1024], stage=4, block='f')

    x = conv_block(x, 3, [512, 512, 2048], stage=5, block='a')
    x = identity_block(x, 3, [512, 512, 2048], stage=5, block='b')
    x = identity_block(x, 3, [512, 512, 2048], stage=5, block='c')

    x = AveragePooling2D((7, 7), name='avg_pool')(x)

    if include_top:
        x = Flatten()(x)
        x = Dense(classes, activation='softmax', name='fc1000')(x)
    else:
        if pooling == 'avg':
            x = GlobalAveragePooling2D()(x)
        elif pooling == 'max':
            x = GlobalMaxPooling2D()(x)

    # Ensure that the model takes into account
    # any potential predecessors of `input_tensor`.
    if input_tensor is not None:
        inputs = get_source_inputs(input_tensor)
    else:
        inputs = img_input
    # Create model.
    model = Model(inputs, x, name='resnet50')

    # load weights
    if weights == 'imagenet':
        if include_top:
            weights_path = get_file('resnet50_weights_tf_dim_ordering_tf_kernels.h5',
                                    WEIGHTS_PATH,
                                    cache_subdir='models',
                                    md5_hash='a7b3fe01876f51b976af0dea6bc144eb')
        else:
            weights_path = get_file('resnet50_weights_tf_dim_ordering_tf_kernels_notop.h5',
                                    WEIGHTS_PATH_NO_TOP,
                                    cache_subdir='models',
                                    md5_hash='a268eb855778b3df3c7506639542a6af')
        model.load_weights(weights_path)
        if K.backend() == 'theano':
            layer_utils.convert_all_kernels_in_model(model)

        if K.image_data_format() == 'channels_first':
            if include_top:
                maxpool = model.get_layer(name='avg_pool')
                shape = maxpool.output_shape[1:]
                dense = model.get_layer(name='fc1000')
                layer_utils.convert_dense_weights_data_format(dense, shape, 'chan
    model = ResNet50(include_top=True, weights='imagenet')

    im(img)
    x = np.expand_dims(x, axis=0)
    x = preprocess_input(x)
    print('Input image shape:', x.shape)

    preds = model.predict(x)
    print('Predicted:', decode_predictions(preds))
创作不易 觉得有帮助请点赞关注收藏~~~
