接上一篇,上一篇我们已经把环境什么的都安装好了,本篇主要做一下各种模型测试,模型下载验证等;背景这里就不多说了,上篇已经介绍过了。
一、安装开发验证环境
1.安装所需包
这里建议用清华和豆瓣的镜像相互替换,因为这两个都有资源不全的情况,个别有特殊需求的包我会单独贴出来。
1.1 安装基础包
python3 -m pip install -i https://pypi.tuna.tsinghua.edu.cn/simple --upgrade pip
pip install  -i https://pypi.tuna.tsinghua.edu.cn/simple   IPython
python3 -m pip install -i https://pypi.tuna.tsinghua.edu.cn/simple launchpadlib
pip install -i https://pypi.douban.com/simple keras-nightly==2.5.0.dev2021032900
launchpadlib 1.10.13 requires testresources, which is not installed.
上面的这几个包,建议留意一下包和版本,免得安装的时候不停报错

1.2 安装 openvino-dev
这一步会很慢很慢,慢慢等着吧,建议换成豆瓣的镜像,清华镜像大概 400-500kb/s,豆瓣能达到3M/s左右,比较节省时间,但是有些包豆瓣又不全,出什么错对应的下包在重新执行即可:
python3 -m pip install -i https://pypi.douban.com/simple   openvino-dev==2022.1.0
# 二选一,建议上面的
python3 -m pip install -i https://pypi.tuna.tsinghua.edu.cn/simple   openvino-dev==2022.1.0
1.3 注意点
这里你可能会遇到这样的错误,如果没遇到自动忽略,遇到了按照我的方法改一下即可:
正在连接 raw.githubusercontent.com (raw.githubusercontent.com)|::|:443... 失败:拒绝连接
raw.githubusercontent.com (raw.githubusercontent.com)|::|:443... 失败:拒绝连接
修改方法:
vim /etc/hosts
编辑hosts ,添加以下内容
# GitHub Start
52.74.223.119 github.com
192.30.253.119 gist.github.com
54.169.195.247 api.github.com
185.199.111.153 assets-cdn.github.com
151.101.76.133 raw.githubusercontent.com
151.101.108.133 user-images.githubusercontent.com
151.101.76.133 gist.githubusercontent.com
151.101.76.133 cloud.githubusercontent.com
151.101.76.133 camo.githubusercontent.com
151.101.76.133 avatars0.githubusercontent.com
151.101.76.133 avatars1.githubusercontent.com
151.101.76.133 avatars2.githubusercontent.com
151.101.76.133 avatars3.githubusercontent.com
151.101.76.133 avatars4.githubusercontent.com
151.101.76.133 avatars5.githubusercontent.com
151.101.76.133 avatars6.githubusercontent.com
151.101.76.133 avatars7.githubusercontent.com
151.101.76.133 avatars8.githubusercontent.com
# GitHub End
1.4 组件安装
python3 -m pip install -i https://pypi.douban.com/simple openvino-dev[caffe,onnx,tensorflow2,pytorch,mxnet]==2022.1.0这步是基于上面的那个安装的,也可以直接执行,考虑到时间问题以及成功的概率性,一步一步来还是靠谱一点,而且都没有多余的步骤,不会让你白白执行的。
2.下载和编译模型
这里我以openvino自带的分类模型为例,供大家参考,后面我会贴出这个模型具体怎么使用。
官方地址:Hello Classification Python* Sample — OpenVINO™ documentation

2.1 下载预训练模型:
omz_downloader --name alexnet2.2 模型转换
如果模型不是 IR 或 ONNX 格式,则必须对其进行转换。您可以使用模型转换器执行此操作:
omz_converter --name alexnet完成后效果如下目录结构:


二、加速卡以及模型验证
当我们把以上步骤做完成后就可以验证加速卡 Movidius Myriad 是否存在,以及验证卡的加速能力。
1.加速卡devices信息查询
1.1 benchmark_app -h
查不到卡的信息
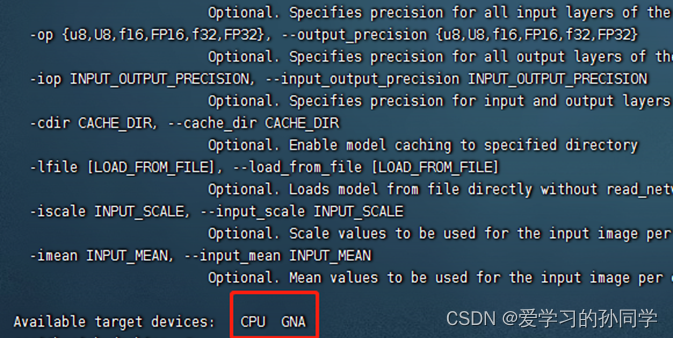
可以查到卡的信息,正确情况
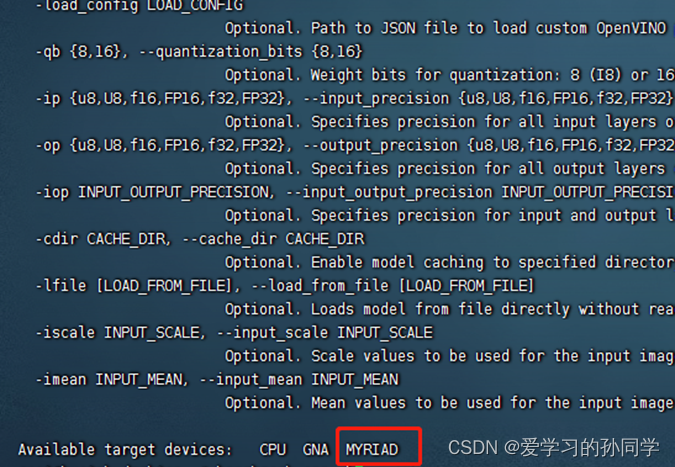
1.2 lsusb

2.Demo模型测试
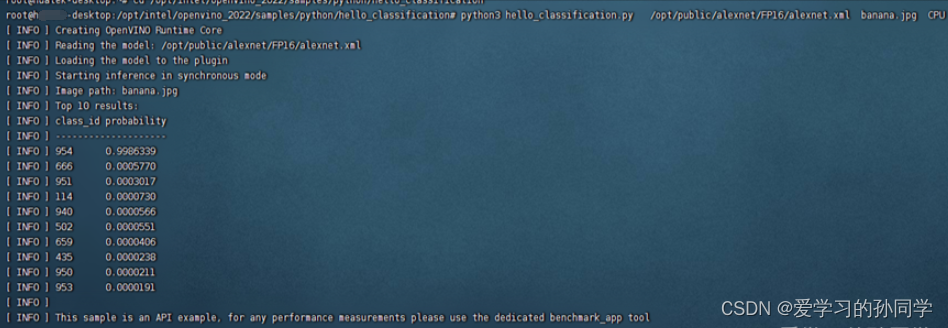
测试的是上面说的那个模型 hello_classification 分类模型,测试方法:
2.1 先验证CPU模式下是否可以正常执行
cd /opt/intel/openvino_2022/samples/python/hello_classification

python3 hello_classification.py   /opt/public/alexnet/FP16/alexnet.xml  banana.jpg  CPU
这里面的目录需要根据自己的目录进行调整,我这里写的是我安装的位置
测试结果
2.2 验证MYRIAD模式下是否可以正常执行
如果可以运行出于与CPU的结果相同代表功能OK
python3 hello_classification.py /opt/public/alexnet/FP16/alexnet.xml banana.jpg MYRIAD
测试结束!
附 当有问题不成功的情况:

此脚本可测出模型的具体运行信息:
benchmark_app -m /opt/public/alexnet/FP16/alexnet.xml -d MYRIAD 3.模型加载流程
刚才一直在说模型是如何验证是否成功的,再说一下模型的加载顺序:
加速卡推理流程:
1.分析和验证输入参数
2.加载OpenVINO环境
3.设置设备配置
4.读取网络文件,读取模型
5.调整网络大小以匹配图像大小和给定批次
6.配置模型的输入
7.将模型加载到设备
8.查询最优运行时参数
9.创建推断请求并准备输入数据
10.进行推理输出
三、问题解决
上面一直在说模型是如何验证成功失败的,现在说一下都会遇到什么样的问题,当遇到问题如何解决
1.RuntimeError: Device with "MYRIAD" name is not registered in the InferenceEngine

这种情况请检查卡是否插好了
2.MYRIAD device is not opened
RuntimeError: Failed to allocate graph: MYRIAD device is not opened_鸡血山上的小太阳的博客-CSDN博客
可参考这个,虽然我的问题不是靠这个解决的,但是提供一种思路,参考一下
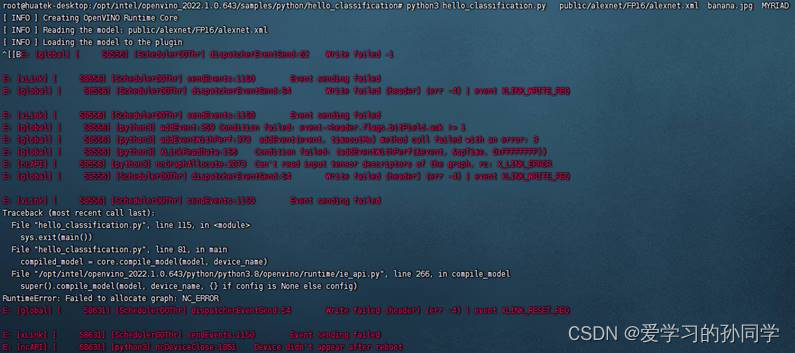
3.NC_ERROR
Intel movidius 神经元计算棒2代 ubuntu16.04运行环境搭建教程_璎珞qc的博客-CSDN博客
Windows 10 [ ERROR ] Can not init Myriad device: NC_ERROR Error_ʚVVcatɞ的博客-CSDN博客
这种错误给几个思路,参考一下:
这个问题可通过这个命令去排查问题:
benchmark_app -m /opt/public/alexnet/FP16/alexnet.xml -d MYRIAD a.卡是否损坏
b.电流是否过大,导致卡不能正常写入
c.传入数据是否过大,导入卡不能正常IO
d.连接线是否有问题,导致不能正常IO
以上是我目前遇到的问题,还有一些我再汇总一下:
问题参考:
盘点在使用openvino过程中遇到的一些问题,如何解决的-第3篇
使用Movidius神经棒过程的问题记录和探索_chutongz的博客-CSDN博客
https://blog.csdn.net/qq_44989881/article/details/119299155
4.python numpy 错误:AttributeError: module ‘numpy‘ has no attribute ‘bool‘
跑代码(pyCUDA,pyTensorRT相关)的时候numpy报错"AttributeError: module 'numpy' has no attribute 'bool'"
pip install -i https://pypi.tuna.tsinghua.edu.cn/simple numpy==1.23.1python numpy 错误:AttributeError: module ‘numpy‘ has no attribute ‘bool‘_冬日and暖阳的博客-CSDN博客

