在上一篇文章中,我们必须将 F 移到视锥体前面,因为 mat4.perspective 函数 将眼睛放在原点 (0, 0, 0) 并且把对象 放到 位于眼前
-zNear 到 -zFar 之间的视锥体中。这意味着,任何想要显示的东西,都需要放在这个空间里。
在现实世界中,通常会移动相机来拍摄某个物体的照片
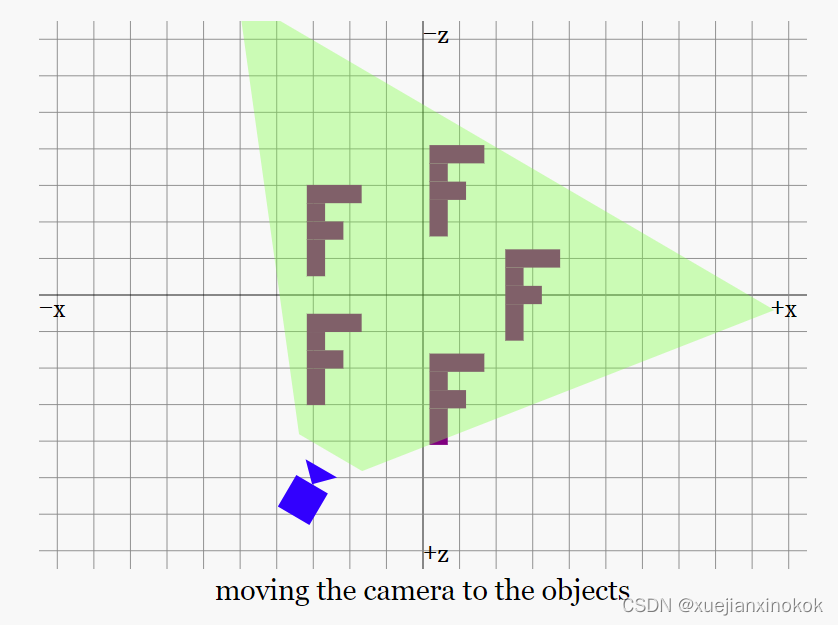
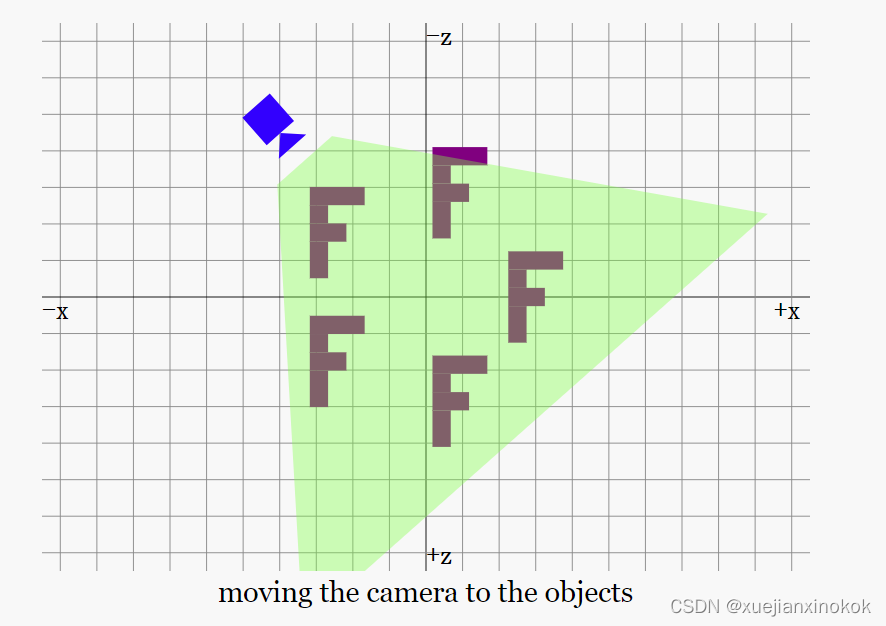
但是,在上一篇文章中,我们想出了一个投影矩阵,它要求事物位于原点之前的 -Z 轴上。为实现这一点,要做的是将相机移动到原点,并将所有其他对象移动适当的量,使其相对于相机仍处于同一位置。
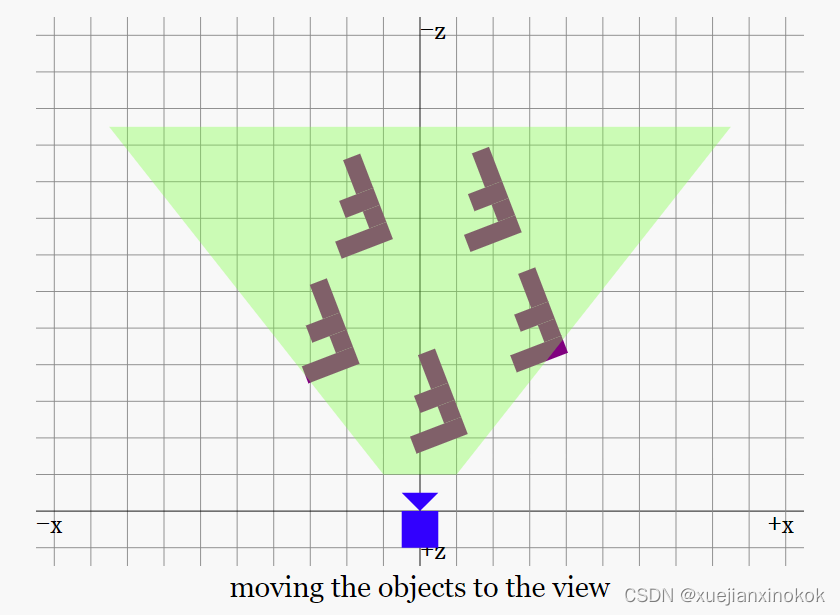
移动并旋转 所有物体,并且保持相机位置和角度固定
需要高效地移动镜头前的世界。最简单的方法是使用“逆”矩阵。在一般情况下计算逆矩阵的数学很复杂,但从概念上讲很容易。相反数是用来否定其他值的值(The inverse is the value you’d use to negate some other value.)。例如,在 X 中平移 123 的矩阵的逆矩阵 是在 X 中平移 -123 的矩阵。按 5 缩放的矩阵的逆矩阵是按 1/5 或 0.2 缩放的矩阵。绕 X 轴旋转 30° 的矩阵的逆矩阵是绕 X 轴旋转 -30° 的矩阵。
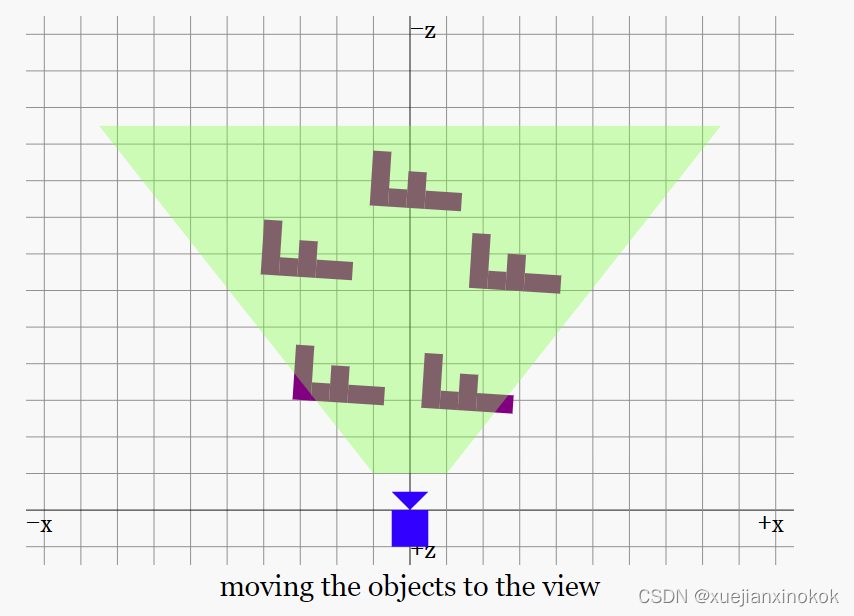
到目前为止,已经使用平移、旋转和缩放来影响“F”的位置和方向。将所有矩阵相乘后,最终得到一个矩阵,表示如何将“F”从原点移动到想要的位置、大小和方向。但也可以对 相机 做同样的事情。一旦有了如何将相机从原点移动和旋转到想要的位置的矩阵,就可以计算它的逆矩阵,这将提供一个矩阵,告诉我们如何移动和旋转其他一切相反的量,这将使相机位于 (0, 0, 0) 并且高效地移动了它前面所有东西。
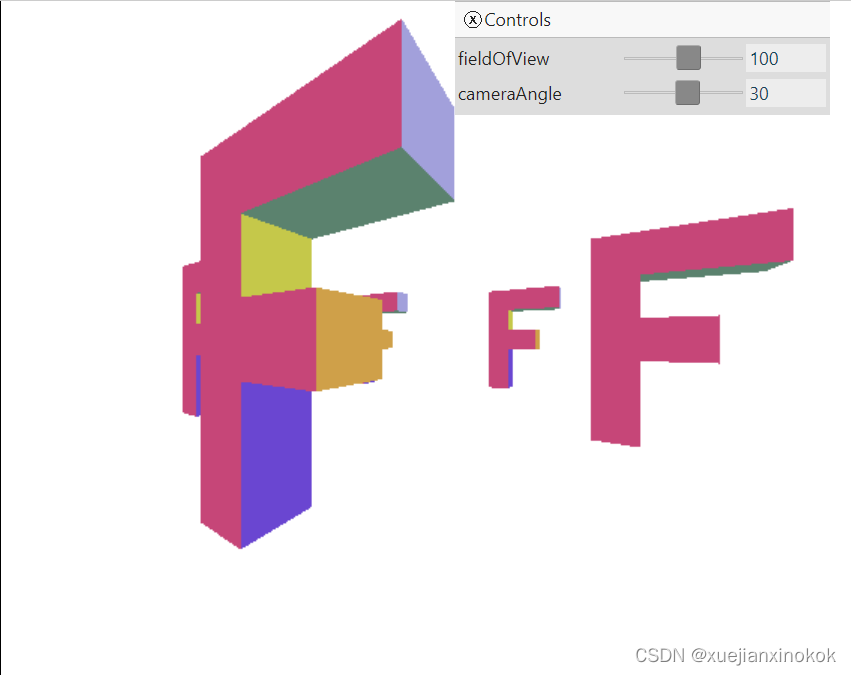
让我们制作一个 3D 场景,如上图所示,是若干“F”围成的圆圈。
首先,调整 F 顶点数据。最初是从 2D 像素开始的。 F 的左上角位于 0,0 处,向右延伸 100 像素,向下延伸 150 像素。 “像素”作为 3D 中的单位可能没有意义,制作的透视投影矩阵使用正 Y 向上,所以,翻转 F,使正 Y 向上,让它以原点为中心。
const positions = [
    // left column
    // 0, 0, 0,
    // 30, 0, 0,
    // 0, 150, 0,
    // 30, 150, 0,

    // top rung
    // 30, 0, 0,
    // 100, 0, 0,
    // 30, 30, 0,
    // 100, 30, 0,

    // middle rung
    // 30, 60, 0,
    // 70, 60, 0,
    // 30, 90, 0,
    // 70, 90, 0,

    // left column back
    // 0, 0, 30,
    // 30, 0, 30,
    // 0, 150, 30,
    // 30, 150, 30,

    // top rung back
    // 30, 0, 30,
    // 100, 0, 30,
    // 30, 30, 30,
    // 100, 30, 30,

    // middle rung back
    // 30, 60, 30,
    // 70, 60, 30,
    // 30, 90, 30,
    // 70, 90, 30,
    // left column
     -50,  75,  15,
     -20,  75,  15,
     -50, -75,  15,
     -20, -75,  15,

    // top rung
     -20,  75,  15,
      50,  75,  15,
     -20,  45,  15,
      50,  45,  15,

    // middle rung
     -20,  15,  15,
      20,  15,  15,
     -20, -15,  15,
      20, -15,  15,

    // left column back
     -50,  75, -15,
     -20,  75, -15,
     -50, -75, -15,
     -20, -75, -15,

    // top rung back
     -20,  75, -15,
      50,  75, -15,
     -20,  45, -15,
      50,  45, -15,

    // middle rung back
     -20,  15, -15,
      20,  15, -15,
     -20, -15, -15,
      20, -15, -15,
  ];
Further, as we went over in the previous article, because we were using positive Y = down to match most 2D pixel libraries, we had our triangle vertex order backward for normal 3D and ended up culling the the ‘front’ facing triangles instead of the normal ‘back’ facing triangles since were scaling Y by negative 1. Now that we’re doing normal 3D with positive Y = up, let’s flip the order of the vertices so that clockwise triangles are facing out.
此外,正如我们在上一篇文章中所讨论的那样,因为我们使用 +Y = 向下 来匹配大多数 2D 像素库(2D pixel libraries),所以我们将三角形顶点顺序倒置以用于普通 3D,并最终剔除 ‘front’ 朝向的三角形而不是正常的 ‘back’ 朝向三角形,因为将 Y 缩放负 1。现在我们正在做正常的 3D +Y = 向上,翻转顶点的顺序,使顺时针三角形朝外。
const indices = [
   //   0,  1,  2,    2,  1,  3,  // left column
   //   4,  5,  6,    6,  5,  7,  // top run
   //   8,  9, 10,   10,  9, 11,  // middle run

   //   12, 14, 13,   14, 15, 13,  // left column back
   //   16, 18, 17,   18, 19, 17,  // top run back
   //   20, 22, 21,   22, 23, 21,  // middle run back

    //  0, 12,  5,   12, 17,  5,   // top
    //  5, 17,  7,   17, 19,  7,   // top rung right
    //  6,  7, 18,   18,  7, 19,   // top rung bottom
    //  6, 18,  8,   18, 20,  8,   // between top and middle rung
    //  8, 20,  9,   20, 21,  9,   // middle rung top
    // 9, 21, 11,   21, 23, 11,   // middle rung right
    // 10, 11, 22,   22, 11, 23,   // middle rung bottom
    // 10, 22,  3,   22, 15,  3,   // stem right
     // 2,  3, 14,   14,  3, 15,   // bottom
     // 0,  2, 12,   12,  2, 14,   // left
     0,  2,  1,    2,  3,  1,   // left column
     4,  6,  5,    6,  7,  5,   // top run
     8, 10,  9,   10, 11,  9,   // middle run

    12, 13, 14,   14, 13, 15,   // left column back
    16, 17, 18,   18, 17, 19,   // top run back
    20, 21, 22,   22, 21, 23,   // middle run back

     0,  5, 12,   12,  5, 17,   // top
     5,  7, 17,   17,  7, 19,   // top rung right
     6, 18,  7,   18, 19,  7,   // top rung bottom
     6,  8, 18,   18,  8, 20,   // between top and middle rung
     8,  9, 20,   20,  9, 21,   // middle rung top
     9, 11, 21,   21, 11, 23,   // middle rung right
    10, 22, 11,   22, 23, 11,   // middle rung bottom
    10,  3, 22,   22,  3, 15,   // stem right
     2, 14,  3,   14, 15,  3,   // bottom
     0, 12,  2,   12, 14,  2,   // left
  ];
最后设置 cullMode 以剔除背面三角形。
const pipeline = device.createRenderPipeline({
    label: '2 attributes',
    layout: 'auto',
    vertex: {
      module,
      entryPoint: 'vs',
      buffers: [
        {
          arrayStride: (4) * 4, // (3) floats 4 bytes each + one 4 byte color
          attributes: [
            {shaderLocation: 0, offset: 0, format: 'float32x3'},  // position
            {shaderLocation: 1, offset: 12, format: 'unorm8x4'},  // color
          ],
        },
      ],
    },
    fragment: {
      module,
      entryPoint: 'fs',
      targets: [{ format: presentationFormat }],
    },
    primitive: {
      //cullMode: 'front',  // note: uncommon setting. See article
      cullMode: 'back',
    },
    depthStencil: {
      depthWriteEnabled: true,
      depthCompare: 'less',
      format: 'depth24plus',
    },
  });
这是一个函数,给定一个矩阵将计算它的逆矩阵。
const mat4 = {
  ...

  inverse(m, dst) {
    dst = dst || new Float32Array(16);

    const m00 = m[0 * 4 + 0];
    const m01 = m[0 * 4 + 1];
    const m02 = m[0 * 4 + 2];
    const m03 = m[0 * 4 + 3];
    const m10 = m[1 * 4 + 0];
    const m11 = m[1 * 4 + 1];
    const m12 = m[1 * 4 + 2];
    const m13 = m[1 * 4 + 3];
    const m20 = m[2 * 4 + 0];
    const m21 = m[2 * 4 + 1];
    const m22 = m[2 * 4 + 2];
    const m23 = m[2 * 4 + 3];
    const m30 = m[3 * 4 + 0];
    const m31 = m[3 * 4 + 1];
    const m32 = m[3 * 4 + 2];
    const m33 = m[3 * 4 + 3];

    const tmp0 = m22 * m33;
    const tmp1 = m32 * m23;
    const tmp2 = m12 * m33;
    const tmp3 = m32 * m13;
    const tmp4 = m12 * m23;
    const tmp5 = m22 * m13;
    const tmp6 = m02 * m33;
    const tmp7 = m32 * m03;
    const tmp8 = m02 * m23;
    const tmp9 = m22 * m03;
    const tmp10 = m02 * m13;
    const tmp11 = m12 * m03;
    const tmp12 = m20 * m31;
    const tmp13 = m30 * m21;
    const tmp14 = m10 * m31;
    const tmp15 = m30 * m11;
    const tmp16 = m10 * m21;
    const tmp17 = m20 * m11;
    const tmp18 = m00 * m31;
    const tmp19 = m30 * m01;
    const tmp20 = m00 * m21;
    const tmp21 = m20 * m01;
    const tmp22 = m00 * m11;
    const tmp23 = m10 * m01;

    const t0 = (tmp0 * m11 + tmp3 * m21 + tmp4 * m31) -
               (tmp1 * m11 + tmp2 * m21 + tmp5 * m31);
    const t1 = (tmp1 * m01 + tmp6 * m21 + tmp9 * m31) -
               (tmp0 * m01 + tmp7 * m21 + tmp8 * m31);
    const t2 = (tmp2 * m01 + tmp7 * m11 + tmp10 * m31) -
               (tmp3 * m01 + tmp6 * m11 + tmp11 * m31);
    const t3 = (tmp5 * m01 + tmp8 * m11 + tmp11 * m21) -
               (tmp4 * m01 + tmp9 * m11 + tmp10 * m21);

    const d = 1 / (m00 * t0 + m10 * t1 + m20 * t2 + m30 * t3);

    dst[0] = d * t0;
    dst[1] = d * t1;
    dst[2] = d * t2;
    dst[3] = d * t3;

    dst[4] = d * ((tmp1 * m10 + tmp2 * m20 + tmp5 * m30) -
                  (tmp0 * m10 + tmp3 * m20 + tmp4 * m30));
    dst[5] = d * ((tmp0 * m00 + tmp7 * m20 + tmp8 * m30) -
                  (tmp1 * m00 + tmp6 * m20 + tmp9 * m30));
    dst[6] = d * ((tmp3 * m00 + tmp6 * m10 + tmp11 * m30) -
                  (tmp2 * m00 + tmp7 * m10 + tmp10 * m30));
    dst[7] = d * ((tmp4 * m00 + tmp9 * m10 + tmp10 * m20) -
                  (tmp5 * m00 + tmp8 * m10 + tmp11 * m20));

    dst[8] = d * ((tmp12 * m13 + tmp15 * m23 + tmp16 * m33) -
                  (tmp13 * m13 + tmp14 * m23 + tmp17 * m33));
    dst[9] = d * ((tmp13 * m03 + tmp18 * m23 + tmp21 * m33) -
                  (tmp12 * m03 + tmp19 * m23 + tmp20 * m33));
    dst[10] = d * ((tmp14 * m03 + tmp19 * m13 + tmp22 * m33) -
                   (tmp15 * m03 + tmp18 * m13 + tmp23 * m33));
    dst[11] = d * ((tmp17 * m03 + tmp20 * m13 + tmp23 * m23) -
                   (tmp16 * m03 + tmp21 * m13 + tmp22 * m23));

    dst[12] = d * ((tmp14 * m22 + tmp17 * m32 + tmp13 * m12) -
                   (tmp16 * m32 + tmp12 * m12 + tmp15 * m22));
    dst[13] = d * ((tmp20 * m32 + tmp12 * m02 + tmp19 * m22) -
                   (tmp18 * m22 + tmp21 * m32 + tmp13 * m02));
    dst[14] = d * ((tmp18 * m12 + tmp23 * m32 + tmp15 * m02) -
                   (tmp22 * m32 + tmp14 * m02 + tmp19 * m12));
    dst[15] = d * ((tmp22 * m22 + tmp16 * m02 + tmp21 * m12) -
                   (tmp20 * m12 + tmp23 * m22 + tmp17 * m02));
    return dst;
  },
...
就像在前面的示例中所做的那样,要绘制 5 个东西,需要 5 个统一缓冲区和 5 个绑定组。
 const numFs = 5;
  const objectInfos = [];
  for (let i = 0; i < numFs; ++i) {
    // matrix
    const uniformBufferSize = (16) * 4;
    const uniformBuffer = device.createBuffer({
      label: 'uniforms',
      size: uniformBufferSize,
      usage: GPUBufferUsage.UNIFORM | GPUBufferUsage.COPY_DST,
    });

    const uniformValues = new Float32Array(uniformBufferSize / 4);

    // offsets to the various uniform values in float32 indices
    const kMatrixOffset = 0;

    const matrixValue = uniformValues.subarray(kMatrixOffset, kMatrixOffset + 16);

    const bindGroup = device.createBindGroup({
      label: 'bind group for object',
      layout: pipeline.getBindGroupLayout(0),
      entries: [
        { binding: 0, resource: { buffer: uniformBuffer }},
      ],
    });

    objectInfos.push({
      uniformBuffer,
      uniformValues,
      matrixValue,
      bindGroup,
    });
  }
去掉一些设置来整理一下例子
 const settings = {
    fieldOfView: degToRad(100),
   // translation: [-65, 0, -120],
   // rotation: [degToRad(220), degToRad(25), degToRad(325)],
   // scale: [1, 1, 1],
  };

  ...

    //  mat4.translate(matrixValue, settings.translation, matrixValue);
    //  mat4.rotateX(matrixValue, settings.rotation[0], matrixValue);
    //  mat4.rotateY(matrixValue, settings.rotation[1], matrixValue);
    //  mat4.rotateZ(matrixValue, settings.rotation[2], matrixValue);
    //  mat4.scale(matrixValue, settings.scale, matrixValue);
因为需要绘制 5 个东西,它们都将使用相同的投影矩阵,所以将在绘制 F 的循环之前提前计算投影矩阵
  function render() {
    ...

    const aspect = canvas.clientWidth / canvas.clientHeight;
    //mat4.perspective(
    const projection = mat4.perspective(
        settings.fieldOfView,
        aspect,
        1,      // zNear
        2000,   // zFar
      //  matrixValue,
    );
接下来将计算一个相机矩阵。该矩阵表示相机在 世界空间中 的位置和方向。下面的代码制作了一个矩阵,该矩阵将相机围绕原点 半径 * 1.5 距离旋转并注视原点。
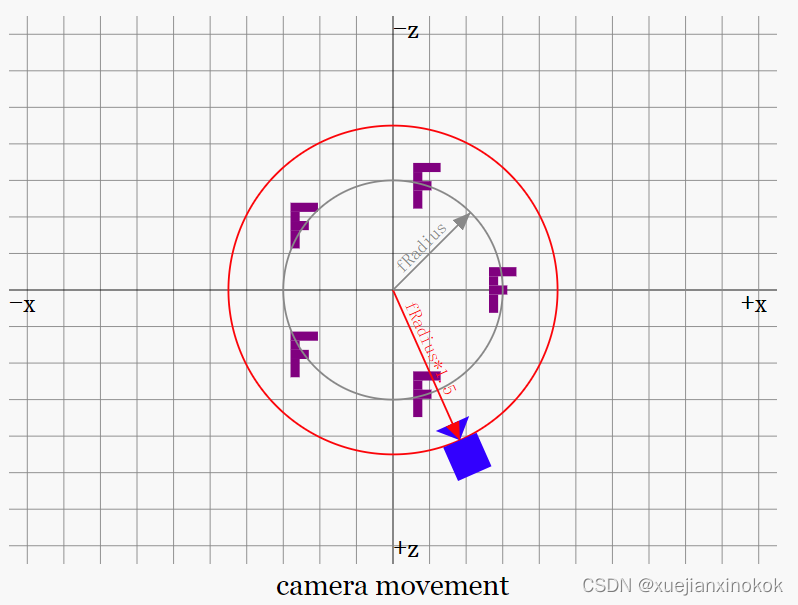

const radius = 200; //here
  const settings = {
    fieldOfView: degToRad(100),
    cameraAngle: 0, //here
  };

  ...

  function render() {

     ...


    // compute a matrix for the camera.
    const cameraMatrix = mat4.rotationY(settings.cameraAngle); //here
    mat4.translate(cameraMatrix, [0, 0, radius * 1.5], cameraMatrix); //here
We then compute a “view matrix” from the camera matrix. A “view matrix” is the matrix that moves everything the opposite of the camera effectively making everything relative to the camera as though the camera was at the origin (0,0,0). We can do this by using the inverse function that computes the inverse matrix (the matrix that does the exact opposite of the supplied matrix). In this case the supplied matrix would move the camera to some position and orientation relative to the origin. The inverse of that is a matrix that will move everything else such that the camera is at the origin.
然后从相机矩阵计算一个“视图矩阵(view matrix)”。 “视图矩阵”是一种矩阵,它可以高效地将所有物体移动到相机的对面,使所有物体都相对于相机,就像相机位于原点 (0,0,0) 一样。可以通过使用计算逆矩阵(与提供的矩阵完全相反的矩阵)的 inverse 函数来做到这一点。在这种情况下,提供的矩阵会将相机移动到相对于原点的某个位置和方向。它的逆矩阵是一个矩阵,它将移动 其他所有东西,使相机位于原点。
 // Make a view matrix from the camera matrix.
    const viewMatrix = mat4.inverse(cameraMatrix);
现在将视图和投影矩阵组合成一个视图投影矩阵。
   // combine the view and projection matrixes
    const viewProjectionMatrix = mat4.multiply(projection, viewMatrix);
最后画一圈F。对于每个 F,从视图投影矩阵开始,然后计算圆上的位置并转换到该位置。
 function render() {
    ...

    const aspect = canvas.clientWidth / canvas.clientHeight;
    const projection = mat4.perspective(
        settings.fieldOfView,
        aspect,
        1,      // zNear
        2000,   // zFar
    );

    // compute a matrix for the camera.
    const cameraMatrix = mat4.rotationY(settings.cameraAngle);
    mat4.translate(cameraMatrix, [0, 0, radius * 1.5], cameraMatrix);

    // Make a view matrix from the camera matrix.
    const viewMatrix = mat4.inverse(cameraMatrix);

    // combine the view and projection matrixes
    const viewProjectionMatrix = mat4.multiply(projection, viewMatrix);

    objectInfos.forEach(({
      matrixValue,
      uniformBuffer,
      uniformValues,
      bindGroup,
    }, i) => {
      const angle = i / numFs * Math.PI * 2;
      const x = Math.cos(angle) * radius;
      const z = Math.sin(angle) * radius;

      mat4.translate(viewProjectionMatrix, [x, 0, z], matrixValue);

      // upload the uniform values to the uniform buffer
      device.queue.writeBuffer(uniformBuffer, 0, uniformValues);

      pass.setBindGroup(0, bindGroup);
      pass.draw(numVertices);
    });
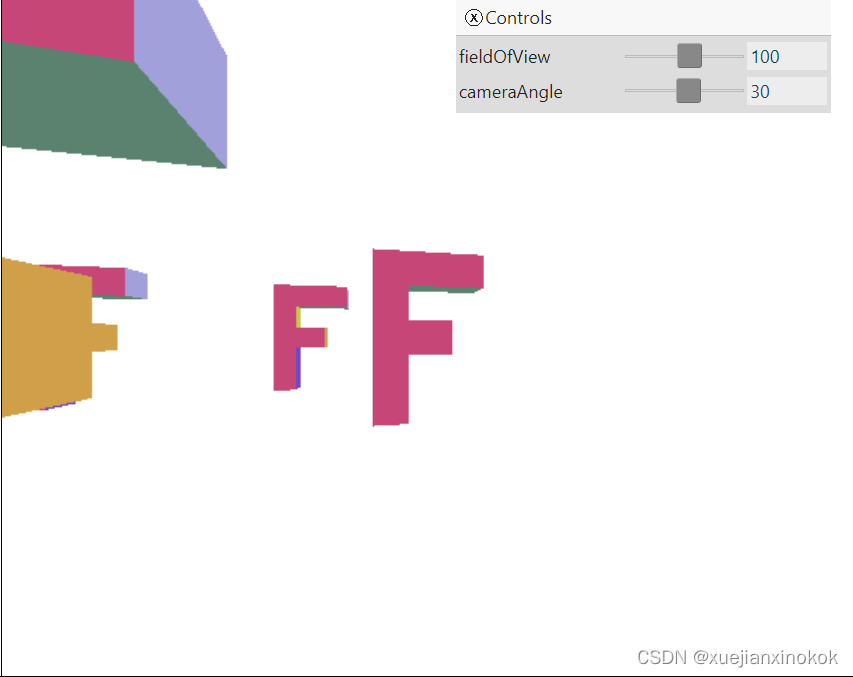
瞧!围绕“F”圈的相机。拖动 cameraAngle 滑块来移动摄像机。
这一切都很好,但使用旋转和平移将相机移动到想要的位置并指向想要看到的东西并不总是那么容易。例如,如果我们希望相机始终指向特定的一个 “F”,则需要一些非常疯狂的数学来计算如何旋转相机以指向那个“F”,同时它绕过“F”的圆圈。
幸运的是,有一种更简单的方法。可以只决定想要相机的位置以及想要它指向的地方,然后计算一个将相机放在那里的矩阵。根据矩阵的工作原理,这非常容易。
First we need to know where we want the camera. We’ll call this the eye. Then we need to know the position of the thing we want to look at or aim at. We’ll call it the target. If we subtract the target from the eye we’ll have a vector that points in the direction we’d need to go from the camera to get to the target. Let’s call it zAxis. Since we know the camera points in the -Z direction we can subtract the other way eye - target. We normalize the results and copy it directly into the z part of a matrix.
首先需要知道想要相机的位置。将其称为 eye 。然后需要知道要看或瞄准的东西的位置。我们称它为 target 。如果从 eye 中减去 target ,将得到一个向量,它指向需要从相机出发才能到达目标的方向。称它为 zAxis 。因为我们知道摄像机指向 -Z 方向,所以可以从另一个方向减去 eye - target 。将结果归一化并将其直接复制到矩阵的 z 部分。
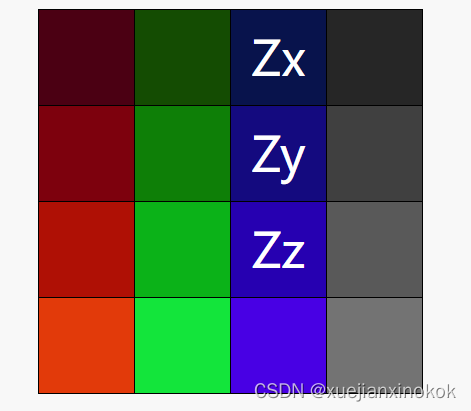
This part of a matrix represents the Z axis. In this case the Z-axis of the camera. Normalizing a vector means making it a vector that represents 1.0 unit. If you go back to the rotation article where we talked about unit circles and how those helped with 2D rotation. In 3D we need unit spheres and a normalized vector represents a point on a unit sphere.
矩阵的这一部分代表 Z 轴。在本例中为相机的 Z 轴。归一化向量意味着使它成为表示 1.0 单位的向量。如果回到讨论单位圆的旋转文章以及它们如何帮助二维旋转。在 3D 中,需要单位球体,而归一化向量表示单位球体上的一个点。
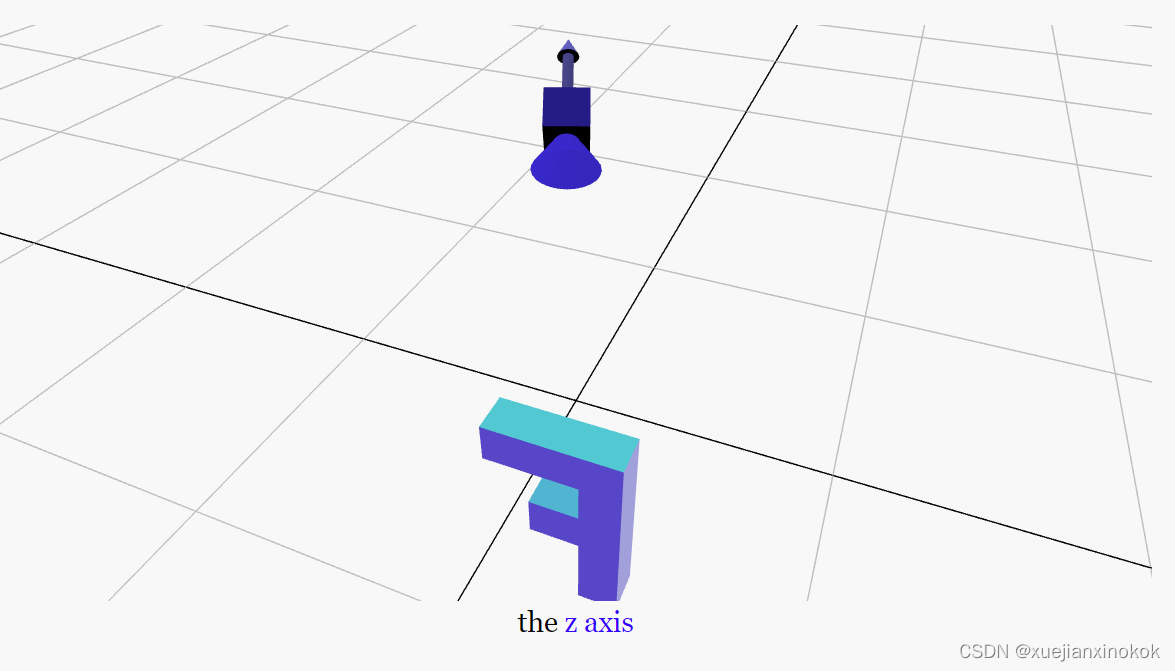
That’s not enough info though. Just a single vector gives us a point on a unit sphere but which orientation from that point to orient things? We need to fill out the other parts of the matrix. Specifically the X axis and Y axis parts. We know that in general, these 3 parts are perpendicular to each other. We also know that “in general”, we don’t point the camera straight up. Given that, if we know which way is up, in this case (0,1,0), We can use that and something called a “cross product” to compute the X axis and Y axis for the matrix.
但这提供的信息还不够。仅仅一个向量只给了单位球体上的一个点,但是从那个点到哪个方向来定位事物呢?需要计算并填写矩阵的其他部分。特别是 X 轴和 Y 轴部分。我们知道,一般情况下,这3个部分是相互垂直的。我们也知道,“一般情况下”,相机不会(也不可能)直接指向正上方。在这种情况下,如果已经知道哪个方向向上,在本例中为 (0,1,0),就可以使用它和一种称为“叉积”的东西来计算矩阵的 X 轴和 Y 轴。
I have no idea what a cross product means in mathematical terms. What I do know is that, if you have 2 unit vectors and you compute the cross product of them you’ll get a vector that is perpendicular to those 2 vectors. In other words, if you have a vector pointing south east, and a vector pointing up, and you compute the cross product you’ll get a vector pointing either south west or north east since those are the 2 vectors that are perpendicular to south east and up. Depending on which order you compute the cross product in, you’ll get the opposite answer.
我不知道叉积在数学术语中意味着什么。我所知道的是,如果你有 2 个单位向量并计算它们的叉积,你将得到一个垂直于这 2 个向量的向量。换句话说,如果你有一个指向东南的向量和一个向上的向量,然后计算叉积,你将得到一个指向西南或东北的向量,因为它们是垂直于东南的 2 个向量及以上。根据您计算叉积的顺序,您会得到相反的答案。
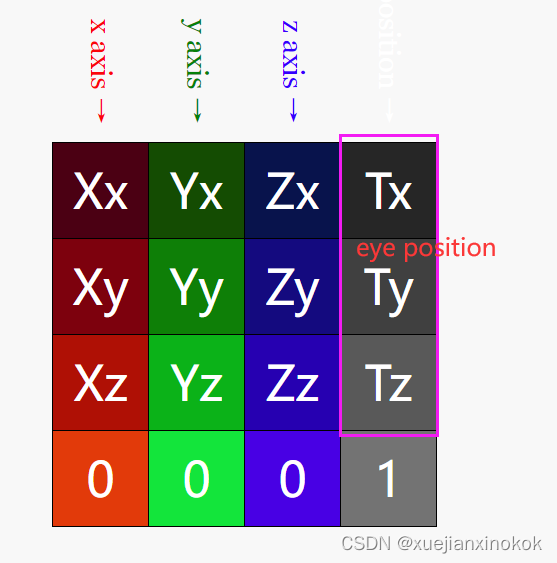
在任何情况下,如果计算 zAxis 和 up 的叉积,将得到相机的 xAxis。

现在有了 xAxis ,可以计算 zAxis 和 xAxis 的叉积 ,结果是相机的 yAxis

现在所要做的就是将 3 个轴插入矩阵。这就提供了一个矩阵,该矩阵将从 eye 指向 target 。只需要在最后一列的 填写 eye 的位置。
下面是计算 2 个向量的叉积的代码。就像我们的矩阵代码一样,我们将让它采用一个可选的目标数组。
const vec3 = {
  cross(a, b, dst) {
    dst = dst || new Float32Array(3);

    const t0 = a[1] * b[2] - a[2] * b[1];
    const t1 = a[2] * b[0] - a[0] * b[2];
    const t2 = a[0] * b[1] - a[1] * b[0];

    dst[0] = t0;
    dst[1] = t1;
    dst[2] = t2;

    return dst;
  },
};
这是减去两个向量的代码。
const vec3 = {
  ...
  subtract(a, b, dst) {
    dst = dst || new Float32Array(3);

    dst[0] = a[0] - b[0];
    dst[1] = a[1] - b[1];
    dst[2] = a[2] - b[2];

    return dst;
  },
这是规范化向量(使其成为单位向量)的代码。
const vec3 = {
  ...
  normalize(v, dst) {
    dst = dst || new Float32Array(3);

    const length = Math.sqrt(v[0] * v[0] + v[1] * v[1] + v[2] * v[2]);
    // make sure we don't divide by 0.
    if (length > 0.00001) {
      dst[0] = v[0] / length;
      dst[1] = v[1] / length;
      dst[2] = v[2] / length;
    } else {
      dst[0] = 0;
      dst[1] = 0;
      dst[2] = 0;
    }

    return dst;
  },
这是计算相机矩阵的代码。它遵循上述步骤。
const mat4 = {
  ...
  cameraAim(eye, target, up, dst) {
    dst = dst || new Float32Array(16);

    const zAxis = vec3.normalize(vec3.subtract(eye, target));
    const xAxis = vec3.normalize(vec3.cross(up, zAxis));
    const yAxis = vec3.normalize(vec3.cross(zAxis, xAxis));

    dst[ 0] = xAxis[0];  dst[ 1] = xAxis[1];  dst[ 2] = xAxis[2];  dst[ 3] = 0;
    dst[ 4] = yAxis[0];  dst[ 5] = yAxis[1];  dst[ 6] = yAxis[2];  dst[ 7] = 0;
    dst[ 8] = zAxis[0];  dst[ 9] = zAxis[1];  dst[10] = zAxis[2];  dst[11] = 0;
    dst[12] = eye[0];    dst[13] = eye[1];    dst[14] = eye[2];    dst[15] = 1;

    return dst;
  },
  ...
下面是如何使用它 使相机在移动时指向特定的“F”。
    // compute a matrix for the camera.
    // const cameraMatrix = mat4.rotationY(settings.cameraAngle);
    // mat4.translate(cameraMatrix, [0, 0, radius * 1.5], cameraMatrix);
    // Compute the position of the first F
    const fPosition = [radius, 0, 0];

    // Use matrix math to compute a position on a circle where
    // the camera is
    const tempMatrix = mat4.rotationY(settings.cameraAngle);
    mat4.translate(tempMatrix, [0, 0, radius * 1.5], tempMatrix);

    // Get the camera's position from the matrix we computed
    const eye = tempMatrix.slice(12, 15);

    const up = [0, 1, 0];

    // Compute the camera's matrix using cameraAim
    const cameraMatrix = mat4.cameraAim(eye, fPosition, up);

    // Make a view matrix from the camera matrix.
    const viewMatrix = mat4.inverse(cameraMatrix);
这是结果。

拖动滑块并注意相机如何跟踪单个“F”。
大多数数学库没有 cameraAim 函数。相反,他们有一个 lookAt 函数,它准确地计算我们的 cameraAim 函数所做的事情,但也将它转换为一个视图矩阵。函数 lookAt 可以这样实现
const mat4 = {
  ...
  lookAt(eye, target, up, dst) {
    return mat4.inverse(mat4.cameraAim(eye, target, up, dst), dst);
  },
  ...
};
使用这个 lookAt 函数我们的代码会变成这样
    // Compute the camera's matrix using look at.
    // const cameraMatrix = mat4.cameraAim(eye, fPosition, up);

    // Make a view matrix from the camera matrix.
    // const viewMatrix = mat4.inverse(cameraMatrix);
    // Compute a view matrix
    const viewMatrix = mat4.lookAt(eye, fPosition, up);
Note that you can use this type of “aim” math for more than just cameras. Common uses are making a character’s head follow some target. Making a turret aim at a target. Making an object follow a path. You compute where on the path the target is. Then you compute where on the path the target would be a few moments in the future. Plug those 2 values into your aim function and you’ll get a matrix that makes your object follow the path and orient toward the path as well.
请注意,不仅可以将这种类型的“瞄准”数学用于相机。常见用途是让角色的头部跟随某个目标。使炮塔瞄准目标。使对象跟随路径。您计算目标在路径上的位置。然后你计算目标在未来几分钟内在路径上的位置。将这 2 个值插入您的 aim 函数,您将得到一个矩阵,使您的对象跟随路径并也朝向路径。
Usually to “aim” something you want it to point down the positive Z axis instead of the negative Z axis as our function above did so we need to subtract target from eye instead of eye from target
通常要“瞄准”你想让它指向 正 Z 轴 而不是负 Z 轴的东西,就像我们上面的函数所做的那样,所以需要从 eye 中减去 target 而不是从 target 中减去 eye
const mat4 = {
  ...
  aim(eye, target, up, dst) {
    dst = dst || new Float32Array(16);

    const zAxis = vec3.normalize(vec3.subtract(target, eye));
    const xAxis = vec3.normalize(vec3.cross(up, zAxis));
    const yAxis = vec3.normalize(vec3.cross(zAxis, xAxis));

    dst[ 0] = xAxis[0];  dst[ 1] = xAxis[1];  dst[ 2] = xAxis[2];  dst[ 3] = 0;
    dst[ 4] = yAxis[0];  dst[ 5] = yAxis[1];  dst[ 6] = yAxis[2];  dst[ 7] = 0;
    dst[ 8] = zAxis[0];  dst[ 9] = zAxis[1];  dst[10] = zAxis[2];  dst[11] = 0;
    dst[12] = eye[0];    dst[13] = eye[1];    dst[14] = eye[2];    dst[15] = 1;

    return dst;
  },

  cameraAim(eye, target, up, dst) {
    dst = dst || new Float32Array(16);

    const zAxis = vec3.normalize(vec3.subtract(eye, target));
    const xAxis = vec3.normalize(vec3.cross(up, zAxis));
    const yAxis = vec3.normalize(vec3.cross(zAxis, xAxis));

    dst[ 0] = xAxis[0];  dst[ 1] = xAxis[1];  dst[ 2] = xAxis[2];  dst[ 3] = 0;
    dst[ 4] = yAxis[0];  dst[ 5] = yAxis[1];  dst[ 6] = yAxis[2];  dst[ 7] = 0;
    dst[ 8] = zAxis[0];  dst[ 9] = zAxis[1];  dst[10] = zAxis[2];  dst[11] = 0;
    dst[12] = eye[0];    dst[13] = eye[1];    dst[14] = eye[2];    dst[15] = 1;

    return dst;
  },
...
Let’s make a bunch of Fs point at another F (yea, too many Fs but I don’t want to clutter
the example with more data). We’ll make a grid of 5x5 Fs + 1 more
for them to “aim” at
  //const numFs = 5;
  const numFs = 5 * 5 + 1;
然后将对相机目标进行硬编码并更改设置,以便可以移动其中一个 F
const settings = {
   // fieldOfView: degToRad(100),
   // cameraAngle: 0,
    target: [0, 200, 300],
    targetAngle: 0,
  };

  const radToDegOptions = { min: -360, max: 360, step: 1, converters: GUI.converters.radToDeg };

  const gui = new GUI();
  gui.onChange(render);
 // gui.add(settings, 'fieldOfView', {min: 1, max: 179, converters: GUI.converters.radToDeg});
 // gui.add(settings, 'cameraAngle', radToDegOptions);
  gui.add(settings.target, '1', -100, 300).name('target height');
  gui.add(settings, 'targetAngle', radToDegOptions).name('target angle');
And finally for the first 25 Fs we’ll orient them in a grid using aim and aim them at the 26th F
最后,对于前 25 个 F,我们将使用 aim 将它们定位在网格中,并将它们对准第 26 个 F
  // update target X,Z based on angle
    settings.target[0] = Math.cos(settings.targetAngle) * radius;
    settings.target[2] = Math.sin(settings.targetAngle) * radius;

    const aspect = canvas.clientWidth / canvas.clientHeight;
    const projection = mat4.perspective(
        //settings.fieldOfView,
        degToRad(60), // fieldOfView,
        aspect,
        1,      // zNear
        2000,   // zFar
    );

    // Compute the position of the first F
    //const fPosition = [radius, 0, 0];

    // Use matrix math to compute a position on a circle where
    // the camera is
    //const tempMatrix = mat4.rotationY(settings.cameraAngle);
    //mat4.translate(tempMatrix, [0, 0, radius * 1.5], tempMatrix);

    // Get the camera's position from the matrix we computed
    //const eye = tempMatrix.slice(12, 15);
    const eye = [-500, 300, -500];
    const target = [0, -100, 0];
    const up = [0, 1, 0];

    // Compute a view matrix
    //const viewMatrix = mat4.lookAt(eye, fPosition, up);
    const viewMatrix = mat4.lookAt(eye, target, up);

    // combine the view and projection matrixes
    const viewProjectionMatrix = mat4.multiply(projection, viewMatrix);

    objectInfos.forEach(({
      matrixValue,
      uniformBuffer,
      uniformValues,
      bindGroup,
    }, i) => {
      //const angle = i / numFs * Math.PI * 2;
      //const x = Math.cos(angle) * radius;
      //const z = Math.sin(angle) * radius;

      //mat4.translate(viewProjectionMatrix, [x, 0, z], matrixValue);

      const deep = 5;
      const across = 5;
      if (i < 25) {
        // compute grid positions
        const gridX = i % across;
        const gridZ = i / across | 0;

        // compute 0 to 1 positions
        const u = gridX / (across - 1);
        const v = gridZ / (deep - 1);

        // center and spread out
        const x = (u - 0.5) * across * 150;
        const z = (v - 0.5) * deep * 150;

        // aim this F from it's position toward the target F
        const aimMatrix = mat4.aim([x, 0, z], settings.target, up);
        mat4.multiply(viewProjectionMatrix, aimMatrix, matrixValue);
      } else {
        mat4.translate(viewProjectionMatrix, settings.target, matrixValue);
      }

      // upload the uniform values to the uniform buffer
      device.queue.writeBuffer(uniformBuffer, 0, uniformValues);
And now 25 Fs are facing (their front is positive Z), the 26th F
而现在面对的是25个F(他们的正面是正Z),第26个F
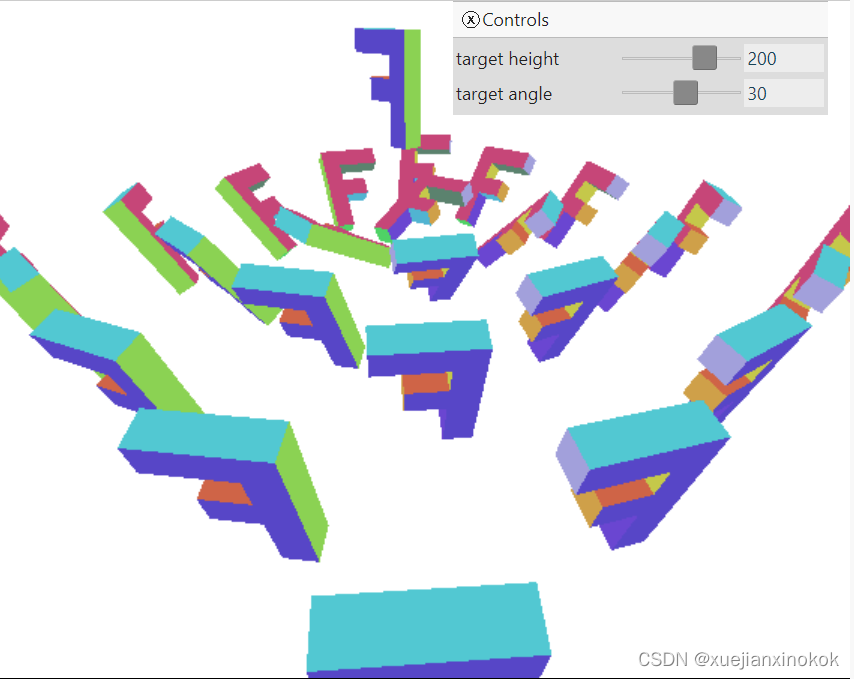
Move the sliders and see all 25Fs aim.
移动滑块并查看所有 25个 F 瞄准。


![五、浅析[ElasticSearch]底层原理与分组聚合查询](https://img-blog.csdnimg.cn/531f2cd371284c1299a7d3c1e726dc78.png)