1.ThreadX简介
Threadx是由 Express Logic 公司开发的一款实时操作系统(RTOS),2019年被微软收购,成为了微软的一款Azure RTOS。在2020年,ThreadX也加入了开源大军,将ThreadX内核及其各大组件开源免费。
ThreadX可以说是一款发展非常迅猛的RTOS,相信最近两年有了解它的朋友都能理解。
- 2019年:被微软收购;
- 2020年:免费开源;
- 2021年:上线中文版手册;
ThreadX陆续上线了全中文手册,地址:Azure RTOS ThreadX 文档
中文手册包含:ThreadX内核文档,以及各大组件文档:FileX、 GUIX、 USBX、 NetX、 LevelX、 TraceX等。
2.说明
本文基于threadx-6.2.1_rel版本,介绍ThreadX在cortex-M7上的移植。
3.移植过程
3.1.获取threadx源码
直接从github上获取最新的release版本:threadx_release。
threadx的文件结构如下:
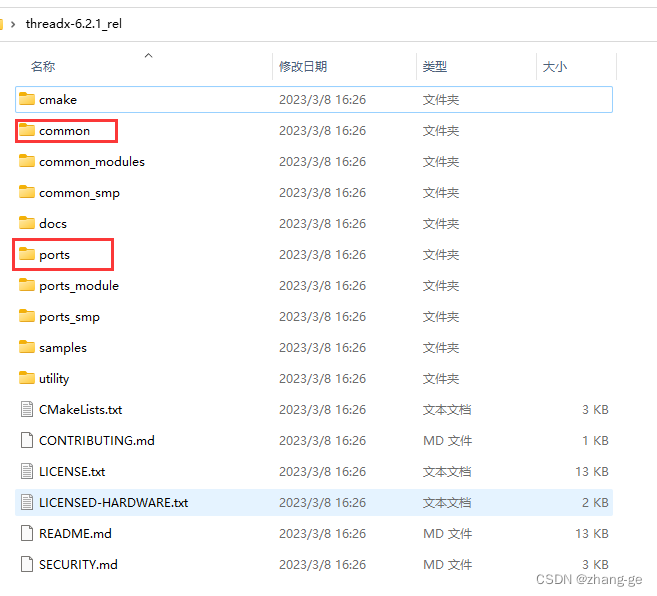
移植过程中,主要使用到ports和common两个文件夹。
3.2.移植步骤
-
1.在自己的工程中创建
threadx-6.2.1文件夹,将threadx源码的ports和common文件夹拷贝到threadx-6.2.1中。

-
2.添加源码到MDK工程
-
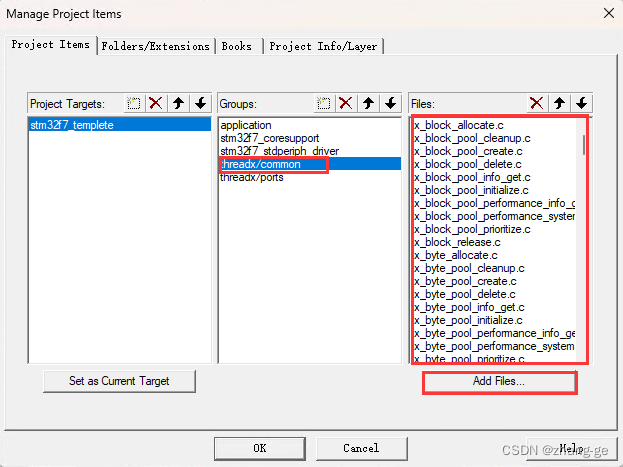
2.1 新建threadx/common分组,添加threadx-6.2.1/common/src下的所有c文件:
-
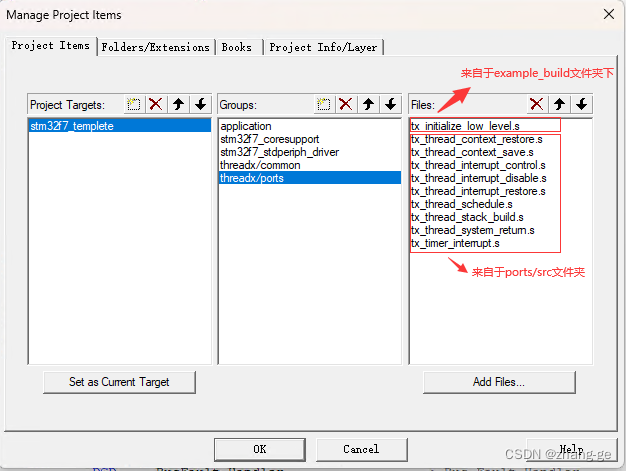
2.2.新建threadx/ports分组,并添加源码到工程
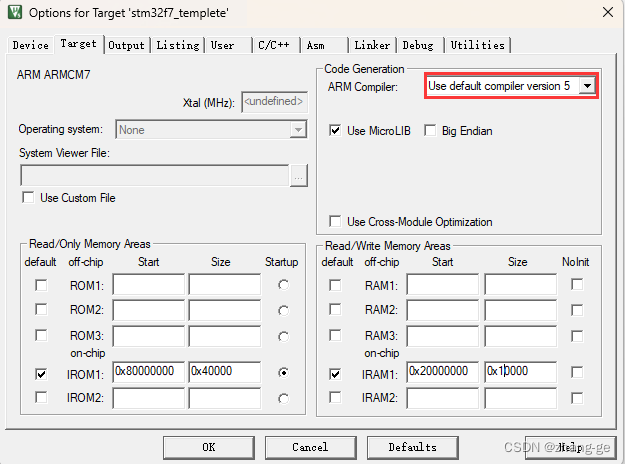
此时需要根据编译环境来选择,我使用的是mdk的ac5编译器,则添加:
threadx-6.2.1\ports\cortex_m7\ac5\src 下的所有 .s 文件和
threadx-6.2.1\ports\cortex_m7\ac5\example_build\tx_initialize_low_level.s文件(将其也复制到ports\cortex_m7\ac5\src下):
设置使用ac5编译器:
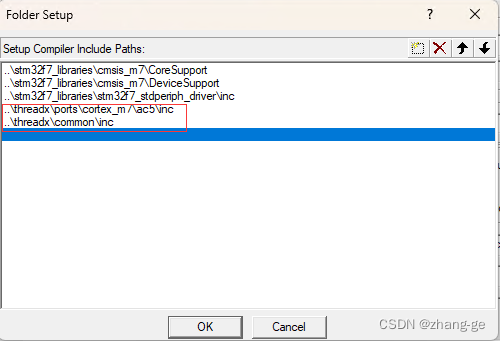
添加头文件路径:
-
-
3.修改适配底层文件
- 3.1.
tx_initialize_low_level.s
threadx官方的example_build中提供了一个底层适配文件tx_initialize_low_level.s,所在位置如图:
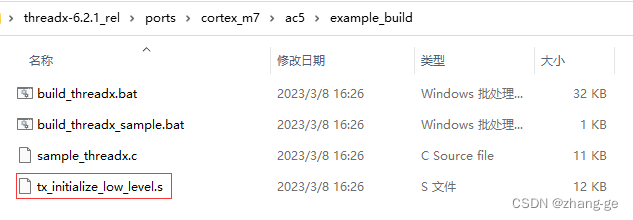
这个文件中实现了_tx_initialize_low_level()函数,该函数用于完成处理器的底层初始化,包括:- 设置中断向量表
- 设置用于产生时钟节拍的定位器(Systick)
- 保存系统栈顶指针给中断程序使用
- 寻找RAM中首块可用地址传入tx_application_define函数供使用,也就是first_unused_memory指针的值
- 3.1.
从文件的实现来看,threadx想用这个文件接管原有cortex-m7的启动文件,但是其接管的启动文件只实现了中断向量表的一部分,并不能完全拿来使用。因此,为了不对原有的启动文件造成影响,需要对此文件做修改,改动如下:
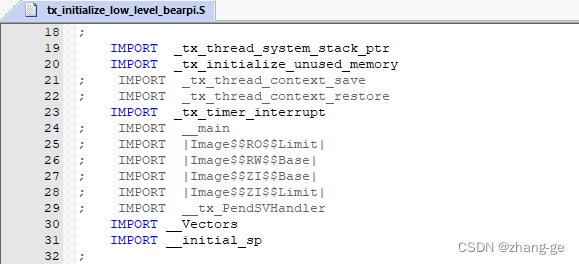
① 将没有用到的标号注释,手动添加_Vectors和__initial_sp标号,分别是启动文件中导出的中断向量表和栈顶指针初始值:
② 设置时钟频率(80Mhz)和时钟节拍(1ms),该值用来初始化Systick定时器:

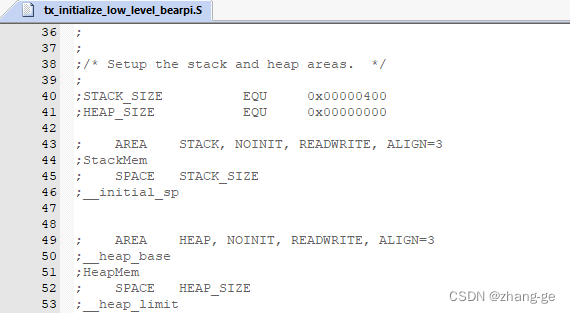
③ 将设置堆栈的代码全部注释(堆栈已经在启动文件中设置了)
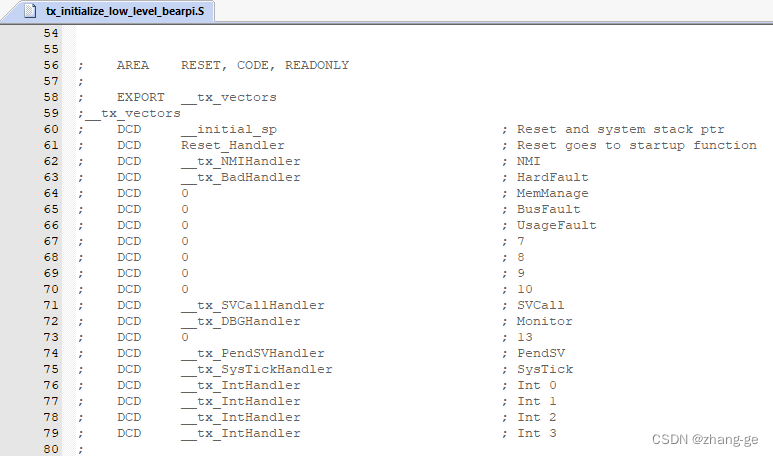
④ 将 threadx 定义的中断向量表全部注释(使用启动文件中定义的向量表):
⑤ 注释threadx定义的复位处理程序(使用启动文件中的复位程序):

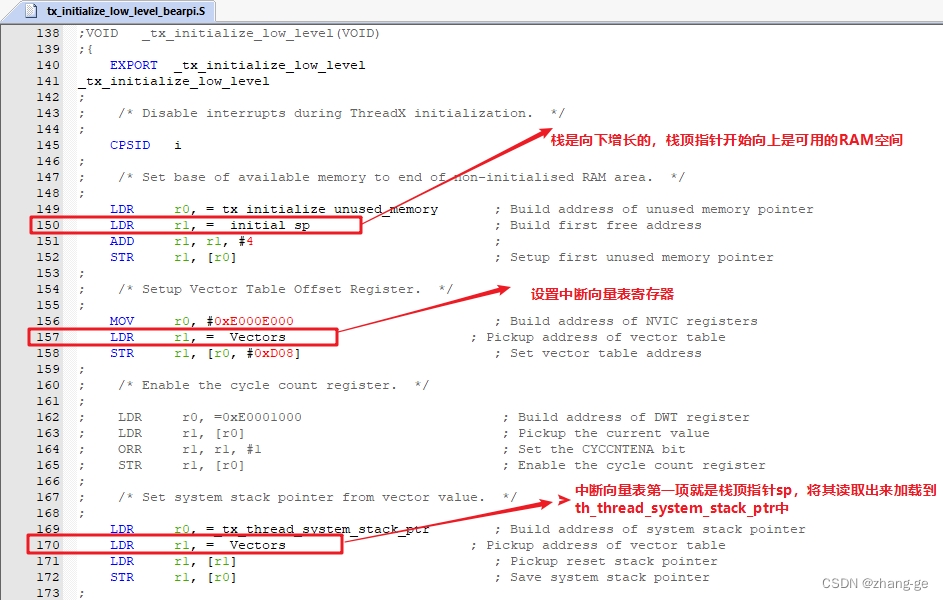
⑥ 修改threadx底层初始化函数:
⑦ 注释用不到的函数:
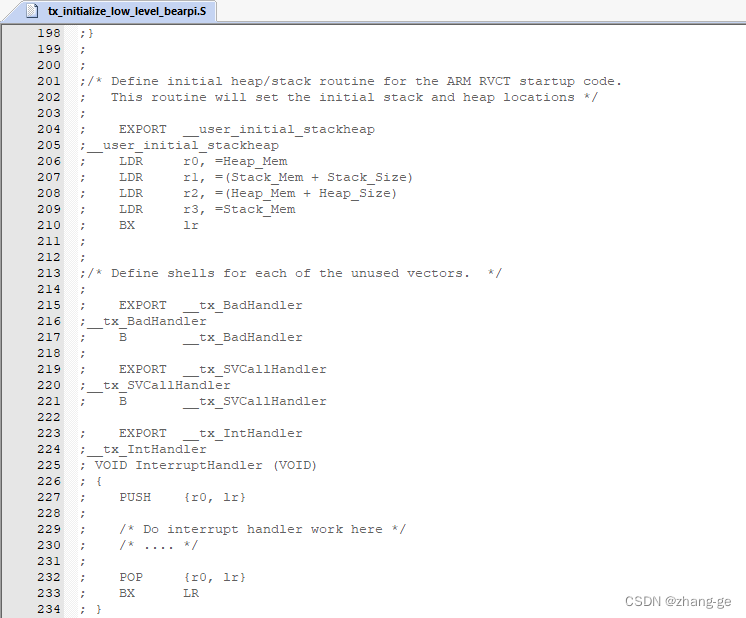
⑧ 处理Systick中断函数:
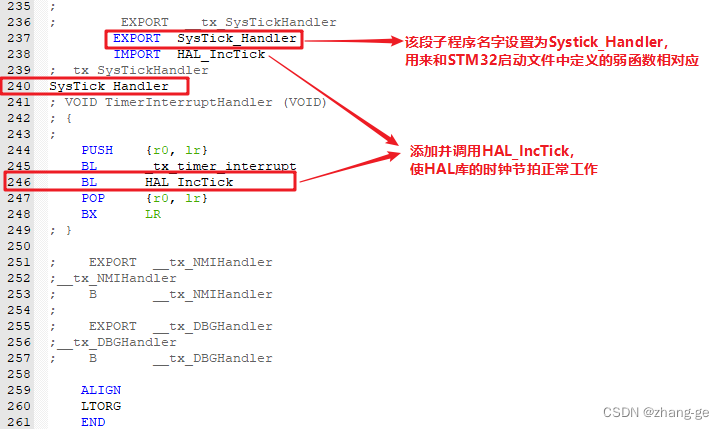
比较纯净的文件如下:
;/**************************************************************************/
;/*                                                                        */
;/*       Copyright (c) Microsoft Corporation. All rights reserved.        */
;/*                                                                        */
;/*       This software is licensed under the Microsoft Software License   */
;/*       Terms for Microsoft Azure RTOS. Full text of the license can be  */
;/*       found in the LICENSE file at https://aka.ms/AzureRTOS_EULA       */
;/*       and in the root directory of this software.                      */
;/*                                                                        */
;/**************************************************************************/
;
;
;/**************************************************************************/
;/**************************************************************************/
;/**                                                                       */
;/** ThreadX Component                                                     */
;/**                                                                       */
;/**   Initialize                                                          */
;/**                                                                       */
;/**************************************************************************/
;/**************************************************************************/
;
;
    IMPORT  _tx_thread_system_stack_ptr
    IMPORT  _tx_initialize_unused_memory
    IMPORT  _tx_thread_context_save
    IMPORT  _tx_thread_context_restore
    IMPORT  _tx_timer_interrupt
    IMPORT  __tx_PendSVHandler
	IMPORT  __Vectors
	IMPORT	__initial_sp
;
;
SYSTEM_CLOCK        EQU     80000000
SYSTICK_CYCLES      EQU     ((SYSTEM_CLOCK / 1000) -1)
;

    AREA ||.text||, CODE, READONLY

;/**************************************************************************/
;/*                                                                        */
;/*  FUNCTION                                               RELEASE        */
;/*                                                                        */
;/*    _tx_initialize_low_level                          Cortex-M7/AC5     */
;/*                                                           6.1          */
;/*  AUTHOR                                                                */
;/*                                                                        */
;/*    William E. Lamie, Microsoft Corporation                             */
;/*                                                                        */
;/*  DESCRIPTION                                                           */
;/*                                                                        */
;/*    This function is responsible for any low-level processor            */
;/*    initialization, including setting up interrupt vectors, setting     */
;/*    up a periodic timer interrupt source, saving the system stack       */
;/*    pointer for use in ISR processing later, and finding the first      */
;/*    available RAM memory address for tx_application_define.             */
;/*                                                                        */
;/*  INPUT                                                                 */
;/*                                                                        */
;/*    None                                                                */
;/*                                                                        */
;/*  OUTPUT                                                                */
;/*                                                                        */
;/*    None                                                                */
;/*                                                                        */
;/*  CALLS                                                                 */
;/*                                                                        */
;/*    None                                                                */
;/*                                                                        */
;/*  CALLED BY                                                             */
;/*                                                                        */
;/*    _tx_initialize_kernel_enter           ThreadX entry function        */
;/*                                                                        */
;/*  RELEASE HISTORY                                                       */
;/*                                                                        */
;/*    DATE              NAME                      DESCRIPTION             */
;/*                                                                        */
;/*  09-30-2020     William E. Lamie         Initial Version 6.1           */
;/*                                                                        */
;/**************************************************************************/
;VOID   _tx_initialize_low_level(VOID)
;{
    EXPORT  _tx_initialize_low_level
_tx_initialize_low_level
;
;    /* Disable interrupts during ThreadX initialization.  */
;
    CPSID   i
;
;    /* Set base of available memory to end of non-initialised RAM area.  */
;
    LDR     r0, =_tx_initialize_unused_memory       ; Build address of unused memory pointer
    LDR     r1, =__initial_sp                ; Build first free address
    ADD     r1, r1, #4                              ;
    STR     r1, [r0]                                ; Setup first unused memory pointer
;
;    /* Setup Vector Table Offset Register.  */
;
    MOV     r0, #0xE000E000                         ; Build address of NVIC registers
    LDR     r1, =__Vectors                       ; Pickup address of vector table
    STR     r1, [r0, #0xD08]                        ; Set vector table address
;
;    /* Enable the cycle count register.  */
;
;    LDR     r0, =0xE0001000                         ; Build address of DWT register
;    LDR     r1, [r0]                                ; Pickup the current value
;    ORR     r1, r1, #1                              ; Set the CYCCNTENA bit
;    STR     r1, [r0]                                ; Enable the cycle count register
;
;    /* Set system stack pointer from vector value.  */
;
    LDR     r0, =_tx_thread_system_stack_ptr        ; Build address of system stack pointer
    LDR     r1, =__Vectors                       ; Pickup address of vector table
    LDR     r1, [r1]                                ; Pickup reset stack pointer
    STR     r1, [r0]                                ; Save system stack pointer
;
;    /* Configure SysTick.  */
;
    MOV     r0, #0xE000E000                         ; Build address of NVIC registers
    LDR     r1, =SYSTICK_CYCLES
    STR     r1, [r0, #0x14]                         ; Setup SysTick Reload Value
    MOV     r1, #0x7                                ; Build SysTick Control Enable Value
    STR     r1, [r0, #0x10]                         ; Setup SysTick Control
;
;    /* Configure handler priorities.  */
;
    LDR     r1, =0x00000000                         ; Rsrv, UsgF, BusF, MemM
    STR     r1, [r0, #0xD18]                        ; Setup System Handlers 4-7 Priority Registers

    LDR     r1, =0xFF000000                         ; SVCl, Rsrv, Rsrv, Rsrv
    STR     r1, [r0, #0xD1C]                        ; Setup System Handlers 8-11 Priority Registers
                                                    ; Note: SVC must be lowest priority, which is 0xFF

    LDR     r1, =0x40FF0000                         ; SysT, PnSV, Rsrv, DbgM
    STR     r1, [r0, #0xD20]                        ; Setup System Handlers 12-15 Priority Registers
                                                    ; Note: PnSV must be lowest priority, which is 0xFF
;
;    /* Return to caller.  */
;
    BX      lr
;}

    EXPORT  __tx_SysTickHandler
	EXPORT	SysTick_Handler
__tx_SysTickHandler
SysTick_Handler
; VOID TimerInterruptHandler (VOID)
; {
;
    PUSH    {r0, lr}
    BL      _tx_timer_interrupt
    POP     {r0, lr}
    BX      LR
; }

    ALIGN
    LTORG
    END
- 3.2.注释stm32库提供的中断函数
① 去除原有stm32f7xx_it.c中的 PendSV 和 Systick 中断服务函数:
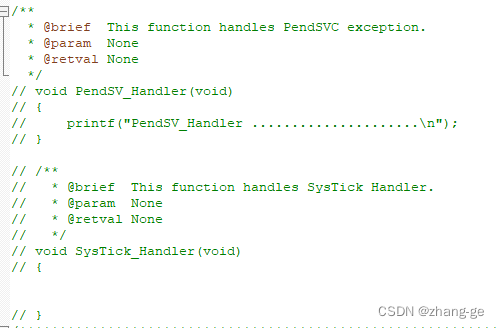
至此,移植完成。
4.编写应用代码
在main.c中编写两个任务,然后在tx_application_define中创建这两个任务:
#include <stdio.h>
#include "tx_api.h"
#include "main.h"

#define THREAD1_PRIO         3
#define THREAD1_STACK_SIZE   1024
static  TX_THREAD thread1;
uint8_t thread1_stack[THREAD1_STACK_SIZE];

#define THREAD2_PRIO         2
#define THREAD2_STACK_SIZE   1024
static  TX_THREAD thread2;
uint8_t thread2_stack[THREAD2_STACK_SIZE];

void my_thread1_entry(ULONG thread_input)
{
  /* Enter into a forever loop. */
  while(1)
  {
    printf("threadx 1 application running...\r\n");
    /* Sleep for 1000 tick. */
    tx_thread_sleep(1000);
  }
}

void my_thread2_entry(ULONG thread_input)
{
  /* Enter into a forever loop. */
  while(1)
  {
    printf("threadx 2 application running...\r\n");
    /* Sleep for 1000 tick. */
    tx_thread_sleep(1000);
  }
}

void tx_application_define(void *first_unused_memory)
{
  /* Create thread */
  tx_thread_create(&thread1, "thread 1", my_thread1_entry, 0, &thread1_stack[0], THREAD1_STACK_SIZE, THREAD1_PRIO, THREAD1_PRIO, TX_NO_TIME_SLICE, TX_AUTO_START);

  tx_thread_create(&thread2, "thread 2", my_thread2_entry, 0, &thread2_stack[0], THREAD2_STACK_SIZE, THREAD2_PRIO, THREAD2_PRIO, TX_NO_TIME_SLICE, TX_AUTO_START);
}
在main()函数中启动threadx内核:
#include <stdio.h>
#include "tx_api.h"

void main(void)
{
	SystemClockConfig();

	UART_init(USART0, 115200, USART_WordLength_8b, USART_StopBits_1b, USART_Parity_No);

	tx_kernel_enter( );
}
至此,应用程序编写完成,可以编译、下载,运行,进行测试了。
