1.准备工作
1.1创建项目
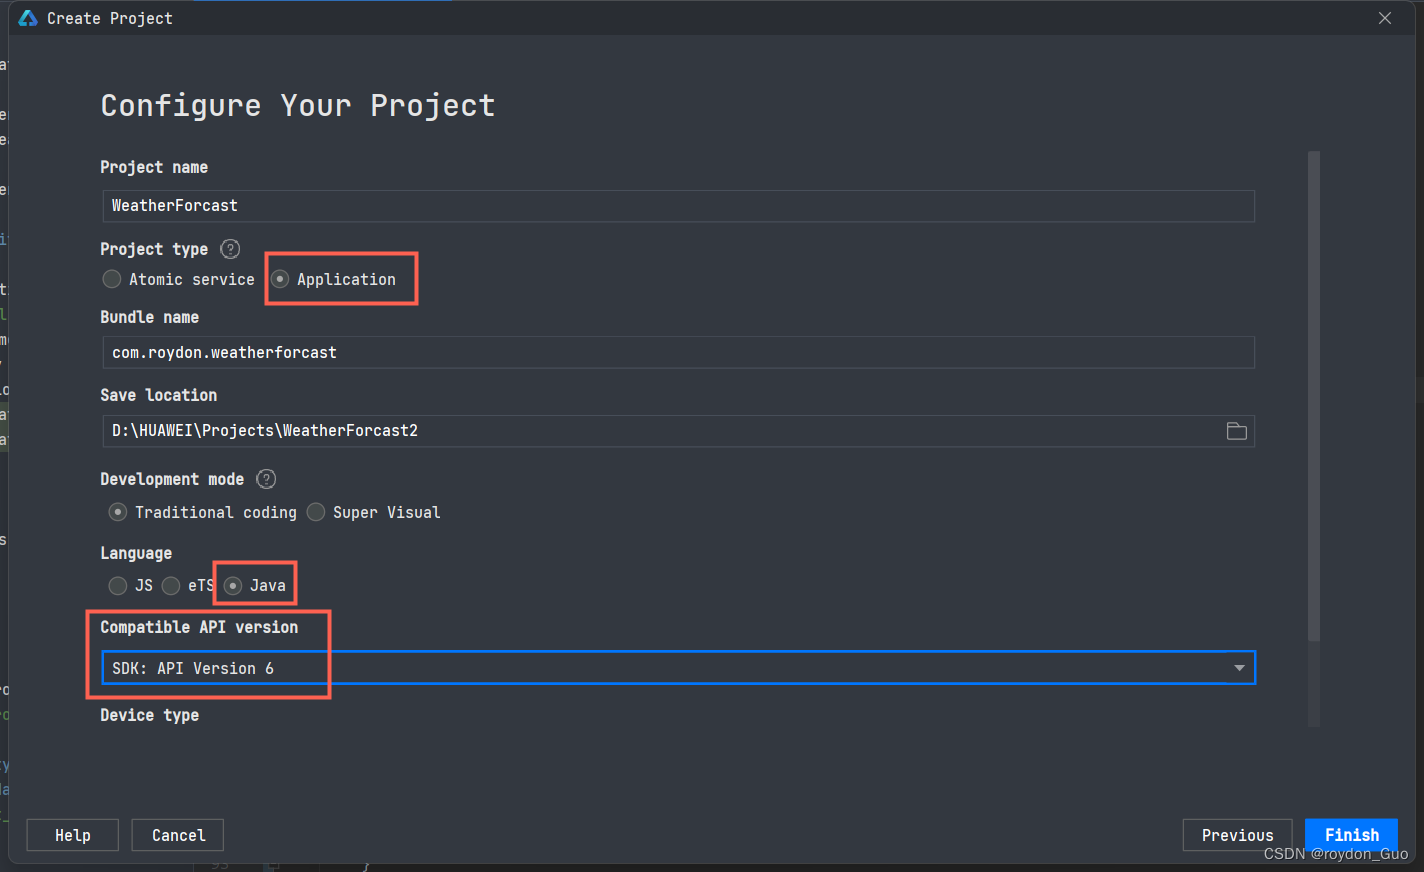
sdk为6版本,所以使用华为的远程模拟器p40即可。
1.2准备图片资源
这里把天气预报用到的天气提示的图片全放在资源目录下的media文件下。
具体资源在github仓库已包含,自行前往。
1.3配置文件
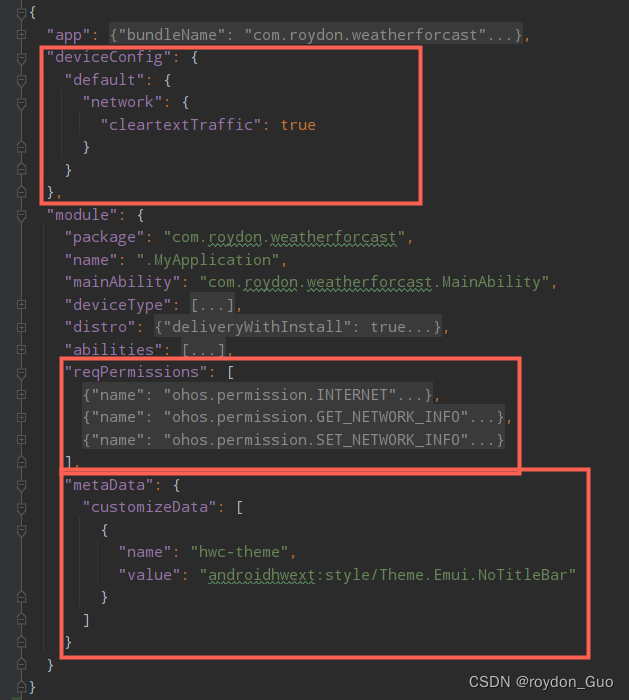
接着是修改配置文件,由于是发送网络请求请求api获取json天气数据,所以和安卓一样,需要修改配置文件,添加网络请求权限。
修改config.json,在module节点添加如下权限。
"reqPermissions": [
  {
    "name": "ohos.permission.INTERNET"
  },
  {
    "name": "ohos.permission.GET_NETWORK_INFO"
  },
  {
    "name": "ohos.permission.SET_NETWORK_INFO"
  }
],
接着还要配置http协议的api也能正常访问。在module和app同级添加如下。
"deviceConfig": {
  "default": {
    "network": {
      "cleartextTraffic": true
    }
  }
},
如果想要去除页面顶部的标题区域,接着添加如下配置。
"metaData": {
  "customizeData": [
    {
      "name": "hwc-theme",
      "value": "androidhwext:style/Theme.Emui.NoTitleBar"
    }
  ]
}
最后添加完成预览:
2.网络请求工具类
天气api以前文章提到过,自行前往–>简易的安卓天气app(一)——解析Json数据、数据类封装
最后得到的api形式为:
https://tianqiapi.com/api?version=v1&appid={your appid}&appsecret={your appsecret}
其中appid和appsecret需要自行申请,免费版有请求上限。
此api会默认根据访问者ip的地理位置进行定位。又因为虚拟手机没法获取设备位置且本人没有华为设备,没法加入定位功能,,所以暂时在代码中指定需要查询的城市,,,
2.1NetworkUtil
网络请求工具类,返回api获取的string字符串就行
public class NetworkUtil {
    /**
     * 18625561:27XjzrB7
     * 67342285:5XgTk31r
     * 19267789:Dhu3DShY
     */
    public static final String URL_WEATHER = "https://tianqiapi.com/api?version=v1&appid=67342285&appsecret=5XgTk31r";

    public static String httpGet(String cityName) {
        String urlGetJson = URL_WEATHER + "&city=" + cityName;
        StringBuilder sb = new StringBuilder();
        try {
            URL url = new URL(urlGetJson);
            HttpURLConnection connection = (HttpURLConnection) url.openConnection();
            connection.setRequestMethod("GET");
            connection.setReadTimeout(10000);
            connection.setConnectTimeout(10000);
            connection.connect();
            BufferedReader reader = new BufferedReader(new InputStreamReader(connection.getInputStream()));
            String temp;
            while ((temp = reader.readLine()) != null) {
                sb.append(temp);
            }
            reader.close();
            connection.disconnect();
        } catch (Exception e) {
            e.printStackTrace();
            return e.getMessage();
        }
        return sb.toString();
    }
}
2.2测试网络请求
为了保证主线程不受干扰,网络请求需要单独开辟一个异步线程请求数据。详情前往鸿蒙开发指南线程管理开发指导
创建一个异步线程:(使用lamda编程,不再new Runnable()实现 )
TaskDispatcher globalTaskDispatcher = getGlobalTaskDispatcher(TaskPriority.DEFAULT);
globalTaskDispatcher.asyncDispatch(() -> {
	//网络请求,城市名指定即可,此处指定北京
    //String result = NetworkUtil.httpGet(cityName);
    String result = NetworkUtil.httpGet("北京");
    System.out.println(result);
}
成功获取数据:

2.3api返回数据结构

3.实体类封装
需要两个实体类封装数据:

WeatherBean封装城市名称更新时间即可,其中还包含DayWeatherBean的数组存放七天天气。
DayWeatherBean就是七天的每一天的天气详情,每天的天气还包含24小时详细天气,本文不再详细探讨。
public class WeatherBean implements Serializable {

    @SerializedName("cityid")
    private String cityid;

    private String city;//城市名称

    private String update_time;//更新时间

    private List<DayWeatherBean> data;//获取今日天气,get[0]
    // get set toString。。。
}
public class DayWeatherBean implements Serializable {
    @SerializedName("date")
    private String date;
    private String wea;//天气
    private String wea_img;//天气图标
    private String week;//周几
    private String tem;//温度
    //tv_tem_low_high=tem2+tem1拼接一起
    private String tem2;//低温
    private String tem1;//高温
    //tv_win=win+win_speed
    private String[] win;//风力
    private String win_speed;//风力等级
    //tv_air=air+air_level+air_tips拼接一起
    private String air;//
    private String air_level;//
    private String air_tips;//

//    @SerializedName("hours")
//    private List<HoursWeatherBean> hoursWeatherBeanList;

//    @SerializedName("index")
//    private List<TipsBean> mTipsBeans;

    // get set toString。。。
}
封装数据使用Google的gson进行
首先引入gson依赖:打开build.gradle添加依赖,别忘了右上角Sync Now同步一下
implementation 'com.google.code.gson:gson:2.8.5'

对获取到的数据result进行封装:得到WeatherBean对象
Gson gson = new Gson();
WeatherBean weatherBean = gson.fromJson(result, WeatherBean.class);

之后就是把数据渲染到ui上即可。
4.ui
4.1首页ui设计
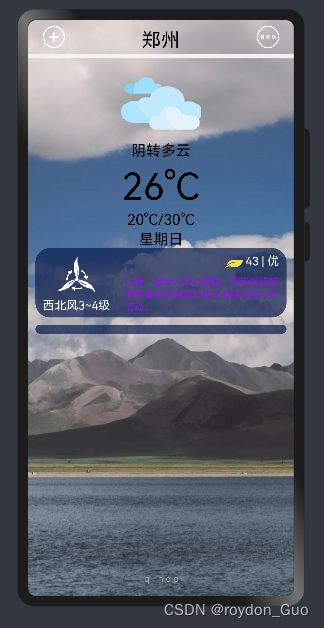
使用StackLayout把壁纸放在最下面一层,接着就是DirectionalLayout布局。
使用ScrollView组件包裹DirectionalLayout可以使布局上下滑动,超出屏幕布局可滑动屏幕查看。
<?xml version="1.0" encoding="utf-8"?>
<StackLayout
    xmlns:ohos="http://schemas.huawei.com/res/ohos"
    ohos:height="match_parent"
    ohos:width="match_parent">

    <Image
        ohos:id="$+id:bg"
        ohos:height="match_parent"
        ohos:width="match_parent"
        ohos:background_element="$media:bg"
        ohos:scale_mode="center"/>

    <DirectionalLayout
        ohos:height="match_parent"
        ohos:width="match_parent"
        ohos:orientation="vertical">

        <!--头部bar-->
        <DirectionalLayout
            ohos:height="match_content"
            ohos:width="match_parent"
            ohos:bottom_margin="8vp"
            ohos:orientation="horizontal"
            ohos:top_margin="8vp">

            <Image
                ohos:id="$+id:add"
                ohos:height="30vp"
                ohos:width="30vp"
                ohos:image_src="$media:add"
                ohos:layout_alignment="horizontal_center"
                ohos:left_margin="20vp"
                ohos:scale_mode="clip_center"/>

            <Text
                ohos:id="$+id:text_city"
                ohos:height="match_parent"
                ohos:width="260vp"
                ohos:layout_alignment="horizontal_center"
                ohos:text="郑州"
                ohos:text_alignment="horizontal_center"
                ohos:text_color="#000"
                ohos:text_size="26fp"/>

            <Image
                ohos:id="$+id:more"
                ohos:height="30vp"
                ohos:width="30vp"
                ohos:image_src="$media:more"
                ohos:layout_alignment="horizontal_center"
                ohos:right_margin="20vp"
                ohos:scale_mode="clip_center"/>

        </DirectionalLayout>

        <!--分割白横线-->
        <ProgressBar
            ohos:id="$+id:progressbar"
            ohos:height="6vp"
            ohos:width="match_parent"
            ohos:max="100"
            ohos:min="0"
            ohos:progress="100"
            ohos:progress_element="#FFF6F0F0"
            ohos:progress_width="10vp"/>

        <ScrollView
            ohos:rebound_effect="true"
            ohos:height="match_parent"
            ohos:width="match_parent">

        <DirectionalLayout
            ohos:height="match_parent"
            ohos:width="match_parent"
            ohos:layout_alignment="horizontal_center"
            ohos:orientation="vertical"
            ohos:top_margin="10vp"
            >
            <!--ohos:scale_mode="stretch"表示将原图缩放到与Image大小一致-->
            <Image
                ohos:id="$+id:weather_img"
                ohos:height="100vp"
                ohos:width="120vp"
                ohos:image_src="$media:weather_yin"
                ohos:layout_alignment="horizontal_center"
                ohos:scale_mode="stretch"/>

            <Text
                ohos:id="$+id:text_weather"
                ohos:height="match_content"
                ohos:width="match_content"
                ohos:layout_alignment="horizontal_center"
                ohos:text="阴转多云"
                ohos:text_color="#000"
                ohos:text_size="20fp"/>

            <Text
                ohos:id="$+id:text_tem"
                ohos:height="match_content"
                ohos:width="match_content"
                ohos:layout_alignment="horizontal_center"
                ohos:text="26°C"
                ohos:text_color="#000"
                ohos:text_size="50fp"/>

            <Text
                ohos:id="$+id:text_tem_low_high"
                ohos:height="match_content"
                ohos:width="match_content"
                ohos:layout_alignment="horizontal_center"
                ohos:text="20°C/30°C"
                ohos:text_color="#000"
                ohos:text_size="20fp"/>

            <Text
                ohos:id="$+id:text_week"
                ohos:height="match_content"
                ohos:width="match_content"
                ohos:layout_alignment="horizontal_center"
                ohos:text="星期日"
                ohos:text_color="#000"
                ohos:text_size="20fp"/>

            <!--风向以及出行建议-->
            <DirectionalLayout
                ohos:height="match_content"
                ohos:width="match_parent"
                ohos:left_margin="10vp"
                ohos:right_margin="10vp"
                ohos:top_padding="6vp"
                ohos:bottom_padding="6vp"
                ohos:background_element="$graphic:background_ability_main"
                ohos:layout_alignment="horizontal_center"
                ohos:orientation="horizontal"
                >
                <!--左侧-->
                <DirectionalLayout
                    ohos:height="match_content"
                    ohos:width="match_content"
                    ohos:left_margin="10vp"
                    ohos:right_margin="10vp"
                    ohos:layout_alignment="horizontal_center"
                    ohos:orientation="vertical"
                    >
                    <Image
                        ohos:height="60vp"
                        ohos:width="60vp"
                        ohos:image_src="$media:fengli"
                        ohos:layout_alignment="horizontal_center"
                        ohos:scale_mode="stretch"/>
                    <Text
                        ohos:id="$+id:text_win"
                        ohos:height="match_content"
                        ohos:width="match_content"
                        ohos:layout_alignment="horizontal_center"
                        ohos:text="西北风3~4级"
                        ohos:text_color="#fff"
                        ohos:text_size="16fp"/>
                </DirectionalLayout>
                <!--右侧-->
                <DirectionalLayout
                    ohos:height="match_content"
                    ohos:width="match_parent"
                    ohos:left_margin="10vp"
                    ohos:right_margin="10vp"
                    ohos:layout_alignment="horizontal_center"
                    ohos:orientation="vertical"
                    >
                    <!--空气质量-->
                    <DirectionalLayout
                        ohos:height="match_content"
                        ohos:width="match_parent"
                        ohos:orientation="horizontal"
                        ohos:layout_alignment="horizontal_center"
                        ohos:alignment="right"
                        >
                        <Image
                            ohos:height="30vp"
                            ohos:width="30vp"
                            ohos:image_src="$media:kongqi"
                            ohos:layout_alignment="horizontal_center"
                            ohos:scale_mode="stretch"/>
                        <Text
                            ohos:id="$+id:text_air"
                            ohos:height="match_content"
                            ohos:width="match_content"
                            ohos:layout_alignment="horizontal_center"
                            ohos:text="43 | 优"
                            ohos:text_color="#fff"
                            ohos:text_size="16fp"/>

                    </DirectionalLayout>

                    <!--出行建议-->
                    <DirectionalLayout
                        ohos:height="match_content"
                        ohos:width="match_parent"
                        >
                        <Text
                            ohos:id="$+id:text_tips"
                            ohos:height="match_parent"
                            ohos:width="match_content"
                            ohos:multiple_lines="true"
                            ohos:max_text_lines="3"
                            ohos:truncation_mode="ellipsis_at_end"
                            ohos:text="儿童、老年人及心脏病、呼吸系统疾病患者应尽量减少体力消耗大的户外活动。"
                            ohos:text_color="#FF9F02FF"
                            ohos:text_size="13fp"/>

                    </DirectionalLayout>

                </DirectionalLayout>

            </DirectionalLayout>

            <ListContainer
                ohos:id="$+id:list_container"
                ohos:height="match_content"
                ohos:width="match_parent"
                ohos:left_margin="10vp"
                ohos:right_margin="10vp"
                ohos:top_margin="10vp"
                ohos:top_padding="6vp"
                ohos:bottom_padding="6vp"
                ohos:background_element="$graphic:background_ability_main"
                ohos:layout_alignment="horizontal_center"
                ohos:orientation="vertical"/>

        </DirectionalLayout>
        </ScrollView>

    </DirectionalLayout>

</StackLayout>
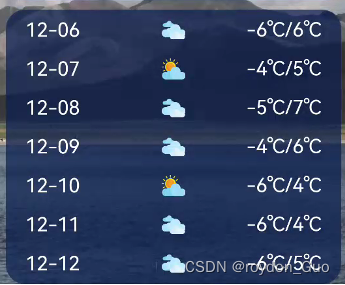
还包含一个ListContainer渲染未来七天天气数据。list_item的模板设计:
<?xml version="1.0" encoding="utf-8"?>
<DirectionalLayout
    xmlns:ohos="http://schemas.huawei.com/res/ohos"
    ohos:height="40vp"
    ohos:width="match_parent"
    ohos:left_margin="20vp"
    ohos:right_margin="20vp"
    ohos:orientation="horizontal"
    ohos:alignment="horizontal_center">
    <Text
        ohos:id="$+id:text_date"
        ohos:height="match_content"
        ohos:width="match_content"
        ohos:weight="1"
        ohos:text="11-11"
        ohos:text_color="#fff"
        ohos:text_size="20fp"/>
    <Image
        ohos:id="$+id:day_weather_img"
        ohos:height="30vp"
        ohos:width="30vp"
        ohos:weight="1"
        ohos:image_src="$media:weather_yin"
        ohos:scale_mode="inside"/>
    <Text
        ohos:id="$+id:text_tem_low_high"
        ohos:height="match_content"
        ohos:width="match_content"
        ohos:text_alignment="right"
        ohos:weight="1"
        ohos:text="20°C/30°C"
        ohos:text_color="#fff"
        ohos:text_size="20fp"/>
</DirectionalLayout>
实现效果:
4.2获取图片位置工具
获取到api返回的数据后,把数据封装成实体类,其中wea_img属性接受一个string字符串,判断字符串的值返回对应图片资源的int整型。
package com.roydon.weatherforcast.utils;

import com.roydon.weatherforcast.ResourceTable;

public class WeatherImgUtil {

    public static int getImgResOfWeather(String weaStr) {
        int result = 0;
        switch (weaStr) {
            case "qing":
                result = ResourceTable.Media_weather_yin;
                break;
            case "yin":
                result = ResourceTable.Media_weather_yin;
                break;
            case "yu":
                result = ResourceTable.Media_weather_dayu;
                break;
            case "yun":
                result = ResourceTable.Media_weather_duoyun;
                break;
            case "bingbao":
                result = ResourceTable.Media_weather_leizhenyubingbao;
                break;
            case "wu":
                result = ResourceTable.Media_weather_wu;
                break;
            case "shachen":
                result = ResourceTable.Media_weather_shachenbao;
                break;
            case "lei":
                result = ResourceTable.Media_weather_leizhenyu;
                break;
            case "xue":
                result = ResourceTable.Media_weather_daxue;
                break;
            default:
                result = ResourceTable.Media_weather_qing;
                break;
        }
        return result;
    }
}
4.3渲染数据
组件全部注册好之后,封装一个渲染数据的方法。
public void dataShow(WeatherBean weatherBean) {
    if (weatherBean == null) {
        return;
    }
    city.setText(weatherBean.getCity());
    DayWeatherBean dayWeather = weatherBean.getData().get(0);//当天天气
    if (dayWeather == null) {
        return;
    }
    // 当天天气
    weatherImg.setPixelMap(WeatherImgUtil.getImgResOfWeather(dayWeather.getWea_img()));
    weather.setText(dayWeather.getWea());
    tem.setText(dayWeather.getTem());
    temLowHigh.setText(dayWeather.getTem2() + "/" + dayWeather.getTem1());
    week.setText(dayWeather.getWeek());
    win.setText(dayWeather.getWin()[0] + dayWeather.getWin_speed());
    air.setText(dayWeather.getAir() + " | " + dayWeather.getAir_level());
    tips.setText("👒:" + dayWeather.getAir_tips());
    // ListContainer展示未来七天天气
    List<DayWeatherBean> dayWeatherBeanList = weatherBean.getData();
    DayWeatherBeanProvider dayWeatherBeanProvider = new DayWeatherBeanProvider(dayWeatherBeanList, this);
    listContainer.setItemProvider(dayWeatherBeanProvider);
}
获取api数据与渲染ui独立封装一个方法:
其中渲染ui需要开辟ui异步线程getUITaskDispatcher().asyncDispatch()
/**
 * GlobalTaskDispatcher 派发异步任务
 */
public void getWeather(String cityName) {
    //网络请求
    TaskDispatcher globalTaskDispatcher = getGlobalTaskDispatcher(TaskPriority.DEFAULT);
    globalTaskDispatcher.asyncDispatch(() -> {
        String result = NetworkUtil.httpGet(cityName);
        // System.out.println(result);
        Gson gson = new Gson();
        WeatherBean weatherBean = gson.fromJson(result, WeatherBean.class);
        if (weatherBean == null) {
            getUITaskDispatcher().asyncDispatch(() -> {
                ToastUtil.showToast(this, "貌似出了点问题~");
            });
        } else {
            System.out.println(weatherBean);
            getUITaskDispatcher().asyncDispatch(() -> {
                ToastUtil.showToast(this, weatherBean.getCity() + "天气更新");
                dataShow(weatherBean);
            });
        }
    });
}
4.3.1ListContainer
跟安卓一样,也是需要适配器。用来渲染哪个模板,并把数据渲染到模板。
①新建provider包,包中新建DayWeatherBeanProvider适配器继承自BaseItemProvider。
②重写BaseItemProvider中的方法,鼠标悬停会提示。
 @Override
public int getCount() {
    return list == null ? 0 : list.size();
}

@Override
public Object getItem(int i) {
    if (list != null && i >= 0 && i < list.size()){
        return list.get(i);
    }
    return null;
}

@Override
public long getItemId(int i) {
    //可添加具体处理逻辑
    return i;
}

Override
public Component getComponent(int i, Component component, ComponentContainer componentContainer) {
    return null;
}
③添加数据集合List与AbilitySlice,并创建构造方法。
private List<DayWeatherBean> list;
private AbilitySlice slice;

public DayWeatherBeanProvider(List<DayWeatherBean> list, AbilitySlice slice) {
    this.list = list;
    this.slice = slice;
}
④重写getComponent(),渲染模板
@Override
public Component getComponent(int i, Component component, ComponentContainer componentContainer) {
    final Component cpt;
    if (component == null) {
        cpt = LayoutScatter.getInstance(slice).parse(ResourceTable.Layout_item_day_weather, null, false);
    } else {
        cpt = component;
    }
    DayWeatherBean dayWeatherBean = list.get(i);
    Text date = (Text) cpt.findComponentById(ResourceTable.Id_text_date);
    Text tem = (Text) cpt.findComponentById(ResourceTable.Id_text_tem_low_high);
    Image image = (Image) cpt.findComponentById(ResourceTable.Id_day_weather_img);
    date.setText(dayWeatherBean.getDate().substring(5,10));
    image.setPixelMap(WeatherImgUtil.getImgResOfWeather(dayWeatherBean.getWea_img()));
    tem.setText(dayWeatherBean.getTem2() + "/" + dayWeatherBean.getTem1());
    return cpt;
}
- 官方开发文档见下方链接
- ListContainer
如果非得想加入每小时天气数据展示,可前往简易的安卓天气app(二)——适配器、每小时数据展示。
折线图设计可参考安卓WeatherForcast4。
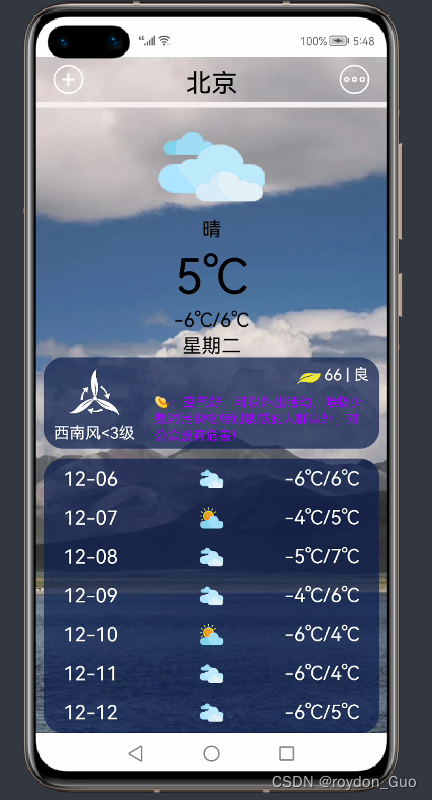
最终效果:
4.4Toast封装
自定义Toast弹框鸿蒙开发指南也为我们提供好了。详情前往鸿蒙开发指南ToastDialog。
此处封装一个带图片的Toast工具类。渲染时需要开辟ui异步线程。
getUITaskDispatcher().asyncDispatch(() -> {
     ToastUtil.showToast(this, weatherBean.getCity() + "天气更新");
 });
新建两个xml,一个是布局设置主要样式,一个是ui美化设置圆角与背景
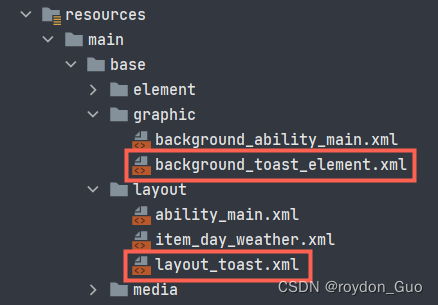
layout_toast.xml
<?xml version="1.0" encoding="utf-8"?>
<DirectionalLayout
    xmlns:ohos="http://schemas.huawei.com/res/ohos"
    ohos:height="match_content"
    ohos:width="match_content"
    ohos:padding="10vp"
    ohos:background_element="$graphic:background_toast_element"
    ohos:orientation="horizontal">
    <Image
        ohos:width="16vp"
        ohos:height="16vp"
        ohos:scale_mode="inside"
        ohos:image_src="$media:icon"/>

    <Text
        ohos:id="$+id:msg_toast"
        ohos:height="match_content"
        ohos:width="match_content"
        ohos:layout_alignment="vertical_center"
        ohos:text_size="12fp"/>

</DirectionalLayout>
background_toast_element.xml
<?xml version="1.0" encoding="utf-8"?>
<shape xmlns:ohos="http://schemas.huawei.com/res/ohos"
       ohos:shape="rectangle">
    <solid
        ohos:color="#6B172F6D"/>
    <corners
    	ohos:radius="10vp"/>
</shape>
ToastUtil:
先加载layout_toast布局文件把渲染的消息放进去然后让new出来的ToastDialog加载布局即可。
public class ToastUtil {

    /**
     * @param context 上下文参数
     * @param msg     内容
     */
    public static void showToast(Context context, String msg) {
        DirectionalLayout layout = (DirectionalLayout) LayoutScatter.getInstance(context)
                .parse(ResourceTable.Layout_layout_toast, null, false);
        Text msg_toast = layout.findComponentById(ResourceTable.Id_msg_toast);
        msg_toast.setText(msg);
        new ToastDialog(context)
                .setContentCustomComponent(layout)
                .setSize(DirectionalLayout.LayoutConfig.MATCH_CONTENT, DirectionalLayout.LayoutConfig.MATCH_CONTENT)
                .setAlignment(LayoutAlignment.TOP)
                .show();
    }

    public static void showTips(Context context, String msg) {
        new ToastDialog(context).setText(msg).setAlignment(LayoutAlignment.TOP).show();
    }
}
5.Github源码
源码地址:WeatherDemo
视star情况更新。
![[附源码]Python计算机毕业设计SSM家教管理系统(程序+LW)](https://img-blog.csdnimg.cn/9ef9a5b769a54b79abc24ea36f92bb50.png)


![[矩阵论] Unit 4. 矩阵的广义逆 - 知识点整理](https://img-blog.csdnimg.cn/c812555e1a4f4b848672e979c427dda3.png)
