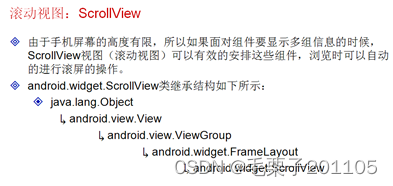
1. 滚动视图:ScrollView
1.1 知识点
(1)掌握滚动视图的主要作用;
(2)可以使用滚视图进行布局;
1.2 具体内容
范例:
<ScrollView
    xmlns:android="http://schemas.android.com/apk/res/android"
    xmlns:tools="http://schemas.android.com/tools"
    android:layout_width="match_parent"
    android:layout_height="match_parent">
	<LinearLayout
	    android:layout_width="match_parent"
    	android:layout_height="match_parent"
	    >
	    <!-- 存放若干组件 -->
	</LinearLayout>
</ScrollView>
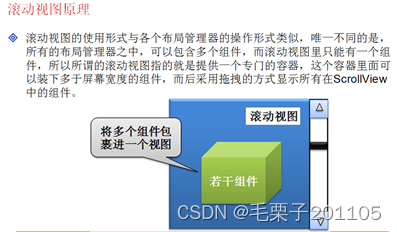
其实滚动视图中,只能保存一个组件。所以在开发的时候,一般在滚动视图中放置一个布局管理器,而这个布局管理器中又可以放置多个组件。
范例:继续在上面一个范例中添加组件。
package com.example.scrollviewproject;
import android.app.Activity;
import android.os.Bundle;
import android.widget.Button;
import android.widget.LinearLayout;
public class ScrollViewActivity extends Activity {
	private LinearLayout mylayout = null;
	private String data[] = { "爱科技有限公司", "www.aikeji.com", "毛栗子",
			"甘肃省软件适用人才重点培训基地", "兰州市软件及服务外包人才重点实训基地", "服务外包人才实训及交流平台",
			"服务外包人才公共服务平台", "爱科技有限公司", "www.aikeji.com", "毛栗子",
			"甘肃省软件适用人才重点培训基地", "兰州市软件及服务外包人才重点实训基地", "服务外包人才实训及交流平台",
			"服务外包人才公共服务平台" };

	@Override
	protected void onCreate(Bundle savedInstanceState) {
		super.onCreate(savedInstanceState);
		setContentView(R.layout.activity_scroll_view);
		this.mylayout = (LinearLayout) super.findViewById(R.id.mylayout);// 获取组件
		LinearLayout.LayoutParams params = new LinearLayout.LayoutParams(
				LinearLayout.LayoutParams.FILL_PARENT,
				LinearLayout.LayoutParams.WRAP_CONTENT);//准备布局参数
		for (int i = 0; i < data.length; i++) {
			Button but = new Button(this);
			but.setText(data[i]);
			this.mylayout.addView(but,params);//向布局中添加组件
		}
	}
}
对于滚动视图来说,并没有太多复杂的操作。
1.3 小结
(1)ScrollView提供一个显示的容器,可以包含一个布局并进行滚动;
(2)在ScrollView中只能包含一个组件,而这个组件可以是布局,布局中添加其他多个组件。
2. 列表显示:ListView
2.1 知识点
(1)掌握ListView组件的基本使用;
(2)可以使用SimpleAdapter对显示数据进行封装;
(3)了解ListActivity类的作用;
(4)掌握ListView组件的事件处理操作。
2.2 具体内容

为了更好的说明ListView的基本使用,首先通过一段程序完成ListView的基本操作,在讲解本程序之前,我们直接将上一章节的数组直接拿过来使用。我们肯定需要做一些简单的设置,将数组的内容在ListView中进行显示。
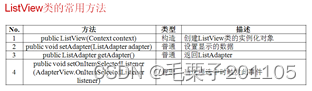
对于这些方法,最关键的还是在ListView数据的设置上,使用setAdapter()这个方法,完成ListView 的数据设置,而此方法的参数是一个ListAdapter接口的对象,既然有接口的话,那么必须就会有实现类,而这个接口的实现类又比较多。我们现在使用ArrayAdapter这个实现类完成对ListAdapter接口的实例化,我们还是需要观察ArrayAdapter类的构造方法:
| public ArrayAdapter(Context context,int textViewResourceId,T[] objects) |
发现此构造方法有三个参数:
·Context context:android上下文对象
·textViewResourceId:要是用的布局管理器
·T [] objects :表示要操作的数组
现在要使用到布局管理器,我们必须要单独的定义一个布局文件,或者使用android中已经为开发者提供的若干的布局。
<LinearLayout
    xmlns:android="http://schemas.android.com/apk/res/android"
    xmlns:tools="http://schemas.android.com/tools"
    android:layout_width="match_parent"
    android:layout_height="match_parent">

    <ListView
        android:id="@+id/mylist"
        android:layout_width="wrap_content"
        android:layout_height="wrap_content" />
</LinearLayout>
package com.example.listviewproject;

import android.app.Activity;
import android.os.Bundle;
import android.widget.ArrayAdapter;
import android.widget.ListView;

public class ListViewActivity extends Activity {
	private String data[] = { "爱科技有限公司", "www.aikeji.com", "毛栗子",
			"甘肃省软件适用人才重点培训基地", "兰州市软件及服务外包人才重点实训基地", "服务外包人才实训及交流平台",
			"服务外包人才公共服务平台", "爱科技有限公司", "www.aikeji.com", "毛栗子",
			"甘肃省软件适用人才重点培训基地", "兰州市软件及服务外包人才重点实训基地", "服务外包人才实训及交流平台",
			"服务外包人才公共服务平台" };
	private ListView listView = null;
	private ArrayAdapter adp = null;//准备的数据
	@Override
	protected void onCreate(Bundle savedInstanceState) {
		super.onCreate(savedInstanceState);
		setContentView(R.layout.activity_list_view);
		this.listView = (ListView) super.findViewById(R.id.mylist);
		this.adp = new ArrayAdapter(this,android.R.layout.simple_expandable_list_item_1,data);
		this.listView.setAdapter(this.adp);//设置ListView要显示的数据
	}
}
此程序是我们将内容设置到ListView中进行显示,如果说显示的效果不好的话,我们可以换其他的系统定义的布局。
| this.adp = new ArrayAdapter(this,android.R.layout.simple_list_item_1,data); |
此时完成的操作是一个简单ListView的显示操作,但是这种操作并不好,因为ArrayAdapter只适合数组的操作,对于一些其他比较复杂的界面的就没有办法完成。

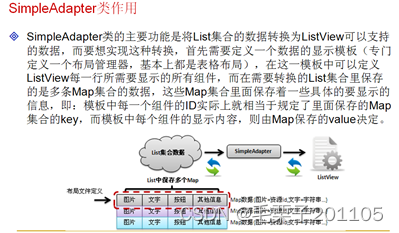
范例:图片—编号—信息
首先我们来编写布局模板
<LinearLayout xmlns:android="http://schemas.android.com/apk/res/android"
    xmlns:tools="http://schemas.android.com/tools"
    android:layout_width="match_parent"
    android:layout_height="match_parent"
    android:orientation="horizontal" >
    <ImageView
        android:id="@+id/img"
        android:layout_width="wrap_content"
        android:layout_height="wrap_content"
        android:src="@drawable/ic_launcher"/>
    <TextView
        android:id="@+id/num"
        android:layout_width="wrap_content"
        android:layout_height="wrap_content"
        />
	<TextView
        android:id="@+id/info"
        android:layout_width="wrap_content"
        android:layout_height="wrap_content"
        />
</LinearLayout>
主布局文件:
<LinearLayout
    xmlns:android="http://schemas.android.com/apk/res/android"
    xmlns:tools="http://schemas.android.com/tools"
    android:layout_width="match_parent"
    android:layout_height="match_parent"
   	android:orientation="vertical"
    >
	<TextView
	    android:layout_width="match_parent"
    	android:layout_height="wrap_content"
	    android:textSize="25px"
	    android:gravity="center"
	    android:text="爱科技有限公司"
	    />
    <ListView
        android:id="@+id/mylist"
        android:layout_width="wrap_content"
        android:layout_height="wrap_content" />
</LinearLayout>
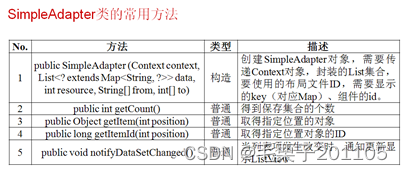
现在主要就是Activity程序没有完成,我们需要使用SimpleAdapter为ListView 设置信息。
	package com.example.listviewproject;

import java.util.ArrayList;
import java.util.HashMap;
import java.util.List;
import java.util.Map;

import android.app.Activity;
import android.os.Bundle;
import android.widget.ListView;
import android.widget.SimpleAdapter;

public class ListViewActivity extends Activity {
	private String data[][] = { { "001", "爱科技有限公司" },
			{ "002", "www.aikeji.com" }, { "003", "兰州市软件园二期" },
			{ "004", "研发一部" }, { "005", "软件项目组" },
			{ "006", "Android应用开发" }, { "007", "初级工程师" }, { "008", "双软认定企业" },
			{ "009", "高科技企业" }, { "010", "服务外包示范企业" } };
	private ListView listView = null;
	private List<Map<String, String>> list = new ArrayList<Map<String, String>>();
	private SimpleAdapter simpleAdapter = null;

	@Override
	protected void onCreate(Bundle savedInstanceState) {
		super.onCreate(savedInstanceState);
		setContentView(R.layout.activity_list_view);
		this.listView = (ListView) super.findViewById(R.id.mylist);
		// 准备List集合,里面放的是Map
		for (int i = 0; i < data.length; i++) {
			Map<String, String> map = new HashMap<String, String>();
			map.put("num", data[i][0]);
			map.put("info", data[i][1]);
			list.add(map);// 将Map加入到List集合中
		}
		this.simpleAdapter = new SimpleAdapter(this, list, R.layout.list_view,
				new String[] { "num", "info" },
				new int[] { R.id.num, R.id.info });//准备好了SimpleAdapter
		this.listView.setAdapter(this.simpleAdapter);//设置ListView显示的数据。
	}
}
对于这种程序来说,依然是比较简单的程序。我们再看一下更为复杂的布局。
首先还是修改布局模板:
<LinearLayout xmlns:android="http://schemas.android.com/apk/res/android"
    xmlns:tools="http://schemas.android.com/tools"
    android:layout_width="match_parent"
    android:layout_height="match_parent"
    android:orientation="horizontal" >
    <ImageView
        android:id="@+id/img"
        android:layout_width="wrap_content"
        android:layout_height="wrap_content"
        android:padding="3px"/>
  	<LinearLayout
  	    android:layout_width="100px"
    	android:layout_height="wrap_content"
  	    android:orientation="vertical"
  	    >
  	    <TextView
  	        android:id="@+id/coursename"
  	        android:layout_width="wrap_content"
    		android:layout_height="wrap_content"
  	        android:textSize="20px"
  	        android:padding="3px"
  	        />
  	    <TextView
  	        android:id="@+id/teacher"
  	        android:layout_width="wrap_content"
    		android:layout_height="wrap_content"
  	        android:textSize="15px"
  	        android:padding="3px"
  	        />
  	</LinearLayout>

  	<LinearLayout
  	    android:layout_width="250px"
    	android:layout_height="wrap_content"
  	    android:orientation="vertical"
  	    >
  	    <TextView
  	        android:id="@+id/info"
  	        android:layout_width="wrap_content"
    		android:layout_height="wrap_content"
  	        android:textSize="15px"
  	        android:padding="3px"
  	        />
  	    <ImageView
	        android:id="@+id/score"
	        android:layout_width="wrap_content"
	        android:layout_height="wrap_content"
	        android:padding="3px"/>
  	</LinearLayout>
</LinearLayout>
主布局文件:
<LinearLayout
    xmlns:android="http://schemas.android.com/apk/res/android"
    xmlns:tools="http://schemas.android.com/tools"
    android:layout_width="match_parent"
    android:layout_height="match_parent"
   	android:orientation="vertical"
    >
	<TextView
	    android:layout_width="match_parent"
    	android:layout_height="wrap_content"
	    android:textSize="25px"
	    android:gravity="center"
	    android:text="爱科技培训学校视频列表"
	    />
    <ListView
        android:id="@+id/mylist"
        android:layout_width="wrap_content"
        android:layout_height="wrap_content" />
</LinearLayout>
编写Activity程序:
package com.example.listviewproject;

import java.util.ArrayList;
import java.util.HashMap;
import java.util.List;
import java.util.Map;

import android.app.Activity;
import android.os.Bundle;
import android.widget.ListView;
import android.widget.SimpleAdapter;

public class ListViewActivity extends Activity {
	private ListView listView = null;
	private List<Map<String, String>> list = new ArrayList<Map<String, String>>();
	private SimpleAdapter simpleAdapter = null;
	private int pic[] = {R.drawable.java,R.drawable.javaweb,R.drawable.oracle};
	private String data[][] = {{"JavaSE","毛栗子","2000"},{"JavaWeb","小石头","1000"},{"Oracle","大白菜","3000"}};
	private int picScore[] = {R.drawable.javascore,R.drawable.javawebscore,R.drawable.oraclescore};

	@Override
	protected void onCreate(Bundle savedInstanceState) {
		super.onCreate(savedInstanceState);
		setContentView(R.layout.activity_list_view);
		this.listView = (ListView) super.findViewById(R.id.mylist);
		// 准备List集合,里面放的是Map
		for (int i = 0; i < data.length; i++) {
			Map<String, String> map = new HashMap<String, String>();
			map.put("img",String.valueOf(pic[i]));
			map.put("coursename",data[i][0]);
			map.put("teacher",data[i][1]);
			map.put("info",data[i][2]);
			map.put("score", String.valueOf(picScore[i]));
			list.add(map);

		}
		this.simpleAdapter = new SimpleAdapter(this, list, R.layout.list_view,
				new String[] { "img", "coursename","teacher","info","score" },
				new int[] { R.id.img, R.id.coursename,R.id.teacher,R.id.info,R.id.score });//准备好了SimpleAdapter
		this.listView.setAdapter(this.simpleAdapter);//设置ListView显示的数据。
	}
}
以上的程序我们都是在Activity程序中设置ListView的内容的,在Android中,也为开发者提供了列表显示IDE一个ListActivity组件类,开发者的Activity程序只需要直接集成此类。

package com.example.listviewproject;

import java.util.ArrayList;
import java.util.HashMap;
import java.util.List;
import java.util.Map;

import android.app.ListActivity;
import android.os.Bundle;
import android.widget.SimpleAdapter;

public class ListViewActivity extends ListActivity {
	private List<Map<String, String>> list = new ArrayList<Map<String, String>>();
	private SimpleAdapter simpleAdapter = null;
	private int pic[] = {R.drawable.java,R.drawable.javaweb,R.drawable.oracle};
	private String data[][] = {{"JavaSE","毛栗子","2000"},{"JavaWeb","小石头","1000"},{"Oracle","大白菜","3000"}};
	private int picScore[] = {R.drawable.javascore,R.drawable.javawebscore,R.drawable.oraclescore};

	@Override
	protected void onCreate(Bundle savedInstanceState) {
		super.onCreate(savedInstanceState);
		// 准备List集合,里面放的是Map
		for (int i = 0; i < data.length; i++) {
			Map<String, String> map = new HashMap<String, String>();
			map.put("img",String.valueOf(pic[i]));
			map.put("coursename",data[i][0]);
			map.put("teacher",data[i][1]);
			map.put("info",data[i][2]);
			map.put("score", String.valueOf(picScore[i]));
			list.add(map);

		}
		this.simpleAdapter = new SimpleAdapter(this, list, R.layout.list_view,
				new String[] { "img", "coursename","teacher","info","score" },
				new int[] { R.id.img, R.id.coursename,R.id.teacher,R.id.info,R.id.score });//准备好了SimpleAdapter
		super.setListAdapter(this.simpleAdapter);//设置ListView显示的数据。
	}
}
以上的程序没有使用主体的布局文件,只是使用了布局模板,最终的效果也是在画面上显示列表的功能。虽然这种操作可以完成列表显示,但是这种风格并不是特别的实用,肯定不如之前在布局文件中直接定义ListView,并使用Activity程序去填充ListView中的数据,现在我们已经掌握了ListView的一些显示操作,现在我们要关注的就是对ListView进行事件的监听操作。

继续修改程序。
修改主布局文件:
<LinearLayout
    xmlns:android="http://schemas.android.com/apk/res/android"
    xmlns:tools="http://schemas.android.com/tools"
    android:layout_width="match_parent"
    android:layout_height="match_parent"
   	android:orientation="vertical"
    >
	<TextView
	    android:layout_width="match_parent"
    	android:layout_height="wrap_content"
	    android:textSize="25px"
	    android:gravity="center"
	    android:text="爱科技软件培训学校视频列表"
	    />
    <ListView
        android:id="@+id/mylist"
        android:layout_width="wrap_content"
        android:layout_height="wrap_content" />
    <TextView
        android:id="@+id/selectinfo"
        android:layout_width="wrap_content"
        android:layout_height="wrap_content"
        />
</LinearLayout>
修改Activity程序:
package com.example.listviewproject;

import java.util.ArrayList;
import java.util.HashMap;
import java.util.List;
import java.util.Map;

import android.app.Activity;
import android.os.Bundle;
import android.view.View;
import android.widget.AdapterView;
import android.widget.AdapterView.OnItemClickListener;
import android.widget.ListView;
import android.widget.SimpleAdapter;
import android.widget.TextView;

public class ListViewActivity extends Activity {
	private TextView selectInfo = null;
	private ListView listView = null;
	private List<Map<String, String>> list = new ArrayList<Map<String, String>>();
	private SimpleAdapter simpleAdapter = null;
	private int pic[] = {R.drawable.java,R.drawable.javaweb,R.drawable.oracle};
	private String data[][] = {{"JavaSE","毛栗子","2000"},{"JavaWeb","小石头","1000"},{"Oracle","大白菜","3000"}};
	private int picScore[] = {R.drawable.javascore,R.drawable.javawebscore,R.drawable.oraclescore};

	@Override
	protected void onCreate(Bundle savedInstanceState) {
		super.onCreate(savedInstanceState);
		setContentView(R.layout.activity_list_view);
		this.selectInfo = (TextView) super.findViewById(R.id.selectinfo);
		this.listView = (ListView) super.findViewById(R.id.mylist);
		// 准备List集合,里面放的是Map
		for (int i = 0; i < data.length; i++) {
			Map<String, String> map = new HashMap<String, String>();
			map.put("img",String.valueOf(pic[i]));
			map.put("coursename",data[i][0]);
			map.put("teacher",data[i][1]);
			map.put("info",data[i][2]);
			map.put("score", String.valueOf(picScore[i]));
			list.add(map);
		}
		this.simpleAdapter = new SimpleAdapter(this, list, R.layout.list_view,
				new String[] { "img", "coursename","teacher","info","score" },
				new int[] { R.id.img, R.id.coursename,R.id.teacher,R.id.info,R.id.score });//准备好了SimpleAdapter
		this.listView.setAdapter(this.simpleAdapter);//设置ListView显示的数据。

		//进行事件监听
		this.listView.setOnItemClickListener(new OnItemClickListener() {//单击选项
			@Override
			public void onItemClick(AdapterView<?> parent, View view, int position,
					long id) {
				//在单击的时候取得数据信息
				Map<String,String> map = (Map<String,String>)ListViewActivity.this.simpleAdapter.getItem(position);//返回选中行的数据
				String teacher = map.get("teacher");//去除选中老师信息
				String coursename = map.get("coursename");//取得选中课程名称
				ListViewActivity.this.selectInfo.setText("课程名称:" + coursename+"老师名称:" +teacher);
			}

		});
	}
}
2.3 小结
(1)使用ListView可以进行数据的列表显示;
(2)对于ListView显示的数据可以使用ArrayAdapter和SimpleAdapter进行封装;
(3)可以直接让一个类继承ListActivit类实现简单的列表操作;
(4)列表操作也可以进行事件的监听处理;


![[进阶]网络通信:概述、IP地址、InetAddress](https://img-blog.csdnimg.cn/b16a2a67ac0140b58a55f8319cbd51b9.png)