一 自定义QTableWidget
创建一个Widget项目,注释掉其中的ui->setupUi(this);使用自定义的布局。
#include "widget.h"
#include "ui_widget.h"
#include <QTableWidget>
#include <QTableWidgetItem>
#include <QLineEdit>
#include <QHBoxLayout>
#include <QVBoxLayout>

Widget::Widget(QWidget *parent)
    : QWidget(parent)
    , ui(new Ui::Widget)
{
    QVBoxLayout *v = new QVBoxLayout(this);
    //ui->setupUi(this);

    QTableWidget * table = new QTableWidget(this);
    table->setRowCount(0);
    table->setColumnCount(1);
    QTableWidgetItem *head_item1 = new QTableWidgetItem(QString::fromLocal8Bit("列1"));

    table->setHorizontalHeaderItem(0,head_item1);

    v->addWidget(table);
    this->setLayout(v);

}
当前的执行效果如下所示:

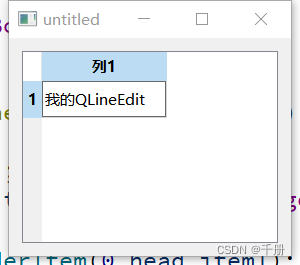
二 自定义QLineEdit单元格
Widget::Widget(QWidget *parent)
    : QWidget(parent)
    , ui(new Ui::Widget)
{
    QVBoxLayout *v = new QVBoxLayout(this);
    //ui->setupUi(this);

    QTableWidget * table = new QTableWidget(this);
    table->setRowCount(0);
    table->setColumnCount(1);
    QTableWidgetItem *head_item1 = new QTableWidgetItem(QString::fromLocal8Bit("列1"));

    table->setHorizontalHeaderItem(0,head_item1);

    //新加代码
    table->setRowCount(1);
    table->setCellWidget(0,0,new QLineEdit());
    //结束

    v->addWidget(table);
    this->setLayout(v);

}
效果如下所示
![]()
 三 自定义QComboBox单元格
#include "ui_widget.h"
#include <QTableWidget>
#include <QTableWidgetItem>
#include <QLineEdit>
#include <QHBoxLayout>
#include <QVBoxLayout>
#include <QComboBox>

Widget::Widget(QWidget *parent)
    : QWidget(parent)
    , ui(new Ui::Widget)
{
    QVBoxLayout *v = new QVBoxLayout(this);
    //ui->setupUi(this);

    QTableWidget * table = new QTableWidget(this);
    table->setRowCount(0);
    table->setColumnCount(1);
    QTableWidgetItem *head_item1 = new QTableWidgetItem(QString::fromLocal8Bit("列1"));

    table->setHorizontalHeaderItem(0,head_item1);

    //新加代码
    table->setRowCount(1);
    QComboBox * comboBox = new QComboBox();
    QStringList itemList;
    itemList.append("item1");
    itemList.append("item2");
    itemList.append("item3");
    comboBox->addItems(itemList);
    table->setCellWidget(0,0,comboBox);
    //结束

    v->addWidget(table);
    this->setLayout(v);

}
效果:

四 自定义QCheckBox 单元格
#include "widget.h"
#include "ui_widget.h"
#include <QTableWidget>
#include <QTableWidgetItem>
#include <QLineEdit>
#include <QHBoxLayout>
#include <QVBoxLayout>
#include <QComboBox>
#include <QCheckBox>

Widget::Widget(QWidget *parent)
    : QWidget(parent)
    , ui(new Ui::Widget)
{
    QVBoxLayout *v = new QVBoxLayout(this);
    //ui->setupUi(this);

    QTableWidget * table = new QTableWidget(this);
    table->setRowCount(0);
    table->setColumnCount(1);
    QTableWidgetItem *head_item1 = new QTableWidgetItem(QString::fromLocal8Bit("列1"));

    table->setHorizontalHeaderItem(0,head_item1);

    //新加代码
    QCheckBox *checkBox = new QCheckBox();
    table->setRowCount(1);
    table->setCellWidget(0,0,checkBox);
    //结束

    v->addWidget(table);
    this->setLayout(v);

}
运行效果:

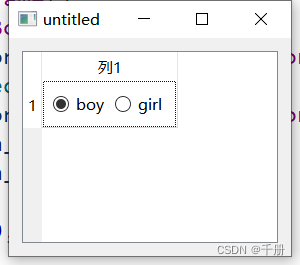
五 自定义QCheckBox 单元格
#include "widget.h"
#include "ui_widget.h"
#include <QTableWidget>
#include <QTableWidgetItem>
#include <QLineEdit>
#include <QHBoxLayout>
#include <QVBoxLayout>
#include <QComboBox>
#include <QCheckBox>
#include <QRadioButton>
#include <QFrame>

Widget::Widget(QWidget *parent)
    : QWidget(parent)
    , ui(new Ui::Widget)
{
    QVBoxLayout *v = new QVBoxLayout(this);
    //ui->setupUi(this);

    QTableWidget * table = new QTableWidget(this);
    table->setRowCount(0);
    table->setColumnCount(1);
    QTableWidgetItem *head_item1 = new QTableWidgetItem(QString::fromLocal8Bit("列1"));

    table->setHorizontalHeaderItem(0,head_item1);

    //新加代码
    table->setRowCount(1);
    QFrame * frame = new QFrame();
    QHBoxLayout *h = new QHBoxLayout();
    QRadioButton *radioButton_1 = new QRadioButton("boy");
    radioButton_1->setChecked(true);
    QRadioButton *radioButton_2 = new QRadioButton("girl");
    h->addWidget(radioButton_1);
    h->addWidget(radioButton_2);
    frame->setLayout(h);
    table->setCellWidget(0,0,frame);
    //结束

    v->addWidget(table);
    this->setLayout(v);

}
运行效果:当前的单选按钮显示的效果看起来像两个小括号,而不是一个圆圈,如何优化呢?

解决办法:
QTableWidget可以通过设置自适应大小来自动调整表格的大小以适应内容。可以使用setSizePolicy()方法来设置表格的大小策略,例如:
tableWidget.setSizePolicy(QSizePolicy.Expanding, QSizePolicy.Expanding)
这将使表格在水平和垂直方向上都自适应大小。另外,还可以使用resizeColumnsToContents()和resizeRowsToContents()方法来自动调整列和行的大小以适应内容。
办法1:添加如下代码,在我的电脑上,这个没达到预期的效果
table->setSizePolicy(QSizePolicy::Expanding, QSizePolicy::Expanding);办法2,添加如下代码:
    table->resizeRowToContents(0);
    table->resizeColumnToContents(0);
添加后的执行效果:不错,单选按钮终于变成圆圈了。
六 自定义QDateTimeEdit单元格
#include "widget.h"
#include "ui_widget.h"
#include <QTableWidget>
#include <QTableWidgetItem>
#include <QLineEdit>
#include <QHBoxLayout>
#include <QVBoxLayout>
#include <QComboBox>
#include <QCheckBox>
#include <QRadioButton>
#include <QFrame>
#include <QDateTimeEdit>

Widget::Widget(QWidget *parent)
    : QWidget(parent)
    , ui(new Ui::Widget)
{
    QVBoxLayout *v = new QVBoxLayout(this);
    //ui->setupUi(this);

    QTableWidget * table = new QTableWidget(this);
    table->setRowCount(0);
    table->setColumnCount(1);
    QTableWidgetItem *head_item1 = new QTableWidgetItem(QString::fromLocal8Bit("列1"));

    table->setHorizontalHeaderItem(0,head_item1);

    //新加代码

    table->setRowCount(3);
    QDateTime now = QDateTime::currentDateTime();
    QDateTimeEdit *dateTimeEdit = new QDateTimeEdit(now);
    table->setCellWidget(0,0,dateTimeEdit);
    QDateEdit *dateEdit = new QDateEdit(now.date());
    QTimeEdit *timeEdit = new QTimeEdit(now.time());
    table->setCellWidget(0,0,dateTimeEdit);
    table->setCellWidget(1,0,dateEdit);
    table->setCellWidget(2,0,timeEdit);
    //结束
    for(int i = 0;i < table->rowCount();i++){
        table->resizeRowToContents(i);
        table->resizeColumnToContents(0);
    }
    v->addWidget(table);
    this->setLayout(v);
}
执行效果:

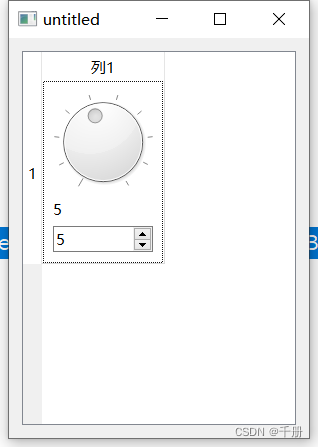
七 自定义QFrame+QDial+QSpinBox+QLabel 单元格
为了将QDial的valueChanged(int)信号传递给QLabel的槽setText(const QString &),自定一个一个QLabel的子类MyLabel。如下所示:
#ifndef MYLABEL_H
#define MYLABEL_H

#include <QObject>
#include <QWidget>
#include <QLabel>

class MyLabel : public QLabel
{
    Q_OBJECT
public:
    MyLabel(QWidget *parent):QLabel(parent){
    }
    MyLabel(const QString &text,QWidget *parent):QLabel(text,parent){
    }
    MyLabel(){}
public slots:
    void setValue(int value){
        this->setText(QString("%1").arg(value));
    }
};

#endif // MYLABEL_H
在下面这个实例中,通过信号槽机制,实现了QDIal空间和QSpinBox空间值的联动。
#include <QVBoxLayout>
#include <QComboBox>
#include <QCheckBox>
#include <QRadioButton>
#include <QFrame>
#include <QDateTimeEdit>
#include <QDial>
#include <QLabel>
#include "mylabel.h"
#include <QSpinBox>

Widget::Widget(QWidget *parent)
    : QWidget(parent)
    , ui(new Ui::Widget)
{
    QVBoxLayout *v = new QVBoxLayout(this);
    //ui->setupUi(this);

    QTableWidget * table = new QTableWidget(this);
    table->setRowCount(0);
    table->setColumnCount(1);
    QTableWidgetItem *head_item1 = new QTableWidgetItem(QString::fromLocal8Bit("列1"));

    table->setHorizontalHeaderItem(0,head_item1);

    //新加代码

    table->setRowCount(1);
    QFrame *frame1 = new QFrame();
    QVBoxLayout *v1 = new QVBoxLayout();
    QDial *dial = new QDial();
    dial->setMinimum(1);
    dial->setMaximum(10);

    dial->setNotchesVisible(true);
    //dial->setWrapping(true);

    MyLabel *label1 = new MyLabel();
    connect(dial,&QDial::valueChanged,label1,&MyLabel::setValue);

    QSpinBox *spinBox_1 = new QSpinBox();
    spinBox_1->setRange(1,10);

    connect(dial,&QDial::valueChanged,spinBox_1,&QSpinBox::setValue);
    connect(dial,&QDial::valueChanged,label1,&MyLabel::setValue);
    connect(spinBox_1,SIGNAL(valueChanged(int)),dial,SLOT(setValue(int)));

    v1->addWidget(dial);
    v1->addWidget(label1);
    v1->addWidget(spinBox_1);
    frame1->setLayout(v1);
    emit dial->setValue(5);

    table->setCellWidget(0,0,frame1);
    //结束
    for(int i = 0;i < table->rowCount();i++){
        table->resizeRowToContents(i);
        table->resizeColumnToContents(0);
    }
    v->addWidget(table);
    this->resize(300,400);
    this->setLayout(v);
}
效果图: